Technology of plastering brick walls. Plastering a brick wall How to plaster old brick walls
The moment of finishing is very important during construction and repair work. It should be borne in mind that almost any person can plaster a brick wall on their own; experience and special skills in this matter are not required. If the work is done correctly, its result will delight for many years and no problems will arise. The main condition is compliance with the rules and nuances of the process, which we will talk about in our article.

Types of plaster
The first problem that finishers face is the right choice of plaster. It depends not only on how smooth the walls will become. The material also protects the surface from moisture ingress, can provide a decorative function, in addition, it helps to improve sound and thermal insulation. Plaster can be divided into several types depending on the scope of its application:
- ordinary;
- special;
- decorative.
Ordinary plaster is usually used in rooms where further finishing is planned. It can be used as a base for paint or wallpaper. Special perfectly protects against moisture, helps to enhance sound and heat insulation. Decorative, on the other hand, can be made in various colors and textures; it is usually used for outdoor work.


For quality work, the right choice of solution is very important. It consists of sand and a special binder, most often cement, gypsum or clay. The type of solution should depend on the place of its use.
Required Tools
The next important point is the selection of tools. It should be borne in mind that the lack of necessary items can disrupt the progress of work and will not allow you to achieve the desired result. So, you will need a container in which the solution will be diluted, a mixer or spatula for mixing it, a brush or roller for application, a scraper, a chisel, a perforator, a level, a drill, a tape measure, a trowel for removing corners, a grater, a spray gun for wetting the surface, a plumb line, usually a pencil.
In order to speed up the progress of work, it is advisable to use a plaster gun. It does an excellent job of spraying the composition on the wall. In this case, the result is of better quality. Due to the pressure, the solution adheres better to the surface, filling the irregularities, and the process itself is much faster.


How to prepare a solution?
When plastering a brick wall, both cement and gypsum mortar can be used. They differ in certain parameters. Gypsum must be mixed in small volumes, since its setting time is quite short. Cement, on the other hand, can withstand longer periods, so it is advisable to prepare it in larger quantities. The final drying time also depends on this - if in a situation with gypsum this process takes up to a week, the cement mixture will finally dry out only after a month.
There are 2 ways to plaster the surface, which differ in the presence of beacons. In this case, the solution in both cases is prepared in the same way. It happens in the following way.
First of all, it is necessary to sift the sand, removing debris from it. Next, cement is added in proportions of approximately 3: 1 and thoroughly mixed until an even consistency. After that, water is poured in. The solution needs to be stirred constantly. If the proportions are not respected, adhesion to the surface may deteriorate. Using a drill, the solution is thoroughly mixed, after which it is left for several minutes.


In order to increase the plasticity of the solution, you can add latex, PVA dispersion or a plasticizer. It is recommended to use the mixture within the next 1.5 hours. When thickened, you can add a little water to it.
Preparatory stage
An important step is the preparatory work. It includes several points that cannot be ignored. First of all, you need to check the availability of tools. The next step is surface preparation.
The walls need to be carefully examined. Loose bricks, if any, are fixed with cement or mounting foam. Cracks and chips are covered, deformed areas are removed. If this is not done, the plastered surface may begin to collapse quite quickly. The old composition needs to be removed.


A plumb line will help to identify flaws and surface irregularities. The seams are cleaned, dirt and dust are removed. The rest of the surface is also cleaned, after which it should be primed. It is the primer that will help the materials adhere better. The next item is the installation of beacons.
To begin with, self-tapping screws are installed in the upper corners, protruding a couple of centimeters above the surface. Plumb lines are placed, screws must be fixed behind their cords. Next, a tourniquet is pulled, which forms straight lines horizontally, and beacons are started under them, the distance between which is 2 meters. Fixation points should be located 20 centimeters apart. As a result, the wall will have vertical dividing strips.


Work technology
Correctly plastering a brick wall is not difficult, you just need to strictly follow the technology. For beginners, the question often arises as to whether beacons should be removed. Experts respond positively, explaining that the implementation of this paragraph will save you from a lot of problems in the future. After all, even galvanized elements will corrode over time, which will negate the work done.
It must be borne in mind that plastering on the street and indoors has its own nuances. Let's dwell on them in more detail.


On the street
If the work is carried out not inside, but outside the premises, the preparatory stage should not be neglected. If the house is old and the exterior of the building has already been repaired, first of all, you need to get rid of dirt and dust. In any case, it will be necessary to moisten the facade, which can be done using a conventional watering can or a spray bottle. Next, the surface should be primed.
You can use a special grid. Its fastening is carried out before starting work, and the mixture is applied from above. The leveling of the plaster is done from the bottom up, focusing on the beacons. In order to achieve a perfectly flat surface, you should use the rule.
The solution is recommended to be applied in a thin layer. If you make several tricks, there will be fewer shrinkage cracks. The first layer is necessary to fill the pores and ensure a stronger adhesion of materials. The second is applied only on a dry surface, so it sticks better and holds tighter. The solution in this case is used thicker.


For greater adhesion to the top layer, the surface should be treated with a metal brush. The topcoat should be laid out with a thickness of 2 millimeters.
After carrying out all the manipulations, grouting is done. This will require a grater, which must be moved counterclockwise. Once the grout is complete and the walls are dry, you can start whitewashing.


Inside the house
If repairs are carried out in the apartment, the work should be performed as follows. Beacons must be securely fixed to the surface to be wetted. The solution primarily fills cracks and irregularities on the walls. As soon as the first layer is dry, the main part of the plaster is applied, the thickness of which depends on the level of the beacons.
The mixture is leveled from the bottom up, excess material is removed. Do not apply the mixture too thick, as it may crack. After the coating has dried a little, the beacons should be removed, and the seams should be carefully sealed. Next is grouting. After that, you can finish the interior of the room.


Plastering brick walls is not a very complicated process, but it requires, however, attentiveness and competent execution. You can do the work yourself, however, violation of the basic rules can lead to the fact that after a while the plaster will crack and crumble, respectively, you will have to change the decoration of the room or the facade of the building. To avoid such a problem, in addition to describing the technology of work, experts give recommendations, focusing on which you can reduce the time of work, get a good result and extend the life of the surface. Let's consider the main ones.
It should be noted that the range of materials for exterior decoration is quite wide. Here there is a decorative brick, siding, ceramics and much more. Plaster occupies one of the main places. Connoisseurs of unusual design and new technologies will like facade decorative plaster called "bark beetle". It is used quite often and has become popular due to its appearance, which imitates wood spoiled by the bark beetle.
Finishing the room begins with the alignment of the walls. For this, a dry method is used (using drywall), wet (stucco mixture), or combined (piece materials). But the most effective and reliable is wet leveling. Although it is the most time-consuming, it allows you to even out all the bumps and create a durable coating.
In this article, we will look at how to choose plaster for brick walls, prepare the surface and perform a rough finish.
How to plaster brick walls correctly
Wet rough finish is designed to eliminate pronounced irregularities, improve the performance properties of partitions and ceilings. The brick wall plastering technology does not depend on the type of finishing material and includes a number of works that must be performed in a certain sequence.
Important: rough plaster of a brick wall is carried out on completely dried brickwork, otherwise the surface will shrink, forming cracks, chips.Foundation preparation
Regardless of whether the brickwork is plastered inside or outside the building, it is first necessary to clean the surface, make notches on it - this will improve the adhesion of the material to the walls.
Foundation preparation
After cleaning, the surface should be treated with a primer, beacons set, which will allow to achieve the same thickness of the plaster over the entire area. Guides can be made of metal profiles or beams.
Note: lighthouses must be set strictly according to the level, without blockages and slopes.
An example of installing beacons
The slope of the beacons is corrected by the level. The verticality of their installation can be checked by applying the rule to several beacons at once.

Checking the evenness of the installation of beacons
Brick surface plastering technology
The solution is applied in three layers. The first is spraying - the mixture is sprayed in small portions onto the brickwork, completely covering its entire surface.
Advice: in order to further strengthen the solution on the wall and prevent its deformation, the rough finish will be done according to the grid. It is overlapped on the first layer of plaster before the beacons are installed.
Spraying red brick walls
Next is the application of the base layer. It is leveled and rubbed at the end. The last layer is covering, made of pure cement. It is rubbed with a grater, the beacons are removed and all grooves are sealed. The thickness of the plaster layer on the brick must be at least 10 mm.

The covering layer is designed to create a protective crust on the surface.
The technology of plastering the facade on brick is slightly different from the interior rough finish. In addition to the primer composition, you will need jointing, and sometimes the use of reinforcement, which is needed for better adhesion of a smooth brick surface to the finish.
On a note: plaster for outdoor work on bricks must have increased weather resistance.More clearly about how brick walls are plastered with your own hands - video:
Choice of rough finishing mix
What is the best plaster for brick walls? Wet rough surface finishing can be done with the following mixtures:
- lime;
- cement-sand;
- plaster.
If the building is built of brick, the best option would be to plaster the brick walls with cement-sand mortar. This is a simple and economical way to carry out a rough finish.

The advantage of the sand-cement mixture is that it allows you to make a leveling layer with a total thickness of up to 7 cm.
White silicate brick, consisting of lime, is more suitable for cement-lime plaster. The solution is applied with a layer of at least 20 mm, since this building material has a low resistance to moisture.
Plaster applied to a brick wall performs several functions. First, it levels the surface. Secondly, it provides heat and waterproofing, without interfering with natural air circulation, and gives the brick oven an aesthetic appearance. In addition, decorative plaster is aimed at additional decoration of the facade or interior.
The answer to the question, the better to plaster the walls, remains relevant for many years. The modern market offers a variety of mixtures for outdoor and indoor work. Until recently, plaster with a cement-sand mortar was considered the most popular do-it-yourself finish. Ready-made mixtures are now available, to which various plasticizers and additives are added, which make it possible to process brick walls or the surface of the furnace more efficiently and quickly.
Application technology

There are several ways to properly plaster an object with your own hands. The first method is less accurate, suitable for the walls of utility and non-residential premises. The process consists of the following steps:
- First you need to remove the old layer;
- Cement mortar is thrown onto the wall;
- The mixture is rubbed and leveled with a spatula;
- The surface is puttied with a finishing layer.
Do-it-yourself walls of living quarters can be beautifully plastered on lighthouses. The technology is more labor intensive, but much more accurate and better. The essence of the work is as follows:
- The beacon bar is attached to the work surface at a distance of 30 cm from the adjacent wall;
- The required number of beacons is installed throughout the cultivated area, the distance between which is 1-1.5 meters;
- The whole structure sits on a cement-sand mortar and is leveled strictly according to the level;
- Correctly check horizontal lines should be at three points (top, middle, bottom);
- Beacons from the walls can be removed or left;
- After the fixing solution has dried (4-5 hours), we make additional fastening of the beacons, filling all the empty space;
- The wall is watered abundantly, then the prepared solution is applied;
- We level the mixture using the rule, leading it from the bottom up along the beacons, slightly pressing down;
- It is best to carry out the procedure several times until the working area is given the desired state.
Finishing the wall with your own hands should be done no earlier than after 14 days, which are required for the complete drying of the applied plaster.
classic plaster

You can prepare a cement-sand mortar yourself by mixing the components in the right proportions. Also on sale is a dry mix, which is diluted with water. Cement plaster is considered the best option for processing brick walls. The solution has the following advantages:
- Low price;
- High plastic characteristics, allowing work on the surface even a few hours after application;
- Practicality and durability;
- Resistant to temperature fluctuations and other atmospheric influences.
The main disadvantage that cement mortar has is the laboriousness in carrying out the work. In addition, the mixture dries for a long time, which affects the speed of the overall process. When working with this type of plaster, certain rules must be observed. The application thickness should not exceed 30 mm. With a layer depth of 20 mm or more, the installation of a reinforcing mesh will be required.
When applying a cement-sand mortar on external surfaces or in conditions of high humidity, lime is added to it. In cold rooms, a mixture with the addition of sawdust or pumice is used. The solution in its classic form is not suitable for finishing the furnace.
Decorative processing

Plaster in the interior
The plaster of the wall or oven is aimed at their perfect alignment before finishing. Along with traditional do-it-yourself methods, decorative cladding is increasingly being used, which has a number of advantages and features. There are several varieties of decorative plaster that can be sold both in a ready-to-use form and in a loose state that requires the addition of water.
The difference between this type of wall decoration is the ability to independently add various components to the cement mortar (granulation, shells, etc.), which allows you to create an original facade design.
Textured finish

This type of cladding is perfect for interior and exterior work on a brick, concrete or pre-plastered rough object. A properly applied layer of wall decoration hides defects and smooths out irregularities due to the presence of large components. Before the main treatment, you need to remove the old coating and clean the surface.
We exclude plastering in the rain and at temperatures below +8 °C. Work with the type of finish in question does not require the use of special expensive tools, and any person with minimal knowledge in the construction industry can handle it.
There are several subspecies of texture installation:
- Fur coat - wall decoration with a rough coating on a cement-sand basis;
- Lamb - a granular one-suited coating with roughness, intended for mineral surfaces;
- Bark beetle - resembles the bark of a corroded tree with grooves and a composite composition.
The finish in question can be used in the treatment of oven surfaces as a finishing layer.

Lime and marble chips are added to the mixture. Each layer is applied with a rubber tool to a thickness of 5-6 mm and requires thorough drying. It is permissible to add various colors to the solution, which allows you to imitate precious metals, gloss or a matte shade.
Structural decoration

This type of plaster is made from acrylic or silicate components and has a thin layer structure. It is used for internal and external works. The final result can be both with a practically even surface (fine-grained composition), and with a certain relief (medium grain).
To obtain various design effects, applying structural plaster with your own hands is best done in a circular motion with a spatula. It is not recommended to use in high humidity and on a hot stove. The addition of coloring pigments to the mixture is also excluded. Structural plaster is supplied ready for use.
Furnace finish

Separately, consider the plastering of the furnace. The most proven and long-used material for this purpose is clay. It is better to start facing the stove after shrinkage and hardening of the masonry. If the work is not carried out on a newly constructed surface, it is first necessary to remove the old plaster and degrease the surface. The thickness of the next application of the layer is a maximum of 5 mm. After completion, there is no need to rush to melt the furnace, the lining should dry completely. In the event of cracks, they must be slightly expanded and rubbed with the mixture used. The usual solution for finishing the stove is not suitable, due to the large temperature differences of the treated surface .
An obligatory stage in the course of construction is the plastering of brick walls. It is also used for repairs in an apartment or in a private house. In the course of work, it is recommended to completely remove the old plaster layer and apply a new one, even if no obvious defects are visible on its surface. How to plaster a brick wall correctly and with what mortar - this will be discussed.
The main task of the plaster layer is to level the surface. It performs several other less significant functions:
- protects the brick wall from moisture on it;
- significantly increases the sound and heat insulation of the building;
- performs decorative functions.
According to their purpose, working compositions for plastering brick walls are divided into the following types:
- ordinary;
- special;
- decorative.
The usual composition is used to plaster the walls inside the room. After drying, it is subject to final finishing with wallpaper or paint. The special solution has a special structure, which is able to give the walls additional properties of thermal insulation and sound insulation. This solution also improves the moisture resistance of the surface. Decorative plaster mixture is usually used on the outside of the building. It can be of different colors and textures. This gives the walls a completely new look.
Each of the listed types of mortar consists of sand and a binder component, which is most often used as cement. It is sometimes replaced with gypsum, clay or lime. It depends on the place of masonry: indoors or outdoors, in a bathhouse or in some other place.
What tools are needed for the job

Plastering brick walls cannot be done without some tools. For work you may need:
- spatula plaster;
- ladle;
- trowel, grater and trowel;
- rule;
- "falcon", trowel, corner levelers;
- plumb, building level, plaster scraper.
Using a spatula, the components are dosed when mixing the solution and level it on the wall surface. The bucket is best to have a capacity of 1 liter. The rule is to level the mixture on the wall when working with beacons. The remaining tools are used to finish the outer and inner corners, to control the verticality of the finished coating.
How to get the job done
Do-it-yourself plastering of a brick wall is carried out in several stages:
- surface cleaning;
- inspection;
- primer;
- applying plaster.
Surface cleaning includes removal of the old layer, reinforcement and dust. After that, you need to carefully examine the surface, find cracks and cracks on it that need to be removed. If this is not done, the thermal insulation of the room will be broken, condensate and harmful insects will begin to accumulate in the cracks. It is better to putty these flaws. After removing the cracks, it is necessary to treat the surface with an antiseptic and prime it. This work will protect the wall from the appearance of mold on it and prepare it for plastering.
A reinforcing mesh can be installed immediately before applying the plaster. It is fixed with metal hooks, which are installed in the seams between the individual masonry bricks. It is better to choose a plastic mesh. The metal product will cause rust.
You can plaster the wall with cement or gypsum mortar. If you finish the walls with gypsum plaster, it will quickly grab. Therefore, you need to cook it in small quantities. It dries within 30-40 minutes. Full solidification occurs after 5-6 days. In cement mortar, this period stretches up to a month. Prepare the solution as follows:
- sand is sifted to remove various debris;
- dry sand is mixed with dry cement in a ratio of 3: 1;
- while continuing to stir the solution, water is added to it.
To make the mixing process faster, you can use a drill equipped with a mixer nozzle and turn it on at a speed of 800 revolutions. The finished solution should stand for 5 minutes. Then it is mixed again, and you can start working. You can increase the plasticity of the solution by adding PVA, latex, and other plasticizers to it. The amount of ready-made cement mortar should be such that it can be used up within one and a half hours. In the future, it will begin to dry and fall off the walls.
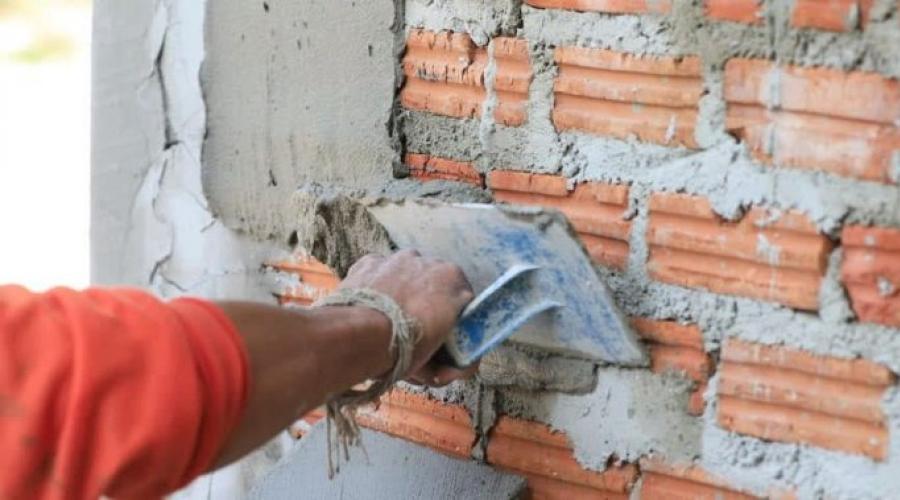
Applying plaster on a brick wall begins with a surface spray. The thickness of this layer is no more than 5 mm. The surface must first be moistened a little. Otherwise, a dry wall will suck moisture out of the working mixture, and it will fall off. Next, the layer is primed with a trowel or trowel. The solution is rubbed from bottom to top. A plastered area of about 2 m² is leveled with a rule.
The next step is the covering. This is the final layer. It is quite thin, about 2 mm thick. Apply with a trowel or float in circular motions. It is recommended to repeat this process twice. The result should be a wall ready for decorative wallpaper or paint.
Conclusion on the topic

A brick wall always has bumps. You can fix this by covering the walls with gypsum or cement plaster. How to plaster your house? For work, it is necessary to prepare tools and materials. The solution needs sand and cement. Sometimes gypsum, clay or lime is used instead of cement. How to plaster brick walls? It is necessary to mix the working solution correctly. This is done manually or using a mortar mixer, a drill with a mixer. The walls are undergoing some preparation. All cracks and cracks are sealed on them, the surfaces are primed and puttied. Then several layers of plaster are applied to them. The last layer is the final one. It makes the wall smooth, ready for painting or tiling or wallpapering.
Sand for mortar must be sieved and mixed with a binder in the form of cement or gypsum. A little water is added and the working mixture is kneaded. Proportions are usually given on the package of cement. The total recommended thickness of the cement plaster layer is up to 12 mm, for gypsum composition - 20 mm. Wall plastering is also carried out using drywall. This method allows you to do the job more cleanly and quickly, but it reduces the area of \u200b\u200bthe apartment due to the formwork elements. The "raw" method is more valuable because it has a special strength compared to drywall sheets.
As a primer, it is recommended to use the compositions: Forward Grunt, Kreps Primer, Osnovit T-51 or Plitonit Grunt-1. There are no special difficulties in decorating the walls. But if you have doubts about your own abilities, you should seek help from a knowledgeable person.
Sooner or later, almost all homeowners are faced with repair work. Most often it is necessary to finish the brick walls. The best way to hide all the irregularities of the surface of the walls today is plaster.
There are several ways to plaster:
- with the help of rules. In this option, the use of beacons is excluded. The method is suitable for walls with a slight curvature;
- by pre-set beacons. It is advisable to use for walls that have large irregularities.
- finishing. With the help of such plaster, the plane is leveled and prepared for finishing (painting, wallpapering, etc.);
- decorative. This type of plaster serves to decorate certain parts of the wall and is divided depending on the application technology into: structural, textured and mineral.
Solution preparation
To plaster a wall, you should prepare a competent solution. For a brick surface, the following types of solutions can be used:
- cement. The materials for its manufacture are sand and cement. It is allowed to use this type of solution in rooms with high humidity;
- lime. This type can be used for plastering brick walls both inside and outside;
- gypsum-lime. The solution can be applied to the inside of the brick walls. Gypsum - increases the strength of the plastered surface.
Tools and materials
The main tools and materials used for plastering walls: 
- construction trowel (trowel);
- putty knife;
- rule;
- brush. It is used to wet the surface;
- ruler or tape measure. Used to measure a layer of plaster;
- lighthouses;
- solution container;
- trowel;
- falcon (wooden board with a handle. Used to apply mortar to the wall);
- metal brush;
- level;
- mortar components - cement, sand, gypsum, lime and water.
How to plaster a brick wall: step by step instructions
Preparatory work
If the masonry is fresh, then it does not require laborious preparatory work. It will be enough to install guides or fix the grid.
If we are talking about the old wall, then it will be necessary to carry out a number of activities to prepare it, namely:
- Prepare the tool and the necessary material.
- Thoroughly clean from old finishes, dust and dirt.
- Clean up seams. For these purposes, an iron brush is suitable.
- Use putty to seal all cracks.
- Cover with primer.
- Moisten the wall with water before plastering. This can reduce the risk of cracks.
- Installation of beacons
In order to achieve the most even surface of the walls, install the beacons correctly. With their help, you can control the thickness of the layer on the entire section of the wall.
Lighthouses can be:
- wooden;
- metal.
Rules for installing beacons:
- Install the first beacon at a distance of 0.3 m from the corner.
- The next beacons are installed on the wall after 100–150 cm.
- Each beacon should be aligned vertically. For these purposes, use the level.
- Lighthouses are attached to the wall with a concrete mixture.
You can start plastering the walls after 5 hours.
splatter
Spraying work should start from the bottom of the wall, gradually rising to the ceiling. Work is carried out from left to right. To do this, a layer of a liquid consistency solution with a high content of binder components 4–5 mm thick is applied to the brick wall. As a result, a strong grip on uneven surfaces will be ensured. Using a trowel, throw a small amount of this solution onto the wall. After three minutes, using the rule, it is necessary to level the layer of plaster. After the mixture hardens, you can proceed to the next step.
Priming
The next step in plastering is the soil. For this stage, it is necessary to prepare a thicker mixture. In one approach, a layer of 10 mm thick is applied with a spatula. Next, the surface is leveled. To get a thicker layer, this operation should be performed in 2 passes.
Nakryvka
Nakryvka is the final stage in plastering, which should result in a smooth finish.  plane. The plastering process is as follows:
- Prepare a solution. To do this, you need to carefully prepare all its components. Sand must be sieved.
- Wet the wall with water.
- Using a trowel, apply a thin layer of mortar to the wall.
- Perform surface polishing.
If it is necessary to apply a layer of plaster mixture with a thickness of 50 mm, then the work should be carried out within two days. On the first day, apply the initial layer on which the notches are applied. You can make them with a spatula. Notches are necessary in order to ensure adhesion of the surface with the next layer. The next day, a primer is applied to the walls and a final layer is applied.
- In order to form the correct angles, you need to use a level and a plumb line. At the final finishing stage, corner rules (internal and external) should be applied. In order for the surface to be as smooth as possible, the tool must be regularly moistened with water during operation.
- After finishing work on plastering the surface, it is necessary to dismantle the beacons. If this is not done, then over time they will begin to rust and spoil the finish. Removal is carried out before the solution completely hardens. In place of the beacons, grooves are formed that must be covered with a solution.
- If the walls are built of ceramic bricks, then in order to plaster them, it is necessary to first carry out work on priming and reinforcing with a mesh.
If you need to plaster a large area of \u200b\u200bthe walls, then it is better to break the entire surface into sections and work gradually.
Plastering brick walls is not difficult. The main thing is not to rush and clearly follow the technology of conducting plastering work.