How to make a visor over the door - photos and construction technologies from different materials
Read also
A homemade canopy over a door or balcony is not a standard design regulated by SNiP or GOST, but an element with unlimited design possibilities. Of course, the initial and main purpose of such a canopy is protection from precipitation and, to some extent, from sunlight, but for the exterior this is one of the most important elements. Due to the fact that different materials can be used for the visor, it is possible to change not only its appearance, but also the cost.
When designing, it should be borne in mind that the canopy over the front door or balcony is not a carport, therefore, its dimensions are much smaller. That is, above the front door, it will cover only the porch or its upper part, and above the balcony - only a protruding slab or a few centimeters further.
Canopy structure made of steel profile, wire and polycarbonate
Preparing tools for building a mini-canopy
You can't do without a puncher during installation
Since the canopy over the door or balcony is made of different materials, the installation tool is also somewhat different, although not significantly. From the list below, you can choose what is more suitable for a particular option:
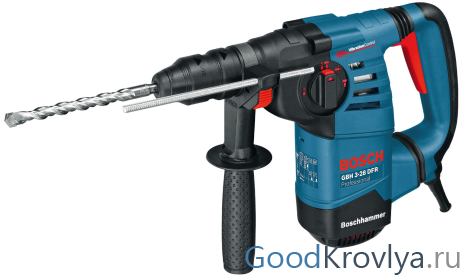
- the structure is attached to the wall of the house, which means that you definitely need a puncher, in extreme cases - an electric drill with the “drilling / impact” function;
- for cutting roofing material you will need an electric jigsaw or an angle grinder (grinder). In addition, a grinder will be required if the supporting frame is made of metal;
- to assemble the metal frame, welding and, possibly, wrenches are needed;
- a screwdriver or an electric drill with nozzles is needed to fix the roofing material and the supporting structure;
- pipe bending machine (manual or electric);
- laser (water) and / or regular long level;
- metric tape measure and pencil.
The choice of roofing material and consumables
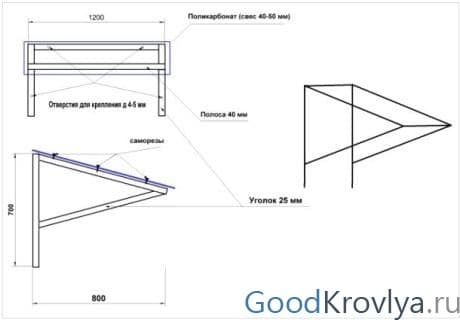
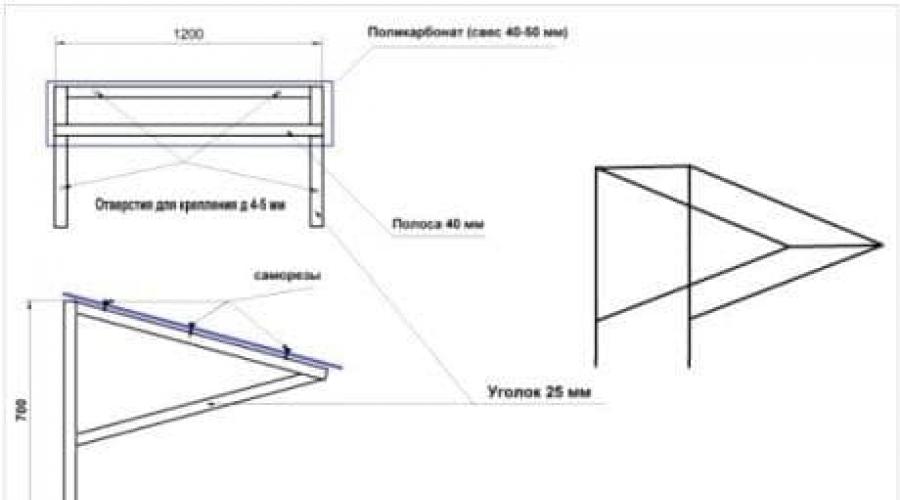
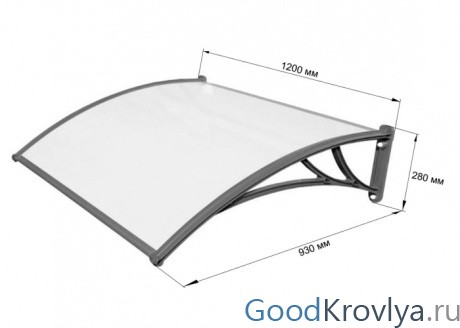
Polycarbonate visor drawing
All types of visors above the front door or balcony are divided into two main types - straight and curved. The choice of material for the roof and the supporting structure depends on this factor:
- peaks over a door or a bent-type balcony can only be made of polycarbonate. In this case, monolithic sheets are usually used, since there is simply no point in cellular panels - they are needed for insulation;
- in addition, to make a bent supporting frame, a metal solid or hollow profile is required. For the manufacture of openwork sidewalls, a wire rod with a diameter of 5-6 mm is usually used, or such elements are bought ready-made;
- for straight structures, you can get by with wooden slats 50 × 50 mm, but this is not as attractive as a metal profile, although it is much easier to install;
- from roofing materials, corrugated board, metal tiles, galvanized sheet and slate (straight or wave) are still suitable here;
- to fix the structure to the wall, you will need anchor bolts - you can, of course, use plastic dowels 6-8mm in diameter with screws for this, but given the possible wind and snow loads, it is better to play it safe;
- self-tapping screws with press washers or nails for roofing material;
- river sand for bending tubular profiles;
- sealant or mounting foam to close the gap near the wall.
Assembly and installation of different options for visors
turn, you need to understand the principle of its attachment. When this side of the issue becomes clear, then you can design the supporting frame for a straight or curved coating, as well as choose a roofing material.
Polycarbonate canopy layout
The principle of fastening the supporting frame for a canopy
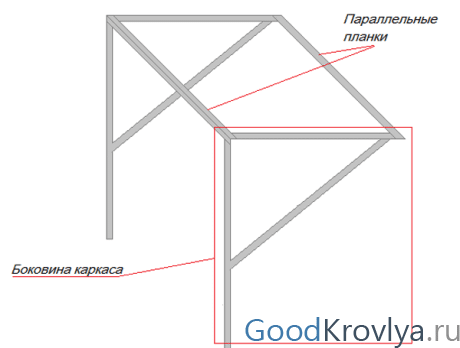
The simplest design of the supporting frame
The drawing above shows the simplest supporting structure for a canopy, but thanks to it you can figure out the method of attachment. The anchors are screwed into the wall through the rear horizontal bar and the rear vertical profile of the sidewall. As a rule, two anchors are needed for the horizontal, and one each for the verticals.
For fasteners, expansion dowels made of plastic should be chosen, but in no case should a molly (umbrella) be it plastic or metal. The length here depends on the thickness of the profile and the density of the wall (plaster), but in most cases 150 mm is enough for reliable fixation. For the porch, four fastening points are enough, but for the horizontal balcony they should be done after 50-60 cm.
The design of the supporting frame with its own characteristics
Before talking about how to make a canopy on a balcony or porch, you should choose the most appropriate form of construction. The configuration here is determined not only by the exterior design, but also by technical capabilities.
For example, when there is a small distance between the door and the roof (30-40 cm), then the frame in the form of a dome or semi-dome simply does not fit in size, and nothing can be done about it.
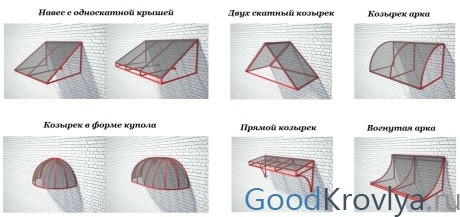
Possible frame configurations
If you assemble the frame from a metal profile, then the connections should be made by electric welding - the structure is non-separable, but this is not necessary. When there is a need to weld a canopy for a balcony, this will have to be done directly at the installation site, which can cause some inconvenience due to the lack of free space for work. You will have to put up with this - it is much more difficult to raise a finished assembly to the floor.
To make a direct design, a welding machine and a grinder are enough - according to a pre-drawn drawing or sketch, profiles are cut and welded into a frame. To draw up such a plan, it is not at all necessary to be a draftsman - you just need to measure the length and width of the porch (balcony slab), and then, based on this data, make a sketch on a piece of paper.
How to bend a round or profiled pipe
Sand is needed to bend the profiled pipe
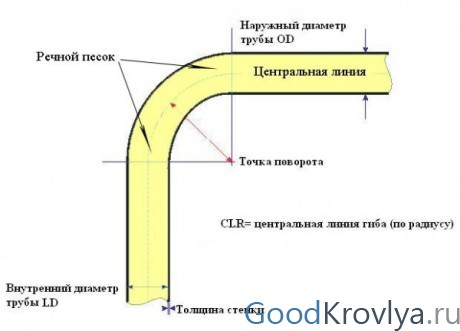
In order to make the visor above the front door or balcony rounded, such as an arch, dome or "Marquise", it is necessary to bend part of the tubular profiles, which is not quite easy to do. The difficulty here lies in the fact that the bend must be done with a certain radius, and in addition, it must be symmetrical to other elements. For such directional deformation, two things are used - river sand and a pipe bender (manual or electric).
Such machines cost a lot, especially with an electric drive, so it makes no sense to buy them for the manufacture of one design - it is better to rent a tool. If you work on a manual machine, then, despite the lever, you need to exert considerable physical effort there, so it is best to warm up the processed profile. It is more convenient to do this by gas welding, but most often it is not available, so heating is carried out in an ordinary fire.
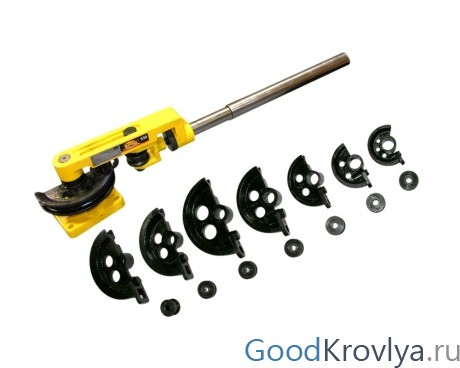
Manual pipe bender with a set of nozzles
A round or profiled pipe during this type of processing can bend asymmetrically, even when heated, which will spoil the appearance of the finished structure - this is due to the difference in wall thickness (manufacturing defect). To avoid unpredictable defects, river sand is poured inside the profile and its ends are jammed - the sand creates density in the void and the bend passes smoothly, only under the pressure of roller nozzles.
As a rule, cheaper suture material is used for frames - but if you install the profile in the rollers of the machine on the wrong side, then this seam may disperse. Therefore, when bending a round or profiled pipe, install it so that the seam is on the inside of the circle. So the connection will experience less load, and the probability of a divergence of the joint will practically be reduced to zero.
Some nuances of manufacturing a bent frame
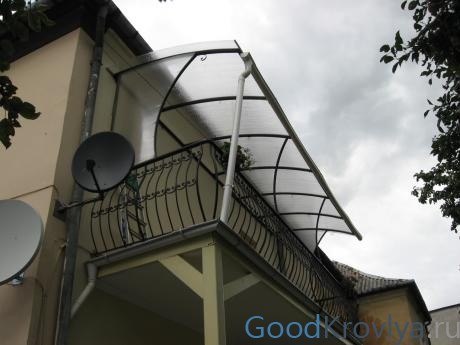
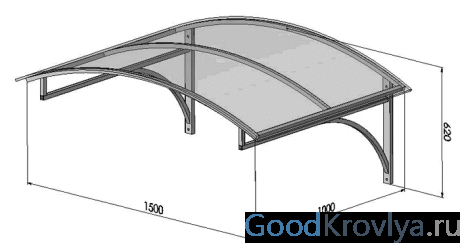
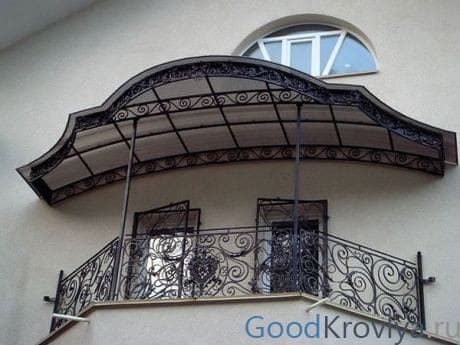
Polycarbonate canopy over the balcony
In the upper photo there is a visor above the front door of a bent-type balcony - here you should pay attention to the steepness of the arc of the profiles that support polycarbonate. If we talk about the general capabilities of pipe bending machines, then with their help you can make a turn by 30-179ᵒ, that is, almost turn around in the opposite direction. But this should not be abused - too sharp a turn will most likely cause a seam to diverge on the profile, even if it is filled with sand and heated.
For each manual or electric machine, a set of nozzles is supplied by the manufacturer, thanks to which you can choose the desired angle. Therefore, if you need to bend several profiles symmetrically, then one specific nozzle is used for this. On samples of frames (examples are in the section "Design of a supporting frame with its own features"), the radii and length of the pipes exactly match each other.
Fastening different roofing materials
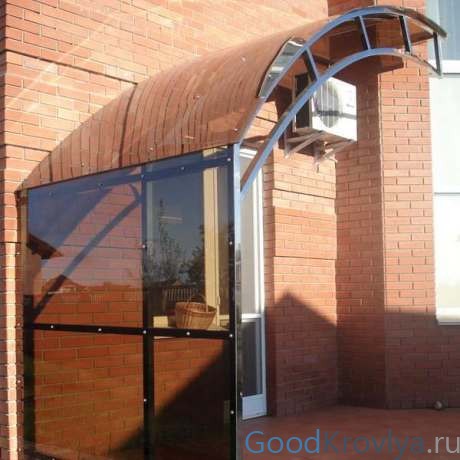
Semi-arched design of the visor above the entrance
It is quite natural that the figured polycarbonate visors above the door, as in the photo above, are more difficult to assemble, but, in both straight and curved structures, the coating is fixed in the same way - with screws. To fix other roofing materials, slate nails, ordinary or press-washer screws (with and without a rubber seal), bolts with nuts and aluminum rivets can be used.
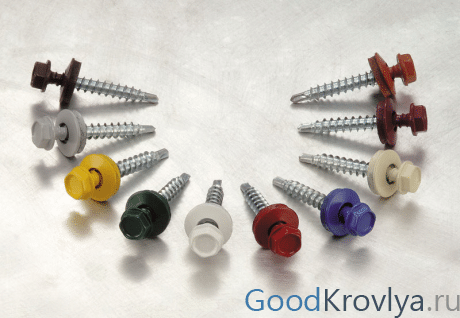
Multi-colored self-tapping screws for corrugated board
Fasteners are chosen in accordance with the roofing material, for example, for corrugated board and metal tiles, special self-tapping screws with multi-colored heads are sold - they are selected according to the color of the roof. But if colored polycarbonate is used for the canopy, then in this case it is also advisable to use plain screws, and since they are not made specifically for PC, you can use fasteners designed for corrugated board.
In the case of installing transparent polycarbonate visors above the front door, as in the photo below, you can use white self-tapping screws with a press washer, but they are without a rubber gasket - it is better to add it separately. With these screws, but without rubber, it is good to fix galvanized sheet metal - sheet and corrugated. For slate, you need slate nails with an aluminum washer to compensate for thermal deformation, or screws with a rubberized press washer.
Straight transparent PC visor
It should be borne in mind that the wooden supporting structure is designed only for a straight roof, but it is much cheaper. In the event that a wooden profile is involved, it should be treated with an antiseptic before painting.
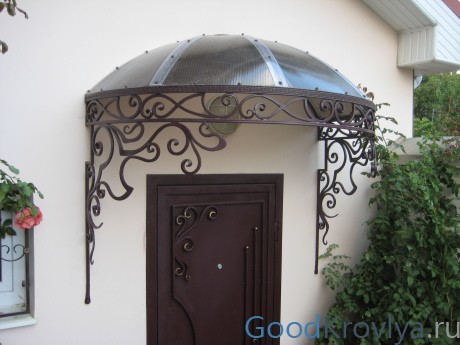
Photo gallery of visors in different styles
Taking as a basis the photo of the visors above the door and the balcony, it will not be difficult to find your own version of the design. When choosing, it is important to take into account the architecture of the house, the roofing material of the main roof, facade decoration, and if we are talking about a balcony, then the style of the entire building.
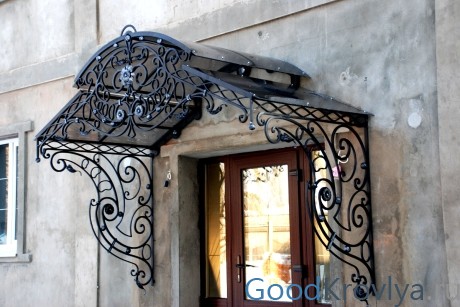
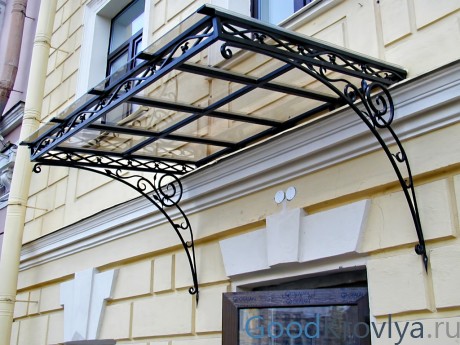
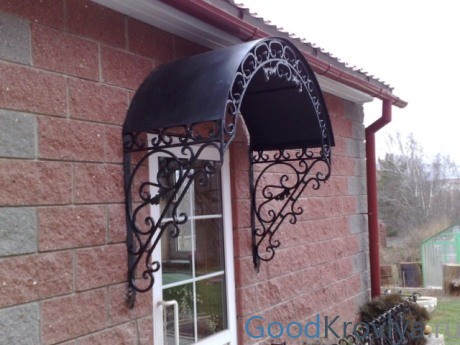
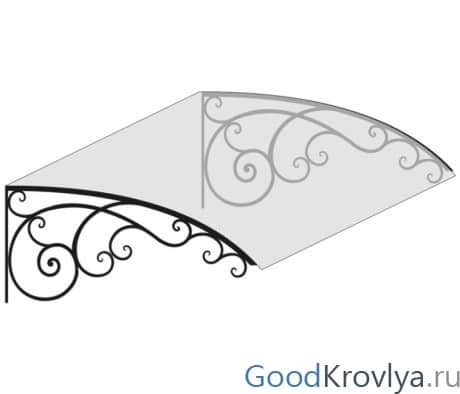
Forging is an eternal classic
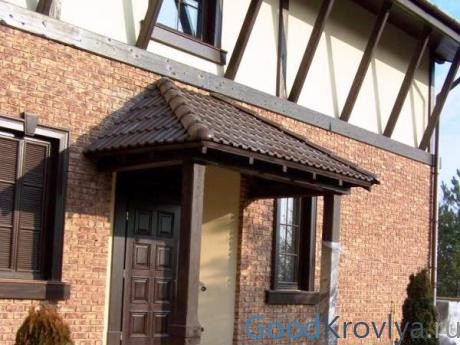
Mini canopy over the front door
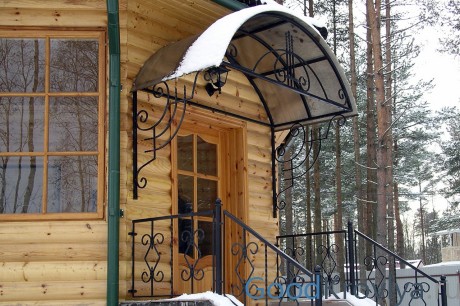
Option for a wooden house
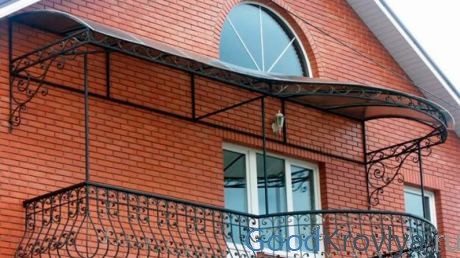
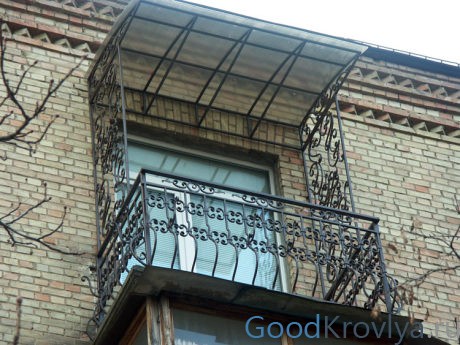
Balcony in a private house
metal structure
Modern style design
Stylish minimalism
Of course, a professional who knows how to make a canopy over a door or balcony from any material will do the job better and faster. If the goal of saving is not worth it, it is better to immediately contact the masters.