How to recover fpt file dbf. Data recovery. Description of file recovery by the OfficeRecovery for DBF Online tool
Business Solutions
If using an online recovery service is not possible, you can download one of the following utilities:
In addition to the ability to recover information at home, they also provide unlimited options for recovering a large number of files, professional support and many other options that are useful for corporate users.
Video guide for using the OfficeRecovery Online service
About OfficeRecovery for DBF Online
OfficeRecovery for DBF Online repairs corrupted DBF (dbf) databases.
Supported versions of Visual FoxPro:
9.0, 8.0, 7.0, 6.0, 5.0 and 3.0
The recovered data is saved to a new Visual FoxPro database.
After the file recovery is finished, you can evaluate the demo results and register for free results or purchase them immediately. If the file could not be recovered, you can order its analysis by our experienced team of specialists.
Examples of using
The Corrupted DBF File Repair Service can be used when a dbf file cannot be opened in Microsoft Visual FoxPro and you see errors or warnings during opening.
In order to quickly recover a damaged dbf file, upload the dbf database to our cloud recovery service using the form on this page.
It is important to note that if the recovery process is successful, then as a result you will receive a dbf file ready for use. You can get a fully restored dbf database by choosing paid or free options.
Standard features:
- Support for Microsoft Visual FoxPro, dBASE, FoxBASE DBF databases
- Restore table structure and data
- Create a new database (.dbf) with restored data
- Easy to use, no special skills required
Description of file recovery by the OfficeRecovery for DBF Online tool
Corrupted dbf databases are files that suddenly become unusable and cannot be opened with Microsoft Visual FoxPro. There are a number of reasons why a dbf file might be corrupted. And in some cases it is possible to fix and restore a damaged dbf (Visual FoxPro 9.0, 8.0, 7.0, 6.0, 5.0, 3.0) file.
If your dbf database suddenly becomes corrupted or unavailable to open in the program it was created with, don't despair! You don't need to buy expensive software anymore to repair just one broken dbf file. OfficeRecovery for DBF Online presents you a new online service that will help you recover a corrupted dbf database instantly. All you need to do is just download the corrupted dbf file using a browser, evaluate the quality of the demo results recovery and choose the solution that suits you best.
OfficeRecovery Online for DBF supports Microsoft Visual FoxPro 9.0, 8.0, 7.0, 6.0, 5.0, 3.0. The recovered data is saved to a new Visual FoxPro database.
OfficeRecovery for DBF Online offers free and paid options to get complete recovery results. The free option assumes that full results can be obtained absolutely free of charge within 14-28 days. All you have to do is just subscribe for free results after the dbf file recovery process is finished. If you need to get the restored dbf file right away, instantly, you need to choose a paid option instead of a free one.
What should you do if your dbf file does not contain recovery data? You can order a non-refundable analysis of your file by our experienced technical team. In some cases, data recovery is only possible manually.
People in pursuit of comfortable working conditions for them often do not think about the security and safety of their data and sooner or later face the issue of their loss. Let's consider the client's request with USB Flash 2Gb Transcend. According to the client, one day when the drive was installed in the USB port of the computer, it was proposed to format it. According to the client, he refused this and turned to the system administrator for help. The system administrator, having discovered that the computer “hangs” when a USB drive is connected, did not come up with anything better than to agree with the operating system’s suggestion to format it ( never do it!). Next, the system administrator used the popular R-Studio automatic recovery program. The result of her work in the form of unnamed folders was copied to the client on another drive. When viewing the result, the client found that about a quarter of the files could not be opened and, worst of all, 1C Accounting 7.7 refused to start with the restored database, referring to the absence of files.
As it turned out, the client had a backup copy of this database more than a year old.
The first step in solving such problems is the creation of a block-by-block copy of the original drive (or, as it is customary to write from the time when only floppy and hard disk drives were media, sector-by-sector). When subtracting, an unstable read speed is detected, which indicates a serious wear of NAND memory (multiple reading of NAND memory pages by the NAND controller and error correction due to redundant error correction codes (ECC) is a very resource-intensive operation, which ultimately affects the read speed). If there are unread sections, it is necessary to fill them with a pattern, which will later help us identify files that have not been read in their entirety.
Next, we proceed to the analysis. It is necessary to establish what file system and within what boundaries was previously on the USB flash. That is, you need to search for regular expressions specific to various file system metadata, but before we start, let's check a simple variant that assumes that the partition boundaries are the same. To do this, set the current file system parameters.
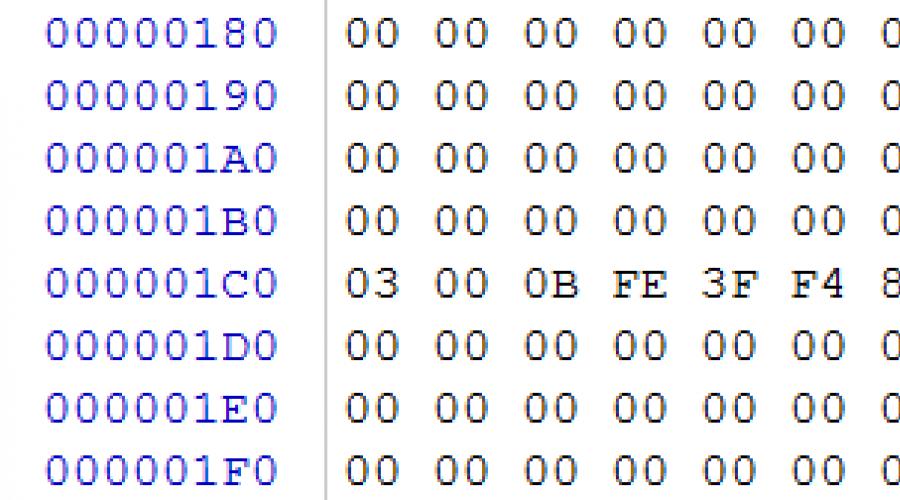
Open LBA 0 (0x0 in the image file) and check for the presence of a partition table there, or for the presence of the Boot sector of the file system.

rice. 2
In our case, we see by offset 0x1C2 of partition type 0x0B, which means that at the moment there is a FAT32 partition on the USB drive, which starts with sector 0x80 (DWORD at offset 0x1C6), 0x003C2000 sectors long (DWORD at offset 0x1CA). We go to the boot sector of the described section in sector 0x80 (in the image file, bytes 0x10000)

rice. 3
It is necessary to calculate the starting point of reference, that is, the place of the zero cluster, relative to which the space is calculated, and also to determine the size of the cluster.
To do this, we need the following parameters described in the boot sector (will be specified as an offset from the beginning of the sector): sector size at offset 0x0B - 0x200 (512 bytes), number of sectors in the cluster at offset 0x0D - 0x08, cluster size is obtained by multiplying the size sectors per number of sectors in the cluster 0x08*0x0200=0x1000 (4096 bytes), number of reserved sectors before the first copy of FAT tables - by offset 0x0E=0x01FE (510 sectors), number of FAT copies - by offset 0x10=0x02, size of one FAT copy - by offset 0x24=00000F01 (3841 sectors). Using the obtained parameters, we will calculate the position of the beginning of the data area: 0x10000+0x01FE*200+0x00000F01*2*200=0x410000 (sector 8320). A small catch from the creators of FAT32 is that at the moment we have calculated the beginning of the data area for the FAT32 partition, but it is not a zero reference point, since the first two entries in the FAT table are reserved and are not used for their intended purpose, and therefore the zero point is the beginning of the data area minus 2 clusters. In this case it will be 0x410000-0x1000*2=0x40E000 (sector 8318).
Let's check for the absence of records in the file allocation table and carry out the procedure for comparing copies for discrepancies.

Rice. 4
Comparison of FAT copies showed that there are no discrepancies. An analysis of the contents of one of the FAT copies showed that, according to the table, only one cluster is filled on the partition.
The next step is to evaluate the root directory for deleted entries. The position of the first root directory cluster is indicated in the boot sector at offset 0x2C=0x00000002. For the second cluster, the FAT shows FF FF FF 0F, which means the end of the chain, that is, the root directory consists of one cluster.

rice. 5
At the address calculated above, we see the root directory (root directory), which contains a single 32-byte entry. At offset 0x0B, we see the value 0x08, which indicates the type of record - the volume label. The fact that the file allocation tables are filled with zeros and there is no hint of any other entries in the root directory indicates that the partition has been formatted.
To check the assumption that the partition was not recreated and all file system parameters are correct, it is necessary to search for the regular expression 0x2E 0x2E 0x20 0x20 0x20 0x20 0x20 0x20 with an offset within the 0x20 sector (this expression indicates the beginning of a FAT32 directory).

rice. 6
When finding a regular expression, you need to make sure that this is really a directory, according to other signs, since in some cases a match is possible and the found regular expression is not a directory element. According to the information in Fig. 6, we can say that this directory began with cluster 3 (the current cluster number of the DWORD directory is contained in WORD at offset 0x1A (lower part) and WORD at offset 0x14 (higher part)) and was described in the root directory, since offsets 0x3A and 0x34 contains zeros (the initial cluster of the parent directory). Let's check if the cluster number of this directory corresponds to the zero point of the file system created after formatting. To do this, multiply the directory cluster number by the size of the current cluster and add 0x03*0x1000+0x40E000=0x411000 to the zero point. As you can see, the billing address corresponds to the actual location. It is possible to set the name of this directory only if earlier the root directory consisted of more than one cluster, and the link to this directory was not in the first cluster, since the contents of the first cluster were completely destroyed during formatting along with the file allocation tables.

rice. 7
We repeat all checks: 0x04*0x1000+0x40E000=0x412000. Again we see the correspondence of the directory position to the parameters of the current file system. But, besides this, we see that there is a cluster number of the parent directory 0x03, which indicates that this directory was nested, and looking at fig. 6, you can set the name of the directory, which is shown in Fig. 7. So, according to fig. 6, at offset 0x4B we see the value 0x10 - this means that this entry points to a directory, and at offsets 0x5A and 0x54, the number 0x00000004 is a pointer to the 4th cluster. At offset 0x40 - the name of the directory "BIN". This is how the interconnection of directories in a damaged FAT partition is established. After performing a certain number of checks of directories in different parts of the image, we can finally conclude that this drive was formatted within the boundaries of the previous file system and the parameters of the newly created file system were inherited from the previous one, that is, further analytical operations should be carried out within the partition, described in the partition table, taking into account the parameters of the current file system.
Knowing that the 1C database, consisting of DBF files, must contain the 1CV7.MD configuration file, let's search for the sequence 0x31 0x43 0x56 0x37 0x20 0x20 0x20 0x20 0x4D 0x44. In order to reduce the number of deliberately false results, it is better to search within 32-byte blocks with a zero offset.

Rice. eight
Thus, we find all directories containing a pointer to the 1CV7.MD file. In our case, only one such directory was found, which suggests that we have found the first cluster of the required directory. This is followed by an analysis of the position of the parent directories, up to the root directory. Each found directory is written into the FAT table (first as a directory from one cluster, by writing FF FF FF 0F for the corresponding table entry). Also, a link to a child object is written in the root directory.
At the current stage, we will copy the found files with the assumption of their continuity, since both FAT copies do not contain fragmentation information (recall that they were irretrievably destroyed by the system administrator as a result of careless USB flash formatting). After copying the 1C database directory, we analyze the number of files. Given that the directory fragment was one cluster in size, we extracted no more than 126 files, which is clearly much less than it should be in a directory with DBF and CDX files related to the 1C database. Approximately the same result will be given by automatic recovery programs, as evidenced by the result obtained by the system administrator through the use of R-Studio.
Among the extracted files are 1CV7.MD (configuration file) and 1CV7.DD (data dictionary file). After performing the integrity check, we will create a temporary folder on our disk, where we will place 1CV7.MD. Specify this path when adding a new database and open the configurator, through which we will create a clean database based on this configuration. Let's compare the generated DD file with the restored one, if the descriptions and the number of directories are identical, then no additional actions are required, and having a complete list of files, you can start searching for the remaining fragments of the 1C database directory. To do this, you need to search for sequences of ASCII character codes used in the names of missing DBF files. As fragments of the directory are found, add the continuation of the chain to the file allocation table. After each operation of adding the directory chain, copy files and analyze how much the number of missing DBF files has decreased, and again form a sequence of ASCII character codes to search for the next fragment.

rice. nine
You also need to remember that when writing a chain of directory fragments to the file allocation table, you need to parse the fragments so that the LFN records are joined. In the case of only short entries, the chain can be written with any order of fragments.
In this case, after searching for 5 sequences, we managed to find all the other fragments of the directory with the 1C base.
After the complete chain of directory fragments has been built, we re-copy all the files of the 1C base with the assumption of their continuity. User information is contained in DBF files, so it is necessary to check their integrity.
The main method of checking the integrity of a DBF file is to check the information contained in the service header and whether the contents of the file match the description in the header.

rice. ten
Initially, the header is evaluated: its length, specified at offset 0x08, is checked to see if the offset specified in it leads to the end marker 0x0D. Base field records, starting from offset 0x20, are described by 32-byte records, in which the field name follows at offset 0x00, the field type follows at offset 0x0B, and the field size follows at offset 0x10. The sum of the field sizes +1 (one extra byte for each record in the database is the status of the record in the DBF) must equal the content at offset 0x0A (the size of one record in the database). In the figure of DBF files we see the following field lengths: 0x09+0x10+0x10+0x10+0x10+0x10+0x01=0x5A.
Let's check the correctness of the file size. To do this, we multiply the number of records indicated in the header at offset 0x04 by the size of one record in the database at offset 0x0A, followed by addition with the content at offset 0x08.
0x00000003*0x005A+0xE1=0x01EF. The resulting offset must contain the end-of-file marker 0x1A.
To control the integrity of the contents of the fields, you can use the visual method.
In this view option, you need to scroll through the contents of the records from the beginning to the end. If the filling is homogeneous, each field contains data types that are typical for those described in the header and there is no foreign content, then after viewing the DBF file, we can conclude that its content is correct.
If you find content that does not match the description of the field in the header of the database, you must determine the exact location from which the incorrect data begins.

Rice. 12
Based on the description of the fields in the header and the contents of a specific DBF file, it is possible to form presumable ASCII sequences that should be located at the given offsets in the missing fragments. If there are no databases of the same type on one of the drives (including file copies of the same database), this method will allow you to relatively quickly find all the missing fragments in the drive image. Separately, we note that additional difficulties will arise in joining fragments if the record size in the DBF file is small or a multiple of 16. If there are other databases of the same type, the task will be much more complicated (this statement is true at all stages of work, starting with searching for fragments of the desired directory).
It is necessary to check the integrity of each DBF file, of which there are several hundred in one 1C database. After passing all the checks and collecting file fragments, a final check will follow in the 1C Enterprise configurator.

rice. thirteen
Ideally, according to the test results, all the items marked in the checkboxes should pass successfully. If errors are found on the first two points, then it is necessary to analyze the error log in the configurator and find out which DBF files contain foreign data that was not detected during the checks. If errors are found when checking the logical integrity, then again it is necessary to analyze the error log to find out whether the problem lies in the base as its collection, or in the mistakes made by the developers of the 1C configuration.
Let's pay attention to the fact that if this USB flash drive had not been formatted, then after reading it, the data recovery procedure would be much simpler, which would greatly affect the cost and turnaround time. In conclusion, I would like to warn all users and maintenance personnel against rash actions in emergency situations that exacerbate the problem many times over, and also wish to perform backup operations more often.
Previously posted on Clipper Summer 87.
I need to create a CDX index file on Clipper 5.3, but I can't even build an exe file.
Inserted at the beginning of the program:
REQUEST DBFCDX
rddSetDefault("DBFCDX")
I link as in the example:
BLINKER FILE $(objs) OUTPUT [email protected] lib dbfcdx.lib
When building, it gives an error:
BLINKER: 1115: DBFCDX.LIB(CL53INIT) : "_DBFCDX" : unresolved external
Replaced BLINKER.
Began to try to collect BLINKERom 6.0
the same.
What is interesting, if instead of DBFCDX you connect DBFNDX to the example, i.e.
in a programme
REQUEST DBFNDX
rddSetDefault("DBFNDX")
and then
BLINKER FILE $(objs) OUTPUT [email protected] lib dbfndx.lib
everything links up and works fine.
On the second question - in my system I also use both CLIPPER (more often) and FOXPRO (less often and tied up with it, since FOXPRO has a deadly flaw - the maximum array dimension is 2. For an algorithmist, this is firewood. If I knew right away, I would generally FOX did not contact). But nevertheless, several programs are already on FOXe. However, I don't understand why common indexes are needed? In the clipper I use NDX, and on FOXe I use his fucking IDX, DBF is common. The work goes on separately - to each his own. Or is the system so monumental that there is a continuous stream of file changes from both sides? I'm afraid that there is no normal solution for heterogeneous systems that work so closely with each other at the index level.
And about glitches in creating CDX Clipper, the only advice is to upload a file with a minimal test case without a subject part (prog + DBF + description of the glitch (when and how it manifests itself), maybe someone will be able to get to the bottom of what is happening.
At least I got interested.
Reply to previous letter. Of course, I link _dbfcdx.lic, but it does not help.
To realize the interest that has arisen, you can take the first available .DBF and build it using any index expression. CDX with a clipper and fox.
The size of the indexes will be different, not to mention the contents of supposedly identical indexes.
At fox there is an advantage over clipper: it works much faster with the database, and I have a task for 400 thousand subscribers, who need to be massively counted every month. Fox would have helped here, otherwise I run around the management, looking for computers that can be left for the night for calculation. So such a bunch is sometimes very usefulKSS: ... I have a task for 400 thousand subscribers ... ... otherwise I run around the management, I'm looking for computers that can be left for the night for calculation. Of course, this is not the topic, but with such a number of subscribers and, therefore, high responsibility, it makes sense to allocate a separate server. Then you can run service tasks on it. My Clipper program, which is already 13 years old, does just that.
Andrey: Urri writes: I have a task for 400 thousand subscribers. I used to have a task for 150 thousand subscribers. I counted all night. Then the algorithm was limiting (did it for a long time) began to count in 5 hours. Moved to Harbor. Considers 1.5-2 hours approximately. So Fox, Clipper - it's time to switch to normal compilers. And if the management does not understand your work, you need to change the management, or give up on work. The sooner you understand this truth, the easier it will be to live on.
I looked at xHarbor at the beginning of his career, but then he did not find the opportunity to attach ADS to it, without which now I cannot imagine working for my large databases (the correctness of indexes and transactions are expensive). If you know how to make friends with ADS - please tell me and give a link where to get a stable working xHarbor. I will try to raise the settlement part on it - maybe it will feel better.
Switch to a normal compiler, you say? This is despite the fact that 60% of machines (out of 300) are such that half of them w98 can hardly pull, and the other half - w95 only supports 14 "monitors and a resolution of 640 * 480 ... What, on VBasic-4? It's hard to change management now - there is a crisis all around, however, employers of programmers do not favor now. Or is it different in your region? Pasha: There is Ads support in the harbor. Harbor made friends with Ads even earlier than with DBFCDX, i.e. working rdd for Ads was ready when DBFCDX was still buggy
Andrey: Urri writes: that half of them w98 can hardly pull, and the other half - w95 only supports 14" monitors and a resolution of 640*480... What, on VBasic-4? and it will be faster. I also doubted very much before, but now I just think why no one showed it (xHarbor) to me before!!! I already brought 5 systems of my own and 3 of others!!!
Urri: Dear (together with moderator Pasha)! You do not tease, but give a link to a stable release of xHarbor and rdd for ADS and where you can read something. Please. Very necessary
Andrey: Damn it! You just take xharbour, download the version from there and that's it! I've been on this version for almost a year now!
Did a test for Clipper 5.3, Blinker 1.0 and FoxPro 8.
There are two identical files testclp.dbf and testfox.dbf
with fields NAME, NAME1 - C(10), NUMBER, NUMBER1, SUMMACLP, SUMMAFOX - N(10).
Fill.exe special program<кол-во записей>fills both these files like this:
NAME=A000000001, NUMBER1=1 for 1st entry,
NAME=A000000002, NUMBER1=2 for the 2nd entry, etc.
The fields NAME1 and NUMBER1 are filled in the same way, but in reverse order, i.e. the specified values will have the last and penultimate entries, and so on. The fields SUMMAFOX and SUMMACLP are not filled by the fill.exe program.
Further, there are two similar programs for CLIPPER (testclp.exe) and for FoxPro (testfox.exe). For testclp.exe (clipper), the task is as follows:
a) index the testclp.dbf file by the NAME field (tag FLD)
and by field NAME1 (tag FLD1), thus creating "own" index testclp.cdx;
b) go through the testfox.dbf file and, using the index file created in a) for each line from testfox.dbf by the NAME value, find the line in the testclp.dbf file that has the same NAME field and add the NUMBER field from this file to the SUMMACLP field from testfox.dbf; then, using the same NAME value, find another line in the testclp.dbf file that has the same NAME1 field and subtract testfox.dbf from the SUMMACLP field.
c) go through the testclp.dbf file and, using the testfox.cdx index file created by another program (testfox.exe - FoxPro),
for each line from testclp.dbf by NAME value find the line
in the testfox.dbf file, which has the same NAME field and add the NUMBER field
from this file to the SUMMACLP field from testclp.dbf; then by the same NAME value
find a line in the testfox.dbf file that has the same NAME1 field and
subtract from the SUMMACLP testclp.dbf field.
For testfox.exe (FoxPro) a similar task:
a) index the file testfox.dbf by NAME field (tag FLD)
and by field NAME1 (tag FLD1), while creating "your" testfox.cdx index;
b) go through the testclp.dbf file and, using the index file created in a) for each line from testclp.dbf by the NAME value, find the line in the testfox.dbf file that has the same NAME field and add the NUMBER field from this file to the SUMMAFOX field from testclp.dbf; then, using the same NAME value, find a line in the testfox.dbf file that has the same NAME1 field and subtract testclp.dbf from the SUMMAFOX field.
c) go through the testfox.dbf file and, using the testclp.cdx index file created by another program (testclp.exe - Clipper),
for each line from testfox.dbf by NAME value find the line
in the testclp.dbf file, which has the same NAME field and add the NUMBER field
from this file to the SUMMAFOX field from testfox.dbf; then by the same NAME value
find a line in the testclp.dbf file that has the same NAME1 field and
subtract from the SUMMAFOX testfox.dbf field.
Thus, when working correctly, both programs must add and subtract the same number to each field of each file (although located in different records), and as a result, when the system works correctly, zero values \u200b\u200bmust remain in the SUMMACLP and SUMMAFOX fields in both files .
The test was carried out for 100,000 and 400,000 records, and despite the different size of the index files, it gave the correct result. The only thing is that when adding entries, one of the index files ("foreign") remains incorrect, therefore, at the first start, each of the programs only works with "its" index, and does not perform with "alien". After running the second program, both files are correctly indexed and both programs start working without failures (similarly, when the number of records is reduced, but FoxPro crashes into an error on someone else's index, and I had to use the ON ERROR handler ... But this is because due to the fact that the number of records is changed by fill.exe without opening both indexes, and also due to the fact that each of the programs does not reindex someone else's index (i.e. this
the problem is artificially created - it should not be otherwise). If you allow FoxPro to reindex someone else's index, then normal work is restored. Further, I did not "improve" the error handling system, so that both programs would not differ much from each other.
Outcome is the following:
1) At first I had Clipper 5.3 without a patch (and I have been working on it for a long time). It really crashed: starting somewhere around 40,000 records, sometimes it worked fine, sometimes it crashed, sometimes it crashed with an error (like the program performed an illegal operation) at the beginning of the program when trying to index "its" CDX. As advised here on the forum, I made a patch to 5.3b - everything worked fine. But even before the patch, glitches were not in the sense that FoxPro indexes were not understood - without reindexing(when both indexes were created by FoxPro) processing was normally performed, CLIPPER fell on creation of "their" indexes.
2) for modern DBMS, 400,000 records are not very many. how
seen from the test results, processing the entire file with random search
takes 2-3 minutes maximum even on somewhat outdated computers. So 2-4 hours of time on modern technology (and even 30 minutes) is "das ist fantastisch" in my terms. The problem is most likely either in an uneconomical algorithm, or in bottlenecks such as network bandwidth (due to the craze for the client-server architecture, which I have a negative attitude to - but this is offtopic). 3) As can be seen from the test results, the time to create an index is insignificant compared to the total operation time, so it is best to create indexes anew before starting file processing, not trusting previously created "alien" and "own" indexes (unless they are not currently in use by other programs).
Each of the programs in the case of normal file processing reports the time (in seconds) required for:
- creation of "own" index (item a);
- file processing by "own" index (item b);
- file processing by "foreign" index (item c);
- total time of work (more time is added here to fill in the fields
SUMMAFOX and SUMMACLP with null values in both files).
Attached archive:
info.doc - runtime experiment results.
fill.prg - auxiliary text programs on clipper to fill files.
calc.prg - text of the clipper program.
program1.prg - FoxPro program text.
makefill.bat - creates fill.exe (will have to adjust a little)
makecalc.bat - creates testclp.exe (same).
proj1.pjx - FoxPro project file.
testfox.dbf and testclp.dbf are data files (created in DBU).
testclp.cdx - index file created by CLIPPER.
testfox.cdx is an inex file created by FoxPro.
fill.exe- program to complete the files.
testclp.exe - CLIPPER program.
testfox.exe is a FoxPro program.
testfox.exe will require a runtime environment (from VFP6
probably won't work, so you'll have to use the text from program1.prg
and possibly corrected.)
To reduce the size of the archive, dbf files contain 10 records each, for real tests, the number of records should be increased.
If CLIPPER 5.2 is available, then you will also have to correct fill.prg and сalc.prg.
I will try to perform tests for CLIPPER "87, CLIPPER 5.2 and VFP6 a little later, since I do not work with these versions and now they are not in working condition
(as well as cross tests like CLIPPER 5.2<->VFP8 and CLIPPER 5.3<->VFP6).
Despite the apparent simplicity of the task, it still took a lot of time, but it is precisely such objective comparative studies that are of considerable interest to me. ist fantastish" in my terms. The problem is most likely either in an uneconomical algorithm. This is not a problem, and not an uneconomical algorithm. Normal, no other way. For the concept of this algorithm, it is necessary to present a record of the values of 24 amounts of money receipt, 24 dates of receipt of money, 24 tariffs, 24 amounts of charges, etc. into one record in the database. So it was still written by me on the Clipper, and I haven’t remade it yet, and I probably won’t. I saw how on the 1C platform version 7.5 they implemented the accrual of utility bills, so there 9.tys. accruals of subscribers were made for about 5 hours. And nothing, no one complained.
Programs for recovering lost information on a PC.
↓ New in the Data Recovery category:
Free
UndeletePlus 3.0.2.406 is a small application that recovers deleted files. The Undelete Plus application will help you recover lost files, including those deleted in DOS mode, from the Recycle Bin, from Windows Explorer or from a network drive.
Free  Scan DBF 1.6 is an application for repairing or restoring damaged DBF files. The Scan DBF application will help you recover damaged files in case of a computer or power failure, when the end or header of the DBF file is damaged.
Free  Recuva 1.42.544 is a handy application for recovering deleted files. The Recuva application is easy to use and will be able to recover data without any configuration or for users who have not encountered similar programs before.
Free  Recover My Files 4.9.4.1343 is an application for recovering files deleted using the Recycle Bin in the Windows operating system. Also, the Recover My Files application has the ability to recover files that are lost due to disk formatting, erased due to PC failure, software failure, or deleted by viruses.
Free  PC INSPECTOR File Recovery 4.0 is an application that you will need to recover information if your hard drive is damaged. PC INSPECTOR File Recovery can work with FAT 12/16/32 as well as NTFS file systems.
Free  OS Backup Wizard 1.19 is a backup application for Windows. The uniqueness of this application is its ability to not use unnecessary disk space for this when backing up the system.
Free 
Free  Norton Ghost 15.0.0.35659 is an application for archiving and restoring data on personal computers. The application supports backup and restore without rebooting the system.
Free  Handy Backup 7.1.1 is a handy application for automatically creating copies of your data and documents that can be stored on any device (external or internal, as well as on CD-RW) or uploaded to an FTP server.
Free  GetDataBack 4.25 is a powerful and convenient tool for recovering lost, damaged or deleted information from your hard drive. The GetDataBack application provides an intuitive interface and improved performance.
Free  BadCopy Pro 4.10.1215 is an application for recovering data from CDs, floppy disks, flash devices or hard drives that are damaged, have viruses, are incorrectly recorded or have any errors. The BadCopy application works automatically when you specify a recovery directory, with the ability to work with various formats of graphic, text and executable files, archives and other types of files.
Free  Acronis True Image Home 2011 Build 6942/ Home 2012 Build 5545 is a powerful application for creating accurate images of selected disk partitions or disks themselves. Acronis True Image creates a complete backup of all data, applications and operating systems, with the ability to quickly restore or copy to another computer with the ability to create a complete copy of this computer.
Free  Acronis Disk Director 11 Home is a comprehensive software package with many tools necessary for working with partitions and hard disk drives. The software package has the ability to manage your disks and partitions, as well as create your own boot disks for system backup and quick recovery.
Free  DiVFix 1.10 with this program, you can easily view partially uploaded .avi videos. DiVFix supports viewing various video formats, including .wmv or .mpeg. Since .avi files can only be viewed if they are fully downloaded, due to the fact that there is an index table at the end of the files, and it cannot be opened without it, they cannot be played on other players either.
Free  Avi Previewer 2.2.7 is a program that has the ability to view incompletely downloaded or simply damaged avi files that cannot be played on conventional players or have defects. The Avi Previewer program will allow you to fix files if they are damaged, restore them after deletion or incorrect extraction from the archive, and the like.
Free  Advanced ZIP Password Recovery 4.00 is a program with the ability to recover lost passwords for ZIP archives.
 Screenshot 1.
 Immediately after starting the program DBF Recovery Toolbox a window for selecting a dbf file to restore opens. There are three ways to select the desired file:
In addition to the dbf file, the table can also include in its structure a file containing information from fields of the MEMO type. Such files usually have a name that matches the name of the dbf table and the extension fpt for FoxPro tables or *.dbt for dBase tables.
Note Note: If the damaged dbf file contains fields of the MEMO type, but the fpt or dbt file was not specified, DBF Recovery Toolbox will restore only the structure of the field in the main table file and links from it to the file of this field. However, the information contained in the external file will not be processed. Thus, if the MEMO file has not been damaged, normal further work with the restored table will be possible. However, if, in addition to the dbf table itself, the fpt or dbt file was damaged and not restored, failures are possible during operation.
After selecting the table file to be restored, to continue working, you need to click the Analyze button, which is located at the bottom of the program window.
If a mistake was made while entering the name or path to the table file, the program will issue a warning Please select file to recover! (Please select a file to restore!) and the table structure analysis process will not start.
 Screenshot 2.
 When you go to the stage of viewing the structure and content of the source table data, the program will display a window with a warning about the beginning of the data recovery process. Do you wish to start recovery? (Would you like to start recovery?). If you need to change the name or path to the dbf file, or add a MEMO file to the selection, you need to click the No button and return to the file selection window using the Back button.
If all files are specified correctly, click the Yes button in the dialog. After clicking this button, the program will start parsing the dbf table file and additional MEMO field files.
If during the analysis of the structure of the source table MEMO fields were found, but the fpt or dbt file - storage for such fields - was not specified, the program searches for files of these types with a name that matches the name of the source file in the directory from which it is read. Upon detection, the program will display a window with a suggestion to use the file when analyzing the table.
In the process of analyzing and recovering information, the program DBF Recovery Toolbox:
- Reads the header of the file, identifies the names and types of the fields in the table, and determines the offsets at which records physically begin in the source file.
- Identifies the start of each record in the source table and extracts all fields of those records from the source file. If the table contains fields of the MEMO type, identifies the links contained in the table records to the addresses of the data stored in the file of these fields. The MEMO file itself is not processed.
- If a file associated with the MEMO fields (fpt or dbt) was specified, the program analyzes its structure and identifies the file records corresponding to the links from the main table.
When restoring information, a progress bar will be displayed at the bottom of the screen, with which you can assess at what stage the data recovery is.
After the analysis of the damaged dbf file is completed, the restored information will be displayed in the form of a table in the main workspace of the window. The columns of the table displayed on the screen will correspond to the fields of the source file, and the rows of the table will correspond to its records.
If the file is damaged so badly that the program will not be able to recover information from it, the Send a file to developers button will appear at the bottom of the window, with which you can send the damaged file to the program developers by e-mail for more detailed analysis and recovery. Also, at any time, you can send the file to developers for analysis using the Send source file item, located in the Actions menu.
After viewing the recovered information, you need to click the Next button, located at the bottom of the program window, to proceed to the stage of saving the recovered file.
 Screenshot 3.
 When working with the original dbf file and all attached files, no changes are made to them. All work takes place with a copy of the information that is in the computer's RAM. Therefore, for further work with the recovered data, they must be saved to disk.
At the same time, saving the information restored from the original file is possible only in the registered version of the program. In the trial version, you can only view the information in stage 2.
To save information, you can use three ways to select a file:
- Enter the path and file name in the Repaired file name (.dbf): combo box, which is located in the main workspace of the window. When you open a window for selecting a file to save, the program automatically fills in the input field. By default, it is proposed to save the restored dbf file to the same folder from which the original file was obtained, but with a name consisting of the name of the original file and the _repaired suffix. That is, if the example.dbf file was used, the program will offer to save it under the name example_repaired.dbf.
- Selecting a folder to save and a file name using the standard file save dialog. The file selection dialog call button is located to the right of the combo box. When opening a dialog, the directory from which the source file was read and the file name constructed according to the principle described above are also used.
- Selecting a file from the drop-down list of the input field. When working with table files, the program DBF Recovery Toolbox stores information about previously saved files in its settings, and if necessary, these names and file paths can be reused.
After specifying the path and name of the saved file, to save the recovered information, you need to click the Save button, located at the bottom of the program window.
If the directory specified in the Repaired file name (.dbf): field does not exist, the Directory does not exist warning will be displayed, the file will not be saved, and the program will remain at the stage of selecting a file to save.
If the file specified in the field already exists, the program will prompt you to overwrite it Do you want to rewrite the existing file? (Do you want to overwrite an existing file?). If the No button is pressed, the program will also remain at the file selection stage. If the Yes button is pressed, or if the file does not already exist, DBF Recovery Toolbox will proceed to the stage of viewing recovery results.
 Screenshot 4.
 The program can save information read from the source file in any format: dBase III-IV, FoxPro 3.x (or later). However, keep in mind that when you save a document in a previous version format, some of the data that is incompatible with the version of the saved file may be lost or corrupted.
The format of the saved document is selected using the Select output DBF file version: drop-down list field (Select the version of the resulting DBF file).
When you open the window for selecting the format of the saved document, the program automatically offers to save the recovered document in a format version that matches the original document. If the source file was damaged so badly that it was not possible to determine its version, the program will offer by default to save the file in the latest available version of the format.
After completing the settings for the format of the saved document, to proceed to the process of restoring and saving data, you need to click the Save file button, which is located at the bottom of the program window.
If necessary, you can return to the page for selecting a file to save by clicking the Back button.
Screenshot 5. At this stage of work, the program in the main working area of the window displays information about all the files that were restored in this session of its work. Information consists of:
- name and path to the file being restored;
- name and path to the file in which the recovered information was saved;
- the number of records that have been restored;
- the time when the dbf table file was restored.
After viewing the log, you can go back using the Back button, which is located at the bottom of the program window to change any settings for working with the program (saving the recovered file under a different name, selecting another file for recovery, etc.).
If you are done with the program, you can click the Finish button to exit or simply close the program window.
End of work
After reviewing the log, you can exit by clicking the Exit button or by selecting the Exit command from the File menu. It is also possible, using the Bak button (Return), to return to the first page of the program and select another file for recovery. Please note that in this case, when you save the file, the name and folder of the restored file do not automatically change, and you will need to change them manually or select them using the dialog.