How to make a Kuznetsov heating and cooking stove? Kuznetsov's stoves: advantages and disadvantages Kuznetsov's fireplace stove
The principle of bell-type stoves has been known for a long time, but it was developed in detail and adapted for the installation of home heating appliances thanks to the well-known stove maker and inventor Igor Viktorovich Kuznetsov. It has become widespread not only in Russia, but also abroad.
What is this article about
The principle of operation of the furnace
Most furnace designs operate by directly heating the walls from the combustion of fuel in the combustion chamber or by heating the brickwork from furnace gases passing through a complex system of air ducts in which hot furnace gases give off heat to the brickwork.
In the first case, the heat capacity of the furnace is determined by the wall thickness. The thicker they are, the more heat-intensive the oven will be. Their disadvantage is the high fuel consumption for heating. As soon as the burning stops, the furnace begins to cool down.
Furnaces with a complex system of air ducts make it possible to heat the “body” of the heating structure more evenly, but the long passage of furnace gases through highly curved air ducts places increased demands on the draft and height of the chimney.
Bell-type furnaces are deprived of these shortcomings due to their design, in which two independent heat-accumulating circuits are formed. The inner, highly heated bell circuit is located inside the outer, less heated circuit. Therefore, cooling in the absence of direct contact with the outside air is much slower. The oven stays warm much longer. All heated furnace gases remain inside and are not thrown out.
Types of bell-type furnaces
I.V. Kuznetsov developed more than one and a half hundred stove models that can be used for a variety of purposes.
However, their configuration and dimensions may vary depending on the location of the caps. Usually, in in order to save space furnace, the caps are arranged vertically. One above the other. But they can be placed horizontally. In this case, the oven is low, but long.
On it, in the public domain, there are several ten most common and universal ovens for every need. From simple heating ovens to special bread ovens that surpass in their functionality the now popular tandoor or Pompeian ovens.
close ×
For more than 50 years, Kuznetsov's stoves have occupied a high position among heating structures for the home, and this is not surprising, since stoves have many advantages and are strikingly different from channel stoves, not only externally, but also in their characteristics. Kuznetsov was the first person who dared to test the most practical and convenient system of furnaces.
In all furnaces, hot air moves through the channels, and passing through them heats up the walls of the furnace, but the air itself quickly cools. Such a movement of air can only be in the presence of optimal traction, that is, forced, but at the same time the furnace body heats up unevenly, which leads to cracking of bricks and the appearance of unwanted cracks. Thanks to Kuznetsov, an independent principle of air movement in the furnace arose. Furnaces have a second name - domed, which they acquired due to their unique design.
The hoods of this furnace must certainly communicate with each other using a dry seam - a space of 2-3 cm, which is not filled with a solution and a heat insulator through which gases pass from one hood to another. In simple terms, the principle of operation of Kuznetsov's furnaces is as follows: gases circulate and pass through the pipe due to their own gravity, and not forcibly, as happens when moving through the chimney.
In channel furnaces, the smoke, as it were, is drawn out through the pipe, and in a bell-type furnace it is pushed out. In this case, the cap can serve as a container for heating water or serve as a place for cooking. Even the simplest domed oven can perform a dual function.
The figure below shows in detail the principle of the movement of gases in the Kuznetsov bell-type furnace.
The red arrows clearly show how hot air moves, and the blue arrows indicate the movement of cold air, which enters the furnace from the outside through the blower. Due to the fact that the weight of cold air is greater than that of hot air, it will not be able to rise up and will go down without affecting the overall temperature in the hood. In turn, hot air collects under the hood, gradually cooling there, and then it will be displaced by gusts of hotter air that rise up.
Advantages, disadvantages and differences
The advantages include the following features:
- The ability to heat the stove with different fuels
- Uniform heating of the walls
- Good heat dissipation
- Does not emit smoke or soot when burning
- The need for cleaning the oven is minimal.
- The oven does not crack
- Holds heat well
- Shape and design may vary
- Fuel economy
- The ability to heat the stove even with raw wood
One of the main distinguishing qualities of Kuznetsov furnaces is an increased efficiency value. In an ordinary Russian oven, it is 30% -40%, and in these ovens it is almost 95%, which distinguishes these ovens from ordinary Russian ones. The internal concept is thought out in detail and competently, thanks to which the heated air lingers in the stove for a longer period, and the cold air, on the contrary, quickly exits into the chimney due to a special recess. It is also worth noting that Kuznetsov's stoves can be fired with various types of fuel, even such low-grade fuels as sawdust, on which equipment that provides hot water supply can be installed.
Kuznetsov was the first in the world to use automatic distribution of thrust through the channels, which makes it possible to eliminate waste even with an open view. This system distinguishes Kuznetsov furnaces in that it is unique and simple. In furnaces of this design, heat is not wasted, but immediately begins to work for space heating or hot water supply, since the emitted gases do not twist into a vortex, as in channel structures, but give their energy to impregnate the furnace.
If in channel furnaces the remnants of the fuel masses simply “fly out” into the pipe, then the Kuznetsov bell-type furnace is arranged differently. When there are few fuel masses left and they begin to burn out, the caps play the role of storage, trapping heated air masses under their arches and giving all the energy to the walls of the stove.
Of the shortcomings, which are not so many, we can name the following:
- It is necessary to carefully follow the order in order for the design to turn out to be of high quality.
- In the manufacture it is necessary to use only high-quality materials.
Types of ovens
All Kuznetsov models are bell-shaped, but they also have different classifications. To date, several types are known:
- Bell-type furnace - has one hood.
- Two-cap - two caps.
- Dome-in this type of furnace there can be several caps. Dome stoves are used more often than others, as they can be designed for any room and supplemented with any devices.
- With a water heating boiler - it is possible to install additional equipment for such furnaces.
- With a bench - this is a stove on which a place for lying is provided.
- OVIK heating and cooking stoves - such stoves not only heat the house, but also make it possible to cook on a specially provided stove.
- The oven-oven - not only heats, but is also equipped with an oven in which you can bake.
- The fireplace stove is ideal for warming up the house and spending the evening near the fire.
- Two-story - these are furnaces that can perform several functions at once. For example, to heat a room, serve as a hob, have a stove bench and an oven. The only disadvantage that the Kuznetsov two-story bell-type furnace has is its bulky dimensions. This oven is ideal for large spaces.
- Russian stoves RTIK - in addition to heating and a hob, the stove is equipped with an additional one on which you can dry firewood or shoes.
- Outdoor ovens are more like outdoor complexes, as they include a grill and barbecue for outdoor cooking.
The models listed above are far from the entire list of furnaces for various purposes, which were developed according to Kuznetsov's schemes. There are also many drawings with which you can make mixed options with different functions. In addition to stoves, according to Kuznetsov's developments, fireplaces and stoves for saunas are also being made. These designs have increased heat dissipation, which allows you to quickly heat up the room.
How to do it yourself
Most often, heating and cooking stoves OVIK 5 are used in houses, we will consider just such a stove as an example.
To make a Kuznetsov oven with your own hands, you will need the following:
Material
- Two types of bricks: solid red (M150) and heat-resistant fireclay (SHB-8)
- Sand and cement (3: 1), but you can also take a ready-made factory mixture
- Accessories for the furnace: cast iron doors, ash chamber, doors for cleaning holes, valves, grate and views
- Wire with a diameter of 3 mm and a length of 10 m. Bricks will be tied with it
- Steel corners (2 pcs.)
- Reinforcing mesh for the foundation
Instruments
- Master OK
- A hammer
- Trowel
- Stitching
- Basin or bath to mix the mortar
- Roulette
- plumb line
- Level
- Drill with mixer attachment
- Bulgarian
Foundation
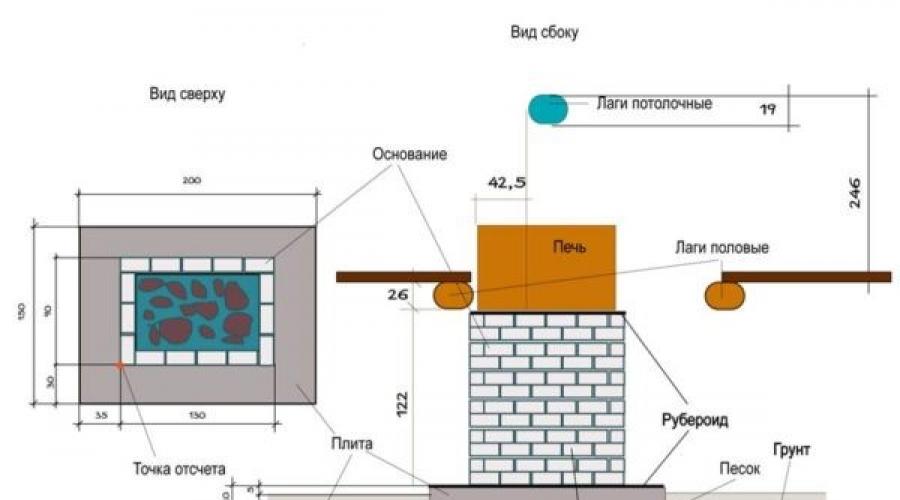
Before making a furnace, it is necessary to prepare the foundation. When it bookmark you should be careful and do everything exactly according to the instructions, otherwise the foundation will settle under the weight of the furnace, and the furnace may crack, which will further lead to collapse.
The foundation should be 15-20 cm larger than the furnace parameters. Only in this case it will meet all the requirements of the regulations.
 This is an approximate drawing of the foundation, which shows the materials used and has markings.
 To make a foundation for the Kuznetsov oven with your own hands, you will need to do the following:
- First of all, we dig a pit with a depth of at least 1 m, it is at this depth that the soil freezes in winter. The edges and walls of the pit must be made as even as possible, which will allow you to spend less cement mortar.
- Next, we make the so-called "pillow" of sand. It is desirable to fill in the sifted sand so that it is compacted more densely. The height of the pillow should be about 20 cm. Then leave the pillow for a couple of days to shrink.
- Next, you need to make formwork. The best option for formwork would be boards, although other material can be used. The upper part of the formwork should match the level of the floor in the house.
- Next, we proceed to the installation of fittings. As a reinforcement, a mesh with cells from 50 mm and a bar thickness from 6 mm is suitable. The grid must be positioned so that it is either in the middle of the foundation, or before the concrete comes out of the soil to the outside. The last option is the most optimal.
- The final stage of the foundation is the pouring of concrete. In addition to concrete, mineral heavy impurities or gravel can be added to the composition, and a water repellent will be the best addition, which will not allow moisture to be absorbed into the foundation and extend its service life. After the concrete is poured, its surface must be leveled with a spatula and immediately remove all defects on the surface.
After completing the above work, the foundation must be left for a while to dry. Ideally - at least 30 days, depending on weather conditions, but it hardens in a week, so you can proceed with the further construction of the furnace.
Let's move on to construction. Since the bell-type furnace is considered the most common design, this is what we will do. Before laying, you need to pay attention to important points:
- On the foundation before the first laying, it is necessary to lay a waterproofing layer, which can be roofing felt or foil isothermal film. If foil is laid, then it must be laid with the shiny side up so that it reflects thermal energy.
- Do not make changes in the order, as this may affect the operation of the furnace and its service life. An exception can be made only in rows of solid overlap and change their appearance.
- To make the front side look solid, you need to take good quality bricks, even and without cracks.
- If you need to cut a brick, then you need to do it with a grinder, the edges and planes should have an even shape.
- The first two levels must be laid out with fireclay bricks using a furnace bonding mortar. The refractory layer will not allow thermal energy to escape into the foundation. From the second row, you need to start preparing the ash pan and blower. Bricks must be placed in a checkerboard pattern and only on clay mortar. It is also necessary to observe the thickness of the seam, which must be at least 5 mm.
- In the third row, we begin preparing the trajectory of the smoke channels.
- To make the furnace easy to maintain, four standard-sized cleaning doors must be made in the chimneys.
- The grate for the grate must be laid at the fifth level, and partitions between the blower, the hood and the firebox are also laid at this level.
- From the 5th to the 14th rows, a combustion chamber made of fireclay bricks is laid out. It is important not to forget about a very important factor: there must be a compensation gap between fireclay and red masonry bricks. It is needed so that the furnace is not damaged by the resulting thermal expansion of the material.
- It is necessary to install the doors of the firebox and the blower with the help of an asbestos sealant.
- In the 17th and 18th rows, the cap overlap has a solid plane, without holes for the chimney.
- As you can see in the order, in the 21st row there are two passages that are located along the inner walls.
- In the 28th, 29th and 30th rows, you can make a slight deviation from the order if you want to change the shape of the oven. In the case of a low ceiling, fire cuts should be made.
- As the laying out, the lining of the inner surface of the brickwork should be made. It is necessary to smooth the joints with a solution, adding heat-resistant material to it.
- The overlap must be carried out with 2 cast-iron support angles, the length of which should be at least 45 mm, but the exact size should be chosen taking into account the load.
During the construction of Kuznetsov furnaces, building materials will be required much less than for channel furnaces, since dome structures contain more empty space inside. For this reason, the stove can be considered as an economical option, and the shape of the structure can be completely different, including the corner one.
Before you make a Kuznetsov oven with your own hands, you should carefully study the orders and not deviate from them even a centimeter, otherwise the correct design may be violated. Also, do not forget that you should choose a high-quality and reliable material that will meet all safety standards.
Do-it-yourself Kuznetsovskaya sauna stove
The 1st row must be laid so that its surface is even, which is easy to check with a level, and the shape should be in the form of a rectangle.
As already mentioned, in the 2nd row the first cap and blower will begin. To do this, you need to take a brick, divide it in half and put each part so that they are pushed out slightly outward, as shown in the figure. There is no need to use a solution. After the masonry is completed, these halves are pulled out.
14 bricks will be needed for the 2nd row, and after the bricks are laid, it is necessary to install the blower door, which must be supported with several bricks. We wrap the frame with a cord, as mentioned in the recommendations. It must be fixed with wire, which must be laid in the seams. Also, the wire is used to reinforce the walls of the furnace, which must be laid in every even row.
We lay out the third row, in which the bricks included in it should fix the blower door well.
The blower door in the 4th row should be blocked with hewn ceramic bricks, which should look outward, and with hewn fireclay bricks, which should look inward. Between them there should be a thermal gap of 5 mm. To make a gap, you will need a gasket made of packaging corrugated cardboard. Such a gap must be made in all places where two types of bricks intersect.
In the fifth row, the fireclay brick, which forms the side walls of the furnace, must be slightly shifted so that the bricks of the lower row form a shelf, the width of which must be at least 15 mm. This is necessary for the grate. In the same row, we begin to form a vertical channel that connects both caps. After the row is fully laid out, we install the grate, and fill the gaps between it and the brick with sand.
During the laying of the sixth row, a furnace door is also installed. An asbestos cord is laid between the door frame and the brick, and it is fixed at the bottom with a wire, and at the top with an iron strip.
When laying the seventh row, the assembly from the brick that forms the back wall of the firebox leaves a gap of 30 mm - this is the beginning of a dry joint.
Following the scheme, lay out the eighth row.
In the ninth row, a channel is formed that connects the firebox with the lower cap. In the diagram, those bricks in the side walls of the furnace are highlighted in lilac, the upper faces of which should be 10 mm below the plane of the row.
When laying the tenth row, do not forget that ceramic bricks are placed on the asbestos lining that covers the fireclay bricks without mortar. In the ceramic bricks surrounding the firebox, you need to make a cutout for the hob. The size of the cutout should be such that there is a gap of 5 mm around the plate. At the point of contact between the fireclay brick and the panel, a gap of 10 mm must be left. Such bricks, cut at an angle, are located on the right and in front, and are indicated in the drawing in yellow.
In the eleventh row, the walls of the cooking chamber begin, and the door for the chamber is also installed in it. Do not forget to wrap the frame with asbestos cord and fix it tightly with wire.
From the 12th to the 14th row we make the masonry according to the order.
After the laying of bricks in the 15th row is completed, the cooking chamber is covered with a sheet of steel, the thickness of which should be 3 mm, and the size is 60X55 cm, with a cutout for the exhaust duct. To strengthen the sheet, we use 4 segments from the corner and a steel strip.
The 17th row is done in order, and in the eighteenth we begin to form the upper cap.
From the 19th to the 27th row we put the oven in accordance with the order. In the 28th row, we proceed to install the main chimney valve. Here, too, you will need to leave a gap of 6 mm around the valve, and the depth under it should be 11 mm.
After the masonry is completely completed, the stove must be left to dry for a while, and the fire should be started with a small amount of firewood.
The bell-type sauna stove has also gained considerable popularity, as it heats all the main bath rooms and has good heat dissipation with minimal fuel consumption. Kuznetsov's two-tier sauna stoves are simple and effective. The problem of heating water in the shower is easily solved by the register built into the stove.
If you decide to make a Kuznetsov oven with your own hands, then it is worth exploring several options for ordering that will help you make it correctly and in accordance with safety measures.
Furnaces designed by Igor Kuznetsov are currently among the most efficient among all existing designs. For half a century now, such stoves have been used by a huge number of people not only in our country, but also abroad. You can build such a stove with your own hands in your house or in the country if you follow the recommended masonry scheme for a particular model.
What is a Kuznetsov bell-type furnace and where is it used: advantages and disadvantages
Kuznetsov began to develop projects for various types of furnaces in the middle of the last century. For all the time of his work, he created more than 150 designs of furnaces for various purposes.
Kuznetsov's bell-type furnace
The most popular furnace designs:

In fact, there are many more varieties of Kuznetsov furnaces, since there is the possibility of building mixed types.
The main indicator of the operation of the furnace is an increase in efficiency (efficiency). This is exactly what Igor Kuznetsov was striving for when creating bell-type furnaces. Depending on their purpose, the master equipped them with improved functions and capabilities. Some furnaces received an increased degree of heat saving, others a new improved furnace, and the third was provided with a long service life.
Thanks to the competent development of projects for bell-type furnaces, hot air lingers in them much longer than in conventional designs, and the cooled air quickly goes into the chimney pipe through a special recess. They got this name due to the fact that a kind of “cap” is created inside the furnace, which connects the two parts of the structure - the lower part and the furnace. It also separates gases into hot and cold.

Bread bell oven Kuznetsov
The efficiency of bell-type furnaces reaches 95%, while conventional furnaces have only 25 to 40% efficiency. Thanks to the “free movement of gases”, which is ensured by the introduction of the Kuznetsov system, soot formation is reduced and the smooth heating of the furnace is increased. Such a 4 kW stove can quickly heat a house with an area of about 100 square meters. If necessary, the design of the bell-type furnace allows you to install a water heating circuit in the house. And since the thrust is distributed automatically through the channels, the risk of waste is almost zero. Therefore, the view can not be closed.
Advantages of bell-type furnaces
- Uniform heating of the furnace and heat transfer.
- Equipped with a large number of places where you can install a metal heating element.
- They burn without soot and smoke formation.
- Rarely need cleaning (every few years).
- They have a low level of heat loss.
- High degree of economy.
- Crack resistance.
- Possibility of design improvement.
- They have a maximum fuel combustion temperature.
- Possibility of firing various types of solid fuels.
- Strong draft even with a small chimney.
Such furnaces are almost completely devoid of disadvantages, except, of course, for the difficulties in their construction and the cost of purchasing materials.
The design and its distinctive features
The principle of the arrangement of bell-type furnaces is quite simple and lies in the fact that the lower tier of the structure and the hearth are combined into a common space. It is called a cap, inside which hot gases circulate.
The lightest incandescent gases, which are formed during the combustion of fuel, rise to the top of the cap. There they will be until all their heat passes to the brick walls of the masonry.

Standard bell furnace design
As they cool, they become heavy and sink down. The following hot gases "come" to their place, and such a cycle occurs as long as the fuel burns in the hearth. Thus, hot air is always under a kind of cap until the brick takes all the heat. He won't be able to get out until he's completely cool and heavy enough to go down.
Design features of bell-type furnaces
In order to understand how such a stove works, we can consider the option with a glass container, when hot smoke cannot escape anywhere in it and gradually sinks down when cooled.
But you need to know that the cooled gas, which goes down, is not cold in the truest sense of the word. It has a temperature of more than 200°C, and the combustion temperature of solid fuel is about 800°C, so the air rising up will be just as hot. Cooling down, the gas descends to the outlet channels, which are located at the bottom of the furnace masonry. And then he enters the next cap, located above the first. And if the gas was cold enough for this cap, then for the upper one it will be red-hot and therefore rise again to the very top. There they will also heat the material of the oven walls. After cooling, they will go down, as in the first case, but with a temperature of about 130 ° C.
That's the whole process of the furnace, but, like every effective device, there is a small nuance here, which is called the "dry crack". It is an opening located vertically in the furnace about 2-3 centimeters wide, which combines the firebox with the lower hood from the floor itself to the end point of the chamber. Due to the dry gap, heavy cold air can directly enter the chimney without mixing with the rising hot gas and without reducing the combustion efficiency of solid fuel.

Dry joint in the masonry of a bell-type furnace
The sauna stove has the same principle of operation as the heating one, but its design is slightly different.
- The lower cap is equipped with a special metal pan with stones.
- There is access for water to enter and special holes for the exit of hot steam.
- The stove has thicker outer walls, which allow the stones to heat up as much as possible, and the room itself does not overheat.
- The hood has a circuit for heating water in the washing room.
Stones are heated in two ways:
- Directly from hot gases.
- In a steel closed pallet.
Since the stones are located at the top of the first cap and therefore they are heated to a maximum temperature. This is due to the fact that hot air "envelops" the stones from all sides at the same time.
For such a furnace, it is best to purchase rounded streamlined stones. This form will perfectly cope with the heating of air.
If possible, 1/3 of the cast iron ingots can be added to the stones.
Calculation of the main parameters
In order to properly build the Kuznetsov furnace, it is necessary to strictly follow the scheme developed by specialists. Masters who have extensive experience in the construction of such furnaces recommend that before you start capital masonry, practice laying it “dry” if you are doing this for the first time.
If the stove will be built at the stage of construction of the house itself, then it is necessary to draw up a project in such a way that it can heat several rooms at once.
The foundation for the furnace must be of high quality and must have a waterproofing layer. It is also necessary to take into account that the foundation of the house should not go into the basis for the furnace. This design must have its own foundation, giving its shrinkage.
The concrete base should be larger than the oven by about 10 centimeters on all sides. The degree of its deepening will depend on the height of the structure and the soil composition where the furnace will be built. Typically, the depth of the pit is from 40 to 60 centimeters. A pillow of sand is laid at the bottom for waterproofing and a layer of rubble to strengthen the building. To form the side walls, formwork is installed from the boards.

Scheme of ordering the bell-type furnace OVIK-9

The depth of the firebox is 450x470 mm with a dry joint to expand the brick by 2–3 cm. If the firebox needs large sizes of 510x530 mm, then the back wall is laid out not in ½ bricks, as shown in the order, but in ¼ bricks.
Necessary materials and tools
To build a furnace, we need a fairly large amount of materials and tools. This list does not take into account the construction of the foundation and chimney.

Instruments
- Trowel.
- Plumb and building level.
- Container for mixing solution.
- Spatulas.
- Construction corner.
- Perforator.
- Bulgarian.
- Mixer attachment.
Preparatory work before assembling the furnace
Before you start building a stove, you need to study in detail the plan of the room where the stove will stand. Since it weighs quite a lot, the foundation must be well reinforced.
The following information will help to build the furnace correctly and efficiently in order to avoid problems during its further operation.
- The cap and the hearth should be combined with a dry seam - a size of 2-3 centimeters. It is necessary for the correct movement of air flows. Heavy gases saturated with water vapor will move in the hearth and create a certain vibration, improving the quality of firewood combustion.
- It is impossible to combine a furnace with a hood, since firewood must burn in a certain volume. This is the only way to create the highest possible temperature.
- Above the combustion chamber, a catalyst made of refractory bricks in the form of a grid should be arranged. Here they heat up to the maximum and burn out what burned out in the hearth.
If the stove will be built in a wooden house, it is very important to protect the walls from severe overheating. To do this, it is recommended to install gaskets made of refractory material at the joints of the walls and the furnace itself.
Also, at the joints of the furnace, the gaps that will be filled with refractory material are needed for the free movement of the expansion of the masonry during its heating. Otherwise, the mortar at the seams will crack, and the oven will be deformed.
- The refractory protection inside the furnace must be located in such a way as if it were suspended in the air. That is, it should not come into contact with the walls of the furnace.
- Internal masonry must be installed on the edge. External masonry is done at the discretion of the master.
- The wire is needed to strengthen the brick bond. Therefore, every 2-3 rows it is necessary to lay it so that the stove is more durable and stable.
- After the solution has completely dried, the walls of the furnace must be treated with a special refractory substance.
- Trial kindling should be carried out from the lowest possible temperature, with a phased addition of heat.
Do-it-yourself bell-type furnace construction
We will begin the construction of the furnace from the foundation, since it is it that is its basis and one of the main elements for ensuring the strength characteristics of the structure.

We leave the concrete to harden for several weeks, since the longer the foundation stands, the stronger and more reliable it will be.
Do-it-yourself step-by-step instructions for laying the Kuznetsov furnace - ordering (photo)
- We lay out the first row of bricks. It must be perfectly even, as it is a solid basis for future ordering. We make the thickness of the seams about 5 mm. We check the correctness of the angles. For this laying we will need 20 bricks.

We lay out the first row of bricks for the oven
- We begin to create a blower chamber and a lower cap. In order to be able to clean its base after the masonry is completed, we put two halves of the brick protruding from the main row and do not sit them on the mortar. We install the blower door and temporarily support it with bricks.

We put the second row of the furnace
- We put the 3rd row according to the drawing. During the masonry period, we tightly fix the blower door.

Third row laying
- We partially lay out the 4th row of fireclay bricks. From it we create the side walls of the furnace and the end wall. We block the blower door with 2 ordinary bricks, release them a little above it and cut it obliquely. We also put 2 hewn bricks from the end of the blower. Between the two types of bricks, we leave a five-millimeter gap. To do this, we put a simple five-millimeter corrugated cardboard between them. In the future, it will simply burn out and the thermal hole we need will remain. We will have to make such slots in other rows, where two types of bricks will join.
- We continue laying 4 rows. After we lay the bricks on the side above the blower door, we block the middle of the door with refractory and ordinary bricks, hewn on both sides from the side. We will need to take 1 ordinary and 1 fireclay brick.

Fourth row laying
- From the fifth row we create a fuel chamber. We cut the brick obliquely and put the front wall of the hearth. The internal space of the furnace between the masonry should be similar to the size of the grate so that it easily fits into the brick rectangle and onto the bricks of the previous row protruding by 10-15 mm. We make a five-millimeter gap between the walls and the grate. Behind the firebox, where the first cap is located, we create a channel in ½ bricks to connect the two caps. We will need 12 and ½ red and 4 refractory bricks. Here, on the protruding bricks of the previous row, we lay out the grate (we do not fix it with mortar). The holes are filled with sand.

Laying the fifth row
- On the sixth row, we install the combustion chamber door. The holes between the bricks and the door are filled with asbestos.

Laying the sixth row
- We put the next row. When laying the end wall of the furnace on the left side, we make a gap of 2-3 cm, which will serve as a dry seam. We use 12 ordinary and 3 refractory bricks.

Laying the seventh row
- We put the eighth row according to the drawing, using 12 ceramic and 3 refractory bricks.

Laying the eighth row
- In the 9th row, we make the walls of the hearth, and between it and the cap from below we create a passage where the combustion products will go. We make the side walls ten millimeters lower than the rest of the masonry. The bricks that we put over the firebox are shifted a little to cover a small part of its frame. Before that, we cut the bricks obliquely and so we create a “notch” in which we will lay the main central brick. We use 12 ordinary and 2 and a half refractory bricks.
- Here, between the facade side bricks, which are located above the chamber door, we put a centering brick covering the door rim. Before that, we cut it obliquely. We cover the side of the chamber on the left with a strip of asbestos 10 mm. She will align the entire 9th row.

Ninth row laying
- On the bricks of the tenth row, which are covered with refractory asbestos, we put an ordinary brick on the “dry” one. In the masonry that frames the furnace, we make a small ten-millimeter cutout on which the hob will lie. We leave a gap of 5 mm between the stove and the brick on all sides to heat the metal. The fireclay brick, which we lay in front and on the right of the firebox, is cut obliquely. We make a small ten-millimeter gap between the slab and the masonry.
- After we have laid out the 10th row, we place asbestos twine, which is saturated with a mixture of clay, on the openings in the masonry. Place a panel on top. We fill all the holes between it and the bricks with sand.

We lay the tenth row
- On the 11th row, we begin to create the walls of the cooking chamber and install a frame with doors. Between the steel frame and the masonry we make a gap of 5 mm. To form the frame, we wrap it with refractory rope.

We lay the eleventh row
- We lay out the 12th row according to the drawing of 11 ceramic bricks.

We lay the twelfth row
- On the 13th row, we continue to form the chamber and side channels.

Laying row 13
- We lay out the 14th row strictly according to the drawing.

Laying row 14
- We put the 15th row in two approaches. First, we raise the walls of the chamber and channels to the level of the steel frame of the door, and then we create a jumper for it. On this row we place a metal sheet 600x550 mm and make a cutout in it for the hood. For strength, we put 4 iron corners and 1 strip on top of the sheet.

Laying 15 rows
- We put an ordinary brick on the corners of the 16th row and a strip, as indicated in the drawing. Leave the channels open. On the bricks that frame the near channel and for the hood before laying, we make holes for the chimney valves. We make a 5 mm gap in the masonry.
- Here, on the site with openings, we put 2 valves.
Laying row 16
- On the next row, we block the hearth for cooking and the valves with ceramic bricks so that the outlet channels are open.
Laying row 17
- Next, we form the second cap. To do this, without mortar, we install two halves of the brick, which we raise above the main masonry. This is necessary so that you can then clean the base of the furnace hood. After finishing the masonry, we fix these bricks with mortar.

We put the 18th row
- We put the 19th row according to the drawing of 12 and a half red bricks.


We put the 27th row
- On the 28th row in the masonry that frames the chimney channel, we make 10 mm cutouts for mounting the main chimney damper. When making openings, we regularly apply a valve so that it is located 5 mm from the walls of the furnace and freely stands in the gap we made.

We put the 28th row
- Here, in the opening on the solution, we install the valve itself
- On the 29th row, we take 19 ordinary bricks and almost completely cover the surface of the structure. We leave intact only the chimney opening with the valve.

We put the 29th row
- On the 30th row, we also almost completely cover the surface of the furnace according to the scheme.
We put the 30th row
- On the 31st row, we lay the base of the pipe in 1 brick. Its size must correspond to the cross section of the chimney. The laying is carried out from 5 bricks.

We put 31 row
- Then we create a chimney pipe. For each row we need 5 ceramic bricks. The oven has been built. Now it should stand until the solution is completely dry.

We lay out the chimney of the desired height
Operation features
The difference between Kuznetsov furnaces is that they do not require special care and are very easy to operate. For them, it is enough just to prepare the appropriate dry solid fuel (firewood) in the right amount.
Since the efficiency of a bell-type stove is very high, the wood consumption will be much less than in conventional stoves, to which we are accustomed.
In bell-type furnaces, soot is practically not formed, since it is spent on secondary combustion and an increase in thermal energy.
- Dry the oven well before using it. To do this, it must be heated 2 times a day, one at a time - an hour and a half with a small amount of fuel. The door of the blower and furnace must be open.
- It is not recommended to use chips and cardboard in large volumes for kindling. Only for a short time they will give the maximum temperature, which will entail cracking of the bricks.
- To kindle the stove, it is best to use paper, torches or birch bark. This will allow you to remove cold air from the chimney pipe, create the necessary draft and obtain a combustion temperature of firewood of about 350 ° C. In winter, if the furnace has not been used for a long time, then kindling is recommended to be carried out with the “summer” valve open.
- After the start of combustion, firewood must be placed in the furnace chamber in order to obtain a maximum operating temperature of 800–900 ° C.
Bell-type stoves practically do not need cleaning, and if the need arises, it is best to seek help from professional stove-makers. They will quickly and efficiently clean the chimney, furnace, grate and other elements of the furnace.
Video: we build a Kuznetsov oven with our own hands
Following the detailed instructions and the developed scheme, you can independently build a convenient and functional Kuznetsov oven in your home. A properly selected scheme of the model will be able to decorate the design of any interior of the room, and will also fully fulfill the functions assigned to it - to heat the house and serve as a kitchen for cooking.