Gmail com new mail. Registration on gmail com creation of a mailbox. How to create and secure your Gmail inbox
Probably, each of us once faced with the need to send an email, and this requires an electronic mailbox. This is a very convenient and useful thing, so this article will talk about how how to create a mailbox on one of the most popular and convenient services, that is, on Google (Google).
A few words about the benefits of Google mail:
Registering a gmail mailbox
1) Go to the site to register
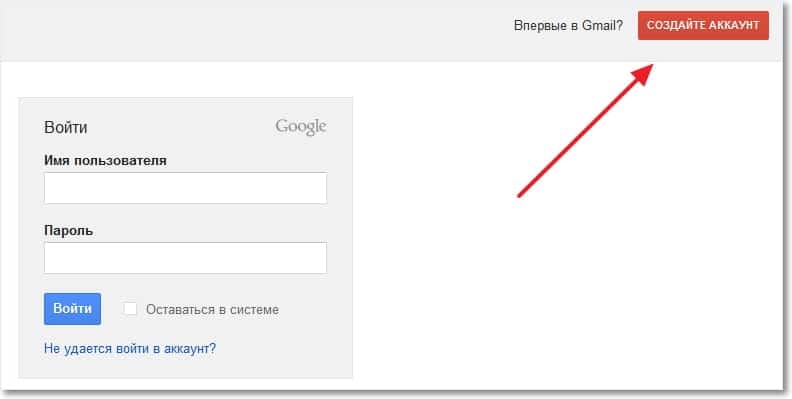
The first thing you need to do is open a browser and go to the site mail.google.com or gmail.com, is required for this. These two different addresses will take you to the same page, so I prefer the second option, it's shorter. On the page that opens, look for the following image:
We are interested in the big red "Create an account" button. Click and navigate to the page where you need to fill in the registration data
2) Create a Google account
To register, you will have to fill out a rather large questionnaire, but do not worry, we will do everything together and accurately. If you need another language, then at the top right there is a switch for it.
Name and Surname- here they are indicated. Not necessarily real, you can do it like this: 
however, this is how letters will be automatically signed and how you will be addressed. Fill in further
Username(login) - this is exactly what will be before the @ sign in the mail address, for example, if it is a computer, then the address will be [email protected]
Username requirements:
- length from 6 to 30 characters
- of characters, only letters of the Latin alphabet (a-z), numbers (0-9) and dots (.) can be used, spaces are not allowed. Latin letters can be used both lowercase and uppercase - they are perceived the same
- such a username should not exist, so it is not necessary to assume that computer, for example, is still free. But let's check and at the same time see how Google will offer other options for the name if the one you entered is already taken. For example, I will introduce shabananton. We press the button "check if the name is taken" and we see the following

of course busy (it's easy to guess by whom) and Google offers to choose one of the options with added numbers. This, of course, is not very beautiful, so I advise you to experiment some more, use a dot and get a great name as soon as possible! For example like this: 
If available, then you can move on!
Enter a password- you need to come up with a password for the mail. This is an important part of registering on any site, so take this procedure seriously, especially if the box will be used for business correspondence or receiving correspondence.
Tips for choosing a password:
- in this case it must be at least 8 characters
- spaces are not allowed
- use only latin letters, and preferably both lowercase and uppercase, here they differ, unlike the username
- use numbers, special characters (at least underscore _ or hyphen -)
- do not use the same password on other sites, because if someone can figure it out (the box is easy to find out already), then the consequences will be disastrous
- do not use your date of birth, last name, phone number or any other information that can be easily obtained as a password (from your page on a social network, for example)
- you can use the online password recovery service www.genpas.ru if there is something wrong with fantasy

- the question should not be related to a password
- The answer should come easily to your mind, but difficult to guess. In general, be invisible
For example like this: 
then you need to specify the country, it should be determined automatically, as well as the date of birth. Be careful with your date of birth, because if you are less 13 years old(that is, if you specify so), registration will be denied. Why?
Google is registered in the USA. And in the US there is a child protection law. Which says that you can not collect data on children under 13 years old. Including registration for accounts. That's it
After the age follows the hated captcha - a picture from which you need to enter the characters. This is such a protection against automatic registrations.

Letters are not case sensitive. Also in the middle there is an icon for people with disabilities, by clicking on which information must be perceived not visually, but by ear. That is, noise will be heard, against which the voice (in the language of the page, that is, in this example, in Russian) will pronounce the numbers. They must be entered. If you cannot read what is written, click the leftmost icon - the text will be updated.
Then you need to press the button
The following welcome page will open, where you can access the created mailbox.

One of the services that allow you to register an email account for free is Gmail. Its creator is Google (Google). The launch of the mail system took place on April 1, 2004, but it was possible to register a mailbox only by invitation. Today, registration is open to everyone.
Using Gmail, the user can very quickly create, send, receive, delete, sort letters. In addition, this service provides 10 GB of storage space for emails. When registering in this service, the user receives a mailing address of the form [email protected]. In 2012, Gmail became the most popular email service in the world, overtaking its rival Hotmail (Microsoft's email service).
Main features of Gmail mail:
- 10 GB mailbox;
- built-in chat that allows you to send and receive instant messages from other users, it is also possible to see the interlocutor (the chat supports voice and video communication);
- quick search for desired messages;
- protection against unwanted correspondence (spam);
- high level of mailbox security (encryption is used);
- the use of labels, marks and filters makes working with letters very comfortable;
- it is possible to work with the mailbox through any mobile device by installing a special application;
- free use of all the possibilities of an electronic mailbox;
- advanced setting of the contact list, which allows you to add information for each of the interlocutors (phone, address, photo);
- built-in spell checker, which provides for the display of spelling options for words and automatic detection of the language of the message;
- regular saving of edited messages in a draft every minute so that data is not lost in case of any failures.
Signing up for Gmail
To get started with Gmail, you need to create a Google account (account). First you need to go to the address Proceed to registration, then you should enter your data. In the first two fields you need to write your first and last name (these fields are required), then you need to come up with the name of the mailbox. When coming up with a name, it is important to create a unique one that is not registered in the service, and easy to remember. If the name is already taken, the service will warn about this, offering to use a similar one or come up with a new one. When coming up with a mailbox name, you can use from 6 to 30 characters, but not less than 6. In the case when the user wants to use more than eight characters consisting of numbers, the system will not accept such a name, offering to add at least one Latin letter to the numbers.
Next, you need to choose a password consisting of at least eight characters. The registration service warns against using simple passwords that are very easy for attackers to pick up. In the next field, the user will need to confirm the password. After you need to specify the date of birth and gender. These fields are also required. Next, you need to specify either a mobile phone number or a spare email address. Both the phone and the additional address are used by the system to recover a forgotten or lost password by the user.
The next field is confirmation that the user is not a robot. You need to enter two words shown in the picture. If the words are not clear, you can click the Refresh button and get a new picture with different words. It is also possible to skip this check, but if you check the box next to the words “Skip this check. Maybe…”, it is necessary to indicate the mobile phone number, since with its help it will be necessary to continue the registration. The "Country" field is determined automatically by the registration service, but if the system made a mistake, you should select your country of residence from the drop-down list.
A prerequisite for continuing registration is to check the box next to the words "I accept the Terms of Use and ...". If this is not done, the registration process will not continue. Regarding the words "I want to see what is recommended ...", it is not necessary to put a tick in front of them. Next, click the blue "Continue" button.

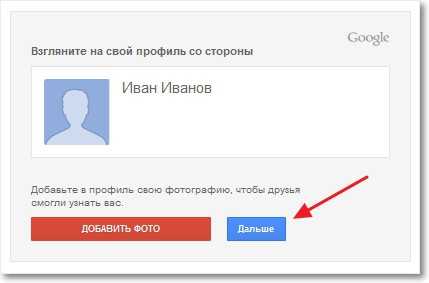
If all the data is entered correctly, the system will open the next page, which will prompt the user to add their photo (there are two options for adding a photo: from a hard drive, from a webcam). Adding a photo is optional, you can just click the "Next" button.

The new page that loads will contain congratulations on completing the registration, as well as an email address that is best to save. You need to save in a safe place not only the address of the received mailbox, but also the password so that in the future there are no problems with logging in. This completes the Google account registration.

Working with a mailbox
To go to the mailbox, you must either click on the blue button "Go to Gmail", or click on the inscription "Mail", which is located at the very top bar of the page. A page with incoming letters will open in front of the user, and a window will appear asking you to transfer messages from the old mailbox. In order to do this, you need to click the "Import mail and contacts" button, and in the page that opens, enter the address of the old mailbox and the password for it. This data will not be used by Google, it is only needed to transfer all correspondence from one mailbox to Gmail.

Create and send a message
On the left panel of the mailbox, the first button is "Write". It is using it, you can create and send a letter. When you click on this button, a pop-up window will appear at the bottom right, in which you need to specify the recipient's email address in the first field, then write the subject and text of the letter. On the bottom bar (to the right of the blue Submit button) is the Formatting Options button. By clicking this button, you can select the size, color of the text, its alignment, etc.
To the right of this button is the "Attach Files" button. By clicking on it, you can see an auxiliary bar that appears, with which, using the "Browse" button, you can select any file from your computer's hard drive and attach it as an attachment to the letter. When the message is created, and the necessary files are added, you can click the blue "Submit" button. In a few moments, the letter will be delivered to the recipient.

Working with incoming mail
In order to view an incoming letter, you just need to left-click on the line with the letter. The message will open right there. Working with an open message is quite simple. It is enough just to use the horizontal strip with buttons, which is located immediately above the header of the open letter. These buttons allow you to add a message to the archive for further work with it, send the letter to spam (junk mail storage), delete it, move it to another folder, mark it as important or read, etc.

Mailbox Left Pane Overview
To return to the list of inboxes, just use the "Back to inbox" button or simply click on the tab in the left panel of the "Inbox". By clicking on the triangle to the right of the Inbox button, the user can change the style of the folder. You can choose the most convenient location of messages in the folder: "Important first", "Started first", etc. If the user has marked some messages, they can be found in the next two folders on the left panel ("Starred" and "Important"). All sent messages are automatically saved by the system in the "Sent Items" folder, and just below it is the "Drafts" folder, which contains messages that have not been saved by the user.
By using the "More" button below, the user has access to the "All Mail", "Spam" and "Trash" folders. By clicking on "All mail", you can see a list of all letters (accepted, sent, drafts, spam, etc.), by going to the "Spam" folder, the user will get acquainted with the letters that the system considered to be of no value (advertising, mailings with notifications about shares). "Basket" contains all correspondence deleted by the user. If the user does not need all or some of the messages in the "Trash", he can easily delete them, and if necessary, restore deleted messages.
Gmail is easy to work with. A lot of users use it as the main one. With a significant number of functions, Google's email inbox makes it easy to perform all the necessary operations with letters. It is also important that there is no need to take care of the security of the box, and it is easy for even a not very experienced user to deal with its work.
Useful video
Prostobank TV talks about all the possible ways to withdraw funds from an electronic wallet. Subscribe to our Youtube channel for a new helpful video about personal and business finance.
About, how to create an email(E-mail). Why did I decide to write this article? I will not tell you what E-mail is and why it is needed, those days have already passed. It seems that everything is very simple, I went in and registered and that's it, but it wasn't there. They ask me a lot how to start an e-mail, tell me what to click where.
To be honest, such questions make me a little angry, but is it really so difficult? I have friends who do not have e-mail and thus cannot register on many sites (Vadim, hello! :)) But creating mail is difficult, and even too lazy. So I decided to tell you step by step and with pictures how to create an email on https://mail.google.com.
I use mail from both Yandex and Google, but to be honest, I like email from Google more and its interface is more convenient. So let's look at the example of mail from Google, it's the same gmail .Follow the link and pay attention to the right side of the page. As you can see, there is a form in which you can enter your password with a login and enter your email box. But that's Later, we don't have an email yet and we need to create one. To do this, click on the red button in the upper right corner “Create an account”.
After clicking on this button, we get to a page in which we just need to remember the registration form. For example, I will remember, and you enter your real data.
Well, everything seems clear to me here. Where “Come up with a username” think up a name for yourself in English letters, you can also numbers. If such an address already exists, the system will warn you about it. As for the password, it is worth coming up with a long and complex one. I advise you to write it down somewhere, so as not to forget. By the way, you don't have to enter your phone number. When you remember everything correctly, click "Next".
A new page will appear with some helpful text and an offer to upload a photo for your profile. But this is not required, so feel free to click “Next” .
Everything is ready! The service will congratulate us on registration and offer to go to your mailbox. Click “Go to Gmail Service”.

After clicking on this blue button, you will be taken to your personal Gmail account, where you can read the letters that you receive and send email. As I said, everything is very simple!
 As you can see, the interface itself is also very simple. You will already have 4 incoming emails, these are emails from Google. To read a letter, just click on it, and to write a letter, click "Write".
How to sign in to email from Google?
If you close the page with your mail, then you will most likely need to enter it again. To do this, go to the same address and in the form about which I already wrote, enter your aileron mail and password, which we indicated during registration.

You can also tick "Remain in the system" so that you don't have to enter your password again. Well, it remains only to click on the "Login" button.
All! Now you are a happy owner of e-mail, you can receive and send letters as much as you want. Good luck!
More on the site:
How to create an e-mail (E-mail)? On the example of Gmail. updated: September 12, 2012 by: admin
Today, email is an integral part of any communication. It is very convenient to use, because you can instantly send a file of almost any format to your interlocutor or receive an incoming one. It is very important to create an email address and that it is easy to use and reliable. Therefore, this article will help you learn about gmail.com mail.
Using this mailbox is easy. In order to enter the server, you must register your own Google account. In this article, we will describe how to log into a mailbox. In addition, we will tell you how to configure and edit it in the future, as well as how to secure your gmail mail.
In the event that you have not yet created your own account on the Google server, proceed to register it. Then come back to this page to learn how to properly log in and set up your gmail email address.
Reasons for testing difficulties when entering mail
Following the creation of your own account, the server will automatically authorize you. That is, you will immediately enter the saved gmail mailbox. However, in order to use it successfully, you will have to enter and exit your own box every time in order to secure your correspondence. It is especially important to log in and out of the "mail" if you entered it not from your computer (from your work, for example).
Since there are people who are faced with the problem of logging into the mailbox from Google, we were interested in what exactly this is connected with. We tried a variety of computer equipment, and also worked with completely different software. But we did not have to find out any difficulties: we entered the mail from any device in the standard way. Based on this experience, we came to the conclusion that, perhaps, some steps are not reproduced correctly.
Sometimes incoming users don't separate gmail.com and gmail.ru emails. The first is from Google, the second is from a completely different server. Therefore, you need to make sure that you are trying to enter the saved box from Google. In addition, sometimes the mailbox interface changes, which also causes some difficulties when you try to log in. But in fact, you need to abstract from the appearance of the service, since everything happens in a standard way, despite the updated interface.
Gmail mailbox: how to log in and log out?
If you want to use mail and log into your gmail inbox, do the following:


If you need to log out of gmail, look at the top right corner of the page. You will see your own photo there. Click on it and click on the "Exit" menu that appears.

Google email settings
Today, there are very convenient functions in the mail (interface, way of working), which you will definitely want to change at your discretion. For example, you have the option to create a permanent signature, change the appearance of labels, or choose a different theme for the appearance of mail.
In order to change the gmail settings, you must do the following: pay attention to the upper right corner of the page. There you will see a gear icon. Click on it and click "Settings". This is where you have the opportunity to transform and change the category you want.


Connecting contacts
Mail from Google server contains a very handy feature. It allows you to create, save and enter the necessary contacts in a specially created address book. This feature gives you the opportunity not to litter your head with all the email addresses of your interlocutors. In addition, it is possible to enter and enter additional information into the contact. For example, mobile number, date of birth, address of residence.
If you decide to add a contact:


To log in and change contact details:
- On the line of the left settings menu, click "My Contacts".
- Select the contact you want to edit.
- After that, you have the option to create any changes to the contact information.

It is also worth noting that in the case when you send a letter to an email address unknown to the system, the gmail.com server can automatically put the corresponding address in your contacts. By selecting "Contacts" from the menu, you can easily add changes to the information about this contact.
Migrate email and contacts
Maybe you have a ready-made list of contacts in another email box? But mechanically importing each individual contact takes too long? Then this setting is for you. Mail from the Google server contains a feature that allows you to transfer your contact list from almost any other mailbox. In addition, it gives you the ability to import all your correspondence.
It is convenient to transfer letters and contacts from Yandex, Mail.ru services. But it is also possible to do this from other emails. For this:
- Click the gear icon located in the top right corner of the gmail page. You need to go and click "Settings".
- Select the "Accounts" category. Check mail from other accounts (using POP3). By following the instructional information that appears on the setup screen, you can easily transfer contacts or emails.

gmail email security
If you think that you are an ordinary person, a simple user and no one wants to enter your mail, no one will encroach, then you are very mistaken. Today, there are a huge number of attackers who hack mail for personal gain. Undoubtedly, if your mail is used exclusively for everyday correspondence with friends, then there is nothing to worry about. But in the event that the mailbox is linked to other important accounts, especially financial ones (for example, WebMoney), you must secure your own mailbox and funds so that no one can enter it. Many servers make it possible to link important personal pages with a mobile phone number. However, most of them continue to sync with the email address.
In the event that you value outgoing information that is synchronized with your "mail" and want to prevent gmail from being hacked, you must properly configure your gmail.com mailbox. Enter "Settings" (top right corner after clicking the gear):
- First, make sure "Use http only" is selected in the General panel. If there is no outgoing checkmark, then you need to put it. This is necessary in order for the data to be sent in encrypted form. In the event that the checkbox is not checked, and you are using mail in a public place with free access to a Wi-Fi network, there is a risk that attackers will intercept information in unencrypted form and be able to enter email;
- those using email clients will be forced to change their connection type settings from simple to secure (TLS). On the connection settings panel, you need to click on a secure connection type, and also change the mail receiving port (POP) from 110 to 995, the sending port (SMTP) from 25 to 465. Usually, the ports change on their own after clicking on the TLS connection;
- for those who do not use mail programs, it is worth disabling this feature: go to the "Forwarders and POP / IMAP" panel to check the "Disable POP" and "Disable IMAP" checkboxes;
- you need to enable dual authentication. Its presence serves as a distinction between mail from Google and mailboxes from other servers. After establishing dual authorization, in order to enter the mailbox, you will need to enter a password sent as an SMS message to your mobile phone number. This greatly enhances the security of your email.
How do I turn on 2-Step Email Verification?
For this:
- you need to enter the "Accounts and Import" panel, click "Change password recovery options".
- on the outgoing page, enter your personal mobile number. In addition, there is an opportunity to specify another email, through which you can recover a forgotten password (linking another email is also not entirely safe, so I recommend not linking it);
- Click on "Other Google Account Settings"
- on the page that appears, in the "Security" branch, click "Change" two-step verification. In the new window, select the "Proceed to setup" option;
- Enter your current mobile number in the initial field. It will receive SMS messages from Google with confirmation codes. In the event that the phone number is already synchronized with the account, skip this field, since the number will already be there;
- select the Trusted PC option. It allows you to enter the confirmation code from the selected computer only once every 30 days.
So you've enabled 2-Step Verification!
Application passwords
Following the establishment of 2-Step Verification, any applications using your google page username and password will stop working. An error will appear in the form of a message: "Invalid username or password." For them to work as before, you need to generate and change application passwords. To do this and have the passwords saved, do the following (after two-step authentication):
- click "Create passwords" or click on the link: https://accounts.google.com/IssuedAuthSubTokens ;
- on the page, enter the name you like for the password;
- click "Create password". The creation wizard will give you a password. It must be saved by you, as it will no longer be found. It is issued only once. Naturally, it will later be possible to change it to a personal one. His name doesn't matter. It will work with any application;
- then enter this password into applications, replacing it with the password name of your Google Page.
Use with pleasure!
Gmail is a free and convenient email service from Google. The best proof of the quality of the Gmail service is the number of users, which has already exceeded 400 million. Security, accessibility and convenience are characteristic features of all services from Google. A step by step guide on how to create a mailbox on Gmail.com will help you set up your email quickly and easily.
Step 1. To get started, open www.google.ru in your computer's browser. The example uses Google Chrome, but the process for creating an email is similar for other Internet browsers:

Step 2. On the Google site page in the upper right corner there is a link " Mail", which you need to go to:

Step 3. A new page will open where you can see all the benefits of using Gmail. To proceed to the direct creation of an electronic mailbox, click the " Create an account» in the middle or at the top of the window:

Step 4. Filling in the data is the most important step in creating an email. Please note that a Gmail account can also be used for other Google services: social networks, maps, multimedia:

Step 5. Data entry window:
The first fields to fill in are the first and last name. You can enter data in Latin or Russian. Both fields are required, but they are editable even after the email has been created.
Next, you need to come up with a username that will be displayed before the “@gmail.com” combination. The mailbox name can contain only dots, numbers and latin letters. Because Google email is so popular, you may not be able to pick up a free username right away. If the option you selected is busy, you will see a warning message about it:

The password from your future mailbox must consist of at least eight characters. For reliability, it is better to include numbers and uppercase letters in it. For security reasons, do not use passwords that you have already assigned to other services, programs or social networks.
In field " Confirm the password» you need to re-enter the password you specified. Please note that passwords must be completely identical.
Field " Date of Birth» is mandatory. In the column " Floor» you can choose the option « not specified».
An alternate email address and phone number is optional. However, if you forget your mailbox password, it will be easier to recover it with additional data.
To verify that you are not a robot, enter the combination of numbers shown in the picture.
Be sure to check the box to agree to Google's email terms of use and privacy policy after reading them:

