Types of plaster for walls: what to choose
What kind of plaster is best for plastering walls?
For many, plaster is a building material, which includes sand and cement, which serves to fill cracks and bumps, level walls when pasting wallpaper, painting and other types of coatings. But when added to the composition of the dye, it can become an attractive finish to any room. The article will tell you which plaster to choose for the walls.
The type of plaster is:
- Wet or monolithic, subdivided into:
- ordinary;
- decorative;
- special.
- Dry.
The material for the base of the mixture can be:
- Cement. It is used for decoration outside the house and for interior coating. The composition is quite durable, they are given a different surface shape. A cement-based dry mix can be used for surfaces used at high room humidity or temperature changes.
Tip: On highly absorbent surfaces using foam concrete, sand-lime bricks and similar materials, the substrate should be primed before applying cement plaster.
With proper preparation of the solution, it is possible to avoid the appearance of cracks. After laying, work can be continued only after 10 days. The same type is used for wall plastering under tiles.
- Lime. The mixture is used for finishing work only indoors - it is afraid of moisture from rains. The material is environmentally friendly, has a low cost, easy to apply to the wall. The downside is it's short lived.
- Gypsum. It has good heat and sound insulation properties. The main advantage of the gypsum-based material is that it is easy to apply (see). It does not require mixing, it is enough to dilute it with water in the right proportions. Gypsum is a highly plastic material, it is well placed on various bases. After plastering, cracks do not appear on the surface. Hardens and dries within a few hours.
Negative features include:
- no resistance to moisture;
- poorly resistant to mechanical damage.
How to choose the right plaster
Such a coating protects any base from atmospheric influences, with its help corners, slopes and walls can be well aligned, they are ready for wallpapering, painting, laying tiles. The result of the work depends on which plaster to choose for the walls. Before choosing plaster for walls, you should get acquainted with its types and features.
The material looks like:
- Structural. It is intended for creation of original furrows. After treatment with such a composition, the surface acquires a heterogeneous structure, a granular appearance. The basis of the material is quartz granules. It can be coarse and fine-grained. In this case, the dimensions of the structural grain can vary from 0.6 to 3.1 millimeters.
- Textured. It is a mineral, structural plaster, reminiscent of white dough in its raw state, which after application can be tinted or coated with paint. The main advantage is plasticity, which allows you to create a variety of effects, such as bas-relief, panels. In this case, volumetric plaster on the wall is obtained.
![]()
The classic version of textured plaster is its imitation for laying stone, bas-reliefs with three-dimensional drawings, and tree bark. After covering the wall, the material acquires the texture of the filler, looks original, and can hide surface defects.
- "Venetian". This type of plaster is versatile:
- imitates valuable types of stone;
- designers use it to create drawings and other decor on the walls. When performing work, the application must be carried out in several layers, after which grouting and grinding should be done.
The material has excellent decorative characteristics, is easy to clean, repels dirt, which is especially important when the finished wall is waxed or a protective varnish is applied to it, this coating additionally acquires water-repellent properties and uniform gloss.
- Mineral. The crumb is the basis of the solution. When decorating the room is used quite often. In addition, it is a durable, environmentally friendly material, which has a relatively low price.
Among the features of plaster can be identified:
- Only manually plaster should be applied, which has a large filler.
- Liquid materials should not be diluted with water.
- Water-based plaster has less toxicity, but it is susceptible to negative environmental influences.
- It is difficult to manually apply marble chips.
- Material with high adhesion readings may not adhere to the surface due to loss of strength.
How surfaces are plastered
Do-it-yourself plastering of walls is a process that is quite complex in technology, which is performed with some skills. The quality and duration of preservation of the resulting coating directly depends on the correct observance of the technology for performing wall plastering.
The wall plastering instruction indicates:
- Works must be carried out at a base temperature ranging from (+6 °С) to (+31 ° С), and humidity up to 60%, sometimes the conditions may be slightly different.
- Carefully follow the instructions of the manufacturer of the solution.
- After each stage of work, all tools used must be thoroughly washed and cleaned of the solution.
- Each layer after application must be sure to dry well before applying the next.
Tip: The degree of readiness can be determined simply: you should press your finger on the plastered surface, if the material does not crumble, it does not sag, you can apply the next layer. If the previous layer is already dry, it must be moistened with water.
Methods for different mixtures differ from each other.
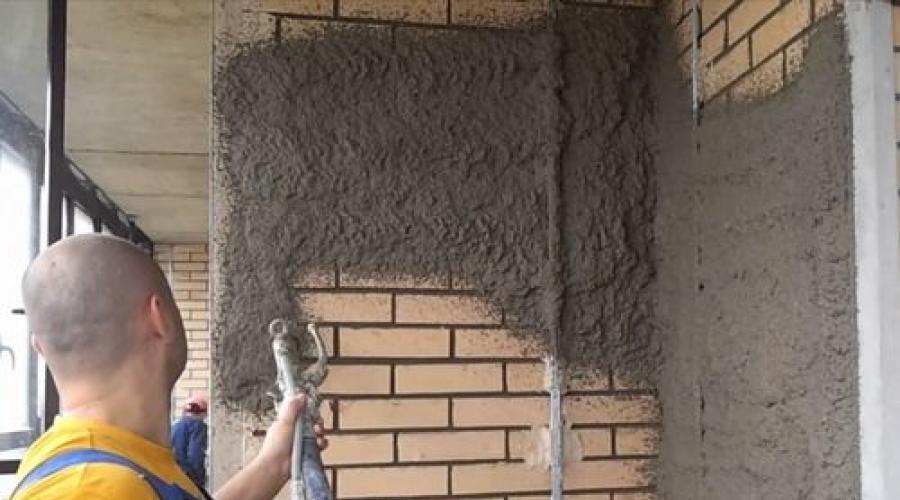
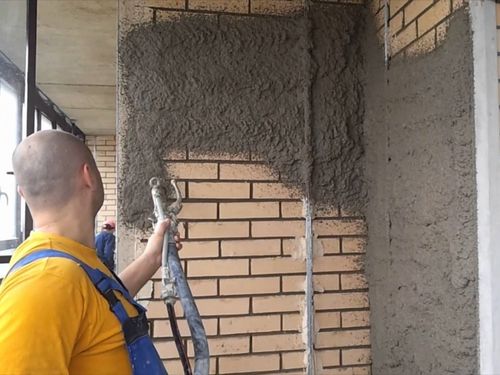
The process of plastering walls with cement-sand mortar includes three stages:
- Spray. In this case, the first coating layer has a thickness of 6 to 10 millimeters:
- on stone surfaces - 5 millimeters;
- on walls made of concrete and brick - 9 millimeters, while plastering is carried out on a grid, and the mixed solution has the consistency of sour cream.
The spray is applied only by throwing the solution with a falcon and a trowel onto the surface. The right amount of plaster mixture is placed on the falcon, using a trowel. In this case:
- the falcon should rest with one end on the container with the solution, and with the other end rise at an angle of about 30 ° above the container and the solution is quickly drawn up with the tool;
- when applying the composition to the wall, the falcon leans towards the wall;
- from the falcon, the solution is collected with the right edge, you can use the end of the trowel, and then pounce on the surface to be treated;
- the wall is covered with a mixture at different levels, starting from left to right, and then from right to left;
- after the application of the plaster, the surface should not be leveled.
- Priming. This is the next layer of plaster, the mixture has a pasty consistency. Application is carried out from one to several steps until the surface becomes absolutely even. The plaster mortar is applied in one go up to 10 millimeters thick.
The soil is thrown or spread. The plaster is smeared with a falcon or trowel. At the first, a solution is collected and substituted against the wall so that the top of the falcon is 50-100 millimeters behind the surface of the wall, and the bottom is pressed against it to the thickness of the entire applied layer by the end of the trowel.
As the falcon moves, the solution covers the surface, and the raised edge of the shield presses against it. When using a trowel, the mixture is placed on it in a bed, the tool is attached to the wall and is guided along it from the bottom up. The trowel should be with a web width of 120 to 200 millimeters, which will allow it to hold more of the mixture. After its application in one layer, the surface is leveled with a trowel.
The primer on the surface can be applied in several layers, their number depends on the desired thickness of the plaster layer and on the thickness of the beacons used. The final layer of the coating is leveled by the rule, which should move in sharp zigzag movements from the bottom up.
Leveling with the rule should be repeated several times, carefully covering all the depressions to get a smooth, rough surface. The layer of plaster must be placed with the protruding elements of the lighthouses on the same level.
- Nakryvka. The thickness of the third layer of plaster coating is from 2 to 4 millimeters, kneading the composition to the consistency of sour cream.
The cover is applied to the surface. Then it is carefully leveled with a trowel or a rule, while moving the tool from the bottom up, the trajectory is wavy.
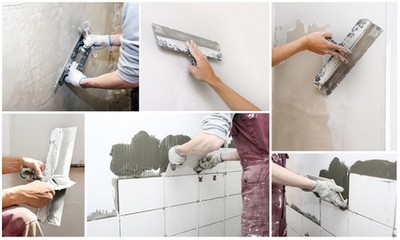
The wall after applying the plaster should have a roughness and serve as the basis for the next layers of putty. This coating eliminates small differences, up to five millimeters, on the wall. The use of a small fraction of a filler in it makes it possible to obtain a finished surface that is smooth, it is easy to grind it with sandpaper.
The process of preparing and applying putty is similar to the process of preparing and coating the plaster mixture. Fixing beacons to the surface, in this case, is not required. If paint is applied to the wall, it should be additionally covered with a thin layer, up to two millimeters, with finishing putty.
How to plaster a wall with dry gypsum
Compared with cement-sand mortar, gypsum plaster has several advantages:
- It is more plastic.
- Simply applied.
- Dries quickly.
- After applying the coating of gypsum, cracks do not form on the surface.
Tip: Dry gypsum mix should be kneaded with cold water. Hot water contributes to the rapid setting of the solution.
Ready plaster for walls is mixed with an electric drill with a mixer. The mixture is prepared in a small container up to 15 liters, with the work of one person, so that it can be worked out until it seizes and becomes unusable in the future. The setting time of a gypsum mortar is on average 20 to 60 minutes, depending on the manufacturer of the dry mix.
When applying gypsum plaster, a wide spatula is used, movements are performed in the direction from the bottom up. Application of gypsum mortar can be done by throwing. In one step, the coating is applied to the area between two beacons up to 100 centimeters high, then you can start stretching.
For this:
- An aluminum rule is used, which has beveled edges, its application provides good results.
- The rule is pressed quite tightly against the beacon guides.
- The tool moves from bottom to top.
- Excess solution is removed and returned to the solution container to be reused.
Tip: One alignment usually does not give a satisfactory result. Defects on the surface after coating should be filled with mortar, and the drawing should be repeated again.
- Plastering of another area of the surface is carried out according to the previously described technology.
- Finished sections are periodically stretched again from the bottom up. This is due to the fact that the gypsum mortar is a rather plastic material, which can simply float under its own weight. This is due to the coating of the material with too thick a layer of plaster at a time, it can reach 70 millimeters. In case of large defects in the base, it is recommended to apply the coating in several layers, after the previous application has dried.
Tip: Surfaces plastered with gypsum mortar can be puttied or smoothed with the same composition of the mixture.
- Approximately 50 minutes after stretching, you can start smoothing the plaster layer. According to the technology of the process, smoothing from putty is no different.
- A small amount of the solution is diluted to the composition of liquid sour cream.
- The mixture is applied to not completely dried plaster.
- Rubbed with a wide spatula.
- The operation, if necessary, is repeated several times.
- Smoothing helps to completely eliminate the defects that may appear when the plaster is pulled out.
- At the end of this operation, the surface is slightly hardened, acquires a smooth and glossy appearance.
To save time, if funds are available, you can use a wall plaster gun.
Tool Benefits:
- A sufficiently large pressure is created inside the gun, which makes it possible to apply plaster on the walls in an even layer. It dries quickly after that, and subsequently does not exfoliate.
- When using a plaster gun, due to the uniformity of the layer, the plaster lasts much longer.
- Coating with a gun allows you to save money, which is associated with the speed of applying the solution, and the process does not take much time.
The surface plastering gun is very easy to use. But there are some recommendations:
- Before starting work, you need to install beacons. How to do this can be seen in the photo.
- Do not do a large amount of kneading at once. Once any mortar begins to harden, it is better to throw it away than to mix everything up again and reuse it, which will increase costs.
- The distance between the cartridge pistol and the surface of the wall should be approximately thirty centimeters.
Subject to the technology and rules for performing surface plastering, it is possible to obtain a high-quality and sufficiently durable coating, regardless of the plaster mixture used. Details about the types of plaster and the process of applying it will show the video in this article.