The device and purpose of the cornice strip for corrugated board
In addition to the roofing itself, various additional elements are used in the arrangement of the roof, with the help of which the joints of the roof with vertical surfaces, the edges of the roof, its breaks, valleys, cornice overhangs, ebbs, etc. are formed. All these additional details allow you to increase the functionality of the roof, protect it from the negative effects of external factors and give the roof a complete attractive look. One of these elements is a cornice strip for corrugated board.
The purpose of the additional bar
The cornice element is needed to protect the roof from precipitation and insects. In addition, this detail is important for the aesthetic appeal of the roof and the integrity of the image. The bar is installed after the crate is completed.
The main functions of this element are as follows:
- During a heavy downpour and melting snow, the cornice bar reliably protects the frontal board from getting wet.
- The cornice additional part is needed to protect the under-roof space and the roof truss system from moisture.
- Without this addition, the roof would look unfinished, unattractive elements of the truss system and waterproofing would be visible. That is why it can be argued that the eaves plank is also needed from an aesthetic point of view.
Device

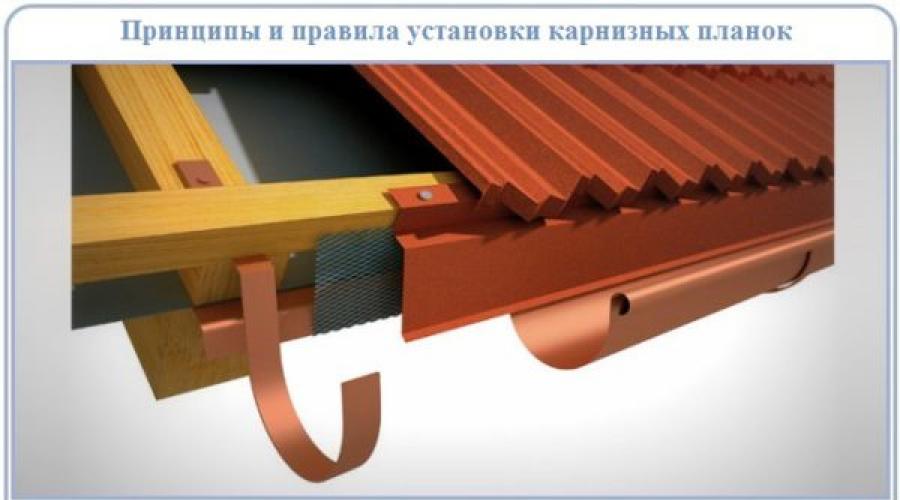
Eaves strips for corrugated board allow you to form a durable, protected roof overhang with an anti-corrosion coating. This part is attached to the frontal and eaves board and reliably protects them from moisture. Only after that you can proceed with the installation of roofing from corrugated board.
In fact, these are long strips with a longitudinal fold, which are needed to protect the under-roof space. They are attached to the release of the crate or board, reinforcing the edge of the crate. These strips cover the end overhang of the roof. The length of one element is 500-600 mm.
Important: these extensions are made of the same steel with a galvanized coating (thickness 0.04-0.05 cm) as the corrugated board itself, and have the same polymeric anti-corrosion protective layer. The color of the strip is selected according to the color of the metal profile.
The sectional shape of this part can be of two types:
- direct products are ordinary planks in the form of a corner with rolled edges of the shelves;
- curly elements can have several additional stiffeners (due to this, the roof edging will be reinforced, and the decorative quality of the element will increase).
If the project provides for the installation of gutters, then the additional strips are attached after their installation is completed. Before this element is attached, the end of the cornice overhang must be covered with an ordinary mosquito net or a special ventilated tape. The end dobors are fastened with self-tapping screws, matched to the tone of the parts and coating.
Necessary tools and materials

Installation of the eaves extension is carried out using the following tools, as well as the necessary materials:
- galvanized nails or self-tapping screws;
- a hammer;
- screwdriver;
- pencil;
- roulette;
- construction level;
- grinder or scissors for cutting metal.
Attention! Since all work is carried out at height, it is necessary to use special equipment for roofers and tool bags.
Mounting technology

Installation of the cornice strip is carried out in the following sequence:
- If the project provides for the organization of a roof drainage system, then these works are carried out before the start of fastening the cornice strip. To do this, hooks or brackets of the roof gutter system are attached to the rafter legs or cornice boards. Gutters will subsequently be laid in these elements. If the pitch of the rafters is the same, then the hooks or brackets can be attached to the rafter legs or filly.
- In order for water from the roof to flow directly into the gutter, the hooks must be installed a couple of centimeters below the slope surface. To ensure the slope of the gutters necessary for the flow of water, hooks or brackets are mounted with a gradual decrease towards the downpipe.
- After that, you can proceed to the installation of the selected bar. It is nailed to the frontal board over the mounts of the drainage system. Self-tapping screws are screwed in a checkerboard pattern with a step of approximately 300-400 mm.
- All planks are attached with an overlap of a couple of centimeters. It is strictly forbidden to fasten the cornice strips end-to-end or with a distance between adjacent elements. The last plank in the row is adjusted to the length of the slope and cut off.
- After installing the cornice strips, they begin to install the wind board on the gable roof overhang. And only after the completion of these works, you can proceed with the installation of the selected roofing.
In addition to the eaves and wind strips, there are other important additional elements of roofs made of metal profiles, the installation of which should not be neglected. All these details are needed not only for the beauty of the roof, but also for the durability of the structure, as well as for protection from negative weather effects.