The device of a gable roof with hanging rafters.
In previous articles that described the roof structure, we already said that the hanging rafters rest on the Mauerlat with their lower end, and the upper ends of adjacent rafters abut (either directly or through a ridge board) against each other. In the most simplified version, this is shown in Fig. 1:

Picture 1
I think it is obvious to everyone that with such an arrangement, there are bursting loads on the walls. To reduce them, puffs are added to the truss truss. But let's talk about everything in order.
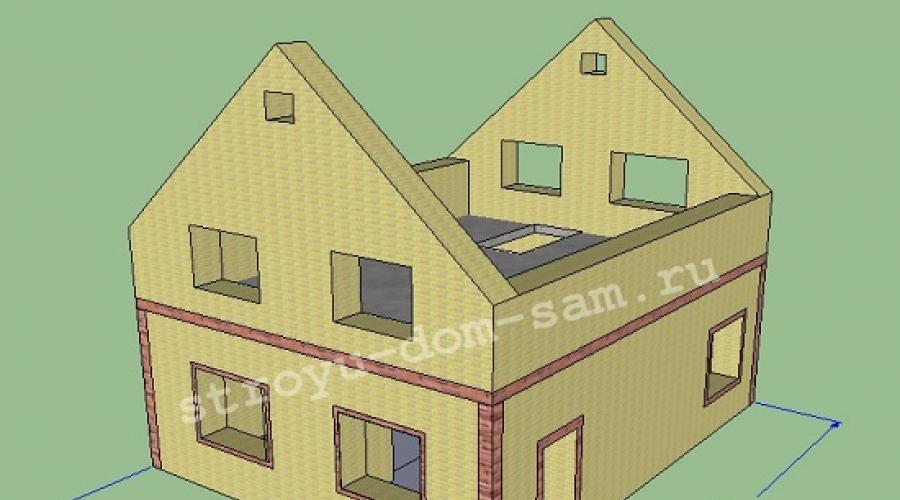
As an example, let's take a house with a semi-attic in the Volgograd region. The sum of snow and wind loads is 155 kg/m 2 . The dimensions of the house box are 8x10 meters. The thickness of the walls is 50 cm. The angle of inclination of the slopes is 40 ° (see Fig. 2):
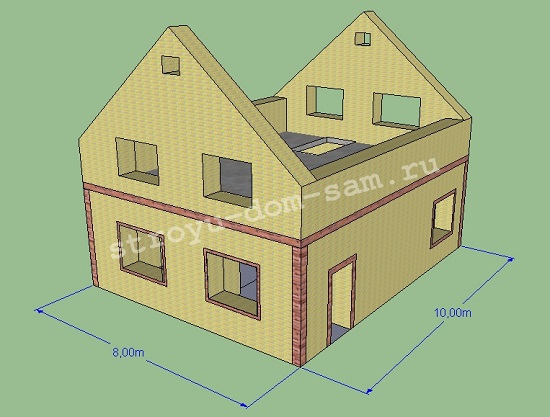
Figure 2
STEP 1: We install . In this design, in addition to the usual loads, bursting forces will act on it, tending to move it off the wall. For more reliable fastening, you can add more metal mounting plates to the anchor bolts (or studs) (see Fig. 3). The plates can be fixed to the wall, for example, with frame anchors, and to the Mauerlat, you can use nails, self-tapping screws, and capercaillie.

Figure 3
STEP 2: We determine the required section of the rafters. We make the calculation in the "Arch" tab (see Fig. 4):
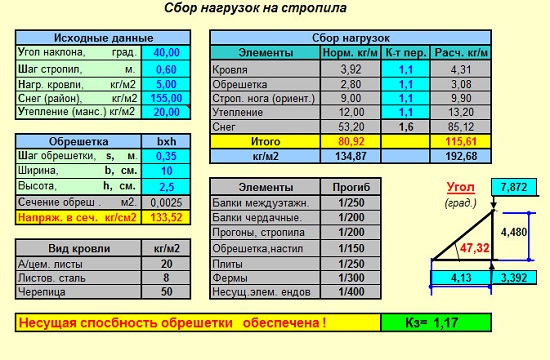
![]()
Figure 4
The cross section of the rafters is taken 50x200 mm in increments of 60 cm.
A question may immediately arise here. Where do we get the distance from the ridge to the puff (crossbar). We have it equal to 2 meters. Earlier on the site, we already said that before proceeding with the construction of the roof, we need to make a drawing of it on paper, be sure to scale (in all proportions). If you know how, you can draw on the computer. Further, according to this drawing, we determine all the dimensions and angles of interest to us.
Puffs are installed between hanging rafters to reduce bursting loads on the walls. The lower the puff, the more useful it is. Those. the less bursting load falls on the walls. But since in our example, the puffs still play the role of the ceiling beams of the attic floor, then we determine the height of their location based on the height of the ceilings we need. I took this height of 2.5 meters (see Fig. 5):

Figure 5
STEP 3: We make a template for the lower rafter cut. To do this, we take a piece of board of the section we need about a meter long, apply it to the Mauerlat at our angle of inclination of the slopes of 40 ° (orient yourself along the pediment) and make the markup, as shown in Figure 6:

Figure 6
The vertical and horizontal lines we need (shown in blue) are drawn using a level. Depth washed down 5 cm.
So let's make a template.
STEP 4: We install a ridge board, through which all the rafters will be interconnected. First you need to outline the place of its installation.
We take the template made earlier and apply it to the Mauerlat. We are interested in the size shown in Figure 7 (here it is 18 cm):
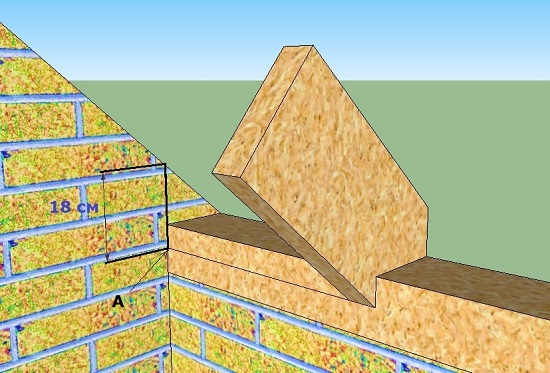
Figure 7
Let's call the lower point on the Mauerlat point "A".
We transfer the resulting size to the top of the pediment, make markings in accordance with Figure 8:
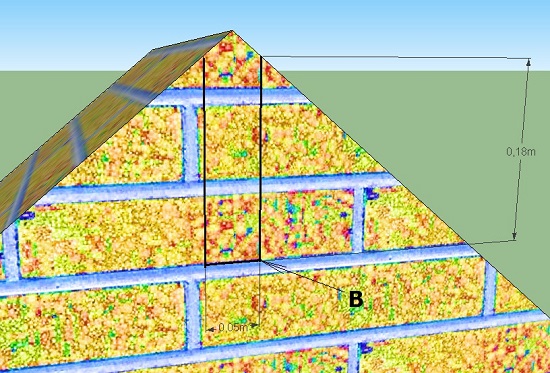
Figure 8
Let's designate the lower right corner as point "B". Now we can measure the distance from the attic floor to point B (the length of the temporary posts).
We install strictly vertically temporary racks from a 50x200 board and put a ridge board of the same section on them. Under the racks for their fixation, you can put a board fixed with simple dowel nails to the floor slabs (see Fig. 9). It is not necessary to fasten strongly, then we will remove it. The distance between the racks is not more than 3 meters.

Figure 9
We fasten the ridge board to the gables with metal brackets. The stability of the racks is provided by jibs.
Perhaps you could see somewhere how hanging rafters are installed without a ridge board (see picture on the left). This method is very familiar to me, we used to do this too.
But when we tried the option with a ridge board, we settled on it. Despite the fact that it takes some time to install the racks and the ridge board, the subsequent installation of the rafters is much more convenient and faster. In the end, you win in time. In addition, the design is more stable and more geometrically even.
STEP 5: We manufacture and install rafters.
We do the rafter like this: we take a board of the desired length, apply a template to one end, mark it out and make the bottom washed down. Then we measure the distance between points "A" and "B" with a tape measure (see Fig. 7-8). We transfer this size to our workpiece and make the top washed down. The angle we need for the top notch is on our template (see Fig. 10). We have it equal to 90 ° + 40 ° = 130 °
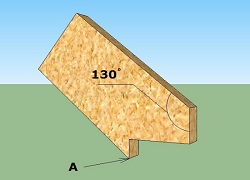
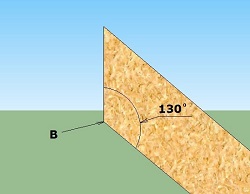
Figure 10
Thus, we put all the rafters (see Fig. 11)

Figure 11
The connection of the rafters with the Mauerlat here does not look the same as it was, for example, I think you have already understood that this is due to the presence of bursting loads, which were not in that version. However, in future articles you will see that this option is just one of the possible, and not the only correct one. We will use more familiar to us washed down. The main thing is to securely fasten the rafters to the Mauerlat.
At the top, the rafters will protrude beyond the ridge board. You can drive small bars between them, or you can leave it as is. This, in principle, does not play any role (see Fig. 12):

Figure 12
We fasten the rafters to the ridge with nails or self-tapping screws. It is not necessary to install any additional fasteners here. In general, in this design, thanks to the lower gash, the rafters are obtained, as it were, sandwiched between the Mauerlat and the ridge board.
STEP 6: Installing braces.
We make them from boards of the same section as the rafters. There is no need to make any cuts and cuts here. We make puffs superimposed on the rafters. We fasten them with several nails and tighten them with a threaded stud with a diameter of 12-14 mm (see Fig. 13):
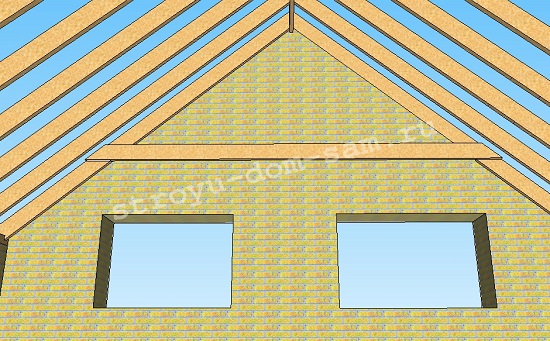
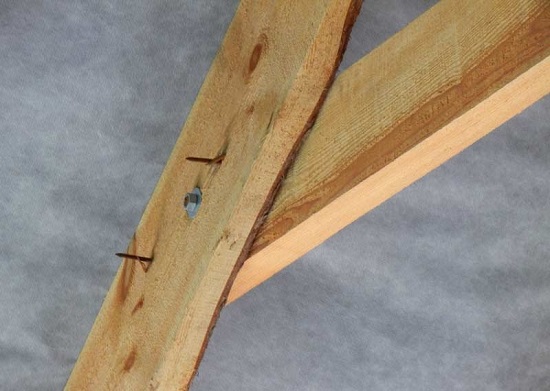
Figure 13
Thus, we install all the puffs and remove our temporary racks on which the ridge board was placed:

Figure 14
Now you can guess the purpose of the small windows in the upper part of the pediment. Through them, ventilation of the insulation will be carried out, which will lie on the ceiling of the half-attic floor (between puffs).
STEP 7: We attach the filly of the cornice overhang to the lower ends of the rafters (see Fig. 15). We make them from boards with a section of 50x100 mm. We make the length of the filly such that we get a cornice overhang of the width we need (40-50 cm), and that it overlaps the rafter by at least 50 cm. We fasten the filly with several nails and tighten it with 2 threaded studs. In the middle part, for additional emphasis on the wall, you can fasten a small bar to the filly with nails or self-tapping screws.

Figure 15
Please note that at the junction of the filly of the overhang with the Mauerlat, we do not drink on it, because. this will reduce it and without that not a large cross section. Here we first make a small cut in the Mauerlat itself (see Fig. 16):

Figure 16
To make the cornice even, use a lace. First put the extreme fillies, then pull the lace between them and put all the rest. In Figure 17 the shoelace is shown in blue.

Figure 17
Step 8: The following steps are already known to us from previous articles. We put the fillies on the pediment and fasten the wind boards (see Fig. 18):
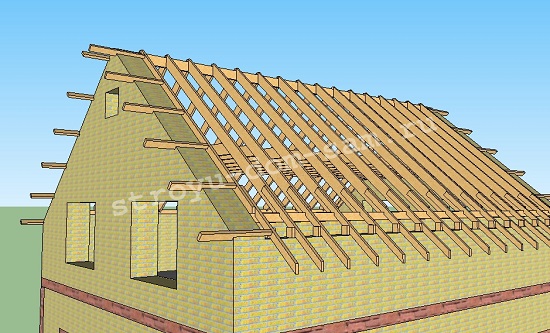

Figure 18
STEP 9: Now we can leave the cornices in the form in which they are.
Let's see another version of the eaves overhangs (see Fig. 19):
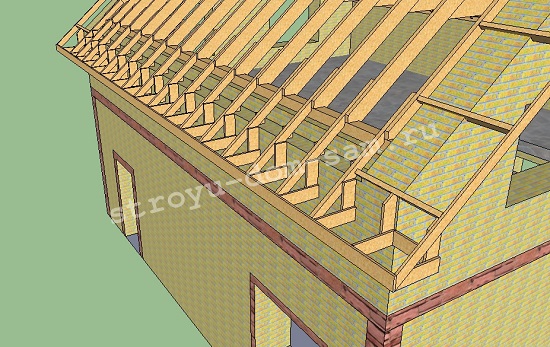
Figure 19
Such "earrings" are made from inch boards 10-15 cm wide. We fasten them with self-tapping screws.
Thus, now it remains for us to hem the siding belts to the bottom of the cornices; having fixed a protective film on the rafters, make a counter-lattice and a crate; cover the roof with roofing material. We have covered these steps in previous articles. I think it makes no sense to repeat here and when considering other roof structures in the future.
