Relief decorative plaster
Finishing plaster materials are divided into two types: leveling and decorative. The first are designed to make the walls even and warm. The second create art.
Relief plaster allows you to give the interior of the house a unique look. The facade of each room, each wall can be made absolutely unique. With this material, decorating a house with your own hands ceases to be a fantasy. After all, despite the compositional complexity of the result, the process of application is within the power of every person. It is enough to follow simple and clear rules.
In the video below you can get acquainted with the relief plaster in more detail. Facing by this method will make your walls unique. In addition, in this case, the process of plastering turns into a real art. Using a variety of methods for applying the mixture, you can achieve unusual effects that will become the highlight of the interior decor of the house.
Relief plaster belongs to the class of decorative ones, but unlike the Venetian one, it has increased plasticity and a unique structure. No other substance gives such opportunities to change the pattern.
Important ! To achieve a greater effect, different mixtures can be used in combination.
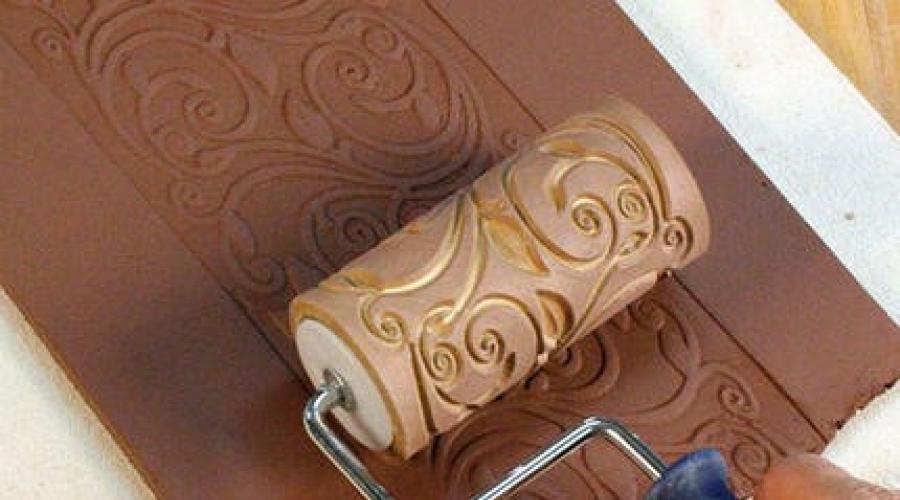
Relief plaster can be easily sanded and polished. Recognized masters create real masterpieces with the help of an ordinary roller and a mixture. Unique stucco bas-reliefs serve as the main decoration for living rooms, corridors or nurseries.
Do not forget about the practical benefits of embossed plaster. It perfectly protects the wall from mechanical destruction. It also increases the level of thermal insulation throughout the room.
This type of cladding not only hides irregularities and defects of any surface, but also creates a unique atmosphere. It has been in demand for centuries. Thanks to him, the walls acquire not only color, but also volume.
Important ! Relief plaster saves on leveling
In order for the walls to acquire the shade you need, it is enough to buy a suitable paint and apply it to the relief plaster. In this case, a roller or sponge is used. The sprayer allows you to speed up the painting process at times.
Embossed plaster may protrude slightly from the wall. But it is better not to cross the limit of 10-15 mm. This is the optimal parameter that is recommended by all professional plasterers.
Relief plaster due to its high plasticity is easy to apply to the surface and create complex compositions from it. Natural themes have been especially popular lately. Tree bark, tall grass or natural stone are increasingly decorating the homes of the inhabitants of our country.
Wall plaster
Necessary tools for work
In order for the embossed plaster to go according to plan, it is necessary to prepare a set of tools, without which you cannot do without during the work, these include:

There are also many additional tools. They are needed in order to create a truly unique relief plaster. For example, special nozzles on the roller allow you to reproduce the imitation of the skin.
Important ! The main tool for creating volume is a spatula.
Surface preparation
The final result depends on what surface you apply the mixture to. To make everything go as it should, remove the remnants of old finishes and paint from the walls. For this you will need a chisel. As a last resort, use an axe.
Take a chisel and make notches about one centimeter deep on the wall. And there must be a lot of them. The optimal figure for a square meter is one thousand.
When the surface is completely cleaned, a primer is applied. You can use "Betokontakt". This substance provides good adhesion. The primer must be applied in one pass using a roller or brush.
Important ! During priming, it is important to ensure that there are no streaks left on the walls.
Before proceeding with relief plaster, you need to wait until the primer dries. Each manufacturer sets its own drying time. Therefore, to know when you can start the next stage, just read the instructions on the bank.
How to choose and prepare a solution for embossed plaster


Since there are more than enough different textures and colors of the mixture for embossed plaster on the market, first of all you need to focus on the samples provided by the consultant.
There are many ways to create the first layer of relief plaster. The compositions are distinguished by their practicality and guarantee a good result even for non-professional builders. The most commonly used substances are:
- In the first option, simple clay is used as the initial layer. Such a coating is not particularly durable, but the low price fully smoothes out this defect.
- If lime is applied to the walls, then special strength will not be achieved. But this is a good environmentally friendly material that can provide a reliable base for further work. The main thing is to strictly adhere to the proportions. The solution should be three parts of sifted sand and one part of lime. Another option is also possible, you can mix alabaster with lime dough in a ratio of 1/3.
- Cement provides the greatest strength. But such a coating has low plasticity. The composition of the solution is as follows: cement to sand - one to three. Before application, it is necessary that the solution gain density. To do this, you need to wait at least an hour after kneading.
- Gypsum composition has good performance. It dries quickly, which means it is best to knead it in small portions.
Each of the above compositions is suitable for creating a base layer. Usually, when choosing, people rely on the availability of the necessary materials at hand or their cost.
Creating the first layer

After the solution for the first layer of relief plaster is selected, it is applied to the previously primed walls. In this case, tools such as a trowel and a trowel are used.
The thickness of the layer largely depends on the unevenness of the walls. In some places you need more solution, in others less. In order to achieve ideal forms, a system of beacon rails is needed.
Important ! If unevenness is not too much of a problem, it is better to use a level and a rule.
If lime mortar is used during the work, it is recommended to treat the surface with a deep-penetrating acrylic primer before applying the mixture for relief plaster.
Application of relief plaster

It is best to carry out this operation with two people. One person will apply the mixture to part of the wall and move to the side. After that, the second one on the freshly applied layer will immediately form the relief of the plaster.
Such a division of labor will allow the second worker to fully appreciate the overall composition and make the image on the relief plaster truly complete. For this, tools such as a roller with special nozzles and a spatula are used. You will also need wooden or metal graters.
Now embossed plaster of the bark beetle type is very popular. The technology of its application has some features. First, the second layer is given time to dry. To then use a grater to process the surface. Mineral grains move, forming a unique image.
Another method of creating a picture on relief plaster is to etch the cement with a neutralizing solution. To do this, a five percent solution of hydrochloric acid is applied to the leveled layer. After a while, it is washed off with water.
Painting

In the process of creating decorative relief plaster, this stage plays a very important role. After all, it is the paint that sets the right tone for the entire room. The combination of colors gives the best effect.
Important ! Depressions and protrusions are processed with colors that contrast with the general gamut. To soften the transition, not completely dry paint is retouched.