Re-glue the wallpaper on the ceiling. Let's figure out how to glue wallpaper on the ceiling. The diverse world of wallpapers
Read also
Hello!
My husband and I do redecorating in the apartment waiting for their first child. I help him as best I can. But there is one thing where I won’t be of any use - wallpapering the ceiling. My husband will have to do this himself somehow.
Please tell me if this is possible, and if so, how? Surely specialists have their own tricks or devices that help them cope with such a complex matter alone.
Pasting the ceiling alone
Hello, Vera. In your position, it is really undesirable to climb a stepladder or walk through scaffolding. But this is not necessary: you can help your husband by simply supporting the free end of the not yet glued canvases with a long stick with a crossbar on top.
If for some reason this option is not suitable for you, we will tell you how to hang wallpaper on the ceiling alone.
Selection of materials
First of all, you should think about which canvases to choose for finishing the ceiling to make your work easier.
There are two very good options:
- Fiberglass wallpaper for painting. They are monochromatic, with a relief surface of varying degrees of severity. They are easy to glue and can be repainted several times.
- Non-woven base. Their price is usually higher, but you can choose a design.
Both wallpapers do not need to be coated with glue, which will greatly facilitate and simplify your task. Only the base is processed.
Note. The adhesive for ceiling wallpaper must match the selected material. You shouldn’t save money and buy a cheaper product if you don’t want the coating to fall on your head one day.
Ceiling technology
You were absolutely right when you wrote that every master has his own secrets when performing this or that work. And pasting is no exception. We will not describe all the methods known to us, since many of them require certain skill and experience.
Let's talk about one that is accessible even to beginners.
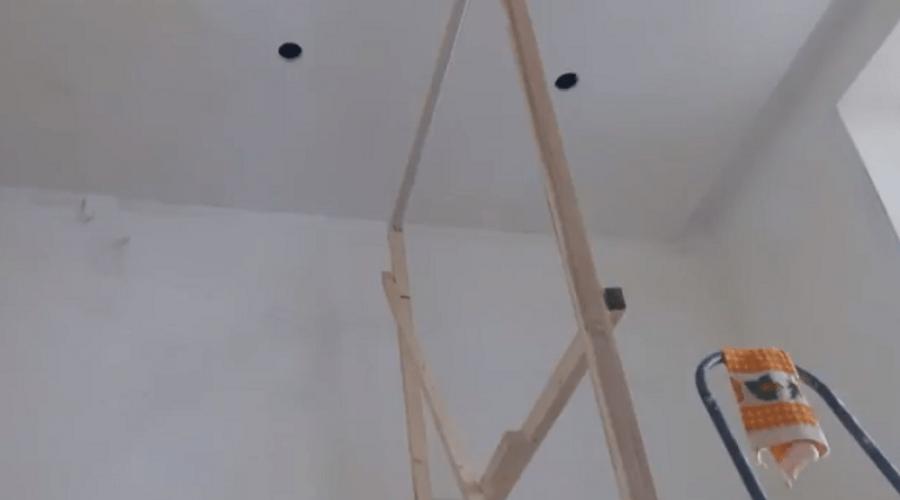
Frame making
To cover the ceiling yourself, you will need to make a frame from wooden blocks.
The requirements for it are simple:
- Height- almost to the ceiling, a few centimeters lower.
- Sustainability– the frame must be placed on stable supports.
- The top crossbar should be smooth, without corners. It can be made from a plastic or metal tube.

Photo of an auxiliary frame, made by hand
This is a temporary structure that can be disassembled after repair, so there is no need to achieve special beauty and strength. But it is advisable to try to make it as easy as possible.
Pasting the ceiling
Prepare a stepladder, a soft, clean towel or plastic wallpaper spatula, brush or roller. Dissolve the glue and you are ready to begin.
- Measure the distance from wall to wall and cut the wallpaper into sheets with a margin of a few centimeters in each direction.
- Place the frame about a meter from the corner from which you start pasting, and throw the first canvas face down over it.
- Carefully coat the ceiling area from the wall to the frame with glue.
- Take the canvas by the edge and start gluing it from the corner, making a slight overlap on the wall.

We glue wallpaper to the ceiling without helpers with our own hands
- Having dealt with this area, slide the frame under it and apply glue to the next one.

How can one person cover walls with his own hands?
- Carefully move the frame under the dry section of the ceiling again and continue gluing the canvas.
- The second and subsequent sheets are glued in exactly the same way.
Advice. If it is difficult for you to fit the wallpaper end-to-end, glue it with an overlap of a couple of centimeters, and then cut both sheets together using a ruler. By removing the cut strips, you can easily join them together. True, this method is only suitable for wallpaper without adjusting the pattern.
Summary
Watch the video on this page, which shows the entire process described in great detail.
And you will see that gluing wallpaper to the ceiling with your own hands is not as difficult as it might seem. Even if you have to do it alone.
Correctly gluing wallpaper to the ceiling is beautiful and aesthetically pleasing. But, before starting work, it is necessary to become familiar with the technology of the process so that the canvases do not sag or wrinkle and are carefully glued.
In this case, wallpapers are chosen in one color or with different patterns. But it is important to follow some rules: if there are bright and catchy wallpaper on the walls, for the ceiling it is worth choosing material in calmer colors, and classic version decorating the walls or using simple pastel colors, hanging wallpaper on the ceiling can be with a nice pattern. The article will tell you how to do this correctly.
How to choose ceiling material
Wallpapering the ceiling is not a very simple task. In this case, the important point is right choice material. This will make the work process more convenient and easy. Especially if you do everything yourself.
In this case, the wallpaper should:
- It is quite easy to slide on the surface to be pasted. Otherwise, it will be difficult for the canvases to join evenly and tightly to each other.
- Instantly stick to the ceiling.
- Do not fall off or sag.
- And the main thing is that they do not need to be coated with glue, especially if a person does the work alone. It is much easier to hold a dry strip in your hands, which is rolled up in a roll and, gradually unwinding it, stick it on the ceiling covered with glue.
- Don't be too fat. You should purchase special ceiling wallpaper, with light weight. This characteristic is indicated by the markings on the roll. It should be no higher than 110 g/m².
Non-woven wallpaper meets all of the above requirements as closely as possible.
Gluing this type of ceiling wallpaper allows you to:
- Hide stains, small irregularities and cracks.
- It glides perfectly on any surface.
- Do not apply glue to the canvas.
- Paint the ceiling with dispersion and water-based paints.
What materials and tools will be needed for the job?
Tip: To make it easy and quick to apply wallpaper to the ceiling, you need to purchase all the necessary tools.

The following tools should be at hand:
- Chalk or pencil for marking.
- Threads.
- Roulette.
- Sharp scissors.
- Container for diluting glue.
- Building level.
- Dry rags.
- Stationery knife.
- A brush or roller for applying glue to the ceiling.
- Rubber roller for ironing seams.
- Special glue that protects wallpaper from sagging.
- Wide spatula.
- High quality wallpaper.
- Stepladder or sturdy table.
How to prepare the ceiling surface for wallpapering
How to prepare the ceiling for wallpapering? This is very important question, which needs to be resolved before gluing the canvases. The surface must be well prepared to ensure a high-quality and reliable coating.
Step-by-step instructions for carrying out the work:
- The ceiling is cleared of old coatings. To do this, use a wide spatula or sandpaper.
- The surface can be washed. For washing, use normal clean water, or adding a small amount of detergent to it.
- The ceiling can be re-primed thin layer glue used for gluing wallpaper (see How to prime a ceiling: we’ll figure it out step by step).
The modern world of design does not stand in one place: more and more new styles appear, Decoration Materials, approaches to room design. Such changes lead to the fact that the room takes on an original and non-standard look. When decorating a house, various alterations are made that affect not only the walls, but also the ceiling. On modern market building materials exists a large assortment finishing coatings for the ceiling, but wallpaper remains the most popular.
Where to start
Wallpapering is a rather complicated process from a technical standpoint. The main difficulties arise when decorating ceilings, which is mainly due to the inconvenience of holding the wallpaper, and subsequently hand fatigue.
To hang wallpaper on the ceiling you will need:

The sequence of preparation and the process of gluing wallpaper on the ceiling will help you evaluate the provided video:
Features of ceiling preparation

The quality of gluing depends primarily on the preparation of the ceiling. It should be even and smooth. To achieve this result, you need to:
- priming the concrete surface;
- to level the ceiling, starting putty is used;
- priming again;
- finishing type puttying;
- sanding until maximum smoothness is achieved;
- and again priming.
Advice! After applying each layer, it is necessary to allow time to dry.

After preparation, all that remains is to draw a line, which will serve as a guide for correctly gluing the wallpaper. It will prevent deviations to the sides, and then the wallpaper will be laid evenly. Ideal option Painting thread will be used to draw the line. It needs to be pulled and released. After this, a line will appear on the ceiling and then you can proceed to the next stage of work. You can see the best way to stick it on the ceiling in the photo:

Now comes the time to prepare the wallpaper. First of all, their required length is calculated. When cutting off the required pieces, it is necessary to take into account not only the distance between the walls, but also make allowance for bends in the corners. We do not recommend saving on this indicator; it is better to cut off a little more. The excess can be cut off later.
Another one of important points To properly stick wallpaper on the ceiling, you need to adjust the pattern. It's most comfortable to do this downstairs. After selecting the pattern, you can cut the required length and stick the stripes to the ceiling without any difficulty.

The next step is choosing the glue. Based on the wide variety of this product on construction market, you will need to choose the type that matches the selected type of wallpaper. But the most basic requirements that are put forward for this material are a thick consistency and quick drying.
Wallpapering

Finishing preparatory stage, you can begin the process itself. First, the glue is diluted, and then applied to the wallpaper using a special tool - a roller. It is recommended to smear it from the center to the edges. This process must be carried out very carefully, since glue can get on the front side, and it will not look very nice. For better impregnation, the canvas must be folded like an accordion or in half. The duration depends on the type of material chosen.

Correctly gluing wallpaper to the ceiling should be done slowly, carefully, focusing on the drawn line. Glue is applied to the area, and then the prepared piece is applied and gradually pressed to the surface. By using special tools, namely a roller or spatula, smoothes the material and removes air, as well as excess glue- sponge. Each subsequent strip is glued end-to-end to the first. The strips must fit tightly to each other, otherwise the joints will be visible. It is better to carefully coat the edges of the joints to prevent unwanted peeling of the wallpaper from the ceiling.
A special approach is required to properly apply wallpaper in the corners. A brush or pencil will help you achieve the desired result in this matter. These items allow you to gently press the wallpaper into a corner. After that small area is separated from the surface and the “extra” piece is cut out.

To make the wallpaper on the ceiling look perfect, Special attention You should also pay attention to gluing around the lamp. If there is a chandelier or other lighting object, it should be temporarily removed. A small cut is made in the canvas for wiring, and the wallpaper is glued directly to the surface. Excess areas are cut off carefully. After drying lighting fixture is installed in place.
Advice! Gluing should be done when closed windows and doors. The absence of drafts is the key successful work. The temperature also has great importance. It should not be below +10C.
The following video will help you to glue wallpaper on the ceiling yourself:
Features of choosing wallpaper

There is a huge selection of wallpaper that can be glued to the ceiling. Most best option- this is non-woven wallpaper for painting. After their installation, you have the opportunity to change their color several times. Such products can be remade up to 15 times.
Since non-woven wallpaper belongs to the heavy class, the glue must be selected appropriately for it. It should be made on the basis of methylcellulose, which guarantees reliable adhesion to the surface

You can glue fabric, liquid, and glass wallpaper to the ceiling.
Paper type is characterized high level environmental friendliness, relatively low quality. The process of gluing them is the simplest.

Very often a controversial question arises: is it better to paint the ceiling or stick wallpaper? The answer depends first of all on people's preferences, and then on the right choice. Wallpaper should be selected to match the interior of the room, since each of them has its own characteristics.
Thus, in order to paste wallpaper on the ceiling correctly and beautifully, you need to prepare: stock up necessary tools, purchase glue, wallpaper, cut them into pieces, and also watch a video tutorial that will help you learn all the nuances of such a difficult task. With some effort, the result will always be positive.
How to properly glue glass wallpaper to the ceiling is shown in the video:
October 3, 2016
Specialization: facade finishing, interior decoration, construction of cottages, garages. Experience of an amateur gardener and gardener. We also have experience in repairing cars and motorcycles. Hobbies: playing the guitar and many other things that I don’t have time for :)
Despite the fact that wallpapering is quite a simple procedure, this work contains a number of nuances, especially if we're talking about about finishing the ceiling. After all, wallpaper should be glued not only beautifully and neatly, but also securely. To help in this matter, below I will tell you in detail how to glue wallpaper on the ceiling correctly.
Gluing technology
Wallpapering the ceiling consists of several stages:

Stage 1: surface preparation
Preparing the ceiling for wallpapering is one of the most critical stages. The durability of the finish, and even its appearance, depends on it.
The preparation process is as follows:
- First of all you need to remove the old one finishing coat. If it's whitewash, it just washes away. Another effective method To remove it, stick it to the ceiling surface with paste or wallpaper glue old newspapers, then tear them off along with the whitewash.

Old wallpaper can be soaked with water and then removed with a spatula. If the old coating is vinyl, before soaking it, you should make cuts in the finishing layer;
- after that the ceiling needs to be brushed and washed to remove remnants of the old coating, as well as dirt and dust;
- Next, it is necessary to prime the surface, which will increase the strength of the base and also improve the adhesion of the glue. The primer is applied using a roller in a thin, even layer. After the ceiling has dried, it must be repeated;

- If there are chips and cracks on the surface of the ceiling, they should be slightly widened and filled with putty.
This completes the process of preparing the ceiling with your own hands for subsequent finishing. It should be noted that such procedures are performed only if the ceiling is smooth and does not have serious flaws. Otherwise, it will need to be plastered or covered with plasterboard.
Stage 2: marking
To simplify the work in the future, before gluing the wallpaper to the ceiling, you should apply markings to it. In this case, it is necessary to decide on the location of the paintings on the ceiling.
To prevent the seams from being noticeable, it is better to place the canvas along the direction of the light falling from the window. If the room has several windows located on different windows, it is better to glue the canvases along the length of the room. In this case, you will reduce the number of joints.

In the photo - applying markings to the ceiling for wallpapering
Having decided how to glue the wallpaper, you should mark a line on the ceiling along the location of the canvases. The line should be located from the wall at a distance equal to the width of one strip of covering.
To get a straight line, it is best to use a special painting thread. The latter should be fixed at the beginning and end future line, then pull down and release, as shown in the photo above.
As a result, the thread will hit the ceiling and leave behind a straight line. Using it, during the gluing process, you can level the canvas.
Stage 3: cutting the material
Now you need to cut the material with your own hands, cutting it to length. This procedure is not complicated, the only thing you need to keep in mind is that you need to leave a small margin.
If the canvases are plain, i.e. their pattern does not need to be joined, then a margin of 2-3 cm is enough. If the material has patterns, then the margin should be slightly longer than the step of the patterns. Thanks to this, there will be no problems when joining the pattern on the ceiling.

If you will be cutting on the floor, be sure to cover it with film first so as not to stain the material.
The cutting itself is not complicated. To do this, you will need a ruler of sufficient length and a mounting knife.
Stage 4: Glue Preparation
Before gluing wallpaper on the ceiling, you need to prepare the glue. It should be noted that special attention must be paid to the choice of adhesive composition. The fact is that there are currently on sale different types adhesives intended for different wallpapers, and they have different prices.
Paper wallpaper is glued to the very regular glue for light fabrics. If the material is heavy, for example, you are going to hang vinyl sheets or glass wallpaper, you need to use special glue, able to withstand heavy coatings.

In addition, it is important to prepare the glue correctly. Typically, this procedure is carried out as follows:
- First of all, water must be poured into a clean container of suitable volume. The temperature of the water and its volume are indicated on the packaging with glue;
- Before adding glue, the water should be stirred so that a funnel is formed in it. This is necessary so that the glue does not form lumps;
- then, continuing to stir the water with one hand, you should gradually add the dry mixture;
- then the glue must be continued to be stirred for another 10 minutes;
- After this, leave the mixture for 15-20 minutes, then stir it again. Now the composition is ready for use.
This completes the glue preparation process. It should be noted that the instructions for preparing the adhesive composition may differ slightly from the diagram presented. Therefore, be sure to read the instructions on the package first.
Stage 5: gluing
So, we have familiarized ourselves with the preparation, now we will look at how to properly glue wallpaper. The only thing, before moving on to gluing, I’ll clarify one nuance.
The fact is that people often ask on forums what to glue first - wallpaper or glue ceiling plinth? A clear answer to this question no, since it all depends on the type of skirting board.

If the baseboard is made of polystyrene foam, then you can first paste over the ceiling and walls, since the canvases will easily support the weight of this decorative element. If the baseboard is heavy, for example, polyurethane or even gypsum, then the canvas will definitely not withstand it.
Therefore, many craftsmen argue about what to glue first - the ceiling plinth or wallpaper. From personal experience I will say that it is almost impossible to paste wallpaper in such a way as to ensure a straight line under the baseboard.
Therefore, it is more advisable to do this:
- first finish the ceiling, leaving no space for the baseboard;
- then mark the location of the fillet on the canvas and carefully cut it along the line with a sharp mounting knife;
- After that, glue the plinth to the walls and ceiling.
If you don’t know what and how to glue the ceiling plinth to the wallpaper, use regular putty. The only thing is to apply it on the back side in a small amount so that it does not protrude and stain the finish of the ceiling and walls.
Thus, I believe that it is better to glue the wallpaper first, and then the baseboard, regardless of the type of the latter.
Home craftsmen, when they learn that it is possible to glue a light baseboard over the trim, often ask whether it is possible to glue ceiling tiles for wallpaper? Of course, you can glue it, but no one can guarantee that such a finish will be durable. Therefore, it is better to spare no effort and first get rid of the old coating.

The actual wallpapering of the ceiling looks like this:
- work should begin by applying glue paint brush. If you are working with lightweight fabrics, for example paper, then the back side of the material is covered with glue.
Before gluing wallpaper, vinyl sheets or other heavy types of this material for painting, glue should be applied to the ceiling; - then the strip is glued. If you are doing this work with an assistant, then you need to stretch the canvas, then follow the markings and press it against the ceiling.

If you do the work yourself, the canvas should be folded like an accordion and placed on left hand, wherein right hand you need to take the end of the canvas and press it to the ceiling. Then you just need to move along the gluing line and press the canvas to the ceiling;
- During the gluing process, the canvas should be smoothed using a roller. Use it to squeeze out all air bubbles and smooth out wrinkles. You can also use a plastic spatula for these purposes;
- The entire ceiling is covered using this principle.
Home craftsmen are often interested in how to hang wallpaper on a rounded ceiling. There's really nothing complicated about it. You just need to decide on the height of the pasting (the level from which the ceiling wallpaper will start), and then stick the canvases according to the same principle as on the ceiling with even angles.
Here, in fact, is all the information about how to wallpaper the ceiling.
Conclusion
The process of gluing wallpaper to the ceiling itself is not as complicated as it seems at first glance, even if you do this work yourself. However, before gluing wallpaper to the ceiling, it is necessary to properly prepare the surface, as well as perform some other equally important operations, which we reviewed above.
See the video in this article for more information. If you have any questions regarding the topic discussed, ask them in the comments, and I will definitely answer you as soon as possible.
October 3, 2016If you want to express gratitude, add a clarification or objection, or ask the author something - add a comment or say thank you!
Not every home craftsman knows how to glue non-woven wallpaper to the ceiling. This process has several features. We will talk about them in detail.
By non-woven we mean a special non-woven material, produced using complex technology from textiles and cellulose. An essential component of such wallpaper is a special compound with a very fine structure. It acts as a binding element for textiles and cellulose, characterized by properties that ordinary glass fiber has.
Non-woven wallpaper
Non-woven wallpaper has the following operational advantages:
- Quite high strength. Non-woven products are almost impossible to tear when gluing. This sets them apart from paper wallpaper.
- Possibility of gluing almost all known ceiling surfaces, from wood and plasterboard to concrete.
- Stability geometric shapes and sizes. After drying on the ceiling, the wallpaper does not shrink. And if you accidentally wet non-woven products before gluing, they will not lengthen even a millimeter.
- Excellent aesthetic performance. Externally, non-woven wallpaper on the ceiling looks impeccable. You can purchase material with an ordinary (flat) image, as well as with the now popular three-dimensional pattern.
- When gluing a ceiling, it is necessary to apply glue exclusively to its surface. The wallpaper itself does not need to be processed. They are applied to the ceiling dry, which greatly simplifies and speeds up the process of finishing the room.
Non-woven wallpaper perfectly levels surfaces with small defects - dents, cracks. They are allowed to be glued to uneven ceilings. In addition, after some time you can easily remove upper layer such wallpaper, leaving their leveling base on the ceiling, which can be repainted several times. Let us add that the non-woven finish is really easy to care for. It can be cleaned with a damp cloth and vacuumed. At the same time, the wallpaper will not lose its unique performance and wonderful aesthetic properties.
As mentioned, non-woven products are suitable for most ceiling surfaces. Here you just need to properly prepare the ceiling for pasting. If it was previously whitewashed, it is necessary to wash off the old finishing layer using a rag and a brush, as well as a soap solution. In cases where the whitewash was applied in a thick layer, it is advisable to first clean it off using a spatula. And only after that wash it off old layer fully. Plastered and concrete floors must be leveled. You have to fill up all existing depressions and gaps, putty the surface treated in this way, and dry it. After this, it is advisable to bring the ceiling to ideal condition using fine sandpaper. .

Non-woven products for ceiling surfaces
Important point! Concrete or a previously plastered surface must be well primed. Then the non-woven products will stay on the ceiling, without exaggeration, forever. Painted with dispersion or oil compositions The surface may not be prepared in any way for the procedure. Just wipe off the dust and feel free to start wallpapering. But only on the condition that the paint does not fall off, but sticks firmly enough. Practical advice. Take a small piece of tape and stick it to ceiling surface. And then abruptly tear it off. If there are no paint particles on the tape, feel free to glue non-woven wallpaper to the ceiling.
You will have to tinker a little with plasterboard floors. You need to carefully seal all areas where the drywall sheets are attached and the joints between them and the putty. It would be correct to place reinforcing tape at the junctions of individual products. And putty the surface over it. Then wait until the leveling layer is completely dry, sand it and apply a primer. Note! The need for putty throughout plasterboard surface No. Non-woven fabric is a dense material with two layers. He himself, as we noted, will cope with leveling the ceiling.
To paste the ceiling with non-woven products, you need to use special glue. When buying wallpaper, sellers will definitely advise you which composition is best to purchase. The following types of adhesive mixtures are popular:
- KLEO Extra Line;
- Methylane Ultra;
- Special interlining Quelyd;
- Premium
All of these formulations are sold in powder form. They require adding water in the proportions recommended by the manufacturer and stirring thoroughly. Note that the glue on the ceiling is always thicker than in cases where the walls are covered with wallpaper. Now proceed to the main operation. First, mark the ceiling for the first non-woven fabric. This strip must be glued as correctly and evenly as possible. It is she who will subsequently set the direction for all other pieces of wallpaper.

Gluing non-woven fabric to the ceiling
The marking is done simply - at the junctions of the ceiling and walls, measure 50 cm ( standard width non-woven wallpaper). Place the appropriate marks and stretch twine (rope, marking cord) between them. Swipe it marking line. Professionals advise marking the ceiling perpendicular to the window. In this case, the lines will run parallel to the flow of light, which will ensure high-quality camouflage of the resulting joints. Next, follow the instructions below:
- Cut out wallpaper strips along the length of the ceiling (take an extra couple of centimeters for tolerances - on both sides on the wall surfaces). Using a square, cut the roll along the line.
- When gluing products with any images, be sure to number the cut strips. Then you will definitely not be mistaken with the correct arrangement of the elements of the drawing.
- Lay paper or plastic film on the floor.
- Use a roller with a long handle or lubricate with adhesive the part of the ceiling surface on which the strip of wallpaper will be glued.
- Paste the wallpaper. You need to align the edges of the strip with the previously applied markings and press the products tightly against the ceiling. It is more convenient to perform this operation together. One person hands the canvas to the second, who is located under the ceiling (on a construction trestle or on another elevated platform). Don't forget to place one of the edges of the canvas on the wall.
- Use a rubber roller or plastic spatula to level the pasted strip from the center to the edges. By doing this, you will not only level the wallpaper, but also remove all small air bubbles from under it.
- The edge extending onto wall surface, press (very tightly) with a metal ruler (you can also use a spatula), and then cut off the excess parts with a knife.
- Immediately wipe the glued strip with a soft cloth, getting rid of traces of glue.
The next steps are simple. Glue the second non-woven strip butt to the first, then the third to the second and so on. Don't worry about the joints between the wallpaper coming apart after the glue dries. This never happens with non-woven products. Areas of the ceiling surface near the lighting devices are pasted over as follows: make a cross-shaped cut in the strip, pass through the cut made electric wires, press the interlining to the edges of the hole for the lamp or chandelier, mount the box (decorative). It will hide the cross-shaped incision.
Pasted non-woven wallpaper should dry in the absence of drafts. Just don't open the doors and windows indoors for a while.
Wallpaper can be treated with paint only after it has completely dried. Coloring in progress water-based paints, water-dispersed, latex. Choose their shade to suit your taste. But do not forget that the color of the ceiling should be in harmony with the overall interior design of the room. Also, please note following tips designers before:
- In rooms with low ceilings, as well as with a modest area, choose paint in the color of champagne, bluish or peach shade. Such tones will visually lift and expand the room.
- Fans of the traditional approach will suit all shades of white paint.
- Young people are recommended to paint the ceiling in bright colors.

Painting non-woven wallpaper on the ceiling
The process of painting non-woven ceilings is carried out with a short-haired roller. Usually the surface is treated in two layers coloring composition. The first should be applied perpendicular to the wall with the window opening, and the second should be applied parallel to it. The use of this technology ensures that there are no unattractive stripes on the ceiling.
The stucco elements on the ceiling are painted not with a roller, but with a brush. It is also used for processing any decorative details on the ceiling surface. And in cases where the walls have been finished completely, their upper section must be covered with masking tape. After painting the wallpaper, you will remove it and get clean walls, not stained with paint.