How to install a bath passageway. Passage through the roof: types of passage nodes and their use. stage: Marking the ceiling surface for the chimney opening
Read also
The construction of the chimney channel to the furnace provides for the need to conduct it through the ceiling and lead to the roof. The pipe for the bath through the roof must pass in full accordance with the rules fire safety. Otherwise, the possibility of fires increases, which will cause harm to human health.
Chimney outlet to the roof
Safety regulations
The passage of the pipe through the ceiling of the bath is regulated by SNiP 41-01-2003. This document says that:
- the passage of the bath pipe in the ceiling should be located on minimum distance 350 mm from flammable structures and 250 mm from hardly flammable elements;
- ideal is to leave this distance not closed (air). However, such a design would lose a large number of heat;
- the specified distance is filled with non-combustible materials;
- the hole must be closed with metal sheets (stainless steel is more often used, which does not spoil appearance premises);
- the pipe in the bath through the ceiling and roof should not have joints. This factor must be taken into account when designing a chimney;
- maximum length pipeline passing through the ceiling or roof should not exceed 1 m;
- The chimney must not be rigidly attached to the ceiling or roof.
The choice of thermal insulation material
The heat insulator can be the following materials:
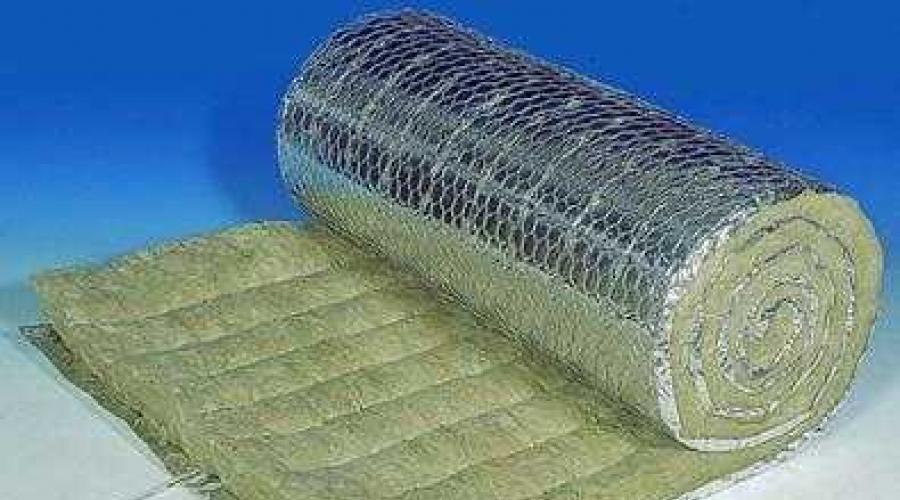
- basalt or mineral wool. The insulation is able to withstand heating up to 600ºС. The main disadvantages are: the release of formaldehyde, since the composition of the material includes resins and the instability of the protective qualities when wet, which is possible in the event of condensation;

Basalt wool
- expanded clay. The material has excellent properties. When wet, expanded clay quickly restores its functions. However, to arrange the floor, you will have to additionally install containers in which the material will be located;

Expanded clay of average fraction
- minerite The material consists of cement, cellulose and mineral fillers. Minerite tile is able to withstand temperatures up to 600ºС. When heated, it does not emit harmful substances, and when water enters, it does not lose its properties;

Minerite insulation
- asbestos. It is a good insulating material, however, with strong heating, it emits substances harmful to humans;
- sand or clay. Materials were used as heat insulators earlier, before the advent of modern heaters. However, some experts prefer to use natural materials than artificial ones.
Pipe joint insulation
To give the joints tightness apply:
- high-strength sealants that can withstand large temperature differences;
- special clamps made of the same material as the chimney.
Transition through the ceiling
How to bring the pipe out of the bath through the ceiling? To arrange the transition, you can:
- purchase ready-made cuts;
- build your own transition.
Arrangement of a ceiling transition with a finished cutting
The finished shelf assembly is designed to facilitate the installation of a ceiling transition. You can buy such a chimney element at any specialized store. Ready passages are of two types:
- containing insulation;
- without isolation.
The pass-through assembly with finished insulation consists of:
- two plates;
- a piece of insulated pipe;

Finished ceiling unit with insulation
The adapter without insulation is metal boxes that need to be filled with insulating materials, and holes for pipes.

Node for arranging the passage through the ceiling without insulation
How to install a pipe in a bathhouse through the ceiling using ready-made cutting? The whole process consists of the following steps:
- make a hole in the ceiling of the required size (depending on fire safety requirements and cutting dimensions);
- in right places cutting is insulated with previously selected material;
- the finished unit is installed in the ceiling passage;
- a pipe is brought to the ceiling in the bath. The length of the pipe should be less than the height by 10 - 15 cm;
- the next pipe section is connected in the attic.
- pipe joints are sealed.

The process of installing the finished cutting
Do-it-yourself ceiling transition arrangement
For self-manufacturing transition node will require:
- metal plates;
- insulation;
- chimney pipe.
The pipe in the bath through the ceiling is installed according to the following scheme:
- a hole is made in the ceiling, the diameter of which is larger than the diameter of the applied chimney at 130 - 180 mm;

Additional reinforcement ceiling beams
- the chimney is led to the attic. In this case, the pipe connection must be above or below the ceiling;
- With inside baths, a metal plate is installed on the ceiling;

Fixing the supporting metal plate

The pipe in the bath through the wall is laid in the same way. More details about the process can be found on the video.
Conclusion of the smoke channel to the roof
Before you bring the pipe in the bath through the roof, you need to take care of two factors necessary for the operation:
- choose the location of the output;
- purchase the necessary items.
Place to withdraw
The output of the pipe through the roof of the bath can be done:


Required Items
Installing a pipe in a bath through the roof is impossible without the following elements:
- cutting, similar to the passage through the ceiling;
- insulating material (compliance with safety rules);
- a special apron that protects the chimney from precipitation.
Cutting can be used both ready-made and equipped independently.
Aprons can be:


Pipe withdrawal instructions
How to bring the pipe in the bath through the roof? For this you need:
- make a hole of a suitable size in the selected place on the roof (slightly larger than the output pipe);
- around the hole to carry out strengthening work on the floor beams;
- from the inside of the roof, install the cutting, as when crossing the ceiling;
- bring out the pipe right size;
- install an apron in the outer part of the roof.

The scheme of arrangement of the passage through the roof
So knowing the rules fire safety and instructions for arranging the main components, the chimney for the bath can be mounted independently. To do this, you must purchase all the materials and basic elements of the system. Before the first flooding of the furnace, it takes time to dry the sealants used (approximately 1 day) and check the tightness of all joints of the chimney channel.
vse-o-trubah.ru
How to install a pipe in a bath through the ceiling with your own hands
 The main aspect when building a bath is to install a pipe in accordance with all fire safety regulations. Many people prefer to run a pipe in a bath through the roof. This design is the most reliable and durable. To make a chimney, you can use various materials. For example, you can use sandwich pipes or build a brick chimney. Before installing the structure, you need to make a hole of a suitable diameter and waterproof the chimney.
If you decide to install a pipe on the ceiling with your own hands, you need to pick up suitable design chimney. The pipe can be external or internal. External chimney less flammable and easy to install. The internal location of the chimney allows you to save large quantity heat.
When choosing a pipe, you need to consider a number of nuances:
- The pipe must be made of galvanized metal, ceramic or brick. Apply aluminum pipes forbidden.
- Make pipe insulation best from non-combustible materials. Expanded clay or stone wool is perfect.
- As thermal insulation materials, only foil materials should be used. Foiled aluminum is best.
- If you are using a sandwich pipe, then it must be filled basalt wool.
 When installing the pipe in the bath, it is necessary to use galvanized metal, it is strictly forbidden to use aluminum
Before installing the pipe, mark the surface of the ceiling. Remember that the chimney must not come into contact with roofing materials, as it may damage them. In order to avoid damage to roofing materials, you need to install a metal casing.
Sandwich pipe in the bath in the ceiling
If you are a beginner, then it is better to install a sandwich pipe in the ceiling. It is fairly easy to install and is fireproof. Sandwich pipes are usually made of several metal layers, between which some kind of fire-resistant composition is installed.
Assembling a sandwich pipe is quite easy. Assembly begins with attaching the product to the nozzle. For fixing, you need to use the starting cone. One end of the starting cone is put on the pipe, and the other is mounted on a straight section of the chimney.
 The sandwich pipe must not come into direct contact with wooden elements interior
Cutting a sandwich pipe is carried out in the following order:
- Install the node on the roof. It is needed to tightly fix the pipe.
- Make a hole in the ceiling. Remember that its diameter should be 15 centimeters larger than the diameter of the sandwich pipe.
- Fill the space between the pipes of larger diameter and the sandwich pipe with sand or expanded clay.
- If you do not want to use a larger diameter pipe, you need to install a box through which the sandwich pipe will pass. Free space in the box, you also need to fill it with expanded clay, sand or basalt wool.
How to make a brick pipe in a bath through a wooden ceiling
A chimney made of brick is the most robust design. Before proceeding with the installation of the structure, you need to design a chimney. During the design, you should pay attention to the features of the stove, which is installed in the bath. Also take into account that it is not advisable to install a massive brick chimney in small baths.
It is best to assemble the chimney on the ground, as it will be extremely difficult to do this on the roof. To raise the chimney on the roof, you can use hinges, spears or stretch marks. Clamps must be used as a fixing material for the chimney pipe.
 A brick pipe is considered the safest option for removing smoke from a bath.
Technology for installing a chimney on the roof:
- Make a hole for the pipe. The diameter under the passage should be 20 centimeters larger than the diameter of the pipe itself.
- Then you need to bring the product through the roof.
- Insulate the pipe with a metal sheet.
- Seal the structure by placing the edge of the sheet under the roof.
- Attach a metal umbrella to the chimney. It will protect the structure from moisture.
- Apply heat-resistant paint to the chimney. It will protect the metal parts of the structure from corrosion.
Cutting a pipe on a low bath ceiling: rules and regulations
If you decide to remove the pipe yourself, you need to adhere to a number of rules regulated in SNiP. First of all, you need to take care of installing a special passage node. From the outer surface of the pipe to the crate and rafters there should be a distance of 130-150 millimeters. If you use ceramic pipes without insulating materials, then the distance between the chimney and the rafters should be at least 260-270 millimeters.
 In the attic of the bath, the pipe must be insulated with special materials from direct contact with sheathing
When choosing feed-through nodes, keep in mind that you need to use only those products that are made of metal. Also, a plate made of of stainless steel. Pipe penetrations must also be made exclusively of stainless steel.
When cutting the pipe, you also need to take into account a number of nuances:
- In places where overlaps intersect, joints should not be present. Consider this nuance when designing sections.
- To insulate the pipe, use non-combustible materials or factory-made sandwiches.
- It is forbidden to rigidly fasten the pipe to the ceiling, as the chimney material can expand under the influence of high temperature.
How to properly remove the pipe from the bath through a high ceiling
To properly install the structure, you need to prepare the holes for the chimney. It is recommended to sheathe them with metal sheets. The thickness of the sheet should be at least 0.5 millimeters. Holes must be square.
It is very important to correctly assemble the protective box. To assemble the adapter, you need to use 4 metal sheets measuring 50 * 50 centimeters. In the middle of one of the sheets you need to cut a hole for the pipe. Metal sheets are connected to each other by welding.
 The pipe must not have any damage, Special attention should be given welds
Subsequent installation is carried out in the following order:
- Insulate the box with basalt and sheathe it with metal foil material.
- Install the first pipe segment. It must be attached to the stove with metal fasteners.
- Then install the second link.
- Fill the box with expanded clay.
- Fix subsequent segments.
- After you assemble the pipe, install a metal umbrella.
Installing a pipe in a bath through the ceiling (video)
Running a pipe through the ceiling is not difficult at all. The main thing is to choose the right insulating materials and properly install the box. To assemble the structure, use only non-combustible materials. At the stage of designing the structure, consider all the nuances of the furnace and roof. Remember that the chimney must be insulated with a casing. Otherwise, roofing materials may ignite.
Conclusion of the pipe in the bath through the ceiling (photo)
homeli.ru
How to remove the pipe from the bath through the ceiling with your own hands?
Many lovers of bathing procedures prefer to heat the bathhouse exclusively with firewood, for which a stove is installed in the room. But it is also important to provide a well-equipped chimney so that the combustion products leave the room without hindrance, without creating a danger to those who are soaring. How to get the pipe out of the bath through the ceiling correctly with your own hands in steps?
in a frequent way the arrangement of the chimney is represented by its output through the ceiling space and the roof. This option seems to be more reliable and durable.
To make such a chimney, it is possible to use various types of materials, but certain finishing technologies are required.

Types of pipes
Today, several types of chimney pipes are used:

Increasingly, people are beginning to pay attention to more expensive chimney finishes, preferring reliability and safety to cheapness. Ordinary metal chimneys can cause a fire in the room, while a brick chimney or sandwich chimney reliably protects the bathhouse from fire.
Chimney pipe installation rules
There are several undeniable rules that should be followed when installing a chimney:
- before installing the chimney, it is important to carefully plan its location so that it does not fall into the main components of the roof. Moreover, the pipe should not turn more than 3 times;
- the pipe section located horizontally from the furnace to the tie-in should not be more than 1 meter;
- a metal pipe must have a gap to flammable finishing elements of at least 1.5 m;
- the chimney should be installed so that its cut does not fall on the leeward zone. This will significantly reduce the force of natural traction;
- in the gas duct, it should be possible to clean the pipe, including from condensate.

Professionals also advise protecting a single-walled pipe with a layer of heat-insulating material. The most commonly used for this is basalt fiber. Outside, the insulation layer is closed with a galvanized steel casing. This will prevent condensation from forming and protect the attic from fire.
Stages of installing chimneys in the ceiling
It is conditionally possible to divide the process of installing a chimney into the ceiling space into several stages.
Stage 1: Design
As mentioned above, for quality installation you need to responsibly approach the process of installing the chimney, which means that you first need to draw up detailed plan chimney location.
It is important that the chimney is located conveniently for steamers, not too close to load-bearing beams and rafters, as well as provide the necessary clearance to flammable finishing materials.


Stage 2: Purchase of a chimney and necessary materials
At the design stage, it is also worth deciding what type of chimney will be installed in your bath. After the choice is made, you can safely go shopping. Do not forget to check with the consultants in the store which Additional materials needed to install a chimney.

Stage 3: Marking the ceiling surface for the chimney opening
In order to correctly determine the location of the future chimney, you will need a building kit, with the help of which we specify the place where the pipe outlet from the furnace should be located. We mark the place of the future chimney shown by a plumb line.

Stage 4: Cut a hole for the pipe
According to the markup made earlier, we make a hole in ceiling surface for the future chimney. It is not scary if the hole is a couple of centimeters larger than it should be.
From the inside, the gaps will be closed with a special box, and from the attic side, it will be possible to isolate the gaps stone wool or others suitable material.

Stage 5: Marking the roof for the pipe
It's no less milestone work, which involves marking the surface of the roof under the chimney. The fact is that the surface of the roof usually has a slope. Accordingly, the greater the slope of the roof, the greater should be the area of the hole cut under the chimney.

Stage 6: Preparing a hole in the roof
The hole in the roof is cut out in the form of an oval, and the greater the slope, the more area oval. To close the hole from the side of the street, special rubber seals are used in the future.
When choosing a sealant, it is very important to take into account the slope of the roof.

Stage 7: Installing the chimney
When choosing metal chimney necessary:
- keep a distance from wooden structures(40 - 50 cm), to avoid fire in the room;
- in the area of \u200b\u200bthe ceiling passage and in the attic space, the pipe must be wrapped with an asbestos sheet, which can prevent overheating of materials adjacent to the pipe.
The asbestos sheet is pre-moistened in water to avoid cracks and breaks during wrapping, and it is also wrapped with wire on top to prevent the material from slipping.
- in the steam room, the resulting hole is closed with a thin sheet metal or asbestos to reduce heat transfer between the chimney and the finish. It is possible to fill expanded clay on top of a metal sheet or put basalt insulation;
- to cover a hole in a roof rubber compressor not suitable, as it will not withstand high temperatures. A sheet of metal should be used, which is laid on the hole, and the resulting cracks are sealed with rope asbestos, abundantly moistened with cement mortar;
The easiest to install will be a sandwich chimney, which is easy to install and ensures the fire safety of the building.

Sandwich pipes, as a rule, consist of several metal sheets, between which a fire-resistant material is laid.
- a knot is installed on the roof of the bath for tight fixation of the chimney pipe;
- the pipe is installed in the prepared hole in the roof;
- the space formed between the sandwich pipe and pipes of larger diameter is covered with sand or expanded clay;
- if using a pipe bigger size undesirable, you should use a box for sandwich pipes, the cavity of which is also covered with expanded clay;
It is important to observe the interval from the sandwich pipe to the finishing materials. In no case should they touch, so as not to create a fire hazard.
The most reliable and preferred, but also quite expensive, design is a brick chimney. Before installing it, you need to carefully plan everything, not forgetting the fact that installing such a chimney in small baths is impractical.

- a hole is made for the pipe, the diameter of which should exceed the diameter of the pipe by 20 cm;
- then the chimney is led through the roof surface and insulated with a metal sheet;
- the structure is sealed by leading the edge of the metal sheet under the roof;
- then to installed pipe a metal umbrella is attached to protect it from moisture;
- Finishing the chimney is applying heat-resistant paint to it, which will protect the metal parts from corrosion.
Having finished the installation outside, proceed to the installation inside the steam room.
First, the box is insulated with basalt and sheathed with a foil insulator, and the first element of the chimney adjacent to the furnace is installed.

Then the second link of the chimney is installed, and the box is covered with expanded clay. After that, all the remaining segments are fixed, and a metal umbrella is installed.
This completes the installation of the chimney through the ceiling. As you can see, this is not such a complicated step-by-step procedure, which, however, requires certain theoretical knowledge and professional experience.
In any case, with a little effort you can make this work independently, without the help of professionals.
Useful videos on removing the chimney from the bath
bezremont.ru
Installation of pipes in the bath through the roof
The bath pipe through the roof solves the important problem of removing fuel combustion products into sauna stove and providing traction in it. When a pipe is passed in a bath through the ceiling and roof, specific problems arise related to the safety of operation. The question of how to bring the bath stove pipe through the roof is considered important issue, which must be solved taking into account existing norms and recommendations of specialists. The installation and arrangement of the pipe can be done with your own hands, but subject to the fulfillment of all requirements. 
Why you need to remove the pipe from the bath
The heart of the Russian bath is considered to be a stove, which, according to tradition, is heated with firewood. As a result of combustion solid fuel smoke is produced, containing combustion products of wood. If these harmful substances do not remove from the steam room, then concentrated carbon monoxide poisoning can occur within 15-25 minutes. Thus, the main purpose of the pipe, i.e. the chimney of the furnace is getting rid of carbon monoxide. In addition, for efficient combustion of fuel, an influx of oxygen is necessary, and the thrust necessary for combustion is provided precisely by the pipe.
In other words, the question of how to bring the pipe in the bath through the roof is related to the safety of the bath procedure and the efficiency of using the stove. The main problem in organizing the outlet of the pipe through the roof of the bath is the temperature of the rising flow. At the maximum mode, the smoke can be heated above 4500C, which creates a risk of ignition of flammable materials. This circumstance requires the adoption of fire prevention measures. In addition to safety requirements, there are certain requirements for the size of the chimney to create the necessary draft. 
The principles of arranging a chimney
The chimney is a pipe connected to the furnace furnace and ending at a certain height above the roof. Traction, i.e. the efficiency of the chimney depends on the dimensions of the internal duct, the presence of obstacles in it, the length of the pipe and the conditions for cooling the exhausted smoke. Naturally, the longer the high temperature inside the channel remains, the faster the heated smoke will rise.
Taking into account the tasks set, the following important requirements:
- reliable sealing of the entire pipeline;
- absence of obstacles in the channel, which means minimizing the number of bends and joints (especially pipes different diameter);
- maximum rise of the pipe above the roof surface;
- creation of fireproof transitions through the ceiling and roof;
- maintaining safety distances to flammable materials.
 Installation of a pipe in a bath through the roof, in principle, can be carried out in 2 ways: installation of a vertical pipe with a passage through the ceiling and removal above the roof, and the formation of an external chimney, i.e. removing the pipe from the stove through the wall to the outside and installing a vertical chimney already on the outside of the bath wall. In the latter case, there is an important drawback: the presence of a significant pipe bend, and most importantly, a sharp cooling of the flow is already at initial movement smoke, which significantly reduces traction. The vertical pipe of the bath through the roof is devoid of these shortcomings, but it poses the problem of arranging the transition through the ceiling and roof.
The most common chimney option is considered to be a bath pipe through the roof, i.e. vertical pipe outlet.
For the construction of such a chimney, it is necessary, first of all, to determine the optimal location of the pipe outlet on the roof. Taking into account the increase in the height of the pipe, it is preferable to place the pipe on the roof ridge ( maximum height baths), but such an exit is possible only in the absence of a ridge cross beam. Most often, the reliability of the roof is increased due to the presence of such roofing element, and it is not recommended to violate its integrity to remove the chimney.
 You should not have an exit in the valley area. The greatest amount of precipitation accumulates here, which requires enhanced waterproofing. The pipe must not be placed next to skylight or close to a neighboring building. It is considered optimal to place the pipe on the roof slope at a distance of about 2-3 m, in order not to damage the ridge beam when arranging the passage through the roof.
Design features of the bath pipe
The chimney of a sauna stove can be made of metal or ceramic pipe by using brickwork or using a sandwich tube. Last option is considered a modern reliable method and finds more and more wide application. In the design of chimneys, the following elements (sections) are distinguished:
- head (pipe on the roof with a probe for extinguishing sparks);
- passage node in the roof (master flush);
- attic chimney;
- passage ceiling node;
- internal chimney;
- stove outlet (iron pipe).
Valves are provided inside the chimney to control the flow of smoke.
 The dimensions of the chimney must comply with current regulations. The diameter of the chimney channel is related to the power of the sauna stove. This establishes the dependency for the pipe rectangular section: with a furnace power of up to 3 kW - the size of the pipe is at least 14x14 cm; up to 5 kW - 14x20 cm, up to 7.5 kW - 14x28 cm. at 15 kW - 160 mm2 (about 14 cm in diameter). When installing the chimney, one condition should be taken into account: the length of horizontal or inclined sections should not exceed 100 cm.
There are norms for the height of the head, and it depends on the location of the output relative to the ridge. When the output is located at a distance of 1.4-1.6 m from the ridge, the sufficient head height is 50 cm above the ridge; at a distance of 1.6-3.2 m - 10 cm or at the level of the ridge; when moving further 3.2 m - 10 cm below the ridge or flush with it. If the roof has flat view, then the height of the head is selected at least 100 cm, and if a tube is placed above 1.4 m, then it is fixed with stretch marks.
Features of passage nodes
When removing the pipe through the roof, the following problems must be solved:
- Formation of a reliable thermal barrier that protects the roofing material from overheating allowable temperature.
- Reliable hydroprotection of the pipe from precipitation and water flows flowing down the slope of the roof.
- Restoration of multi-layer bath protection to prevent heat loss and steam escape from the steam room.
In accordance with current regulations distance from the chimney to the fuel roofing material even taking into account the creation of a thermal barrier, it should be at least 14-26 cm (depending on the materials used). Thus, in a multilayer bath protection, enough big window where the protective layers are removed. To restore protection, the passage section is first of all separated from common roof. For this, additional truss supports around the pipe, which are connected by jumpers. An insulated box is created, which is filled with basalt mineral wool and covered with hydro and vapor barrier roll material. The edges protective films are formed in the form of an envelope and brought to the surface of the pipe, where they are fixed with staples or nails. All areas of the joint are reliably sealed with heat-resistant adhesives. The drainage of water and condensate flow is best done using special drainage gutters that are installed directly around the pipe.
When arranging through node on a round sandwich pipe, it is recommended to use ready-made master flush assemblies.
They are made from elastic waterproofing material and reliably protect the place of passage through the roof from moisture. The design includes a flange and an apron made of silicone polymer or rubber. The flange also has a certain elasticity, but is hardened by metallization. Such a ready-made sealing assembly is put on the pipe and tightly covers it. The edges of the apron are wound under roofing.
When installing the pass-through node, it is important to securely seal all joints. For this purpose, special adhesive compositions with increased heat resistance are used. Most often, special sealants based on silicone are recommended, which remain operational at temperatures up to 350-4000C.
The chimney of the bath plays an important role and is obligatory element when using solid fuel. When arranging the chimney and passing it through the roof, all fire safety standards must be observed, and all bath protective layers must be restored.
How to putty the ceiling with your own hands
When designing a bath, it is important to provide for a well-equipped chimney so that the combustion products can freely leave the room without creating a danger to those who are soaring. How to get the pipe out of the bath through the ceiling correctly with your own hands in steps? We will consider this issue in this article.
One of the options for the output of the chimney is to output it through the ceiling space and the roof. This option is more reliable and durable.
To make such a chimney, you can use different types materials, but, in any case, it is necessary to follow the rules of finishing technology.

Types of pipes
Today, several types of chimney pipes are used:

Increasingly, people are starting to pay attention to more expensive chimney finishes, preferring reliability and safety. Ordinary metal chimneys can cause a fire in the room, while a brick chimney or sandwich chimney reliably protects the bathhouse from fire.
Chimney pipe installation rules
There are several rules that should be followed when installing a chimney:
- before installation, it is important to carefully plan its location;
- the pipe section located horizontally from the furnace to the tie-in should not be more than 1 meter;
- a metal pipe must have a gap to flammable finishing elements of at least 1.5 m;
- the chimney should be installed so that its cut does not fall on the leeward zone. This will significantly reduce the force of natural traction;
- in the gas duct, it should be possible to clean the pipe, including from condensate.

Professionals also advise protecting a single-walled pipe with a layer of heat-insulating material.
The most commonly used for this is basalt fiber. Outside, the insulation layer is closed with a galvanized steel casing. This will prevent condensation from forming and protect the attic from fire.
Stages of installing chimneys in the ceiling
It is conditionally possible to divide the process of installing a chimney into the ceiling space into several stages.
Stage 1: Design
First you need to draw up a detailed plan for the location of the chimney.
It is important that the chimney is located conveniently for steamers, is not too close to the supporting beams and rafters, and also provide the necessary clearance to flammable finishing materials.


Stage 2: Purchase of a chimney and necessary materials
At the design stage, it is also worth deciding what type of chimney will be installed in your bath. After the choice is made, you can safely go shopping. Do not forget to also check with the consultants in the store what additional materials will be needed to install the chimney.

Stage 3: Marking the ceiling surface for the chimney opening
In order to correctly determine the location of the future chimney, you will need a building kit, with which we mark the place where the pipe outlet from the furnace should be located.

Stage 4: Cut a hole for the pipe
According to the markings made earlier, we make a hole in the ceiling surface for the future chimney. It is not scary if the hole is a couple of centimeters larger than it should be.
From the inside, the gaps will be closed with a special box, and from the attic side, it will be possible to isolate the gaps with stone wool or other suitable material.

Stage 5: Marking the roof for the pipe
This is an equally important stage of work, which involves marking the surface of the roof under the chimney. The fact is that the surface of the roof usually has a slope. Accordingly, the greater the slope of the roof, the greater should be the area of the hole cut under the chimney.

Stage 6: Preparing a hole in the roof
The hole in the roof is cut out in the form of an oval, and the greater the slope, the larger the area of the oval. To close the hole from the side of the street, special rubber seals are used in the future.
When choosing a sealant, it is very important to take into account the slope of the roof.

Stage 7: Installing the chimney
When choosing a metal chimney, you must:

The asbestos sheet is pre-moistened in water to avoid cracks and breaks during wrapping, and it is also wrapped with wire on top to prevent the material from slipping.
In the steam room, the resulting hole is covered with a thin metal sheet or asbestos to reduce heat transfer between the chimney and the finish. On top of the metal sheet, you can fill it with expanded clay or put basalt insulation.
A rubber seal is not suitable for closing a hole in the roof, as it cannot withstand high temperatures. A sheet of metal should be used, which is laid on the hole, and the resulting cracks are sealed with rope asbestos, abundantly moistened with cement mortar.
sandwich chimney
The easiest to install will be a sandwich chimney, which is easy to install and ensures the fire safety of the building.

Sandwich pipes, as a rule, consist of several metal sheets, between which a fire-resistant material is laid.
Work plan:
- a knot is installed on the roof of the bath for tight fixation of the chimney pipe;
- the pipe is installed in the prepared hole in the roof;
- the space formed between the sandwich pipe and pipes of larger diameter is covered with sand or expanded clay;
- if the use of a larger pipe is undesirable, a sandwich pipe box should be used, the cavity of which is also filled with expanded clay;
It is important to observe the interval from the sandwich pipe to the finishing materials. In no case should they touch, so as not to create a fire hazard.
brick chimney
The most reliable and preferred, but also quite expensive, design is a brick chimney. Before installing it, you need to carefully plan everything, not forgetting the fact that installing such a chimney in small baths is impractical.

Work plan:
- a hole is made for the pipe, the diameter of which should exceed the diameter of the pipe by 20 cm;
- then the chimney is led through the roof surface and insulated with a metal sheet;
- the structure is sealed by leading the edge of the metal sheet under the roof;
- then a metal umbrella is attached to the installed pipe, protecting it from moisture;
- Finishing the chimney is applying heat-resistant paint to it, which will protect the metal parts from corrosion.
Having finished the installation outside, proceed to the installation inside the steam room.
First, the box is insulated with basalt and sheathed with a foil insulator, and the first element of the chimney adjacent to the furnace is installed.

Then the second link of the chimney is installed, and the box is covered with expanded clay. After that, all the remaining segments are fixed, and a metal umbrella is installed.
This completes the installation of the chimney through the ceiling. As you can see, this is not such a complicated step-by-step procedure, which, however, requires certain theoretical knowledge and professional experience.
In any case, with a little desire, you can do this work yourself, without the help of professionals.
Useful videos on removing the chimney from the bath
I'll talk about the most fire-hazardous part of the chimney: cutting the wall - cutting the ceiling, aka a passage unit or passage box. Based on what I know from the Internet and from my own experience, it is illiterate cutting that is the cause of most fires. Especially in the baths.
What does the problem look like?
The chimney pipe passes through the wall or ceiling, heats up the unit, the wood is charred and on the second or third or one hundred and third kindling, it flares up. Moreover, it flares up vilely - in the attic room or from the side of the street. That is, you are sitting indoors, and at this time the building is burning where you cannot see it.
Like this:
Now about why it comes out like that.
1) The passage node was passed not with a sandwich, but with a bare pipe
2) The passage box is stuffed with sand or earth, and not with expanded clay or mineral wool or, at worst, with bricks broken into small pieces. For those who do not really understand why sand or earth is not suitable - a video of making coffee on the sand
3) cutting is done without ... a box! Very economical fire victims like to do this cutting.
So what? We wrap it with asbestos and okay!

4) Make all the mistakes from the first three points at the same time!


Here is a test video!
If you carefully read everything that is written above, then after watching the video you yourself will find editing errors.
Traditionally in the Russian bath set metal ovens for normal operation which it is necessary to properly plan and install the ceiling passage unit for the functioning of the chimney. The principle of the device will depend on the degree of readiness of the ceiling, as well as on where you need to bring the pipe - into the attic or attic, through the roof or to the second floor. The fluffing of the chimney in the bathhouse is responsible for the level of compliance with fire safety standards when the pipe passes through the ceiling and roof ceilings.
How to equip a passage hole in a bathhouse or sauna
It is necessary to equip the pipe passage through the ceiling in the bath to install a normally functioning and most importantly safe chimney system. It is impossible to skip this stage, since only in a specially equipped passage hole will it become possible installation transition pipes from the branch pipe in the furnace design itself.
hole in stone wall should be located directly opposite the nozzle. Only in this case it will be possible to exclude the formation of distortions during the installation of the transition pipe. Before properly equipping the hole, the ceiling is cut in compliance with the work algorithm described below.
The hole can be reinforced with overlay plates with through holes. It is correct that the pipe is directed to vertical position.
As for the plates, they can be made with your own hands from a finished iron sheet of the desired thickness.
The device for the passage of a round pipe through the ceiling of a bath with various types of PPU
Most convenient option in order to make a chimney device wooden bath- ready-made factory PPU for the chimney, taking into account the diameter of the pipe. Before mounting the assembly, take time to prepare the surfaces in contact with wood finish ceiling, as well as the inner part of the surface of the box, in need, requiring proper thermal insulation.
When it is necessary to install a factory-type PPU, before starting work, it is covered with a heat insulator from all sides, with the exception of the front. Optimal solution- practical and environmentally friendly basalt wool with increased resistance to high temperatures. As part of such a heat insulator, binders that can withstand temperatures up to 1000 degrees. An additional plus will be the insulation of the pipe with foil wool to improve the safety of the structure during operation.

As soon as the ceiling chimney pass-through unit is correctly and reliably insulated, proceed to prepare the site for installation:
- To do this, perform markings on the surface of the ceiling - at the location chimney.
- The contours of the hole should be slightly inferior to the parameters of the front panel of the assembly so that there are no difficulties with fixing to the skin with self-tapping screws.
- A hole is cut out along the contours, the edges are insulated with the same insulator that was used to protect the passage node.
- To increase the level of security, sheets of thin but durable metal are additionally used.
- A ceiling-through assembly for a bath is mounted in the prepared hole, while for convenience it is initially mounted on a pipe, after which the structure is already fixed in full assembly.
The finished passage with the pipe is fixed with self-tapping screws using pre-prepared holes.

Ceiling preparation and installation
After making sure that it was possible to install the pipe in the correct vertical position, proceed to the final operation. The voids formed in the passage node are densely filled with material for thermal insulation - all the same basalt wool ( the best option when it is necessary to arrange a reliable PPU fire-fighting unit), or use expanded clay.
As an option, it is worth considering sand to fill voids, but with the understanding that in relation to thermal insulation properties it is noticeably inferior to basalt wool and expanded clay. In addition, as you use the grains of sand will gradually crumble down through the cracks, penetrating into the oven and clogging it from the inside.
The subsequent algorithm of actions will depend on the chimney outlet option. There are several ways to implement: installing a pipe through the roof or chimney in the bath, on the second floor or attic room. The main difference between the methods is in the principle of finishing. So, if the output of the chimney was originally carried out on the attic or roof, then the passage through the above steps can be considered complete.

If you need to run a pipe through the ceiling to the attic or to the second floor, then you will need to take care of the aesthetic component - mask the pipe with a protective metal screen fixed to the floor with self-tapping screws. Only after that it makes sense to proceed to the next stage - the removal of the pipe through the base of the ceiling of the second floor, and then the roof through the attic or attic space.
Pipe passage device without the use of factory PPU
It is possible to bring the chimney outside without a special passage structure. In this case, it will be mandatory to insulate the edges of the holes with a material that is immune to high temperatures. If you follow the recommendations regarding compliance with fire regulations, then the distance from the pipe to flammable materials should not be less than 36 cm.
Do-it-yourself foam making: process features
It is important not to forget that the installation of the chimney should not resist the movement of the pipe, which in the bath under the influence of high temperatures will expand, requiring additional space.
From the side of the ceiling, the pipe is necessarily protected by non-combustible material, and from the side of the second floor or attic it is filled with a heat insulator that is resistant to high temperatures. Most affordable option- expanded clay. Better than him, only basalt wool with a melting point of up to 1000 degrees and an additional foil layer will cope with fire insulation.

Features of the passage for a brick chimney
Among materials capable of maintaining temperature for a long time, maintaining a comfortable microclimate in the room, brick rightly occupies one of the leading positions. When it is necessary to properly equip a pipe passage for brick oven, the main thing to focus on is the device of a special penetration to thicken the chimney wall in the area of contact with the ceiling.
If it is not possible to make a penetration, then in the surface ceiling base prepare a hole with a diameter slightly larger than the diameter of the chimney, then following the previously described algorithm for driving a round furnace through the ceiling:
- arrange protection for the edge of metal strips or minerite;
- sheathe the entrance from the side of the living room with a metal sheet;
- fill voids in the attic or second floor area with heat-insulating, high-temperature-resistant material;
- mask the cutting from the side of the attic or the second floor with a metal sheet.
With such a passage arrangement, you can be sure that the brick pipe is reliably insulated and retained the aesthetic component.

The subtleties of organizing a brick chimney through the roof
The main requirements for the passage of a brick chimney through the roof are tightness and fire safety. In order to achieve efficiency on the second point in the zone of contact of the chimney with flammable materials, it is important to monitor the temperature level, not allowing the thermometer to rise above 50 degrees Celsius. In the case of brick structures, this problem is solved simply - by increasing the thickness of the walls with a special penetration device and taking into account the slope of the roof.
Making out the passage brick pipe through the roof of the bathhouse, on each side it is reinforced with a special box.

An important point is compliance with the requirement for the distance between the wooden elements and the pipe, it should not be more than 25 cm. If it is not possible to achieve the desired distance, mount additional elements, thus minimizing damage to the waterproofing and heat-insulating layer during the subsequent removal of the pipe to the roof.
During the installation of the chimney, it is placed in a separate box. The membranes and films inside it are carefully cut. In the corners, the film is cut at an angle, and the edges are folded and fastened with staples to the elements truss system. To improve the sealing, the edges and cuts are reinforced with adhesive tape. Not only the reliability and durability of the structure, but also the safety of the entire premises will depend on the conscientiousness of the work at this stage.

Another option should be considered in the case when the temperature of the pipe in the roof area does not exceed 50 degrees. Only then can the edges of the diapers be fixed on the pipe with adhesive tapes and sealants, with particular emphasis on the quality of sealing. The space between the brick pipe and the rafters is laid resistant to moisture and high temperatures. thermal insulation materials, including the basalt wool with a foil surface described above.
In conclusion, it remains to be noted that the principle of arranging a passage unit through the ceiling to the second floor, attic or through the roof differs slightly and depends on the material of manufacture, diameter. The main condition for safe operation the furnace in the bath room will be a device for reliable thermal insulation of the passage in the base with materials resistant to high temperatures and open fire and compliance with the rules regarding its tightness when the pipe is taken out.
When building and equipping a fireplace or stove, fire safety rules must always be observed. The passage of a brick pipe through the ceiling, made in the right way, will not only ensure the environmental friendliness of the structure and the safety of the room during heating, but also strengthen the structure, preventing unwanted cracks on the walls and ceiling.
Rules for bringing the heating element outside
According to section SNiP 6.6 about " Furnace heating”, the developer must adhere to the following generalized rules:
- Subject to the rules for the location of a brick chimney, contact of the chimney with any combustible surfaces and materials is excluded. For their implementation, as a rule, a passage unit is installed in the ceiling made of non-combustible materials. Here, the strictest observance of fire safety standards is necessary, in particular, an indent of 130 mm in size when passing through hardly combustible surfaces and up to 500 mm for a wooden floor (or any other, consisting of flammable substances).
- It is important to keep a distance between walls, partitions and the heating element. Depending on the type of brick, the thickness of the walls of the chimney, the bonding solution, the distance varies from 20 to 50 centimeters.
- The clearance between the upper surface of the oven and the ceiling must be at least 350 mm if thermal protection is present and 1000 mm if not. The figures vary depending on the material of the heating element, the frequency of using the stove, the roof.
Manufacturers of chimneys and stoves, builders usually provide documentation, materials that describe in detail the dimensions of the indents and installation rules.
Through the roof
brick construction you need to build as close as possible to the highest point of the roof of the house.
It is recommended to locate the chimney closer to the highest point of the house and build it 0.5 meters above it. The size of the seams, the filling of cracks, the insulation of the pipe itself depends entirely on the selected material. The installation of the heating element, as a rule, occurs through a professional coating. However, most cases of leakage through the roof, for all its reliability, are precisely in the places of passage heating pipe through corrugated board. To avoid this, you can resort to the methods of the times when most houses used stove heating. The method involves a thickening of a unique shape at the base of the chimney, which prevents drainage along the walls. However, this technique is now not popular, and most often attention is paid to the correct insulation of the roof around the base of the pipe.
Connection to pipes with a rectangular cross section
To isolate brick chimney, at the junction of the profiled sheet, a special metal belt is installed, called an apron. The individual components of the heat-insulating element are brought under the corrugated board by 1.5-2 centimeters. In places where the pipe passes through the ceiling, a special hermetic substance is poured. This prevents the formation of excessive moisture.
Through the wood ceiling
If the ceiling is made of wood, then fluff must be made in the pipe structure.
Chimney passage through wooden floor carried out with the help of a deliberate thickening of the outer walls of the chimney, called "fluff". The thickness determines how often and intensively they will heat. Masonry ranging from one brick to one and a half. Subject to fire regulations, a gap of 3 centimeters is made between the edge of the opening and the chimney. The ends are upholstered with several layers of felt or asbestos board 10 mm thick. Then they plaster. The surface can be protected with asbestos cement boards 40 millimeters thick, which are fastened reinforced mesh or wire on cement mortar.
A simplified version involves the purchase of a special ceiling unit with a reinforced box, filler and insulation. The structure is covered with an asbestos sheet on the outside and foiled mineral wool inside. The thickness of the layers is approximately 3-5 cm. The gaps are filled with a heat-resistant sealant.
When an ordinary ceiling
The passage of the pipe in this case is done in the same way as through a wooden one. However, the exit of the pipe through ordinary ceiling is not always possible. The way out is the following:
- Seal the edges of the ceiling with heat-resistant insulating material.
- Close them with metal strips or minerite.
- Sew up with a metal sheet from the living quarters.
- Fill voids on the upper side with heat-resistant material.