Installation of ondulin: step by step instructions
When choosing a material for finishing the roof of their house, many homeowners opt for ondulin. This sheet material appeared with us not so long ago, it is a light, durable and environmentally friendly coating suitable for both new roofs in houses under construction and for replacing old roofs. It is produced in the form of sheets of wavy shape or in the form of sheets of tiles. The advantage is the possibility of mounting euroslate, as ondulin is sometimes called, on top of the old roof, without dismantling it.
Do-it-yourself installation of ondulin can be carried out by any novice builder without work experience. The main thing is that the roof structure is pitched.
The mass of a single sheet is about 6 kilograms. This makes it easy for one person to work with them, and transportation and unloading will not cause any problems. In order for the installation to be carried out qualitatively, it is necessary to follow the instructions and pay attention to the nuances.

Cutting a sheet of ondulin in the transverse direction is easily carried out using a conventional saw for wood. To prevent bitumen sticking to the teeth and facilitate cutting, it is recommended to moisten the blade with water. It will be more effective to lubricate the saw with oil or silicone grease. To facilitate cutting, you can use a jigsaw.
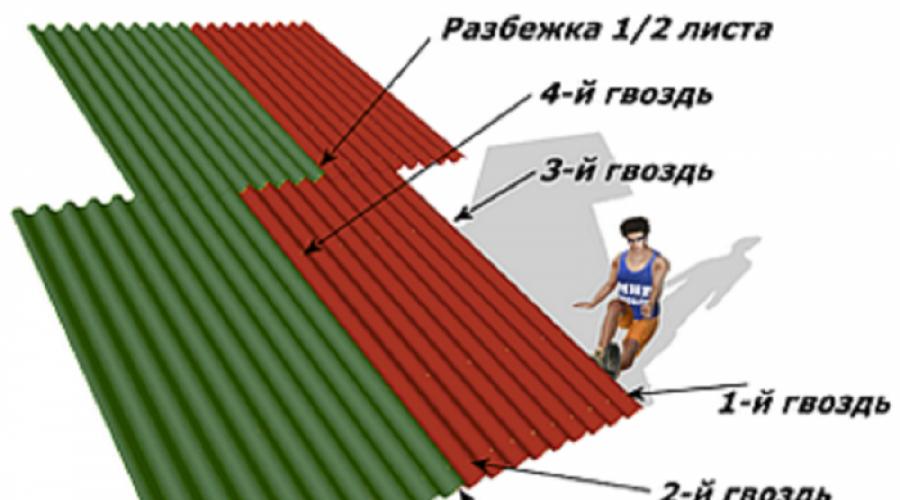
You can cut sheets along the wave using a sharp construction knife. The layout of the sheets on the roof is carried out in a checkerboard pattern, while it is imperative to use the level for control. Fastening starts from the lower corner of the roof slope located on the leeward side. It is imperative to ensure that no junction of four different sheets of ondulin forms in any place on the roof. To avoid such a situation and carry out the layout in a checkerboard pattern, you need to start each new even row from half of the whole sheet.
![]()
If the sheet has been fixed incorrectly, it cannot be reinstalled. It is deformed and holes for fasteners remain. Such a sheet is considered damaged, it must be thrown away and a new one taken.
Ondulin - the material is quite elastic. When installing it, do not apply force, this can lead to its deformation. Often a situation arises when a couple of centimeters remain to the edge of the roof, in such cases it is necessary to add a new sheet, and not stretch the penultimate one. If the sheet is held in tension, after a while it will begin to deform.
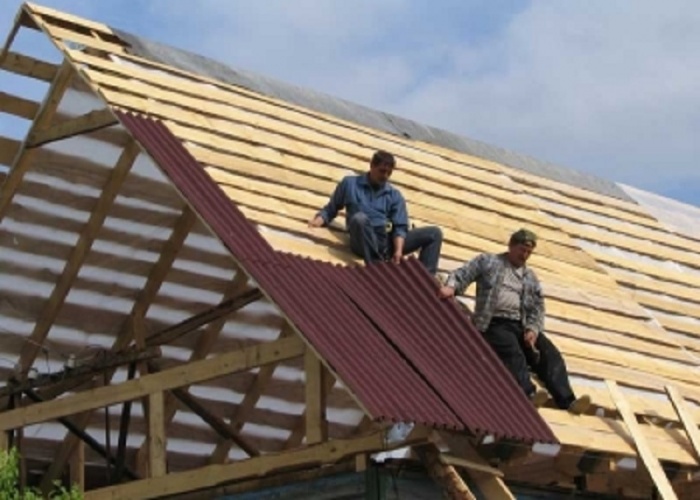
It happens that during the installation of the roof it is necessary to move along the already fixed coating. To avoid damage to the sheets, it is necessary to step on the top of the wave, and not in the depressions. For reinsurance, it is better to put the board on several waves.
Rules for calculating the number of sheets of ondulin
Calculating the required amount of ondulin is quite simple. If you do not want to carry out the calculations yourself, you can use online calculations. To do this, you need to know the dimensions of the roof. You can roughly estimate the amount of material needed for laying yourself. To do this, you need to calculate the total area of \u200b\u200ball roof elements, add them up, and divide the result by the area of \u200b\u200bthe sheet used, minus overlaps and overlaps. The correction for waste is taken at about 15 percent. The amount of waste depends on the complexity of the roof, the more complex it is, the more there will be.
Installation of the crate for laying ondulin is considered mandatory. This material is plastic and can change shape when heated. For lathing, a 50 by 40 beam is recommended, which is attached to the rafters, forming a lattice structure. The step of the necessary crate directly depends on the slope of the roof or its individual elements. If the angle of inclination is less than 11 degrees, it is necessary to build a continuous crate using boards, plywood or OSB boards. When the slope of the roof elements is in the range from 11 to 16 degrees, the gap between the battens of the crate is maintained no more than 45 cm. Steep slopes, a roof angle of 16 degrees or more are equipped with a crate in increments of 60 cm.
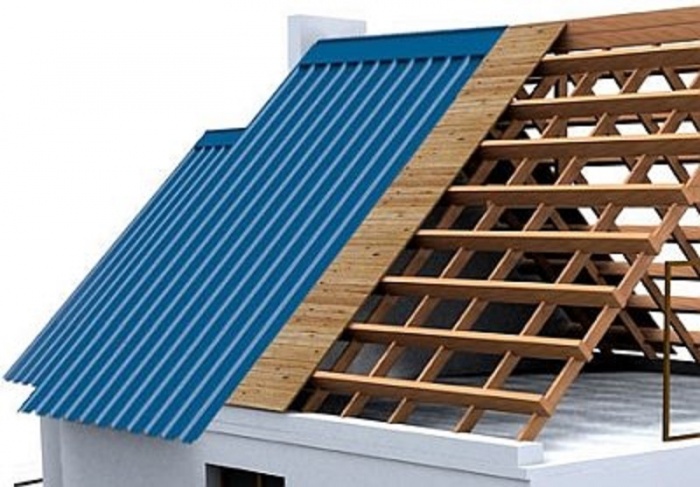
Advice! For reinsurance, you can perform a continuous crate, regardless of the slope of the roof elements. This guarantees the absence of deformation and sagging of ondulin sheets.
Any operation must be controlled with a plumb line and level. It is not necessary to install insulation or waterproofing under ondulin, this is only at your own request. Laying sheet material begins with the starting bar.
Marking for fasteners must be done so that the holes are located above the bars of the crate. If the geometry of the roof involves the construction of complex elements, it is necessary to draw a diagram of the layout of the sheets and number them. Installation must be carried out according to the drawn up scheme.
Rules for fastening sheet material
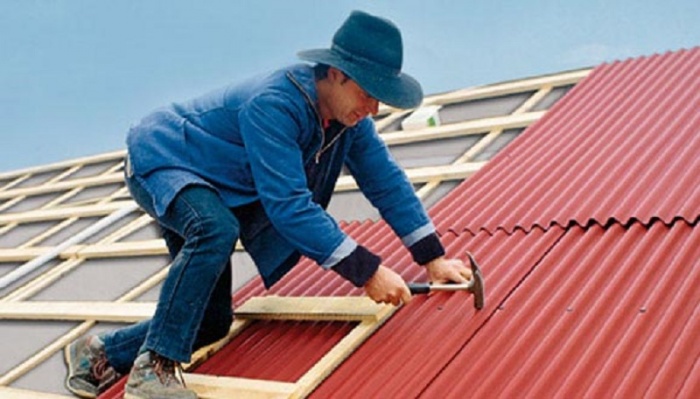
In order for the roof to be reliable and last for many years, you must strictly follow the ondulin installation instructions. The first sheet is mounted in the lower corner. It is chosen by calculating the most characteristic wind direction, and laying starts from the opposite side. This will ensure that the covering wave does not have a subversive force.
Due to the tendency of ondulin to soften from heat and become brittle in the cold, the layout of the sheets must be carried out in a fixed temperature range.
Installation is carried out at an outside air temperature of 3 to 29 degrees Celsius. This avoids cracks or breaks in sub-zero temperatures, as well as stretching and deformation in hot weather.
If you need to replace several sheets urgently, but the temperature does not allow, you can carry out the work by preparing the holes for the fasteners in advance, and carry out all actions very carefully.
To speed up the installation process and save material, some attach stretched sheets. During temperature changes, these sheets are deformed, and to eliminate the consequences, it will be necessary to cover the entire roof again.
The ease and quality of installation depends on the correct installation of the starting sheet, since the subsequent ones largely fit on it. It must be aligned along the edge of the end of the roof and the eaves. The protrusion of the ondulin sheet beyond the eaves should not exceed 40-50 cm. Exceeding this parameter can cause the sheet to sag, which will spoil the appearance. The final fastening of each sheet is carried out after a thorough level check.
Preparatory work on marking and cutting sheets must be carried out on the ground. After that, numbering is carried out according to the laying plan. After that, they begin work on the roof, strictly adhering to the scheme.
During work on the arrangement of the roof with ondulin, the following values \u200b\u200bare maintained:
- when the angle of inclination of the roof parts is not more than 11 degrees, adjacent sheets are laid with a longitudinal overlap in the width of two waves, and the transverse overlap is 19 cm;
- if the roof slopes are located with a slope of 11 to 16 degrees, then the longitudinal overlap is reduced to the width of one wave, and the transverse overlap, respectively, will be 15 cm;
- also, overlapping in the width of one wave is used on roofs and its elements with a slope of 16 degrees, and the transverse one decreases to 12 cm.
Fixing Rules and Elements
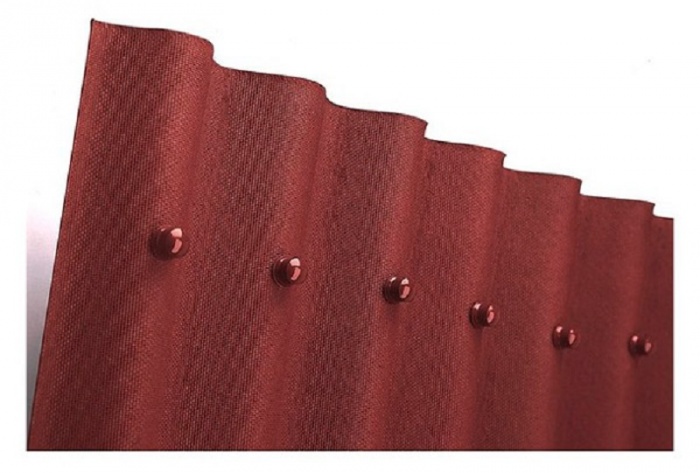
A special type of fastener is used - a nail with a cap, which, after driving it into the crate, closes and protects the metal from the effects of the atmosphere, thereby preventing corrosion.
Not so long ago, a new type of fastener appeared - special hardware for fixing ondulin with a reinforced plastic closed hat.
The hardware is hammered into the upper point of the wave of the sheet according to the markup, according to the scheme, previously developed, based on the instructions for the material.
The arrangement of the roof covering with your own hands ends with the installation of additional elements, such as a cornice, a ridge, a wind bar. These details create additional protection against leaks and give the roof a finished look. At the top, where the roof slopes converge, a ridge is mounted and fastened on both sides. Before installation, it is recommended to carry out insulation.
The wind bar is placed on the crest of the wave at an overlap of at least 10 cm wide.
Cosmetic painting of ondulin sheets
The range of colors used ondulin is limited to four colors: black, green, brown, red. Any of them during operation will inevitably burn out under the influence of ultraviolet radiation.
The way out is to paint with any color you like. This will allow you to update a burnt out or initially create a unique look of the roof. The paint used for such material is made on the basis of bitumen and must be resistant to precipitation and ultraviolet radiation.