Installation of metal tiles: instructions from professionals
Roofs covered with metal tiles are currently very popular. This is explained simply, the metal tile has excellent performance characteristics and, at the same time, is quite affordable. If you plan to install metal tiles yourself, the instructions below will help you with your work.
Necessary tools and materials
To perform the work, you will need the following types of construction tools:
- Sheet cutting tool. This can be a circular saw (requires a blade with victorious teeth), an electric jigsaw, metal shears (manual or electric).
- Screwdriver with speed control function;
- Roulette;
- Long straight rail (you can take a long section of the profile for attaching drywall);
- Marker for marking;
- Gun for applying silicone sealant.
Advice! There is no “grinder” in the list of tools, since cutting sheets of metal tiles with abrasive wheels is prohibited. However, this tool can be useful in roofing work. For example, to create a strobe in the wall when installing an internal junction bar.
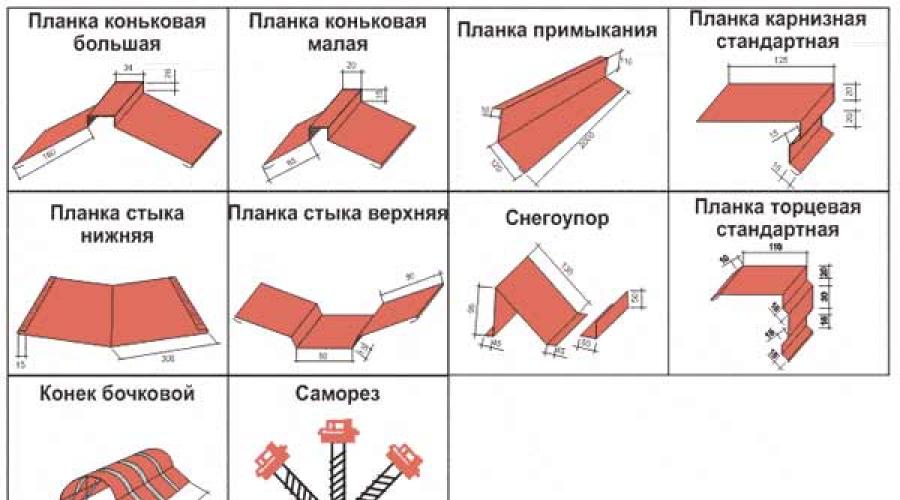
To create a full-fledged roof made of metal, in addition to sheets of roofing material, the following components will be required:
- Skate plank. This element can be semicircular or flat. When choosing the first option, you will need to install a ridge cap.
- Cornice and end strips;
- Valleys (internal and external), grooves;
- Adjacency strips;
- Seals (universal and profiled);
- Ventilation pipes;
- ventilation outlets;
- Antenna outputs;
- Exit for the chimney pipe;
- Roofing self-tapping screws, the heads of which are painted in the color of the metal tile coating. Self-tapping screws are equipped with washers made of EPDM rubber, which serve to seal the fastener points.
Advice! It is advisable to purchase branded self-tapping screws for fastening metal tiles. In this case, the service life of the fastener will be approximately equal to the service life of the coating itself.
The list of necessary components for the roof and their number depend on the roof project.
Stages of work

Accessories required for the installation of a metal roof
When carrying out roofing work, this instruction must be taken into account - the installation of metal tiles is carried out in a strictly defined order. First of all, the truss system is being built, according to the developed project.
Then you need to check parameters such as:
- Horizontal ridge and eaves;
- The correctness of the shape of the slopes and their flatness;
This can be done by conducting control measurements. If deficiencies are identified, they must be eliminated with the help of additional elements.
After the rafter system is completely ready, you can read the roofing work. As recommended by the instruction, the installation of metal tiles will be performed after the following operations:
- Calculation of consumables (metal tiles, self-tapping screws, components, waterproofing, insulation.);
- Installation of a cornice and frontal board, on which hooks are mounted under the gutter;
- Installation of waterproofing and construction of crown bars;
- Construction of a crate with the installation of reinforcement in places of greatest vulnerability (at the intersection of slopes, in the area of \u200b\u200bthe exit of the pipe, at the roof windows, etc.);
- Installation of the cornice strip;
- Installation of internal valleys and aprons;
- Laying roofing material, that is, sheets of metal;
- Installation of ridge and end strips;
- Installation of external valleys, aprons, installation of external junction strips;
- Installation of accessories provided for by the project (antenna and ventilation outlets, roof ladders, snow retention devices, etc.);
- Mounting ;
- Post-repair maintenance, including cleaning of the roofing and touching it up.
Let's consider the stages of work in more detail.
Calculation of the amount of consumable

Scheme for calculating the amount of metal tiles
Calculations are made after measurements of the roof. To calculate, you need to know the length and width of the slopes, as well as the area of \u200b\u200bthe roof.
When calculating the amount of roofing material, you need to find out such a parameter as the effective or working width of one sheet of metal tiles. For most manufacturers, this parameter is 1.1 meters.
Knowing the length of the slope and the working width of the metal tile, it is easy to calculate how many sheets are required for laying in length.
For example, if the length of the ramp is 6 meters, then 6 sheets will be required (6 m divided by 1.1 m and rounded up the resulting figure).
According to the instruction of the metal tile - installation can be carried out in one or more rows. Despite the fact that the manufacturer can make to order a sheet of metal up to 8 meters long, such long sheets are rarely used in work.
The fact is that with such a length of the sheet, the risk of damage during transportation, unloading and installation is too great. Yes, and working with such a lengthy material is extremely difficult.
To calculate the amount of materials for hydro and thermal insulation, you need to know the area of \u200b\u200bthe roof. At the same time, it should be remembered that the membranes are not laid tightly, but quite freely, and at the place of joining of the panels, it is necessary to make an overlap of 20 cm wide.
When calculating the number of self-tapping screws required, it is assumed that eight screws are required for each square meter of roofing material. Eight self-tapping screws are also installed for each linear meter of strips (ridge, end, cornice).
Installation of frontal and cornice boards
Both of these elements serve to ensure that the structure has acquired additional rigidity. The frontal board is attached to the ends of the protruding rafter legs, and the eaves fit into specially made grooves on the rafters.
On the cornice board, in turn, grooves are made to strengthen the long hooks for attaching the gutter. If short hooks are used, they are attached to the frontal board. In the latter case, the installation of a cornice board is desirable, but not required.
The procedure for strengthening long hooks:
- Long hooks can provide sufficient security for the gutter, so they are used more often. They are installed in grooves prepared on the eaves board or directly on the rafters. The step of installing the hooks corresponds to the step of the rafters. Both long and short hooks are installed in increments of 600 to 900 mm. It is not recommended to increase the pitch of the hooks, as the gutter may not withstand the snow load.
- To make the water from the roof go faster, the gutter is installed with a slope. must be at least 5 mm per meter of gutter. To achieve the required slope, the hooks are installed on the cornice board with a vertical offset.
- To calculate the displacement value, the formula H = 0.005 x L is used, where the letter L denotes the distance between the first and last hook.
- At the first stage of work, the first and last hooks are strengthened with an offset calculated according to the above formula. Then a marking cord is pulled between them, and the remaining hooks are attached, according to the formed line.
Cornice filing
The next stage of work is filing the eaves. If a metal tile is used as a roofing, the installation instruction for filing recommends using a metal profile that has the same coating as the main roofing material.
You can hem the cornices with boards, but this solution clearly loses from an aesthetic point of view.
To carry out filing under the installed frontal board, a bar is horizontally stuffed, then the transverse bars are strengthened. The resulting crate is used to attach the hemming material.
Advice! To ensure normal ventilation of the under-roofing space, it is necessary to leave gaps between the panels of the material for filing. Another option is to create one large gap between the wall and the filing. To protect the roof from penetration of birds and insects, a grate with a small cell is installed on the gaps.
Waterproofing device

Waterproofing the roof before laying metal tiles
To ensure ventilation of the insulation layer, it is recommended to lay waterproofing films on a counter-breech, which is stuffed over the main rafters from boards 50 mm high.
The film is attached to the rails with a construction stapler, and then finally reinforced with an external counter-lattice.
Most often, they are laid along the rafters. The overlap between panels must be at least 20 cm on roofs with a slope angle of 30 degrees or more. On more gentle slopes, it is recommended to make a gap of at least 25 cm.
Laying waterproofing with a stretch is a big mistake. The material must be spread freely, with a slight (10-15 mm) sagging.
Modern waterproofing films, which have a high steam throughput and can withstand significant water pressure, can be mounted without a gap with a heater. In this case, installation of an internal counter-lattice is not required.
Construction of the crate
After the counter-lattice has been built on top of the waterproofing, the instructions for installing the metal tile recommend starting the construction of the batten.
For this, boards with a section of 32 x100 mm are used. Only for the first purlin from the eaves, it is recommended to take a board with a large (50 x100 mm) section.
The distance between the first and second lathing is 280-300 mm, further the lathing step is determined by the wave step of the selected type of metal tile. So, in most cases, the distance between the boards will be 350 mm.
In the most vulnerable places of the roof, the crate is made continuous. These places include:
- Places of intersection of the slope with the formation of internal corners;
- Outlets of chimney pipes, ventilation pipes, antennas and other devices;
- Places for installation of roofing accessories (stairs, snow guards, etc.).
In addition, the reinforcement of the crate is carried out on both sides of the ridge bar.
Installation of the cornice strip
The bar is installed over the hooks for attaching the downpipe. It should be fastened tightly to eliminate the occurrence of noise effects in windy weather.
To fasten the bar, self-tapping screws are used, eight pieces per linear meter.
Installation of lower valleys and internal aprons

Installation diagram of the lower valleys
Valleys (finished roofing detail) are installed in the inner corners of the roof. The plank is attached to a solid crate using self-tapping screws, the screw pitch is 300 mm. The overlap at the joints of the valley planks must be at least 100 mm.
An internal apron is mounted at the outlet of the brick chimney pipes.
This is done even before the metal tile is laid - the instruction recommends the following procedure:
- Choose the appropriate size junction strips;
- Using a grinder, make a strobe on the surface of the pipe;
Advice! You need to ditch along the brick, and not along the seam of the masonry. The strobe must be at least 15 mm deep and is not made strictly horizontally, but upwards with a slight slope.
- Bring the waterproofing material to the surface of the pipe and glue it with adhesive flight (the waterproofing must be heat-resistant!);
- Fill the strobe with silicone sealant and insert the edge of the abutment strip into it;
- Strengthen the bar with self-tapping screws;
- Install the inner apron on all sides of the pipe;
- Make a "tie", pointing it to the gutter or to the nearest valley.
Laying sheets of metal
After completing all the preparatory work, you can start laying the roofing material. Consider how to mount a metal tile.
On a gable roof, the installation of sheets can be started both from the right and from the left end.

Laying sheets of metal
In the first case, the overlap of the sheets will be formed due to the overlap of the last wave of the previous one with the next sheet. And in the second - the next sheet will slip under the previous one. It is up to the installers to decide which direction of installation to choose, the main thing is that the overlap of the roofing material is sufficient.
The easiest way is to stack the sheets in one row. To avoid distortions, the sheets are not strengthened immediately to the crate. First, the first sheet is not rigidly fixed with one self-tapping screw.
Then I lay the second one next to it and, after leveling, fasten them with self-tapping screws to each other (without fixing them to the crate). Do the same with the third and fourth sheets.
Then a block of four sheets fastened together is aligned along the cornice and, only then, attached to the crate.
However, such a scheme for mounting a metal tile is possible only on slopes of small length. In most cases, the material has to be laid in several rows.
In this case, the first two sheets are assembled into a block in the same way, but the third sheet is stacked above the first. The fourth leaf, respectively, is higher than the second.
The result is a block of four sheets, which, after alignment, is fixed by screwing to the crate.
The greatest difficulties arise when laying sheets on a triangular slope. For this case, there is its own installation instructions - the metal tile begins to be mounted from the center of the slope.
This must be done by aligning the center line of the slope and the center line of the first sheet of metal. Further installation is carried out to the left and to the right of the first sheet.
The main difficulty is that the sheets will need to be cut. It is more convenient to markup in place, using a home-made tool, which roofers call "devil".
This is a rectangular structure made of boards 100 mm wide, which are hinged to each other. The distance between the inner surface of the board on the left side and the outer surface of the board on the right should be 1.1 meters.
Using this tool is easy. The sheet to be cut is set in place.
A “devil” is applied to it so that the vertically located board lies on an oblique slope, and the horizontal boards are parallel to the eaves.
The marking line is drawn along the outside of the second board, located vertically. Then the sheet is removed and cut according to the markup.
General rules that must be followed when installing metal tiles
In the event that a metal tile is used, the installation instructions prescribe to adhere to the following rules:
- The self-tapping screw is always screwed into the lower crest of the wave in the place where the material is adjacent to the crate;
- Since the edge of the coating experiences the largest wind load, when fastening to the lower crate, the screws are screwed in through one wave, and the screws are located above the step;
- In other places of the coating, the screws are screwed in at a minimum distance from the step. The fact is that in this place their hats are almost invisible, as they are in the shadow falling from the step.
- To ensure a better fit of the sheets, it is necessary to shift the centers of the fasteners (by 3-5 mm) at the place where the overlap is formed. On the top sheet - place the screws a little closer to the overlap, on the bottom - a little further from the overlap.
Advice! Here is the recommendation that the instruction contains - a metal tile is a material that is quite easy to damage with careless handling, so you should move very carefully along the reinforced sheets of the metal tile, stepping only into the deflections of the waves in the places where the battens are located.
Installation of ridge and end strips

Ridge rail mounting scheme
The end strip is both protection of the coating from tearing off by the wind, and a decorative element that improves the appearance of the roof.
The waterproofing material must be brought over the board and covered with a finished additional element.
Installation rules:
- The plank is mounted in the direction from the eaves to the roof ridge;
- Fastening is carried out using self-tapping screws, the screw pitch is 500 mm;
- When joining the planks, the overlap should be 100 mm;
- The end strip is mounted so as to block the upper crest of the wave of the metal tile, otherwise water may get under the roofing.
The next stage of work is the installation of the ridge bar. It can be semicircular or flat. Fastening is carried out at the top of the wave with a step of 200-300 mm.
Roofing screws are used for fastening. To prevent the bar from skewing, use cord alignment.
A profile sealant is attached under the bar, nailing it to the crate with galvanized nails.
If a semicircular bar is selected, then plugs are installed at its ends.
Installation of upper valleys and external aprons
The next step, which describes the installation instructions for metal tiles, is the installation of external valleys. The task of this element is to drain water that accumulates at the junction of two slopes.
When fixing the upper valley, it is important that the screws do not get into the middle of the lower valley strip, otherwise the waterproofing will be broken. A self-expanding sealant must be laid between the metal tile and the upper valley plank.
An external apron is mounted at the exit point of the chimney. It is made in the same way as the internal one, only the outer junction strips are simply screwed to the pipe without a strobe device.
Installation of roof accessories

Installation of snow retainers
Snow guards must be installed on the roof. These are devices that are used to prevent large masses of snow and ice from coming off the roof.
This accessory must be installed above the entrance to the house, above the windows, as well as in places where people pass and drive or park cars.
Places for installing snow retainers are planned during the creation of the roof project, since an additional bar is mounted on the crate under them.
As recommended by the rules for the installation of metal tiles, the snow retainer should be installed under the second, if counted from below, wave of roofing material. If the slopes of the house are long, then it is recommended to mount snow retainers in several rows.
In order to bring ventilation pipes to the roof, as a rule, ready-made passage elements are used. These details allow you to organize the output with a maximum degree of tightness, which eliminates the occurrence of leaks. In addition, the passage elements, as a rule, are painted in the color of the roofing material, therefore, their installation will not spoil the appearance of the roof. Antenna leads are drawn in the same way.
Installation of a drainage system
Even before the metal tiles were laid in the cornice strip or in the rafter legs, long hooks were installed to fasten the gutter.

Installation of a roof drainage system
If this has not been done, then it is necessary to use compact hooks that can be mounted on the frontal board.
However, this option is not the best solution, since only long hooks can secure the gutter securely.
Next, you need to install drain funnels, given that for every 120 square meters of area you need one funnel. Then, a gutter is mounted in the installed hooks, and a plug is placed on its end, which does not fit with other elements.
Advice! The overhang of the metal tile covering should protrude beyond the edge of the eaves, hanging over the gutter by 50 mm.
Post-repair service
In order for the roofing to serve for a long time, it must be properly looked after. Here are the basic rules:
- After completion of installation work, all construction debris should be carefully swept from the coating.
- Scratches and abrasions that have appeared in the process of work must be painted over with paint from an aerosol can. Similarly, the cuts are treated with paint.
- Three months after the completion of the installation of the roof, it is necessary to tighten the screws.
- Twice a year, the roof surface should be cleaned of fallen leaves and other debris. To do this, you can use a brush with soft bristles or a jet of water. The direction of cleaning is from the ridge to the eaves. The last step is to clean the drainage system. The accumulated debris on the roof contributes to the development of metal corrosion and reduces the life of the metal tile.
Advice! When cleaning the roof, you need to move along it in the same way as during installation, that is, stepping on the deflection of the wave.
findings
Laying metal tiles is not a very complicated process, so many developers prefer not to pay money to a roofing team, but to do this work on their own. Before proceeding with the installation, you should study the technology of work.
It can also help watching a video - installation of metal tiles. Such a video instruction will allow you to clearly see how this or that stage of work is carried out and avoid mistakes that can reduce the quality characteristics of the coating.