Installation of flexible tiles
If you are working with a soft roof, then it is important to perform the installation correctly. Only in this way the coating will serve you a long and reliable service. Flexible tiles are a popular representative of soft roofing, which we will talk about. Interestingly, each manufacturer has its own installation instructions for roofing.
However, speaking in general, the principle and rules for installing flexible tiles are the same. Let's go through the whole process, from start to finish.
Some features of the material
I would like to note that the flexible tile has its own characteristics. What is this material? It refers to a soft roof, based on bitumen. Since the material is flexible, it requires a continuous crate. It is clear that it will cost you much more. But the roof, covered with flexible tiles, has a lot of advantages:
- high heat resistance, frost resistance and wind resistance;
- excellent resistance to temperature fluctuations;
- she is not afraid of precipitation and UV rays;
- for many years the color will not change;
- the roof will be silent.

Installation of flexible tiles
Stage 1 - foundation
As mentioned earlier, the rafter system, covered with a continuous crate, will serve as the basis for flexible tiles. To ensure the correct roofing cake, a vapor barrier is fixed on the rafters inside the attic. Outside, you need to lay insulation and cover it all with a layer of waterproofing. At the same time, slats are stuffed onto the rafters themselves, which will play the role of a counter-lattice.
Note! Nail heads after you need to process with mastic.
The lining layer is made of rolled material, which must be laid parallel to the ridge. The overlap should be 10 cm long and 20 cm wide.
Stage 3 - installation of slats
To protect the crate from water, the installation of gable and cornice strips is required. Droppers (cornice strips) are mounted on top of the lining layer. Overlap - not less than 20 cm. Fasteners are located at a distance of 10 cm from each other, in a zigzag, and not in a straight line.

When the slats on the slopes are installed, you can lay a waterproofing carpet on the valleys. Its color must match the color that the flexible tile has. You need to fasten it with nails, 10 cm apart.
Stage 4 - laying shingles
Now it's time to mount the flexible shingles. All preparatory work is done, little remains. You need to start the process with cornice tiles (one of the elements of a soft roof). If this is not included in the kit, you need to cut even strips from the shingle, removing the petals. After that, gluing is performed on the eaves, at a distance of 2 cm from the overhang. The same goes for the pediments.

Before laying the shingles, it is recommended to make a marking indicating the location of the rows of shingles. So, you can lay them parallel to the eaves, without bevels. An important nuance is that flexible tiles are laid in the middle of the overhang of the eaves. Further shingles are laid to the left and to the right of the initial one. You need to remove the film before sticking, not before. The elements are sweatily pressed against the coating, and 4 nails per shingle are used for additional fixation.

Note! With a tilt angle of 45˚, it is better when there are 6 nails.
The first row of shingles should be positioned so that the lower part of the shingle is 1-1.5 cm higher than the lower edge of the cornice. The sheets should be laid so that the petals of the flexible tile can close the joint of the cornice shingle. As for the other rows, each petal should be located above the cutout of the layer below or on the line, as shown in the photo.

The sheets that adjoin the gable plank must be cut exactly along the edge, and the edges should be glued with bituminous mastic. It is required to lubricate the shingle by 10 cm.

Advice! To avoid damage to the bottom layer of the material, cut off the edges, place a piece of plywood or other plank under the bottom.
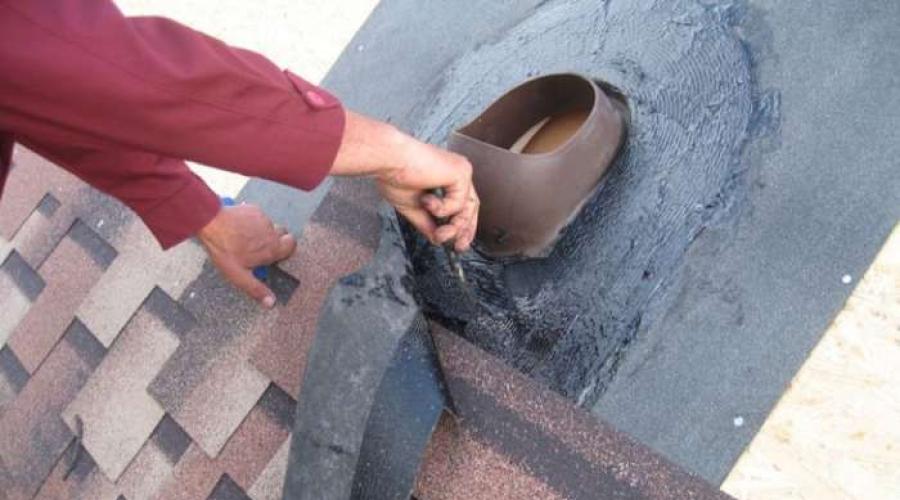
Stage 5 - installation of the valley
The valley is the most vulnerable part of the roof, because a joint is formed there. In order for the roof to serve for a long time, the valley must be done correctly. Before laying flexible tiles, the valley is covered with an additional waterproofing lining. Sheets of flexible tiles must be melted onto this lining with a building hair dryer or fixed with bitumen-polymer mastic.

It is better to start equipping the valley from the slope that has a gentle slope or a smaller length.
So, on the opposite slope, which is parallel to the axis of the valley, draw a line. The distance of the strip from the axis of the valley is 30 cm. Sheets of flexible tiles that reach the line from the first slope must be cut along the line and fixed with mastic or a hot air gun. Thus, all sheets that enter from a gentle slope are fixed. Now a line is drawn on this slope, at a distance of 10 cm from the axis of the valley. Sheets that reach the line from another slope, cut along this line. At the end, trim the top corners by 60˚.