Do-it-yourself soft roof. Mounting technology
Roof covering materials, united by the common name "soft roof", also have a common feature: they are installed only on a solid base. Soft roofing, which can be installed on various types of roofs, is nothing more than a waterproofing carpet that does not require additional waterproofing. These are bituminous tiles, euroruberoid, mastic materials and polymer membranes.
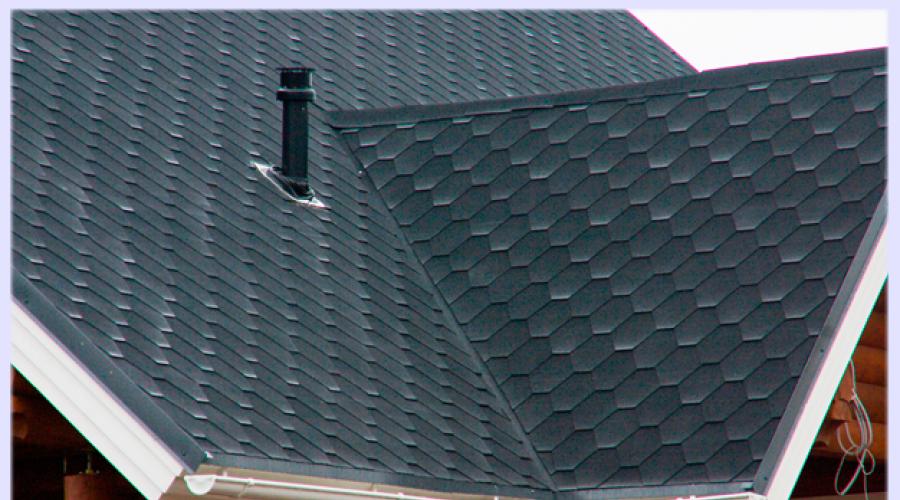
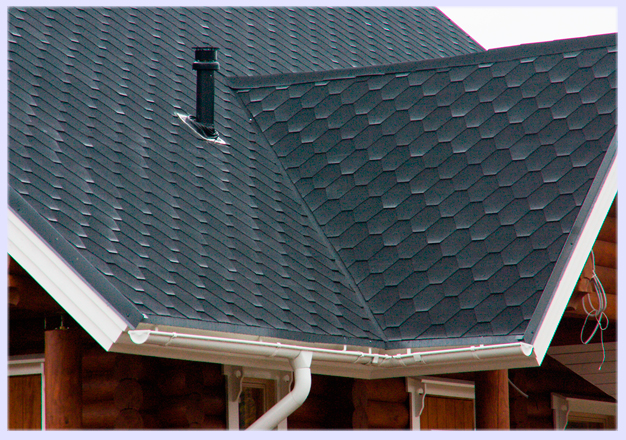
How to make a soft roof from flexible tiles
The use of bituminous tiles is justified in the case when the roof plane has a minimum slope with respect to the horizontal of at least 12 degrees. If the slope is less, moisture will inevitably stagnate at the joints, which will lead to rapid deterioration of the coating.
Better in warm season
It is recommended to mount bitumen shingles on the roof if the “overboard” is at least five degrees above the zero mark. It's all about the features of the shingle - a sheet that consists of three or four "tiles". It can be attached to the surface both with nails and with the help of a special self-adhesive layer located on the inside. The tightness of flexible tiles is ensured by solar heat, under the influence of which the sheets are soldered to each other and to the base. At sub-zero temperatures, this does not happen, so the insulation is unlikely to be of high quality. In addition, the fragility of the shingle in cold weather will not allow you to install the material with an overlap - and this will definitely be required, for example, on a ridge.
If, nevertheless, due to necessity, it is necessary to do the installation of a soft roof with your own hands at the wrong time of the year, before starting work, the tiles must be kept in a room with room temperature. You can also use a hot air burner.
Installation of a soft roof video (tile)
It goes without saying that the installation of a roof is a complex event and includes a certain number of stages.
Foundation preparation
As a basis for flexible tiles, you can use edged boards, moisture-resistant plywood, OSB-board and other building material with a flat surface, the maximum allowable humidity of which is 20%. The boards at the joints are attached to the supports and overlap at least two runs between them.
The seams of the bottom skin must have at least two millimeter gaps. If the crate is made of edged boards, then the gaps are made five millimeters.
Tip: during installation, annual rings on edged boards should be placed with rounded parts up.
The ventilation system provides air circulation, which is necessary to prevent condensation on the bottom of the base. Neglecting this stage of the construction process will lead to the fact that the truss system will begin to rot, and in winter icicles and ice will form.
Elements of the roof ventilation system:
- ventilation outlets;
- vents in the overhangs of cornices;
- the air gap between the base and the waterproofing is at least 5 mm.
Tip: in order for the attic to ventilate naturally, ventilation holes should be placed evenly under the overhang of the eaves along the entire ridge.
Lining layer
When installing a soft roof, the installation technology provides for laying the lining layer. It is mounted on cornice overhangs, roof ends and valleys from top to bottom.
If the roof slope exceeds 18 degrees, you can limit yourself to lining only where leaks are most likely. Valleys and skates are reinforced by 500mm and 250mm, respectively. At the same time, the valleys are equipped with a lining layer on both sides, and along the eaves and end overhangs, it must be laid to a width of at least 400 mm.
If the roof has a slope of 12 to 18 degrees, the lining carpet is laid over the entire area - in the direction from the bottom to the top, in a parallel direction with the cornice overhang. In the longitudinal direction, the overlap should be 150mm, in the transverse direction - at least 100mm. The lining is nailed to the base with galvanized roofing nails at a distance of 200mm from each other.
Tip: for better tightness of overlapping places, they need to be coated with bituminous mastic.
Cornice strips: installation
Such strips are made of metal and are attached to the lining on the overhangs of the cornices. They are needed to protect the edges of the crate. Fasteners are made with mounting nails, the step between them should be 100mm. Where the cornice strips meet, there must be an overlap of at least 20mm.
Gable strips: installation
They are also made of metal, they are attached to the lining layer at the ends of the roof. Designed to protect the edge of the crate. Fastening is similar to cornice strips.
Valley carpet
Additional protection of the roof from atmospheric precipitation. You need to choose it according to the color of the tiles, it is nailed with roofing nails. The overlaps are carefully glued.
Cornice tiles: laying
When installing a soft roof with your own hands, it should be remembered that before laying the protective film must be removed from the bottom surface of the tile. Cornice tiles are laid at a distance of 1-2 cm from the edge of the cornice along its overhang, exactly butt to butt.
Ordinary tile: laying
Start laying the main part of the tiled roof from the middle of the overhang towards the ends. Under standard conditions, sheets are nailed with four nails, but if the roof slope is very steep or the climate zone is famous for constant strong winds, at least six nails should be used.
The first row is mounted so that the location of its edge is no further than a centimeter from the upper edge of the cornice tiles. The joints should be covered with "petals". When laying the next row and subsequent ones, you need to make sure that the level of the cutouts of the previous row and the ends of the "petals" match. Along the edge, the shingles are cut and glued to a width of at least 10 cm.
Tip: before proceeding with laying, the slopes must be marked with chalk - horizontal lines. This is necessary so that the sheets are accurately installed in an even row. If the slope geometry is broken or any additional elements (pipes, dormer windows) are installed on it, then chalk markings will help align the rows.
Ridge tiles: laying
In order to get a ridge tile, you need to cut the eaves into three parts at the perforation points. They lay it on the ridge of the roof parallel to it - with the short side. Each part is nailed with four nails - a pair on each side. On top of the nails, an overlap is made with the next tiled sheet - at least 5 cm.
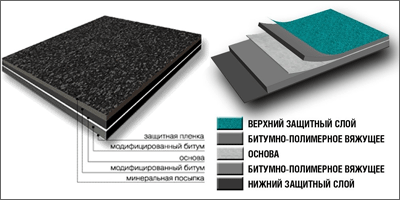
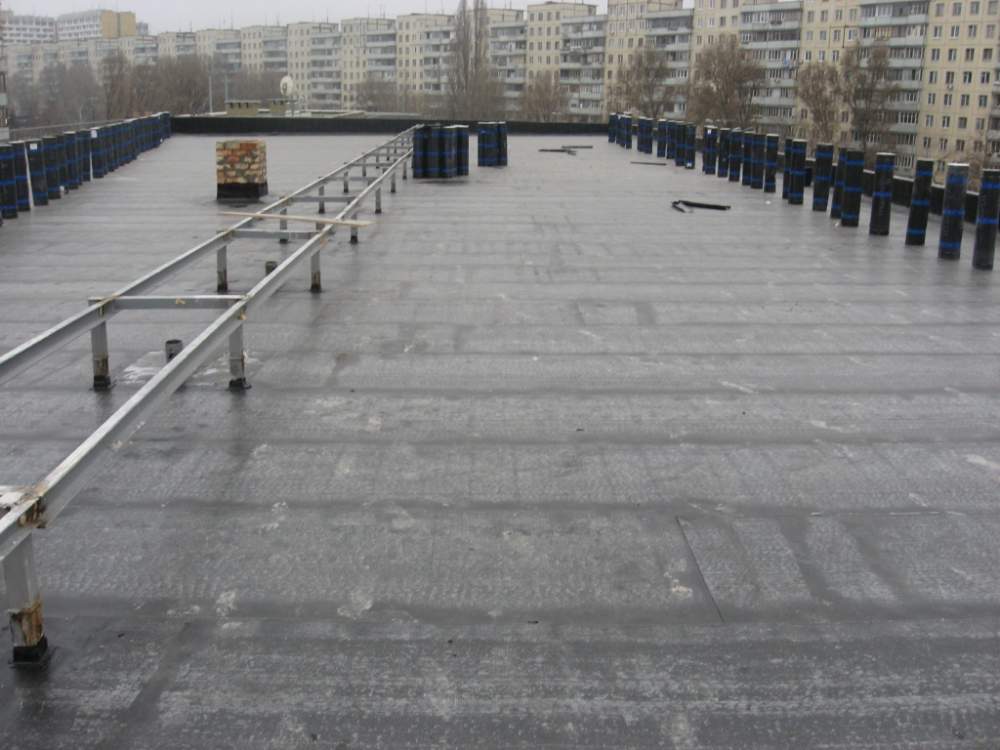
Soft roof installation technology: euroruberoid
Euroroofing material is a rolled material of the built-up type, which also applies to soft roofing. Unlike bituminous tiles, it can be laid on a flat roof.
Foundation preparation
A dry and solid base for euroroofing material must be completely cleaned of dirt and dust, and it must also meet all fire safety criteria. Any monolithic ceiling or concrete slabs can serve as such a base, only they must be equipped with slopes for water runoff, and also have a cement-sand screed.
It is also possible to fuse such roofing material on a pressed plate - OSB. If the roofing is done on an old roof that already has a resin cake, then it will be a good base for the new roofing.
Already prepared base should be treated with bitumen-polymer mastic. It can be purchased both in the form of a concentrate, and already in the finished state. Mastic is not needed when laying euroroofing material on an old coating.
Tip: the mastic packaging indicates how long it will take for it to dry completely. It is categorically not recommended to weld roofing material ahead of time, since the quality of the roof will suffer significantly.
Installation of a soft roof video (euroroofing material)
Laying work should always begin from the point of the roof where the drain line is located - that is, from below. The runoff line is parallel to the slope line, so the runoff water will not get into the junctions of the strips.
The roll is unwound in such a way that it is even, without gaps and folds, after which it is well stretched. One edge is fixed as follows: the roofing material is heated with a burner until the indicator film melts, then the edge of the material is glued to the base. After the edge hardens, the unwound roofing material is again rolled up to a fixed place - tightly, neatly and evenly.
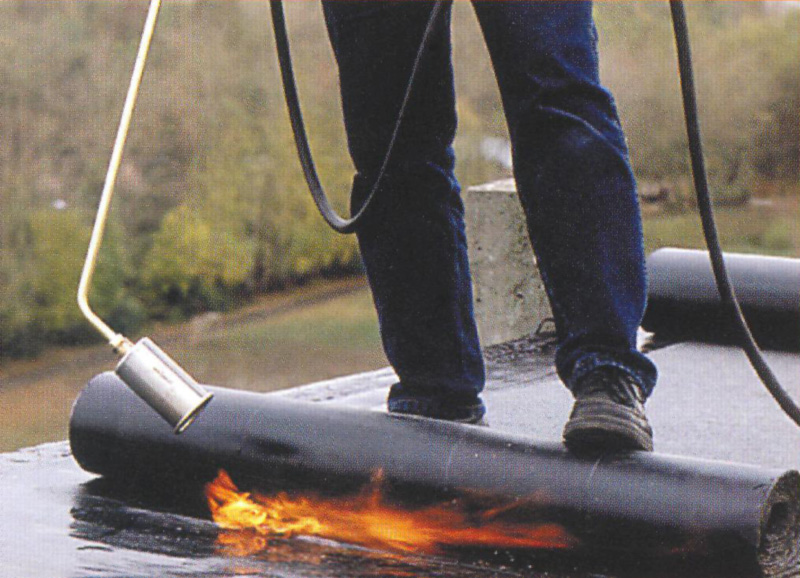
The next step in the laying process is directly fusing. In order to no longer have questions about how to make a soft roof from euroroofing material, you should especially carefully consider the rules for its construction.
- Under no circumstances should the material be overheated. If this does happen, then you will have to buy a new one - overheating leads to damage, and the roofing material loses its ability to stick.
- The finished surface should not have places without protective dressing, black spots and voids: a high-quality deposited coating is always homogeneous.
- The fusing of strips of roofing material is done with an overlap of not less than 10 cm. In order to have something to navigate, a special strip is applied along the entire length of the material.
The closest attention should be paid to the places where the roofing material adjoins ventilation ducts, parapets and other elements. Problem areas should be treated with roofing mastic. After drying, it acquires the same protective properties as those of euroroofing material.
Snow can get into places where rainwater can't, so abutment treatment is just as important. If the roof has a steep slope, it is necessary to equip snow retainers, and also try to prevent icing in the winter by properly installing gutter systems and drippers.
When installing a ruberoid soft roof, the installation technology, of course, differs from the process of covering the roof with bituminous tiles, but after completing all the work in both cases, it is necessary to ensure that the roof is cleared of debris, stones and foreign objects. If this is not done, the coating may prematurely become unusable in places of contact with them.