How to cover a roof with soft tiles
Surely, you have repeatedly noticed that many private houses are covered with flexible tiles, a noble, solid and aesthetically attractive roofing material. You can also equip such a roof, because you can lay this coating on a roof of any complexity, the slope of which reaches 12 - 90 degrees. Bitumen is very light, which makes it easy to install a soft roof with your own hands. Today we will talk about how to cover the roof with soft tiles.
Calculation of shingles
Before buying a soft tile, it is necessary to take into account that the price of a soft roof will depend on the coverage area and the number of additional elements. A feature of the material that is used to organize the roof is to minimize waste during work. It is this factor that allows you to accurately calculate the roof and calculate the required amount of base material.
Let's give an example of calculating the amount of flexible tiles. So, let the gable roof have the following parameters: the length is 6 meters, the height is 4 meters; tilt angle - 32 degrees. Then the total area is 48 square meters (4*6*2). Keep in mind that one package of shingles is enough for 3 square meters. But be careful, as the area covered is indicated on each package. Then you will need 16 packs (48/3).
Similarly, you can calculate the amount of required lining material and valley carpet. It should be noted that the technology of covering the roof with soft tiles is such that there will always be cut parts and waste. Therefore, feel free to add another 10-15% to the calculated amount. After buying a soft tile, it is necessary to store it in a warm, dry, shady place, folding no more than 12 packs one by one.
Installing a roof sheathing
To lay the bituminous tiles correctly, it is necessary to properly prepare the base. A soft roof can be laid on an ordinary crate, which can be lattice or solid and is attached to the rafters. The frame is most often made of wood. If you need to arrange a lattice crate, then take boards for this.
In this case, it is desirable to use planed coniferous boards, which have a thickness of about 20-25 millimeters. To create a solid crate, you can use moisture-resistant plywood or chipboard, grooved and edged boards. The moisture content of the material should not exceed 20% of the dry weight. The material is attached to the rafters using ordinary nails or self-tapping screws.
To increase the service life of wooden elements, they must be impregnated with an antiseptic before installation. When creating a crate, calculate in advance the installation step of the rafters and the thickness of the board used for its construction. If the step is 60 centimeters, then you can use a board that has a thickness of 20 millimeters. With a rafter pitch of 90 centimeters, a board with a thickness of approximately 23 millimeters is required.
The joints of the boards must be placed in the places of the supports, and the boards must have a length of at least 2 spans between the supports. When laying the sheathing under a soft roof, it must be remembered that it is worth leaving a couple of millimeters between the individual materials to compensate for the expansion of the wood when it dries.
On the crate between the boards, a gap of 1-5 millimeters is made, between large-panel elements - 1-3 millimeters. Plywood and slabs are laid on the rafters with a spaced seam. You can not leave such gaps if all the wood has been previously subjected to technical drying.
Underlay installation
After arranging the crate under the soft roof, it is necessary to lay the lining layer, the main purpose of which lies in protecting the house from moisture ingress in case of possible leakage of flexible tiles. According to current standards, if the angle of inclination of the roof is 18 degrees or a little more, then waterproofing can only be arranged parallel to the end and cornice edges. It is these areas that are considered the most likely places for leaks.
Things will be different if the roof has a smaller slope angle - from 12 to 18 degrees. The installation technology of such a waterproofing layer provides for its installation over the entire roof area. This layer is mounted parallel to the cornice overhang from the bottom up with an overlap of at least 10 centimeters for transverse seams and at least 15 centimeters for longitudinal ones, fixing the edges with nails at intervals of about 20 centimeters. The seams must be sealed with glue.
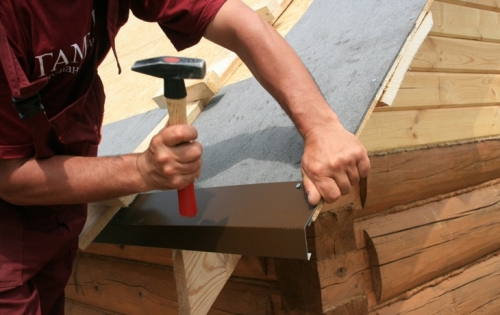
To protect the edges of the frame structure of the roof under the soft tiles on the eaves overhangs from moisture, metal cornice strips called “droppers” with an overlap of at least 2 centimeters should be mounted over the lining carpet. They are nailed in a zigzag manner with special roofing nails, maintaining a step of 100 millimeters. To protect the lathing on the end parts, gable strips are mounted with the same overlap of 2 centimeters. The strips are stuffed on the cornices and ends over the lining layer.
If the design has elements such as valleys, then it is necessary to lay a special carpet that matches the color of the tiles on both sides. The edges should be fixed with roofing nails, maintaining an interval of 100 millimeters. After fixing, it will not be superfluous to smear the carpet along the edge with bituminous mastic.
Ventilation space device
Without sufficient ventilation in the attic, the microclimate will be disturbed, humidity will increase and condensation will form. Ventilation is ensured by three elements: channels above the thermal insulation, a hole that serves for the inflow of outside air and exhaust holes, which are located in the upper part of the roof.
If the eaves in a residential building are hemmed with siding, then the soffit strips will act as a ventilation gap.
If, when constructing a roof for a soft roof, the cornice is made out with a clapboard, then it is customary to equip a gap between the boards. Ventilation of a roof made of flexible tiles is carried out by means of a ridge, which is customarily laid on a special ribbed profile. But often its throughput is not enough and it is necessary to install special ventilation elements on the roof surface.
If the roof slope is 15 - 40 degrees, then the area of the ventilation space is calculated as a quotient of the total area of \u200b\u200bthe slopes and a factor of 300. And if the slope reaches 41 - 85 degrees, then it is calculated as a quotient of the soft roof area and a factor of 600. Let the total roof area be 50 square meters, the angle of inclination is 35 degrees, and the cross section of the ventilation element is 258 square centimeters.
The ventilation area in this case will be 0.167 square meters (50/300) or 1670 square centimeters. Then the required number of ventilation elements is five (1670/258). The number of ventilation elements that are installed on the ridge is half of their number on the roof slopes, that is, 3.
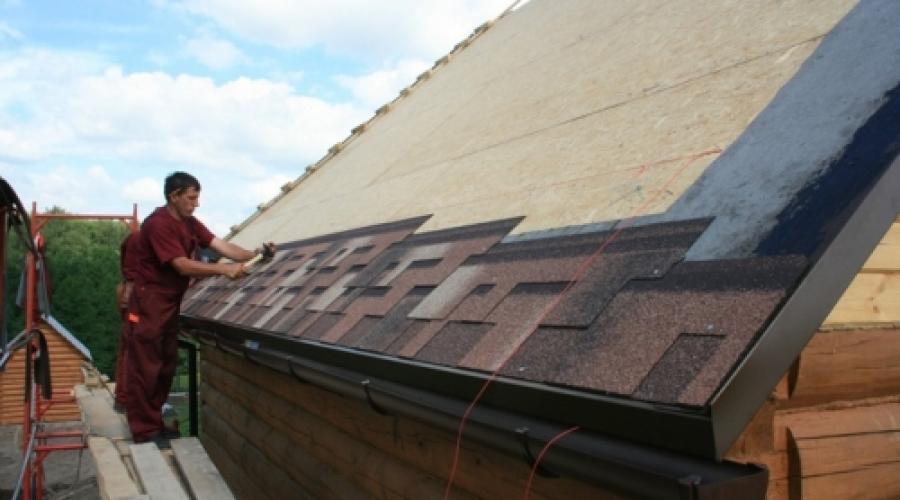
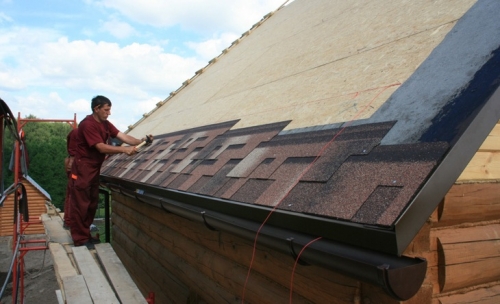
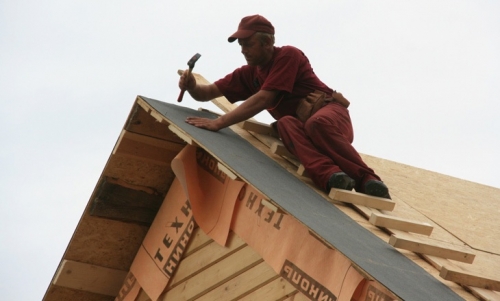
Installation of soft tiles
Manufacturers of flexible tiles do not recommend fixing it at temperatures below plus 5 degrees, because the shingles become brittle in the cold and the procedure for installing a roof made of soft tiles is difficult, and the lack of heat affects the tightness of the joints. In winter, joints and folds of shingles should be heated with a blow dryer or other device that generates heat flow. To lay the material on the roof in the summer, it must be taken in parts, because the protective film is poorly removed from the tiles heated by the sun.
When laying tiles, roofers often make the same mistake, as a result of which the roof has a different shade in different places. Remember that tiles in different packages may not be from the same batch, but from different ones, and therefore its color is different. Thus, it is necessary to use several packages of material at once so that the color of the roof is uniform.

To simplify work and ensure smooth lines, before covering the roof with soft tiles on the roof, a chalk marking of the slope is carried out along the crate and lining. Horizontal lines are drawn parallel to the eaves in increments of 80 centimeters. It turns out approximately 5 rows of tiles. Vertical lines are applied along the length of the slope in increments of 1 meter.
Installation of roofing from flexible tiles begins with the arrangement of the zero "cornice" row. Self-adhesive ridge tiles are glued end to end over a metal plank. From the edge of the slope you need to retreat 1-2 centimeters. On the other hand, the tiles are nailed, and the first row of ordinary flexible tiles is laid on top of the attachment point. If you did not buy ridge-cornice shingles, then you can attach simple shingles to the cornice, but without petals.
The first row of ordinary shingles begins to be laid from the center of the eaves, heading towards the ridge and gables. To move in hot weather on the roof, you need to use special manholes, otherwise footprints may remain on the roofing. First, the protective film is removed from the individual roof tiles from the back and glued to the base. Also, the tile requires additional fastening.
The tiles are fixed with nails, hammering them when laying two adjacent rows. When you drive a nail into the first row, you will also nail the second one at the same time. It is impossible to displace the mount - to drive a nail from the very edge or into the center of the petals, since the device of a roof made of soft tiles does not allow chaotic fastening;
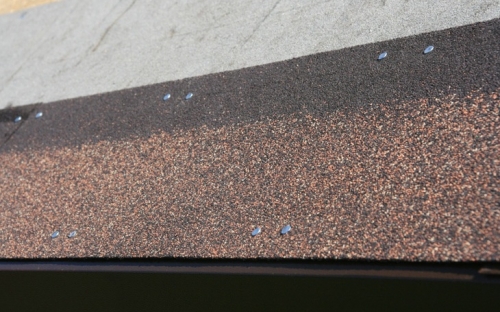
Approximately 4-5 nails are used per shingle. This is enough, since the bituminous tiles between themselves under the influence of solar heat will stick together and stick to the crate. The length of the nails is selected according to the type and thickness of the crate. The diameter of the nail should be approximately 3.2 millimeters, the diameter of the cap should be 10 millimeters.
When installing subsequent rows of tiles, remember that the lower petals of the material must correspond to the upper ones, which are located on the already nailed row. Along with this, it is customary to shift half the petal to the left or right.
Ridge tiles are obtained by dividing the cornice tiles into three parts according to the perforations. Mount the ridge shingles on the roof ridge, having previously cut the tile, while the short side should be parallel to the ridge. Nail with four nails so that the nails are located under the overlapping shingles with an overlap of 5 centimeters.
Proper connection design
In the process of installing a soft coating for the roof, quite often one has to face some difficulties and various objects to which the roof adjoins. Say, the most elementary object of this type is a stove heating pipe. In the area where the pipe adjoins the roof, a gap is always formed through which moisture flows.
To get rid of this shortcoming, you need to properly attach the flexible tile. To begin with, hammer the rail into the angle between the roof surface and the chimney. It is desirable that it has a triangular shape, like an ordinary wooden plinth. Further, it is recommended to bring the tiles onto this rail and directly onto the pipe. After that, a valley carpet should be laid on top of it, starting from the chimney.
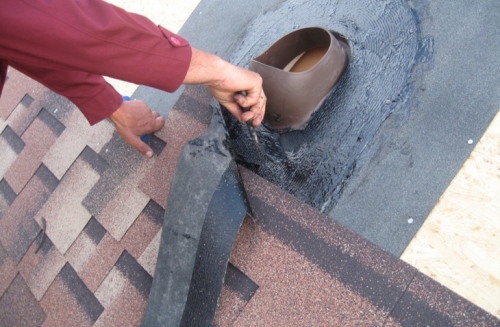
It should cover the entire channel at a height of 30 centimeters from the roof surface. After that, the lower part of the pipe with a carpet and bituminous tiles is placed in a metal apron - lined with sheets of painted tin on all sides. To avoid the accumulation of snow behind the pipe, it is necessary to equip the groove by installing a pyramid with two faces close to the pipe. Thus, both snow and rainwater will fall on the slopes of the groove and flow down the roof, flowing around the pipe.
Sometimes you need to bring some communications through the roof. In such cases, it is best to use passage elements that are made specifically for tiles. They are attached to the base of the roof with nails. Such elements reliably protect the roof from leakage. For example, antenna passages of small diameter through the roof can be made with rubber seals.
Joint sealing procedure
To seal the roof of soft tiles, overlaps of the lining carpet and ordinary bituminous tiles on the valley carpet, passages of the ventilation system and various junctions, a special sealant is used. Immediately before applying the composition, clean the surface of loose materials, oil and dirt. On dusty and porous substrates, first apply a bituminous mortar. Remember that with an excess of glue, excessive dissolution of the bitumen may occur.
The composition is applied to one of the surfaces to be glued with a spatula. Maintain a layer thickness of 0.5 - 1 mm. The width of the sizing is indicated in the instructions. When pasting joints to pipes and walls, apply sealant over the entire contact surface. Grout the seams of the brickwork with mortar flush with the brick. The bonding process lasts 1-3 minutes, depending on the air temperature. At low temperatures, the composition must be heated before application.
Now you know how to cover the roof with soft tiles! In addition, you can always update the roof with flexible tiles without removing the old coating. Laying on top of old new shingles is not much different from laying from scratch. To do this, you need to lay an inverted shingle on the protruding cornice strip and glue it, and cut the protruding part along the cornice. Next, the tile is laid exactly on top of the previous pattern.