Do-it-yourself ondulin roof installation instructions
The main differences between ondulin roofing are represented by sufficient lightness and strength. Widely used in construction, ondulin provides an excellent opportunity to quickly and easily build a new roof, which will be highly reliable and maintain performance for a long time. Ondulin not only allows you to cover structures of any complexity, but can also be used in repair work, regardless of climatic conditions.
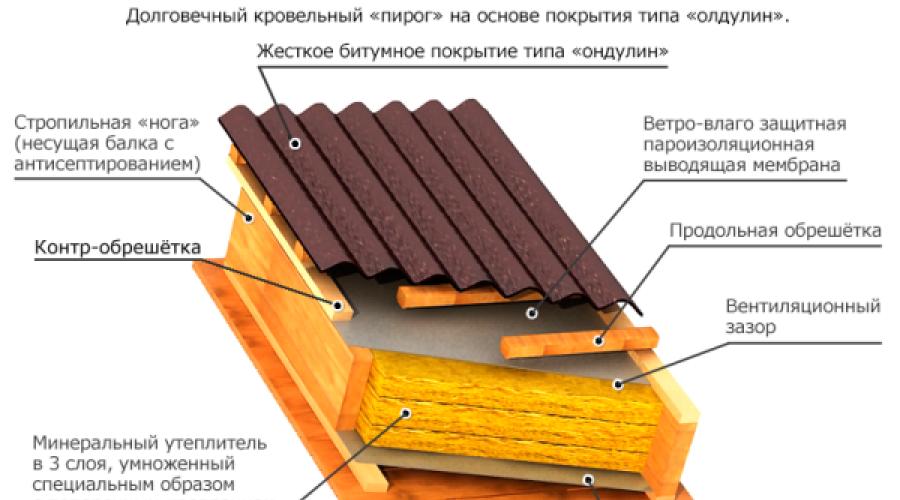
Roof device
Compliance with all norms and rules for the installation of roofing using ondulin allows you to get good results. Such a roof will meet all the requirements of reliability and safety, and the appearance will please with a high degree of aesthetics.
Basic rules for the installation of roofing:
- Ondulin sheets are cut with a pre-oiled wood saw. It is allowed to use a circular or electric saw;
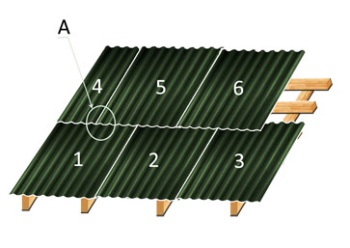
- installed sheets must be fixed with special roofing nails. The attachment point is not only the end of each wave, but also the places of overlaps. In accordance with the established regulatory technology, strictly twenty fasteners should be used to fasten each sheet;
- roofing sheets must be fastened exactly along the bars. For this purpose, it is required to pull a rope or twine;
- ridge elements are attached with overlaps of ten centimeters. The place of fastening is each wave, which joins with the beam of the crate;
- the joints of the side roofing with vertical walls are equipped with special valleys from the manufacturer Ondulin;
- joints of vertical obstacles with the end part of the sheets are equipped with an Ondulin covering apron. Additional waterproofing is carried out with bituminous type mastic;
- elimination of gaps and gaps between roofing sheets and ridge elements is carried out with a special cornice filler in compliance with all manufacturer's requirements for ventilation;
- the ventilation pipe is installed by attaching to each sheet joint. On top of the base of the mounted pipe, it is necessary to start up the top sheet;
- when using a metal crate, not nails, but self-tapping screws are subject to use.
Do-it-yourself instructions and installation rules
- with a slope of 1/11-1/6, a solid type of crate is mounted using boards or moisture-resistant plywood sheets. Overlap parameters: end - 30 centimeters, side - the size of two waves;
- with a slope of 1/6-1/4, a crate is mounted with an axial step of 45 centimeters. Overlap parameters: end - 20 centimeters, side - the size of one wave;
- with a slope of less than 1/4, a crate is mounted with an axial step of 60 centimeters. Overlap parameters: end - 17 centimeters, side - the size of one wave;
- for marking roofing sheets, it is recommended to use a colored pencil and a small segment of the sheet;
- as a cutting tool, you can use a hacksaw for wood, which must be lubricated with oil for better glide. It is allowed to use saws: circular or electric;
- during installation, the direction of air flows is of great importance, according to which the fastening of the sheets is not carried out from the leeward side. Each subsequent roofing row is mounted from the middle of the previous sheet;
- twenty fasteners are spent on fastening one sheet, which are nailed at the end of each wave and along the sides of the side overlaps. At the level of intermediate crate bars, fastening is carried out through a wave.
Laying the crate and its step
The bituminous type of slate from the manufacturer Ondulin is practical and durable, however, in order for a roof made of such material to withstand all operational loads, the lathing installation technology must be strictly observed. The insignificant weight of such a roofing can significantly reduce the cost of materials for the truss system. Ondulin can be mounted on roofs with a slope angle of five degrees. The step of the lathing depends entirely on the angle of the roof slope.
Before installing the lathing, it is necessary to lay a layer of waterproofing, and fill the laths of the counter lathing along the length of the rafter legs. The next step is to mount the overhang, for which a cornice board with a section similar to the elements of the crate is used. Another board is attached parallel to the overhang, maintaining a gap of 30 centimeters. For the installation of the remaining boards of the crate, a distance of the designed step is applied. Fasteners are nails or screws.
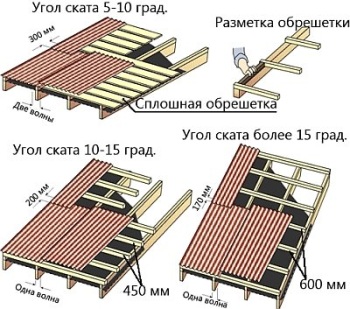
With a roof slope of five to ten degrees, it is recommended to use boards, moisture-resistant plywood, OSB-boards or unedged timber as a material for continuous lathing.
With a pitched slope of ten to fifteen degrees, it is necessary to mount a crate of bars, the cross section of which can be 4 × 5, 5 × 5 or 5 × 6 centimeters. Elements are mounted in increments of 40-45 centimeters.
With a slope of more than fifteen degrees, the step of the lathing should be increased to 60 cm. For regions with a high level of snow load, the distance between the elements of the lathing from the bars must be reduced to 45 centimeters, which will allow the roofing sheets to withstand the snow mass without deflections.
The dimensions of the crate base for ondulin are calculated based on measurements of roof slopes. The data obtained allow us to calculate the cubic capacity of lumber, based on the required step of the crate. The calculation of the material for the counter batten is based on the number of rafters. A separate calculation is performed for the installation of a continuous coating of "special" areas, which include: the junction of the roof and walls; fit of chimney pipes, as well as dormers and dormers; cornices, valleys and ridge.
The solid base of the crate can be mounted with a gap of up to five centimeters, which will save about ten percent of the material. For maximum savings, good quality unedged wood should be used. It is preferable to use lumber from softwood.
When performing a lathing of a non-continuous type, it is necessary to strictly ensure that the base under the roofing sheets is as even as possible in height. For slopes with a significant width, it becomes necessary to join the boards to each other, which are recommended to be staggered.
Before installing the roofing, it is advisable to treat the crate with antiseptics and fire retardants. In addition, it is necessary to check the finished structure for geometry. For this purpose, twine is used, which measures the diagonals of the slope. If deficiencies are found, they must be corrected.
It is imperative to install wind boards at the ends of the slopes. The crate should be four centimeters below the wind board. Then ridge boards are mounted parallel to the eaves.
Competent execution of the lathing guarantees the receipt of the necessary functional parameters of the roof and will allow it during operation not only to withstand the calculated loads, but also to obtain a certain margin of safety.
Installation of roof elements
Ridge elements of Ondulin are fastened from the windward side, withstanding an overlap of ten centimeters. Roofing nails are driven in on the waves at the joints of the roofing material and additional bars of the roofing sheathing. For the installation of special valleys from Ondulin, it is necessary to mount an additional roofing sheathing.
A special gable from Ondulin is installed in accordance with the rules for roofing elements. It is allowed to fasten a bent roofing sheet to the gable board. When designing roofing ribs, it is recommended to use Ondulin ridge or gable elements, and a valley is well suited for lateral joints of the roofing surface and the wall.
On any end joints with vertical surfaces, it is recommended to use a covering apron from Ondulin, which is fastened with nails for each wave. After installation, it must be provided with high-quality waterproofing.
In addition, it is necessary to ensure high-quality ventilation of the roof with the help of a roof fan, which is nailed along the waves, and the roofing sheet is overlapped on top of it. Ventilation pipes guide ventilation ducts through the roofing. Pipes are attached in the same way as a fan.
In addition, a special comb is used for a complete ventilation system, which

mounted on the cornice part under the roofing sheets. Ventilation combs protect the roofing from the penetration of insects and birds. Roof ventilation may require the installation of a cornice filler that closes the gap from the ridge element to the roofing sheets.
Access to the roof and lighting of the attic space are carried out through a roof window. For its installation, fastening is used for each wave with an overlap on the window base.
It is recommended to fasten Ondulin roofing sheets to a metal base using Stelfix self-tapping screws.
For more information on how to install your own hands, see the video.
The cost of the work
Work on covering pitched roofs with ondulin is much cheaper than roofing from or. Ondulin, unlike these roofing materials, does not make noise from precipitation and wind, and is also not subject to rust formation.
Professionals perform roofing work using ondulin quickly and efficiently. The average cost of such work is about 1200 rubles per square meter, including the cost of the material. In addition, experts give a guarantee for the entire volume of work performed. The term of such a guarantee depends on the construction company and can range from twelve months to three years.
The average cost of ondulin in the construction markets is about 400 rubles per sheet and may vary depending on the amount of roofing material purchased.
Summing up
- in the process of installation work using ondulin, it is necessary to use special nails supplied by the manufacturer complete with roofing sheets;
- installation work must be carried out in warm and dry weather, at a temperature not higher than thirty degrees;
- you can choose the right method of lathing based on the slope of the pitched surface of the roof;
- in order not to damage the roofing sheets in the process of moving along the roof, it is necessary to step only on the crest of the sheet;
- roofing Ondulin has the ability to stretch, so significant effort should not be applied during installation;
- during the installation process, it is necessary to comply with the norms for the number of fasteners and overlaps;
- the crate, made of lumber with different thicknesses, provokes the destruction of ondulin at the joints;
- when calculating the amount of materials required for roofing work, five to ten percent of installation costs should be added to the final result;
- for independent installation work you will need: a measuring tape, a building level, a hammer with a rubberized handle, a hacksaw or any electric cutting tool, a drill or a screwdriver, a grinder, a colored pencil or crayons, twine, a paint cord for beating the distance from the working edge.