Flexible tiles: installation. Instruction, installation and technology
They perform the most important function in the house - protective. Therefore, they must be of high quality and durable. Flexible shingles, which are installed in stages, are a very common roofing material. It almost in all cases it satisfies the requirements of the buyer.
What is a material?
Flexible tiles, reviews about it are almost always positive - this is a plate consisting of several layers, and having one carved edge. Such material can have a different shape and size. The main ingredient that is used during the manufacture of such a roof is fiberglass or polyester. This explains the softness of the product. As for the strength characteristics, they appear due to impregnation with bitumen.
In addition, the composition of the material contains various synthetic additives, the purpose of which is to increase the necessary properties: resistance to external influences, frost, elasticity. It should be noted that due to this composition, the presented products have a large number of advantages.
In order for the material to have a beautiful appearance, multi-colored stone chips are applied to its surface. Next, you will consider the technical characteristics of such a roof that make it so popular.
Material Advantages
 Flexible tiles, reviews about it will help you decide whether you want to buy it or not, it has the following advantages:
1. There is no need to build reinforced structures, since the presented material is light in weight.
2. Easy to use and stack.
3. A wide range of prices, which allows anyone to buy a roof, regardless of their income or social status.
4. A large number of species.
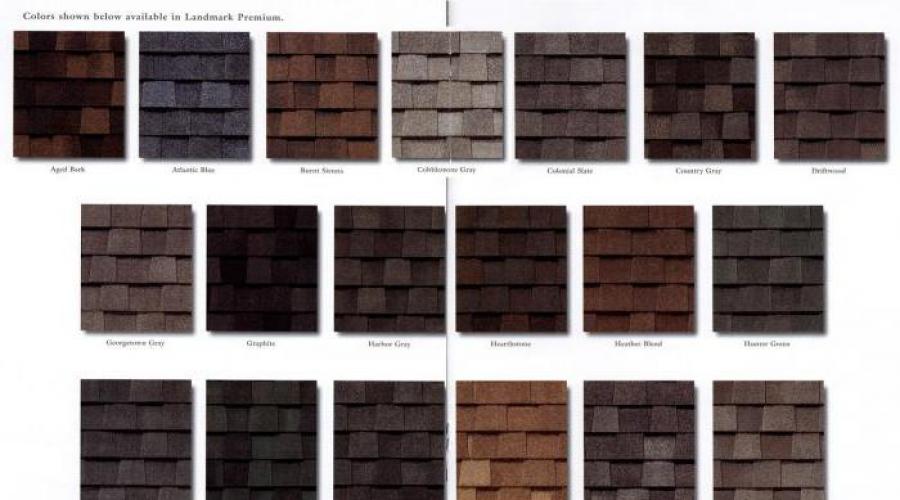
5. Wide range of colors.
6. Absence of extraneous noise (for example, raindrops).
7. Resistant to temperature extremes, fading, precipitation, cracking, corrosion, decay, fire and insect damage.
8. Excellent waterproofing.
9. Ease of transportation and installation (even on complex roofs).
10.Environmental friendly and long service life.
Product Disadvantages
Despite the fact that the roof of shingles has a lot of advantages, it also has certain disadvantages:
During installation, it is necessary to observe the slope of the roof, which ranges from 12-45 degrees.
The quality of the product depends on the fulfillment of all necessary requirements in production.
Such material should be laid on a solid surface (crate).
As you can see, flexible tile, the price of which is acceptable for almost any buyer, has not so many easily eliminated shortcomings.
Specifications
 The presented material has the following features:
1. Temperature mode of use: -50 - +115 degrees.
2. Weight per 1 square meter - 5 kg.
3. Warranty period - 30 years.
4. Sheet dimensions: length - 1 m, width - 33.3 cm.
5. Number of products in one package: 10-22 pcs.
In principle, these are the main characteristics of the material presented. Thanks to them, you can calculate the cost of tiles on your roof, and determine the cost of repairs in advance.
Material types
Flexible tiles, the price of which is 200-2500 rubles per square meter, can be of different types:
1. Self-adhesive. Its feature is the adhesive base, which is covered with a special protective film during production. During installation, it is enough to remove it.
2. Traditional. It is attached with special adhesives.
In addition, there are also ordinary and ridge tiles. These species also have their own narrow purpose. And in stores you can find different shapes of the product and various colors of sheets. If you need a flexible tile, its types should be chosen based on the requirements of the roof and your own preferences.
Material laying features
 This section is very important for those who are going to do the installation themselves. Laying flexible tiles is not a very simple process. The fact is that it requires maximum attention, caution, accuracy and compliance with instructions. There are certain features of the procedure:
1. First of all, you must protect yourself while working at height. So wear comfortable work clothes and shoes, and play it safe with strong connections.
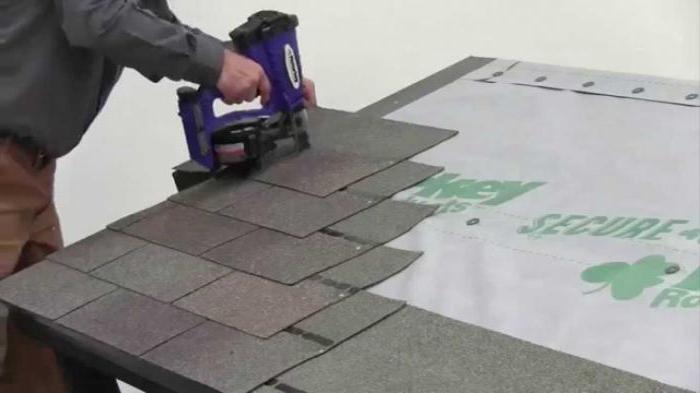
2. Naturally, you will need to collect all the necessary tools: scissors or a knife for cutting canvases, mastic (if necessary), nails (for better fixing the material on the surface of the crate).
3. Please note that the base must meet the requirements of the tiles as much as possible. First, it must be solid. Secondly, the crate must be at a certain angle (not less than 10 and not more than 45 degrees, although vertical parts can also be covered).
4. It is better to work in the warm season at a temperature that will not be lower than +5 degrees.
5. It is better to combine the color of the tiles with the shade of the facade. In this case, you can achieve an almost perfect design.
6. Laying shingles can be done using a hot air burner.
As you can see, there are some nuances that are very important to observe during work.
Preparation for installation: organizing the crate
 If you have chosen a flexible tile, its installation should be carried out only after careful preparation. That is, you will need to build a crate. This stage is very important for high-quality laying of the material.
So, for the construction of the base, it is better to use edged boards or plywood, protected from moisture. Please note that the joints between the elements should fall just on the supports. The surface must be flat, so use the building level in the process.
It is also necessary to take into account the ventilation gap under the roof. It should be about 5 cm. Thanks to him, you can not worry about the safety and durability of the rafter structure. In addition, the normal temperature regime for life will be established inside the room.
If the base is not rigid enough, flexible tile, its installation must begin after the selection of colors and pattern of the material, will look ugly. In addition, it will not fully perform its functions.
Installation instructions
 Now we can consider, in fact, the stages of laying the presented roof:
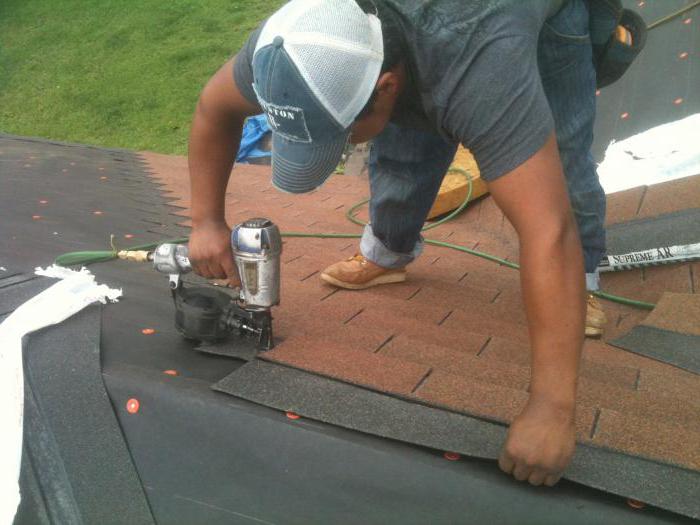
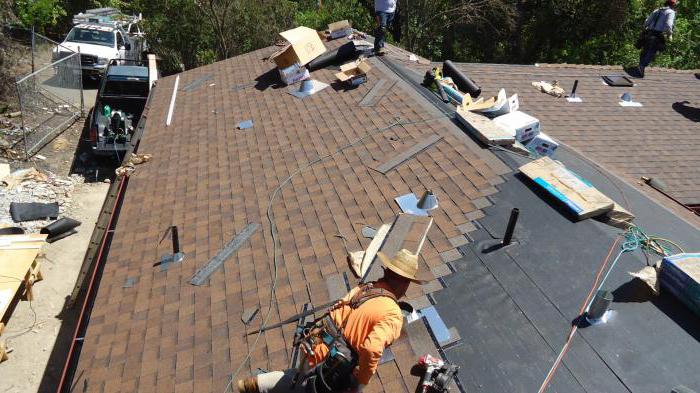
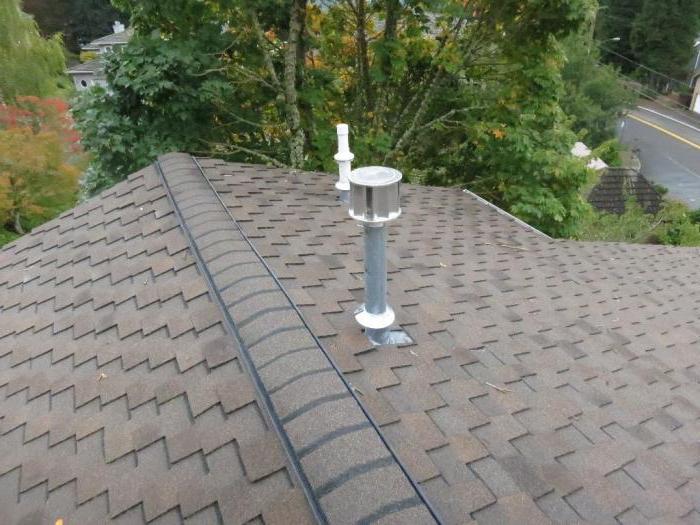
1. Installation of the lining. It should be attached to all parts of the roof: end, valleys, eaves, near the junction with external walls, around attic windows, pipes. A slight slope of the base predetermines the laying of the lining over its entire surface. It is necessary to perform it, starting from the top of the roof and going down. The material should be laid with an overlap (10 cm). The seams of the product must be sealed with glue. In order for the lining to hold well on the base, it is better to additionally fix it with nails.
2. Installation of cornice strips and gable strips. This should be done with a certain overlap of 2-3 cm. Fixation is done using roofing nails. The distance between the fasteners is no more than 10 cm. At the joints, the pitch is 3 cm.
3. Laying the valley carpet. It is needed in order to provide additional waterproofing. The material must necessarily match the color scheme of the tiles. Otherwise, it may break the combination.
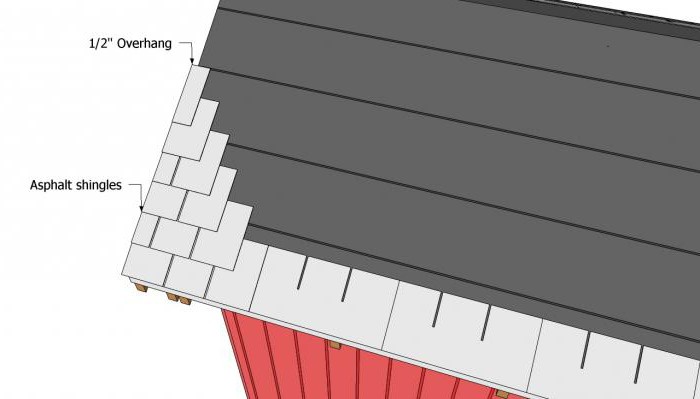
4. Installation of cornice tiles. This should be done end to end. At the same time, you need to step back a few centimeters from the place of the bend of the bar.
5. Installation of ordinary tiles. Here you need to use material from several packages at once. This will ensure uniform coverage. In this case, flexible tiles, installation can be carried out only after fully familiarizing yourself with the instructions, it is laid starting from the center of the eaves overhang and moving towards the ends. The first row must be fixed so that the pattern necessarily coincides with the already laid material. It should be located 4 cm below the cornice tiles. Next, the product must be fixed so that the ends of the sheets are at the same level as the cutouts of the previous plates. If the material is located correctly, then you can remove the protective film (or smear the base with mastic) and stick it. Additionally, a few nails can be driven in a little above the tile groove line.
6. Installation of ridge material. Each part of this tile must be fixed with two nails. In this case, it spreads with an overlap of 5 cm. In this case, the tiles should be laid so that their short sides are parallel to the ridge.
7. Gluing the seams. This is done with a special substance.
Each row must be laid with a shift of half a meter to the previous one. This will ensure the tightness of the roof. If you decide to use such material as sheets will be very useful for you.
Features of shingles "Shinglas"
 This material is very popular. The tile "Shinglas" has an excellent appearance, is resistant to corrosion processes due to the basalt granulate, which is part of it. In addition, the material has a self-adhesive backing.
Shinglas tiles can serve you for decades, which is stated in the product warranty. The main advantages of the material are noiselessness, ease of use and installation, excellent resistance to negative temperatures. Due to the lightness of the product, it will not weigh down the structure, which means there will be no additional load on the foundation. This allows you to use this roof when building houses on weak soils.
Another property of the material is a small amount of waste. And moisture resistance ensures good preservation of the pattern and protection of the house for many years.
How to properly care for the roof?
Flexible tiles, you already know the installation instructions, will last much longer. If properly cared for:
1. Do not allow the material to come into contact with vegetable oils, solvents, gasoline.
2. Try not to use sharp objects during the inspection of the roofs, which can damage it.
3. Do not walk on the roof too often, so that there is no undue stress on the material.
4. The roof should not be in contact with hot steam or heat sources that heat up to more than 45 degrees.
That's all. Now you know how flexible tiles are laid. Good luck!