Windows 10 scheduled update. Using Registry Settings
Even if the user has not made a reservation for a system upgrade on his computer to an operating system with index 10, data on the PC from Microsoft resources will be stored in memory and the device will regularly and persistently recommend Windows installation 10. The notification is displayed in the tray and there is no option to refuse to download files.
Therefore already a large number of people wondered: “How to refuse Windows 10?” Below are specific steps to resolve the above issue and at the same time ensure the correct further functioning of the Update Center.
Step one - client installation
From the Microsoft resource support.microsoft.com you need to download and install the current Operating System Update client. This is important to do before you decide not to upgrade to Windows 10. After installation required option client (for a 32-bit or 64-bit system) you will need to restart the PC.
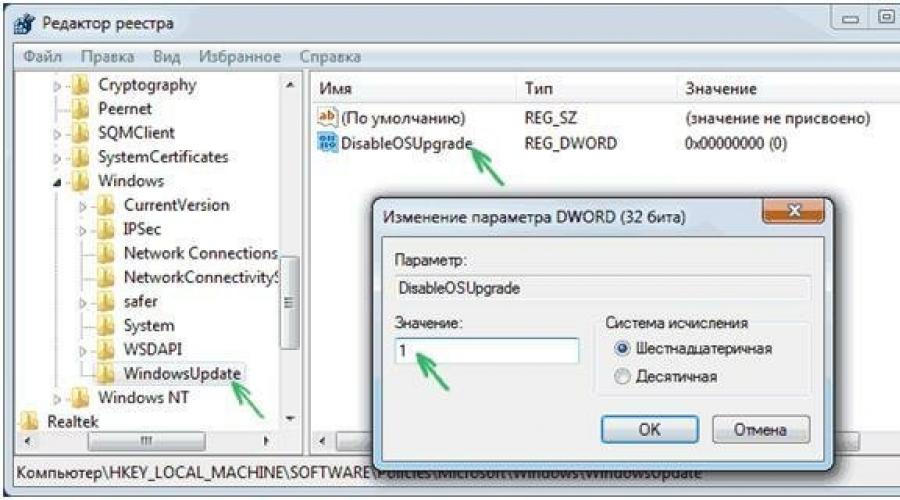
Step two - cancel in the registry
To cancel the update you will need to do the following:

Ready. Completing these steps will save your computer from installing the tenth version. However, it is advisable not only to cancel the transition to a new OS, but also to delete the directory with the files of the intrusive “Ten”.
Step three - getting rid of downloaded Windows 10 files
They are located in the “$Windows.~BT” folder and take up about 4 GB of space on the computer.
 In order to delete this directory, you must use the following algorithm of actions:

These steps allow you not only to cancel and refuse to install Ten, but also to significantly free up disk space on your computer.
How to prevent a notification from appearing in the tray?
To resolve this issue, do the following:


What to do if the computer owner canceled the installation, but then changed his mind and decided to install a new OS?
You should take the following steps to return your PC to its original state:
- open the window "Update Center";
- enter the list of hidden upgrades and reactivate “KB3035583”;
- then open and uninstall the “DisableOSUpgrade” parameter;
- reboot your PC.
Microsoft resources will again begin to receive offers to upgrade to Windows 10 and files of the new OS will be downloaded for its subsequent installation.
Center Windows updates 10 allows you to timely download operating system updates from official Microsoft servers. After installing the OS, this service is enabled by default and runs in the background. However, you can disable it yourself and not receive new versions. If you don't care about keeping your computer busy with tracking and installation related processes system files, then you can enable Windows 10 Update in several ways.
This procedure can only be performed using the built-in functionality of the operating system. You don't need third-party software. First, check if Update is running by default on your computer. You can do it like this:
- Launch Task Manager using the combination Ctrl + Shift + Esc.

- Open the Services tab. Here, look for a service named "wuauserv".

Thanks to it, auto-update works in the background in the operating system. If you don’t have “wuauserv”, then go to one of the inclusion methods:
- through group policy;
- through "Windows Settings";
- using the command line;
- through registry settings;
- via Services.
Let's consider each method in detail.
Enable in Local Group Policy
You can restore the operation of this service in the “top ten” as follows:
- Open the Run program using the key combination Win + R. Enter the command “services.msc” and start execution with the OK button.

- The “Services” window will appear in front of you. In the right list, find the line “Windows Update” and using RMB in the menu, select “Properties”.

- In the “General” tab, find the “Startup type” line and set the “Automatic” option in the menu, then apply the changes with the “OK” button.

- Restart your PC.
In this way you can start a central heating center in the operating room Windows system 10. This method can help you get rid of error code 0x80070422.
Now let's figure out how to check for available updates manually and start downloading/installing them. To do this, you will need the functionality of the “Parameters” section:
- Right-click on the “Start” icon on the bottom panel and select “Settings” from the menu.

- Open the "Update and Security" section.

- Go to the "Windows Update" subsection in the left column.

- In this window you can do everything necessary settings CO and check for files to download. To check, you need to click on the button marked in the screenshot.

- The tool will now scan for new Windows 10 patches and notify you about it. In the “Advanced Settings” section, move the option to the “Off” position, as shown in the screenshot. By clicking on "Choose how and when to receive updates", you can configure delivery methods (from PC to local network, Internet, etc.).

If you have a problem with the operation of the central authority, you need to check the settings in the Group Policy Editor.
"Local Group Policy Editor"
To run the program, follow these steps:
- Go to Run using Win + R. Write the command “gpedit.msc”.

- Open the “Windows Update” branch, which is located along the path “Computer Configuration” - “Administrative Templates” - “Windows Components”.

- On the right side of the window, find the line “Setting automatic updates” and right-click on it. In the menu, go to “Edit”.

- Set the setting to Enabled (1). In the "Options" section, select the settings according to which the automatic update(schedule, installation, notifications about available downloads, etc.). Apply the changes with the "OK" button.

Using the Windows 10 command line, you can disable or enable Update Center. This will force you to start the “wuauserv” service.
- Open command line with administrator rights. Type the command “net start wuauserv” and press Enter.

- The program will start the service, after which you will see a corresponding message. The process will start every time you turn on your PC, so you won't have to repeat this procedure. To disable the Windows 10 CO, you must enter the command “net stop wuauserv”.

- Now it remains to check whether the system will be updated.
Registry
Also, the central heating center will not work unless the value of the parameter in the registry is corrected. You need to do the following:
- In the “Run” window (Win + R) enter the command “regedit”.

- In the registry editor, find the HKLM\System\CurrentControlSet\Services\wuauserv branch. Just copy the path from these instructions and paste it into the search bar at the top of the window.

- On the right side of the window there will be a “Start” option. Right-click to select “Edit” from the menu.

- In the disabled state, the parameter will have a value of 4. For the CO to start downloading updates, set the value to 1.

The launch of this service is not affected by any others, so malfunctions and performance problems should not arise. You can also check the HKEY_LOCAL_MACHINE\SOFTWARE\Microsoft\Windows NT\CurrentVersion\Hotfix branch, which contains information about all update files.
Third party programs
What to do if you can’t set up automatic downloading? Starting the service doesn't help, but you don't have the time or knowledge to find workarounds? Then try updating operating system using the WSUS Offline Update utility. Download it from the official developer website using this link. On the main page, click on the button marked in the screenshot. The creators guarantee complete security for users and their personal data on their PC. After downloading, follow the following procedure:
- In the program folder, open the UpdateGenerator.exe file.

- Select your OS version: Windows 10 x32 or x64. To start downloading files, click “Start”.

- Once the download is complete, you will see a log on the screen with a list of all downloaded files. The download and installation time depends on how long it has been since you updated Windows. Now you need to go to the “client” folder and open the UpdateInstaller.exe file.

- In the program window, click “Start” to begin installation.

If WSUS Offline Update starts to freeze or stops searching for files, try using an earlier, more stable version of the program.
You only need to update the operating system in this way once, since after installing the patch, troubleshooting will be carried out and the default central processing center will be launched.
Bottom line
If you would like to install extreme Windows version 10, then all the described methods will help you with this. Don’t forget to adjust the settings for yourself so that downloading or rebooting with scheduled installation doesn’t take you by surprise.
Video
So, to consolidate the material received, let's watch a video on this topic.