Not all RAM is used. How to use all RAM. Patching system files
Read also
On computers with the Windows 7 operating system installed, the amount of available random access memory (RAM) may appear less than the actual amount of memory installed on the computer.
For example: in the 32-bit version of Windows 7, in the "System" section of the control panel, you can see that with 4 GB of memory installed on the computer, only 2.8 GB of memory is displayed.
As another example, on Windows 7 64-bit, it may show that with 8 GB of RAM installed on the computer, only 6.1 GB of available memory is available.
Note. The amounts of available memory shown in the examples are not accurate. The total amount of available, free memory is calculated by subtracting the total amount of memory reserved by the hardware from the amount of physical memory.
To quickly access information about the amount of available and installed memory in Windows 7, you need to do the following:
1. Click the Start button, select Control Panel, then System and Security, System.
2. Look at what is listed in the Installed Memory (RAM) field. You can see, for example, such parameters - 4.00 GB (3.2 GB free), which means that out of 4 GB of installed physical memory of the computer, only 3.5 GB is available.
What is the reason?
This situation is provided, it occurs on computers with the Windows 7 operating system installed. How much the amount of available RAM can be reduced may depend on several factors:
- Installed version of Windows (Basic version only supports 2 GB of physical memory, the rest is ignored).
Installed devices and memory.
Configuration and BIOS version.
The ability of working memory to process information.
Other system settings.
For example, if your computer has a video adapter with 256 MB of native memory, that memory is mapped to the first 4 GB of the address space. If 4 GB of physical memory is installed, part of the address space will be reserved for displaying the memory of the video adapter installed on the computer. Part of the system memory is used to map the memory of this component of the computer. As a result, the amount of total system memory available to the operating system is reduced.
Allocating physical memory in Windows 7
The following shows which resource categories the system divides the memory installed on a computer in Windows 7 into.
| Memory | Description |
|---|---|
| Reserved by hardware | Memory reserved by installed peripheral device drivers and for use by the BIOS. |
| used | The amount of memory used by drivers, processes, and the operating system itself. |
| Changed | The amount of memory whose contents must be moved to disk for use in another purpose. |
| reserved | Memory containing code and unused cache data. |
| Free | Memory that does not contain any important data. This is the portion of memory that will be used first if drivers, processes, or the operating system need more memory. |
Note. You can find out how the installed memory is distributed in your operating system in the "Control Panel", "Resource Monitor" section.
Click the Start button, in the search for programs and files type "resource monitor", then in the "Programs" list, select "Resource Monitor".
On the "Memory" tab, at the bottom of the page, select the "Physical Memory" section.
Anyone can face the problem of accessing all RAM. At one point, when you decide to add one or more sticks of RAM to your computer, the following situation occurs. In the system properties it says that 4GB is installed, but only 2GB is available. Or instead of 8GB, 4GB is available.
In this article, we will tell you how to fix this problem and force windows to use all the RAM.
How to make all installed RAM available?
The first step is to decide on a couple of things. First - . If you have 32 (x86) bit Windows, then it will not see more than 3.2 GB of RAM! The only option in this case is to install a 64-bit OS.
Also, if used, it will consume some amount of your RAM. Usually no more than 700MB. This is corrected only by installing a discrete (free-standing) video card with its own video memory.
If you have 64-bit Windows and a discrete graphics card, but not all of the RAM is available, then you need to do the following.
First, open the system unit, remove all RAM modules and wipe the contacts on them with an alcohol wipe / simple eraser and install it back, preferably swapping. It helps a lot.
One possible reason is poor RAM contact.
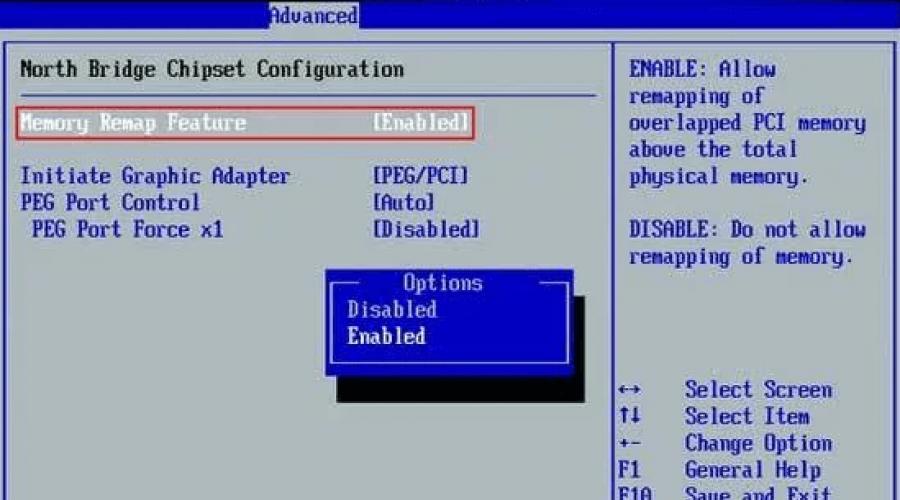
The next step is to enable the feature in the BIOS settings. It is usually located in the Advanced -> North Bridge Configuration section.

Enabling the Memory Remap Feature option in the BIOS
You also need to go to the system configurator by pressing the "Windows" + "R" buttons on the keyboard and entering the "msconfig" command in the window that opens.

The combination of the "Win" + "R" buttons on the keyboard

Open the system configurator with the msconfig command
In the window that opens, go to the tab "Download" -\u003e "Advanced options".

Increasing the range of RAM is one of the easiest methods to improve PC performance. However, many users at the same time often encounter such a problem: after adding memory, the operating system reports that it is not available to it. For example, after increasing the volume to 8 GB, Windows sees only 4 GB. Such problems can be caused by hardware or software reasons.
32-bit operating system is used
When using Windows 7, 8, XP, Vista on the 32-bit version, it is provided maximum amount RAM that they are able to recognize. 32-bit versions are severely limited in terms of recognition volume. For this reason, users using more RAM should use the 64-bit version or they will won't be able to use it in full.
In order to find out your operating system version, you need to go to control Panel and select " System". In the column " Installed memory» shows the size of the installed RAM, and in parentheses indicates how much of it can be used. The number of bits of the operating system is displayed next to it.
Windows version does not support this amount of memory
The operating system may not recognize all RAM due to limitations associated with its version. Each edition of Windows has its own limitations, for example:
- 7 starters– 2 GB;
- 7 home basic– 8 GB (including for the 64-bit version).
A complete list of editions of Windows that have a corresponding limitation can be found on the Microsoft website.
If this problem occurred with a 64-bit Windows 10 system, you can fix the situation by reset bios settings.
Memory reserved by graphics card or other hardware
A common scenario is when part of the random access memory reserved for work other equipment. Most often it is used by the built-in video card. In order to check how much RAM is used by other equipment, you need to go to the " System". If the memory is actually reserved by other devices, the corresponding column will show 2 values: the installed amount and the amount available for use, which is displayed in brackets. The difference between these indicators shows the amount that other devices take.
This option is possible if a video adapter is installed on the PC that does not have its own video memory. In this case, the system automatically allocates RAM to it at the BIOS level. It can also often reserve network adapter.
The motherboard does not support this amount of RAM
The motherboard may also have a limit on the computer memory installed in it. This is manifested in the fact that after the successful installation of modules and startup, the board cannot use its entire volume.
In order to make sure that this is the reason, you need to enter the BIOS and read supported volume information which will be displayed on the first screen. In order to prevent this situation, you should carefully study the specification of the motherboard before installing it. 
RAM sticks installed incorrectly
If the motherboard supports all the amount of RAM, and it is not displayed in the BIOS, then the reason may be incorrect installation. It is possible that the contacts are poorly connected to each other. This problem is solved very simply: just remove the board and plug it, or swap the slots or shuffle the strips.
RAM damage
The most difficult problem is the damage to the RAM bar itself. It can be damaged in during operation or installation, in addition, the marriage may be manufacturing. To check for damage, test all boards in turn to one port. After each shift, you should turn off the computer and check in BIOS whether the computer sees this bar. In addition, you can check each bar separately or all together at another computer. To get out of this situation, it is necessary to repair or replace the device. 
If programs freeze, games are buggy, You Tube videos are slow, it's time to check the RAM usage. Perhaps the system components do not have enough space to store and process information.
How to check the amount of memory used?
We launch the "Task Manager". Go to the "Performance" tab and click "Resource Monitor".
Go to the "Memory" tab and look at the data.

Reasons for incorrect use of RAM
If Windows sees a bar of RAM, then the problem lies in the following points:
- Incorrect installation of the operating system. For owners of a PC with 4 GB of RAM, a 64-bit version of the system is suitable, since the 32-bit version uses a maximum of 3.15 GB of memory.
- The integrated video card consumes RAM resources dynamically, not fixedly. This means that if she needs a certain amount of RAM, she will get it.
- motherboard limit. All motherboards have a certain number of slots for RAM sticks. If there is a free one on it, this does not mean that the motherboard will be able to use an additional bar.
- The old version of BIOS, which does not have the ability to get full access to all resources.
- Mechanical failure of the slot or the RAM card itself. If you have the opportunity to swap the planks, do it. Also, RAM can be checked for operability through the Memtest86 + program.
How to set maximum RAM usage?
In order for the RAM to be fully used, it is worth performing a number of simple steps. We launch the "Task Manager". Click "File", "New Task (Run)".

Enter "msconfig" and click "OK".

Updated: 01.01.2020 Published: 15.06.2018
Description
The system detects less RAM than is installed in the computer.
Or not all memory is available to the system:
Also, not all of its volume may be determined in the BIOS (more often, only half).
Cause
- Part of the memory is taken by the video card.
- The edition or bit depth limit of the operating system.
- software limitation.
- System memory reservation.
- RAM failure.
- Processor limitation.
- BIOS error or the need to update it.
- The maximum volume limit that the motherboard supports.
- The motherboard does not support one of the memory modules.
Solution
1. Using the built-in graphics card
This problem is characterized by a slight allocation of memory for the operation of the video adapter. In this case, we will observe a slight decrease in available memory, for example:
Any video card integrated into the motherboard consumes system memory, as it does not have its own resources.
To understand which video card is used, you can go to the device manager (command devmgmt.msc) and expand the section Video adapters:
Typically, NVIDIA and AMD adapters are discrete (not built-in), while Intel adapters are integrated.
If we want the integrated video card to consume less memory, we go into BIOS / UEFI and find one of the parameters:
- Share Memory Size
- Onboard VGA Frame Buffer
- Display Cache Window Size
- On-Chip Video Window Size
- Onboard Video Memory Size
- Internal Graphic Mode Select
- Integrated Graphics Share Memory
* in different BIOS versions, they may be called differently. It is also possible that other parameters can be used - in this case, you need to study the documentation for the motherboard or use a search engine.
After we change the amount of memory reservation for the necessary video systems:
2. Software limitation
The limit can be set in the system. To remove it, open a command prompt and enter the command msconfig- the "System Configuration" window will open (you can also use the Windows search by the name of the window).
In the window that opens, go to the tab and click on Extra options:
Verify that the checkbox is not checked. Maximum Memory or not worth a value less than the volume. Otherwise, just uncheck the box:
3. Operating system limits
Different editions of the Windows system have a limit on the maximum amount of memory used.
a) All 32-bit versions can use a maximum of 3.25 GB of RAM. This architectural limitation is the limit that a 32-bit system is capable of. The picture will look something like this:
To use more than 3 GB of memory, you need to reinstall the system to the 64-bit version.
b) Windows editions also have limitations. For example, Windows 10 Home 64 bit will allow you to use 128 GB, and Windows 10 Pro x64 - 512 GB. With Windows 7, the situation is worse - the home basic edition will allow you to use only 8 GB, and the initial one, only 2 GB.
More details in the tables:
| OS | Limit, GB | |
|---|---|---|
| 32-bit | 64-bit | |
| Windows 10 Home | 4 | 128 |
| Windows 10 Pro | 4 | 512 |
| Windows 8 | 4 | 128 |
| Windows 8 Enterprise | 2 | 512 |
| Windows 8 Professional | 4 | 512 |
| Windows 7 Starter | 2 | 2 |
| Windows 7 Home Basic | 4 | 8 |
| Windows 7 Home Premium | 4 | 16 |
| Windows 7 Professional | 4 | 192 |
| Windows 7 Enterprise | 4 | 192 |
| Windows 7 Ultimate | 4 | 192 |
If our problem is related to the edition limit, we need to update the system or reinstall it.
4. Setting up the basic I/O system
In order for the computer to use all the memory, in some cases, BIOS / UEFI settings may be required:
5. Checking the fastening of modules or rearrangement of memory strips
The memory stick may not be connected tightly enough to the slot on the motherboard, which is why it will not be used by the computer. In this case, we will observe the lack of a large amount of memory (per module). We try to insert it more tightly into the connector. When properly installed, the module should make a click.
Sometimes, swapping memory modules helps. We just disassemble the computer, pull out the modules and swap them.
In some cases, the slot on the motherboard may be faulty. If there are free connectors, you can try to use them. It is necessary to use slots of the same color.
6. The maximum volume that the motherboard supports
It is necessary to check what is the maximum volume that the motherboard itself can see. To do this, you should use the instructions - it comes with the kit, and it can also be downloaded from the manufacturer's website. Also, similar information can be found on some online stores:
Some hardware (usually already obsolete) basically does not support large amounts of memory. For example, the ASUS K50 notebook supports 4 GB by specification, however, official technical support states that it will only see 3 GB.
7. Problem with BIOS / UEFI
Since BIOS / UEFI is responsible for collecting information about the computer, a problem may occur at the initial stage of turning on the PC.
First, let's try to reset the settings. To do this, disconnect the computer from the power source and pull out the battery for 20 minutes (the first time you can try, for 10 seconds). If this does not help, update the BIOS.
8. Memory module failure
In the event of a memory failure, the system and BIOS will not display its entire volume (usually only half). For example, if 16 GB (2 sticks of 8 GB each) are inserted into the computer, we will see only 8.
In this case, you can try to pull out and insert the memory sticks back (you can blow them a little from dust). Also, the boards can be swapped. You can also try cleaning the contacts (a regular eraser will do). Some laptops or monoblocks have a separate plug, opening which you can get to the memory modules, otherwise you need to disassemble the computer completely.
If this does not help, perform a memory test. In the case when the test also shows part of the memory, we try to pull out both bars and insert them one at a time - if the computer does not turn on with one of them, this faulty bar must be replaced, if the computer starts up with all the bars, we may be dealing with a problem BIOS (step below).
9. Discrete graphics card
Above, it was already indicated that the built-in video card takes up part of the memory for its work. A discrete card, in some cases, can also take system memory as so-called "swap memory". This happens at a time when its own memory is not enough for it (most often, after overclocking or running demanding games / applications).
To solve the problem, try the following:
- If the card was overclocked, we return the old parameters.
- Reinstall the video card driver.
Also, some laptops can use two video cards - built-in and discrete. If the application is not demanding on the graphics adapter, then the laptop will work from the built-in video card, taking up memory resources. Alternatively, in the BIOS settings, you can enable the priority of using a discrete video card.
10. Processor Limits
Each processor has its own limit on supporting the maximum amount of RAM. You need to go to the official website of the developer and check the maximum volume supported by our processor.
11. Module support from the motherboard side
If the memory was purchased in addition, and it differs from the second bracket, you need to make sure that the motherboard supports the new module.
This can be done on the official website of the motherboard manufacturer - go to the support section and find the compatibility sheet. Among the list of equipment, you need to find the purchased memory.
12. Cleaning modules with an eraser
If the problem appeared by itself, you can try to pull the memory modules out of the motherboard and clean their contacts with an eraser. After we blow through the connectors on the motherboard and insert the memory into place.
13. Installing the chipset driver
Updating or reinstalling the driver may also help resolve the issue. To do this, we determine the manufacturer and model of the motherboard, go to the manufacturer's website, find the page for a specific model and download the driver for the chipset. Install the downloaded driver and restart the computer.
Also, the driver can be installed in semi-automatic mode using the DriverHub program.
14. Adjusting timings
If brackets with different timings are installed in the computer, the memory controller automatically adjusts the necessary parameters, as a rule, focusing on the indicators of the slowest of them. But it happens that the controller cannot find the optimal settings. This leads to the fact that one of the modules does not work correctly and its memory capacity is not used.
To set the timings, go to BIOS / UEFI and find the memory settings option. Depending on the availability of the firmware type, version and manufacturer, these settings may vary greatly. You need to find the instructions for the BIOS / UEFI version used to change the timings and set those that correspond to the slowest memory module.
15. Disable virtualization
In some cases, the enabled virtualization technology may have an impact on maximum memory support. To check this option, we try to disable it.
Virtualization support is disabled in the BIOS in a section with a name similar to CPU or CPU Configuration. This section is usually located in the subsection Advanced. Depending on the processor used, the virtualization support option is called differently:
- for Intel processors we translate the option Intel Virtualization Technology(or Intel VT) to position Disabled.
- for AMD processors we translate the option SVM Mode into position Disabled.
We save the settings and check the amount of memory.
16. Windows License Restriction
The systems that come with computers have a strict licensing policy that restricts hardware replacements. This can lead to a situation where, when adding memory, it will not be recognized all.
In this case, you need to reinstall the system. In this case, a simple reinstallation over the existing system will not help - only a complete formatting of the system partition with the installation of a new Windows.