View of suspended ceilings in the hallway. Stretch ceiling in the hallway (70 photos). General recommendations for preliminary surface preparation
Read also
Corridor renovations are usually done last. Through the corridor there is constant movement. Either the furniture needs to be brought in, or the trash needs to be taken out. Therefore, such a passage place is left for the final stage. The hallway ceiling requires special attention, because the first thing a person sees when entering an apartment is the corridor. Let's take a closer look at how to make a ceiling in the hallway, and figure out what materials to use.
Design Features
The design of the corridor ceiling has the following features:
- to increase the area of a small room (hallway) with low ceilings, you can use light colors for decoration;
- if the surface is high, then finishing in dark tones is suitable.
Ceiling design in the corridor is interesting solutions, capable of coping with room defects. For example, correctly selected wallpaper or tiles can visually expand or reduce the space of the hallway.
Types of ceiling coverings
There are various ways to decorate a hallway ceiling. What kind of ceiling to make in the corridor depends on the size of the room, height, and individual preferences. The most common finishing methods are the following:
| Whitewash | A budget-friendly, but outdated and labor-intensive option that requires a lot of time to preparatory work |
| Painting | Inexpensive, simple solution. Coloring composition applied perfectly smooth surface, pre-plastered and puttied. The method is used to save space in rooms with low ceilings |
| Decorative plaster | Hides small defects well |
| Wallpaper | Vinyl or non-woven wallpaper is suitable. Inexpensive option- paper wallpaper |
| Expanded polystyrene boards | Simple preliminary surface preparation, easy installation |
| Drywall (suspended structure) | Suitable for high ceilings. Simple installation that does not require preparatory measures |
| Tension covering | Several types of coating are used: glossy, matte, with photo printing |

Regardless of the chosen option for finishing the ceiling covering, it must be taken into account that the corridor is a place where there is not enough natural light. Therefore, it is necessary to think about what lighting fixtures to install in the room. In any case, the lighting should be bright and of high quality.
Illuminated ceiling
When installing a backlit ceiling in a corridor, the following nuances must be taken into account:
- carefully consider the lighting options for the hallway so that it is in harmony with the lighting of neighboring rooms;
- lighting fixtures should be of moderate brightness, not dim. Comfortable lighting is soft, diffused light;
- with proper installed lighting you can achieve the effect of high space;
- For narrow hallways wall lighting fixtures are suitable, thanks to which the boundaries of the corridor will visually expand;
- for hallways with high ceiling covering good decision will be the installation of lamps with the ability to regulate the direction of lighting.
A suspended structure with lighting can be a cornice around the perimeter of the hallway, with built-in lamps. Another option is a pop-transparent design with backlighting.
Almost every hallway is equipped with a mirror. Ceiling lighting should be selected so that there is enough light for the mirrors.
Try installing LED spotlights. At the same time, the lamps should provide an unobtrusive, scattering stream of light.
Ceiling in a narrow corridor
If the hallway is narrow, then finish ceiling surface you need to be especially careful. The goal is to visually make the room wider.

Look at the photo of the ceiling in narrow corridor. The following finishing options are available:
- from plasterboard;
- tension;
- hanging.
Let's take a closer look at each of the options.
Plasterboard ceilings in the corridor can be made by creating several levels. How many levels the structure will have (two or three) depends on the height of the room.
Look at two-level design plasterboard ceiling in a narrow corridor in the photo. The structure is equipped with spotlights, making the room seem much wider.
An interesting solution is to divide the corridor space into several zones. Pay attention to the photo of the ceiling in the plasterboard corridor - each zone is complemented by a high ceiling plinth. Before laying plasterboard sheets, it is necessary to install a metal frame.
Advantage plasterboard construction consists in the possibility of installing reliable, beautiful design in several levels, and in that the finishing covers small surface defects. Installation of drywall does not require preliminary preparation. Moreover, the work can be done independently, following the installation rules. Look at examples of what designs look like suspended ceilings from plasterboard in the corridor in the photo. If the height of the hallway is not high enough for a plasterboard structure, then you can choose a tension covering.

Tension covering
Installing stretch fabric for the hallway is becoming an increasingly popular option. Installation work take approximately two days, and are completed after completion of other finishing works premises. Look how suspended ceilings look in a narrow corridor in the photo.
When installing suspended ceilings in a narrow corridor, you can install electrical wiring, an alarm system, and other necessary communications (Internet, telephone) to the ceiling surface.
As you can see in the proposed photo, a stretch ceiling in a narrow corridor provides an ideal, smooth coating. Look at the photo of the design of suspended ceilings in the corridor - there is room for your imagination to run wild.
Tensile structures can be mounted in two levels. With this option, part of the structure is installed in the center of the space, the other along the perimeter. Two-level option A ceiling with a stretch fabric will give the room additional volume.
Spot LEDs, evenly distributed over the surface, are suitable as lighting fixtures for suspended ceilings in the corridor.
Suspended covering
Suspended ceiling in the hallway is an opportunity visual expansion narrow space. But, it should be borne in mind that suspended structures visually reduce the height of the room.

On to the pros suspended structure This includes the ability to close small surface defects. This option is suitable for houses where there are noticeable differences in surface levels. Putty alone will not be enough for processing and leveling, but the suspension system will become the best solution question for installing a beautiful ceiling in a narrow corridor.
Suspended finishing of the ceiling space is available in two options:
- installation of gypsum board construction;
- slatted ceiling.
ABOUT plasterboard version discussed in the previous chapter, let's talk about the slatted ceiling in the corridor. Each suspension system has a specific installation method, which includes mounting the frame and fastening elements.
Rack structures are considered an expensive option, but have the following advantages:
- attractive appearance;
- long service life;
- are not afraid of moisture;
- steam resistant;
- large selection of colors and the ability to install mirror slats;
- the ability to combine different shades in the design;
- quick installation.
See what the slatted ceiling in the hallway looks like in the photo. If the length of the corridor is more than 3 meters, then when installing slatted ceilings it is necessary to use special connectors for the guides. The installation itself does not take much time and is quite easy. After measuring, the stringers (guides) are mounted, then the slats are cut to the required length and snapped onto the stringer.

Rack structures are made of aluminum and wood. The aluminum version is resistant to temperature changes and is not afraid of moisture. Wooden structure will create a cozy, inviting atmosphere in the apartment.
Mirror finish
Check out the photo for the design of the ceilings in the hallway. As an option, you can install a mirror coating. Mirror coating has several types:
- classic, using natural glass. Visually expands the space;
- mirror stretch fabric ( polyvinyl chloride film) with a hazy, reflective effect;
- mirror plates made of polystyrene. Rarely used.
The mirror version of the ceiling is installed on a perfectly smooth, pre-prepared surface.
Selecting panels
An available option for finishing the hallway ceiling surface is installing panels. The ceiling in the corridor is made of plastic panels has the following advantages:
- moisture resistance:
- easy care during operation. A damp sponge or dry cloth is suitable for cleaning;
- the ability to hide small surface defects and hide communication elements;
- You can install spotlights.

The most important advantage is the ability to install a ceiling in the corridor from panels with your own hands.
As for the disadvantages, they are as follows:
- it is impossible to create a structure of several levels;
- the thin structure of the material allows light to pass through;
- reduce the height of the room;
- The joints between the installed slabs are noticeable.
The panels differ in how they are joined. Distinguish following types material:
- seamless panels. This type of panel allows you to achieve minimum size seams;
- embossed The seams are noticeable, but do not increase when the surface is deformed;
- rust. The seams have a cone-shaped, not too deep section.
The installation of panel ceilings in the corridor begins with markings. Marks are placed using a level along the perimeter of the entire ceiling surface.
The next stage is fastening the guide profile with dowels and nails. Then mounted electrical wiring for lighting fixtures.
The first panel is installed to the metal profile using press washers. Subsequent finishing elements are placed in the lock and secured in the same way. Once all panels are installed, the ceiling plinth is installed.

General recommendations for preliminary surface preparation
Which better ceiling what to do in the hallway, which material to choose depends on the overall interior of the apartment, budget, preferences.
But, regardless of the chosen finish, you need to prepare the ceiling surface. The exception is plasterboard covering, for the installation of which you do not have to remove the old one.
For suspension systems No primer coat is needed. But be sure to treat the ceiling antiseptic against mold and fungi.

- performed complete dismantling old covering. First, remove the lighting fixtures and insulate the electrical wiring;
- in the presence of ceiling plinth, it also needs to be dismantled;
- the surface is completely treated with a layer of primer (preferably twice).
Next stage repair work depends on the selected facing covering. If the ceiling will be painted, then preliminary preparation must be carried out with special care. Even the slightest irregularities will be visible after painting, and the entire work will have to be redone. Look at the photo of the ceiling in the corridor, the surface of which has already been prepared for finishing.
The surface must be leveled before painting. This work is carried out by installing metal beacons. Focusing on the beacons, the mixture is applied to level the surface. After completely dry layer, the ceiling needs additional putty. To avoid the appearance of cracks when puttying, first install a reinforcing mesh on the ceiling surface.
Apartments with flat ceilings no preliminary measures with plaster are needed. You can check how smooth the ceiling surface is using laser level.
When planning renovations, it is worth remembering the hallway, often one of the smallest rooms in the apartment.
Very often a problem arises: what is the best way to finish the flow in the hallway?

When answering this question, it is important to remember the role of design: it can hide obvious flaws and give style and attractiveness to the hallway.

For low ceilings it is best to use materials light colors, which are ideal for the same light walls and darker floors.
This technique will help to slightly increase the height of the ceiling. In the case when the ceiling, on the contrary, is higher and you would like to make it visually lower, you should resort to dark colors for the ceiling in the hallway - they will make the room lower and harmonious.

This color option ceiling will harmoniously fit into a narrow hallway.

You may also think about using materials with a pattern, but in this case it is important to choose it correctly for the general interior and room parameters.

Options for finishing the ceiling in the hallway.
Today there are various options ceiling decoration in the hallway, which can be seen in the presented photos.

Using whitewash
This method is recognized as the most economical and least troublesome. Before whitewashing the ceiling, it is important to plaster the surface to correct any unevenness.

Some people believe that using plaster is a thing of the past, but if you are on a tight budget, it becomes the most convenient solution.

Using Ceiling Paint
This is another easy way to give your ceiling a unique design.

Be sure to carefully treat the ceiling before painting: putty and plaster, since paint can highlight all the defects of the surface to which it is applied.

That is why it is worth taking care in advance to ensure that the surface is as even and smooth as possible.

Painting with a texture roller
The use of decorative plaster is becoming increasingly popular in today's construction industry.

The ceiling should be leveled first, but the quality of the surface on which decorative plaster will be applied is not of great importance. The relief created by decorative plaster smoothes out all the unevenness and roughness.

It is precisely because of its ease of use and minimal preparatory work that many people love it so much. this type finishing.


Wallpapering the ceiling
This type of ceiling decoration can dramatically change the space. The economic component depends on the quality and price of the selected material.

Ceiling tiles
A fairly common option for finishing the ceiling in the living room.

The surface does not require any special preparation, and the material from which the tile is made allows it to be fixed to the ceiling surface as quickly as possible.

This type of ceiling decoration is ideal in a small hallway.

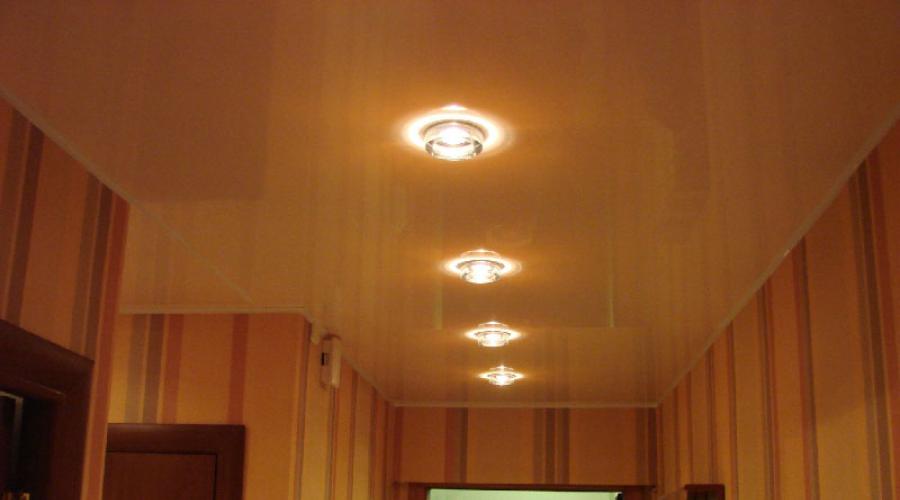
Stretch ceilings in the hallway
This type of ceiling decoration can radically change the room.


However, it is quite difficult to carry out this finishing option on your own without certain skills. That is why the entire procedure should be entrusted to the masters.

The material from which the suspended ceiling is subsequently obtained is a canvas made of elastic polyvinyl chloride, which must be fixed at a certain distance from the ceilings between the walls of the room.

First of all, special clamps are attached. Then, using tools (a plastic spatula, for example), you need to insert all the edges of the canvas into the holes of all the clamps without exception.


Today, the design of a stretch ceiling in a hallway can be either glossy or matte. Stretch ceiling looks very stylish and beautiful. Its only drawback is its fairly high cost.


Plasterboard ceilings in the hallway
Plasterboard ceilings are often also called suspended ceilings. In fact, they are a separate structure that is fixed to the ceiling using special fasteners.

After installing such a ceiling, the surface must be treated with putty and painted.

If the material for the suspended ceiling is plastic, then it will not require any additional finishing work in the future.

Photo of ceiling design options in the hallway


Many property owners pay insufficient attention to the design of the ceiling in the hallway and in vain, because this room is considered business card apartments or houses. When a person enters a home, he sees exactly the corridor. Therefore, the hallway and the ceiling surface in it should look decent.
Ceiling design options
As in other rooms, the ceiling in the hallway can be painted, whitewashed, and inexpensive polystyrene foam tiles can be glued onto it. Despite the fact that all these finishing methods are financially affordable, they do not always suit the owners from an aesthetic point of view.

Currently, there are more effective, but inexpensive and original options ceilings in the hallway:
- rack and pinion;
- plasterboard hanging;
- tension;
- from plastic panels;
- coated with decorative plaster;
- covered with mirror tiles.
Features of plasterboard structures
Creating suspended ceilings for a corridor from plasterboard sheets requires more money and time compared to other finishing methods. For such structures you need from metal profiles assemble the frame and then cover it with slabs of material.
If you choose the right pattern for such a ceiling, then it can visually increase small space premises. When installing a two-tier plasterboard ceiling Having a niche around the perimeter and a figured recess in the middle, the hallway will appear taller.

Suspended ceilings made from plasterboard are good because they are used for finishing. different methods– painting, applying decorative plaster, wallpapering or tiling. For creating cozy atmosphere in the corridor they make lighting built into the niches.
It is not difficult to make a classic single-level ceiling structure from gypsum plasterboard yourself, but such work requires the help of at least two people who have the skills to carry out construction work.
Nuances of arranging suspended ceilings in hallways
Installing such a ceiling in a hallway will not be as expensive as it seems at first glance. This will not require significant time and financial costs. You can create a suspended ceiling in a small hallway with your own hands, following the detailed step-by-step instructions.
The fact that this design option for the ceiling surface is characterized by efficiency and great variety color solutions, many property owners know. Therefore, you need to choose a color for the film that will harmonize with the interior design of this room.

Although glossy surface looks good in corridors because it visually expands the space; owners often choose matte ceiling in the hallway, since it is more affordable, does not have reflective properties, makes it more comfortable.
The work of installing it consists of using a light, durable film or fabric made from high quality material, must be fixed in a framing structure that holds the panel taut.
Characteristics of plastic panel coatings
This finishing option is attractive to many homeowners. affordable price, not bad appearance and ease of care. To make a ceiling in the hallway from panels, you will need a certain amount of this material and wooden blocks. They are used to build a lathing that serves as a support for laying plastic elements.

Every beginner can handle such a task as assembling panels. home craftsman, even without the skills of such work. On every plastic element There is a protrusion on one side and a recess on the other, so the “tongue and groove” principle is used during assembly.
Using mirror tiles to decorate ceilings
The reason mirror tiles are so attractive is because of their reflective properties. Thanks to the presence of this feature, any corridor visually becomes more spacious. The important thing is that mirror ceiling in the hallway it is able to reflect light, as a result of which the room seems brighter and more comfortable.

This modern finishing material is affordable, sufficiently durable and light in weight. Therefore, mount mirror tiles simple and convenient. They are glued onto a completely flat base, so the ceiling must be leveled using plaster or putty compounds. The most convenient to use are gypsum-based mixtures.
Ceilings in the corridor with decorative plaster
Modern techniques for applying plaster mixtures make it possible to create a different atmosphere in a room, for example, an ancient castle or unusual house. These repair techniques are easy to perform and even novice craftsmen can do them.

To finish the ceiling in the corridor you will need a small amount of plaster mixture. The only tools you need are a spatula. Decorative plasters contain a coloring pigment. But if you wish, you can purchase a white composition and paint the ceiling surface as needed for a particular room.
An effective technique is to varnish decorative plaster, and in addition, this protective covering will give the ceiling finish additional strength and make it look more attractive. Plastering the ceiling surface is carried out in two stages.
Features of slatted ceilings
When choosing which ceiling is best to make in the hallway, owners often give preference to slatted structures, since this is one of the most profitable ways to design ceilings. They are mounted from slats, for the manufacture of which a thin profile is used.

There are two types of slatted structures: slotted and slotless, or they are also called open and closed. The first of them have no gaps between the panels, so such coatings look like a continuous canvas with almost invisible seams. Constructions of the second type have insignificant gaps between the slats, resulting in the impression that these are type-setting surfaces.
Slat ceilings in the hallway
As evidenced by the design slatted ceiling in the corridor, he is excellent option interior design in this small room. The most popular are plastic and aluminum slatted systems. Like any surface finishing method, they have advantages and disadvantages.
Pros of plastic rack structures the following:
- Inexpensive price.
- Easy installation, since the material is flexible, the strips are easy to cut.
- The surface is quickly cleaned.
There are also disadvantages:
- The decor looks cheap.
- Since the material is fragile, transporting and storing the panels is problematic.
- Low-quality plastic quickly loses its original color and changes shape, and quality products not easy to find.
- The material is fire hazardous and flammable.

The advantages of aluminum slats include:
- Durability, fire safety, strength.
- Larger coefficient reflections compared to plastic.
- Wide choose texture - gloss, mirror surface, imitation gold or silver.
- Possibility to install a suspended ceiling of complex shape in the hallway.
At the rack and pinion aluminum construction the following disadvantages:
- High price.
- Labor-intensive installation.
- The need for frequent surface cleaning.
Selecting material for assembling slatted ceilings
Ceiling systems made from slats differ design features components. The slot-type slats have a U-shaped profile, and the slotless product is equipped with a stepped protrusion, thanks to which it is connected to the adjacent plank.
The slats are made from:
- aluminum;
- plastic;
- become.

Metal elements are always produced with varnish coating, regardless of color, they are created in the corridor glossy ceiling. This feature provides their reflective ability. These rack systems are often installed in bathrooms, kitchens and hallways.
When buying them, you should take into account the length of the panels; usually this parameter is 4 meters. Such products are difficult to transport and lift. upper floors. Most often, the planks are sawn in half and 2-meter products are obtained.
They must be transported carefully, avoiding shock, otherwise aluminum slats dents remain that can spoil the design of the ceiling in the hallway - they will be clearly visible on the mounted surface due to its reflective ability.
Features of the open type slatted ceiling structure:
- The planks form a single flat surface.
- The absence of depressions ensures ease of maintenance.
- To hide the space between the panels, a layout is used, which is a special profile.
- You can collect multicolor planes.

Distinctive characteristics of ceilings closed type:
- The planks create a textured relief ceiling plane.
- The presence of slots ensures high-quality ventilation space available under the panels, which has great importance when installing recessed luminaires.
- There is no need to use a profile to cover cracks.
- Multi-colored panels with gaps between them look less attractive.
Accessories for slatted ceilings
You can purchase ready-made slatted ceilings for the hallway or place an order for an individual set. Manufacturers of such structures offer to purchase kits for installation in bathrooms measuring 1.7x1.7 meters or 1.35x0.9 meters.
To design a ceiling of a different size, you must either select the elements yourself or contact the manager of the retail establishment.
IN standard equipment slatted ceilings include:
- Ceiling strip with a width of 50, 84, 100 and 150 millimeters. You can choose any color for the ceiling in the hallway according to the RAL table.
- Tire (other names: stringer, comb, traverse). This strip is needed to fix the elements to the base floor. It has special recesses.
- U-shaped profile. Intended for installation along the walls of the room along the perimeter and fastening the ends of the slats. On sale there is a U-shaped profile with perforations for fixing to surfaces.
- H-shaped profile. It is used for joining the ends of panels when laying double or more in length.
- Installation instructions from the manufacturer.

In addition, to cover the gaps between the slats on a closed ceiling, layouts are used, which are also called decorative inserts. Can be implemented original ideas ceiling in the hallway, buying planks of one color and inserts of another. But even layouts of the same color can provide a spectacular play of light and shadows on the ceiling plane.
Also, the standard package does not include hangers, which are required to adjust the level of the suspended structure, if basic basis There are significant elevation differences and other disadvantages. You can purchase a corner perimeter profile used to decorate joints.
Manufacturers pack standard kits in boxes with plastic handle. Taking care of consumers, the CESAL company informs about the contents of the package by attaching a sample of the strip to its handle.
Design of slatted ceiling structures
For beautiful ceilings in a rack-type corridor, depending on the shape of the slats and layouts, there is a certain classification:
- German;
- French (S-design);
- designer.
Designs with French design produced by the following companies: CESAL, Alconplas and Albes. These ceiling panels have rounded shape, their width is 100 or 150 millimeters, and their thickness is 0.5 millimeters. These ceilings are produced in both types. Included open version Includes 25mm wide inserts.

When you plan to install a German-made structure when decorating the ceiling in the hallway, you need to take into account that it will have a strict geometry of shape. At the panels of this type there is a rectangular edge profile and this gives the ceiling surface a laconic appearance. German models of slatted ceilings are produced in open and closed versions.
Designer designs are made to order according to technical specifications provided by consumers.
Creating slatted ceilings in corridors
To complete the installation, you will need the following tools:
- level;
- tape measure and marker;
- drill and drill bit;
- grinder with a thin disk or scissors for metal work;
- hammer.
The assembly of the slatted ceiling is carried out step by step.
Step one is to determine the level of the structure. When the ceiling is flat, the U-shaped profile can be attached to the corner joints of the walls. But even then you need to make sure that the walls are the same height. This is done by taking measurements with a tape measure.
IN apartment buildings It is rare to find the correct geometry of a room. For this reason suspended ceilings in the hallway they are mounted on hangers that allow you to adjust the height of the frame.
The most convenient way to determine the height is with a self-leveling laser level. The fact is that when using it you do not need to take measurements. This device shows the horizontal using a red line. If you use it as a guide, you can begin to attach the U-shaped profile around the perimeter of the room.

In the absence of a laser level, old methods are used, using a marker, tape measure, thread and bubble level. When cutting lines in this way, you must first determine the height of the corners and measure the distance down at the lowest one. It should be enough to hide electrical wiring and various communications.
At this point, screw in a self-tapping screw with a thread, pull it along the adjacent wall and level it bubble level relative to the horizontal. A self-tapping screw is also screwed into the other corner and a thread is attached to it. Similarly, stretch the threads throughout the room, including all the protrusions, and draw a straight line along them.
To determine the amount of indentation from the base floor and the length of the screws, lay the recessed lamp and pendant on the table on its side - its length should exceed the body lighting fixture by 5 - 10 millimeters. The length of the screws is selected so that it is 7 - 10 millimeters greater than the height of the lamp, taking into account that the head of the fastener will fit into the recess on the tire.
Step two - installation of the U-shaped profile. You can use aluminum corners instead. The profile is cut to the required length using metal scissors. If the product does not have holes for fastening to the wall, they are drilled at intervals of 40 - 50 centimeters. The profile is applied to the wall so that its lower edge is located on the marking line.
The locations of the holes on the profile are marked on the wall with a marker. Then they drill holes and drive plastic plugs into them so that their upper cut is flush with the surface of the walls. The profile is attached to the wall with self-tapping screws. With the aim of corner connection The ends of the profiles are cut at an angle of 45° or inserted into one another.
Step three - installation of stringers. The main load from the suspended ceilings in the hallway falls on the tires. When the room has big sizes, the length of these guides may not be enough, so they are extended. This is done like this: one stringer is placed on top of the other so that the recesses for fixing the slats are completely aligned. Metal screws are used to connect the planks.
To ensure the rigidity of the suspended ceiling structure, it is installed on stringers, placing them at intervals of 70 centimeters. Side guides should be placed at a distance of 1 - 2 centimeters from the walls. The hangers are attached to the base base as described in step No. 2.
To align the stringers relative to the level, you can use two methods. The first of them is that threads are pulled between opposite U-shaped profiles. When using the second one, stringers are attached to the base surface with self-tapping screws - this option is more convenient if the ceiling is wooden. The height is adjusted by screwing in and unscrewing fasteners.
Step four - installation of wiring and installation of lamps.
Step five - attaching the panels. One end of the rail is inserted into a U-shaped profile. Having shifted the panel diagonally, its second end is also inserted into the U-shaped profile located on the opposite side. The rail is moved so that it is located under the notch of the stringer. The panel is lifted and pressed against the stringer so that it clicks into place with a characteristic sound.
The following strips are installed in the same way. When the panel is located under the mounting location of the lamp, appropriate markings are applied to it and a hole is drilled with a crown of a certain diameter. After installing the rail, the housing of the lighting fixture is secured into place in it.
Step six - installation last bar. When it does not fit completely, it is trimmed with metal scissors.
Step seven - installation of layouts. The insert strips are squeezed and inserted into the gaps between the panels and should click into place. At the end of the work, the functionality of the lighting is checked. The ceiling is wiped from dust and stains with a damp cloth.
Regardless of the species ceiling structures and ceiling design in the hallway - stretch fabrics, slatted or suspended plasterboard systems are chosen taking into account many nuances.
When starting a home renovation, we all think about the design of the hallway, so the question often arises about how to decorate the ceiling. Its area is usually small, so modern technologies mastering finishing on it is much easier and much faster. In addition, you can see the results of your work very quickly.
Ceiling design
Often, when designing a hallway ceiling, people completely forget about the role of design. And completely in vain. After all, it has long been known that using design techniques, can be decorated small room, hiding and sometimes correcting existing shortcomings.
Finishing secrets
When decorating a low ceiling in the hallway, you should use light colors. They will go well with light walls and darker floors. This way you will visually increase the height of the room.
If the ceiling in the hallway is too high, the room has a somewhat disproportionate appearance. The situation can be improved dark color, then the hallway will become more comfortable and harmonious.

When choosing a finishing method, you can leave the area of the room unchanged. For example, if you choose and position the ceiling tiles correctly.
In any case, before starting work, you need to think about the implementation of the design idea - it can radically change the room.
Plastic ceiling in the hallway
This material has won the recognition of many of our compatriots. It is widely used in the design of residential premises, offices, and shops.

For those who are afraid of various innovations, you can suggest painting the ceiling quality paint(fortunately, the choice is now huge), whitewashed or covered with foam panels. Last method, probably the most affordable, does not require complex installation. And the range of such slabs in stores selling finishing materials is quite diverse.

They don't require complex training surfaces before starting work. You just need to clean it thoroughly from the previous coating (if any), from dust and dirt. Mark the middle of the ceiling and stick the first four tiles from there in the shape of a cross. And then, focusing on them, glue the next slabs. detailed instructions for this material is on the packaging.
This ceiling does not require complicated maintenance - if it gets dirty, just wipe it with a damp cloth. In addition, anyone, even those very far from construction, can do it with their own hands.
Don't be afraid to experiment - your hallway will only benefit from it. The main thing is that the result of your work pleases you for many years.
One of the final stages of renovation is finishing the hallway ceiling. And indeed, it is the hallway that we tackle last, so as not to disturb the integrity of the already repaired walls, floor and ceiling during the renovation of other rooms.
But despite the fact that the decoration of the hallway is carried out when the main part of the renovation is completed, it’s too early to relax!
Ceiling finishing options
Today, there are several dozen methods and varieties of finishing the ceiling in the hallway.
But to a first approximation, they can be divided into two groups:
- A finish that is applied directly to the ceiling;
- Finishing that requires the construction of additional structures.
The first group of finishing methods are:
- Whitewash;
- Painting;
- Wallpapering;
- Finishing ceiling tiles;
- Finishing with decorative plaster.
All of these finishing options use the ceiling as a base. Naturally, in order for the finish to be of high quality, the floor must be properly prepared - cleaned of the old finish and primed (see).

The second group includes:
- Ceilings made of plastic panels;
- Suspended plasterboard ceilings (single and multi-level);
- Stretch ceiling.
These types of ceilings in the hallway are mounted at some distance from the ceiling. Because special requirements There is no overlap in processing here.
Below we will take a closer look at the most common of the listed methods. After studying them, you can decide what kind of ceiling to make in your hallway.
Finishing ceilings on ceilings
Ceiling preparation
Before you start applying finishing material, the ceiling needs to be prepared.
If we are finishing the hallway in a typical high-rise building with concrete floors, then we prepare the ceiling like this:
- We clean the ceiling down to the concrete: wash away old whitewash, remove the paint with a wire brush, and remove the old wallpaper with a spatula.
- We treat the ceiling with a primer.
- Using a level, we attach beacon profiles to the ceiling - we will use them to guide us when plastering the ceiling.
- Using lighthouse profiles as a basis, we begin plastering the ceiling. To level the plaster layer, we use a long rule strip (see).

Note! Before completion plastering works beacon profiles are removed from the plaster layer. The cavities remaining from the profiles are filled with plaster composition.
After waiting for the plaster to dry (the period depends on the composition of the plaster mixture), we putty the ceiling. For whitewashing and decorative plastering There is no need for particularly thorough putty, but before painting the ceiling we putty it very carefully (see). When the preparation is completed, we move on to finishing.
Whitewashing and painting
Whitewashing and painting the ceiling in the hallway is one of the most simple ways. However, as we noted above, these methods are simple only in themselves - since at the stage of preparation for whitewashing they require serious efforts to level the surface.
Note! If you plan to whitewash or paint the ceiling in the hallway, it is important to level it very carefully using putty. In such small room like a hallway, any unevenness in the ceiling will not only not be masked by painting - it will be emphasized by it.

This decoration of hallway ceilings has proven itself in small hallways with relatively low ceilings.
The whole point is that both whitewashing and painting:
- They “eat up” the space in height to a minimum (where a suspended ceiling needs 100-150 mm, for painting, including plaster, 10 is enough).
- Visually increase the height of the corridor. Choosing wisely color scheme – light ceiling, intermediate shade walls and a dark floor - we can “stretch out” the hallway very much.
Naturally, both whitewashing and painting the ceiling are done before finishing the floor and walls in the hallway (see).
Decorative plastering
Decorative plaster is another way to quickly get a beautiful and even ceiling.
Plaster is applied according to the following scheme:
http://design-remont.ru/images/article/109_3.jpg
- On a plastered base plaster mixture we apply the ceiling decorative mixture in an even layer several millimeters thick.
- After applying the cut, before the plaster begins to polymerize, we apply a relief to the plaster using a sponge, grater or notched trowel. The relief can be furrows, dots, lines, waves - in general, here you are given complete creative freedom.
- After polymerization decorative plaster we paint, or simply tint, passing with an almost dry brush over the protruding parts of the relief.
In addition to whitewashing, painting and plastering, the ceiling can be covered with wallpaper or ceiling tiles. These finishing methods are quite simple, so they should not cause you any particular difficulties (see).
Independent ceilings
Suspended ceiling made of plasterboard or plastic
The second group of ceilings consists of the so-called independent ceilings - structures that are strengthened not on the ceiling itself, but on a frame made of wooden planks or metal profile:
- At a selected distance from the ceiling (most often it is 10-15 cm), we attach a starting profile or a base rail along the perimeter of the hallway.
- We attach metal hangers made of galvanized iron to the ceiling itself.

- We attach frame elements to the hangers, which we connect to starting profile and among themselves.
- We attach sheets of drywall or plastic panels to the frame below. To fasten drywall, we use self-tapping screws; we fasten plastic panels either with a construction stapler or with “liquid nails.”
The resulting ceiling made of plastic panels does not require additional finishing, but plasterboard sheathing most often putty and paint.
Stretch ceiling
Stretch ceiling - practically perfect option for finishing the hallway.
This ceiling is an elastic PVC sheet that stretches at a certain distance from the ceiling between the walls of the hallway:

- First, we attach the canvas clamps to the walls.
- Then, using a plastic spatula or special tool we place the edges of the canvas into the grooves of the clamps.
- Using a heat gun or construction hair dryer heating the canvas, stretching it into a single plane.
Stretch ceilings have only one drawback: they are quite expensive, and only professionals can make them well.
There are a lot of answers to the question “How can I decorate the ceiling in the hallway?” So, when starting a renovation, don’t stop at considering just one option. It is quite possible that after reading this article, you will find exactly the method you needed!