Installing a heated towel rail step by step. How to properly install a heated towel rail in the bathroom. Knownly NOT working, erroneous connection diagrams

Add site to bookmarks
- Kinds
- Choice
- Installation
- Finishing
- Repair
- Installation
- Device
- Cleaning
Installation of a heated towel rail: necessary equipment and materials
Today, the problem of private construction remains very relevant. A special place in this section is occupied by the arrangement of a bathroom in an apartment or a comfortable house. Important detail– this is the installation and connection of a heated towel rail. You can do all the plumbing in the bathroom correctly either on your own or with the help of plumbers. Heated towel rails are an important component of any bathroom, since the bathroom does not have radiators for heating. A water heated towel rail is the same radiator, only its functions are slightly different.
A water heated towel rail not only serves to dry towels and other linen, but is also part of the heating system. Having a high temperature, it contributes to partial heating of the bathroom, maintaining optimal parameters microclimate in this room. It performs a hygienic function. Let's take a closer look at how to properly use a room and the main types of these devices.
Main types of heated towel rails

Before you do it, you will need to familiarize yourself with its types. So, a heated towel rail for a bathroom can be of two types: electric and water. You can install any of them. The water one differs in that it is connected to the hot water supply or heating system. The first option is the most optimal. This heated towel rail is part hot system water supply It's not that easy to install. It is important to take into account the quality of the material and the wall thickness. To avoid leaks, you need to carefully select the threads and properly process the ends. The good thing about installing such a heated towel rail is that it does not require grounding and waste of electricity, which will save money.
You can also install an electric heated towel rail. Externally, these two species are very similar. They can be installed in any place, regardless of the location of the pipelines. Besides, in in this case interruptions in operation are excluded, regardless of the heating season. There is also no need optional equipment in the form of adapters and pipes. But installing such a heated towel rail is more expensive.
Return to contents
How to properly install a heated towel rail in the bathroom
In the bathroom, you need to connect 2 pipes to it: one for supplying hot water, and the second for draining it.
Installation is carried out by inserting a heated towel rail (if it is water-based) into the heating or hot water supply system.
The second option is preferable, because the water runs around the clock, and the heating is turned off very often. Connecting to the heating system is quite difficult, since cold period you will have to turn off the entire system for a while. Installation of such equipment includes dismantling the old and subsequent installation of lintels and taps. It is very important to correctly adjust the interaxial space for a new heated towel rail.
In order to install the device in the bathroom correctly, you need to remove the old equipment, solder (weld) the pipes, install 2 taps and a jumper. The work is complex, so it is recommended to use the services of specialists. To properly install a towel dryer in the bathroom, you need to choose a material, in particular, pipes. Can use metal plastic pipes, it must be taken into account that they are sensitive to pressure drops in the system. This option is the most economical. The internal diameter of the pipes in the connections is smaller than usual. The most reliable are copper pipes. They are durable and well adapted to pressure changes. In addition, they are connected to each other by soldering, which ensures their tightness. The heated towel rail can be placed using polypropylene pipes.
Return to contents
Jumper installation
The rules for installing a heated towel rail provide for the installation of a bypass (jumper). Why is it needed? The bypass will simplify the repair work of your own equipment. When installing a jumper for a heated towel rail, it is important to know that it is not required. Water dryers are connected to the main riser (vertical pipeline of the house) using connections that use rubber or paronite gaskets. They do not last long and will soon need to be replaced. In this case, you will need to temporarily shut off (turn off) the water in the entire riser. For such a service you need to pay money to the local utility service.
Installing a bypass involves. With this mechanism, it is possible to block the access of water to the device for drying towels, but at the same time, the water in the riser will move along the jumper without disrupting the operation of the entire network. In this case, you can carry out equipment repairs without any worries. It must be remembered that in detachable connections


It is recommended to use fluoroplastic gaskets. When installing a bypass, special valves are installed at the ends of the pipes, and the pipeline in front of them is connected by a jumper. The bypass is a piece of pipe with connecting elements. Installation of jumpers involves the use of metal or polypropylene pipes.
When renovating apartments in old houses, many people consult how to install a heated towel rail in order to replace a nondescript unit with an elegant chrome one. You can obtain the necessary information without the services of a specialist and even carry out such an operation yourself.
A modern bathroom is not complete without a simple but very effective device - a heated towel rail. In most cases, the device is a pipe bent in a special way, designed not only for drying towels, but also for creating a comfortable microclimate in the bathroom. Today there are only two types: electric and water. Each of them not only has device features, but also requires appropriate installation rules.
Pipe for drying towels in the bathroom Replacing with an electric heated towel rail is a less traditional approach, but such an accessory is more mobile. If you need to install it in a place where access to water pipes , then installation will not be difficult. The only problems will be good waterproofing on electrical wires and the connection itself, and saving energy. There are many questions associated with installing a water heated towel rail with your own hands. First of all, it is necessary to find out whether the connection will be made to the heating system or to the pipe supplying hot water. The first case is less common, since heating the bathroom in usually goes the second way. This is what we will consider as the main one.
How to install a water heated towel rail if in the bathroom there is only a curved pipe through which it's hot water? Before replacing it with a beautiful accessory, it is important to make sure whether it can be covered locally, within the same apartment. If there is no valve, you will have to negotiate with the housing office to block the hot flow in the entire entrance.
After shutting off the main, wait 15–20 minutes for the water to leave the system, and then you can try to change the old heated towel rail. Usually this operation does not cause difficulties, unless over time threaded connection didn’t “stick”. Then you will need to try to apply some kind of anti-corrosion agent to the joint, and then apply some effort to remove the fasteners. If all else fails, you will have to remove the device using a grinder. Subsequently, deciding how to install the heated towel rail will be a little more difficult; you will have to tinker with the main pipe, making threads.

Replacing an old heated towel rail
When the old fixture has been removed and everything is ready to connect the new heated towel rail, you should take the opportunity to provide the outlet with an additional pipe, called a bypass, and two ball valves. This is very useful design, allowing you to turn off the water in the future without leaving the bathroom if you decide to change this accessory again.
Modern technologies are such that polypropylene pipes are successfully used for water mains. Now there is no shortage of them, and therefore you can always pick up required diameter in any construction market. Many experts prefer copper pipelines, considering them more durable and stronger. But for those who decide to do everything with their own hands, without the help of craftsmen, it is still better to use devices of the first category. They are easier to install, and there is no need to purchase tools for cutting metal. In addition, such pipes are absolutely not subject to corrosion and, therefore, are more durable.
Installation of a new device
Now let's move on to the instructions on how to properly install a water heated towel rail. In this matter, it is important not to rush in order to avoid unnecessary distortions, especially if you are doing such an operation with your own hands for the first time.
Installation of a new heated towel rail in the bathroom - step-by-step diagram
Step 1: Select a model
First of all, you should carefully choose the heated towel rail model so that it matches both aesthetic tastes and technical requirements. Then – the material from which the structure itself is made. Stainless steel fixtures are now considered common. Their price is much higher than the others, but their service life and reliability are excellent. The second most popular is brass. From point of view appearance There are no complaints about products made from it, but they are still not as durable and reliable as steel ones.
The optimal solution can be called stack pipes, that is, products reinforced with aluminum. Thanks to this engineering solution Expansion due to exposure to high water temperatures is completely eliminated, and this property not only preserves the ease of processing plastic, but also the pipes themselves are not inferior in strength to metal ones.
Step 2: Marking
When answering the question of how to properly install a heated towel rail in a bathroom, any master will first answer - keep it vertical. It is due to this factor that normal fluid circulation throughout the entire device and uniform heating of the entire structure are achieved. Initially, you need to properly measure all the distances between the pipes, mark the installation locations of the brackets that will hold the entire “structure”. It should also be noted that many people like to “hide” eyeliner in the walls. This means that the issue of laying pipes will have to be resolved.
Step 3: Installation
After the necessary markings have been made, brackets are installed on the wall. And since you are doing the work with your own hands, you need to know how to drill the walls and screw these parts. Then make a trial, “rough” installation of the dryer, measuring the verticality of its location with a level. If there are any mistakes, try to correct them immediately. Afterwards, we fix the device body “white” and connect it to the pipes. When installing, do not forget to use sealing thread or tape, tow, and do not miss the moment of installing gaskets.
The threaded connection must be installed with extreme caution: too much force can lead to the thread itself breaking, and the worst outcome will be that you will have to completely discard the entire structure. And remember the main thing: compaction, compaction and compaction again.! You don’t want to then have to pay to repair the bathroom of your downstairs neighbors if they get flooded?
It should be especially taken into account that water must circulate through the dryer from the top connection to the bottom, and nothing else!
Step 4: Check
Finally, when everything is assembled and connected, perform a leak test. First, as soon as the water is turned on, inspect the connection from all ends. It should not be wet, and even more so, water should not be allowed to drip from there. If this happens, you will have to turn off the riser again if you don’t like the idea of installing a bypass. You should let water into the heated towel rail smoothly, and do not open the taps abruptly, so as not to cause a water shock. Otherwise, the pipes may burst, and it turns out that instead of comfort, you have created a lot of additional problems for yourself - you will have to replace not only the damaged pipe.
As mentioned above, installing a device with electric heating yourself is much simpler, but you must remember the features related to the safety of its operation. These tips are few, but the importance of each of them can hardly be disputed.

Installation of an electrically heated device
- If the outlet to which the device is connected is located, it must be waterproof and have a special cover that insulates it from water.
- Grounding is a mandatory condition to prevent the formation of static electricity on the surface of the dryer.
- Use the device automatic shutdown electricity. The condition is indisputable if you do not want to get electrocuted during water procedures!
- It is advisable to use hidden wiring preventing moisture from entering the wire.
- When purchasing, you need to pay attention to the type of electric dryer. Oil-containing ones require rigid fastening in one position, take a long time to warm up and cool down slowly, but installation of grounding is an indispensable condition. Cable - can be rotated as conveniently as possible, heat up quickly and cool down quickly, grounding is desirable, but not necessary.
The question of how to properly install a heated towel rail in the bathroom is important from the standpoint of efficiency. Although this simple device is found in every home, in some cases it needs improvement. For example, if, when planning a bathroom, this pipe bend is placed in a visible place and it spoils the interior of the room. From time to time, a blockage occurs in the device itself, and the drying process is not carried out as efficiently as before.
Therefore, it is worth considering how a heated towel rail is designed, what types of it you can choose for the bathroom, and what to consider during the installation process.
Types of heated towel rails
Often homes have a place for drying towels or certain types of clothes, where constant heating provides quick fix moisture from everything on it. It is convenient for large families with small children, where clean things are needed very often. And in the cold season it serves as an additional source of heat. Therefore it effective work very important.

Depending on the type of energy used, there are several types of heated towel rails. Less often found in homes electrical appliance for this function. It is efficient to use and operates from a regular electrical outlet. Installing an electric heated towel rail with your own hands is not much different from installing a lamp or other electrical appliance. But if you place such a device in the bathroom, you need to take into account all the measures fire safety. For example, do it so that water does not get on it.

Most often in homes they use heated towel rails connected to a heating pipe. Their operating principle is simple: hot water rises through heating pipes and batteries in multi-storey building, providing warmth to everyone equally. And in reverse side this water descends through a pipe with many bends, forming heated towel rails in each apartment in the riser. This ensures rational use of heat.

Since the heating system is not designed for one family, any change in it will affect other users. Therefore, correct reinstallation of a heated towel rail should not only be effective in a particular apartment, but also safe for others.
There are heated towel rails of the so-called combined type, combining water and electric heating. If necessary, you can connect any of them. This option is convenient, since the heated towel rail will work effectively even when the heating is turned off.
Installation principles
When deciding how to install a heated towel rail in the bathroom with your own hands, it is worth considering several important points:

There are two main ways to install a heated towel rail powered by a hot water supply pipe. The structure can be connected directly or corner connection. Each of these methods has its own characteristics and conditions that contribute to their effective operation.
Direct connection installation
This method is used when severe blockage heated towel rail pipes and you need to replace a piece of pipe without moving the device to another location. This procedure does not require large quantity time or special professional skills. 
Before you start dismantling old pipe, you need to take care of turning off and draining hot water from the system. Otherwise, there is a high chance of getting burned.
Afterwards, the unnecessary piece is cut off and a new one is fixed in its place. Depending on the conditions, it is either simply welded or fixed using threaded pipes.

If there is a direct connection when installing the device, it is worth considering 2 main points:
In this case, it is allowed to install taps that will allow you to disconnect the device from the network if not needed or dismantle it completely. If desired, you can install a thermostatic regulator in the system, which will maintain a certain temperature in the device. To new system
looked good in the interior of the bathroom, you can use a decorative box to hide the riser pipe.
Corner installation

This method is used by those who want to not only update the pipe of this device, but also change its location. According to the installation principle, an angular connection is not much different from a straight one. But installing a heated towel rail in the bathroom should take into account several important points: An alternative could be diagonal connection
heated towel rail. But it does not bring much effectiveness. Heat transfer with this installation method can increase by 5-7%. Heated towel rail circuits with an offset bypass are used as an alternative to replacing the riser. However, it is worth remembering that this approach is applicable when directing water flow
down. If the installation of pipes involves an upward movement of flow, such a DIY installation of a heated towel rail in the bathroom will be ineffective. Also, with this choice, you should not use narrowed pipes.
Advantages and features of the bottom connection Similar unit installation schemes are popular in last years . Because by fixing the heated towel rail from below, you can hide extra pipes various accessories or interior items. You can find it in stores a large assortment models that will be installed in this way. But despite its external attractiveness, the scheme bottom connection

In view of the existing conditions, it is worth paying attention to popular heated towel rail connection diagrams. Some of them may be deliberately inoperative due to non-compliance with standards. Therefore, if the master offers you options with inlet bends, a narrowed or offset bypass, be careful.
This way you will avoid disappointment when, even if the hot water supply is working properly, the heated towel rail remains cold. 
Let's summarize: install or can, not the name of special skills. The easiest option to connect may be a device powered by electrical energy. If you choose a device powered by heating system
or hot water supply, consider some details. First, find out how often the heating or hot water is turned off in your area. This will determine the time when the heated towel rail is useless. This does not apply to persons living in houses in which water is heated by a water heater or boiler.
When choosing a connection type, set the direction of water flow. The options used will depend on this. Be sure to use models with a bypass if you want to turn off the device with taps when not needed.
Since there are several main options for connecting a heated towel rail to a riser: direct, side, diagonal or bottom, the choice should be made based on the initial position of the device and its height. The easiest to implement is a direct connection. Several conditions are worth considering when choosing a side or bottom method, especially if an offset bypass or narrowed pipes are used. Choosing one of latest methods , analyze and refuse options that will obviously not work. And then your heated towel rail will be beautiful and functional subject
interior
Video instruction In that step-by-step master class
Let's learn how to install a ladder heated towel rail with a bottom connection. We will install and route pipes to the riser and secure the plumbing in accordance with regulatory standards.
Step 1: Marking and scoring the wall
One of two types of heated towel rails is purchased for the bathroom: electric or water. The first option is easier to install, but it requires more energy. Therefore, most often a water heated towel rail is installed. It is connected to the general heating system or hot water riser. all year round will be impossible, unlike connecting to a hot water riser. There may also be difficulties with this option. You will need to obtain permission to shut off the water to your entire home. IN heating season this will be problematic, there is a high probability emergency situation. Therefore, we recommend connecting the heated towel rail to the hot water riser.
Replacing an old Soviet-style heated towel rail in a bathroom is done using a grinder, cutting out the coil along with the riser.
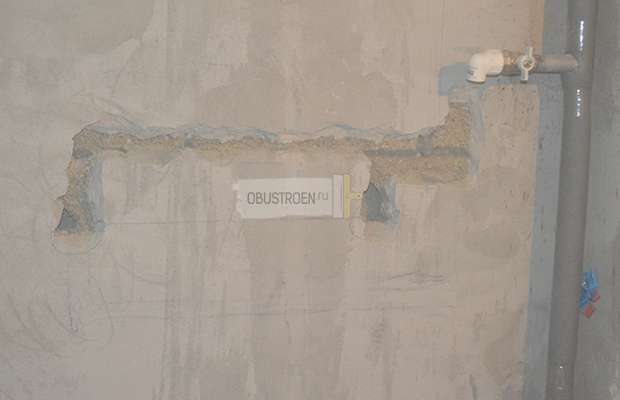
After dismantling and shutting off the water, we make markings. We mark with a pencil the places of the lower connection and the location of the pipes for distribution. When installing this plumbing, we adhere to SNiP. According to the regulations, the installation height of a heated towel rail should be at a distance of 1.2 m from the floor level and located at least 0.6 m from the sink, bathtub and other plumbing equipment.
The heated towel rail can be installed above washing machine, providing unhindered access to equipment. A ladder-type dryer, as in our case, is mounted at such a height that a person of average height can easily reach the last rung. When marking, also keep in mind that the heated towel rail should not be located at a distance of more than 2 m from the riser, otherwise the installation will provoke large heat losses.

Next, we hollow out cavities for pipes in the marked part of the wall. To make a groove, you can use a special wall cutter or a regular grinder with a drill. Wear a protective mask and goggles while chipping. If you are leaving the pipes exposed, skip this step. We install ball valves at the ends of the riser under the outlet of plastic pipes, thanks to them you can turn off/resume the water supply at any time.
Step 2: Routing and piping to the heated towel rail
The general connection diagram for a heated towel rail is the same for all types of device. Water is supplied from one end and water is removed from the system from the other. Let's start wiring. We solder the polypropylene pipes from the ball valves to the water supply to the dryer. Let's prepare additional tools and materials that will be needed during work - a soldering iron and scissors for polypropylene pipes, connecting fittings (angles and American couplings). To install the heating system we use plastic pipes with fiberglass d=20 mm. We screw on the plugs.

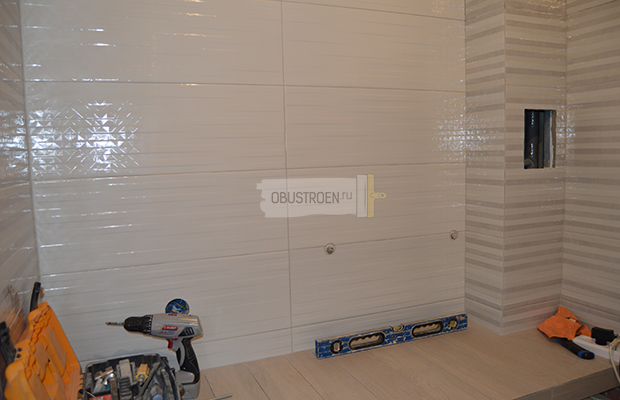
Temporarily screw the heated towel rail into place without final fixation or winding, set it level horizontally and vertically, and attach the plumbing fixtures to dowel screws. American couplings should protrude from the wall to the thickness of the tile with which it will be faced.

Step 3: Sealing the fines and facing
After installing the heated towel rail, we wet the wall from dust and seal the groove with putty.

Leave the outer part outside polypropylene fitting with thread, putty the rest.

As soon as the putty hardens, remove the heated towel rail. We will finally install it when we cover the walls with tiles.

Step 4: Installing Cams and Fasteners
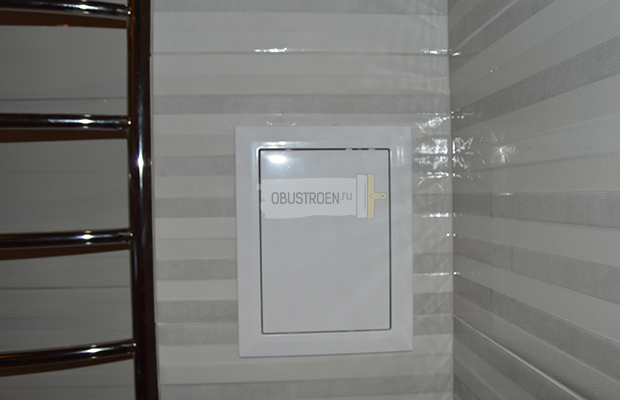
The tiles are laid, now comes the final installation of the heated towel rail. On the side of the riser, we cut a window in the tile for the inspection door. Through it we make sure that the taps are closed, unscrew the plugs.
The heated towel rail comes with eccentrics with narrow and wide threads, ½ and ¾ inches with offset. We screw the eccentric manually into the thread coming out of the wall, inserting it with the narrow part, having previously wound the sealing thread. We install it evenly, without distortions, slightly too far, so that you can adjust the position of the heated towel rail. Tighten the connection with a wrench.

Don’t forget about installing gaskets; we put reflectors on top that will hide the junction of the pipe and the plumbing. We screw the heated towel rail on by hand, level it by turning the eccentrics.

We screw the device and make marks where the top fastening of the heated towel rail to the wall will be located. Last time remove the heated towel rail, drill holes in the marked places for dowel screws using a special tile drill to avoid cracking of the tiles.

To attach the plastic, we will use Point 96 liquid nails. This is a crystal clear fixative that, after application, creates an invisible seam and is suitable for almost all surfaces. Another feature is the primary contraction. There is no need to use additional bolts or fasteners.

The hatch is installed; if necessary, it can be easily opened for inspection and turning off taps.
The heating element for drying towels is designed to create comfortable temperature in a bathroom or other room, it serves as an integral attribute for normalizing ventilation, eliminating air humidity and the smell of dampness. It is a kind of climatic unit.
Choosing a heated towel rail
The installation technology depends on the choice of heated towel rail. There are three main types of these units: water, electric and combined.

1. Characteristics of the water heated towel rail:
- classic design. Known to users of the first block houses;
- one of the popular models;
- installation requires a heating system or hot water supply;
- advantage of this device- possibility of autonomous disconnection from the general water supply. It is enough to install a tap on the coil to shut off the water and not turn off the general heating;
- material for the manufacture of water heated towel rails: brass, stainless steel, cast iron, plastic;
- Not high price models. Familiar design.
2. Description of electric heated towel rail:
- used when it is impossible to connect water models, in places where there is no hot water supply or central heating, for example, in private baths, saunas, and in the bathrooms of country houses;
- offered;
- the choice of model is made by power, taking into account the electricity consumed during the heating process;
- installation is carried out according to two schemes: open and closed;
- advantages of the models: the ability to automate the heating process, use in any room, not just in the bathroom, have original design forms.
3. Description of combined models:
- hybrid type, consisting of a combination of water and electric heated towel rails;
- By design features They are more aquatic. Hot water flows freely through the coil. To heat it up in case of shutdown central heating, heating elements are provided;
- the main disadvantage of the models is the very high cost compared to the first two types.

Installation of a water heated towel rail
Water heated towel rails are used more often than others. This is due to simpler installation due to the presence of hot water supply in every home. The old coil is being replaced with a modern one with an attractive design.
1. Ways to install a heated towel rail:
- embed into an existing heating system;
- connect to the hot water supply central.
The most acceptable and optimal is the second method. It provides benefits:
- in constant, round-the-clock heating of pipes, without additional automatic or visual control. There are no interruptions in heating and cooling of pipes;
- connection to the city central heating system means heating only in heating season. Hot water supply will allow year-round heating;
- It is necessary to carry out installation using this method in the summer, when the supply of hot water in boiler rooms stops, during the preventative period.

2. Tools for installing heated towel rails:
- main unit - heated towel rail;
- special machine for welding pipes;
- polypropylene pipes;
- brackets;
- ball valves - 3 units;
- couplings and fittings;
- knife for cutting polypropylene.

3. Workflow steps:
- removal of the old unit;
- establishment ball valve and buy passes;
- welding process of polypropylene pipes;
- installation of a new heated towel rail.
4. Removing the old heated towel rail:
First turn off the riser on which the work will be carried out. dismantling work. Get permission from your local office utilities to turn off the hot water supply to the common riser. If the pipes are blocked in basement, then find them there and block them yourself or contact a plumber. Prepare all tools for work in advance. Drain the water from the pipes, wait until all the water has drained, and only then begin work.
5. Installation of ball valve and bypasses:
- bypass is optional mounting element. It is installed at will;
- The purpose of the bypass is to prevent an emergency situation, for example, a leak from a pipe or connections. It looks like a polypropylene pipe with a ball valve at the ends. In the event of an accident, the taps turn off the water through the heated towel rail coil;
- one tap is installed on the bypass itself, so as not to air the system and ensure normal water circulation in the pipes and system.

6. Welding process of polypropylene pipes:
The heated towel rail is installed to the system using polypropylene pipes. Pipes made from this material have a low price combined with a high working life.
For example, given comparison table on the use of pipes made of other possible materials:
- copper pipes are highly resistant to corrosion. Disadvantage - very high cost per linear meter;
- steel pipes. Complex installation, required welding machine. They quickly oxidize and become clogged with scale inside. They require constant surface treatment with anti-corrosion compounds. They make the heated towel rail heavier and attach it to brackets;
- polypropylene pipes. The material has some advantages: low price, corrosion resistance, light weight pipes, withstand high temperatures and differences temperature conditions. If couplings and fittings are available, quick and easy installation heated towel rail.
7. Professional advice how to install a heated towel rail on the wall with your own hands
Professional installation of a heated towel rail is carried out in accordance with SNiP 2-04-01-85. The heated towel rail installation diagram is standard for walls:

- To fix it on the wall, the heated towel rail is fixed with clamps; in exceptional cases, units with integrated fastening are used. General principle the work consists of fastening the coil with a dowel at several points;
- When purchasing a clamp, check the length of the dowel supplied with it. They most often go undersized and are not intended for heavy loads. Be especially careful when choosing the length of the dowel for attaching the heater to the tile. The short length is suitable for rigid fastening of supply/return pipes. For risers emerging from niches, support that is more durable is required;
- The heated towel rail is not fixed “dead”. The cantilever structure has an adjustment system; it will allow you to move the device relative to the wall surface. This is done using a threaded rod. By unscrewing or tightening the pin, the working length of the bracket is changed;
- if a fixed clamp is used, then the distance of the corner fitting is calculated for its convergence with the hole of the heated towel rail coil. The diagram shows the inlet hole in section and in the order of assembly;
- onto a previously sealed coupling with outer or internal thread a special transition coupling or “American” is installed. Many devices are immediately equipped with this part.

DIY heated towel rail installation
1. During installation, two situations are possible:
- the first, when the old heater is connected to the pipes with a threaded coupling. In this case, the old coil is unscrewed with an adjustable or water wrench;
- the second, when the riser and heater pipes are connected by welding. Using a grinder, the old heated towel rail is cut off. The ends of the pipes are threaded with a tap of the appropriate diameter. When cutting, it is necessary to leave an end sufficient for carving.
2. Installation shut-off valves, taps and bypass jumpers:
- An adapter/tee is screwed onto the riser thread. The screwing is done on the upper and lower threaded sections;
- then a bypass with a tap is installed between the risers;
- The heated towel rail is screwed into the remaining outlets.

3. Installation of a heated towel rail:
- a place to plant the heater is selected: a wall, distance from risers, bathroom accessories;
- at what height should the heated towel rail be installed? Distance recommended by professionals: from the bathtub not less than 600 mm, from the shower stall not less than 650 mm, from the sink not less than 550 mm;
- attach the heating device with brackets. Adjust the distance to the wall;
- connect the ends of the heated towel rail to the riser taps. If the coil connectors do not match with the riser taps, adapters are used, for example, made of metal-plastic or polypropylene. Diameters that coincide with the diameter of the heater and riser are selected, the presence of threads is taken into account: internal or external;
- The heated towel rail and riser taps are secured using a special union nut, American. It is necessary to place the Mayevsky tap or drain valve in the upper part of the heater in order to be able to bleed air from the coil;
- carry out initial start-up of the heater. One by one, smoothly open the taps, gradually filling the coil, without water hammer.

Installation of an electric heated towel rail
1. Preparatory stage:
- installation of an electric heated towel rail in the bathroom is carried out in compliance with the relevant safety rules for wet rooms;
- the installation location is selected. The degree of protection from moisture and convenient easy access for maintenance and repair are taken into account;
- The optimal distance of the electric towel dryer from the floor is taken to be no more than 225 cm, the distance to the shower taps is at least 60 cm to protect against splashes. The distance from the surface of bathroom objects is at least 75 cm;
- mark the installation location of the heater, attach the electric dryer to the wall and make a final marking;
- According to the wall material, select a tool for fastening, for example, drills, drills, dowels;
- for plaster walls, take a drill with a diameter of 8 mm, a metal dowel with a diameter of 32 mm and a screw with a diameter of 4 mm;
- for concrete block walls, brickwork select a drill with a diameter of 6 mm, a plastic dowel with an 8 mm diameter and a screw with a diameter of 8 mm.
2. Installation and connection of the electric towel rack:
- a fixed socket is installed in compliance with the NFC-15-100 standard;
- The electric dryer should not be located directly above the socket. A distance of up to 20-25 cm is maintained;
- Study the instructions included at the manufacturer. The connection is made strictly in accordance with the diagram. Strict adherence to the phase and neutral connections is mandatory;
- All connections are connected in the junction box, including the programming unit.

3. Tips for application and operation:
- The crossbars should only be used for drying fabric items. You cannot dry plastic, cardboard, or plastic on the electric heating segment;
- carry out seasonal and general cleaning of segments from dust and dirt. Unplug, cool the heater, wipe with a dry cloth.
4. Correct control of the program block:
- The software block allows you to work in different modes. The settings are displayed on the display screen;
- Manually controlled thermostats are used for operation. Modes are selected and set using buttons. The backlight on the screen shows the selected mode and its parameters.

How much does it cost to install a heated towel rail
1. Professional installation, excluding materials, is currently estimated as follows:
- installation of a heated towel rail from any material from $35 per unit;
- move the heated towel rail to another location, plus installation of the unit from $39 per unit;
- removal/dismantling of old coil from $9 per unit.
2. Cost of work from private mechanics:
- installation of a heated towel rail from any material from $19 per unit;
- move the heated towel rail to another location, plus installation of the unit from $29 per unit;
- removal/dismantling of old coil from $3 per unit.
How to install a heated towel rail video: