Alabaster jewelry. DIY plaster crafts. What you need to make moldings
Gypsum has been used for many centuries as a building material in the most different areas. One of the most developed areas of its use is the creation decorative elements. The properties of gypsum were used by artisans who lived before our era - in Ancient Greece and Rome, plaster sculptures were widely used to decorate buildings. The beauty of this material is its availability, ease of processing and durability. Today, almost anyone can make crafts from plaster with their own hands.
Features of working with gypsum
 It is difficult to find a building supply store that does not sell gypsum powder or plasters based on this material. Gypsum has become so widespread due to the fact that the process of its extraction is easy and relatively inexpensive. Mine gypsum stone, from which, in fact, this material is produced, possibly without the use of any special means and technologies.
A working with plaster is incredibly easy: you just need to dilute it with water and create the desired shape. But you should be careful in some respects - it hardens very quickly. outdoors. Therefore, it is advisable to initially prepare material for only one job.
Gypsum is extremely easy to work with and is capable of conveying even the smallest details. That is why the list of what can be made from plaster is incredibly huge. You can use it as a resource for creating huge sculptures to decorate columns and buildings, or you can make small crafts and toys for your own home.
 Besides the fact that this material easily takes the desired shape, it also lends itself perfectly to painting and other decorative processing. This is also facilitated by the color of the gypsum itself - white. With the right skills, a plaster toy or sculpture can be disguised as a product made from a completely unusual material.
Making molds
If you have a desire to create something with your own hands to decorate your home or site, then plaster is the best choice. However, not everyone has the necessary skills to create decorative elements. This is why it is better to first practice making jewelry using molds and templates. It's very simple - just fill out the ready-made form plaster mortar and end up with a wonderful sculpture. This is best suited for development creativity in children.
 In addition, you can use the frame and process the gypsum blank yourself using certain tools. This method is more complicated, but also much more interesting, because involvement in the work process is almost one hundred percent. Of course, when the material hardens, it becomes quite fragile, but with careful work, you can soon learn how to create real masterpieces with your own hands. It’s better to start with something simple, uncomplicated, small.
Many hardware stores sell both sculpture molds and ready materials for this. Gypsum for crafts is a very common product. A great option would also be to use non-standard forms, for example, from culinary stores. However, nothing prevents you from showing your imagination even in this - creating forms yourself.
Making molds with your own hands:

You can use the mold you created to create finished sculptures.
Creating figures
To create high-quality crafts from plaster do it yourself for home you need to know some technical details when working with forms. For example, mandatory stage there will be lubrication inner surface molds, which are needed to correctly remove the figurine after the plaster has hardened. You can use regular Vaseline, but most often you prepare or buy a special lubricant for working with plaster or other products.
The next step is to dilute the gypsum mixture. You need to know how to do it without negative consequences for your work.
Operating procedure:

 After you get a hardened figure, you can start sanding and subsequent painting. You must first apply a primer coating, which can be purchased separately, or use improvised means such as PVA glue diluted with water.
For painting You can use almost any means. Gouache, watercolor, and aerosol paint are perfect. However, it is worth considering the environment in which these figures will be placed.
For sculptures that you plan to place in the yard, you should provide some kind of protection from unfavorable conditions. Usually a simple varnish or waterproof paint is enough for this.
Crafts made from gypsum have a number of advantages. Firstly, the material is environmentally friendly, secondly, it is very inexpensive, and, finally, working with it is a pleasure. Gypsum easily takes any shape, hardens quickly, is light in weight, and can be painted well. It’s worth taking a closer look at crafts made from this material.
Preparation of the solution
However, the process of making gypsum crafts is not so simple. You need to know how to dilute gypsum, as well as the proportions when preparing the solution. The powder must be mixed with water. If you do this incorrectly, you risk inhaling gypsum dust. First, a little water is poured in, then the powder is added, stirred, and then the remaining liquid is poured in.
The consistency of the proportion of gypsum and water depends on the purpose of using the material. Crafts, voluminous or flat, are best constructed from thick mortar.
The volume of the mixture depends on the planned number of figures. If you need to make a couple of crafts, you should not mix a whole bucket, as the remaining mass will harden.
Usually finished crafts are painted over, but you can also paint the plaster mass itself. In this case, gouache or other water-soluble paints are used. If they are missing, you can color the solution with strong tea leaves, potassium permanganate, brilliant green or iodine.
Gypsum material is widely used due to its positive qualities because it is different:
- sufficiently high strength;
- simple processing technology;
- the ability to perfectly convey the smallest details of the planned model.
The strength of the gypsum is indicated by the number on the packaging. Most often for various crafts use gypsum with strength from G-6 to G-16.
Garden crafts of mushrooms: ideas, instructions
Plaster sculptures look very good on summer cottage. Sometimes gypsum is combined with other available materials - clay, cement. Or they make figures from plaster and concrete.
With such colorful figures, the entire garden plot comes to life.
For example, you can make bright mushrooms. If even the first mushroom doesn’t work out, don’t despair, try again. And then a whole mushroom family will appear on the site.
Prepare the following tools for work:
- gypsum;
- plastic containers;
- plate;
- cling film;
- acrylic based paints;
Sequence of work:
- First, the mushroom stem is prepared. To do this, take a plastic bottle and cut off the bottom. To stabilize the structure, a wire is placed inside the bottle.
- The gypsum is diluted to the required consistency. Gypsum mass is poured into the bottle. Waiting until completely dry solution. Now the plastic base can be removed, the bottle is cut diagonally and removed. The resulting product is plastered.
- The next stage is making the hat. To do this, take a round and deep plate. Plaster is also diluted and poured into a plate previously covered with film and left until completely dry. While the plaster is still wet, a mushroom stem is placed in the center. After drying, the plaster is freed from the plate and film.
- Finally, you need to color the craft. Standard colors are not required. You can add brightness to the figure. Painted products are varnished.
In a short time you can decorate your garden with simple, hand-made figurines. Involve your child in the activity, he will certainly be interested in such an exciting work.
Using the same technique you can make swans. But this work is painstaking and requires special skills, as well as artistic abilities. Mushrooms are much easier to make.
Making a panel - a gift for grandma
But gypsum crafts will be relevant not only in the garden. They will also come in handy in the house. For example, you can make a gift for your grandmother. This is a homemade plaster panel that will bear the hand and foot prints of her beloved grandchildren.
Here's what material you'll need for the job:
- Photo frame;
- gypsum;
- brush;
- elastic bands – 2 pcs.;
- sand - 2 cups;
- water.
The workflow includes the following steps:
- First, the back panel along with the glass is removed from the prepared photo frame. The back panel is attached to the front frame using rubber bands.
- Now you need to turn the frame over and pour sand into it. If the sand is dry and crumbly, you can add a little water to it.
- Using a ruler, you need to level the sand, then make an imprint of a child’s hand or foot.
- At this time, you need to mix the plaster with water. The proportions are most often indicated on the packaging. Keep in mind that these may not be standard for all types of plaster.
- The gypsum mass is applied to the sand footprint. At the same time, you should not press down too hard.
- After this, the remaining spaces are covered with a layer of plaster and leveled with a spatula.
- Wait until the plaster dries completely, most often the mass hardens after 30-40 minutes, but to be on the safe side, wait 3-4 hours.
- After this, the back panel is removed from the frame. And the excess sand is shaken out.
- The resulting picture should dry out a little while still open.
- When the plaster mass has completely hardened, excess sand is removed and glass is placed over the frame.
In the animal world: spending time with children in a fun and interesting way
Moms and dads can come up with activities for children too. They love to spend time with their parents, so the process of making plaster crafts will only bring positive emotions to them.
We present to your attention examples of crafts made from plaster of the butterfly family.
Prepare the following tools for work:
- gypsum;
- molds for muffins or cookies (sometimes you can find special molds for crafts on sale);
- paints;
- cardboard;
- scissors;
- small things with which you can make eyes and antennae for butterflies.
Butterfly making process:
- Gypsum is diluted with water and poured into molds, leaving a little free space.
- After complete drying, the workpiece is removed from the mold and painted by children in different colors. This will be the basis for the future butterfly.
- Now the eyes and antennae are glued to the base of the caterpillar.
- Then the child’s hand is drawn on colored cardboard and cut out; there should be four such “hands”. These will be the butterfly's wings.
- For another butterfly, ordinary wings are cut out of cardboard and decorated with sparkles and sequins.
- The resulting crafts can be glued to the wall using double-sided tape.
Original ideas for creativity
There are many crafts made from plaster. Ideas for making useful things never run out. Here are some interesting offers for making gypsum crafts:
- If you don’t want to see standard flower pots on your windowsill, you can make them yourself from plaster. It's not difficult to do this. The diluted mass is coated around any plastic container, then you need to let it harden. You must first add paint of the required color to the diluted plaster.
- You can make original candles from cookie cutters using plaster. The plaster will rather serve as a candlestick. For color, add paint to the mixture.
- The next craft will be especially for fashionistas who find it difficult to fit their numerous jewelry in one place. You can make a stand in the shape of a hand. It will decorate the interior and will be an excellent way to place jewelry. To work, you will need liquid plaster and a rubber glove. Pour the mixture into the glove and wait until it dries.
Garden crafts figurines made of plaster and cement
We present to your attention garden design in the form of a human hand. To work you will need:
- cement or gypsum;
- flower pot;
- operating or other rubber gloves.
Execution sequence:
- Cement or gypsum should be diluted to the required concentration.
- The solution is poured into a glove, which is placed in a flower pot.
- You need to wait for the solution to harden.
- After complete hardening, the glove is cut and removed.
If you also make a “second hand”, you can connect them and use them as flower pot.
If you install the sculpture outside, you can plant low-growing flowers in it.
Thus, as it turned out, gypsum can be used both for the construction of complex figures, and it can be used in children's creativity. In any case, the finished crafts will please the eye and cause satisfaction from the work done. In addition, many gypsum products will be very useful in the household, on personal plot or when decorating the interior
Gypsum is a sulfate mineral. There are two types recognized - with a granular and fibrous structure. The second is also called selenite, the first has long been familiar in construction. Gypsum is a sedimentary material and is found everywhere.
Using plaster
In medicine, gypsum is used as a binder; jewelers make small jewelry. Everyone knows alabaster in construction, for tucks of large interior figures. To this day I know very much experienced builders They also came up with a very cool idea - 3D drawings on the wall. It looks very original and impressive. And “raw” it will be used industrially as a fertilizer.

For clarity, we will provide you with photos of plaster crafts in different directions use. Only true art connoisseurs will be able to truly understand these works.

People have been making various products with their own hands since ancient times, but in our country this type of mineral was seriously appreciated only recently. We started doing a variety of things for our country house, estates.

Decorative stones, bottles, shells and much more are used. Usage of this material for sculptures is very beneficial for craftsmen, since it is absolutely environmentally friendly, which means it is completely safe for you and others.


This material is also quite practical. I know the results beautiful crafts made of plaster (there is no other way), everyone around you will definitely like it, because the products turn out to be very realistic and will definitely become the main attraction of your home.

In this article we will look at how to make a small sculpture in your home. After all, in stores such figures cost a lot of money, and we can create a masterpiece for pennies!

Sequence of work
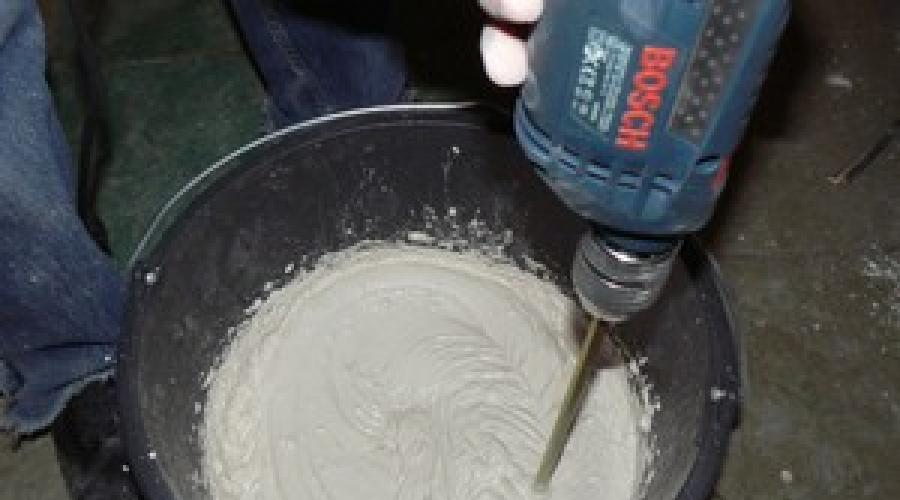
For quality work We need to mix the solution first. The instructions on how to dilute plaster for crafts say that you need to follow the following:
- Prepare a container in which you will make the batch.
- Pour water into a vessel
- Pour gypsum powder into water
- Mix the mixture with vigorous movements (you can use an electric mixer)

On a note!
All work must be done very quickly, because the solution hardens very quickly. It's better to breed more the required solution, because if there is excess left, it’s not at all difficult to remove, but if there’s not enough, then it becomes a little more difficult...

Advice! Pour the powder very carefully; when it reaches the water, the gypsum dust will rise into the air, try not to breathe in this cloud. Especially if you regularly encounter this activity, it is better to tie a scarf over your face so that the nasal passages are carefully closed.


Boletus made of plaster
- For a mushroom stem you need from a small plastic bottle(0.5 liters) cut off the neck.
- We also cut off the neck of another bottle (volume 5 liters).
- Pour the mineral into the large one.
- Insert a small bottle into the middle with the bottom facing up.
- Let it harden.
- A small deep plate or wide cup is suitable for the hat.
- We put cling film inside, folded in several layers.
- Let's fill.

Working with this material is not at all difficult; the instructions on how to make a craft from plaster tell us about this. You will understand this yourself when you make your first masterpiece.


As my husband says, “the eyes are afraid, but the hands are doing the work.” I think the principle of operation is clear, I’ll just add a little about the filling forms. They can be purchased at hardware store, there are a huge number of them, or you can be smart and do something suitable yourself.

It won’t be difficult for housewives to make a bunch of flower pots, saving a lot of money family budget, and ultimately get a unique and beautiful thing tailored to the design of your home.


Step-by-step making of plaster crafts with your own hands
The simplest option for your blooming garden:
- Cast the sole of your foot
- Multiply to required quantity
- Place along the garden path

Note to the master! The finished product should be left in a warm place until completely hardened for several days. After removing all excess, the product should be treated with transparent varnish, then decorated with paints to your liking.

This simple option will create a mysterious effect. You can also the required form It’s trivial to mold from plasticine and pour out the product.


This option is the most practical, because after one job you can sculpt another desired figure and pour it with plaster again. In general, templates for working with this mixture are the personal fantasy of each master.

And yet I will not tire of repeating that such master classes on plaster crafts work on the “magic wand” principle! For example, you wanted to transform your yard with something extraordinarily beautiful, but you are too lazy to tinker with crafts for a long time - remember our article, and everything will definitely work out.

If you are a builder, or just doing home renovations, then catch the idea!


3 d drawing on the wall
- Take a stencil with the desired element
- Hold with one hand, apply the solution to the cut out parts with the other
- Carefully remove the stencil
- It remains to correct the mistakes a little
- Next you can paint or apply varnish.

Such design approach the case will definitely emphasize your creative personality, will cheer you up even if there is a snowstorm and cold outside! May children's laughter never cease in your home, and let your friends never give you peace! Thank you for your attention.

Photos of plaster crafts


At all times, gypsum sculptures and other products made of alabaster were highly valued. They could be used to decorate the inside of a house or install a statue on a terrace; plaster products can still be found on the streets. Many centuries have passed, but interest in the art of creating sculpture and stucco decoration is only increasing, so the request “how to make a plaster figure with your own hands” remains one of the most popular on the Internet.
When planning to work with plaster, you must understand that you will not be able to create a masterpiece, but making a simple product is quite possible. You can place the craft in your dacha; it will also look good on your garden plot. If you want to get a truly masterpiece, it’s better to turn to specialists. This will save you from the dirt associated with working with the plaster mixture, save your nerves and save a couple of days that you would have to spend when self-production planned.
So, more about how to work with plaster yourself.

Stucco options
Before casting anything, you need to decide on the shape and type of the product.
Nowadays, there are several styles in which gypsum is an integral part. Most often in modern interiors Classic, Baroque and ultra-modern are used. Each style has its own details and compositions. For example, Baroque includes so-called figurative elements that have bizarre, sometimes disproportionate forms. The classic is distinguished by the correct geometry of the pattern, the inclusion of details in the form of flowers, diamonds, etc. Ultra-modern style- these are peculiar forms: abstraction or, conversely, clear geometry, a repeatedly repeating pattern, or minimal amount elements that contrast due to color or volume. You can see examples of trendy interiors Here.
Plaster stucco molding is created in the form different forms: , decorations, ceiling decorations, decorative masks, vases, etc. Each item has its own purpose, shape and proportions. Exclusivity can be given to the interior by a competent combination of plaster parts; a disorderly arrangement of stucco elements or a mixture of styles will lead to the corresponding results - an absurd and tasteless design.
Before you start work, prepare a sketch that takes into account the number and size of elements, their location and shape, according to the chosen style. Do not forget that stucco molding is located not only on the ceiling, plaster parts should be located around window and doorways, on the walls, in the interior. In workshops, this work is done by a professional artist, and plaster masters work with a ready-made sketch. You will have to do all the work yourself.
What you need to know about gypsum
Gypsum mixtures may have different composition . In addition to the alabaster itself, they include various additives that improve the properties of the solution and the finished product. When choosing a mixture, you need to take into account that the more complex it is, the better the quality of the product, but also the more difficult it will be to work with. For example, especially strong gypsum mixtures harden very quickly; the curing speed can reach a couple of minutes. Without the skills to work with plaster, you will not be able to fill the mold efficiently during this time, so this option will not suit you. Ordinary building gypsum It takes longer to harden, but its qualities are far from perfect, although it is quite suitable for training and creating simple sculptural forms.
Distinctive features of alabaster are plasticity, fragility, ability to expand . The structure of the gypsum in the solution itself is very elastic and can be easily sculpted. But when the material hardens, all the parts become very fragile and delicate, and therefore require special handling. Particular care must be taken when removing the product from the mold.
Another property that is significant for the master is the ability of gypsum to expand when hardening. On the one hand, this is very useful; when hardened, gypsum is able to penetrate into small areas forms and fill them, thanks to which, correctly made plaster sculptures have the ideal accuracy that was determined by the form. On the other hand, novice craftsmen cannot calculate the percentage of expansion of the mixture, so they get rough product, requiring lengthy and careful refinement. Unfortunately, it is impossible to teach how to “feel the cast”; this quality comes with experience.
Many products require a frame . Beginning plaster craftsmen often miss such a moment as the frame, thinking that they can do without it. As a result, their products do not exist for very long, over time, and sometimes immediately, falling into pieces. Having decided to cast a plaster figure large sizes, a sculpture or a bas-relief panel, when developing a sketch, you should note the most vulnerable parts of the product. For example, for a person or animal these will be the limbs and head, but for a bas-relief all parts exceeding the size of ⅓ of the product will be fragile. It is these places that need to be strengthened with the help of a frame, and you cannot save on the structure. If you use ordinary metal as a base, it will rust and after a while the rust will show through the plaster; in addition, when the metal deteriorates, cracks will appear in the plaster.
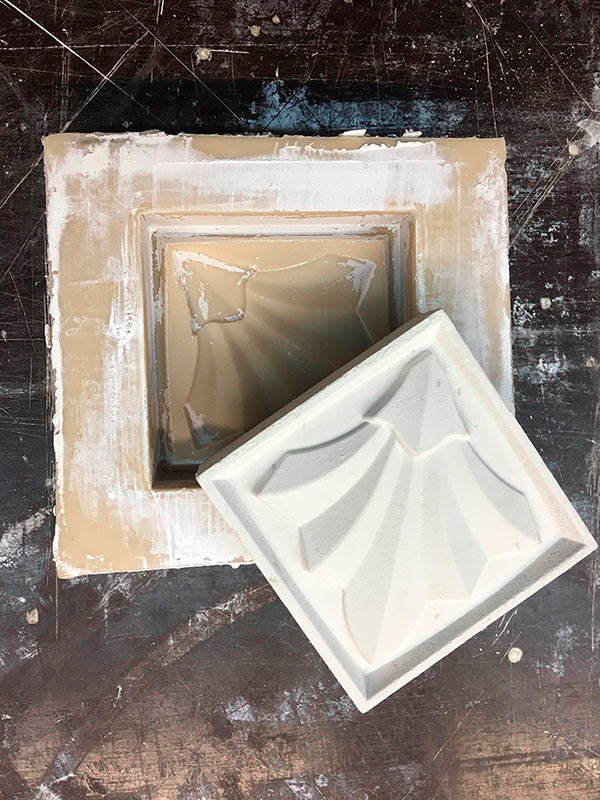
A high-quality blank is the key High Quality casting . Before making a mold for casting stucco or sculpture, it is necessary to make a blank. This stage is one of the most labor-intensive. To make matrices at home, plasticine is most often used. Plasticine can be easily given any desired shape, and it will retain it perfectly, making it excellent for creating molds for making simple parts. gypsum stucco. It's even better to buy a special polymer clay. Unlike the rather soft plasticine, it hardens as it hardens. Another plus is that polymers do not lose their shape in heat as quickly as plasticine.
You can’t skimp on forms . When planning to work with plaster, many beginning craftsmen make the grave mistake of purchasing cheap molds. In fact, shape is one of the most important tools, without which it is impossible to obtain high-quality castings. Inaccuracy of shape, its pliability, ability to stretch or tear - this is just a small list of disadvantages inherent in cheap templates. In workshops you can see very expensive quality forms, more often they are made manually, for each order. If you don't want to make molds by hand, purchase metal molds, they do not require special care and are not subject to deformation. The metal can withstand up to 2,500 processes of making sculptures.
Molds made of latex or silicone are cheaper than metal ones, but the strength of such forms is much worse than that of metal. Another problem is that the gypsum mass in them is distributed less well, which leads to inaccuracies in the finished product, so finished products need additional processing, and making adjustments without damaging the entire casting is not so easy.
After preparing the forms, they need to be lubricated with clear varnish or shellac so that the gypsum solution does not stick to them.
How to pour plaster
After all preparations, a gypsum solution should be prepared. Its consistency should be similar to sour cream. Although, there are a number of situations when the mixture is made thicker. A very liquid solution takes longer to harden; in addition, products made from it are fragile and unsightly.
To reduce warping of gypsum, it is made using lime water, which can be slaked or not. To prepare a good mass of gypsum, you will need 1 part water and 0.7 of the same parts gypsum, and if you want to prepare a mass for pulling, then the mixture should be made thicker - here you will need 1 part water and 2 parts gypsum.
Before pouring, place the mold on a solid surface. level base: It should not swing or move.
Pouring the finished solution is a fairly simple process; you just have to fill the mold.
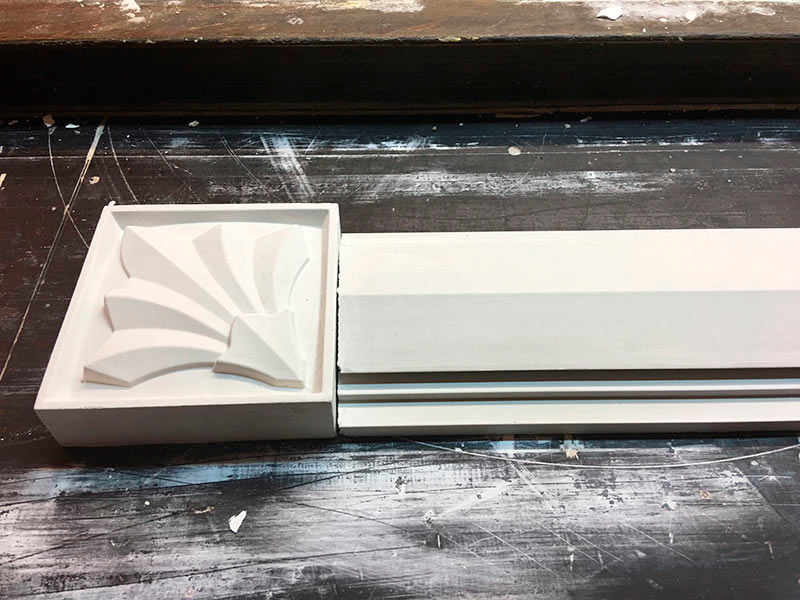
The first layer is applied to the sketch using a brush, which will help fill all the depressions in the matrix. After this, using a spatula, apply the next gypsum layer, which should completely fill the mold. At this stage, it is very important to ensure that there are no air bubbles in the solution. The poured plaster must be shaken well, this will remove air bubbles from the mass, so you will avoid the formation of voids.
If the product has enough big size, then after applying the first layer of gypsum, several copper wires should be placed in the mold, which will act as reinforcement and will increase the strength of the product.
Then we smooth the back side of the product and leave it to dry. The drying process can take up to four hours (until completely dry). After making sure that the product is ready, we take it out, carefully sand it and coat it with a special varnish. If you follow all the manufacturing rules, you should get an aesthetically attractive, as well as strong, reliable and durable stucco decoration.
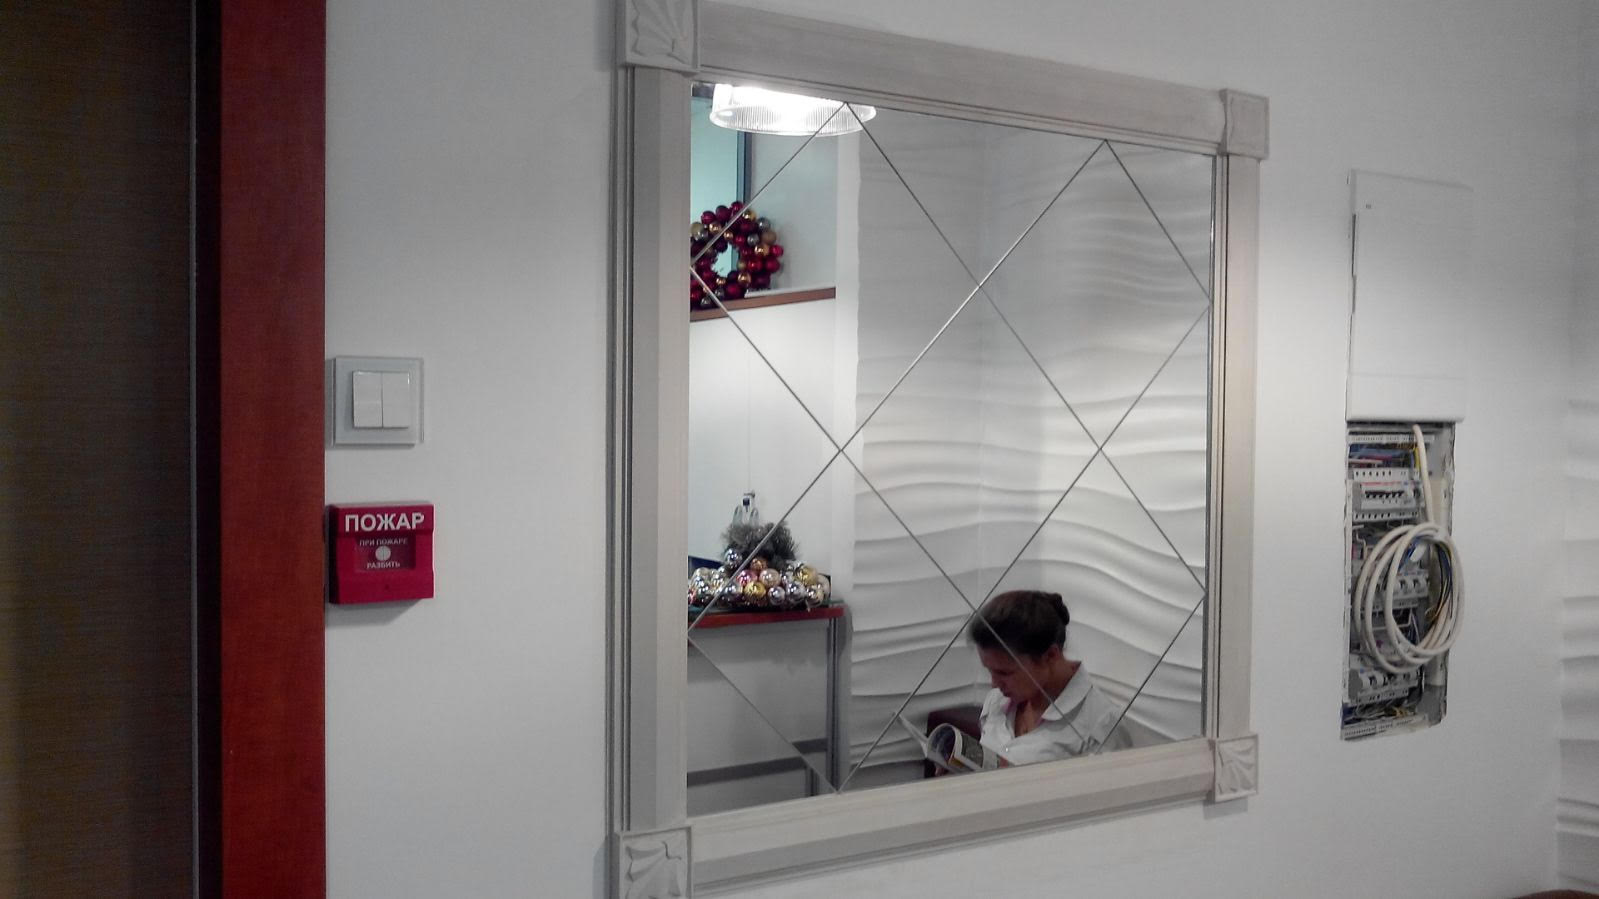
Painting the stucco
To give special type the product can be painted with paint, it is best to choose light, pastel shades. IN classic design Gilding is often used, and in modern times silver plating is used. When choosing paint, give preference to specialized paint designed for interior work. The paint surface also needs to be sealed with varnish.
Important! Do not start creating complex elements before you have mastered the simplest stucco molding. Ask for an estimate ready product professional and only after that continue to work further.
The use of this material to create surface texture, including bottles, is mentioned quite often - frozen draperies look very beautiful. In addition, everyone knows the use of plaster bandages for creating casts, for example, masks, as well as directly for what the plaster bandage was originally intended for - for rigid fixation of damaged parts of the body. I suggest using a plaster bandage as independent material for sculpting. The following is the development of a lesson on creating a decorative fairy-tale house with detailed description techniques for working with this material.
Gypsum is a typical sedimentary mineral.
In today's work we will use a plaster bandage.
Plaster bandage - consists of strips of gauze with medical plaster fixed (using PVA), 10, 15 and 20 cm wide, 3.0 m long, which are rolled into rolls and hermetically packaged in plastic film one bandage per bag.
The method of use described in the instructions for use of the plaster bandage is an important guiding point in the use of this material. We will strictly adhere to these instructions!
1. It is recommended to use water room temperature(about 20 degrees). Although it is possible to use water with a temperature from 0 to +35 C.
2. The depth of the container with water for soaking should ensure that the roll is completely vertically immersed.
3. Without releasing the bandage from your hand, lower it into the water, preferably vertically, to ensure complete and rapid release of air from the roll, since complete wetting of the bandage occurs in 1-2 seconds, for which it contains special components that speed up this process to make it easier to work with.
4. Remove the bandage from the water by squeezing it slightly, without fear that the plaster mixture will leak out. Required amount the plaster will still remain on the bandage.
5. The thickening time, after which modeling and adding water is unacceptable, is 1.5...2 minutes. after soaking. Primary strength occurs within 2...3 minutes. Period from 5 to 7 minutes. characterized by intense heat release.
Final strength occurs after the water has completely dried from the plaster cast. Complete drying time depends on parameters environment and the temperature of the body to which the bandage is applied.
Something to remember!
- low spin (left a large number of water in the roll) during the soaking process leads to slightly longer setting and drying times;
- strong spin (small amount of water) - makes modeling difficult.
The setting time of the plaster bandage is different manufacturers different, but no more than 8-10 minutes.
Practical work
On a piece of paper with a pencil, draw the silhouette of our bottle. Let’s mentally imagine how we can turn what we’ve drawn into fairytale house- we will determine where the door, windows, roof, pipe will be. Now let's try to draw a house on a sheet of paper. Add details: bench, canopy over the door, threshold, animals, etc.

At the first stage, the bottle must be tightly covered with pieces of bandage; to do this, cut off the pieces, equal circles bottles plus 2-3 cm. Pasting occurs in several stages from bottom to top, usually two pieces of bandage are enough - for the main bottom part and on the neck.
Direct pasting is carried out as follows: we take the cut piece by the corners with both hands, completely dip it in a container of water, quickly remove it, unfold it and immediately, without squeezing, press it to the surface of the glass. By stroking we level the surface and remove wrinkles.

Set the covered bottle aside. For further work Hands must be washed and dried.
Cutting out parts from bandage to decorate a house.
Knowing the properties of a plaster bandage to harden after exposure to moisture within a very short time, we prepare all the parts in advance. We put the sketch in front of us and, following the drawing, proceed.
We start with the most voluminous elements.
Important! When wet, the bandage decreases in volume!
First of all, we make the door blank. We determine the size, cut off a large piece of bandage and fold it 3-4 times, i.e. it turns out 6-8 layers. We try it on and put it aside. Loops - two pieces in three layers. We put it off. Door handle - then roll a small piece into a ball. We put it off. In the same way, we prepare a canopy over the door, a threshold and thin flagella for the windows and frames in them, a long rod for the drainpipe and holders for it. Enough for now! We remove the bandage away from the water.

The time has come for the most creative stage. Gluing elements. You need to glue it quickly and clearly! We take the door blank and quickly dip it completely into water, straighten it and apply it to the bottle, press it hard and align it around the perimeter with our fingers. If you immediately draw stripes on the door from top to bottom with a toothpick, you will get an imitation of dividing the door into boards. Next, looking at the sketch, we glue the remaining details: canopy, threshold, drainpipe, windows, hinges and handles by pre-wetting them with water.


Another very material-intensive part is the roof.
We make the roof by folding the bandage many times and fitting it to the house.
We wet the roof part in water and, applying it to the top of the bottle, quickly mold it into the desired shape.
Our house is fairy-tale, so we add fairy-tale paraphernalia: boots at the entrance on the bench (if you made one), Baba Yaga’s stupa, an owl on the roof or Bayun’s cat on the canopy above the door, a bucket of living water, a little mouse, fairy-tale-shaped flowers and size...
Animals are formed from pieces of bandage after wetting with water from individual parts: head, body, paws, tail, ears. We form the parts with our fingers, giving them the desired shape and applying them to each other, the joints are smoothed with wet fingers.
We make objects from pieces of bandage folded several times. For example, we make a bucket from a folded strip, closing it into a ring and gluing the bottom. We sculpt the handle separately.

We coat the dried product with a primer for a gypsum surface. An unprimed gypsum surface absorbs moisture very strongly, which contributes to its destruction and the formation of fungi and mold on its surface.


I absolutely loved the idea with the zipper! It’s very easy to implement this using the Gypsum art technique!


We got a little distracted.
We begin to paint the dried house acrylic paints. Or any others.


After painting, varnish everything.


All the resulting works are “functional”, they can be used for their intended purpose for any liquids, wiped with a damp cloth.


