Decorating a dollhouse. How to make a dollhouse from plywood with your own hands - instructions and diagrams with dimensions. Video: do-it-yourself doll house

Read also
Every girl’s dream is a large beautiful dollhouse, equipped with all the interior items, a very expensive pleasure.
Not everyone can buy it in a store.
However, you can make a dollhouse with your own hands, and if you involve your daughter in the process, then collaboration will bring pleasure to the whole family.
In order to begin manufacturing, you must first resolve the issue of the dimensions and material of the future structure. Then draw up a house project, make drawings for sawing or cutting, think through and select finishing materials, consider options for fastening and installing the entire structure. It is important that it is stable and can withstand small “shocks”.
The size will depend on the height of the dolls that will “live” there, as well as on the capabilities of the room. After all, an apartment for half a room will take up too much space, limiting the owner.

At the same time, a very small structure will be more difficult to manufacture and finish, because working with small parts is not easy.
For ease of use, the ceiling height is set at twice the height of the doll, then it will be easy to move it around the rooms and install it inside. Higher ceilings are welcome, they will make the game even more interesting.
The depth of the rooms is determined based on the height of the dolls and the need free space for items inside the house. On average it is 30-45 centimeters, but it can be more. The width is calculated based on the number of rooms for dolls and the volume of the room.
The shape of the house usually resembles a rectangle, elongated in height or width, it all depends on the imagination of the manufacturer. For large structure You can use furniture wheels that are screwed from the bottom and make it easy to move the doll housing to any place.
You can create a project on paper or, using modern technologies, in a computer program, which itself will calculate the amount of materials needed for the building.
An example of a standard doll house design:

The size largely depends on the material, since not every raw material is able to maintain its shape and withstand the load. Let's try to look at houses made of different materials.
Plywood or laminate
Plywood is very a good choice for making a dollhouse. It holds its shape well, is strong enough, and is easily fastened with glue or self-tapping screws. It is convenient to work with it using standard tools, only after completing the work it is advisable to clean it with sandpaper to make it smoother.
Plywood is easy to decorate with paper or fabric, and it is durable. Laminate has similar properties, which is also often used to create a doll’s apartment.
An example of a dollhouse diagram:
To create you will need:
- laminate or plywood, with a thickness of at least 7 mm;
- PVA glue, it can be replaced with carpentry glue;
- jigsaw;
- remnants of wallpaper that will be used to decorate walls, pieces of furniture, and for the floor you can use self-adhesive film;
- pencil for making notes;
- tape measure or centimeter.
The manufacturing process consists of the following stages:
- Cutting out the wall of a plywood structure according to the dimensions in the drawing.
- Selecting places where windows and doors will be located, cutting them out.
- Assembling the structure using wood glue or small nails.
- Construction of the roof, its design. The roof of the house can be covered with corrugated cardboard and painted, thus simulating tiles.
- Fastening the structure to the base - a piece of plywood with a little big sizes. This is necessary to give the structure greater stability and the possibility of additional decoration. For example, on a wide surface in front of the house you can organize a veranda or flower beds.
- Decoration of interior and external sides walls, floor. Sometimes it is more convenient to paste over interior walls before assembling the house, then the joints will not be visible, but in this case it is important not to make large overlaps, violating the proportions of the structure.
- Furniture arrangement.
- Interior decoration with small details: curtains, rugs, tablecloths, etc.
Example step-by-step construction house in the photo (instructions for dad):
Project Marking the future house Drilling Drilling Finishing with a file Putty Grinding Finished walls Painting Painted parts Marking for fasteners Assembly Assembly Finished design Interior Balcony Room
Drywall mockups
Drywall is also a popular material because of its durability and low cost, because often after repairs it remains in the form of small pieces that have nowhere to be attached. House for Barbie – perfect option for this. However, it is more difficult to fasten, glue is not suitable here, it will be necessary to align the cut points to reduce the consumption of the product.
Self-tapping screws twisted in metal corners. But they will need to be taken small sizes or then saw off the ends protruding from the outside.
The scheme for working with drywall is similar to that of plywood; the same tools are required for it. Therefore, you can use the diagram above.

Styrofoam
This material is also a budget material that remains after purchase. household appliances or other goods. Its only drawback is its fragility, so you should work with polystyrene foam carefully.
To work you will need:
- polystyrene foam, preferably in large sheets;
- toothpicks, bamboo sticks (left over from sushi sets);
- glue gun;
- some wooden rulers;
- corrugated cardboard;
- wallpaper remnants;
- foam sponge;
- remains of ceiling plinths;
- accessories for creating an interior.

Let us present the manufacturing process in stages:
- Project development, drawing up.
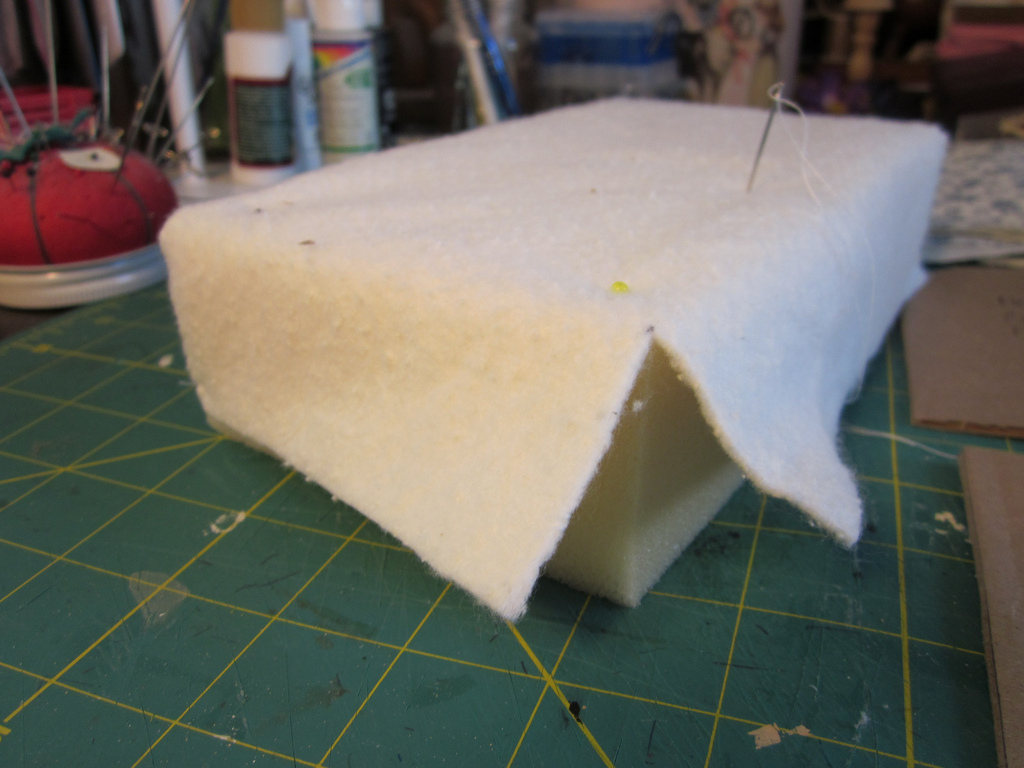
- Cutting the foam according to the drawing, it is better to do this with a hot knife, then the foam will crumble less.
- Cutting out future windows and doorways.
- Assembly. To do this, you will need toothpicks, which you need to break in half, fasten the pieces of foam with them, apply glue between them and press them tightly.
- The ceiling and floor are also glued using glue gun, only to strengthen the structure they need to be strengthened. For this, bamboo sticks are used, which are glued to the foam in the form of transverse beams.
- An interfloor staircase is built separately; it is made of wooden rulers or the same foam, and the railings are made of toothpicks or bamboo sticks. After which the finished one is glued into the structure.
- Making a roof, the material for which can be foam or corrugated cardboard.
- Exterior finishing includes painting the entire building with acrylic paint, which is convenient to apply with a foam sponge using light tangential movements. A balcony can be made outside, which is assembled in the same way as a staircase.
- Finishing from the inside, for it, pieces of wallpaper and colored paper are used, from ceiling plinth You can cut out window sills and other interior details. Curtains, carpets, and small decorations will add coziness to the design.
- Furniture arrangement, check-in.
Bookshelf or rack
It is not at all necessary to purchase materials to make a home for dolls; sometimes it is enough to use interior items that are no longer in use. Yes, old bookshelf or the cabinet may well become a home for Monster High or a little princess.
In this case, the amount of work required is minimal: you will only need to seal the back wall of the house and arrange the internal contents. Details such as the roof and chimney, for a structure standing against a wall, can generally be drawn or depicted with adhesive tape.

Old cabinet or chest of drawers
Old bedside tables, chests of drawers, and wooden cabinets gathering dust in the attic or basement can also be put to good use. They are much better suited for larger dolls and require minimal processing.
Internal shelves and drawers can be removed, thus creating large rooms. Or, conversely, add partitions between high ceilings to match the height of the dolls used. And of course, finishing that will give the product a finished look.

Cardboard
The popularity of cardboard is understandable; it is inexpensive, easy to assemble, and always available. True, this design is short-lived, since the cardboard breaks and tears. Therefore, it is better to use corrugated cardboard, which is used for packaging.
The house can be assembled quickly and easily from scrap materials:
- corrugated cardboard itself;
- finishing elements;
- fabrics and other things.
Tools you will need for work:
- drawings, parts templates;
- knife, brushes, paints, pencils, felt-tip pens;
- glue gun;
- ruler and others.
Photo of the scheme:

Photo of the house:

The assembly process is simple and similar to other designs, but cardboard has some special features: it bends easily, so you need to crumple it carefully. It is better to fasten with glue; the edges are not cut off, but are bent inward and act as a fastening element.
To correctly bend the cardboard at this point, you need to draw something pointed, but not cutting through, for example, a pencil. A groove is formed along which the material can easily bend.
Cutting out details like windows is better stationery knife along the intended lines.
Boxes
Cardboard boxes are the easiest way to assemble a dollhouse for a girl. To do this, you will need to go to the back exit of the nearest store and pick up boxes that are similar in size. This will make it faster and easier to assemble the house.
Then you need to fasten them together using glue or double-sided tape. Cut out windows and create an environment. Exterior decoration can also be made from boxes, for example, a balcony or terrace.

Fabric
Fabric house – good option For small room, since it can be folded and stored away for a while. To make it you will need thick fabric with various patterns and the ability to sew.
The structure is assembled from fabric according to the diagram. Each element is sewn separately, then turned inside out and fastened together into a single house. To seal the walls, you can use cardboard or plastic mesh, which is placed inside, they will not allow the walls to bend and will make the entire product more durable. However, a house with cardboard cannot be washed.
Video tutorial on creating a house from fabric and cardboard:
How to make a staircase for a house or castle?
Staircase in doll house– one of the most difficult elements, a real task for dad. The easiest way to make it is from cardboard or foam. The first one can simply be bent into the desired position, and then reinforce with intermediate parts using the same foam.
A wooden staircase can be made from two rulers and several blocks. On the rulers, you need to make small cuts at regular intervals, into which steps from small pieces of wood are inserted at an angle of about 45 degrees, which are attached with glue to one and immediately to the second ruler. Wide rulers can serve as railings.
A foam ladder can be cut from a piece if you have a large enough block. It is placed at an angle and the steps are sawn through with a hot knife. Real craftsmen can build a staircase from wooden blocks according to special drawings.
Examples of stairs in the photo:
Interior design - toy furniture and decor
Interior decoration is a real holiday for a girl, so it’s worth inviting her to help with interior design and furniture making. The latter can also be very diverse. Most affordable option– cardboard.
Everything that is in the house will be used for finishing:
- wallpaper remnants;
- pieces of fabric;
- beads;
- artificial flowers;
- toothpicks;
- cardboard boxes and so on.
Everything depends only on the imagination of the manufacturer. Beautiful curtains, bedspreads, tablecloths, even paintings for the walls can be made yourself. This will not take much time, but it will be fun and will help to attract the girl to housework and sewing.
Video tutorial on creating furniture from plywood:
Video tutorial on creating foam furniture:
Lighting
Making lighting in the house seems almost impossible, because connecting to the network and the presence of wires is far from safe. Especially if the home is made of wood or cardboard. In the event of a short circuit, a fire may occur.
However, there is a simple safe solution - small led light bulbs, battery operated. Their voltage is very low, and fastening is simple - using double-sided tape.
Creating lighting in a doll's home:
Making a dollhouse is a fascinating and long process in which not only parents, but also their children should participate. Can even make small parts or hold tools Small child. At the same time, working together brings people together, and children will learn the acquired skills much faster and the process will be interesting.
Examples of doll houses in the photo.
We have all dreamed of doll houses. but making them yourself was quite difficult. Today, there are many different materials that allow you to quickly and, most importantly, create a high-quality dollhouse for your child. Beginning needlewomen strive for the perfect creation of houses, so those who have not been able to master “construction” will learn a lot of interesting things today. We will tell you how to make a dollhouse with your own hands and what materials will be needed to make every girl’s dream come true.
How to make a barbie house with your own hands?
We all know that dollhouses are especially necessary for Barbie, so today we’ll talk about how to create this magnificent house so that your child will love it. It will be especially fun if kids join in the creation process themselves. The most important thing is to think over an action plan that will help you build an unusual and bright house for dolls.
There are several models of doll houses that are especially popular:

Materials for doll houses
- Dollhouse fiberboard(if you have ever carried out renovations, then it’s time to pay attention to the remaining pieces of drywall. They will make a particularly beautiful house.
- Dollhouse from cardboard boxes (It turns out not so bright and unusual, but if you put in a little imagination and work, you can create a house that will be no worse than a building made from fiberboard. In fact, the main thing is to make an effort and in a few hours you will be able to recreate such a doll house , which every Barbie will envy.
- Plywood house(It is better to make such a house with the help of dad, since to create it you will have to work hard with a hammer and nails)
- House from old furniture (if you still have old drawers and chests of drawers in your house, then it’s time to pay attention to them. Just a few hours are enough to see unusual house for Barbie, only it will turn out to be quite massive, and it will take up a lot of space, but if you omit these points, durability and similarity to a real house are undoubted advantages.
So, each of these houses undoubtedly has its own diagram, which you can see on our website.
We provide house plans for Barbie and Monster High dolls so that you don’t have to waste time on calculations, but simply create ready-made layouts and arrange them to your liking.
Materials and tools:

Every home needs various instruments, but there is a list of standards that are required to create each of the above houses. If you keep such tools at hand, you can quickly build a house for your daughters.
- PVA glue(necessary in cases where you need to paste wallpaper, as well as various small parts)
- Nails(useful if you are going to build a house from plywood, since using nails you can quickly and conveniently fasten them together.)
- Stapler(when building a dollhouse from thin plywood or old boxes, it is better to use it, since gluing is not always reliable, but a stapler will be an excellent solution for every parent)
- Double sided tape(necessary for small parts, various accessories. If you want to create a balcony, then double-sided tape is perfect solution to fulfill your desires)
- Fabrics, wallpaper(would you like to give your home more real view? It's time to pay attention to the fabrics. Tulle and organza will look especially beautiful. Try adding a little imagination and decorating the windows tulle curtains, you'll see, it will look very unusual)
- Colored paper, cardboard(for finishing roofs, walls, floors and other parts)
- Magazine clippings (additional accessories, allowing you to add liveliness to your house)
- Curly and regular scissors
- Various accessories for home decoration( artificial turf sponge and other interesting materials)

Now let's get down to the process itself. In fact, there is nothing difficult in building a doll house. The main thing is to be patient.
Do-it-yourself plywood dollhouse.

If you want to make a house out of plywood yourself, then prepare a hammer and nails. In addition, you will need a jigsaw, since you can cut necessary details It will be very difficult, but with a jigsaw it will be much faster. So, first of all, you will need to think about the layout of your house and cut out the necessary parts. On our website there are diagrams that will help you create a doll house.
It is best to sharpen plywood with sandpaper so that the child does not get hurt by splinters. Next, I coat each of them with varnish or paint, depending on how you want your future home to look. Next, we assemble the parts according to the diagram indicated on the website. Be sure to think about where the window will be located and, observing all the parameters, calculate the angles at which the roof will fall.

As for fastening, PVA glue is definitely not suitable here. It won't hold enough pieces together, and if it does, it won't last long, so it's best to use nails. As for the bayonets, cover them with a diluted solution of cement or soil.
Cover the inner surface with wallpaper and add furniture that you can build yourself from scrap materials. In our previous articles you can learn how to properly create furniture for a dollhouse. Use matchboxes and other materials that will make the structure cozy. By the way, you can easily make a house out of laminate. Houses made of plywood and laminate are characterized by increased strength and ease of finishing.
Dollhouse made of fiberboard.

In order to create a doll house for monster high from fiberboard, sketch out small sketches where you can calculate the dimensions you need. We will provide you with ready-made calculations, based on which you can build your house.
Working with fiberboard is much easier, since it is softer than other materials and can be easily cut with scissors. Just cut out the necessary parts and glue them together regular glue PVA. If you doubt the reliability of the glue, use hot gun or glue moment.
Pay special attention to the roof. It can be trimmed with a variety of cardboard for naturalness or used natural materials, like leaves and other details.
By the way, it is better to attach the house itself to plywood to make it more stable. So, he will not lose his balance and will not break.

Also, decorate the area near the house with various accessories and additions. Decorate your walls with magazine signs. By cutting out various pictures, you can make a kitchen and other interior items without wasting time on creating furniture.
Thus, a fiberboard house is made much faster than a plywood house. You can easily glue it together, and it will last for a very long time.
Doll house made of boxes.

If we talk about a dollhouse made from boxes, then everything is much simpler here. Gluing the boxes together is quite easy. The most important thing is to find suitable and strong ones that can maintain strength and beauty for a long time. Do not forget that interior items and dolls will be located inside the house, so try to choose stable and thick boxes.
On our website you will find a video where you will learn how to make a house for Barbie from polystyrene foam, cardboard, plywood and other materials. We also provide you with the necessary diagrams and drawings, based on which you can create a beautiful and cozy home together with your children.
Also, the lists contain photo projects of doll houses, as well as various examples that you can use as a guide when constructing a structure. In the video you can learn how to make a light in a dollhouse and what materials are needed for the project.
Conclusion.

As you can see, making a dollhouse is not at all difficult. The most important thing is to choose the necessary materials and tools with which you can quickly create a doll house for Barbie with your children. You'll see, in a few days a beautiful and slender building will show off in the corner of the child's room, the most important thing is to pay more attention to the process and look various videos lessons.
Every needlewoman can create a dollhouse step by step, so we will be glad if you try to make a dollhouse based on our diagrams and will provide a lot of information for the next crafts.
Making a dollhouse with your own hands is an exciting activity for the whole family, where children, by watching and helping, gain skills in working with tools, planning, decorating, and develop a sense of harmony. Adults can fully realize their creative potential and involve the whole family in teamwork.
Impressions from the process and the result will remain in the memory for a long time, even from transforming an ordinary box.
The choice of materials for building a house with your own hands should coincide with financial capabilities, the amount of free time and the level of skill.
- Paper. Scrapbooking paper is suitable for these purposes: it is thick, does not fade, and has wide choose textures and prints. Ready-made schemes can be printed on regular office paper.
- Cardboard. Ideal options would be binding, beer, corrugated three-layer. The latter is more difficult to cut, but more affordable (for example, household appliances or weighted candies are usually packaged in it). The rigidity of cardboard allows you to add more floors to the project.
- Boxes. Their characteristics do not differ from the previous material. One large or several medium-sized ones, always whole boxes, are suitable for work.
- Plywood. It is distinguished by its availability, ease of processing, the ability to implement complex projects, and its price-quality ratio. At the same time, it requires certain skills in working with sawing tools and precise design. The recommended plywood thickness is at least 6-7 mm. You should definitely pay attention to the E0 marking - its presence confirms the low formaldehyde content.
- Tree. The material is more expensive and difficult to work with, requiring expensive tools. Suitable for making large-sized multifunctional shelving houses.
Comparative characteristics of materials:
| Material | Price | Durability | Complexity |
| Paper house | Very cheap | Low | Very easy |
| Cardboard house | Cheap | Low | Easy but requires patience |
| House made of boxes | Very cheap | Low | Very easy |
| Plywood house | Moderately expensive | High | Medium difficulty, requires tool skills |
| Wooden house | More expensive than average, but cheaper than store bought | Very high | Complex, it is advisable to cut into professional equipment |
Drawings and dimensions of a paper house
The dimensions of a paper house are limited only by the size and density of the material used. Large models made from thin paper will not hold their shape. In cases where the material is dense but small in size, the house is assembled from individual parts.

The peculiarity of the paper house drawing is that it is made up of a single canvas.
At the junctions of the walls, as well as on the roof slopes, additional narrow strips are provided for applying glue or double-sided tape. In the finished printouts, the houses are drawn in detail; all that remains is to cut them out and glue them together. Creating a sketch yourself leaves room for creativity and layering when decorating.
Paper house option:
- 4 open rooms separated by two sheets of paper.
- The basic drawing consists of 2 rectangular parts with transverse slots in the middle. The depth of the cuts is up to half the width of the elements.
- The dimensions of the blanks correspond to the height and double length of the future rooms.
Paper house for dolls
To work you will need a drawing, scissors and glue.

With their help you need:
- Carefully cut the workpiece along the contour.
- Fold along the dotted lines, giving the model volume.
- Apply glue to the special valves provided in the drawing.
- Glue the house together.
- Decorate with textured printed paper.
Such models do not imply interior decoration and act as the scenery around which the game takes place.
The disadvantage of the model is that it can be conventionally called a dollhouse, since the entire structure is very schematic. But this house provides a play space. The child has the opportunity to create an interior in each room and freely move the doll inside. At the same time, the design takes up little space and can be easily disassembled or folded for storage.

The work comes down to two steps:
- Cut both elements taking into account the windows, doors and central slots.
- Connect the parts with cuts facing each other.
Next, you should decorate each room as you wish. Based on this drawing, you can create more complex models. For example, if you lengthen one of the elements and make 2 slots instead of 1, inserting one base part into each of them, you will get a 6-room house.
Drawings of a cardboard house
You can outline the details right away on cardboard, but it is much more convenient to have the entire list before your eyes necessary elements, their number and size.

A schematic representation of the component parts of the house is enough, the main thing is to take them all into account:
- Side wall(2 pcs.): a rectangle, the height of which is equal to the uppermost interfloor ceiling, and the width is the desired depth of the rooms.
- Back wall(1 pc.): rectangle with width, equal to length house and the same height as the side walls.
- Gable(2 pcs.): isosceles right triangle, the hypotenuse of which is equal to the width of the side wall.
- 1st floor floor(1 pc.): a rectangle with a height equal to the width of the side walls, and a length equal to the width of the back wall.
- Interfloor ceiling(1 pc.): floor part of the same dimensions, but with a cut-out staircase opening.
- Interior partition(1 pc.): U-shaped figure with a width equal to the depth of the house and a height corresponding to the height of one floor.
- Roof(1 pc.): a large rectangle, the height of which is slightly more than the amount There are 2 gable legs, and the length is slightly longer than the length of the house.
If there is a large piece of cardboard, the quantity individual elements can be reduced, combining the side walls, gables, floor of the 1st floor and the rear wall into one part in the drawing. Doorways will not be needed if the interior partitions are made one third narrower than the width of the house.
Connecting rooms
It is more convenient to connect the walls with wide masking tape. It does not damage the cardboard when removed, does not make the work sloppy and does not interfere with decoration. Adhesive Moment Crystal will help fix cardboard walls relative to each other: it sets quickly and leaves no marks.
To connect the walls to each other you should:
- Coat the cut of the side wall with glue and press it tightly against the edge of the rear wall, trying to maintain an angle of 90 degrees.
- Cover the resulting corner with masking tape from the outside and inner sides, so that the middle of the adhesive tape is at the junction of the walls.
- Similarly, attach the second side wall, forming a U-shaped frame for the future house.
- Coat the cut of the floor part with glue on three sides, press it to the edges of the walls, while simultaneously adjusting the internal corners of the house.
- Reinforce each joint between the floor and the wall with adhesive tape on the outside and inside.
- Apply glue to those sections of the inner wall that will be attached to the floor and the back of the house.
- Press the part strictly perpendicular to the floor and parallel to the side walls of the house (check the distance between the walls below and above with a ruler, adjust if necessary).
- Cover the resulting corners on both sides of the partition with masking tape.

Taping the corners on both sides will make the structure stronger, will fix the shape more rigidly. To ensure a tighter fit of the tape to the surface, it is recommended to forcefully iron the gluing areas with the edge of a ruler or plastic card.
Connecting ceilings to floors
The ceiling of one floor is the floor of the next. To prevent peeling and sagging, the interfloor ceiling is secured to a support.
- For accuracy, it is recommended to draw a line along the perimeter of the frame at the level of the upper boundaries of the internal walls parallel to the floor of the floor.
- Cut out long strips of cardboard no more than 1 cm wide. If the material is not thick enough, the strips can be cut twice as large and glued together.
- Glue the resulting parts with the wide side around the perimeter of the house, aligning with the control line. There should be a uniform protrusion that encircles the outer walls from the inside.
- Apply glue to the sections of all the parts on which the ceiling will rest, as well as the sections of the ceiling itself.
- Lay the ceiling part, making sure the internal walls are perpendicular.
- Apply masking tape to the joints of the walls and floor of the upper floor, making sure that the tape goes all the way to the corner without deforming it.
DIY dollhouse from a box
Dollhouse It is easier and faster to build from boxes with your own hands than from individual sheets of cardboard.
For work you will need following materials and tools:
- cardboard box from large household appliances;
- marker;
- scissors, stationery knife;
- masking tape, glue;
- colored paper, braid, pieces of fabric - everything that can be useful in decorating a finished house.
Before starting work, you need to make sure there are no defects on the cardboard, cut off excess tape and remove the staples from the stapler.
- Mark the middle of the box with a marker. It is convenient to take the connection line of the folding parts of the box as a guide.
- Cut along the line into 2 equal parts. One half will serve as the basis for the house.
- One of the folding parts will become the floor of the first floor. It should be secured to the side walls of the box using tape.
- Cut off the corners of the opposite flap to form a roof gable
- At this stage, until additional volumetric parts are glued in, it is more convenient to cut through windows and doors. First, you need to mark with a marker the future location of the interfloor ceilings. This will allow you to choose the correct location of the windows. It is more convenient to cut them with a stationery knife. Cut the front door on one of the side walls of the house.
- Cut off both opening parts from the second half of the box. They will serve as floors for the second floor and attic. Make an opening for the stairs for each part: cut the upper left part in the shape of a small square or rectangle.
- Using tape, attach the ceilings along the previously marked lines. Openings for stairs should be in opposite directions, internal corners house.
- Cut the roof slopes from the side walls of the remaining part of the box. Use tape to glue them to the pediment and walls. Cover with tape top corner roofs.
- Attach cardboard ladders to the openings in the floor.
 A dollhouse made from boxes can be furnished with homemade furniture
 The construction of the dollhouse from the box is completed. All that remains is to decorate it and arrange the furniture.
Features of working with plywood
Dollhouses made of plywood are lightweight, environmentally friendly, and relatively low in cost. But, unlike houses made of boxes, plywood ones are stronger, withstand heavy loads and last longer. When choosing this material, you need to take into account the features of its processing.
- The tool for cutting parts must be very sharp and selected in accordance with the thickness of the sheet: up to 1.5 mm - can be cut with a knife, 1.5-6 mm - with a hand jigsaw, over 6 mm - with a jigsaw.
- It is advisable to saw the sheet along the grain. In the case of a transverse direction, it is recommended to make several cuts along the entire length of the future cut, which will reduce the likelihood of cracks and chips.
- Finished parts should be thoroughly sanded.
- It is better to connect parts using wood glue. The connection will be stronger if the fibers of the bonded surfaces are in the same direction.
- For nails and screws, you need to pre-drill holes and place washers under the heads.
Compliance with these rules will make the work easier and protect against unnecessary consumption of material.
Required tools and materials
Making a dollhouse from plywood is possible for anyone with minimal skills in working with tools, desire and patience.

To build a house you will need the following tools and materials:
- plywood 6-7 mm thick;
- narrow wooden slats;
- small nails or a construction stapler;
- jigsaw (can be replaced with a manual one);
- drill with a thin drill bit;
- sandpaper for processing the edges of parts;
- wood glue;
- mounting tape;
- a simple pencil and tape measure;
- decor for decorating a finished house.
The amount of material is calculated according to the drawing and depends on the size of the project.
For example, for a small tabletop house you will need 4-6 main parts, while for the construction of a floor house multi-storey building 4-6 sheets of plywood can be used. For accurate calculation, the finished sketch is disassembled into components, and for each element a detailed drawing.
After the parts are completely laid out on paper, a calculation is made total area required material.
Drawings for a plywood house
A dollhouse made from boxes with your own hands can serve as a model for self-creation drawing. A visual model, no matter how complex it may be, will allow you to assess the scale of the idea, actual sizes products, identify the features of the main parts and possible weak spots designs.
Story about creating a dollhouse from plywood:
For the most simple house with a pitched roof you will need drawings of the basic elements.
- Side walls with opening for front door. The difference in the height of the walls will determine the angle of the roof.
- Rear wall including pediment. The height differences on opposite sides must correspond to the side parts.
- Shed roof.
- The base should extend beyond the house for better stability.
- Interfloor ceilings with staircase openings, which are located in opposite corners so that they do not end up under the stairs leading to the floor above.
- Interior partitions with arched doorways.
Window openings are located on the rear wall, side elements and roof according to the sketch. A front opening cover can be added if desired. In this case, it is more appropriate to place windows on it. The dimensions of the parts depend on the available space where the house according to individual wishes will stand.
The height of the floors should be comfortable for playing - this is 40-50 cm.
It is recommended to install the uppermost ceiling (attic or loft) no higher than the child’s eye level. Rooms that are too deep are not convenient for playing, especially on the extreme floors. Under the folding roof you can place a hidden attic box, where doll outfits will be stored.
Step-by-step instructions for a plywood house
You can assemble a dollhouse with your own hands from boxes in a couple of hours without a preliminary drawing, unlike a plywood one, where precision and accuracy are very important, which require time. Carefully double-checking all dimensions will make it easier to fit and assemble the elements.

- Carefully and accurately transfer the image of the elements onto a sheet of plywood using a template and a pencil.
- By using electric jigsaw It will be possible to cut parts faster and with better quality.
- For sawing window openings Make auxiliary holes using a narrow drill bit. Cut along the contour of the window and door.
- All cuts of each element must be sanded to avoid splinters and scratches.
- On the prepared parts, mark with a simple pencil the location of the interfloor ceilings and internal partitions.
- It is more convenient to start the assembly by gluing the outer walls, strengthening the outer corners mounting tape.
- Glue the internal elements according to the markings.
- Connect both pieces. For more reliable fastening of the ceilings, it is recommended to attach ceiling moldings made of lath or narrow strips of plywood around the perimeter of each room.
- Glue the roof slope to the gable and side walls.
- Glue the finished house to the base.
- Reinforce all joints of parts with mounting tape. Leave the house for a day for completely dry glue.
- For facade decoration, acrylic paint on wood is used as one of the options.
- When decorating the interior, choose available materials that do not create large loads: paper, fabric, pieces of fur.
- To make the stairs you will need rectangular pieces of plywood with a width equal to the openings prepared in the floors. The steps are made from cut narrow slats with a triangular cross-section, thin wooden blocks sawn diagonally or strips of corrugated cardboard.
Stairs are installed after interior finishing work, so as not to create hard-to-reach areas.
Wooden house master class
A do-it-yourself dollhouse made from boxes or plywood has one significant drawback: fragility of the structure. Large models that combine the functions of a chest of drawers or a rack require reliable fastenings and are made of wood.
When purchasing sheet material, it makes sense to immediately order cutting of parts.
This will reduce labor costs and compensate for the lack of expensive tools. The cut line made with professional equipment is more accurate and even, which will significantly facilitate further processing of the wood. But, even in this case, the process of making a house remains quite difficult for inexperienced craftsmen.
You can simplify the task by using the old wooden furniture as a finished base.
To work, you need to prepare materials and tools according to the list:
- Wooden rack.
- Wood putty.
- A sheet of plywood 20-25 mm thick.
- Fiberboard sheet for interior partitions and the back wall of the house.
- Drill-driver, set of drills and screws.
- Wood glue, masking tape, liquid nails
- Sandpaper.
- Primer and white acrylic paint, universal colors of orange and brown colors, varnish
- Decoration materials.
- Scissors, pencil, ruler, tape measure.
- Thick cardboard.
- Brush and roller.
- Construction stapler or small nails and hammer.
- Hand jigsaw.
The list may vary slightly depending on the condition of the furniture being remodeled and the choice of finishing.

Hi all! Tell me, when you give your baby a toy, do you think about where it will live? Believe me, the baby is definitely thinking about this. And all because he projects his life onto them. He plays during the day, just like a toy, but evening comes and the little one has to go to bed. What about his ward? What to do with it? To give your child pleasure, continue playing and teach your toddler to be orderly, today let’s learn how to make a doll house out of a box with your own hands.
Preparing to create an apartment for a doll
Before you start working, decide what exactly you will create. The box itself already has “walls”. All that remains is to make them look like their place of residence. The size of the house can be different: it can be two-story or one-story, with one or several rooms; furnished with homemade or purchased furniture.
What materials and tools will be needed for work:
- Cardboard boxes;
- Glue;
- Colored paper;
- Scissors;
- Pencil;
- Ruler.
When everything you need is collected, you can start tinkering.
First house
I recommend practicing in a small one-room house. Then it’s not such a shame to throw it away, and the children quickly get bored with everything. Look how cute and cozy they are, even though they are small. Pictures enlarge by clicking.


But what a cute little house, even without wallpaper it already looks decent, but what if you hang curtains, throw in a couple of pillows, and lay down a carpet? By the way, the easiest way to make a carpet and pillows is from felt. And you don't have to sew! You can simply glue the felt with a moment or a hot gun.


Once you get bored, you can build either a castle or a country villa. You already have experience, your hand is full.


“Building” a house
From me a detailed master class with photos. Hope it helps you!


The little one's help will depend entirely on how interested the parents are and involved them in the process. Therefore, show your creative processes, prepare with a fairy tale or interesting story your baby. Instruct him certain work or ask him for advice on a craft.
Furniture
Of course, dolls simply need furniture! And playing with an empty house is not interesting. What can you think of?
Bedroom furniture
Bedroom furniture can be made from paper using the origami technique, glued from cardboard and laid out, but the most comfortable and nice option- upholstered furniture made of cardboard, foam rubber and fabric. You can glue everything using regular PVA, although it will take a long time to dry. Instead of foam rubber, you can take padding polyester or batting, or in extreme cases, cotton wool.
Bed MK

Step-by-step photos of production - enlarge when clicked:


Armchairs
Photos enlarge by click


Kitchen
The kitchen can be filled with a refrigerator, stove, countertop, beautiful chandelier and the dining table. Cardboard and ice cream sticks are also suitable materials.
If you have a 3D pen, you can make furniture out of plastic.
Cardboard plate

Lockers
Cabinets, shelves, and a refrigerator are simply made from cardboard. Easy to glue with hot glue.


Furniture for kitchen
Furniture - chairs, a table - very beautiful ones made from ice cream sticks. You can cut such sticks with large scissors, but only carefully, they can crack in half. You can glue with instant or hot glue.


Little things for the kitchen
You can put a bird in a cage in the kitchen, or put a box of fruit or flowers. Detailed master classes in the photo. Enlarge on click.


Fruits, vegetables, dishes
Fruits, vegetables, dishes are the easiest make from plasticine. To prevent the product from getting dirty and losing its shape, it is coated with transparent nail polish.
You can make vegetables from salt dough - they dry out and look like they came from a toy store. From play to They also sculpt food, but my playdo cracks after it dries. That's why I prefer to do salty dough: 1 cup flour + 1 cup fine salt + water, knead a very stiff dough.
Also very a good option — air self-hardening plasticine(new material). It is cheap, bright, and when it hardens it is elastic, somewhat similar to hard rubber. We sculpt as from ordinary plasticine and leave to dry overnight.
Interesting ideas for a dollhouse
Some toys already come with a house, for example, for Lol dolls it is simply fabulous. You can copy some ideas from it. For example, the fact that the apartment is not limited only by the area of individual rooms, and the lower floor usually protrudes. Or you can even make a courtyard in front of the house with a sun lounger and flowers.


Another one interesting idea- bag house. This option is especially convenient when you are planning a trip with kids. You just need to attach a handle and “shutter doors” that close the house, and the mobile version is ready. 
If you like to sew, then a soft house bag made of fabric is ideal.


And one moment. Did you think that your craft is just the beginning? Over time, more and more rooms may appear in which other toys will live.
Create, make your baby happy and be surprised at how talented your little one is! I hope you enjoy spending time with your child and can develop your friendship with him. I suggest you become friends with our site so that you can always be aware of the latest articles! Subscribe and receive messages about what you can read on the site. Don't forget to tell your friends what you learn.
Until next time. Bye bye!
There probably isn't a little girl in the world who doesn't dream of a doll's house. You can buy a variety of toy cottages in stores that look like real ones. It's worth trying to make a house with my own hands. The mini-house is designed for small dolls and other toys that a child plays with. It can be made from beautiful box with compartments, plywood, fabric. The house will also serve as small closet for toys.
Manufacturing the structure will not take much time, effort, or require minimal amount materials, the child will definitely be delighted! A simple way to please your little one is to make a dollhouse with your own hands from cardboard, boxes, or plywood. We will tell you how to do this below.
Hanging house from a box for Lalalupsy and other small dolls
What you will need:
- square box;
- colored tape, adhesive tape;
- PVA glue;
- scissors;
- colored paper for scrapbooking.
How to make a house - step by step

DIY cardboard floor house
Before you start work, choose the appropriate house plans, you should figure out what material is best to use, how you need to cut holes, glue rooms together so that the structure is strong and stable.
How to choose cardboard and boxes?
Important material– boxes, or rather the cardboard from which the boxes are made. Difference various types cardboard is shown in the photo below:

The cardboard structures shown in the left photo are strong, stable, and do not deform under the weight of subsequent floors. The cardboard floor shown in the right photo may sag under the weight of the next floor, and the work will have to start again.
How to cut out rooms correctly?
Cutting out rooms is not easy. After looking at many photos of houses, you can see that some of the openings have a frame. This is the most convenient option holes. Removing the entire side is a mistake! Such a room will tremble, fall apart, and look unsightly. The frame (albeit without the bottom part) needs to be cut out and in cardboard boxes, which need to be combined, increasing the interior of the rooms. To understand what we are talking about, it is worth looking at the visual aids in the form of pictures below.
Here's how to create a room from one box: you need to mark the future access hole, leave 5 centimeters for the frame, and cut the hole.

Step-by-step drawings of a house consisting of two boxes

Connecting rooms - stitching walls
To prevent the dollhouse from falling apart, you need to ensure a strong connection between the rooms. A reliable way to connect rooms from cardboard boxes is stitching.
Required:
- gypsy needle,
- thick thread,
- pliers.
The cardboard is sewn together using simple large stitches.
Regardless of whether boxes are combined with an open connector or with a door opening, we always follow the rule: sew along the edge!
It is necessary to “immobilize” the boxes in work areas, where they can move or move apart under the influence of the applied glue, which will make it difficult to work and easily spoil the final result. Below are 3 examples of stitching rooms.

| In the drawing, 2 boxes without holes are connected. You need to “grab” the middle in several places so that the cardboard does not move after gluing. |

| The second drawing shows an example of stitching boxes with a hole. Note. In this and the following drawings, for better visibility of the seams, some of the walls of the rooms are “hidden”. |

| The third drawing shows an example of stitching boxes with a hole for a door. |
Connecting ceilings to floors
- The ceiling and floor need to be sewn close to the edge - this is the same rule for walls and ceilings.
- There is a second rule: you need to immobilize the “dangling” elements - the parts indicated in the figure below:

Now let's start sewing. The outer edges are sewn first, then the inner ones.

At the end, we fasten the dangling elements and sew along the line of their contact.
Attention. Loose elements located on the floor of the upper floor and on the ceiling ground floor, if they do not overlap, we hem each one. The diagrams below represent such a situation I:

What to do if the dangling elements do not touch each other, and you get a hole?
- If the situation occurs on the ceiling, it’s okay.
- If there is a hole in the floor, it needs to be closed.
There are 3 ways to close the hole.
- The first is to choose another box.
- The second is to rotate the cardboard box 180 degrees vertically (the hole will move to the ceiling).
- The third is to fill the hole, you need to insert a piece of cardboard of the appropriate size (the same thickness as the whole cardboard), then sew it on as shown in the diagram below.

Shapes and sizes
Above is the basic knowledge about sewing a dollhouse from cardboard boxes. Which option to choose depends on the builder. By choosing boxes, you can manipulate the size, distribution of rooms, create a tiny one-story house or a huge multi-level villa. Below are several diagrams depicting adding further floors to the dollhouse. Boxes can have different heights, widths, depths, giving the house a special shape.

Photos of cardboard house design


Plywood dollhouse, photo
A plywood house is a real challenge. Plywood is more difficult to work with than cardboard. It is worth preparing for work in advance. What is important is the plan, the design of the house, drawn on a sheet with dimensions. Below are instructions on how to build a dollhouse out of plywood step by step.
Drafting
It is advisable to draw the project on a sheet of paper in a checkered pattern. The scale may look like this: 2 cells on a sheet = 10 centimeters. It's so easy to calculate the actual size of the house. The house can be made small or a larger structure - with 2-3 floors.
- Small house in the diagram it has dimensions: width – 60, height – 57 centimeters.
- Big house, presented in the picture, is 120 centimeters high and 80 centimeters wide. Depth – 22 centimeters.

Calculation of the amount of materials, necessary tools
Below is the calculation for production big house.
- hardwood plywood 4 mm thick, dimensions 90/22 centimeters ( side walls) - 2 pieces;
- plywood 4 mm, dimensions 80 × 22 centimeters (lower and upper parts of the structure) - 2 pieces;
- plywood 4 mm, dimensions 79.2 × 22 centimeters (floors) - 2 pieces;
- plywood 4 mm, dimensions 50 × 22 centimeters (roof) - 2 pieces;
- plywood 4 mm, dimensions 30 × 22 centimeters (internal walls) - 2 pieces;
- plywood 4 mm, dimensions 60 × 20 centimeters ( façade wall with chimney);
- laminated fiberboard 3 mm 120 × 80 centimeters (back wall);
- acrylic paint for wood.

Tools and accessories:
- wood glue;
- hammer, nails;
- jigsaw;
- sponge roller;
- ruler;
- pencil.
Step-by-step instruction
- Painting plywood. Plywood elements need to be coated with acrylic paint. Ready product painting is much more difficult. Hypoallergenic paints are now available that dry in 20-30 minutes. The paints are non-toxic, odorless, and can be used indoors.
- Construction of a rectangular frame. When the paint is dry, you can begin building the rectangular cottage. You will need: 4 mm plywood, dimensions 90 × 22 cm (side walls) - 2 pieces; plywood 4 mm, dimensions 80 × 22 cm (lower and upper parts of the structure) - 2 pieces. You need to apply glue to the tangent edges of the individual plywood elements, aligning them with each other at right angles, and fasten the joint with small nails. 4mm plywood is very fragile, so precise nailing is important. Attention, the use of glue is necessary! Without its binding properties, the nails will fall out of the plywood, and the work will be done in vain.
- Building individual floors. The next step is to attach the shelves, which will serve as the floor for the individual floors. The shelves consist of 2 sheets of plywood measuring 79.2 x 22 cm each. In the project, each floor has a height of 30 cm. rectangular design measure 30 cm from the base, then another 60 cm from the base. Draw a horizontal line marking the place where the first shelf is attached, draw it with glue, and attach the shelf to the line. Do similar work 60 cm from the base. Then nail the 2 shelves to the side walls.
- Rear wall cutout. It's time to make the back wall from laminated fiberboard measuring 120 x 80 cm. On the long sides of the board, measure 30 cm from the top edge. Mark the center of the top edge - this is the future roof. Draw 2 lines from the top of the roof to the places marked at a height of 30 centimeters from above, you will get the outline of a triangle. Using a jigsaw, cut out the shape of a house along the drawn lines.
- Rear wall mounting. We cover the edges of the fiberboard with glue, attach it to the house, and secure it with nails.
- Roof. For the roof we used 2 pieces of plywood 50 × 22 centimeters each. Coat the triangular edges of the fiberboard and one shorter edge of the plywood with glue. Glue the roof to the edge of the house by joining both sheets of plywood at right angles. Strengthen the structure with nails.
- Chimney. From plywood measuring 60 × 20 cm, we cut out the shape of a chimney with a fragment of the facade. Don't forget to cut out the bathroom door. The first element needs to be glued, then nailed to the edge of the top shelf and roof.
- Dividing walls. Final stage construction - insert dividing partitions, forming separate rooms. Use 2 plywood 30 × 22 centimeters. You need to place the plywood in the space of your choice between the floors. You can move them freely, changing the size and location of the rooms.

Below are several unique hand-made plywood dollhouses.


Wooden house - master class


The products presented below will require experience and skill. A father can make a wooden house, who will spare no time and effort to please the baby.

DIY house bag – photo
Mom can make the next house. Original idea- bag house. Sewing it is not difficult. The girl will be able to take the bag to kindergarten and play with her friends for a walk.

Video