Warm glazing of the balcony with your own hands. Glazing a balcony with your own hands: types of glazing, procedure, video. Stages of design and glazing of a wooden structure
Read also
Glazing a balcony with your own hands - instructions from the master
The renovation is in full swing and it’s time to improve the balcony? Of course, modern diversity in the services market makes you tense. Everyone wants quality and cheap. How about making your own balcony glazing? Let's figure it out together.
Stage one – preparation.
It is impossible to do without this. It is important that the balcony does not collapse under the weight of the structure, the windows do not fly out at the first wind, and the cladding does not come off as quickly as it is being installed.
Technical analysis is one of the components of the initial actions. Grade design features, the percentage of dilapidation (unsafety) of the living space - these parameters will allow us to draw a conclusion about whether the design of the house is designed for the fact that there will be an additional load on the balcony in the form of glazing.

Having made sure that all this will definitely not collapse, we move on to additional strengthening of the parapet. Depending on the future load, reinforcement is carried out using foam concrete blocks or metal.
Which material to choose? The answer depends on your goals and the technical capabilities of your home. Metal will be universal, suitable even for extremely dilapidated balconies.
How to do this is detailed in the diagram. We only note that a strong metal structure “ties” the parapet and is capable of taking on the main load of the glazing system.
If your balcony is strong and wide, then you can use foam blocks. This material also serves as excellent thermal insulation. But such a structure requires strengthening with reinforcement. Otherwise, the desired effect will not occur.
After the preparatory work is completed, you can, without fear, deal directly with what, in fact, everything was started for.
Stage two – design selection.

Of course, the process itself is not so complicated, considering that almost every man, to one degree or another, has a little knowledge in the field of construction.
But when glazing without the help of specialists, you must be prepared to do not only the “dirty” work with your own hands, but also other related work. One of which is the choice of design.
It makes no sense to say that there are standard and non-standard double-glazed windows. This is already clear to everyone. But the expected result from the design matters. Traditionally, there is a division into warm and cold glazing. What is the difference?
Having dealt with the functional load, we will solve the issues with the material. Wood, aluminum, PVC. Today these are all possible options for finishing a balcony:
- Wooden Euro-windows have long term service, so you don’t have to worry about them rotting or drying out under the influence of external factors.
- Aluminum frames are cheap, lightweight and are most often used for cold glazing.
- If we take PVC, then they have a wide range of additional functions - noise insulation, thermal insulation, imitation of a certain style in architecture, etc. Of course, they are heavier than aluminum and are used for warm glazing.
How are things going with the lighting in the room? In addition to frames, you should also pay attention to glass. You sunny side, but would you like to make a games room on the balcony? So that the baby's delicate skin is not exposed to ultraviolet rays, solar control glasses are used, which, through special technology covered with film.

How energy saving glass works
This glass absorbs almost 99.9% of radiation. Or maybe the balcony is a future greenhouse? For this purpose, tinted glass is used, which prevents the sun's rays from penetrating through the glass and creating a “magnifying glass” effect.
Colored glass and stained glass are ideas for specific styles of both interior and exterior. Well, and finally energy saving windows. Factory applied to the glass surface the thinnest layer metal that retains heat indoors.
Glass, structure, reinforcement - all preparatory issues have been covered, the decision has been made. All that remains is to understand how it can be glazed. To do this, we move on to the next stage.
Video - what is energy-saving glass and what are its capabilities:
Stage three – choosing a glazing method.

The variety is amazing, just look at the neighboring house. There’s a lot you won’t see there, but let’s focus on the ways.
a) With take-out. The internal space becomes wider due to the extension of the window profile (relative to the main fence). The increase is insignificant - 20-25 cm. A window sill can be placed on such a frame.
b) Frameless. In essence, it turns out panoramic window without vertical frames and horizontal partitions. A large number of light is a plus. Problem with care (for example, washing) is a minus. The design is quite durable, so there is no need to worry about bad weather.
c) Art finishing. This method is relevant when we, for example, install stained glass windows. It’s difficult to do without an artist-designer (unless, of course, you have a talent for drawing). Also read the article: interesting designs loggias.
Stage four – installation of the visor.

This should be done before the glazing system is installed, so that later you don’t have to think about how to stick it there so that it doesn’t come off. Using regular dowel nails, we attach it to the ceiling.
After the canopy is secured, you can begin glazing, but first, you should secure the anchor plates on all sides except the bottom.
Video - installation of a loggia with a canopy:
Stage five - step-by-step instructions for glazing.
Of course, the balcony must be cleared of everything that was previously there: chairs, flowers, linoleum, tiles, old trash, etc. The issue of strengthening was previously touched upon, so we will omit the description of this procedure.
Installation of wooden windows.

Correct installation according to GOST
Installation of the frame. The beams serving as the base are pre-treated with sealant (but only mounting surface). Next, a wooden structure is constructed around the perimeter using mounting dowels.
Window installation. The frames must be glazed, as the glass may simply break. Installation is carried out in the following sequence: front structure - side elements.
Afterwards, it is necessary to seal the seams using sealant and polyurethane foam. When everything has hardened (at least a day), you can glaze. But first, all grooves must be treated with silicone sealant. The beads used to secure the glass must press it tightly against the frame.
Video - how to glaze a balcony wooden windows:
Installation of aluminum frame.
Video - how to install an aluminum frame with your own hands:
Installation of PVC windows.
The installation diagram is similar to the previous one, with some exceptions.
- To remove the window, you just need to remove the plastic beads.
- Installation is carried out using mounting plates that are attached to the frame with self-tapping screws.
- All gaps are also eliminated with polyurethane foam.
The final stage is to bring the balcony into an appropriate aesthetic state: installation of siding.

External installation requires certain efforts, such as the construction of fastening belts. There are two of them - upper and lower.
Such structures are built around the perimeter, which are attached to the walls using corners or liquid nails. The blocks are connected to each other by metal corners. The lower belt should go along the base of the balcony.
Attaching the siding itself begins from the sides. The screws should not be overtightened; they are located exactly in the middle of the panel's technological hole. Installing trims that hide all the screws completes the glazing process. It is simply put on the strip of siding until it clicks.
Thus, by carefully examining specifications of your premises and strictly following the instructions, it is possible to glaze without resorting to the help of specialized companies and saving your own money.
Glazing a balcony with your own hands - step-by-step instructions
A couple of years ago I decided to glaze my balcony. I wanted to give it a cozy look, put a chair, coffee table. But without glazing this was impossible. I decided right away that I would carry out all the installation work myself, because I have little experience, and glazing a balcony with my own hands is a labor-intensive process, but quite realistic.
Just a couple of decades ago, all apartments had only wooden windows, but nowadays modern world There are several options for glazing residential premises. They have different characteristics, composition, and each has its own pricing policy. Therefore, everyone can choose the most suitable option.

DIY balcony glazing
Choosing material
Since I wanted to give my balcony a cozy feel, main task for me it was thermal insulation. Therefore, I immediately chose the “warm” glazing option. But I’ll write more precisely about each one.
So, there are three types of glazing for balconies:

French glazing of the balcony using transparent mirror windows.
All that remained was to choose the glazing option for your balcony.
The most popular option today is PVC glazing windows, but there are also:
- Aluminum profile
- Wooden windows

Aluminum profile glazing refers to cold balconies
The option of glazing with an aluminum profile immediately became impossible for me. This type of glazing refers to cold balconies. The material is not thermal insulating - it is used on those balconies that do not need to maintain room temperature. The aluminum profile serves to protect the room from wind, rain and snow.
However, this form also has its advantages:
- Low weight of materials used
- Low cost
- Parallel sliding sashes

Balcony glazing - wooden frames
Wooden windows are made from two types of materials. If homogeneous wood is used, then the cost of windows is relatively low. If the material is laminated veneer lumber, then the price automatically increases and is already on average 60-80% higher than the cost of similar PVC windows.
For me, the option with wooden windows was not suitable due to the price. Although this is beautiful, the financial side of the issue interested me no less. My choice settled on PVC windows. Good price/quality ratio, excellent heat and sound insulation properties this material in first place in demand.
Siding
In addition to glazing the balcony, I was interested in the option of external cladding of the balcony. And for this I chose siding. This material is the most optimal, it is durable, consists of PVC and is not afraid sun rays, atmospheric precipitation. In addition, it enhances thermal insulation on the balcony. The siding has a wide range of colors, and the manufacturer claims a service life of no less than 50 years.

DIY balcony siding
Advice! For those who decide to carry out all the work on glazing the balcony themselves, you need to know that it is better to complete the outer cladding of the balcony before glazing. This will save time and money. After all, after glazing the balcony, it is not so convenient to carry out external cladding, and calling craftsmen who will do all the work with the help of climbing equipment will cost a lot of money.
It is quite possible to do siding work yourself, but only if you are confident in your abilities and have skills in such work.
Otherwise, it is better to entrust all work on covering balconies with siding in apartments to qualified specialists who have professional equipment.

Finishing the balcony with siding
I have described the sheathing instructions below:
- First you need to build fastening belts from wooden beams- upper and lower. In the future, siding will be attached to them
- We attach the beams to the wall using liquid nails. They are connected to each other using iron corners
- Let's start installing the siding - you should start from the sides. We do not overtighten the screws; they should be left in the middle of the hole.
- Upon completion of the siding installation, we hide all the screw heads using platbands

Balcony siding
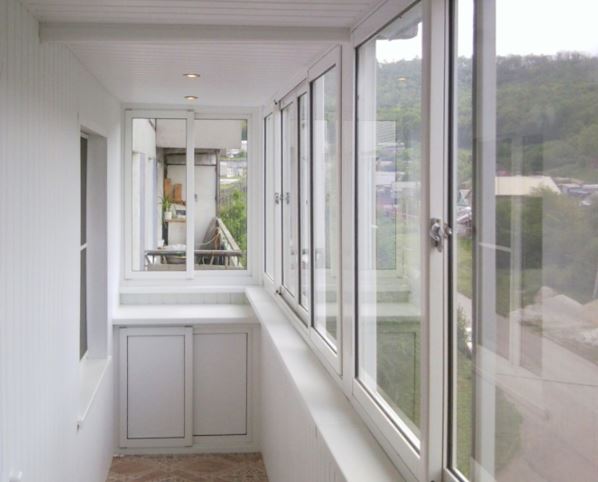
Balcony glazing
After all the work has been completed external cladding balconies were completed, I proceeded directly to glazing my balcony.
Next I will write step by step instructions, with which everyone can try to glaze a balcony with their own hands.
Advice! Start the glazing by installing the canopy - then you won’t have to guess where to attach this canopy so that it doesn’t fall off with the first strong wind. It will be enough to screw it to the ceiling using dowel nails.

Glazing of balconies with plastic windows

Installation of low tide and window sill on the balcony
Finally, I installed a drip sill on the outside of the balcony and installed a window sill on the inside.
Although I spent quite a lot of time completing all the work, and then cleaning the entire room from construction dirt, I was satisfied. Self-glazing of the balcony allows you to save a decent amount of money. In addition, I gained valuable experience and new skills in construction work, and the external cladding of the balcony with siding is doubly pleasing. Now the balcony looks perfect from the outside and this is due not only to the siding manufacturer, but also to me.

Technologies and types of exterior cladding for balconies 
How to cover a balcony with siding: installation instructions 
Phased construction frame for covering a balcony 
Do-it-yourself balcony in Khrushchev: step-by-step instructions 
Analysis and types of repairs of balcony slabs
Instructions for glazing a balcony with your own hands
Accommodation in conditions big city in apartments is associated with a number of problems, the main of which is considered to be the lack of living space. Many owners use the balcony to store various things in order to free up some space in the rooms where they spend most of their time. However, wind, rain and cold do not always allow this. Decide this problem, at least partially, glazing the balcony with your own hands will help.

Types of balcony glazing
The simplest type of structure is the so-called cold glazing. In this case we're talking about about the use of thin single-layer frames, which is why the balcony can only be fully used in the warm season. Such structures can reliably protect against dust, wind, birds and insects (provided they are installed correctly), but they will not help with thermal insulation.

The main advantage of cold glazing is its low cost
A more expensive option is warm glazing. To carry out this procedure, full-fledged frames with double-glazed windows for 2-3 chambers are used. In this case, we can already talk about a full-fledged additional room in which you can arrange a corner for relaxation, a small office, a greenhouse, and so on. In some cases, the balcony is even attached to the living room after this procedure.

Warm glazing involves the use of full-fledged frames, therefore it is a more expensive option
Also, different frames can be used for glazing:

Wooden frames - classic version for balcony glazing

Installation metal-plastic structures best left to professionals

Installing frameless windows allows you to create a panoramic view, but requires professional equipment
Important! Before choosing the final glazing option, you need to soberly weigh your strengths and capabilities. If there is any doubt, it is better to entrust this matter to specialists.
Installation of wooden frames
This procedure consists of the following steps:
Glazing of wooden frames
Glazing a loggia with your own hands requires the following tools and materials:
- Hammer, nails and glazing beads.
- Rubber spatula, putty or putty.
- Drying oil and paint brush.
When installing glass in wooden frames, one problem very often arises - the impossibility of installing glazing beads on the back side of a blind window on floors above the first. If the frames are small, then it is better to first put glass in them, and then carry out the installation. But if we are talking about large massive structures, then placing them on a base with glass is not only difficult, but also dangerous. Therefore, installation will have to be carried out from the inside.

One of the main problems with installing glass in wooden frames is installing glazing beads on the back side
Installation Guide:
- First you need to moisten the brush in drying oil and treat the window openings with it. It should be applied in one layer, but without gaps. After the material has dried (the time is indicated by the manufacturer on the packaging), you can begin painting.
- To do this, they also use a brush, which carefully paints all the openings and leaves to dry.
- After this, putty or a special putty is applied to the folds of the opening, which will close the gaps between the glass and the frame, preventing water from entering and drafts.
- Next, the trimmed glass is installed in the frame and pressed against the putty.
- Then another layer of putty is applied, but on the glass itself, closer to the frame.
- A glazing bead is placed on the putty strip and carefully nailed with small nails.

Putty performs the main function in fixing glass
On a note! The nails must be driven strictly vertically or horizontally, since driving them at an angle can damage the glass.
Alternative options
You can also use putty instead of silicone tube, which is cut and laid, just like putty, and then pressed with glass. In addition, you can do without driving nails. To do this, apply to the glass thick layer putty, after which it is carefully leveled.
You can also use sealant. Some people think that it will permanently fix the glass in the frame and cannot be replaced. But there is one secret: before applying the sealant, the glass must be treated with a soap solution.
Installation of metal-plastic frames

To remove the glass unit from plastic frame, you need to remove the bead first
Important! Even small distortions are unacceptable, as they will subsequently lead to breakdown of the entire structure.
Installation of double-glazed windows
Gaskets must be placed in the lower and side internal parts of the frame installed in the opening. It is necessary to lay it so that the weight of the glass unit is evenly distributed over the frame. One of the edges of the gasket should extend slightly beyond the boundaries of the frame, so that after hammering in the bead, cracks do not form on the glass. After this, take two suction cups, press them to the surface of the glass and carefully place it in the window frame. At the end, the glazing beads are hammered in with a wooden mallet, and at this point, do-it-yourself glazing can be considered complete.

To fix the glass unit in the frame, you need to hammer in the glazing beads using a mallet
Installing frames and glass is a rather complex process that requires experience and certain skills, so if you are not completely confident in your abilities, it is better to immediately call specialists.
Precipitation falls on a balcony without glazing, a lot of street dust accumulates there, and gifts from birds appear. Often apartment owners prefer not to store anything on such open area. To make a balcony a full-fledged enclosed space, it is better to glaze it. Anyone can do this with their own hands.
What you need to be prepared for before starting glazing
Balcony glazing requires professional approach. In such work, it should be remembered that the balcony slab is designed for a certain load. Therefore, she may not be able to withstand the weight gain. To prevent a fatal collapse of the entire structure, it is better to seek advice from specialists. They will be able to give clear recommendations on materials that can be used for glazing in a particular case.
When glazing a loggia, such detailed calculations of the load-bearing capacity of the balcony slab are not required, since the load of the side of the loggia is transferred to the main wall of the house. Glazing can be produced using almost any materials and methods.
It is better to do the balcony glazing yourself with your own hands together with an assistant. In such work you will have to constantly lean over the parapet, so it wouldn’t hurt to have someone who can provide backup. For safety, it is advisable to prepare safety equipment in advance.
Balcony glazing – choosing the best method
Glazing a balcony with your own hands can be done both cold and warm method. In the first option, lightweight frames with single glasses are most often used. In winter, it is quite cold on such a balcony, so during this period of the year this room is used as a pantry for food. Well, in the summer you can organize gatherings on the balcony with such glazing.
To avoid unnecessary maintenance hassle, we can recommend an aluminum profile as a replacement for wood. This material is easy to install, environmentally friendly and lightweight. During operation, aluminum is not subject to rotting. Therefore, there is no need to worry about the destruction of this material. For such cases, the doors can be used as either rotary or tilt-and-turn. Recently, sliding doors have become increasingly popular.
Such balcony glazing requires a serious approach to work and careful calculation, since the dew point should not be inside the balcony. Due to improper insulation, condensation in the room can lead to mold throughout the apartment. To ensure that the dew point is not in the room, it is necessary to carry out high-quality hydro- and thermal insulation of the floor and parapet. Remember, even a small gap or cold bridge can lead to condensation.
For warm glazing balconies require double-glazed windows with seals. It is recommended to implement natural ventilation, which can be adjusted independently. For this purpose, the manufacturer of metal-plastic windows provides ventilation dampers. To get rid of condensation, air circulation is required between the balcony and the room. For this purpose, it is necessary to install a fan in the window of the room, which will draw air out of the room. At the bottom of the balcony door you need to install ventilation grille.
Types of glazing
In elite multi-storey buildings As a rule, panoramic glazing of balconies is used. This option involves a glass fence from floor to ceiling. The most popular is frameless panoramic glazing, with it daylight the room increases several times.
For such glazing, shockproof glass 6–8 mm thick is used, which is treated with metal oxide. Such a double-glazed window is quite difficult to break. Thanks to special coatings, glass can reflect heat back into the room and allow ultraviolet light into the room. Such double-glazed windows have very high sound insulation properties.
Glass sashes can be hinged, sliding (on rollers) or folding. When small space balcony, the best option would be to use a sliding mechanism. In this option, when opening the doors, the room area is not lost.
Aluminum profiles are also used for glazing. Weight depends on the thickness of the glass and the size of the sections, but, as a rule, does not exceed 20 kg per linear meter. m. Therefore, it becomes possible to carry out glazing of the balcony with removal. For this, detailed strength calculations are not required.
To assemble the sections, you will need to make guides at the top and bottom of the balcony opening. Then you need to install vertical posts. Then the frame is secured using latches and locks. It is imperative to measure the evenness of the location of the guides and racks. The skew should not exceed 5 mm per linear line. m.
Glazing of balconies can also be done using metal-plastic windows. In this option, the weight of the structure will be 40 kg per linear meter. m. It is recommended to install such glazing before installing the window sill. Racks made of metal-plastic profiles must be attached to the ceiling and parapet using self-tapping screws.
Before installation, it is necessary to remove double-glazed windows in all windows, since glass can easily be broken during installation work. To remove double-glazed windows from the frame, you need to pull out the window beads.
Also, before installing the frame, all sashes must be removed. To do this, you need to squeeze out pins in the upper loops, which can be pulled out using pliers. After this, the sash can be removed from the lower hinge.
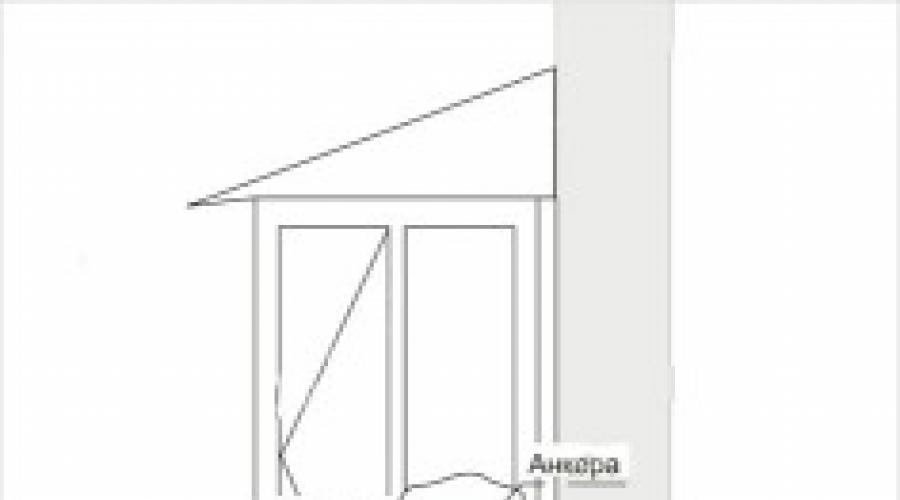
If you decide to do it on the balcony winter Garden or a greenhouse, then you can use balcony glazing with removal. This will require a parapet of increased strength. Additionally, you will have to take care of installing the visor.
Consecutive glazing of the balcony
Finishing and glazing of balconies is always carried out different stages. For example, with lattice fencing, insulation and decorative external finishing done before glazing begins. But the interior finishing and installation of the window sill must be done after the window frames are installed.
If there is a brick or concrete parapet, you first need to level its surface using cement mortar. Then do exterior finishing. Only after this can glazing work be carried out. Interior decoration and insulation is done after installing the window sill.
If the balcony does not have top floor or is hanging, then you need to use pipe stands. They will be able to withstand most of the glazing load. External frames must be made from 40–60 mm angles. Using a grinder, you need to smooth out all the welds. After this, you need to do degreasing and cleaning. Then you can cover the entire frame with acrylic enamel.
The most labor-intensive stage of the work is creating the visor. It should protrude 15 cm beyond the glazing. As a rule, 40 mm corners are used. The height of the visor is made within 40 cm.
The first step for the visor is to make a frame, in which you need to drill 10-12 mm holes for anchor bolts. The distance between the holes should be 40–60 cm. You need to ensure that there are at least 4 holes along the entire length.
To mark places for bolts on the wall, you will need to attach the frame, level it horizontally using a level and draw marks in the holes. After this, you can start drilling holes for the anchors. Once the bolts are installed, the frame itself can be attached to the wall.
The next step is to create cross members and slopes that need to be welded to the frame. Then the outer crossbar is attached. Upon completion, you can begin installing the canopy roof. As a rule, galvanized sheets are used for this. They must be laid overlapping in one wave. To prevent water from leaking between the wall and the roof during rain, it is necessary to insert the sheets into the grooves.
Width load-bearing frames must be done with a small margin (10–15 mm) from the thickness of the window. According to experts, the frame can have a maximum size of 1100x1500 mm (provided that a 40 mm corner is used). If a 60 mm corner is used, then the length can be made 1300x1700 mm. Using pipe stands, the frame must be connected to the canopy by welding.
When the frame is completely installed, you can begin decorative finishing and insulation. For cladding it is possible to use metal sheets, which must be welded to the frame. As an option, you can use moisture-resistant plywood or plasterboard for finishing. A balcony covered with siding looks quite decent. As thermal insulation material basalt wool is used.
The glazing process begins with the installation of window frames, which must be secured to the corners with 6 mm self-tapping screws. The distance between the fasteners should be 25–30 cm. After the window frames are secured, all grooves must be foamed. Then the window sashes are installed and the double-glazed windows are put in place. Upon completion, you can begin interior decorative finishing. For this purpose, wooden lining, plastic panels or drywall, which can be painted, are used.
To ensure that the balcony area does not remain ownerless, you can carry out some work to transform it and turn it into a small but very functional room. Since this room is not heated, first of all it needs to be glazed and insulated.
It can be possible to do it yourself if you study in detail the instructions for carrying out this process. But when the window frames are already installed and glazed, work on further insulation and decorative design Nothing will disturb the premises - neither rain nor wind.
Types of glazing
If you decide to renovate, you need to start by choosing the type of glazing. It can be traditional - using ordinary wooden frames or Euro-frames - aluminum, metal-plastic and wooden with the installation of double-glazed windows. In addition, glazing can be frameless, insulated and cold.
Warm and cold glazing
Glazing of balconies can be cold or warm, and both are done both when installing conventional wooden frames and more advanced ones.
- Cold glazing includes the installation of wooden frames with ordinary glass or Euro-frames - also with one hermetically installed glass. It is used if the balcony is not planned to be used year-round as a living space.
 The simplest glazing is the “cold” type
 A balcony made in this way should not have any special requirements for maintaining temperature. Frames can only make the room neat and protected from wind and dust, and somewhat reduce the penetration of sounds from the street.
Cold glazing does not require additional insulation measures. The only thing that can be done is to install wooden flooring on the floor for comfort.
- glazing is necessary if the balcony or loggia will be combined with one of the rooms. The entire room must be insulated with one or another thermal insulation materials.

With this change in layout, frames with double-glazed windows with triple glazing are installed.
- Warm insulation requires a more serious approach.
If one of the Euro glazing options is selected, then you need to purchase frames with thermo-in rates that fit between the profile and the double-glazed window.
Double-glazed windows should have one, or better yet, two vacuum chambers - this choice will depend on the weather conditions of the region.

Further, when creating a warm room, you must remember that you cannot allow the so-called “dew point” formed indoors. Failure to comply with this condition will lead to the appearance of dampness and mold due to the formation of condensation - first on the balcony, and then in the room.

It is impossible to allow the formation of a “dew point” between the glasses installed on frames placed outside the perimeter of the balcony. In this case, achieving the correct balance of temperature effects on windows is much more difficult, since they can be cooled not only through the glass, but also from the lower and upper end sides. Therefore, you need to carefully consider their insulation.
If wooden frames are chosen, then you will need to “conjure” by installing good insulation between them, as well as a seal between the frame and the glass.
To prevent mold stains from appearing on the balcony, it is necessary to take a number of measures to help avoid dampness:
- sealing cracks and gaps in the floor and walls of the room before insulating it;
— waterproofing the floor and balcony parapet;
— organization of effective ventilation.
Ventilation is one of the main conditions for preventing the formation of condensation. But in order not to cool down the insulated room, it must be adjustable:

— on Euro-windows it is installed in the upper horizontal part of the profile;

- when installing wooden frames that are tightly closed for the winter, you need to build a through window into one of the upper sections of the window or wall ventilation valve, having an adjustable damper.
Prices for ventilation units
Ventilation units
Traditional wooden frames with glazing
In recent years, this option for protecting the balcony from rain, wind and snow has become a thing of the past, but still some apartment owners prefer it due to the low cost of the material and the ability to carry out the process independently.
 “Classics of the genre” - wooden frames
 Such glazing will not save you from frost and will not make the balcony warmer in winter, nor will it create effective sound insulation from external noise, but will become an obstacle to dust, wind and precipitation. In winter, a balcony protected in this way can only be used as a refrigerator.
Nevertheless, if you install double wooden frames, insulate them well, as well as the walls, floor and ceiling, and install heating devices, then in not very cold times you can use the balcony as a living room.
Glazing of wooden balcony frames is not quick, since in each of them you need to install a separate glass with a special putty, securing it with nails driven through a glazing bead. It should be noted that this process is very tedious and requires the highest accuracy.
The disadvantages of such glazing also include the difficulty of putting the glass in order, especially if double frames are installed, twisted together. In addition, wooden frames require special processing and periodic painting.
Metal-plastic windows
Euro-glazing called the installation of metal-plastic frames with double-glazed windows. This method of transforming a balcony will cost much more, but it also has much more advantages over wooden frames.
 Modern approach- metal-plastic frames
 Double-glazed windows installed in metal-plastic profiles can have single, double or triple glazing. The advantages of this type of glazing are:
- Aesthetic and neat design.
- The tightness of Euro-frames allows you to create effective heat and sound insulation, preventing precipitation, wind, dirt and dust from entering the premises. At additional insulation all walls and ceiling, the balcony becomes a full-fledged room in which you can arrange an office, workshop, greenhouse or quiet relaxation area.
- If you know the installation process of Euro-frames, then you can install them quite quickly yourself.
- Ease of care will allow you to tidy them up more often and quickly.
- Frames do not require additional annual insulation and painting.
- By installing special locks on opening sashes of windows, you will not be afraid that a child will be able to open the frame on their own.
Aluminum frames
Frames made of aluminum are currently quite popular for installation on balconies. They are used for both cold and warm glazing. In the first case, options with single or double glazing are used. But when organizing a warm room, frames with thermal inserts.

Aluminum frames can be installed on parapets, or they can be used to form a panoramic glazing structure. It should be noted that in the latter case, the thermal insulation of the balcony is reduced, since the metal has a very high thermal conductivity.
When using aluminum frames, it is recommended to leave part of the balcony closed and install glazing only in front of the parapet. This design is called a “French balcony”.
Advantages of aluminum frames:
- This metal is very light, and at the same time has high mechanical strength.
- Aluminum has good heat resistance, it does not burn, and is not susceptible to corrosion.
- The service life of such structures is on average 50 ÷ 70 years.
- The lightness of aluminum allows the use of structures made from it in conditions where heavier frames, for example, made of metal-plastic or metal-wood, cannot be used due to their greater weight. This speaks in favor of such frames for installation on balconies - no additional reinforcements are required, which will save some money.
- Aluminum frames do not require painting and are easy to maintain.
- The balcony, glazed with aluminum frames, receives good sound insulation.
Frameless glazing
Frameless glazing of balconies is used infrequently, as it — more new technology , but already gaining popularity. Glazing can be made from ceiling to floor or installed on a parapet.

Frameless glazing not only visually expands the space small room balcony, but also perfectly protects it from dust and external noise. It is perfect for a room where you plan to grow various plants - due to the absence of frames, they will receive sunlight in maximum volume
Frameless glazing is characterized by the following qualities:
- For this transparent balcony fencing, tempered glass is used, which is 8 to 10 times more impact-resistant and durable than regular glass, so it can withstand very high loads.
- It is impossible to get hurt with such glass panels, since all their edges are rounded and polished in a special way.
- Such glazing is simply operation - design it is designed in such a way that it is easy to open and close, since each of the panels slides on rollers along a metal rail.
- Glass fencing takes up practically no space, while frames always “eat up” 50 ÷ 100 mm of area around the entire perimeter, and so on small room. This is especially true for glazing installed from floor to ceiling.
- High sound insulation – noise absorption efficiency reaches 50–70%.
Glazing with roof arrangement
The real problem is a balcony that does not have a roof. Rain and snow, dust and leaves from the trees - it all collects on this small area. Such a balcony cannot be used functionally, you cannot rest on it, leave clothes to dry, and in rainy weather you cannot even go out on it.

Therefore, the apartment owner has to solve the problem himself by installing the roof and glazing the balcony.
Roofs over a balcony in combination with glazing can be of two types:
- A dependent roof is installed only when installing aluminum frames. It is attached to the block built from them and the wall of the house.
The advantages of this design include its reliability, ease and speed of installation at a fairly reasonable price.
The disadvantages of a dependent roof include the fact that it can only be installed over narrow balconies and loggias. When installed above wide extensions, the structure becomes unreliable and is unlikely to withstand snow loads in winter.
- An independent roof is different in that its installation is not associated with the glazing of the balcony. An individual metal or wooden frame, That there is something that can be done roof, without even planning further glazing.

The advantage of this roof is that it can be installed over a balcony of any width, the main thing is to correctly calculate the strength of the structure. In addition, if it is not possible to install both the glazing and the roof at once, then you can install the roof first, and then the balcony frames.
Building a roof over a balcony at a height is a rather dangerous undertaking, so it is recommended to entrust this work to professional craftsmen. Moreover, you first need to make accurate calculations of the brackets and the entire frame so that the structure is not blown away by the wind one day.
Window prices
Safety precautions when working on the balcony
When planning balcony glazing, always remember the dangers of working at height. Not only do you need to protect your life or health, you must not allow threats to other people, for example, in the form of tools or construction materials falling from a height.
- At independent execution Work on insulation and glazing of a balcony requires extreme caution, especially in cases where any processes are carried out from the outside. You should not take risks and fully rely on your strength and dexterity - you must definitely protect yourself with a safety belt. The belt is purchased as an industrial or sports one, and the fastening must withstand a load of 350 ÷ 400 kg, which must be indicated in the certificate. If such information is missing, then this product is not worth purchasing.
In addition, you should definitely consult with a sales consultant who will clearly show you how to use this safety device.
- Not worth it do work alone - you must definitely invite a partner who can, if necessary, provide backup - this should be taken into account both for work outside the balcony and when installing frames and double-glazed windows.
- To protect your hands when working with glass and metal, you must use gloves made of durable material.
Balcony glazing stages
Unlike a loggia, where one of the sides is glazed, on a balcony frames have to be installed on three sides. The work is complicated by the fact that it is necessary to correctly align each of the structural elements and make a reliable connection at the corners. Moreover, during installation it is necessary to take into account that only end frames will be rigidly fixed to the wall.
The front part of the structure has the maximum size and weight, therefore it also differs in windage. It must be installed extremely carefully and immediately firmly secured not only to the balcony parapet, but also to the slab of the upper balcony (or to the canopy).
Frame blocks can be purchased ready-made or ordered from the company that manufactures them, indicating exact dimensions balcony You can install ready-made blocks yourself if you carefully study the instructions.
Frame installation
Before carrying out, it is necessary to glaze it. The explanation is simple - you can’t create a risk of getting wet insulation materials- they will simply lose their qualities.
The installation of frames is carried out according to the same principle, but the preparation of the base for them may vary. For example, frames can be installed on the base of a balcony, on a fence (parapet) or moved outside the perimeter.
 Direct installation of frames - and with a slight offset
 Preparing to install the structure on the parapet
It is good if the balcony parapet is made of brick or concrete - in this case it will be easier to secure the frames to a fence of sufficient width. It is more difficult to resolve this issue if the parapet is made of a metal angle and rod.
In this option, it is advisable to carry out preparatory work by slightly expanding the base for the convenience of fastening the frame structures. This could be installing an additional corner with a wider shelf. One side of it is placed outward, creating a kind of fence for the lower profile of the frame. In the same way, you can secure the corners in the upper part.

The corners are screwed with self-tapping screws in increments of 150 ÷ 200 mm from each other to the top of the parapet.
Metal elements must be well coated protective paint. It will not only reduce the impact external environment, but will also give the structure a more aesthetic appearance.

Wider brackets installed to expand the base under the frame structure will also serve to secure the window sill inside the balcony.
Preparing to install frames on the base of the balcony
In this option, you need to take into account the height to which it will be raised. For example, if you plan to raise it by 100 mm, then a block of the same size is fixed around the perimeter of the balcony. It will be easier to install glazing frames on such a base.
 Frames can go panoramic: from top to bottom
 At the top of the balcony, metal corners, wooden blocks can be used to secure the frames, or the frames can be screwed to the ceiling using special brackets. If it will also be insulated, then it will be necessary to include it in the scheme installation of the block, which will set the thickness of the insulating layer.
Preparing the parapet base for installing frames with offset
When expanding the upper part of the balcony by moving the frames beyond its perimeter, you will have to build a more complex structure for their installation.

Installation is usually carried out using a metal corner, from which a kind of shelf is welded.

If you don’t have a welding machine or welding skills, you can build such a structure from metal profile, strengthening it with a wooden block, laying it in the cavity of the profile and securing it to the parapet and floor of the balcony.
Using only a profile, it is impossible to obtain sufficient rigidity of the structure, and if you install it only from a bar, then under the influence of the external environment the frame with thanet will be less durable.
Brackets installed outside the parapet should be made in the form of triangles - this will give the greatest rigidity to the frame.
 Ready frame- bottom view
 The upper, protruding part of the structure is also mounted from corners, connecting them horizontally with the visor, and vertical posts- With bottom frame. It is best to additionally attach corners to the load-bearing wall of the house to the height of the entire balcony and fasten them to the structure of the protruding part - this option will give the frame maximum reliability.
If used for glazing aluminum frames, for which it is not necessary to install a common frame, they can be secured in the upper part using metal strips. They are screwed to the end side of the frame and to upper balcony(to the roof).
Video: example of balcony glazing with extension
Balcony extension
If there are plans to increase the area of the balcony, then its floor slab must be thoroughly strengthened so that the main load from the entire structure is removed from it. The possibility of this action must be agreed upon with specialists, as this will require an accurate engineering calculation of whether it will withstand bearing wall additional workload at home.
Expansion is carried out using metal structure, which will be attached to the wall of the building with the frame extended beyond it for installation of frames. This method will help increase the area at the base of the room by 200 ÷ 300 mm in width, and the window sill in the upper part beyond the balcony - by 200 ÷ 250 mm.
Frame fastening
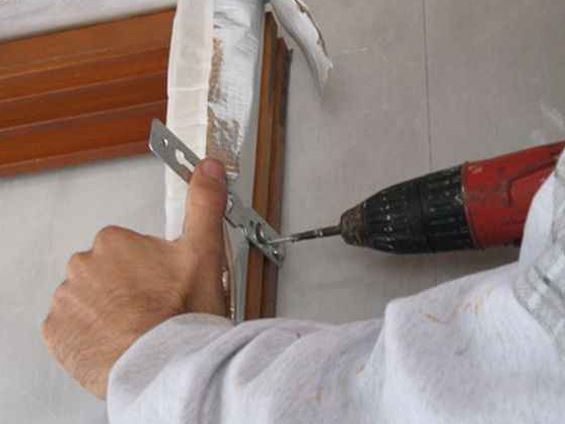
Frames (wooden or other) are fastened according to the same principle - using special perforated metal strips and anchor screws.
 Attaching the brackets to the frame - on a wooden...
 Fastening strips of the required length are screwed to the end sides of the top and bottom of the frame. They are often used for mounting the sides of the frame. On each side you will need two to three strips for fastening.
 ...or metal-plastic
If necessary, wooden spacers and stands are installed between the frame and the wall to help achieve the desired position.

Often, to attach frames to the wall, anchors are used, for which the necessary holes are drilled. In this case, it is very important to select an element of the required length, since it must enter the wall at least 50 ÷ 60 mm.

Complex knots when installing frames on balcony are the angles. To connect them and fix them together, you can use several techniques:
- Use special corner profile, which is built in during the manufacture of frames.

- Install on corners metal corner 80 ÷ 100 mm in size, and attach the frames to it. First, the corner must be painted with a special protective paint.
- Attach frames to wooden block, disguised plastic panels from outside and inside after installation.
- It is easier to solve the problem with wooden frames - they are fastened together with corners or a wooden block.
But here it should be noted that if the glazing is carried out along the entire perimeter of the room, it will not be warm, since it is impossible to create the necessary insulation at such connection angles.

After installing the frames, all gaps between the walls and frame profiles are filled with polyurethane foam. If the gaps are very wide, in order to save money, you can first install fragments of polystyrene foam in some places of the gaps, and then apply polyurethane foam.
Glazing of frames
After the polyurethane foam has dried and cut off the excess, you can begin installing double-glazed windows in Euro frames or cut glass - into ordinary wooden structures.
When installing double-glazed windows in installed frames, it is very important to follow all recommendations.
Before installing a double-glazed window, special spacers must be placed in the lower inner part of the frame. pads. They are also sometimes placed on the sides and top, between the frame and the glass unit.

The gaskets must be laid so that they With from the insulating glass package was distributed evenly along the entire length of the frame profile. One of the sides of the gasket should protrude slightly beyond the perimeter of the glass package. This must be done so that when the bead is driven in, cracks do not form on the glass. When driving it, the bead will select the final location of the lining, moving it to the required (but not more than) certain distance.

Next, a double-glazed window is carefully installed on top of the gaskets. For ease of installation, professionals use special suction cups. They help to easily lift a fairly heavy element and install it in the frame opening.
Having installed the double-glazed window, hammer in the glazing beads using a wooden hammer. They should fit tightly into the gap intended for them and press the glass unit against the frame.

After the installation of double-glazed windows is completed, they proceed to installing the window sill and insulating the ceiling, floor and walls.
Glazing of a wooden frame
To glaze a wooden frame, you will need small nails, wooden glazing beads, a rubber spatula, putty or sealant, drying oil and a narrow brush.
When installing glass in wooden frame on the balcony you may encounter one discrepancy, which in this work is considered the rule. Beads that fix glass in window opening must be nailed from the outside in order to protect the frame from moisture penetration, which is not always possible to reproduce in a balcony located above the first floor.
If the frames are small, then glazing can be done before the frame is installed on the parapet.
If the wooden structure is massive, pre-installed glass will make it even heavier and lifting it will not only be problematic, but also dangerous. Therefore, you will have to install the glass into the frame from the inside, and there is nothing wrong with this if this process is carried out correctly.
The first thing you need to do before installing glass is to treat all window openings in the frames with drying oil, applying it with a narrow brush. Then you need to wait until the composition penetrates into the wood and dries.
If the frames are to be painted, then the next step is to apply paint on top of the drying oil on the openings of the frames, which should also dry well.
After this, it is applied to the opening folds using rubber spatula a uniform layer, 2.5 ÷ 3 mm thick, putty. This will prevent water from getting between the glass and the frame.

Then the glass, prepared to size, is installed in the frame opening, on a soft, uncured putty, and gently presses himself against her.
Next, another layer of putty is applied to the inside of the glass, and a glazing bead is installed on it, which is nailed very carefully with nails. The nails are installed on the bead vertically or horizontally, since if they are driven in at an angle, the glass can easily be damaged.

You can do without putty by using a silicone tube in its place, which is cut On the one side along the entire length and put on the edges of the glass.
Another option for installing glass in a frame is to fix it only on putty, which is applied under the glass, and then on it in a fairly thick layer, and carefully leveled.
 Sometimes they do without glazing beads - just a layer of putty
 From modern materials To seal the gaps between the frame and the glass, a sealant is used. Many are afraid that it will stick tightly to the glass, and if necessary, it will be difficult to remove it from the opening. To prevent this from happening, lubricate the glass along the edge with soapy water or liquid soap, and after that they adhere to the sealant and fix it with glazing bead, which is also nailed down with nails.
By following the recommendations and knowing some secrets, you can glaze the balcony yourself without any problems. At the same time, the biggest difficulty remains the factor of working at height - this is very important to take into account. If you have absolutely no skills in working with tools and building materials, it is recommended to entrust this process to professional craftsmen. Moreover, today some companies producing Euro-frames provide free installation when ordering their products.
Video: the work of professionals on glazing and insulating balconies
Proper glazing of a balcony with your own hands will not only provide your home with additional thermal insulation and sound insulation characteristics. But thanks to the fact that the balcony will be glazed correctly, corresponding to all its main characteristics, you will also have an additional, albeit small area. She can serve you extra space for personal recreation or a place to store things (warehouse).
Most companies offer their own services for glazing balconies and loggias, most of them are those that manufacture plastic pvc structures with their further installation. But many people think that the company’s services are expensive, so you can read the presented article and do full balcony glazing yourself.
To glaze a balcony, a permit is required, which must be agreed with the relevant authorities, they must also give you permission and indicate the characteristics of the house and review your balcony slab. If you do not complete this procedure completely, your balcony will be considered illegal. But before glazing the balcony,...
Do-it-yourself glazing of balconies and loggias
Each type of balcony glazing presents its own special category of complexity and requires certain skills, due to which certain difficulties may arise. Depending on the type of glazing you choose for your balcony, you will need to adapt to its structure and do it in a certain sequence. Thanks to the presented article, you will be able to fully overcome all the difficulties and take into account all the factors that you will need to glaze your balcony or loggia yourself. First, you should familiarize yourself with a small diagram of the arrangement of glazing elements:

Measurements and ordering of designs
After you have chosen which profile your balcony or loggia will be made from, you need to order the structure from the manufacturer. But, to do this, you must first take all measurements from your balcony and perform the appropriate calculations. To do this it is necessary to make complete dismantling old glazing, if available. The previous glazing must be completely removed. You need to remove all the frames and all the fastenings until you go through the entire area from the ceiling to the parapet.
The next step will be taking measurements from the resulting balcony after cleaning. To do this, you need to use a tape measure to accurately measure all the distances from the base of the parapet to ceiling slab, and then, from one wall to another.
All measurements must be as accurate as possible, because sometimes this can lead to huge problems. Initially, this will not have any effect and will not be noticeable, but during direct installation, even a few millimeters can ruin the installation and cause a huge amount of damage. various problems. It is worth noting the fact that when placing an order with a company, people are not completely trusted and they send their own measurer to check the correctness of the measurements.

In addition to the fact that the person sent from the company will independently take all the measurements again, he will also look at the general picture of the balcony. Further, he may say that your loggia does not meet all standards. This may be due to the fact that the parapet has been standing for quite a long time and may not support the entire weight plastic construction.
In the presented case, you can fix this problem, fake the parapet to the desired condition, or even pour a new parapet. Another option is to install not a plastic structure, but an aluminum one, which is much lighter.
There is an option where the balcony slab cannot support the weight of the structure. It will be quite difficult to correct this issue, but it is still possible with the help of additional reinforcement of the floor covering.

In order for the company’s expert to make a final decision, he needs to take all the dimensions from your balcony and carry out the appropriate calculations.
If everything is fine and your balcony is completely ready for full glazing. You and a company employee draw up an order for the structure, calculating its approximate cost.
Preparatory work
After the specialist has made his satisfactory decision, you need to move on to the stage of preparing the premises for further reconstruction. First, you need to completely check the parapet and find out the presence of all the cracks on it, even very small ones. Next, you should purchase galvanized metal and completely seal them.
You need to clearly measure the gap, cut the required piece from the galvanized sheet and seal the crack. It will need to be inserted from the outside under the railing, and then finally secured using self-tapping screws. This process is quite difficult to complete on your own, so you will need a little help.
If your parapet is not approved by a specialist, then you need to build a new one. To do this, you need to completely demolish the old parapet and build a new one from scratch. A standard parapet is laid out one brick wide. Its installation takes place on a sand-cement mortar, one by one.

During the construction of the parapet, you need to constantly monitor its level, because in the end, you should get a completely horizontal structure. The clearly horizontal design will help you easily install the glazing.
After completing the manufacture of the parapet, you need to purchase metal strip, or a corner with a section of 5 mm. One of the selected materials will serve as a frame to which the structure frame will be attached.
The manufactured frame, using dowels and self-tapping screws, is attached along the entire perimeter of the balcony opening.
Additional preparation for glazing installation
So, let's proceed to the actual installation of the glazing of your balcony with your own hands.
- The company has delivered a manufactured structure to you and your balcony is fully prepared for installation.
- First, you need to remove the glass units from the frame. This process is quite important before installation, because the weight of the complete structure is quite large, and it will complicate the installation process.
- Usually, in companies that manufacture double-glazed windows, initially, the glazing beads are not hammered in completely; this is done to easily detach the double-glazed windows from the frame.
- To remove a double-glazed window, you need to pry off the beads that hold it in place with a spatula, and then remove them. It is necessary to pry starting from the middle and moving to the edges. This must be done in the following order, first the side beads, then the bottom, and lastly the top. Next, hold the glass and carefully remove it.
- Removed double-glazed windows must be placed on a clean and level floor, free of debris and other things.
- Next, you need to remove the sashes from the frame. There is a rod in the upper loop that must be pushed down and then pulled out completely using pliers or pliers.
- Next, you need to remove the sashes from the frame. To do this, you need to remove the latch, which is located in the upper hinge of the sash. After which the sash itself should be slightly tilted towards itself, then lifted and removed from the lower hinge.

Frame installation
- The frame comes with a stand profile that needs to be installed. It is a plastic strip that should be attached to the bottom of the structure. Turn over the already lightweight frame and, using a mallet, insert the bar into the grooves. Turn the frame over to its standard position.
- Now it’s time to install the frame fastenings. From each edge of the window frame you need to retreat 15 centimeters on each side and secure the plate tightly in this place. A special hole must be drilled for each fastener. The part of the fastening that will protrude must be bent at a right angle; this part will be attached to the concrete surface.
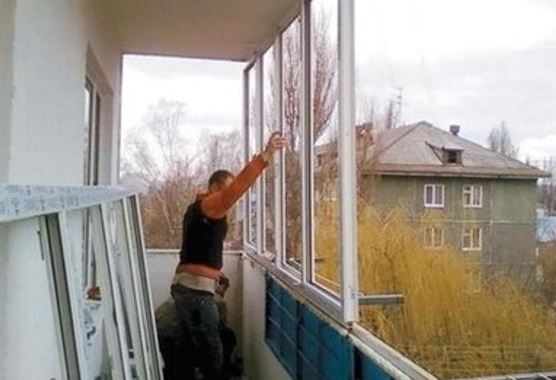
- Installing a frame in a window opening. This stage requires additional help and is almost impossible to complete on your own. It is advisable to have three people. The three of us install the frame in the designated place, after which it must be completely leveled in both vertical and horizontal positions.
- After complete alignment, using wooden stands, we fix the frame in its place.
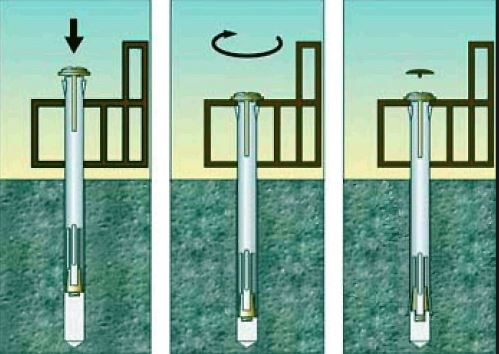
- We attach the frame to the parapet. This must be done using anchors, which will need to be driven into brick or concrete at least 6 centimeters.
 Frame fastenings when installing glazing
  Installing a frame in a window opening
Installation of ebb tides
After the frame is installed, there are only a few details left that are also important to consider:
- Once the frame is completely secured in place, you need to install the canopy. It will serve as a drainage basin. Installation should take place in the upper, outer part, installation is carried out using self-tapping screws.
- The cracks are being blown in. This is done using polyurethane foam.
- Insulating glass is installed into the installed and secured frame.
- Next, installation is carried out on the hinges of the tilt and turn sashes.
- We secure the folding mechanism to the sash and frame.
- The last stage is a complete check of the tightness of the fit and full operation of the valves.
 Installation of ebb tides
  Installation of low tide on upper floors
 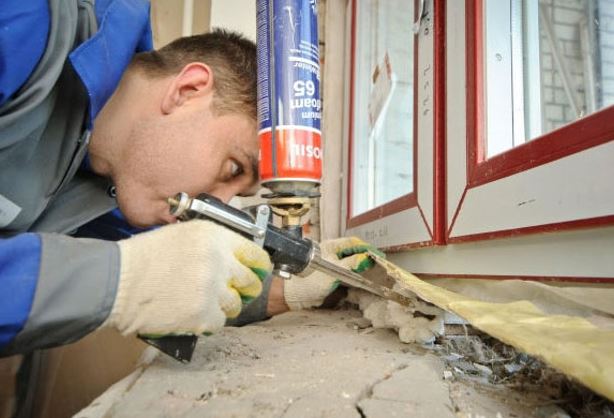 Sealing cracks with foam
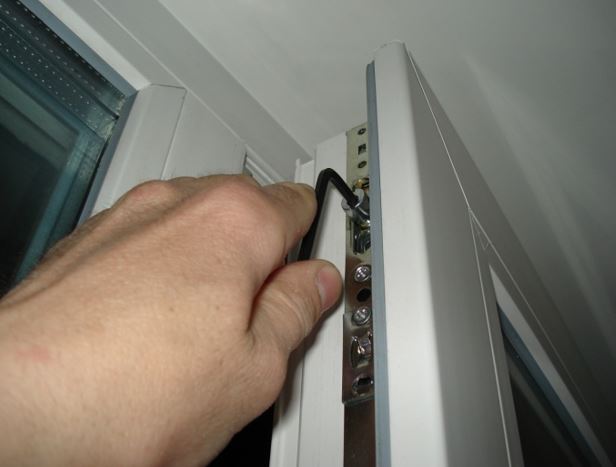
If the doors move with extra effort or are difficult to open/close, then they need to be adjusted as in the photo.
Self-installation of PVC structures for balcony glazing
This process is quite simple, although they charge a lot of money for its work, which is why we recommend that you install the windows yourself. This will not only save your finances, but will also help you buy additional accessories or something else altogether. The company you contact to order windows will have to send you a measurer who will independently take all the dimensions and transfer them to the company so that the direct craftsmen can make you a window structure. After the order is completed and delivered to your home, the immediate work begins related to the full, independent, and most importantly correct glazing of your balcony or loggia.
Full PVC installation window design is described above, only a few can be noted here individual characteristics and interesting points when installing a window structure from PVC profiles with your own hands.
Glazing of a loggia using an aluminum profile
Glazing using an aluminum profile is not a more complicated installation system compared to plastic, but each has its own nuances. By giving preference to the presented type of profile, you can also easily perform a full and complete correct installation, saving the same money that can be used for other items of clothing and the like. So, let's get started, all the work coincides with the general glazing options except:
- If your parapet is initially made in the form of standard metal handrails, then you will need to install an “apron” on top, preferably made of galvanized steel. If a concrete barrier is installed, no additional actions are required. The profile will be installed directly on it.
- For a complete correct installation frames, you first need to install anchor plates. Next, the structure is secured using special anchor bolts. You need to pay special attention to this point, because it differs from installing a plastic profile.

After all the above steps have been completed, the doors should slide apart smoothly and not create noise when closing. If these factors are normal, then you have done everything correctly and can continue to arrange your loggia (balcony).
Wooden window structures
In order to glaze a balcony or loggia yourself with wooden window structures, you will need some carpentry skills. If you understand this, then this installation option will not only be easier, but also cheaper. To install wood yourself window designs, you need to assemble the sashes correctly and as accurately as possible.
For a carpenter, this will not take much time and high costs. He will be able to assemble the sashes himself using timber, ordinary glass with a thickness of 4 millimeters and glazing beads. But if this talent is not present, then you will have to order the presented product from a separate workshop. And only then begin the glazing of the balcony.
An important point, also, sch
There is also the fact that a large structure can “sail” a little. No matter how beautiful and attractive a large or wide space looks, you should never forget that if you do not pay due attention to its features, serious problems may arise.
Glazing of a balcony using a wooden profile
- Using metal mounting plates and using self-tapping screws, you need to completely install the structure frame and secure it.
- All fittings are fully adjusted and checked.
Enough for a long time for glazing in Khrushchev-era houses, this was the only possible option. Such designs do not look very prestigious, and the neighbors will not envy him.

But even this glazing option allows you to protect your balcony or loggia from unwanted dust and dirt, water and falling leaves, and much more. And in the housing itself, the temperature will rise by several degrees, due to which heating costs will be reduced.
Frameless window designs
The presented type of glazing looks as impressive as possible and is very beautiful. But in order to do it, appropriate efforts are needed. Also, it is important to take into account the fact that this option is not the safest, especially in those moments when children are playing on the balcony. Since the windows will be full height, it is often suggested to make or purchase additional removable design, for example, a meter high. At such moments, as indicated above, you can install it and no longer worry about further actions children. Typically, this design is made of metal pipes with a small diameter.

Another point that is worth paying attention to when glazing a balcony is that not only from the apartment you will be able to see as much as possible everything that happens on the street. But even from there one can see one’s entire personal life. All housing will be especially visible in the evening when the lights are on. In order to avoid the “reality show” effect at home, there are several options:
- You can consider a separate system of curtains and blinds. This option is quite common, but it is worth considering the fact that blinds will become quite an expensive pleasure. And when choosing a fabric, it should be completely opaque, even in the light.
- The second, more popular solution this issue, the choice of design with glass of one-sided transparency appears. In the summer, they will be as beautiful and efficient as possible, but in other seasons, they will be a little dim and there will not be enough light. As another small variation, we can say that such glasses are combined with ordinary ones, that is, you can make some single-sided and some ordinary double-glazed windows.
Interesting facts about frameless glazing
When considering frameless glazing, more high floors, and without being nearby standing houses, the above incidents do not occur. An important point is the fact that installing frameless glazing will require demolition of the parapet. This small factor can have a unique impact on the overall structure of the house, so it is advisable to contact the appropriate service and find out all the details.

Beauty is beauty, but it is worth paying a lot of attention to the insulation of this balcony, because the glass itself will not be able to protect the home as much as possible from the winter cold. An unpleasant moment may also be that the balcony goes directly to another house or to a nearby factory.
The aluminum panoramic profile does not have high thermal insulation characteristics, due to which it is also worth thinking about before choosing it.
Features of glazing with and without extension
You should also consider some features of installing remote glazing along with standard glazing. Of course, there are not many of them, but you should know them..
- Primarily for carrying out glazing with removal, especially when working in houses old building The parapet will need to be reinforced, since this type of glazing has a slightly greater load than standard options.
- In addition, we further suggest looking at the diagram of the remote version of the balcony, to understand some of the differences in the structure compared to conventional balconies.
- In addition, it can be noted that here you will need additional arrangement of a larger and more durable visor.

Conclusion
Glazing a balcony yourself is not a difficult task. With its help, you can save your finances well and buy something else. Now, having studied the installation of each of the various structures, you can easily glaze the balcony yourself. We also suggest watching a short video tutorial on how to glaze a balcony yourself:
A couple of years ago I decided to glaze my balcony. I wanted to give it a cozy look, put an armchair and a coffee table. But without glazing this was impossible. I decided right away that I would carry out all the installation work myself, because I have little experience, and glazing a balcony with my own hands is a labor-intensive process, but quite realistic.
Just a couple of decades ago, all apartments had only wooden windows, but nowadays in the modern world there are several options for glazing residential premises. They have different characteristics, composition, and each has its own pricing policy. Therefore, everyone can choose the most suitable option.
DIY balcony glazing
Choosing material
Since I wanted to give my balcony a cozy feel, the main task for me was thermal insulation. Therefore, I immediately chose the “warm” glazing option. But I’ll write more precisely about each one.
So, there are three types of glazing for balconies:
- Cold - does not retain heat in the room, used for glazing balconies where maintaining room temperature is not required
- Warm – maintains room temperature at any time of the year, does not allow cold to pass through. It differs from the cold look in the set of materials used and their characteristics.
- French - the balcony is glazed along the entire perimeter and height. High-strength and tinted glass is used

French glazing of the balcony using transparent mirror windows.
All that remained was to choose the glazing option for your balcony.
The most popular option today is glazing with PVC windows, but there are also:
- Aluminum profile
- Wooden windows

Aluminum profile glazing refers to cold balconies
The option of glazing with an aluminum profile immediately became impossible for me. This type of glazing refers to cold balconies. The material is not thermal insulating - it is used on those balconies that do not need to maintain room temperature. The aluminum profile serves to protect the room from wind, rain and snow.
However, this form also has its advantages:
- Low weight of materials used
- Low cost
- Parallel sliding sashes

Balcony glazing - wooden frames
Wooden windows are made from two types of materials. If homogeneous wood is used, then the cost of windows is relatively low. If the material is laminated veneer lumber, then the price automatically increases and is already on average 60-80% higher than the cost of similar PVC windows.
For me, the option with wooden windows was not suitable due to the price. Although this is beautiful, the financial side of the issue interested me no less. My choice settled on PVC windows. Good price/quality ratio, warmth and sound insulation properties have brought this material to the forefront in demand.
Siding
In addition to glazing the balcony, I was interested in the option of external cladding of the balcony. And for this I chose siding. This material is the most optimal, it is durable, consists of PVC and is not afraid of sunlight and precipitation. In addition, it enhances thermal insulation on the balcony. The siding has a wide range of colors, and the manufacturer claims a service life of no less than 50 years.

DIY balcony siding
Advice! For those who decide to carry out all the work on glazing the balcony themselves, you need to know that it is better to complete the outer cladding of the balcony before glazing. This will save time and money. After all, after glazing the balcony, it is not so convenient to carry out external cladding, and calling craftsmen who will do all the work with the help of climbing equipment will cost a lot of money.
It is quite possible to do siding work yourself, but only if you are confident in your abilities and have skills in such work.
Otherwise, it is better to entrust all work on covering balconies with siding in apartments to qualified specialists who have professional equipment.

Finishing the balcony with siding
I have described the sheathing instructions below:
- First you need to build fastening belts from wooden beams - upper and lower. In the future, siding will be attached to them
- We attach the beams to the wall using liquid nails. They are connected to each other using iron corners
- Let's start installing the siding - you should start from the sides. We do not overtighten the screws; they should be left in the middle of the hole.
- Upon completion of the siding installation, we hide all the screw heads using platbands

Balcony siding
Balcony glazing
After all the work on the outer cladding of the balcony was completed, I proceeded directly to glazing my balcony.
Next, I will write step-by-step instructions with which everyone can try to glaze a balcony with their own hands.
Advice! Start the glazing by installing the canopy - then you won’t have to guess where to attach this canopy so that it doesn’t fall off with the first strong wind. It will be enough to screw it to the ceiling using dowel nails.

Glazing of balconies with plastic windows
- Before purchasing windows, you need to find out what size they are needed. To do this, use a tape measure to measure the length of the parapet to the ceiling and from wall to wall. You need to know if there is a distortion on the parapet - a level will help with this. By the way, many companies selling glazing send their own specialist who takes his measurements. This is very convenient and minimizes the possibility of incorrect calculations. I took the measurements myself, leaving a gap of 1.5-2 cm in both directions; for those who are not sure that the diagonals are even, you can leave about 1.5-3 cm. In any case, it will all be blown away with foam.
- Next, we remove the double-glazed windows from the windows; this is not required for opening sashes. There are a couple of reasons for this action - firstly, together with double-glazed windows, the windows are very heavy, and secondly, there is a possibility of damaging the glass during installation.
- Afterwards we fix the stand profile. Turn the frame over and insert the profile into the grooves. Then we turn the frame back over. Doing everything will be convenient and simple; the frame without glass is very light.
- We set the fastenings for the frame at a distance of 15 cm from each edge. We hammer the fixing plate into the grooves with a hammer, then turn it 90 degrees to secure it to the concrete wall.
- The next step is to install the frame in the opening. A friend helped me with this. Using a level, we leveled the frame and secured it in the opening with self-tapping screws. There is no need to drive them in - you just need to screw them in.
- Afterwards, all frames are inserted according to the same principle, using a level and self-tapping screws.
- Once all the frames were in place, I secured them to the parapet, ceiling and walls using anchors. I deepened them by about 60 mm.
- All that remains is to cover all the cracks. For this, polyurethane foam is used.
- That's all there is left - we insert the double-glazed window into the frame and return the flaps to their place. It is enough to hang them back on the hinges and check the functionality of all mechanisms.

Installation of low tide and window sill on the balcony
Finally, I installed a drip sill on the outside of the balcony and installed a window sill on the inside.
Although I spent quite a lot of time completing all the work, and then cleaning the entire room from construction dirt, I was satisfied. Self-glazing of the balcony allows you to save a decent amount of money. In addition, I gained valuable experience and new skills in construction work, and the external cladding of the balcony with siding is doubly pleasing. Now the balcony looks perfect from the outside and this is due not only to the siding manufacturer, but also to me.
 Technologies and types of exterior cladding for balconies