We build a tent at the dacha with our own hands. Tents with mosquito net Tent 6x3 rectangular green assembly diagram

Read also
In the summer, it is impossible to live in a dacha without a gazebo or a tent. But since it takes quite a long time to build a gazebo, you can stop at building a convenient collapsible tent. It can be made from a variety of available materials in a few days. In summer, it will provide excellent protection from the sun if you decide to have a family picnic outside. And for the rest of the year, you can simply assemble it and store it in the garage, closet or pantry. You can easily make a tent with your own hands at minimal cost.
Tent: design, functions, advantages
A tent is a mobile outdoor structure that protects from rain and hot sun. Basically, the frame of this structure is made of aluminum, profiled metal or plastic pipe covered with waterproof material.
Open tent for a summer residence with gable roof will be a great place to relax
The functional features of the tent depend on the type of material from which it is constructed.
The design with light shade fabric is designed to protect vacationers from the hot sun, and the frame with a water-repellent coating will protect from heavy rain. Sometimes you can see tents with a polyethylene cover, but such material has a short service life, does not allow air to pass through, and therefore it will be very hot inside the structure in the summer. Also popular are models with mosquito net
, which is used as a covering material for walls.
A collapsible country tent with a mosquito net will protect you from both heat and mosquitoes
- Depending on the size and purpose of the tent, there are:
- stationary or collapsible;
- made in the form of a gazebo, awning or tent;
have 4,6,8 or 10 faces forming a square, hexagonal or rounded polyhedral design.
Regardless of the type of tent, it must have at least three protective “walls” made of thick fabric.
To protect against flies and mosquitoes, a mosquito net is hung on the front of the tent.
Advantages of the tent:
- ease of construction;
- ease of assembly;
- affordability;
- mobility;
- large area of protection from sun and wind;
- ease of disassembly and storage;
- wide range of colors;
- large selection of materials for manufacturing.
Types of tents
Eat different types tents that can be installed on a summer cottage:
- The awning is a compact and lightweight structure that stands on four supports.
A tent-awning for a summer residence is simple design
- The gazebo tent is a fairly popular type of structure that can have different quantity walls There are many additional convenient elements, such as windows, partitions, mosquito nets. Such a tent can be used even in the cold season if you remove the light summer nets and replace them with blank walls.
A gazebo tent for a summer residence can be used in winter
- A tourist tent is designed to protect people on a hike from rain and sun. Typically, this model is equipped with wind braces.
You can take a tourist tent for hiking with you
- The pavilion tent is the most spacious and capacious structure that can be used to accommodate large quantity people and even for various events (weddings, birthdays, children's parties in nature).
Tent pavilion suitable for celebrations
There are certain rules for choosing a design depending on your needs and capabilities:

Photo gallery: types of tents
 A hexagonal tent for a summer residence can be open or closed
  A tent for a summer residence with two walls is suitable for a large company
  A lightweight wooden tent for a summer residence is as open as possible
  A summer cottage tent with a mosquito net as walls will protect against mosquitoes
  Closed tent made of light fabric won't let you get burned
  Open arched tent made of plastic pipes has an unusual shape
  An open collapsible tent on a metal frame is very mobile
  You can always take a folding accordion tent for your dacha with you
What is better - a tent or a gazebo?
Many summer residents often have a question - what better gazebo or a tent? The fact is that both designs have their positive and negative sides, as well as their similarities and differences. Let's see what characteristics tents and gazebos have, and which option is better to choose for your personal plot.
Table: Comparative characteristics gazebos and tents
| Alcove | Tent |
| Can only be stationary or portable | Can be collapsible or stationary |
| Requires foundation installation or pouring | Can be assembled and installed on open ground without base |
| Has a high degree of strength and reliability | At strong wind the collapsible structure can “fly away” |
| Can be used at any time of the year | Designed only for warm seasons |
| Only durable building materials are used for walls and roofing (wood, metal, tiles, slate, metal tiles, chipboard, fiberboard) | Light but durable fabrics are used for walls and roofing (tarpaulin, synthetic fibers from polyester, polyethylene coverings, etc.) |
| You can build a structure of any shape | Can have any shape |
| Impossibility of transportation | Collapsible design can be transported in a car |
| Construction takes several days | Quick installation (several hours) |
Preparing to build a tent
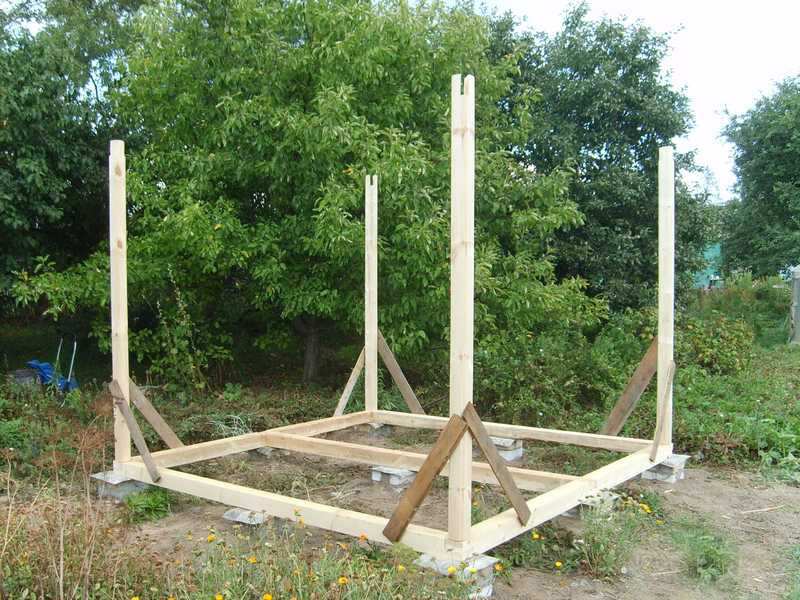
Before you begin building a tent, you must take all measurements and draw up simple drawing with their instructions. The simplest design is a stationary product made of wooden beams.
The drawing of the frame of a wooden tent must contain all dimensions
When installing wooden supports for a stationary tent, you must take into account that it will stand under open air during the whole year. Therefore, the material for the frame must be durable, high quality and reliable.
For support posts, you can take rounded or laminated timber, as well as pine or spruce boards, since they are least susceptible to rotting.
Less commonly used are boards made of oak, larch or fir, since these are expensive lumber for such a lightweight structure.
Wooden beams are ideal for a tent frame

As covering material for a tent you can take:
- Tent fabric has different subtypes: Oxford. Waterproof material made of polyurethane or PVC (polyvinyl chloride). This is a durable and elastic nylon fabric that has high degree
resistance to temperature changes. Disadvantages: highly electrified and has a low degree of fire resistance.
- Oxford tent fabric for tent is durable and elastic Taffeta. Fabric made from polyester or nylon with a special structure. Polyurethane or polyvinyl chloride is applied to the base material. Advantages: resistance to aggressive chemical environments, repulsion of fatty substances. Nylon fabric has a high degree of waterproofness, strength and wear resistance. Disadvantages: electrified and practically non-hygroscopic. Polyester fabric does not stretch, has excellent air permeability, dries quickly, but is not strong enough for a stationary tent.
Taffeta tent fabric for tent covering is not suitable for stationary structure
- Teflon with cotton. This is a thin fabric consisting of two layers (top cotton and bottom Teflon). Most suitable for making lungs summer coverings for tents and other country houses.
Tent fabric Teflon with cotton for tent is very light
Video: tent drawing
Calculation of the required amount of material: tools for work
To build a simple tent with wooden frame you will need:
- timber - 2.4 and 2.7 m (diameter 5x5 cm);
- wooden boards - thickness 3–4 cm;
- durable material for walls and roof;
- metal corners;
- building level;
- nylon thread for marking;
- brace or shovel;
- self-tapping screws and electric screwdriver;
- sand, cement and crushed stone.
Step-by-step instructions for building a country tent with a mosquito net
After careful preparation When making a tent, you can begin the process itself. It consists of several steps:
- Choose a place to build a tent. Remove excess vegetation, stones and debris from the area. Mark points for supports and tighten the construction thread. After making sure that all corners are level, start digging holes using a brace or shovel to a depth of about 50 cm for the supports of the future tent.
Drilling holes for supports can be done with a special device
- All wooden elements Before installation, prime and allow to dry completely. Then install them in the corners of the dug holes and compact them well with earth. You can concrete them, and then the structure will be more stable.
Wooden supports for the tent frame must be concreted
- In order for the tent roof to be pitched, you need to make two supports on one side 20 or 30 cm higher than on the other.
- Fix horizontal transverse boards between the supports at the top and bottom for the strapping device. It is also necessary to place on top of the crossbars wooden sheathing so that the fabric does not sag.
Tent with pitched roof building is not as difficult as it seems
- The floor (base) of the tent can be made of wood by nailing boards to bottom harness or lay it out with paving slabs, stone, fine crushed stone, or purchase a natural or artificial lawn.
Paving slabs can be used as a base for a tent
- The wooden frame of the tent must be impregnated with antiseptic, antibacterial and antifungal agents, and then painted oil paint or water-repellent varnish. This is necessary so that the structure lasts as long as possible, standing outside in the rain, snow and scorching rays of the sun.
The frame of a stationary country tent is made of wood
- Then you just need to sew from the selected fabric side walls and roof covering. Since the tent will be used to a greater extent in the summer, it is better to sew fabrics from mosquito net. It will allow air to pass through perfectly and will not allow mosquitoes and flies to enter the tent.
An open wooden tent can be decorated with light fabric
Preparing the foundation for the construction of a tent at the dacha
The base for the tent can be anything depending on the type of structure, its weight and other characteristics. There are certain rules:

How and with what to secure the tent on different surfaces
Depending on the type of tent and frame material, there are several ways to attach the structure:
- A tent with wooden supports can be installed on the ground in several ways: by concreting the posts, on a columnar or strip foundation, on a base of similar material. You can also simply bury the racks in the ground, which is well compacted.
- The metal frame supports can be driven deep into the ground. The tent will be durable and stable due to its lightweight construction.
- If you plan to install the structure on an asphalt surface, then special “heels” can be welded to the legs of the metal frame, which will serve as additional supports. You can also install a tent on paving slabs, stone surface, etc. For more reliable fastening heels can be nailed with special dowels or anchors to the asphalt surface.
Video: how to assemble a pavilion tent
The tent is a light and comfortable design, so it will be simply indispensable for a summer residence during summer holiday. It can be installed in literally a few minutes, so it will not take up much space in a small summer cottage. After rest, the structure is quickly assembled and put away in the pantry. You can take a tent on a metal frame with you to a river or lake, on a hike or a long trip. And if you build it at your dacha and install comfortable furniture, as well as a barbecue or grill, you can have a great time with your friends and acquaintances.
It seems that on a hot summer day it is almost impossible to hide from the omnipresent heat. Sometimes it seems as if the heat is poured into the air in the form of an invisible mass that envelops your entire body. And only in the evening, when the coolness descends to the ground, a person seems to get a second wind.
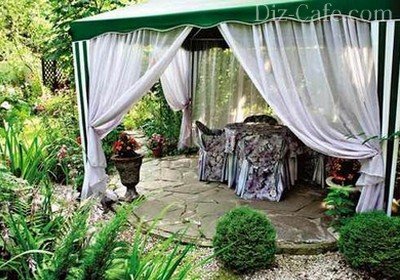
In the evening, it’s time for the whole family to gather around the table on the terrace to drink tea with herbs or chat in the gazebo.
But if on your suburban area there are no such structures, then it would be worth thinking about alternative. Lovers country holiday in the shade you will certainly appreciate structures such as garden tents, which are the most convenient and incredibly mobile devices.
What is a tent and why is it needed?

If you compare a structure such as a tent or awning in the garden with a full-fledged one, then it will not be difficult to identify the following advantages of such structures:
- Light weight;
- Low price;
- Ease and simplicity of installation;
- Minimum necessary measures on maintenance;
- Mobility;
- Large area protected from direct sun rays;
- Reliable shelter that protects from sun and wind;
Note!
If a tent with a mosquito net is installed on your site, then in its shade you can also hide from annoying insects.
- Easy to store when folded;
- Large range of tint solutions;
- Big choice building materials and textures.
Why do you need a tent? Any summer resident will calculate the answer to this question obvious - to relax in comfort. Under its dome can be located big company for dinner and simple get-togethers with a guitar; in addition, a tent can be a great place to organize a romantic dinner for two people.
Types of tents
According to the configuration, products of this type are divided into the following types:
- With open walls;
- With closed walls.
The simplest model is a structure consisting of the following parts:
- Dome;
- Supports holding the dome - 4 pieces;
Note!
Of such a type open gazebo very convenient for use in spring and autumn, when people sitting in the gazebo will not be disturbed by either intense heat or insects.
Such structures are usually located near, which is most protected from drafts.
During the hot season, a garden tent with closed walls is simply irreplaceable. By drawing the drapery, the vacationer will be able to protect himself from insects, sharp gusts of wind and scorching summer sun rays. In this case, the air circulation inside the structure will not be disrupted, and if you want, you can open one or all walls at once at any time.
Based on the material from which a tent can be made, it is easy to distinguish the following types:

- Wooden. The main advantages of such structures include environmental friendliness, comfort and versatility. You can make a gazebo on a wooden frame with your own hands, and it will be easy to disassemble, which is very important for wintering a tent;
- Brick. Perfect for a country style landscape. Tents with a frame made of bricks are used by many as summer kitchen. Under the dome of such a structure, you can install a barbecue and long benches, thereby setting up a home pub, and young people will like to organize, for example, hookah parties in such a place;
Note!
Construction brick gazebos- the matter is quite troublesome, since the structure must be capital, but the result will certainly be worth the money and time spent.
- Metal. The metal frame is quite strong and reliable. Of course, making such a tent with your own hands is quite difficult for people who do not have the proper experience and skill. But the final result will last a long time.

The photo shows metal structures
Making a tent yourself
The instructions for making a home tent consist of many steps, but the main thing is this process, choose the right place.
Installation location
Regardless of what type of tent will be installed on the territory, it must be an independent element of the landscape and fit harmoniously into the overall design.
- If the dome is decorated with flowers, then the tent can be placed between flower beds or on a small lawn next to the house;
- The installation surface must be flat, free of debris, stones, weeds and large roots;
- If the structure is permanent, then you should take care of the foundation and flooring in advance.
Construction
The simplest option may be wooden structure, the construction of which we will consider.
In order to build a tent we will need boards and beams, as well as thick fabric for dome and walls:
- Markings are being made on the territory. To begin with, 4 recesses 0.5 m deep are dug, which will be the corners of the future structure;
- We prime and paint the wooden blanks, allowing each layer to dry thoroughly. We install beams in the corners and compact them with earth;
- We install cross members between the supports. If you plan to make a dome from polycarbonate, then the rafters should be laid on top of the crossbars:
Note!
In order for precipitation to drain from the surface, the roof must be slightly inclined.
To do this, on one side the supports must be at least 20 cm shorter.
- It is necessary to sew a dome and curtains from fabric, which will act as walls, or we can lay polycarbonate on top of the roof.
- We fix the dome on the frame.
That's all, stylish decoration for landscape and a nice place rest is ready.
Note!
A country tent does not require special care. A simple rain is enough to wash away the dust and the sun to dry the remaining moisture.
Side curtains can simply be washed when they become dirty.
Finally

A tent on a country plot is not only convenient, but also incredibly beautiful. Each owner can decorate such a structure as he sees fit, and constructing the frame will not pose any particular difficulties even for an inexperienced craftsman.
The video in this article can serve as a visual aid for constructing a country vacation spot.


Instructions
on assembly
on 5 sheets, for: Trade tent 1.5x1.5, Trade tent 1.9x1.9, Trade tent 2.5x1.9, Trade tent 3.0x1.9
https://pandia.ru/text/78/151/images/image004_33.jpg" width="458" height="684 src="> Trade tent 1.9x1.9
6. Designed for outdoor trading
7. dimensions: -1900x1900x1900x2210mm
8. Weight, kg: - 15
9. Assembly time (2 people): - 5 minutes
10. The awning is made of synthetic fabric with waterproof impregnation.
Assembly order
6. Assemble the tent frame, starting from the base, pos. 5,6,7,8
according to the attached diagram.
7. Install vertical racks pos. 7,8
8. Assemble the roof, pos. 1,2,3,4,9
9. Throw the awning and secure it with ties.
10. Disassemble in reverse order.
awning to frame
with strong gusts of wind.
Trade tent 2.5x1.9
 |
11. Designed for outdoor trading
12. Dimensions: - 2500x1900x1900x2330mm
13. Weight, kg: - 17
14. Assembly time (2 people): - 5 minutes
15. The awning is made of synthetic fabric with waterproof impregnation.
Assembly order
11. Assemble the tent frame, starting from the base, pos. 5,6,7,8
according to the attached diagram.
12. Install vertical posts pos. 7,8
13. Assemble the roof, pos. 1,2,3,4,9 on the floor and install it in place assembled.
14. Throw the awning and secure it with ties.
15. Disassemble in reverse order.
Required operating conditions:
Implement correct assembly frame
Pull the awning and check the fastening of all elements
awning to frame
Do not light a fire inside or in the immediate vicinity of
with strong gusts of wind.
 Trade tent 3.0x1.9
16. Designed for outdoor trading
17. Dimensions: - 3000x1900x1900x2490mm
18. Weight, kg: - 18,5
19. Assembly time (2 people): - 5 minutes
20. The awning is made of synthetic fabric with waterproof impregnation.
Assembly order
16. Assemble the tent frame, starting from the base, pos. 5,6,7,8,10
according to the attached diagram.
17. Install vertical posts pos. 7,8
18. Assemble the roof, pos. 1,2,3,4,9,11 on the floor and install it in place assembled.
19. Throw the awning and secure it with ties.
20. Disassemble in reverse order.
Required operating conditions:
Correctly assemble the frame
Pull the awning and check the fastening of all elements
awning to frame
Do not light a fire inside or in the immediate vicinity of
with strong gusts of wind.
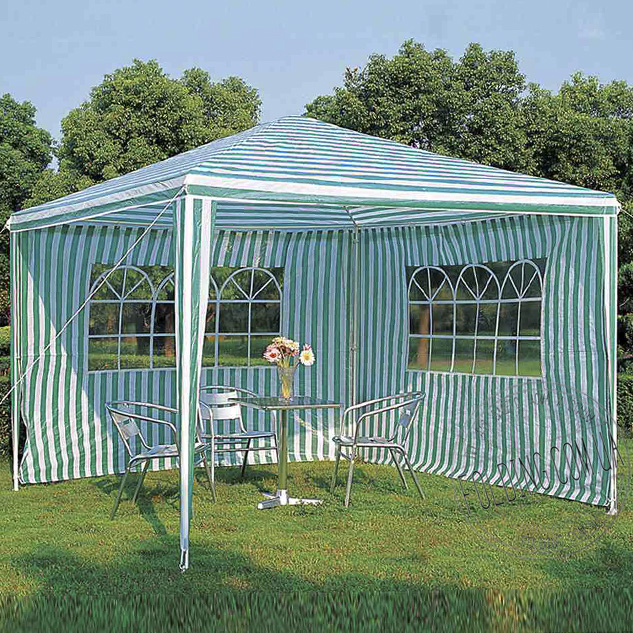
Not every owner country house has the opportunity to build a gazebo on the site, in which it is pleasant to spend time enjoying your vacation. A summer cottage tent is an excellent alternative to a traditional gazebo. Convenient design, which will protect owners and guests on a hot afternoon from scorching sun rays or on a cloudy day from raindrops, can be purchased at a gardening center. However, for such pleasure you will have to pay a decent amount. Therefore, it makes sense to try to build a tent for a summer residence with your own hands, which will organically fit into the existing architectural ensemble.
The main purpose of a summer cottage awning is to provide additional comfort for relaxing on fresh air, be it a noisy pastime with a group of friends or a relaxing holiday alone with nature. And the main advantage of the awning is that it can be moved to any location at any time without much hassle. comfortable spot, placing it near a pond or installing it on the lawn in the garden. The tent is quick to set up and easy to clean. A lightweight collapsible design You can even take it with you anywhere in your car.
Depending on the size of the tent and the main purpose of the structure, it can be: stationary or folding, in the form of a spacious gazebo or a more compact tent. Tents can have 4, 6 or even 10 sides, forming square or rounded multifaceted structures.
Garden tents and awnings – universal designs, under the arches of which one can easily accommodate the whole company or large family

The variety of models available is extensive, starting with simple options tents in the form of pieces of fabric stretched between trees, and ending with real “sultan” tents
Regardless of the model, a mandatory design detail is the presence of protective “walls” on three sides of the tent. They are made of fabric material. The front wall of the tent is covered with a transparent mosquito net, protecting against annoying flies, wasps and mosquitoes.
When planning to set up a garden tent or awning, you must first decide on the location of the future structure.
The best option for placing a country tent is an open, flat area in the garden or directly next to the house against the backdrop of an elegant flower garden.
The area on which the tent is supposed to be installed must be cleared of plants and roots, debris and stones. The surface should be leveled as much as possible and, if necessary, compacted. When planning to build a simple lightweight structure, it is enough to mark the area and prepare recesses for placing support posts.
When arranging a stationary structure, you will need to build a foundation and lay out the flooring. To do this, remove a 10 cm layer of soil from the intended area, level the bottom and line it with a “pillow” of sand. Water the sand and compact it thoroughly. It is convenient to lay paving slabs or install wooden flooring on the prepared base.
Options for do-it-yourself tents
To build one of the simplest tent options you will need:
- Beams 2.7 and 2.4 meters high with a section of 50x50 mm;
- Wooden boards 30-40 mm thick;
- Fabric for canopy and walls;
- Metal corners and screws.
Having marked the territory, we determine the place to dig in the support posts. On site support pillars Using a hammer, we dig holes half a meter deep.

The pillars can be simply installed by covering them with a layer of earth. But to create more reliable design It is advisable to install them in prepared holes on crushed stone cushions, and then fill them with cement mortar
Before we begin assembling the tent, in order to prevent rotting, we cover all wooden structural elements with paint or primer. For arrangement pitched roof, along which raindrops will flow freely, the front support posts we make it 30 cm higher than the rear ones. After the solution has completely hardened, we fix the horizontal crossbars between the posts, making connections using metal corners.
The frame is ready. All that remains is to cut out and sew the cover for the roof, as well as the curtains for decorating the side walls.
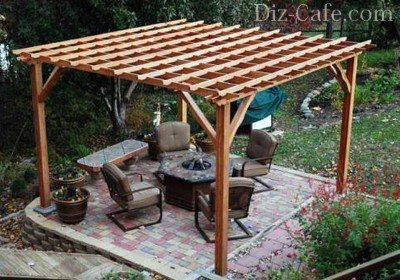
If you plan to make the roof not from fabric material, but from polycarbonate, then you need to place rafters on top of the crossbars, which can also be made from timber with a section of 50x50 mm
We lay and secure the sheathing on the rafters, onto which we attach the covering material using self-tapping screws.
Option #2 – metal gazebo-tent
To install such a tent on a site you like, you need to place four concrete disks or slabs with a hole in the center at the location of the support posts. They will act as the foundation of the structure.

A tent based on metal carcass. This design will not visually look bulky and will fit perfectly into landscape design plot
We install metal rods or tubes made of durable plastic into the holes of the disks. We connect the upper ends of the rods to each other using wire or clamps, creating support arcs.
After the frame is assembled, we gather the upper edge of the fabric and secure it, wrapping it with twine or wire, at the junction of the frame arcs. Then we straighten the fabric and stretch it over the rods. Additional ties that can be sewn on will help prevent the fabric from slipping. inside tent in places of contact with the frame. You can additionally stretch a mosquito net around 3-4 posts, leaving free place to enter.
Option #3 – children’s “house” for games
It would also be a good idea to take care of the youngest members of the family. We suggest building a special one for children. Such a “house” can easily accommodate small company from 2-3 fidgets.

Nice tent made in bright colors and decorated with appliqués fairy tale characters, will become a favorite place for your kids to spend time
To set up such an elegant tent you will need:
- Plastic hoop d = 88 cm;
- 3-4 meters of cotton fabric or raincoat fabric;
- Velcro tape;
- Mosquito net or tulle.
The width of the base of one lower cone will be about 50 cm, and the length of the part will depend on the expected height of the tent. We sew together only the cone-shaped elements of parts “A” and “B”. They are assembled into a single structure using six ribbons sewn at equidistant distances along the edge, which we tie to the frame hoop.

From the selected pieces of fabric we cut out four identical parts “A” that will hang bottom part structure, and four parts “B” for the top of the tent
At the junction of parts “A” and “B” we will place a frill made from pieces of fabric in contrasting shades. To secure the cone tent and hang it from the branches of a tree, we equip the dome of the structure with a loop with a ring.
To make a frill, you will need strips 18-20 cm wide. We fold the strip in half lengthwise and mark the dimensions of the semicircles on them. We sew a frill along the outlined contours, then cut off the allowances and turn the strip outward. We make a loop from a piece of fabric 30x10 cm, which we also fold in half lengthwise, stitch and turn inside out.

To attach the loop to the tent dome, you will need to cut 4 small cones, between which we insert the loop and sew together with the details
The frame of the “house” is a plastic hoop, to which the “walls” of the tent are suspended using ribbons sewn along the edge. We make the floor for the tent from two pieces of fabric with a diameter of 1 m, which we sew together, laying a layer of foam rubber, and turn them inside out. We sew Velcro tape along the outer perimeter of the floor in several places.
We sew the tape to the lower edge of the cones of part “A” sewn together and mark the places for attaching the Velcro tape, with which the bottom of the tent will be attached.

To arrange the entrance, we outline the dimensions of the hole. We cut out curtains from mosquito net or tulle and sew them on the inside over the entrance, overlapping them. We attach a wide bias tape made of yellow fabric along the perimeter of the entrance
We make patterns for applique from the same fabric, gluing the elements together using adhesive web. We decorate the walls of the tent with appliques, attaching them with a zigzag seam.
Not every owner of a country house is able to build a full-fledged gazebo on the property in which to relax. A suitable alternative to an equipped gazebo is an awning for a summer residence. This simple design will reliably protect the owners and their guests from the hot sun or from rain on a cloudy day.
The concept and purpose of tents, awnings for summer cottages
The first thing to note: the concepts of a tent and an awning for a summer residence are not synonymous. Awning - fabric canopy, which is designed to protect from bad weather or scorching sun. The main component of the awning is polyester, synthetic fabric, durable polyethylene, material with protective impregnation.
By tent we mean temporary structure, which, if necessary, can be assembled and reinstalled in another location. An integral part of a summer cottage tent is the frame, usually made of aluminum, metal profile or tubes. The frame is covered with water-repellent material. We can say that a tent is practically an awning, but with a frame.
The main task of an awning or a tent in a country house is to provide comfort for outdoor recreation. With this design, any area can be turned into a kitchen, dining room, or gazebo in a matter of minutes.
The function of a tent (awning) largely depends on the material from which it is made. Lightweight fabric intended for tents (awnings) that are installed for the purpose of protection from the scorching sun. Waterproof fabric is obviously the material for the structure to keep out the rain. There are cases of making tents (awnings) from polyethylene, however, such material is impractical: it does not allow air to pass through, and is short-lived. mosquito net It is also often used as a material for the manufacture of such structures.
Advantages of tents (awnings) for a summer residence
Among the advantages of tent structures in comparison with foundation buildings:
- ease of construction;
- excellent sound insulation, providing excellent outdoor recreation;
- cheapness;
- compact size, easy to transport;
- durability;
- maintainability of the structure;
- mobility (in some cases).
Types of tents and awnings for summer cottages
Depending on the functional purpose tents (awnings) are:
Choosing an awning or a tent for the dacha
The issue of purchasing a tent (awning) for a summer residence should be approached seriously.
First you need to decide what you want dimensions of the structure. If you plan to place only a small table with four chairs under the awning, then a design measuring 2.5x2.5 is quite suitable for you.
The purpose of the tent (awning) for the dacha will determine the type required design. Think about why you need a tent (awning) at your dacha. For example, if the main function of the planned tent (awning) is to protect yourself from the scorching sun, then there is absolutely no need to purchase a tent (awning) from waterproof material. If your Vacation home located next to a forest, a lake, and you are often bothered by mosquitoes, it would be logical to purchase an awning (tent) equipped with mosquito nets. A design made of water-repellent fabric will protect you from rain.
 An important criterion for choosing an awning (tent) for a summer residence is the technology for assembling the structure. Tents (awnings) have a fairly simple design, the frame of which is assembled from support pipes and brackets made of hard plastic; screw version The design will require much more time to assemble.
You should purchase a design for your dacha from specialized suppliers. Some of the manufacturers are also able to produce goods according to your requirements. individual order. In this case, all your wishes will be taken into account: shape, material, design of the tent (awning).
Installation of a tent (awning) at the dacha
How to install a structure on a summer cottage? The first thing to do is choose appropriate place for installation of the structure. Next we dig in support posts into the ground. If you want to make a deck, you will have to install a foundation underneath it to support it.
If the structure is temporary (folding version), its installation will not take you much time. Please use the included instructions.
Do-it-yourself awning for a summer house
Buying a ready-made tent (awning) for a summer residence is far from a budget option. If you have a desire to save money and at the same time “put your soul” into the arrangement of your site, you can easily build an awning (tent) with my own hands. Homemade awning (tent) It will look no worse than the store bought one. To make a structure you will not need a lot of time, just some materials and desire. So let's get started.
Before you start setting up a tent at your dacha, choose the most optimal place for him. Prepare the area: clear it of plants, stones, and debris. It will be very good if the structure is located in the garden or near a flower garden.
Making a homemade awning with a wooden frame
You will need:
- beams (section: 50×50, height: 2.7 and 2.4);
- the fabric you choose;
- wooden boards (thickness: 3−4 cm);
- self-tapping screws;
- metal corners.
During the construction process, proceed in stages:

Making a metal gazebo-tent for a summer residence
To set up such a tent you should:

Your tent is ready.
Repairing a damaged tent (awning)
Despite excellent quality material for making awnings (tents), the canvas may tear. In this case, do not be upset: the problem can be solved. To repair a tent (awning) you may need:
- a piece of fabric (the same as the manufacturing material, or similar to it);
- stapler;
- construction hair dryer;
- plywood sheet;
- roller
So, let's start fixing it:
- We remove the awning from the frame and place it on a plywood sheet inside side up.
- We fix the material on plywood sheet stapler.
- Cut it out patch slightly larger in size than the damaged area.
- We put it on the awning.
- We hold the hairdryer with our right hand, and the roller with our left.
- Let's start hair dryer nozzle between the patch and the awning and move it along the entire perimeter of the patch, smoothing the awning with a roller.
Your tent is ready for use again.
By purchasing or making an awning (tent) for your summer cottage, you will definitely not regret it. Now you are not afraid of either the sultry sun on a hot July day or the rain that suddenly finds you on vacation.