We install a chain-link fence with our own hands. Construction of a chain-link fence with your own hands. The main criteria for choosing a chain-link mesh

Reading time ≈ 5 minutes
Today, with all the variety of fencing, few types of construction could replace a home-made chain-link fence.
Advantages of a chain-link fence
- Very quick and easy to install with your own hands;
- Low cost;
- Lightweight construction, does not require a reinforced foundation;
- Lets light through, will not create conflict situations with neighbors because of the shadow created;
- Strict and unobtrusive appearance, which fits perfectly into any landscape.
Installation methods
You can install a chain-link fence with your own hands in two ways:

1. Ordinary, as in the photo above, when the mesh is stretched between two support posts. This method is much cheaper and simpler. It is recommended to use in cases where the goal is not to achieve an impeccable appearance, but you just need to install a fence quickly and cheaply.

2. Sectional, as in the photo above, when ready-made fencing sections are produced, in which a fragment of the chain-link mesh is fixed. This method will be much more expensive, because you will have to acquire metal corners, the price of which is higher than the mesh itself, but the fence itself will be much more attractive and practical (for example, you can hang a carpet on top of the fence, dry something, etc.)
Materials
To install such a fence we will need the following materials:
- Metal pillars 50x50x2x3000 mm;
- Chain-link mesh (not galvanized, galvanized or plasticized);
- Fastenings (nails, galvanized bolts);
- Concrete M200.
Step-by-step instructions for installing a chain-link fence
So, how to make a chain-link fence with your own hands?
I. Marking the territory.

We begin work by driving in pegs in the corners of the area and pulling laces between them. We measure the length of the lace - this is the length required mesh chain-link, you also need to take into account +5-7% additional length “in reserve”. Next, we mark the locations of the supports, the optimal step is 2.5-3 m.
II. Installation of pillars.

In the event that after the construction of the house there remains a sufficient amount wooden beam or other material that you can use as future support posts for the fence; when the price of “timber” in your region is several times cheaper than metallic profile, or you just need a temporary fence - then you should use wooden supports. The surface of the wooden beam must be cleared of bark, and it is also advisable to treat it with antiseptics and waterproofing mastic, which will protect the material from rotting and pests. The pillars should be trimmed based on the desired height of the fence, as well as the depth of the foundation to be dug (the hole should be 100-150mm larger than the soil freezing depth, therefore, if you are counting on a two-meter fence, and the soil freezing depth is 800 mm, then you should prepare pillars with a height of 3 m). But such supports will not last long, so it is better to use metal poles!

If you decide to build a solid and durable fence, take care of your purchase metal poles. Installation of such supports requires concreting the base. The depth of the concrete pit should be 1/3 of the height of the fence. For example, if you planned to install a fence 2 m high, the depth of the hole should be at least 1 m (you should also take into account the freezing depth and heaving of the soil).
III. Chain-link mesh tension.
TO wooden base It is most convenient to nail the fence with nails.

DIY sectional chain-link fence
The main difference between this method and the usual one is the presence of a frame.
To install a sectional chain-link fence we will need the following: materials:
- Metal posts 50x50x2x3000 mm;
- Chain-link mesh, galvanized or plasticized;
- Bent metal corner 40x40x3 mm
- Metal rod and strips for welding
- Concrete M200
Marking and installing the posts of a sectional chain-link fencing is no different from its simpler counterpart, but welding the frames will require some work. If you do not have good welding skills, then it is better to turn to a professional.
The patented invention of Karl Rabitz has been a reliable material option for fences for centuries. In the fencing of a chicken coop and a transformer hut, a sports ground and a plot of land - such a mesh can be found everywhere. There is no alternative to it in the distinction neighboring plots– according to regulations, it is prohibited to install boundary fences made of opaque materials. The task of making a chain-link fence with your own hands will not seem difficult to any man with a minimum of tools.
Which chain-link mesh to choose for a fence
The chain-link mesh is a continuous fabric of wire spirals woven together. This design makes it easy to splice the fragments together. In this case, the cell size can be in the range of 20-100 mm (the most common sizes are 30-50 mm), standard height rolls 1, 1.5 and 2 m.
Wire is used to make mesh different diameters from 1.2 to 5mm; Most of the chain-links on sale are made of wire 1.5-2 mm in diameter. The wire can be coated or uncoated:
- Without coating (“black”). It is better not to use mesh made from it for permanent fencing, its service life is short, and it is almost impossible to paint such a product with high quality, despite all the assurances of the “advisers.”
- Zinc coated is the most common option. Galvanized chain-link will fade after a while, but will not rust, having served for decades.
- From of stainless steel. A chic and timeless option, but very expensive.
- In a polymer shell. This mesh appeared on sale not so long ago and is in great demand. Firstly, it has a long service life (provided you choose a reliable manufacturer with high-quality plastic coating), and secondly, you can realize your fantasies due to a wide palette of colors.

Galvanized wire mesh

Grid with color polymer coating
You can not only build a chain-link fence with your own hands, but also weave the mesh itself. There are many drawings manual machine for weaving it. Manufacturing the machine will require some milling, welding and light turning work. One person is able to produce up to 10 m of mesh per day, therefore, if you have wire, it makes sense to think about independent production.
Installation of supports for fencing construction
There are several options for making a chain-link fence. In any case, the most responsible and labor-intensive process is marking the territory and installing support pillars.
How to prepare the site and choose supports
Before installing a mesh fence, you should accurately, in accordance with the existing documents for the site, measure the boundaries of the future fence, think about the location of the gates and gates. Clear the area for the construction of the fence from debris and vegetation, and then drive stakes (wooden or metal stakes) into the places of future corner posts and supports for gates and gates.
To determine the location of the intermediate posts, you need to stretch a strong cord between the stakes, then measure the distance between them. Optimally, the racks are placed 2-2.5 m apart from each other, so the resulting distance must be divided by 2.5 and rounded to big side.

The distance between the pillars should be from 2 to 2.5 m
In this way the number of corner posts is found; the exact distance between them can be found by dividing the distance mentioned above by the number of pillars. The locations of future supports should also be marked with pegs.
Depending on the type of underlying soil, material, thickness of the pillars and the type of future fence, there are several methods for installing supports. Wooden posts are short-lived; concrete or asbestos-cement pipes cause difficulties when attaching the mesh.
The optimal solution To make a chain-link fence with your own hands, you will need metal posts made of round or profile square pipe from 60 mm in diameter. Next we will consider this option.
Support Pole Installation Methods
You can install metal racks:
- simply driving them into the ground;
- forget - place in a pre-prepared hole and fill it with stones or large crushed stone, constantly compacting it;
- partially (when the end of the post is driven into the ground) or completely concreted in pre-prepared pits.

There are many methods for calculating the length and depth of the underground part of the pillars - determining the type of soil, the level of passage groundwater and depth of soil freezing. But for light fence from a chain-link mesh, possible movements of the supports of a few centimeters in height are insignificant, so in practice they use a simple rule - at least 40% of the column must be in the ground. That is, a post for a fence 1.5 m high should be about 2.1 m long for any installation method, but complete concreting is optimal.
In practice the process looks like this:
- Install corner (or end, if there are gates and gates) posts, strictly controlling their verticality using a level.
- Prepare holes for intermediate posts according to the preliminary markings. The presence of a drill under normal conditions (without roots and large stones) soil makes the work much easier!
- After the concrete has hardened, pull a cord along the top of the posts to control the height of the intermediate supports being installed, and another one at the bottom to control the placement of all posts on the same line.
- To make it easier to level the pillars in height, fill the bottom of the holes with sand, gravel or small crushed stone and simply change the height of this cushion by adding or removing material.
- Pour the height-adjusted racks with concrete with level control, and install stops and supports if necessary.
Further installation should be carried out only after the concrete has hardened (at least one week); the posts must be primed and painted.

Instructions for building different types of chain link fences
Before you start building a chain-link fence with your own hands, you should determine the purpose of the fence, the basic requirements for aesthetics and strength. Indeed, in one case you need a powerful fence made of non-standard mesh with 4-5 mm wire for grazing livestock, in another you need a beautiful and elegant fence in front of the house or lightweight design no frills on the borders of neighboring plots. For each task there is its own option.
The simplest fence for a site
Most easy way installation of a mesh fence - simply attach it to the installed supports. For this work you will need an assistant, or better yet two.
- Before fastening, roll out the chain-link on the ground to a distance of slightly more than one span between the posts.
- Check the height level of the wire spirals and, if necessary, screw in or unscrew displaced ones. The fact is that it is not visible on the roll whether they are all at the same level, and after stretching the mesh it will be impossible to align the links.
- Immediately bend the edges of the spirals with pliers to avoid injury and the possibility of the mesh unraveling during installation.
- As you fasten the mesh, unwind it further.
There are several ways to attach the chain-link to the posts, but it is highly advisable to attach not the mesh itself (to avoid its deformation), but a metal rod with a diameter of 6-10 mm inserted vertically into its link. Using another similar pin, inserted a little further, the assistant should pull the fabric.
This does not require any blocks, levers or complex structures for tensioning, moreover, excessive efforts by one person can lead to deformation and stretching of the 2 mm wire mesh!
The rod can be attached to the support like this:
- just tie it soft wire to the pillar. Most quick way, but not too beautiful;
- use special clamps rather than wire;

Fastening with clamps
- put the pin on the pre-prepared hooks and bend them. Hooks made from pieces of wire with a diameter of 4-6 mm and a length of 50-80 mm should be welded to the stand at a distance of 400-500 mm from each other until the mesh is tensioned;

Fastening with hooks
- weld the rod (not the fabric!) to the post in several places, obtaining a permanent connection;
- stitch the mesh spiral with a rod, inserting it into pre-welded sections of pipe with a diameter of 1/4″ and a length of 15-20 mm. They should be placed on the support at the same distance as the hooks; the short length of the segments will allow them to fit into the grid cells. The most aesthetic way of dismountable connection.
End and corner posts will experience constant stress from the impact stretched mesh, so braces (stops) are required.

Corner post installation method
Fence option with guy wires
To ensure greater rigidity of the fence, better resistance wind loads and to prevent sagging of the fabric, you can stretch one (from above) or several rows of cable or wire 4-6 mm thick.
Such strings can be attached to supports and tensioned using any in a convenient way, but most practical option– using special ties or tensioners.

String tensioner

When installing a chain-link fence with your own hands using guy ropes, the distance between the posts can be increased to 3 m. But it is worth considering that when tensioning, the load on the outer and corner supports increases many times over, so their rigidity should be increased in comparison with the supports for a simple tension fence.
Ideal option Fixing the fabric is through stitching the mesh along its length. But this process is long and labor-intensive, and the complexity increases with increasing diameter and stiffness of the cable or wire.
Therefore, in practice, the strings are first tensioned, then the chain-link is installed in the same way as described above simple method, and then after 200-300 mm the mesh is tied to the guy wires with galvanized binding wire with a cross-section of 1-1.5 mm.
Reinforced version with lags
To enhance load-bearing frame fence, logs should be welded to the installed posts, preferably from profile pipe. The main load in the fence will be compression, so the section of the log should ensure that the frame does not “fold” when the mesh is tensioned and the fence is subsequently used. With this installation method, there is no need for braces for corner and end posts.

Chain-link mesh on a frame with logs
Since most of the efforts will be applied in the upper part of the fence, the lower and intermediate logs (if any) can be replaced with reinforcement, rolled wire, or strings even stretched, as in the previous method. Screw the mesh fabric to the frame with wire.
A fence with logs will be a good foundation for the future, if there is a need to decorate the fence by hanging additional material. You can also easily replace the chain-link with corrugated sheets or slate, making the fence much more solid.
Practical sectional solution

Sectional fence
A fence made of sections, which are frames from a corner with a mesh fixed inside, is the most difficult to manufacture, but has a lot of advantages and benefits:
- such a design is the most beautiful and impeccable from an artistic perspective;
- each section is separate and rigid structural element, therefore, there will be no issues with the mesh sagging and loss of protective properties;
- if necessary, sections can be dismantled and the posts can be used to build new fences;
- Possibility of installation with a large slope of the fenced area. It is believed that the chain-link mesh can be stretched when the ground level rises no more than 6° (which corresponds to a slope of 1:10). If these values are greater, the correct solution would be sectional fence with uniform ledges.

Sectional fence with ledges
To manufacture the section, a solid-rolled steel angle with a flange of 40-50 mm is used.
- Using a grinder (preferably a mounting saw), cut off the parts strictly perpendicularly required size.
- Lay out the frame on flat surface(or level all corners using pads), carefully measure the diagonals. To avoid twisting, the frame should be cooked in opposite corners.
- In the finished frame, clean the seams, prime and paint it (it is much easier to repair areas burnt from welding than to paint the corner under the mesh!).
- It is necessary to install the mesh fabric through rods, which can be welded or installed on hooks and bent (as with racks). At the same time, fasten the first pin on the side of the frame, after tensioning the mesh - on the opposite side, and then on the top and bottom.
- Do not apply excessive force when tensioning, otherwise the section may “fold” inward. Fastening on all sides, even with minimal tension, will prevent the canvas from “worrying” and sagging.
- The distance between the supports should be calculated so that there is a gap of 40-80 mm between the support and the frame (or make sections based on the already known distance between the posts).
- To attach the sections to the posts, weld metal dies (approximately 6*60*250 mm) in advance.
- The frames can be attached to the dies using either electric welding or bolts, resulting in a collapsible structure.

Approximate diagram of fastening sections
Video: do-it-yourself chain-link fence
How to decorate a chain-link mesh - original solutions
Many people do not want to make a fence from chain-link mesh, considering it impersonal, too simple, and refuse this option in favor of other materials. Completely in vain! There are many ways to make such a fence original and unique, here are some of them.
Making patterns from wire. A labor-intensive method, but beautiful and long time.

The use of polymer multi-colored tapes and cords. Bright, elegant, but not too durable.

Elegant appliques made from ribbons and cords
Living plants. Always relevant, but beautiful only during the active growing season and flowering. And from autumn to spring, if the dried stems are not removed in a timely manner, it looks very untidy. You can use artificial greenery in the same way.

Light-shading nets. They are various colors and degree of light transmission. They significantly increase the windage and weight of the fence, so they are not suitable for a simple tension fence.

Application of light-shading mesh
PVC photo fence or decorative photo grid. New, expensive, beautiful and luxurious material. It is also worth using with a powerful frame or sectional fence solution, hanging over the chain-link.

At this point, the question of how to make a mesh fence with your own hands can be considered closed. Good luck in construction, and may the fence made with the help of the advice received please you for many years!
A chain-link fence, installed with your own hands, is very relevant specifically for dachas, since serious metal or any other monolithic fences between areas are simply prohibited. Chain-link is an excellent, inexpensive material accessible to everyone, widely used for the construction of fences or fences for country houses. The cellular structure of the mesh does not shade areas with plants (like slate or siding), and freely allows air flow and sun rays to pass through. In addition, this material is successfully used to fence areas of reservoirs, poultry houses, animal habitats, and technical areas.
Chain-link fence, photo
Before making a fence from a chain-link mesh, you need to take into account all the nuances, especially the size of the cells. For example, if you or your neighbors keep chickens in their dacha, then the cell size should be minimal (so that the living creatures do not enter someone else’s plot). For the usual division of territory, a grid with cells of any size is suitable.
Types of mesh
On the market today building materials Three types of mesh are available and successfully used.
The difference is in the material from which it is made:
- Non-galvanized, non-painted mesh made of ferrous metal. Such a chain-link does not have a long service life; after a few days it begins to rust. It is used as a temporary material before installing more serious fencing, but coating it with paint significantly extends its service life.
- Galvanized chain-link is not subject to rust, and is the most common building material in cases where exactly such mesh fencing is required.
- Plastic chain-link mesh for fence (with polymer coating). This steel mesh, covered with a layer of polyvinyl chloride. It has a modern aesthetic appearance, it is not afraid of moisture and corrosive processes. This grating is plastic, does not burst when deformed, and is excellent for installation in areas with high level acid or alkali in the soil. An additional advantage is the fact that plasticized chain-link is available in different colors.
 One type of chain-link with plastic coating, photo
 A chain-link mesh braided with climbing plants and flowers looks very aesthetically pleasing, and if it itself is green ( plastic covering), then doubly attractive.
Installation of a chain-link fence, which is best
You can build chain-link fences with your own hands in two ways:
- by tensioning the mesh between the support posts,
- installation of sections (in the second case you will need welding machine).
Support posts can be metal (for example, pipes), concrete or wood. For a more thorough sectional fence you will need metal corners for making a frame. Such a fence will look more aesthetically pleasing, but it will also be much more expensive. Tension option simpler, but also quite practical. In any case, the choice must be made by you.
 Installation of racks for tensioning the mesh, photo of the working moment
 The location of the future fence is marked with pegs, between which a string is stretched. The length of the rope should be equal to the length of the net, but to be safe it is better to stock up big amount meters. The placement of the pegs is a marking of where the posts for the chain-link fence will stand, so it is better if the distance between them does not exceed one and a half to two meters. This material(mesh) tends to sag, so you should not make too large distances between the posts.
 Strengthening the corner of a chain-link fence, photo
 The depth of the holes for the supports is usually a meter and a half, and the corner posts are installed first (there is always more pressure on them). To strengthen the corner pillars, an additional sand and gravel mixture is poured onto the bottom of the hole, compacted, and filled with cement mortar.
Until the mixture has completely hardened, the pillar should not be touched. It is also appropriate to use a plumb line or level for these purposes. Options for strengthening supports depend on the preferences of the developer and the purpose of the fence.
Photo of a chain-link fence:

After hardening concrete mixture there follows a line of hooks to which the chain-link will be hooked. Typically, nails or wire are used for these purposes. large diameter, which are then welded to the supports using a welding machine.
It is worth keeping in mind that there are now ready-made painted poles on sale that have hooks. Before tensioning the mesh metal supports painted, and wooden ones are treated with special protective equipment(along the entire length). After this, the chain-link is stretched and put on the hooks in cells. For more reliable fastening Some summer residents additionally wrap the support with the mesh with wire.
To ensure that the installation of a chain-link fence is as reliable as possible, it is recommended to use a reinforcing technique. Additionally, a vertical support rod is installed. To do this, a rod or reliable thick wire is threaded into the first or second row of cells from above, which is also welded to the posts (or attached to a wooden support). This technique does not allow the mesh to sag over time and strengthens the entire structure as a whole. Make sure the tension is elastic. The subsequent process is similar for the remaining supports.
There is another, fairly common mounting option - a fence made of chain-link mesh on slags (wooden veins). The difference in installation is that the mesh is fixed not on the pole itself, but on wooden board(vein) attached to this support. Lightly attached to the top and bottom of the main support.
When the fence is installed, do not be too lazy to take pliers and bend all the upper hooks of the chain-link downwards - this way you will be sure that no one is accidentally injured.
 Photo of a chain-link fence on a multi-level site
 It happens that the fenced area has an uneven landscape; in these cases, so-called terracing is performed. It is done in a similar way: a support pillar is installed at the place where the soil drops. On one side, the grid is attached at a certain level, and on the other (the next piece of the grid) it is already higher or lower - depending on the height of the difference. In this case, the chain-link fence for the fence is cut into fragments.
But there is another option for installing a fence that is optimal for uneven ground - sections.
Sectional chain-link fence
These sections are welded metal frames, which are made from angles. Inside such a frame there is a chain-link, and it itself is welded to support pillar. On initial stage During the installation, marking with pegs is still used, only the poles are already more powerful, since an increased load is placed on them. If you decide to make a durable sectional fence from chain-link mesh, then fill strip foundation will not be superfluous, but without it similar design will also last a long time.

The dimensions of the frame are determined individually, the distance between the supports is 15-20 cm smaller. In turn, the width of the frame should also be less than the length of the post by about 15-20 cm. The roll of mesh is cut into sections of the required sizes using a grinder saw. A metal rod is threaded into the upper part of the fragment. It is welded to the top of the frame. Using the same method, the remaining sides of the mesh are attached to the frame.
The next step is to attach the supporting metal strips (about 5 cm wide and 30 cm long) to the support (they are also welded). The section is then placed between the posts and welded directly to these strips. At the final stage, the sectional chain-link fence is painted.
Installing a tension fence will not require any special skills from you and will not take much time, and it is preferable to install a sectional structure with an assistant, or better yet, with two.
This type of fencing will serve you for many years; if any section of the fence is damaged during operation, it is easy to repair. Despite its “airiness,” a chain-link fence is a serious obstacle to uninvited guests — tension structure It is flexible, it will be very difficult to stay on it. And, if you install it, then it is the most economical and quick option For country fencing, and when individual approach very aesthetic and attractive.
Fence - required element any private property. If country houses experts recommend fencing with more reliable protective structures, then summer cottages - their practical and inexpensive options. Most suitable material for a country fence - chain-link mesh. With its help, you can not only make a durable one, but also increase the productivity of the beds, since the design does not interfere natural ventilation on plot of land, and also does not block the sun's access to it. To build a chain-link fence with your own hands, you don’t need to be a professional. This article will reveal all the secrets of craftsmen in installing a practical fence without welding, and will also tell you what tools and materials you need to have to perform such work.
Features of chain-link mesh, its advantages
Chain-link mesh is a universal material that is indispensable in summer cottages. It has many advantages that make it even more popular among buyers. These include:
- affordable price. Rabitz - a budget option material for the construction of a fence, because not every homeowner is able to allocate a decent amount of money to install a more expensive structure at the dacha;
- long service life. High-quality galvanized mesh is capable of maintaining its original appearance for several decades (up to 40-50 years). It does not rust when correct operation not deformed.
- need to use minimum quantity tools and fastening materials during fence installation;
Important! You can install a chain-link fence with or without welding. Installation without welding is ideal for people who do not know how to work with such equipment.
- ease of care of the material;
- the mesh does not interfere natural circulation air, does not shade the area.
Important! A chain-link fence serves as an ideal fencing not only for beds, flower beds or vegetable gardens, it is also indispensable in the process of arranging children's rooms. playgrounds, enclosures for pets, etc.
Material classification
Depending on the material of manufacture, chain-link mesh comes in three types:
- Non-galvanized.
- Galvanized.
- Plasticized.
Non-galvanized mesh is enough cheap material. Of course, it is more affordable, but its long service life can be doubted, since under the influence of moisture the surface very quickly becomes covered with rust.
Galvanized mesh is the most popular among customers. It is a little more expensive than its non-galvanized counterpart and does not rust, which is really very valuable.
Plasticized material – modern version, but more expensive. In the manufacturing process, polymers are used that properly protect the metal mesh from moisture. Plasticized mesh has different color scheme. Each homeowner is able to choose a material that will ideally suit the interior of the house, as well as complement it.
Instructions for craftsmen: how to make a simple chain-link fence without welding with your own hands
Making a durable and reliable fence from a chain-link mesh is quite simple and interesting task. Its implementation does not require availability large quantity professional knowledge and skills. To work, you only need tools and materials, as well as the desire of the master.
There are two ways to make a galvanized fence from chain-link mesh:
- Using a welding machine.
- No welding.
Since not every homeowner has a welding machine at his disposal (or does not know how to use it), we will consider the option of installing a fence without using it.
Important! Installing a fence without welding will allow you to build a structure that will be less practical than its welded counterpart.
Tools and materials
To ensure that the construction of the fence does not cause difficulties, you must first stock up on all necessary tools and materials. During the work you will need:
- chain-link mesh (non-galvanized, galvanized or plasticized);
- support pillars (wooden, metal or reinforced concrete);
- special fastening hooks;
- sand, screenings, crushed stone and cement;
- shovel;
- building level;
- mounting tape;
- hammer or drill;
- bolts, nails or screws.
Step-by-step instructions for installing a galvanized mesh fence
The simplest option for a mesh fence for a summer house is a tension fence. Its installation will not take as much time as it might seem at first glance. For correct execution work, it is necessary to know and follow a clear sequence of the entire technological process.

Advice! To install a tension fence made of chain-link mesh, it is best to hire an assistant who will help you get the job done faster.
A chain-link fence is the best budget option for summer cottage. Install such a fence with your own hands; you will appreciate its advantages not only personal experience, but you will also see by the increased amount of harvest received from the beds.
Video instruction: how to build a chain-link fence without welding with your own hands
Chain-link fence: photo


In some dacha cooperatives, it is impossible to install a fence made of slate and other materials between plots, because they heavily shade small areas. In this case, a fence made of chain-link mesh would be a good solution - it does not prevent the sun from entering the area and does not impede the natural circulation of air. Chainlink – inexpensive material which can last for a very long time. Its additional advantage is that it can be used as a support for climbing plants. The author of this successful invention was Karl Rabitz. The mesh began to be used already in late XIX centuries, it was originally used during plastering work.
Chainlink – available material, which any owner of a summer cottage can afford to purchase. In order to create a chain-link fence with your own hands, in addition to the mesh, you will need thick wire, reinforcing rods, cable and support posts.
A chain-link fence can be an excellent hedge or serve as a support for climbing plants. In this case, the site will be much more beautiful
Today, manufacturers offer three types of chain-link mesh:
- non-galvanized mesh is one of the cheapest, it is better not to consider this option, because... within a few months it may become covered with rust;
- galvanized chain-link is the most common - it is slightly more expensive than non-galvanized chain-link, but does not rust;
- Plasticized chain-link is a metal mesh, which is coated with multi-colored polymers on top to protect it from corrosion.
The last option is very practical, and such a mesh looks much more aesthetically pleasing than a metal one. Therefore, plasticized chain-link, although it appeared recently, is already actively used by our gardeners.
When choosing a mesh, you should pay attention to the size of the cells; the smaller their size, the stronger and more expensive the mesh. A mesh with cells of 40-50 mm and a roll width of 1.5 m is quite suitable as a fence for a summer cottage.
Option #1 – “tension” chain-link fence
The design of a chain-link fence can be different. The easiest way to make a fence is to stretch mesh between the posts. The poles can be metal, wood or concrete.
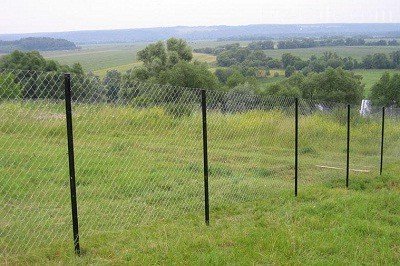
Easy way to do tension fence made of chain-link without the use of rods - the mesh is stretched between the posts and hung on hooks. Of course, over time it may sag, but such a fence can last quite a long time
The number of pillars depends on the distance between them and the length of the fence. As practice shows, best distance between fence posts metal mesh– 2.5 m. Used pipes that are not affected by corrosion can be used as pillars. Now they sell ready-made fence posts, already painted, with hooks. Wooden poles must be treated along their entire length before installation. protective composition. You can also use concrete pillars and attach a mesh to them with wire or a clamp.
The height of the pillars is calculated as follows. If there is a gap between the ground and the fence, you need to add 5-10 cm to the width of the mesh, and then another meter and a half, taking into account the underground part. As a result, you will get the average post height required for installing the future fence. The load on the corner posts will be slightly greater; they should be dug deeper, so their length should exceed the length of ordinary posts by about 20 cm.
It is better to concrete the bases of all pillars for greater strength. The posts are the frame of the fence, after you install them, you can start attaching the mesh. After the concrete has hardened, hooks for attaching the mesh are attached or welded to the posts (if the post is metal). Suitable materials for fastenings include screws, rods, nails, wire - any material that bends into a hook. We straighten the roll with the mesh and install it at the corner post, hang the mesh on the hooks.

To ensure good tension and strength of the structure, we vertically thread a rod or thick wire into the first row of mesh cells, attach the rod to wooden post or weld it to metal. The mesh secured in this way will not bend or sag, as often happens without such fastening.
Then the roll is unwound over the span, to the next post. A little further from the place where the mesh connects to the post, we thread the rod in the same way. We hold on to the rod and pull the mesh; if you don’t use the rod and just pull it with your hands, you can tighten the mesh unevenly. It is best to do this together - one person at the bottom edge, the other at the top.
Now the reinforcement is threaded horizontally into the mesh at a distance of at least 5 cm on both edges, top and bottom. Horizontal rods are welded or attached to the posts. If you tension the mesh without rods, over time it will sag, and the rods will maintain its tension.

Diagram of a fence made of galvanized mesh with reinforcement running along the top and bottom sides. This type of fence is a stronger structure.
The fence is almost ready, now you need to bend the hooks on the posts and paint the posts. It is better to wrap the protruding wire “antennae” down so that no one is injured. It is convenient to thread the wire through the top row of cells and wrap the protruding edges around it.

Here the “antennae” are neatly bent down towards the rod, you can dry things on such a fence, there is no risk of injury

The “antennae” of the upper cells must be bent to avoid accidental injury. In this photo they are slightly bent - there is a risk of injury or tearing clothes
If you do not want to use reinforcement and concrete pillars, you can use the simplest technique presented in this video:
Option #2 – erecting a fence from sections
To make a fence of this type, you need sections where the mesh will be mounted. First, similar to the installation of a tension fence, markings are made and pillars are installed.

This diagram can be taken as a basis for determining the proportions of the dimensions of the future structure (click to enlarge)
You will need to buy a corner measuring 40/5 mm to make the frame. We determine the length of the frame in this way: subtract approximately 10-15 cm from the distance between the pillars - this is its length. We subtract the same amount from the height of the pillar above the soil level - the resulting amount is the width of the frame. The corners are welded in rectangular designs. You can make the size of the sections based on the size of the mesh (1.5 -2 m), you can unwind the roll and, if necessary, reduce the size of the mesh to the desired size using an angle grinder.
Then strips of metal are welded horizontally to the pillars (length 15-25 cm, width 5 cm, cross-section 5 mm). Along the edges of the pillar you need to retreat 20 cm, install a section between the two pillars and, using welding, attach it to the horizontal strips. Now all that remains is to paint the new fence.

Rods with a cross section of 4 mm are threaded through the mesh from 4 sides, first into the outer row, then from above and below, the mesh must be stretched well and the rods welded to the corners of the section. (The rods are welded to the horizontal corners). It turns out a section from a corner with a chain-link mesh welded onto the rods from the inside

It will not be possible to make a tension fence on an inclined area; in an inclined position, the mesh cannot be tensioned. For a sloping area, you can make a sectional fence by installing sections on both sides of the posts at different distances along the soil level.
Every owner familiar with welding can make a fence from a chain-link mesh on their own. As a rule, 2-3 people can cope with the work for a relatively short term. Go for it!