Creating a garden path using a do-it-yourself mold. Laying a garden path yourself using a mold Make a garden path with your own hands
Read also
Elegant and well-groomed garden paths are a mandatory attribute of almost any modern dacha or country house. Agree, it’s nice to stroll along an elegant path deep into your favorite garden or to please guests beautiful tiles, which leads from the gate to the home porch.
Garden paths organically fit into the green landscape and are divided into unique sectors, giving the territory a well-groomed and complete look. They are a kind of fencing for a vegetable garden, garden or favorite flower bed.
In addition, the tiles can be laid as a platform for a bench or for parking a car. Finally, thanks to flexible and durable garden paths, even in bad weather you can safely walk to the outbuilding or garage without fear of getting stuck in soggy ground. WITH choosing material for a garden path can be found in .
Today we will talk about one of the most common, accessible and simple ways construction of a garden path using a special “filled” form.
Ready plastic molds for laying garden paths have many interesting options design, thanks to which any, even the most fabulous “stone” path pattern is formed.
Further, they are very easy to work with: the whole process is fast and fun. It’s easy to rearrange the mold and pour concrete, and besides, you won’t waste time on making own form from an old iron hoop and other materials. Finally, it is important that this method will be cheaper than buying ready-made paving slabs.
Buying a form for a garden path is not a problem - it can be purchased at a specialized store or ordered online. Traditional dimensions of the form: 60*60*6 or 40*40*4 cm.
Preparatory stage
First, decide on the location of the new path. Make a preliminary marking: drive pegs around the perimeter, through which you stretch a string to mark the boundaries of the path.
Now estimate the density of the soil. If upper layer the soil is loose and fragile, then dig a trench - a groove about 8-12 cm deep depending on the type of soil, and at least 45-65 cm wide based on the parameters of one shape and taking into account the indentation along the edges for the border. If necessary, you can take double or triple width.
Afterwards, compact the soil well and add about 5-9 cm of sand and small gravel, then compact everything again. Make sure that the earth does not sink anywhere, otherwise all the work will be ruined.
If the soil is initially dense, then it is not necessary to dig a trench. It is enough just to compact the earth, then lay a thin layer of sand and crushed stone no more than 5 cm and compact everything thoroughly again.
In principle, to form a bedding, you can get by with sand alone, and add crushed stone later when pouring the path. The initial gravel-sand backfill is needed in the case of fairly loose soil or when a large operational load is expected, for example, a platform is being built for a car.

Setting up the form
Pour water over the sand at the site of the future path - this will compact the foundation and retain sufficient moisture in the concrete. Sand can be temporarily covered with polyethylene. When you plan to drive a car along the tiles or park it, then lay a reinforcing mesh on top of the gravel-sand base, which is cut with a grinder to the size of the path. An alternative to reinforcement is fiberglass.
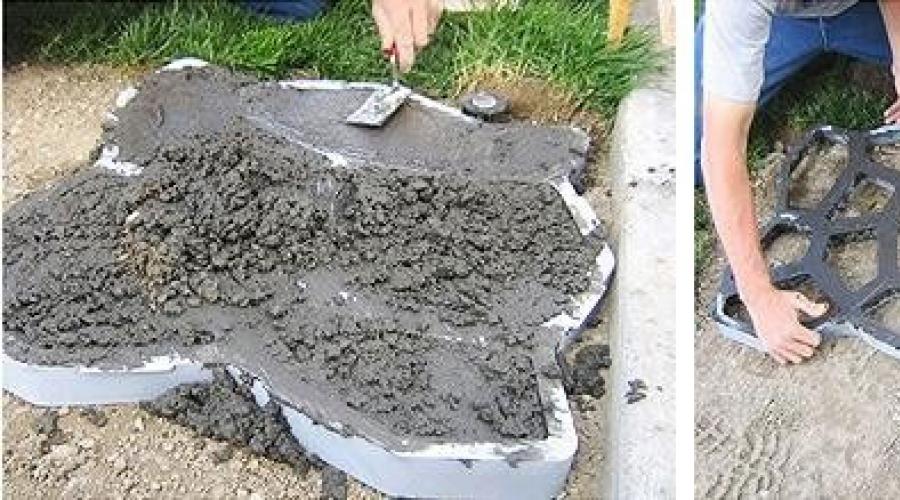
Now, using a brush or spray, carefully and thin layer Lubricate your mold with soapy water, a specialized lubricant (optimally), or, as a last resort, recycled car oil. Thanks to lubrication, the mold will be easier to remove back. When using special lubricant - " K-222"etc. - it is enough to treat the mold once, with a soap solution - every time before installing it in a new position, with machine oil - once every 3 fills.
Lightly spray the sand with water again using a spray bottle, then carefully and evenly place the mold on the bedding, lightly pressing it in so that the layer of future tiles protrudes at least slightly above the level of the surrounding surface.
Preparing the solution
Let's move on to cement mortar. There are several options here.
- You can take the standard ratio: cement 1 part, clean fine-grained sand 3 parts.
- Further, there is this method: cement 1 hour, sand 3 hours, crushed stone 4 hours (medium or fine fraction).
- The composition is also used: cement 1 part, sand 4 parts + plasticizer.
Often, for the strength of the track, crushed stone and a plasticizer are added at once, and sometimes also reinforcing fiber.
Cement consumption may vary, but here is a guide from practice: 50 kg of M500 cement is enough for 2.6-3.0 sq. m. m of paths with the usual ratio to sand of 1:3 and without crushed stone. Here, for example, are 40 cm shapes (4 cm high), 1 row in width plus 17 shapes in length, for a total of 40 cm * 680 cm = 2.72 square meters. m.
For tiles 60*60*6 cm, 50 kg of cement is enough for approximately 1.7-2.2 square meters. m. With gravel or with a plasticizer, cement consumption will be at least 15% lower everywhere.
So, first, thoroughly mix dry cement M500 or M400 with fine-grained sand in a container. To make the tropics more durable, you can add crushed stone.
If you are planning color track , then add a special dye for concrete to the dry mixture at a dosage of approximately 2-5% of the total mass of cement. You can also use the so-called. liquid pigment that is added to the solution. A 750-800 g package of pigment is enough for about 8-9 square meters. m paths.
With painting, you can do this: paint the path in 1 color, adding it to the solution or mixture, mixing the dye evenly; paint the path “spot”, when the dye is added to the concrete, but not completely mixed; sprinkle the pigment on top of the finished, but not yet covered tile, painting only its surface.
Next, it is recommended to add to the water or dry mixture plasticizer which will provide the garden path better protection from moisture and temperature, will make it more elastic, flexible, smooth and strong. The plasticizer saves cement consumption and strengthens concrete by approximately 15-20%. In this regard, we can recommend the plasticizer “SP-1” (or “SP-3”) with a dosage of approximately 100-200 g per 25 kg package of cement (0.3-0.8% by weight).
You can also add to the dry ingredients or directly into the solution reinforcing polypropylene fiber by 12 or 18 mm. This is especially good for space under the car. Thanks to fiber, you can do without preliminary reinforcement with wire. This substance significantly increases the strength of concrete, eliminates any appearance of cracks, and makes the material resistant to abrasion. One package of fiber per 600 g is enough for 40-42 slabs of 60*60 cm (about 15 sq. m).
Gradually adding water to the dry mixture, thoroughly stir all the ingredients to a creamy consistency. Make sure that the solution is not too liquid, as too much water can cause cracks to form after the track hardens.

Laying a garden path
Post it cement-sand mortar from above into a form placed on the bedding. Fill it as evenly as possible, do not leave any voids anywhere, especially in the corners. Using a trowel or wide spatula, carefully level everything, compress and remove excess mortar. Try to keep the top of the tile as level as possible.
Now wait approximately 20-35 minutes until the solution thickens. Carefully holding the opposite diagonal corners, remove the mold, lifting it straight up so as not to distort the edges. It is permissible to lightly tap the shape with a trowel before doing this.
That's it, the first fragment of the path is ready.
Then spray the sand again with water, if necessary, lubricate the mold, move it to the next place and fill the solution again. Use a string, a level or a long strip to control the verticality of the form: the entire track should be on the same plane in height. By the way, you can use several molds at once for construction - this will make the work go faster.
After the final filling, cover the path with film or other material to protect it from traces or rain while it dries.
You can step on the finished path after a couple of days, apply loads, walk after 4-5 days, and park the car after no less than 16-18 days.
Final stage
Fill the seams between the path slabs, as well as its edges, with sand, compacting it well. You can also fill the seams with soil, then plant grass there. pour out onto already compacted seams, roll with a wallpaper roller, then lightly sprinkle them with earth on top.
Finally, around the edges you can make a more solid border using a special form. The work process is the same, but the composition of the solution will be as follows: cement 1 part, sand 2-3 parts + plasticizer + fiber. If you take 2 parts of sand, the border will be white; if a little more, it will be dark gray. Border dye is added as needed.
You now have a beautiful new garden path. Good luck with your construction!
Photos of garden paths
You can admire the already ready-made options garden paths and adopt the ideas you like. But make sure that the path you choose fits perfectly into your garden.


Neat paths, gracefully winding between green spaces and landscape decor, are an integral attribute of any garden. So, if you want your site to be truly well-groomed and complete, do not neglect the paths. Fortunately, to equip them you don’t need to spend fabulous sums and attract professional designers – beautiful paths You can do it yourself, seriously saving on both materials and labor. How? There are many answers to this question, because there are a huge number of types of garden paths that can be laid at low cost. Next, we offer you instructions for the most popular options with accompanying photos and videos - after reading them, you will definitely be able to effectively improve your area.
Wooden round timber - very simple, but original material for garden paths. Raw materials for them can be found on every site - there are probably old trees everywhere that would be time to replace them with new seedlings. It is advisable to use larch or oak - they are the most resistant to external influences, which means they can boast a long service life. The path from the saw cuts is made according to the following scheme:

Advice. To protect the path from moisture and increase its durability, arrange simple drainage– pour a layer of fine crushed stone between the sand cushion and the saw cuts.
Durable paths made of stones
One of the most durable garden path options is made from natural stone. Here you can use cobblestones or rubble - they are equally durable. The path is laid as follows:
- Mark the garden path.
- From the area where you plan to lay the path, remove the top layer of drainage. The depth of this layer should be 7-10 cm greater than the height of the largest stone prepared for the path.
- Fill the resulting trench with a 10 cm layer of sand, carefully level it and compact it.
- Place the stones one at a time on the sand cushion, pressing them firmly into the base. The distance between small stones should be no more than 2-3 cm, and between large ones - up to 8-10 cm.
- Carefully fill the remaining gaps cement mortar. Once the track has set, fill the seams with soil or fine sand to make them look more natural.
 Garden path made of stones
 Classic concrete paths in the country
Concrete – traditional material for laying paths, which is always popular due to its low cost and ease of use. Anyone can definitely make a cast path:
- Mark the boundaries of the path - drive pegs along its contour and stretch a wire between them.
- Within the designated contours, dig a small trench up to 30 cm deep.
- Place a 5 cm layer of gravel and the same layer of sand on the bottom of the base. Compact the resulting pillow.
- Cover the base with chain-link or any other thin metal mesh.
- Install lumber formwork along the perimeter of the future path.
- Prepare a cement mortar: 1 part dry cement, 1.5 parts sand, 2 parts gravel and 1 part water.
- Pour the cent and evenly, with vibrating movements, using a spatula, distribute the composition over the entire area of the path. During installation, pierce the mixture with a rod to prevent the formation of voids.
- Use the rule to do final leveling paths and cover it with plastic.
 concrete path
 In 3-4 days the path will be ready. All this time, do not forget to gently moisten it with water to protect the concrete from cracking and give it maximum strength.
Advice. To make the path more interesting, even before concrete mixture to finally set, “drown” various decorative pebbles, pieces of glass or shells in it.
Budget garden paths made from tires
Transport tires have long been found wide application V dacha farming: they are used to make flower beds, ponds, swings, and now also garden paths. This trend is not surprising, given operational features material: tires are resistant to moisture and temperature changes, easy to care for, non-slip and durable. You can arrange a garden path out of them like this:
 Tire garden path
 - Using a knife, divide the tires into two parts: rolling tracks and sidewalls. To make the knife fit into the rubber easier, lubricate it regularly with oil or soap.
- Cut ribbons from the resulting rings. Adjust them to length and trim the edges.
- Take wide ones wooden boards and carefully fasten the rubber bands to them with nails so that they completely cover the wood - there should be no empty spaces between the elements.
- Remove the top layer of soil no more than 5 cm deep along the entire length of the future path and press wooden boards into the base. If desired, the rubber can be painted.
Country paths made of bricks
Another traditional material for garden paths is brick. It is recommended to use clinker products, as they are characterized by high resistance to various kinds chemical and mechanical influences. It is important that the bricks are intact and without chips, otherwise the path will turn out not only unaesthetic, but also unsafe.
 Brick garden path
 The path is laid in this way:
- Mark the path: drive a peg around the perimeter and stretch a rope between them.
- Dig a trench along the marked contour - up to 25-35 cm deep.
- Place barriers made of bars or boards along the trench.
- Cover the space between the limiters, that is, the “body” of the path, with a 10 cm layer of gravel and compact it thoroughly. Place a layer of sand no more than 5 cm high on top.
- Remove the limiters and make curbs in their place: on both sides of the path, lay one row of bricks in the “edge” position.
- Form from bricks inner space paths: lay them in the usual position, gently tapping them with a wooden spatula or rubber mallet for them to sit down.
Advice. The bricks do not have to be laid closely - to give the path a more original look, leave small gaps and fill them with pebbles. In addition, you don’t even have to cover the gaps - after a while, grass will grow in them and decorate the path.
Multi-format wooden walkways
Wood is one of the most beneficial materials for making garden paths, as it can be used in completely different forms. Let's consider two common options: paths made of boards and paths made of bark.
Site preparation in both cases looks the same: Path made of boards
Further technologies diverge. So, if you are making a path from boards, prepare the component elements: adjust them in length and width and treat them with an antiseptic. If desired, you can give them a twisted shape. Next, install wooden supports along the edges and in the center of the trench along its entire length and secure them with cement mortar. The final stage is to nail the prepared planks to the supports.
If you want to build a path from bark, make sure that the material is durable - it should not crumble. Be sure to treat the bark with an antiseptic. Before fixing the material in the trench, lay a sand cushion on its base, and then drown the bark in it.
Garden paths made of tiles
Although tile cannot be called a very cheap material, it is still used very often for making garden paths. There are several reasons for this: aesthetic appearance, good performance and ease of working with the material. The technology for laying tile paths will convince you of the latter:

Now you know a lot interesting ways make a garden path with your own hands at low cost. Following simple instructions, you can implement any of the above options on your site, so feel free to get to work and discover new opportunities for improving your garden area.
Garden paths at the dacha: video
Hard to imagine country cottage area without a beautifully landscaped garden path. With its help, you can divide the site into zones, fence flower beds or beds, arrange a place for a dining ensemble on fresh air, build a platform for cars. After all, in inclement weather it is convenient to run along the path without getting bogged down in the soft ground and without leaving unsightly footprints. We invite you to find out how to make a garden path using a form.
Step-by-step instructions: garden path
You can make your own garden path using ready-made forms into which the solution is poured. This method is this moment is the most budget-friendly and common among owners who prefer to equip the space with their own hands. The advantage of ready-made forms is that they are made of durable plastic, have a wide variety of designs, convenient sizes for work (60x60x6 or 40x40x4 cm), and are available in the retail chain.

So, the first stage is preparing the space for the future path. At the place of its intended location, markings are made, marking the limits with pegs with taut rope. First of all, you need to assess the density of the soil. If the soil is dense, it will be enough to pour sand and a thin layer of fine crushed stone about five cm and tamp everything down well.

If the soil is loose, then you will have to carry out the following measures: dig a ditch along the width of the tiles, adding to the border, and deepening it by 8-12 cm. Then the soil in the dug ditch is compacted, sand and crushed stone are poured in a layer of 5 to 9 cm, everything is compacted again . While performing this work, you must ensure that the soil does not settle, otherwise all the work will go down the drain. This additional bedding is made under the car area.

The next stage is installing the form on the surface. The embankment of sand and crushed stone is moistened for compaction. If this is a car area, fiberglass or reinforced mesh. The mold is lubricated with a special lubricant, which makes it easier to remove. This lubricant can be replaced with soap solution or machine oil. The mold is treated with a special lubricant once, with machine oil after 2-3 pours, and with a soap solution before each new pour. Moisten the sand again and carefully place the mold on it, pressing it slightly.

Cement mortar is often strengthened with crushed stone, plasticizer, fiber reinforced using following proportions: cement 1 x sand 3 x crushed stone 4 parts; cement 1 x sand 4 x plasticizer according to the instructions. The use of crushed stone or plasticizer reduces cement consumption. It should be noted that the use of a plasticizer increases the resistance of the solution to moisture and temperature, and improves the appearance of the tiles.
Watch the video: Making a garden path
When preparing the solution, mix the dry ingredients, adding water until the consistency of sour cream. It is important not to overfill the water, because... this will cause cracks to appear. You can decorate the tiles by adding color to the solution. The dye can be completely dissolved in the solution, you can only stir it slightly - you will get stains, or you can scatter it over the uncured surface of the tile.
The cement mortar is evenly spread into the mold, avoiding voids, and the top is carefully leveled. Remove the mold when the solution has set a little, after about half an hour, holding it diagonally. To make the mold easier to remove, you can tap it lightly. Then the steps are repeated.

You can walk on the finished path after a week, park your car after 20 days. To complete the work, the seams between the path tiles are filled with sand or soil. Everything is compacted well.

Photo of a garden path according to shape
It’s quite simple to do, so you can try to arrange it yourself with minimal costs. The advantage of such a path is that its cost is lower than that of finished tiles, and you can independently adjust its width and length. Experiment, then your summer cottage will not only be beautiful, but also convenient for carrying out gardening work and rest.
Ten years ago I made a path to my house from concrete stones. Over time, they were overgrown with grass and now look terrible. About 4 years ago in America I saw how molds were used for garden paths, and recently I noticed that they began to be sold here too. I decided not to buy ready-made tiles, but to make them myself.
The form is reusable (enough for about 360 m²), size 60x60x6 cm. The manufacturer promises that homemade tiles will cost 4-5 times cheaper than a sidewalk, and making 10 meters of a path will take 16-20 hours with one mold.
I took a stone mold, but there are also brick and paving slabs. I ordered through this store. For a more realistic effect I used paint under . It is sold separately and costs about 700 rubles.
Quick navigation through the article
Preparing the base
- I pulled out the old stones and removed the top layer of soil (8-10 cm).
- I leveled the base, but it is not necessary to maintain the ideal level, as when laying paving stones. The concrete will accept itself the required form after filling.
- Since the load on a regular path will not be large, I simply compacted the soil. It is advisable to make a bedding of sand and crushed stone 4-8 cm thick and spill it with water before laying it.
- To get an even path along the entire length, I pulled the cord level.
Preparing the solution
The solution was mixed according to the following recipe:
- Cement M400 -1 part,
- Sand - 3 parts,
- Crushed stone (fraction 5-10 mm) or granite screening- 3 parts,
- Plasticizer SP1 - 25-100 g per 25 kg of cement,
- Iron oxide pigment (dye) - 1-3%,
- Fiber fiber - 50-100 g per 25 kg of cement.
I mixed half a bag of cement at a time. First, I threw cement and 125 g of dye into a concrete mixer. Then he added diluted in warm water 75 g plasticizer. Then he added crushed stones and water so that the solution took on the consistency of thick sour cream. To increase durability, I added 50 g of fiber fiber, this is a reinforcing additive. Stir everything for at least 3 minutes.
Filling the form

It is important to lubricate the molds before laying the mortar, otherwise you will not be able to remove them. There is a special reusable lubricant for this, but instead I used machine oil. If it is not there, you can replace it with a vegetable solution or at least a soap solution.
- First I pour the mortar on with a shovel, then fill the mold tightly with a trowel. To fill the voids from below, I hit the mold with a hammer a couple of times.
- Using a rule or an even lath, I go over the top and remove the excess.
- After 20-40 minutes the solution will begin to hold its shape. I remove the template and move on to the next element. The form rises neatly and evenly, with your hands at diagonal angles. After this, you need to smooth the surface again with a spatula.
If there are several templates, you can make a track almost without stopping. But the form must fit with ready-made tiles. That is, to speed up the work, you need to fill the tiles diagonally. If this is a path with one tile, then you need to find the center and go from it to opposite ends.
In essence it turns out concrete slab 3 cm thick and decorative stones on it 3 cm high.
You can walk along the path after 1 day.
Seam filling

The next day you can fill the seams. To do this, mix 1 part cement, 3 parts sand and a little fiberglass without water. This mixture is poured onto the path and sprayed with a sprayer. When the mixture is absorbed into the seams and hardens, the excess is removed with water from a hose. You can use special grout for paving slabs.
Garden paths made using a mold are an alternative to paving stones, natural stone, bricks and monolithic concrete. For those who want to arrange paths in their country house both cheaply and beautifully - best option. With this choice, you will have to work hard with your own hands and spend certain time.
Wonderful imitation of stone using moldsFeatures of paths made using molds
It is most correct to use forms for laying pedestrian paths, as having small thickness and limited strength. Each template is poured separately and the solution must set before the stencil is removed. All this requires a considerable investment of time. At the same time, the use of matrices for making paths in the garden has a number of advantages:

Choose a matrix or make it yourself
 The simplest option is factory ready-made forms, samples of which are shown in the photo. Firstly, they are inexpensive. Secondly, the thin and smooth mold lintels have a variable cross-section, which allows the matrix to be removed without destroying the concrete casting. The template is reusable. There are ready-made matrices made of plastic, silicone, rubber and metal.
If you want to make unusual garden paths, you can make molds for them yourself from wood, metal, silicone, and other available materials. In this case, it is possible to create several different stencils of the required sizes, which will provide a varied structure of the track.
Note that to speed up the paving of the surface, several forms will be required. In this case, you need to purchase enough templates, or make more yourself.
 You can buy silicone matrices or make them yourself
 The most durable homemade mold is made from silicone, but you will have to work hard to create it:
- First you need to decide on a prototype. It will be good to choose several different samples for variety.
- Formwork is made around the prototype to prevent silicone from leaking.
- The sample and formwork are covered with lithol so that the finished matrix can be easily removed later.
- Fill the mold space with silicone, removing air. The operation is performed with a brush and spatula treated detergent. The base of the mold must be at least 2cm thick.
- After the silicone has completely cured, the mold is carefully removed. It will take 2 to 4 weeks for the material to harden.

For many, it is much easier to make molds from metal:
- The basis will be a metal tape with a thickness of 1.5-3mm. For a pedestrian path, a width of 3-4 cm is sufficient; for a platform under a car, tiles with a thickness of 5-6 cm are required.
- The tape is bent in accordance with the required pattern and connected by welding or rivets.
- Welding areas, protruding parts of rivets and burrs are cleaned so that the mold can be easily removed.
- Convenient to use as a ribbon - rings cut from metal pipes and barrels. It is possible to use other available materials.
 Some examples of wood forms
 The easiest way to make forms for walkways is from wood. Of course, such a matrix will last less than a silicone or metal one. In this case, there will be quite large gaps between the covering elements that can be planted with grass:
- It is best to choose larch slats with a thickness of 15-20mm and a width of 60mm;
- individual structural elements are connected to each other with self-tapping screws;
- uneven internal surfaces the forms are cleaned with emery cloth;
- the matrix is treated with impregnation to protect it from moisture and extend its service life;
- Before use, the mold is covered with lithol.
The process of laying a path using a mold

The process of pouring a garden path using a mold is quite simple. In this case, the matrix cannot be removed until the cement has cured.
In order not to stop the paving process, it is advisable to have several templates at once so that after filling the last form, the first one can be used again.
Using a template, we construct the track according to the following scheme: 
Original options for shapes for paths

A relatively simple way to decorate a pedestrian surface is to add color to the concrete. This path will not lose color over time.
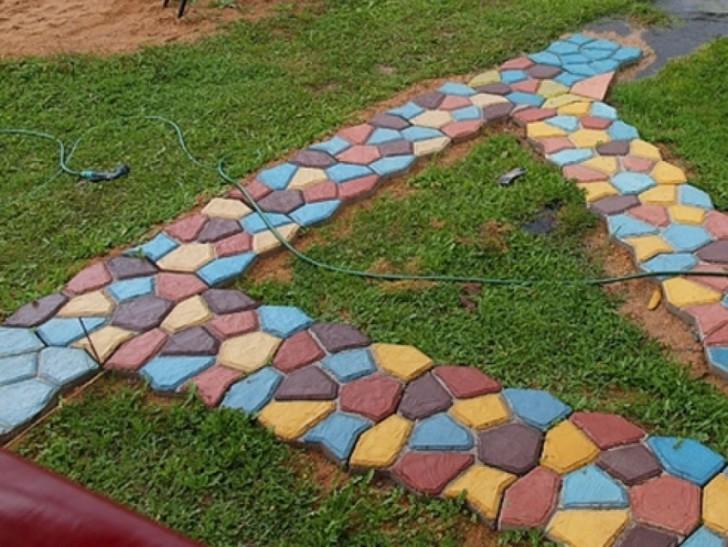
If you use acrylic paint, you can color individual fragments of the coating in different colors. The dye is applied to a dry and clean surface in several layers with intermediate drying.

Another opportunity to decorate the path at the dacha - debris ceramic tiles. The tile pieces are pressed into the mortar before the mold is removed.

You can create an original path in your dacha using burdock leaves as a stencil. The leaves will be slightly different, which will ensure the individuality of each element.

Professional builders know that after concrete is cast, a cat will miraculously walk across it, and there will be its tracks on the surface. You won't give the cat any chance if you do it first. In this case, it is better to lubricate your hands with Vaseline. In this way you can capture the image of any other objects. Whatever option you choose for making a path using molds, it will be cute and practical.
We invite you to watch a video on the relevant topic.