DIY sundial - photo and diagram. DIY sundial. Master class DIY sundial
Read also
First, let's look at the types of sundials. There are three types of counting time by the sun: using horizontal, equatorial and vertical sundials. At home, the easiest way to do the first two types.
Equatorial. The surface of the dial is inclined relative to the ground level at an angle equal to 90 degrees - the latitude of the area and is turned towards the polar star (to the north). The arrow is perpendicular to the dial and can be a regular pin. The hour markings on the dial are every 15 degrees.

Horizontal. The dial is placed strictly horizontally on the ground or stand. The arrow is a triangle with an angle equal to the latitude of the area. Arrow direction is north. The division of the dial into hours-sectors is carried out according to the formula.

How to make a sundial
Equatorial.
- On a piece of plywood or plastic we draw a dial with divisions into hour sectors every 15 degrees.
- Insert a pin or stick of any length perpendicularly into the center of the dial.
Now you need to set the clock correctly.
- We give the finished dial an angle of inclination using a stand. The height of the stand (angle of inclination) is determined for each location separately. For example, for Moscow the angle will be 90 degrees minus 55 degrees (northern latitude) = 35 degrees. Accordingly, if you live in Volgograd, then you need to subtract the latitude of Volgograd (48 degrees) from 90 degrees.
The latitude of each city can be found on Wikipedia.
- Having found the angle of inclination of the dial, we orient it on the ground, directing the now inclined arrow to the north.
The disadvantage of such watches is that they will only show time for half a year, and in winter they will be in the shade.

Horizontal.
These watches are very easy to make with your child.
- Cut out a gnome (triangular arrow) from plywood or plastic. One of the angles is straight (90 degrees), the second is the latitude of your city. That is, in Moscow, it will be a triangle with angles of 90 and 55 degrees, and in Volgograd - 90 and 48 degrees.
- We set up a triangle on the area where we plan the hours, oriented by the compass to the north.
- We set a timer, and every hour we go out and mark the divisions.

IN modern world sundials look, at least, exotic, and in most cases they are a banal decoration - decorating a dacha or a plot of a residential building. But we should not forget that in ancient times it was a very useful and functional thing, the accuracy of which even some modern products of this type may well envy. If the sundial is made correctly, it may well compete with yours. wristwatch. You can make them three different ways, which is what we will talk about in this article. Together with the site, we will get acquainted with the question of how to make a sundial with your own hands - we will talk about three varieties of these items and their correct manufacture.
Equatorial sundial: DIY production
This is a very simple sundial to make - this is due to the fact that the divisions of its dial are the same and amount to 15 degrees, which corresponds to one hour. In principle, this is where everything simple in this watch ends and the complexity begins - the watch of this type it is necessary to establish correctly, which in itself is difficult. Such a clock must be installed simultaneously in two planes.
As for the actual production of equatorial sundials, everything is very simple. It is better to use a hard material like plastic for them. First you make a dial with a gnomon, then you think about how you can install it at an angle, but also orient it to the north, after which the clock will work. By the way, the angle of inclination of the gnomon can be easily adjusted with a protractor and rulers - the drawing tool has a special lock that allows you to set the desired angle between a pair of rulers. By the way, for our hemisphere, the clock should be pointed towards the true north pole, but if you make a clock while in the southern hemisphere, then the gnomon and dial should point towards the true south pole. In this case, the dial will be a little different - it will be a mirror image of a sundial for the northern hemisphere of the Earth.
You can see what a sundial can be like in this video.
DIY horizontal sundial
A distinctive feature of this type of watch is the horizontal arrangement of the dial - the gnomon is oriented exclusively towards the true pole of the Earth. On the one hand this is good ( simpler technology manufacturing), but on the other hand, not very well, since setting the clock looks very problematic. In such watches, the shadow from the gnomon does not move the same distance over the course of an hour, so you need to be patient and use a watch. The divisions will have to be applied in accordance with a mechanical or electronic chronometer. Such watches are made as follows.

During even hours, we simply place marks where the shadow of the gnomon points.
Once the dial markings are completed, the watch can be used fully. In principle, they can be used immediately after installation, only without divisions you can determine the time exclusively intuitively.
How to make a polar sundial for the garden
The beauty of this solar chronometer lies in its dial - it is not round, like most illogical devices, but linear. The shadow from the gnomon moves along it in a straight line, which greatly simplifies the technology of making sundials. By by and large, this is still the same equatorial sundial, only its gnomon is not a pin, but a stick located across the so-called dial. The divisions in such watches are also applied unevenly, which makes it possible to claim that this type of sundial is some kind of hybrid between the first two options. Do-it-yourself polar sundials are made as follows.

In principle, there is a fourth option for sundials, which are very difficult to manufacture and configure - these are vertical, or, as they are also called, wall sundials. They are more convenient to use, but their assembly requires a lot of accurate calculations and very jewelry (no less precise) manufacturing.

Sundial do it yourself photo
To conclude the topic of how to make a sundial with your own hands, I will say a few words about the materials. Their choice depends entirely on the purposes of production. If this is pampering or just Toolkit for children, the chronometer can be made from cardboard. If you want to make a truly working model and use it to determine the time, then you need to choose more reliable materials. In this case, the dial can be made of concrete (alternatively, cut off the surface natural stone big size), and the gnomon is made of steel - such a watch can be safely left on fresh air, and at the same time they will last a very long time.
On the eve of summer, sun, summer season, gardening and all sorts of things I want to offer you step by step instructions How to make a horizontal type sundial on your site. Finding out the time by them is sometimes even more convenient than by mobile phone(because I don’t always have my phone with me; my hands are dirty; the sun shines off the screen).
The basis of the sundial is the gnomon. This is a stick, the shadow of which will show us time. The more accurately we orient this stick parallel to the axis of rotation of the Earth (how to do this - see points 1, 2, 3 below), the more accurate the device will be. Any straight stick, similar in size to the handle of a shovel, will work as a gnomon (you can use the handle itself if you have an unnecessary one lying around).
We find a place where there are not many people and dogs running around, and where you often pass. The main thing is that it is illuminated by the sun most of the day. To do this, find the south (either navigate using Google Earth, or turn your face to the sun around 12–13 o’clock) and look for a place on the site that is as clear as possible (from roofs, trees, etc.) southern half sky.
Points 1 and 2 are devoted to finding the exact direction to the North. Yes, you can also use a compass for this, but we must remember that magnetic declination (that is, the deviation of the compass readings from the real direction to the geographic North) in our country can reach 10, 20 or more degrees. In addition, you can catch a local magnetic anomaly. Therefore, the method of determining North by the sun is more accurate and reliable.
1. By the time of true noon (solar climax, also mistakenly called “zenith”), we prepare a plumb line (for example, we hang a pebble/piece of iron on a rope and make sure that it all does not dangle in the wind) and a horizontal platform on which the shadow of the rope is visible. I will describe methods for calculating the time of true noon for your area below.
2. At the moment of true noon (it would be a good idea to synchronize the time with the Internet in advance, for example using the time.is service, or the ClockSync Android application), we mark the direction of the solar shadow of the plumb line, for example, using several pebbles, which we place along the shadow. This is the exact north-south direction (meridian direction).
3. We calculate the tangent of the angle to the horizontal at which the gnomon (that is, our stick) should stand. To do this, find out the latitude of the place, enter it into the calculator and press tan. For example, if the latitude is 56 degrees, then tan(56) = 1.483.
We multiply this number, for example, by half a meter (50 cm), we get 74 cm. We stick a stick into the ground, in the direction strictly north (we found it out in the last point by plumb line), from this place we place a pebble 50 cm from the place where the stick is stuck, and tilt the stick so that it passes over the pebble at a height of 74 cm. In Figure 3 (and 3a for greater clarity) I showed a plumb line that descends from the gnomon and falls on the meridian line (the length of this plumb line in our example = 74 cm) . Instead of a plumb line, you can “shoot” with your eye, but it won’t be as accurate. And in this position we begin to drive the stick in, checking/adjusting from time to time so that it passes over our “half-meter” stone at a given height. As soon as the stick holds tightly, we can congratulate ourselves - the most important part of the work is done: we have oriented our gnomon in parallel earth's axis. And, by the way, he also points out with good accuracy North Star(you can check at night, “shoot” your eye along the stick).
4 and 5. The following positions of the hour markers, made by timer. It should be noted that although the figure shows 12 o'clock for the noon marker, in reality the civil time for it will be different. To avoid thinking about this, the easiest way is to mark the dial, approaching the gnomon at 13:00, 14:00, and so on, and simply mark the direction of the shadow. And the next day, from morning to noon, mark the remaining hour markers.
The hour markers themselves can be anything you want: you can hammer in tablets with numbers, you can line them with stones.
Calculating true noon time
Let me list exactly what things happen at the moment of true noon:
* the sun is exactly in the South (for our northern latitudes);
* horizontal shadows from vertical objects fall exactly to the North;
* the sun is at the highest point of its daily course;
* this is the moment - with good accuracy the midpoint between sunrise and sunset on this day.
Each meridian has its own moment of true noon. So, say, in comparison with the center of Moscow, true noon in the east of the city occurs about 1 minute earlier, and in the west - a minute later. Here annual schedule noon time for the center of Moscow (for the UTC+3 time zone, in which Moscow has been permanently located since October 2014):
That is, on the Moscow meridian you can simply use this graph. The graph will have exactly the same shape in your location, only it needs to be shifted according to vertical axis by the amount (D–37.6)/15 hours, where D is your geographic longitude. For example, let’s take Perm, its longitude is 56.2 degrees, substitute it into the formula: (56.2–37.6)/15 = 1.24 hours = 1 hour 14.5 minutes. That is, in Perm, true noon occurs 01h14.5m earlier than in Moscow, and according to Moscow time, 01h14.5m must be subtracted from the above schedule. For example, for May 22, we get 12h26.5m minus 01h14.5m = 11:12 Moscow time, add 2 hours (the difference in the time zones of Perm and Moscow), we get 13:12. Let's remember this time to compare with the next method.
The second method is to find your locality on a weather website that shows sunrise and sunset times. For example, for the case of Perm, we open the Yandex weather site yandex.ru/pogoda/perm and see there Sunrise: 04:37 Sunset: 21:47, we find the arithmetic mean of these two times (04:37 + 21:47) / 2 = 13:12 . Same time as we got above.
The third method is the use of calculation programs. You can choose a program to suit your taste, I use my Day–night (at the link daybit.ru/video/video-i-soft.html you will find a video on its use, and the program itself), and it gives the time of noon for Perm = 13:11:45.
Notes
1. The above graph for Moscow is a consequence of the so-called Equation of Time - the difference between mean solar time and true solar time. It should be noted that the readings of your sundial will change with the same amplitude as in this graph. That is, up to plus or minus a quarter of an hour throughout the year. However, if you look closely, you can see that the most interesting for us summer time the fluctuations are not so great and fall within plus or minus 5–6 minutes. Sometimes, when they want to get minute accuracy, a correction schedule is specially drawn up for sundials throughout the year.
From this graph, for example, it is clear that if you set your sundial in mid-June, then by mid-September it will be 5 minutes faster.
2. Why shouldn't you just use a vertical stick? Why bother with its inclination and its parallelism to the Earth's rotation axis? The fact is that a clock made using a vertical stick will sooner or later begin to show a noticeably incorrect time. So, a clock made for a vertical stick in June will go wrong by 1 hour in the mornings and evenings in September. More details here sundial-ru.livejournal.com/2337.html
3. If you want, you can immediately calculate the dial for your area using, say, the Shadows shadowspro.com program, take the angles from this calculation and immediately measure them on the ground, instead of running around all day and marking the sun's shadow.
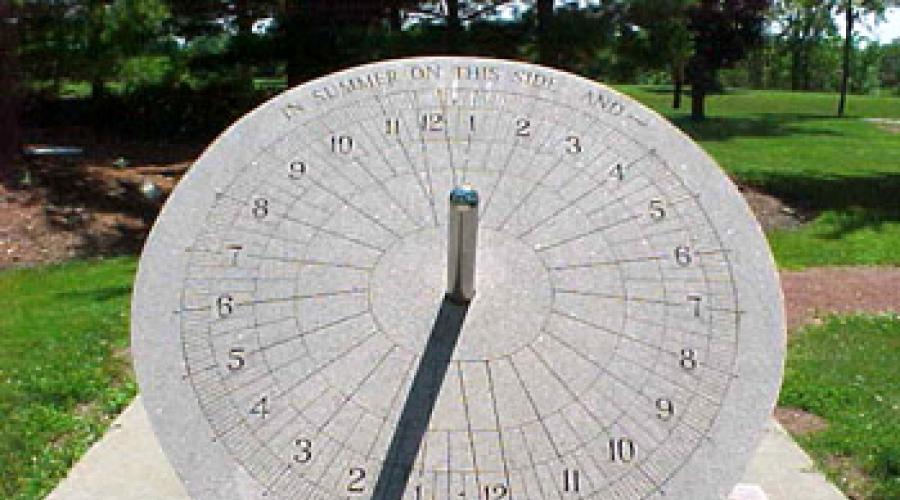
I HAVE LONG DREAMED OF HAVING A GARDEN DECORATIVE CLOCK IN FRONT OF THE GATE TO THE PLOT.
I LOVE AND CAN WORK WITH STONE, SO I TOOK IT AS THE BASIS OF A FUTURE PRODUCT.
IT TURNED BEAUTIFUL AND USEFUL - NOW BOTH ME AND ANY PASSERBY ON A SUNNY DAY CAN EASILY DETERMINE WHAT TIME IT IS.
I found a boulder of suitable size with a wide flat surface.
To check the quality of a boulder, you need to scrape it with something - if the stone crumbles easily, then it is not suitable for work. Granite is best polished and ground.
Then he started doing the calculations. I found out the latitude at which Mogilev is located: 53 degrees. 55 min. - the angle of inclination of the gnomon* (53 degrees) along the latitude of the area guarantees the accuracy of the sundial. Experienced way determined the approximate height of the gnomon; its shadow should not extend beyond the boundaries of the future dial.
I marked a right angle on a piece of aluminum. Using a protractor, I drew an angle of 53 degrees from the bottom line upward. 55 min. (see diagram 1). I drew curly lines inside to make the pointer look more fun, and cut it out with a hacksaw (can be made from long nails, plastic pins or knitting needles).
On flat surface The boulder marked the center of the circle, drew a line from it to the edge - this is the noon mark of 12 o'clock. From this line, using a protractor, I laid off 15 degrees, in each direction 8 times (Diagram 2) - dial marks from 4 am to 20 pm.
1. The dial markings can first be drawn on a sheet of paper that exactly matches the size of the frame plane**, and then transferred to the plate.
2. If the dimensions allow, you can mark the half-hour and quarter-hour divisions on the dial with pieces of stainless wire, colored stones, glass, fixing them with waterproof glue.
Using a grinder with a diamond wheel, I sawed these lines on the stone, 2 mm wide and 5 mm deep. The gnomon was driven with a hammer along the noon line, aligning the center of the pointer with the center of the dial as in diagram 2
I twisted aluminum wire d 1.5 mm into a spiral and drove it into all the cuts with a hammer (photo 1) At the ends of the lines I drilled holes and drove cap nuts into them (photo 2) I hollowed out a recess in the lower part of the boulder and tried a pipe d 150 mm into it - on such a pedestal it is easier to set and tighten the watch. I drove the pipe into the ground (photo 3) and placed a boulder on top.
I set the compass dial to the noon line to the north. I checked the readings of the sundial as usual at noon. I placed small cobblestones under the boulder and cemented it.
On permanent place The frame of the sundial is installed strictly horizontally. You can check the level using a plate filled to the brim with water.
I came up with a corresponding design for such a watch. Under the cobblestone I placed a wire curved in the shape of a neck and head (photo 4) - it turned out to be a swan. I drilled the mushroom caps and placed them on the rods in the legs (photo 5)
I found a stone heart in the Dnieper, secured an arrow on both sides (photo 6). I stuck a sword into another cobblestone, having first sawed the stone (photo 7). By the way, I connected all the parts without glue.
There are 5 dragons in my family according to the eastern city, so I sculpted a sculpture of this animal from a chameleon stone. Near the garage, the clay wall was crumbling. Strengthened it with cobblestones and decorative tiles by using cement mortar(photo 8)
On a note
The sequence of hour symbols on the dial follows the rule of movement of the hand of a mechanical watch. The reference point is the noon line running from the base of the gnomon. It can be determined quite accurately using a compass (north-south line).
It’s even more convenient to use simple watch, comparing their readings with the shadow of the gnomon. This line is determined especially accurately by the clock on the days before and after April 16, June 15, August 31 and December 26. The simplest clock design is horizontal, so you can make it with your children right on the ground: draw an even circle, stick a stick in the center - it will serve as a gnomon for you.
Draw a straight line from the center of the circle to the north - noon according to astronomical time. Divide the circle into twenty-four equal sectors. Tilt the pointer stick in the direction of north at an angle corresponding to the latitude of your particular area.
DIY sundial - photo

DIY sundial - drawing
* Gnomon is a rod that is attached to the dial, and its shadow shows the time.
**Cadran is a surface on which the appropriate markings are applied.
 Luxury Women Watches Magnetic Starry Sky Ladies Quartz Wristwatchifashion…
218.45 rub.
Free shipping★★ ★★ ★★ ★★ ★★ (4.60) | Orders (4647)
Elena Belega
Sundials are the most reliable, because they never run ahead and are never late. Therefore, they were probably built by the Egyptians, Chinese, Babylonians, Greeks, Indians, and Peruvian Incas. Want to try? Making such a clock can also be a wonderful lesson in mathematics and astronomy for your children. The simplest equatorial sundial can be made from scrap materials and placed in the garden or on the balcony. These watches are called equatorial because the plane of their dial is parallel to the plane of the earth's equator.
1. Let us determine the direction to the north as the most ancient and in an exact way. To do this, we fix a vertical pin (gnomon) on a horizontal surface. A couple of hours before solar noon, mark the position of the shadow from the gnomon with a dot and draw a circle with a center at the place where the gnomon is fixed and a radius equal to length shadows from it at the initial moment of observation.
2. Let's follow the shadow: it will decrease, move away from the circle we drew, but at some point it will begin to grow and cross it again. Let's fix this touch of the shadow with the second point and connect it to the first. Divide the resulting segment in half. A straight line passing through the center of the circle and the middle of the segment will give us the noon line. This line is the exact north-south direction.
3. Now let's mark the dial. For equatorial watches, this is as easy as shelling pears: divide the circle into 24 equal parts of 15° (24h x 15° = 360°) and mark the hours.
4. It's time to make the body. Thick cardboard, a piece of plywood, or a thin board (we used polystyrene foam) are suitable for this. It is necessary to fix the gnomon perpendicular to the surface and place the dial on it.
5. All that remains is to correctly orient the resulting structure. To do this, the following conditions must be met: a) the dial line “6-18” must be located strictly horizontally; b) the line “12-24” should coincide with the north-south direction, which we have already found (see 1); c) the plane of the clock dial should be tilted to the north so that the angle between the gnomon of the clock and the horizon plane is equal to the geographic latitude of your area (for Moscow this is approximately 55.5°). The clock is ready!
They reflect the truth solar time, and their testimony will coincide with yours wristwatch, if you take into account the summer time in force in our country and maternity time. In winter, a clock of this design, unfortunately, will not work: the sun in our latitudes is too low above the horizon, and the gnomon will not provide shade.