Homemade machine for. How to make your own machines and devices for your home workshop. Stamping, forging and bending
It's nice to see when a person made everything and other household items with my own hands. To simplify the process of cutting metal or sawing elements from wood, they build homemade machines and devices for the home workshop. This solution saves not only time on manufacturing products, but also money on purchasing ready-made ones. Several practical and interesting options Let's look at it below.
DIY pipe bending machine
Read in the article
How to use homemade machines and tools for your home workshop
The use of homemade machines and devices for the home workshop is aimed at solving several problems:
- Simplification of the metal processing process. When creating household items, a metal cutter or press is often required.
- Improving wood processing. Even to build small shed or make it wooden, others are needed.

Buying a ready-made tool is quite expensive, so the use of homemade machines and devices for the garage is becoming more and more relevant every day. Among the most common options for home tools are:
- carpentry workbench;
- device for quickly sharpening knives;
- device for sharpening metal drills;
- drilling machines;
- press;
- cutting disc machines.

Here are a few photos of do-it-yourself tools and devices from “homemade” people:
1 of 4


Practical DIY tool shelves
Before creating devices and with your own hands, determine the storage location of all devices, so that later you do not have to search throughout the workshop or where everything is. It’s not difficult to make a shelf for tools with your own hands; the main thing is to decide on its dimensions and material of manufacture.

The easiest way to make shelves is to assemble them from wood. Don't forget to cover finished design protective varnish or to prevent rotting and swelling of the wood.

You can create combined option from a metal support and wooden shelves. Here detailed instructions to create such a homemade model:
| Image | Sequencing |
 | Assembling the frame. To do this, prepare two side frames consisting of 4 corners. Connect the elements using . Then, tighten the 2 frames together using 4 corners. |
 | When the frame is completely assembled, proceed to making the shelves. They can be made from wood or metal, as well as from other dense materials at hand. It is enough to cut the canvases of a suitable size and attach them to a metal base. |
 | If desired, you can make the rack movable by attaching four small wheels. Or install it firmly in a designated space in the garage. |
You can find others interesting projects and drawings for making tool shelves. Watch the video on the topic:
And also do it yourself useful devices for household:
1 of 4


We make a carpentry workbench with our own hands according to the drawings: video instructions and photo examples
Among the common do-it-yourself devices is a workbench. Durable and dimensional, allowing you to securely fasten the workpiece, useful for high-quality cutting of wood and creating from it various elements.

The device package includes:
- Working surface. Hard is used for it to increase the service life of the device. The thickness must be at least 6 cm.
- Supports. Collected from wooden beams or metal plates. The main task is to ensure the stability of the entire mechanism.
- Vise for securing the product. If the table is long, you can install two vices at once.
- Tool box. Useful recess or retractable design, providing quick access to necessary small parts.

To assemble a carpentry workbench for your workshop yourself, you should choose a drawing and purchase materials for the work.
DIY carpentry workbench drawings
Before purchasing materials to assemble your own workbench, you should think about a detailed drawing. It should include the dimensions of the machine itself; it is advisable to note the dimensions of the materials used and their quantity.
For example, finished drawing A DIY folding workbench may look like this:

Whatever model you choose to create, take into account several features of the workbench that ensure ease of cutting wood:
- height and length of the master’s arms: the height and width of the tabletop depend on these parameters;
- which hand is working: place the vice on the right or left;
- what blanks will be made: choosing the shape of the table;
- how much space in the room do you allocate for the workbench?
Considering all these parameters, it will be easier for you to decide on the drawings carpentry workbench and machine dimensions. Here are some interesting examples:


Instructions for assembling a wooden workbench with your own hands
You can buy a wooden workbench in a store or through online catalogs, but it’s cheaper to make it yourself. Let's take as a basis a simple option with typical tabletop dimensions: length - 150-200 cm, width 70-120 cm.
The manufacturing work will include several stages:
| Image | What need to do |
 | Make the top cover from thick ones to make a shield with a width of 70 to 200 cm. Fasten the elements with long nails, and you need to drive them in with outside, and carefully bend the inner one. The working surface of the workbench is made only of wood or. |
 | Sheathe the lid along the lower perimeter with a 5 by 5 cm beam. This will make it more convenient to attach vertical supports. The location of the supports depends on the size of the tabletop. It is better to make them from thick rectangular timber minimum 120 by 120 mm. |
 | The carpentry workbench must be installed correctly. Be sure to secure it firmly. If it will be mounted outdoors under a canopy, dig holes for supports. Indoors, use other fastening methods. |
When the structure is assembled, install a vice on it. To fully understand how to assemble a carpentry workbench with your own hands, watch the video:
Making a carpenter's vice for a workbench with your own hands
Professional “homemade workers” assemble not only tables for work, but also vices with their own hands according to drawings. Any design of such a clamp will include several elements:
- Supports, where each one has a sponge for clamping.
- Moving jaw.
- Metal guides. The sponge moves over them.
- Lead screw for moving elements.
- Collar. Necessary for rotating the screw.
When making a homemade vice with your own hands, you can use various available materials. For example, there is a design option from profile pipe. To do this, prepare several pieces of pipe different sizes, steel stud with coarse thread and double nuts.
Instructions for creating a bench vise from a profile pipe:
| Image | What need to do |
 | The largest pipe acts as a body. Supports are soldered to it from below. A 3-4 mm steel flange is put on the back side. A hole is drilled in the center for the running nut, and opposite the front support is the rear jaw. |
 | There is a front steel flange on the internal moving part. A stud is mounted in it, with lock nuts attached to it. Thrust washers are placed on both sides of the flange. The last element is a movable tube attached to the front jaw. |
And also watch the video “do-it-yourself vice at home”:
DIY metal workbench drawings
A metal workbench does not differ much from a carpenter's workbench. The base is hard metal, not wooden frame. A vice is attached to it, and the entire workbench is designed to withstand the force of a sledgehammer.

Do-it-yourself metal workbenches can have one, two or three cabinets, and also not have shelves and drawers for small parts. In terms of strength for working in a garage, you can make a regular table from metal up to 5 mm thick and reinforced structure, where sheets from 10 to 30 mm are applicable.
Here are some useful plans for making a metal workbench for your workshop:


How to make a device for sharpening knives with your own hands: drawings and photo examples
No home is complete without a knife in the kitchen. It is quite difficult to make the correct one without special devices: you need to maintain the desired angle and achieve the ideal sharpness of the blade.

For each knife, a certain sharpening angle must be observed:
- A razor and scalpel require an angle of 10-15⁰.
- Knife for cutting bakery products – 15-20⁰.
- Classic multifunctional knives – 25-30⁰.
- For hunting and hiking, take a device with a blade angle from 25 to 30⁰.
- If you want to cut hard materials, then sharpen at an angle of 30-40⁰.

To ensure the desired angle, it is worth buying or making a sharpening device. For example, you can assemble a sharpener with your own hands.


A comment
Tool selection specialist at VseInstruments.ru
Ask a Question“If you don’t use sharpening every day, then 1000 rpm is enough for a high-quality result and a long service life of the device.
"To assemble such a machine, you will need a motor from a washing machine with a power of 200 W. Completely for creating a sharpener from an engine from the Progress of work on creating such simple device will be as follows:
- Sand the wood blocks sandpaper, removing burrs. Make markings depending on the desired angle.

- Attach a stone to the drawn line to give the blade a sharp edge. To do this, attach it to the block and mark its width. Then, make cuts on the markings, up to 1.5 cm deep.
- Attach abrasive stones to the resulting recesses so that the grooves coincide. Then, install the sharpening stone by screwing it onto the bolts.

There are many ways to make a homemade knife sharpener. Choose the one that suits you and try to create a convenient and useful tool for home.
How to make a device for sharpening a metal drill with your own hands
They make their own not only a sharpener for blades, but also a machine for drill sharpening on metal. Here are a few drawings useful for work:


 Ready home machine The simplest and most common version of such equipment for a garage is a converted drill. To work you will need:
 - base frame;
- rotation mechanism;
- vertical stand.
For the rack, they usually use either boards. The drill is lightweight, so there is no need to use metal. In this case, the frame must be made massive in order to reduce vibrations during operation of the device.

To properly connect the frame and vertical stand, and also assemble all the equipment into one whole machine, pay attention to the video instructions:
DIY drawings with dimensions for a drilling machine
To correctly make any machine or practical device for private use, you should first make a drawing with dimensions. Only then begin preparing materials and assembling the device.
Here are some examples of do-it-yourself drilling machine drawings from a drill:


You can also do homemade vice for drilling machine. Below is a video instruction for assembling such a device:
Article
Many car owners use their garage as a workshop, gradually filling it with practical devices that make car repair and maintenance easier. Many of them can be made independently using the recommendations presented in this article.
Many accessories for a garage workshop can be made independently; the video below demonstrates some of them.
Garage DIYs- devices that make garage life much easier; in addition, they work no worse than factory machines. Having equipped your workshop with such devices, you can make your own necessary details for cars, as well as various crafts for home or cottage.
Video of homemade tools and accessories for the garage
It is difficult to predict in advance what devices may be needed when repairing a car, however, there are some homemade products, some of which are used most often. Some of them can be seen in the video below.
Drawings of homemade devices
Pipe bender - useful in household a device that allows you to bend metal or polymer pipe at a certain degree. Bent pipes often used in the construction of greenhouses and greenhouses, installation of heating and other needs. Using the presented drawing, you can make a manual pipe bender yourself.

A vice is a practical device used when performing plumbing work. With its help, it is possible to reliably fix a part requiring metalworking in a certain position.
Consists of this device from several parts:
- base plate;
- 2nd lips – movable and non-movable;
- lever;
- chassis screw.
Using a small-sized bench vice, the drawing of which is presented above, it is convenient to sharpen and otherwise process small parts.

Having a CNC milling machine in your home workshop allows you to perform whole line work on machining tree.
Homemade milling machine consists of several units and parts:
- bed;
- calipers designed to move cutters;
- caliper guides;
- spindle with installed cutter;
- microcontroller or switching board with microcircuits that provide automation of the machine;
- electric motor with power supply;
- drivers responsible for transmitting commands from the controller to the electric motor;
- a vacuum cleaner for collecting sawdust generated as a result of the operation of the machine.
A DIY CNC milling machine allows you to perform engraving and milling work.
Homemade tools for car repairs
 Windshield wiper arm remover – special tool, facilitating the process of removing the wiper arms. You can make it yourself from a piece of reinforcement, a six-channel channel and a ten-bolt. To do this, use a drilling machine to make 14 holes and weld 2 nuts on both sides of the hole and a handle from the fittings, screw the bolt into the workpiece and, putting on heat shrink, screw in the threaded rivet. The tool is ready.
Another version of the device for shooting windshield wiper arms is shown in the photo below.

 Another useful homemade device with which you can manually re-align your wheels yourself. Another version of this device can be seen in the photo below.

 When carrying out major car repairs, you usually cannot do without a lift. A device made in a factory is not cheap, and is not needed very often, so it can easily be replaced with a device made at home.

Homemade machines and devices for the garage
By making devices for mounting and balancing tires, you can carry out this work yourself, significantly saving money on car maintenance. In addition, such devices will come to the rescue if it is not possible to come to a specialized tire shop.
 In your garage workshop, you can equip a universal tire changing machine using available materials - metal pipes and the hub.
 When performing various crafts for the home, it often becomes necessary to drill a straight hole. This is difficult to do with a regular drill, but if you make a stand for the drill, like the one shown in the photo, then drilling without distortions will be much easier. This design can be made from various materials. For example:
- made of metal;

- made of wood.

Using the diagram presented below, you can make your own drilling machine from a drill.

Usage homemade press will allow the garage workshop to produce products using the pressing method. A similar device can be made from a hydraulic jack fixed to the top of the frame, which in turn is welded from scrap materials. The pressure in this case is directed downward.

Another version of a homemade press, the design of which involves attaching a jack at the base of the bed. In this case, the pressure process is carried out upward.

Using a homemade press, you can straighten, bend sheets of metal, compress cardboard, fasten individual elements. The video below demonstrates how to do this the right device on one's own.
Tool storage devices in the garage
Having order is the key to comfortable use of workplaces in the garage. To ensure this order in the workplace, special organizers are designed to make it convenient to store and easy to find. necessary tools. You can make such devices yourself, using available tools.
 Simple and in an accessible way keep hand tool, is a wall organizer made from tin cans, attached to plywood sheet. Additionally, you can nail several hooks or nails to it to conveniently hang the measuring and electric tool. In the absence of tin cans, PVC pipes can be used as holders various diameters, cut into pieces and screwed to a sheet of plywood or chipboard.
 It's even easier to do special device for storing screwdrivers. To do this you need to take wooden block and drill holes in it the right size. Mount the finished holder on the wall. On the same holder you can organize a storage system for chisels and chisels. It is enough to cut out special holes in a wooden blank. In the same way, you can make a holder for power tools by cutting out the corresponding holes in a wooden shelf.
 Interesting way Tool storage is suggested in the photo above. Its principle is based on the use of magnetic tapes attached to metal strips. Using such a system, it is convenient to store drills, keys and other metal tools.
Convenient and practical organizers for storing screws, bolts, nails and other small items can be made with your own hands from transparent plastic cans with lids. To prevent them from taking up space, you should attach them by the cover from below to the shelf. This and other ways to store tools allow you to efficiently use space in the garage and have everything you need at hand.
The video below demonstrates how to set up a simple and convenient system storage of tools.
Homemade woodworking tools for the home workshop

Homemade milling machines can perform one or more operations. Preference, of course, is given to multifunctional devices that save space in the garage workshop. With their help you can:
make indentations a certain shape;
drill holes
make grooves;
process the workpieces.
The simplest milling machine can be made on the basis of a drill. To do this, it is fixed to steel profile or in a plywood body, and a rotating clamp is placed opposite it. Parts are processed using special cutters held by hand.

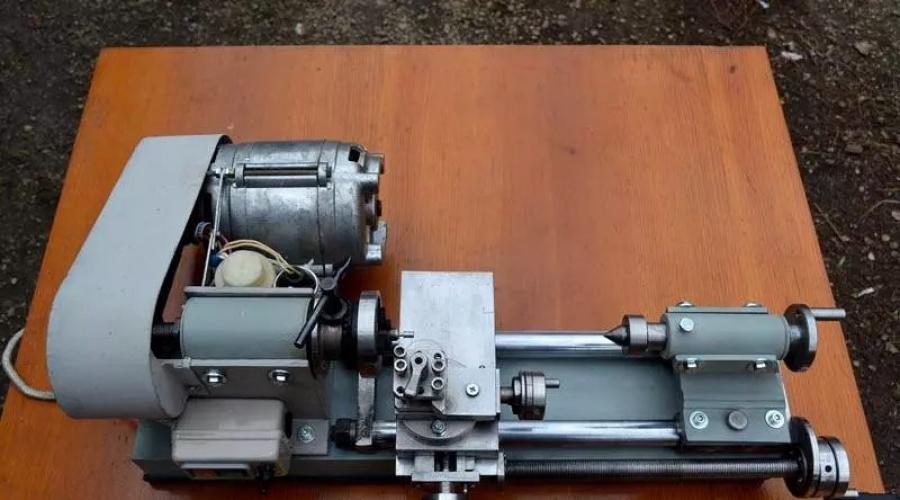
Homemade lathe
DIY creation lathe allows you to make dishes, interior decor and furniture from wooden blanks. Such a device will be affordable alternative industrial projects, and will help you realize your creative potential. A homemade lathe can be made from individual components and parts:
- an electric motor used as an electric drive for the machine;
- a headstock, which can serve as an electric sharpener;
- tailstock made from a drill;
- stop for cutters;
- transverse guides;
- a frame made of metal profiles or beams.
Front and tailstock lathe are the main working elements, between which the wooden blank. The rotating movement from the electric motor is transmitted to the workpiece through the front headstock, while the rear headstock remains static, responsible for holding the workpiece. If you equip a homemade lathe with additional devices - a baluster, a trident, a copier and others, then its functionality will increase significantly.
The video below demonstrates how to make a lathe with your own hands.

Drill if necessary precise holes in metal, plastic or wooden parts, experienced craftsmen It is recommended to use a drilling machine. Unlike a drill, which vibrates strongly during operation, this device provides high-quality results, regardless of the material and thickness of the workpiece. You can make a simple drilling machine yourself using the same home drill, but installing it in a vertical position on a frame made of furniture board and attaching it to a metal stand. If necessary, such a machine can be equipped with an asynchronous motor.
As a rule, home craftsmen do not stop at making the machines themselves. Very often they work to improve existing equipment.
The video below demonstrates useful accessories for a lathe that expand its functionality.
Homemade metal tools for the home workshop
These do-it-yourself devices for the home workshop are designed to facilitate the metalworking process. They are usually made from scrap materials and tools.
Among the most popular devices are:
- pipe benders;
- press;
- vice;
- milling, metalworking, turning, drilling and thicknessing machines;
- devices for sharpening drills, knives and other tools.
With their help home craftsman can produce practical devices for a summer house, garage, and also to equip comfortable home. Examples of useful machines and devices in the household can be seen in the photo below.

Homemade cutting machine for metal
The video demonstrates how to make some useful household devices.
Taking into account the presented recommendations and drawings, any home craftsman will be able to make useful devices for the garage and machines for his workshop, arrange an ergonomic space in it, and realize his creative abilities.
“You can never have too many tools” - everyone who has been involved in construction or making something has heard this phrase. The right tool is invaluable when you need to saw something off, weld it, or connect parts. The section on FORUMHOUSE about homemade machines and devices, which is called that, is constantly updated with new products that simplify and optimize the work of a builder or a “jack of all trades.”
We have already told you, and... Let's continue the topic we started. Today we will talk about homemade turning, plumbing and even gardening tools and devices for construction.
Grinder cutting machine
Workshop machines are always in demand, but angle grinders Grinder), popularly “grinder”, one of the favorites in the arsenal of any home handyman. But the instrument requires a very careful attitude, because any neglect may result in serious injury. Therefore, when cutting large volumes of metal (when making a fence or cutting reinforcement), many people prefer to work with a metal cutting machine.
You can buy a frame for an angle grinder on the Internet, but to save money, you can make a cutting machine yourself, from an “unnecessary” or “superfluous” grinder on the farm, which almost every owner has country house. As we'll see, it's good for more than just sharpening garden equipment!

Ivici FORUMHOUSE user,
Moscow.
I have an angle grinder weighing 5.5 kg. One day I thought about how to make it easier to use. After all, working with it, moving all the time, is inconvenient - your hands get tired quickly. I decided to make a convenient cutting machine from what I had.
Looking ahead, let's say that the machine (more precisely, its second modification) was a success: it cuts smoothly and without distortions.

Ivici I made it like this - I took a piece of channel No. 6.5 (65 mm wide and 36 mm high). This is the basis of the machine.

A steel strip of 50x5 mm was also required. With its help the angle grinder is secured. A 4x2 cm profile and a three-millimeter piece of steel were also required. A figure eight bolt serves as a turning axis.

In the first version of the machine, a powerful door hinge. But, due to welding, under the influence high temperature, all the lubricant in the loop has burned out, and a backlash has appeared in the assembly.
According to the user, the most difficult thing was to accurately mark and drill three holes with a diameter of 14 mm for attaching angle grinders with bolts to the threaded holes intended for installing the side handle.

To do this, I had to use a stepped (conical) metal drill.

I also had to work with a round file. A small bore of the holes, due to the backlash, allows you to move the angle grinder a little during the assembly process and accurately install it. After all the parts are ready, the user welded the piece of hardware holding the angle grinder together, assembled the entire structure in rough form, checked all the corners and, making sure that everything was mounted as it should, finally welded the entire structure.

Ivici
The machine is attached to the support table (a piece of slate 1 cm thick) with six self-tapping screws. You can dispense with the return spring, just tighten the axle bolt more tightly. There are no backlashes or distortions when cutting the workpiece. You can also cut at an angle of 45 degrees.

Another homemade machine from an angle grinder was suggested by a portal user with the nickname Bistok.

As usual, at first we start a small construction project or renovation, then we realize that we need new ones Building tools and devices, and then the search begins for the most optimal solution. Well, don't buy it!

Bistok User FORUMHOUSE
I decided to make the stairs out of metal. To avoid defects, backlashes, and discrepancies, maximum precision is required when cutting metal parts. Therefore, I decided, using an angle grinder as a basis, to make a sawing machine.

Everything that is usually lying around in the home workshop (and it would be a pity to throw it away) of a zealous owner went into action, waiting for its finest hour. As a stand for a cutting machine Bistok I used an overlock table.

The swivel unit is made from the hub from the “nine”, because it has a bearing.

As in the option described above, the most difficult thing was to “catch” the right angle between the cutting disc and the stop angle. After all, the accuracy of sawing metal depends on this unit.

The end result is clearly demonstrated by the photo below.

To turn on the grinder Bistok made additional wiring - brought it out regular switch and a socket, and from this switch comes an extension plug.
You can buy a homemade machine from a craftsman you know, but it’s much better to upgrade to a creator of devices of this level!

Bistok
I got a portable machine. I welded a corner to the handle to get 3 support points for the angle grinder. The fastening with two bolts was adjusted to the location. I work only in safety glasses. I am very pleased with the result of the work done. I didn’t buy anything extra to make the machine. The cut is exactly 90°.
Budget drilling machines
In addition to cutting machines, popular various devices for drilling holes in metal. Starting from stationary drilling machines and ending with devices in which a conventional drill is fixed, like a “driller” user FORUMHOUSE with nickname g8o8r8.

g8o8r8 FORUMHOUSE Member
While drilling many holes of the same type in thick metal, in order to relieve my hands, I made a simple device based on a clamp welded to metal support, and a pair of clamps for rigid fixation of the drill. Now drilling a corner or channel has become much easier.

According to the user, drilling 1 hole with a diameter of 4-5 mm takes no more than 30 seconds. Having decided to repeat such a design, you should remember that the load on the drill increases significantly due to the increase in the volume of work. g8o8r8 I've already rebuilt my drill twice.
Also, the user, based on an electric motor, made a small “vertical” machine for drilling holes with a diameter of up to 4 mm in printed circuit boards.


g8o8r8
The long spindle compensates for the inaccuracy of the bearing race groove. For amateur use, this machine is quite suitable. Drilling accuracy remains at an acceptable level.
If you do not have a welding machine, you can assemble the device you need on the farm using bolted connections.
Hand trowel for concrete
No less important than homemade machines for the home workshop are devices for construction and repair. And we can easily make many construction devices with our own hands.
Anyone who has ever encountered concrete works, knows how difficult it is to smooth freshly laid mixture to perfection. If on small areas If you can get by with the rule, then when pouring the area in front of the house or parking lot, you won’t need a regular tool. A concrete trowel comes to the rescue, which, due to its long handle (from 3 to 12 m), allows you to smooth concrete onto larger area without stepping on the surface being leveled.

The principle of operation of such a device, somewhat reminiscent of a mop, is simple. There is a working profile (also called a “wing”), attached to a long handle. When moving away from you at the ironer, due to the gearbox, the edge opposite to the user rises. That is, due to the angle of inclination of the “wing”, the trowel glides along the concrete and does not collect it in front of itself. When moving towards you, on the contrary, the side facing the worker is lifted up, and the trowel smoothes the concrete again.


ronik55 FORUMHOUSE Member
I know from personal experience how difficult it is to smooth concrete perfectly. I didn’t want to go and buy it for 10 thousand rubles. As a result, my father made a cheap device for smoothing concrete, practically from garbage - all sorts of unnecessary things.

The following photos clearly demonstrate how this ironer works. Let's take it metallic profile(dimensions depend on the area being smoothed), we weld transverse stiffeners to it, on which, in turn, hinge joints made of pipes are fixed.

Most main element, due to which the angle of elevation of the “wing” changes, this is a rotating gearbox with a chain.

When the handle was rotated, the chain was wound around the pipe, and one edge of the smoother was raised.

Having carried the iron to the end point, we rotate the handle in the opposite direction. The chain is wound again, and the edge of the smoother is raised, facing the user.

We pull the ironing iron towards ourselves and repeat all the steps until we finish the job.


ronik55
Due to the “pipe-in-pipe” connection and fixation with a cotter pin, you can increase the length of the handle at your discretion. This design is easy to assemble yourself.

See how to make it yourself (follow the link and you will find a drawing).
Garden sprayer and clamp
It all started with Metamorph it was necessary to treat the area against ticks, and the old manual sprayer had given up its life. There was an urgent need to buy a new device or find a replacement for it. While preparing for processing and thinking about what could be done, a user of our portal came across an unnecessary fire extinguisher lying around the household.

Next, we proceed as follows - carefully unscrew the fire extinguisher, pour out the remaining powder and rinse the cylinder with water. Instead of a bell, we screw in an adapter into which, depending on the need, you can screw in a nipple (for pumping air) or a nozzle (for spraying the mixture).


Metamorf FORUMHOUSE Member
Using a homemade sprayer is very simple: fill the fire extinguisher halfway with a special spray liquid, then pump it with air, screw on the sprayer and go poison the ticks.


DIY carpentry tools

QWEsad FORUMHOUSE Member
One day I needed to glue together a lot of wooden panels. I didn't have any clamps. So I decided to a quick fix assemble a rim from wooden blocks with a cross-section of 5x5 cm and metal plates with welded nuts in “tens”.

In total, the user made 3 of these clamps; this was enough to glue a wooden board measuring 1.5x1.7 m and 18 mm thick. To prevent the bars from sticking to the workpiece, under those places where there is a seam and glue may protrude, you can put a newspaper or shoot polyethylene with a stapler.

In order not to spoil the workpiece, you need to place a gasket under the plate into which the screw rests. The gluing width is adjusted by moving the stop bar.
A garage or workshop in a private house is a room in which men spend a significant part of their time. Owners try to do most of the work themselves, but this is not always possible without additional equipment. Buying factory tools is expensive, so homemade machines are an excellent alternative.
Making homemade machines with your own hands is a completely feasible task. They are indispensable in the home workshop and help solve many problems, such as:
- processing of metal blanks, since in everyday life you often have to sharpen or drill something;
- working with wood.
Price professional tools is high, so homemade machines and other self-made devices are in great demand.

The standard set in the workshop includes:
- carpentry workbench;
- device for sharpening cutting objects;
- device for sharpening drills;
- drilling machines;
- pressing mechanism;
- cutting machine using discs.
Joiner's machine
Making homemade machines with your own hands begins with sketches of a drawing. The main details of a homemade carpentry machine are:

- Working surface. It is necessary to stock up on wood, the thickness of which is at least 6 cm. It is better to choose narrow boards, made of oak, hornbeam or beech. To extend their service life, they are pre-treated with drying oil.
- Homemade vice. Product sizes may vary. If desired, several types of clamps can be installed. To create a massive vice, choose wood. For small bench vices, steel blanks are used.
- The basis of a carpentry workbench. Linden or pine are suitable for it. The structure is strengthened by means of longitudinal bars, which significantly increases the stability of the machine.
It is more convenient to work if there are shelves nearby. Most good option their location is directly above the working surface. Shelves are either fixed or retractable.
Optimal linear parameter carpentry machine is a length not exceeding 1 m. When installing a pair of vices, the length is slightly increased.

According to modifications they are distinguished:
- mobile;
- stationary;
- folding universal machines.
Simple design
A woodworking machine of simple design is made as follows:

- A shield is made from thick boards (0.7×2 m). To connect them, nails are used - they are driven in and bent with reverse side.
- To prevent tools from rolling down during operation, around the perimeter work surface install a small border. To do this, bars with a cross section of 50 x 50 mm are nailed from the end side.
- For the installation of supports, choose bars with dimensions of 12x12x130 cm. The height of the supports must be adjusted taking into account the requests of the master who will work at the machine. The main condition for this is comfort. It should be taken into account that after installing the cover, the height of the machine will increase by 8-10 cm. Next, you need to make markings on the ground and deepen the bars by 20-35 cm.
- Crossbars are attached to the supports, which are wide slats 20-40 cm from the ground level. Connections are made with wood screws. A pre-prepared wooden shield is installed on top.
You should not fasten the cover with nails; it is better to use self-tapping screws, since driving in the fasteners can damage the lower frame of the structure.
Manufacturing technology universal machine differs little from the previous one.
Connections are best made using fastening bolts. In addition, foldable universal workbench involves installation drawers in which the tools will be stored.
Step-by-step assembly instructions:

- They start by installing the supports and connecting them with horizontal jumpers. Before installation, grooves for bolts, nuts and washers are made on the jumpers using a hammer and chisel.
- After installing the jumpers, through holes are drilled in the required places. Bolts are inserted into them and tightened with nuts.
- Jumpers are installed at the rate of 2 pieces on each side. Additionally, crossbars are made directly under the tabletop, in the center. These will be used for drawers. Install the crossbars in increments equal to the width of the box.
- The work surface is also attached with bolts. Recesses are pre-prepared at the ends of the supports, and through holes are made on the tabletop. When fixing the bolts, the heads are recessed by approximately 1-2 mm.
How to make a vice
Main element homemade machine- vice. For them, you need to purchase special fasteners - studs, which are easy to find in hardware stores.

The next detail, which is fundamental in the design, is the screw pin. It is with its help that objects in a vice will be clamped or loosened. The minimum diametrical cross-section of the screw is 20 mm, and the length is 15 cm. With these parameters, the machine connector will be 8 cm. The larger the screw, the larger the vice connector.
Clamping is carried out using jaws. One of them is fixed and attached directly to the tabletop, the second is movable. Sponges are made from pine boards. Parameters: 20x18x500 mm. A hole is made in them with a diameter corresponding to the size of the screw rod. Then use a No. 10 drill to make holes for the mounting pins. For ease of work, it is recommended to connect the sponges together with nails and remove them at the end of installation.
The main element in a lathe workbench is the bed. The convenience of working on the machine, as well as its stability, depends on it. The part can be made from either wood or metal.

When drawing up a drawing of a workbench, you need to think about the engine option. Most often, its speed is 1500 rpm, and its power is 200-250 W. If you plan to process large objects, then the power should be greater.
Another element of a do-it-yourself lathe is manual frezer. It is mounted on a plywood platform. The thickness of the plywood is 12 mm with dimensions of 20x50 cm. Holes are made in the base for mounting the cutter and for fasteners. Supports made of bars will also be attached to the router - they will ensure greater stability of the structure.
For a do-it-yourself wood lathe, it is better to choose a steel profile with thick walls. To increase strength, it is necessary to install two supports. A frame is installed on them. The connection is made using a groove type. Support platforms are pre-prepared.
Here are a few nuances of a homemade machine:

- For activation it is used Electrical engine, which can be removed from old devices - pumping station or washing machine.
- The tailstock requires a drill head with high power ratings.
- For the headstock, a purchased production spindle with 3-4 pins is suitable. With their help, the movement of the workpiece along the rotational axis is ensured.
- The working surface can be a table of any design. The main thing is its stability and the comfort of the master during the work.
- A pulley connects the headstock to the electric motor.
- To ensure the workbench works, you also need a set of cutters. They are purchased in a store or made with your own hands from tool steel.
Blanks for the manufacture of cutters must have adequate strength and a hard edge responsible for the thread, and be securely inserted into the clamp.
Suitable for making cutters:

- Small pieces of steel rods corresponding to the dimensions of the parts and having a square cross-section.
- Failed files and rasps that do not have strong chips or cracks.
- Car springs. The workpiece is first given the shape of a square - using welding or autogen.
To install cutters on a machine, you need a specially modified housing with parts for installation. All elements must be made of high-strength material that can withstand heavy loads.
After the cutter is made, it is sharpened. To increase strength, the cutting part is hardened by heating to the desired temperature and dipping into machine oil. By repeating this process several times, a durable tool is obtained.
Mini-machines in everyday life
In addition to massive workbenches, homemade mini-machines for the home workshop are also popular. One of them is a knife sharpening device.
The sharpener is made from a 220 W motor taken from an old washing machine. If necessary, it is increased to 400 W, selecting Alternative option engine.
Knife sharpening machine details:

- flange tube;
- nut for fastening the stone to the pulley;
- metal blank for protective casing thickness 2−2.5 mm;
- grindstone;
- electric cord with plug;
- a block of metal or wood for installing the frame.
The flange is made in full accordance with the dimensions of the sleeve built into the motor. A sharpening stone will also be placed on it, so a carving is made on one of the sides.
The part is pressed into place on the reverse side using heat. It can be fixed using a bolt or welding.
Important! The thread is cut in the opposite direction to the direction of rotation of the shaft. Otherwise, the fixing nut will fly off.
A cable cord with a plug is attached to the winding. The frame is installed, and the device is attached to it.
Do-it-yourself homemade machines will be excellent helpers in Everyday life and will help you save significantly on the purchase of equipment. In addition, such a machine is a source of pride for the master, so working with it is much more pleasant and comfortable.
Modern processing of metal parts is almost impossible without a lathe. To save money, you can make this device yourself.
Making an ego is actually not as difficult as it seems, and a drawing of a lathe can easily be found on the Internet. The design of the machine can be very diverse, as well as its dimensions.

The material for making it at home can easily be found in any garage.
Lathe device
It is impossible to make a lathe with your own hands without knowing its structure, so below we present its main parts:

- Drive unit. The basis of the mechanism generates power. For a low-power machine, a drive from a drill or washing machine is suitable;
- Bed. A steel corner or a wooden frame is suitable for manufacturing; this is a kind of supporting frame, so it must be durable to withstand vibrations;
- Tailstock. It is made by welding a corner to an iron plate. It is needed for fixation during processing of the manufactured device;
- Headstock. Installed on a movable frame, similar to a tailstock;
- Caliper. Acts as a support for the working part.

The rotational torque is transmitted by the engine to the working part using the following options:
- Chain;
- With a belt;
- Friction.
Each has its own advantages and disadvantages. Belt - the cheapest and most reliable, easy to manufacture. But the belt wears out quickly and needs to be replaced frequently.

The chain one is more expensive, it is more bulky, but it lasts a long time. In terms of its advantages and disadvantages, the friction one occupies a middle position. It is worth noting the fact that photos of a lathe with different gears are available on the Internet, and you can easily study them in detail.

Caliper - extremely important detail machine It regulates both the amount of effort expended during work and the quality of the part.
Moves in different directions and is therefore highly susceptible to wear. Don't forget to adjust it before starting work.

Mechanism assembly sequence
We assemble the machine frame using channels and beams. The larger parts you plan to work with, the more durable materials there must be a frame.

To produce the headstock, we will need a hydraulic cylinder with a wall thickness of 6 mm or more. We press 2 bearings into the cylinder. Using large diameter bearings we lay the shaft.
It is necessary to fill the lubricating fluid into the hydraulic booster. Then we install the caliper with guides and pulley.

We install a tool rest to give the cutter stability. At the bottom we attach a small strip of metal, which makes the working part wear-resistant.

Which electric motor to choose?
The motor is the most main part any machine, because without it it will not function. The total power of the machine depends on its power. A motor with a power of up to a kilovolt (old sewing machines can serve as a donor) is suitable for the manufacture of small parts.

Motors with a power of 1.5-2 kW. used when processing large parts. Never forget to insulate all electrical parts.

For correct installation It is better to call an electrician than to get injured.

How to make a lathe from a drill?
To save on spare parts and simplify assembly, it is allowed to use a drill as a drive. This design has its advantages:
Note!


- the structure can be assembled and disassembled at any time;
- it is quite easy to carry and transport, because it is quite easy to disassemble it;
- cost savings;
But this method has its drawbacks, because the drill has a low torque, which will make it almost impossible to process large parts.

It is worth modifying a metal lathe with a drill only when it is not planned large volume work and you need to make small parts.

To make this type of metal lathe, you need the usual parts (except for the motor and headstock). The function of the headstock is taken over by the drill.

Due to the compactness of the machine, the role of the bed can be played by Smooth surface or workbench. The drill itself can be secured using a clamp or clamp.

The following safety precautions must be observed:
Note!

- Upon completion of the machine layout, it is necessary to check the serviceability.
- the electric motor in the machine must be protected by a casing;
- the power of the electric motor must be covered by your electrical network;
- the working tool can only be positioned parallel to the surface of the workpiece. Otherwise it will bounce off;
- when processing the end planes, the latter must rest against the tailstock;
- you can start working only using eye protection from chips;
- after work it is necessary workplace leave it clean.

A woodworking machine requires the same safety precautions as a metalworking machine.

Changing the machine
When it is necessary to install cone-shaped holes, we attach two files so that the shape of a trapezoid is obtained. Next, we mount the device on springs for supplying the file.

To sharpen various blades, we attach a grinding wheel to the engine.

To summarize, I would like to say that assembling the machine is quite simple. It is quite possible to make a homemade lathe at home using scrap materials, which is a fairly economical undertaking.

You can adjust the size and power of the equipment yourself, as well as make the necessary modifications.
Note!


Photo of a do-it-yourself lathe


