Manual white balance on a canon camera. White balance is the secret to correct color reproduction. Using a Gray Card to Take Photographs
Do you know this picture when a photograph looks unnatural and the colors in the picture are greatly distorted? What does this mean? This indicates that the white balance in the camera was not adjusted and the digital automatic balance meter made an error; it did not correctly determine the color component of the frame and distorted the color settings.
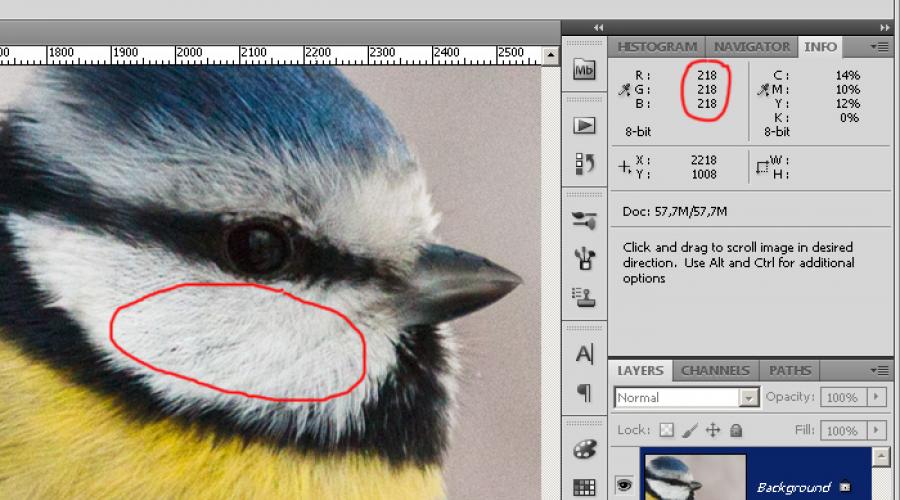
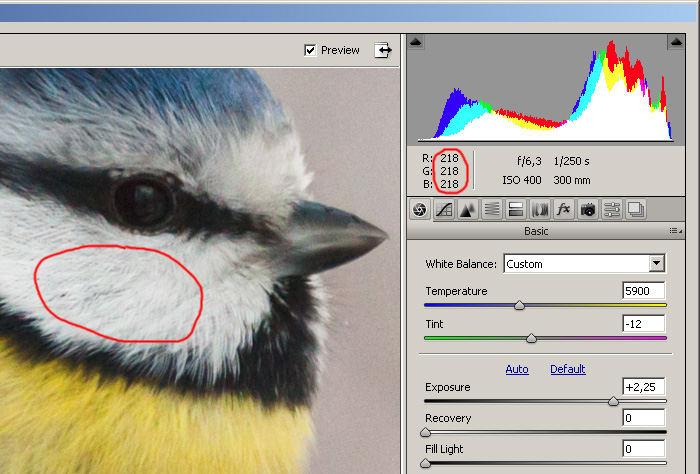
If in Photoshop or any other graphic editor you select conditionally white area, which is perceived by our eyes in a familiar environment as an area of white color (in the Blue Tit these are the “cheeks”), then it will be possible to notice that the color component in three channels RGB colors will have the same values - R:218, G:218, B:218 (for a photo with the correct white balance). In the bottom photo, these values will be noticeably different R: 162, G: 186, B: 237 (photo with incorrect white balance, with a clear predominance of blue).


If there are a lot of such white fragments in the frame, then the camera processor will be able to rely on these areas independently, automatically determine the balance and correctly convey the colors, and if there are few such white fragments in the frame or there are none at all, then the processor begins to “get confused” and transmits The color shades are wrong. All this, of course, is conditional; the measurement process in a camera is much more complicated and the camera’s processor can help with this.
How to fix this and set the correct white balance?
Theoretically, there are two ways:
1) before shooting, teach the camera to understand white balance;
2) after shooting, process the image in a graphics editor.
Many people believe that processing photos in a graphics editor after taking a photo is easier and faster than setting manual white balance in the camera before the shooting itself, especially if you shoot not in JPEG, but in RAW (NEF). For RAW(NEF) you can agree only under certain conditions:
1) you need to shoot in RAW (NEF), and not in JPEG;
2) the photographs should contain supporting fragments of conventionally white (like the cheeks of a tit);
3) the number of photographs for processing should not exceed 20-50, because This is a rather monotonous and tedious task.
If you don’t know how to work with RAW (NEF), if there are suddenly no white fragments in the pictures, if the volume of photographs is very large, then processing in a graphics editor will turn into agony and take a lot of time, and in some cases, extracting the correct white balance from JPEG will be difficult extremely difficult or almost impossible.
Setting up the camera before shooting
All instructions write (and photographers themselves recommend) to adjust the balance with a white sheet of paper. This confuses many newbies, especially in cases where the shooting takes place outside the home/office. Where can I get this piece of paper and how can I carry it with me? Forget about the white sheet of paper!
We take a regular grocery bag from the store. The package should be white, translucent enough to allow some light to pass through and should not contain colored impurities. If the walls of the bag have such transparency that you can clearly read the inscription on the camera strap, then you will need two such bags so that it would be difficult to read the inscription through the layers of the double bag. Next, temporarily set the AF-MF switch on the lens to the “MF” position and put the bag on the lens so that the front lens of the lens is completely covered by the bag and there are no inscriptions or drawings on the bag at this point. Then we point the camera in the direction where our subject is located and take one photo. Return the switch on the lens to “AF” mode and go to the camera menu.
In the camera menu, we find and select the “Manual WB” (Manual White Balance) option, select our last frame with the package as a reference white image and press the “SET” confirmation. Then in the Menu we find the “White Balance” option and change “Auto” to “Manual” as shown in the figure.

We put the bag in our pocket and take pictures until the lighting of the place where you are shooting changes, for example, the Sun has gone behind the clouds, fluorescent lamps have been turned on instead of incandescent lamps, you have entered a dense forest from a sunny clearing, etc. . In this case, repeat the entire procedure again:
1) lens -> "MF";
2) put the bag on the lens;
3) pointed the camera at the object and took a frame;
4) put the package and lens back to “AF”;
5) in Menu -> "Manual BB";
6) selected the last frame with the package;
7) in the Menu we check -> “White Balance”, “Auto” -> “Manual”.
Now you can shoot in both RAW (NEF) and JPG, the processor will have in its memory a reference, reference image of a white package as a sample and will already use it in its calculations, replacing the white cheeks of a tit with a white package.
How to fix white balance in Photoshop?
If something didn’t work out for you or you forgot to turn on the manual balance in the camera, then the situation can always be corrected if you shoot in RAW (NEF). It is enough to open the RAW (NEF) file in editing mode, select the White Balance Tool (I) option, the Ctrl + I key combination, a tool in the form of a pipette will appear, all you have to do is poke it into the area of the tit’s cheek, in the same area that our eye is looking at real life perceives it as a white area. As soon as you do this, the entire photo will immediately change its color, and the RGB values will become equal to each other - R: 218, G: 218, B: 218. In my case, this value is 218, you can have 224 or 188 or any other, the main thing is that all RGB values are the same - R:224, G:224, B:224 or R:188, G:188, B:188 .
What to do if there are no white objects in the photo?
If there is not a single object in the photo that would contain conditionally White color, then you need to look for fragments of the entire spectrum of gray, what in real life our eye perceives as pure gray, without admixtures of other colors - this could be asphalt, concrete, and stones, if we are talking about a landscape and there is no person in the frame . If we are talking about portraits of people and there is not a single piece of white or gray fabric on the clothes, then as a last resort you can use a fragment of the white area of the eyeball. If this doesn’t help, our model came from another planet and her eyes are yellow, then we move on to plan “B”.
![]()
Plan B will require you basic knowledge what is color temperature and what are the values in photographic conditions with standard lighting or close to standard. Below is a table describing lighting and color temperature in Kelvin. The values from the table will initially give you numerical guidelines by which you can adjust the value of the “Temperature” parameter and change the white balance close to the conditions at the time of shooting. From 5000K to 6000K - color temperature for typical street photography, from 2200K to 2800K - filming gatherings in the kitchen under incandescent light, from 3500K to 4500K - filming in an office where fluorescent lamps from Armstrong lamps are lit, etc. Choosing one of table values depending on the type of lighting, you can bring the color balance to the most natural, to the colors that our eyes perceived in environment at the time of filming.

What should I do if I shoot in JPEG?
Well, what can I say? All that remains is to envy you, you still have everything ahead! There is a very exciting path ahead of mastering the works of Dan Maruglis, I would say Bibles on Photoshop: “PHOTOSHOP for professionals” and “Photoshop LAB Color”. It is not possible to reflect the volume of information from these works within the framework of this article; moreover, to master these techniques, you must have a professional calibrated monitor of 24" or more with a matrix no worse than IPS and free time for study from 1 to 6 months.
In any case, you have to choose between an ordinary package from the store and mastering a whole science called “Color space”, although you don’t have to bother and leave everything as it is, the titmouse doesn’t care what color her cheeks are in your photos :)
Sometimes a photographer is faced with the fact that the resulting photographs are unpleasantly surprised by disgusting, low-quality color reproduction. For example, the faces of people in photographs take on an unpleasant grayish-pink hue. This is usually due to difficult lighting conditions and incorrect camera settings. To increase the realism and naturalness of colors in a photo, you need to use one setting - adjusting the white balance. Correct setting White balance while shooting helps prevent images with incorrect, distorted colors.
White balance in photography
White balance (WB) is special method adjusting the color background of a photograph to complete authenticity to the spectra that the photographer sees with his own eyes during shooting. The thing is that even modern DSLR cameras in some cases, they do not provide accurate color reproduction that would be as close as possible to the natural perception of the scene by our eyes. The white balance function assumes that if a white piece of paper appears white on the screen (in a certain light), then all other colors in the photograph will appear correctly. White acts as the main, base for all color shades.
As you know, pure white does not exist on Earth; it is only a mixture of seven colors. Therefore, depending on certain lighting conditions, white color can acquire certain shades. In particular, an object that appears white to us will be brighter on a clear sunny day, but when photographed in the shade it will take on a bluish tint. When photographed with an incandescent lamp, this object will become slightly yellowish. Unlike a camera, our brains are skilled at interpreting colors so that they look the same to us, even if in reality they are not. The camera electronics, unfortunately, do not have such unique capabilities, so the colors in the photo may take on a distorted appearance.
An example of an image of an object at different White Balance settings:
1 of 5


By adjusting the white balance, you can correct the perception of the camera electronics various colors, making red objects in the photo appear red and green objects appear green. The need to change the BB primarily arises among those photographers who prefer to shoot in JPEG. Here you immediately receive a finished, compressed and processed photo image. However, if you do not monitor the white balance during photography, then such an image may not be entirely correct, with distorted color rendition. But in portrait, landscape photography and other genres, accurate reproduction of colors and even halftones is very important. So it turns out that you must always pay attention to the BB and resort to manual settings if necessary. In addition to the fact that proper adjustment of the BB helps ensure correct color rendition of the photographed object, it also allows you to decide difficult questions related to shooting in different lighting conditions.
By default, a digital camera uses the WB settings in automatic mode. The built-in electronics perceives the captured image in an average neutral color. It marks the brightest parts of the frame as white shade, and then adjusts all other colors relative to this base color. Correcting colors takes just a few seconds. Thus, the device tries to independently adapt to the scene lighting, but often makes mistakes due to the fact that the color temperature is measured based on the brightest object. To get more realistic colors in your photo images, you will need to set the correct white balance. Or you can adjust the colors later during processing.
Preset white balance settings
If you want to get a photo with high-quality color reproduction, then you should not rush too much when shooting. Take a test photo and carefully examine it on the screen. You may need to adjust exposure and white balance to achieve optimal results. IN digital cameras Today there are several options for color correction. The first of them is various preset modes for setting up the WB. Among them there are usually such standard settings as “Cloudy”, “Daylight”, “Incandescent”, “Flash” and others. With these simple settings, you can quickly move the BB in one direction or another, that is, to a warmer or cooler part of the spectrum. The more advanced and expensive the camera is, the more preset modes it offers the user.
For beginner photography enthusiasts, the preset white balance settings are more than enough. Here you only need to abandon the automatic mode and select the appropriate preset depending on the lighting conditions by pressing a couple of buttons. As a result, you will get pictures with fairly natural colors, without unpleasant distortions. If we talk about the presets themselves, the “Cloudy” mode will make your photo warmer in color temperature, while the “bulb” modes, on the contrary, will give the frame a cooler tint. In particular, the “Incandescent” mode compensates for the excess yellow in the frame, adding coldness to the image.
Example image with different color temperatures set (unit: Kelvin)
1 of 5


Using the preset settings, you can not only correct the color rendition, but also adjust the colors in the photo to suit your desired mood. For example, when shooting in gray, cloudy weather, you can add some warm shades to the frame using ready-made modes. Using preset settings is certainly very convenient, but they do not always guarantee you desired result. And here one way or another you will have to resort to manual settings. However, if you only have an inexpensive compact camera at your disposal, then, probably, the options for adjusting the WB will be limited only to these ready-made modes.
Adjusting White Balance Manually
But advanced cameras always provide the photographer with the opportunity to manually adjust the WB settings. The need for manual settings often arises in cases where you have to photograph indoors using several lighting sources. However, even when shooting on outdoors You may need to adjust the settings slightly manually. You just need to install the BB one time and then you will receive photo images with realistic, natural colors. There are several ways to manually change white balance. The simplest of them is adjustment according to white sheet.
The paper sheet acts as a “reference” example of the color white. You take it and position it in front of the camera so that the sheet is evenly illuminated. In addition, it should fill the entire central area of the frame, or the entire frame. You simply take a photo of a white sheet of paper and then go into the menu, selecting the "Manual WB Adjustment" option. You point the camera to the captured image, and the settings are automatically saved. The advantage is the comparative simplicity of this method.
But, unfortunately, it sometimes fails. This is due to the fact that a sheet that seems white to us is not always so. It can get a certain shade due to the characteristics of the surrounding light. In particular, if a bright background shines through it. And the white sheets themselves are characterized by different shades due to the specific features of paper production. Be that as it may, in most cases, adjustment “on a white sheet” gives good results, allowing you to adapt the camera to specific lighting.
However, if you need to adjust the BB even more accurately, professional level, then you can purchase a gray card at the photo accessories store. It looks like a dense sheet or circle that is filled with 18 percent gray. This card is placed next to the object being photographed. You photograph one frame in such a way that the card takes up the overwhelming area of the image. Next, go to the settings again, indicate the frame taken and set it to “Custom WB” in the menu. Now all settings will be automatically applied to all frames. It makes sense to use such a card in the studio when you often change lighting or work with several light sources.
Some digital cameras, in addition to the above methods, open up other opportunities for the photographer to change the BB. In particular, there may be a BB bracketing function, when several frames you take in a row will have different color rendering settings. One of these shots is sure to hit the spot. In addition, some devices allow you to correct the color background of a photo without using the notorious white sheet. This setting is the same as if you were using different filters when shooting.
If you take pictures in RAW, then, in principle, you don’t have to worry too much about the WB directly during shooting. Save images in RAW, then on your computer by running Adobe program Photoshop or Lightroom, you can easily edit the white balance and adjust the background color of each photo. But it’s still more convenient to adjust the BB on your camera in advance during shooting, so that you don’t have to do extra work during post-processing of photographs.
So, cameras operating in automatic mode, in practice, do not always cope with the task of accurately transmitting colors or halftones. This is especially true for shooting in difficult conditions lighting. Preset modes and manual adjustment of the WB will allow you to correct colors, thereby saving time on image processing. In principle, it is enough to figure out how to adjust white balance once, and subsequently you will not have any problems with it.
How do you think the three photographs below are different?
Of course - white balance! It is not difficult to notice that in the first photo the white balance is shifted to the warm part of the spectrum (this is what this color distortion is called - when the image (including napkins, which should be white!) seems to “turn yellow.” In the second photo, the white balance is close to normal But in the third photo, the BB is shifted to the cold - violet side of the spectrum, so the napkins no longer look completely white, but rather bluish...
Without delving into the jungle of terminology, let's try to define white balance. So, we can say that White balance is a measure of the correctness of the color characteristics of an image. Often, instead of the phrase “white balance”, the abbreviation BB is used; we can also use this abbreviation in the text of this site.
So, now it has become clear that if you see that the photo is a little more yellowish than it should be, or vice versa - a little cold, then you should look for the reason for this in incorrect white balance settings!
Why do inaccuracies occur in the white balance settings? The answer is simple: different light sources have so-called different color temperatures! For example, the Sun gives a rather “warm” light, and so does an incandescent lamp. But the light of fluorescent lamps is quite “cold”... Probably, you yourself have noticed that, for example, a green dress may appear bright green in sunlight, and almost blue in sodium lamps street lighting. And if it’s not always easy for human eyes to adjust to the color temperature of a light source, then what can we say about cameras? In addition, there may be several light sources of different color temperatures in the frame, for example - sunlight from a window and an incandescent lamp from a home chandelier - in this case, the camera is unlikely to be able to “guess” which light source to focus on when adjusting colors, what BB value to set! In such cases, the camera's automation is not effective, and manual white balance adjustment is used.
First of all, the BB can be influenced by changing the camera settings. Let's look at these settings using the example of the menu of Canon cameras. More precisely, using the example of the Canon 600D camera, its menu is in many ways similar to the menu of such popular models like 450D, 500D, 550D, 650D.

As you can see in the picture, using this menu you can change the BB - either using ready-made presets, or choosing your own parameters for this value. I would not recommend using the existing white balance presets unless absolutely necessary, because... most often the camera works correctly with this parameter - in automatic mode, especially in nature - when natural light- taking into account all its nuances.
However, there is a possibility White balance settings - manually! Most often this type of setting is called setting the white balance “on a white sheet”. This makes it possible to precisely “adjust” to a specific light source. This is how this procedure is described in the instructions for Canon camera 600D:

You can find information on how to use a similar feature on cameras from other companies or models in the operating instructions for your device.
But that's not all! Some cameras (for example, the same Canon 600D) have the ability to adjust the color tone of a photo - without using a white sheet! In this case, the effect is like that, as if you were sorting through color filters. The following illustration shows an example of such a setup:

Some cameras also have "white balance bracketing", this means that three photographs taken in a row will have different white balance (if you allow it in the settings) so that at least one of the frames “hits the spot.” This mode is used when you are not sure that the BB settings are correct.
But... and that's not all! If you take photographs with a DSLR, then it probably has a function for shooting in RAW format! This wonderful format is distinguished by the fact that when shooting in it, you don’t have to worry about the white balance while shooting, because it can be changed as you like - later, using special program. Typically, such programs are included with any SLR camera. I would recommend using the program Adobe Camera Raw (ACR), but more details about it will be written in another article.
That's all for today :) Let your white color remain white in the photos too!
Even though we see real color, the lighting constantly changes depending on the angle of view and the passage of time. The fact that we do not perceive these changes at all in daytime days, the result of the incredible work of the human eye and brain. Our cameras, unlike us, cannot distinguish colors, much less monitor changes in their tonality. The camera needs to be “explained”, or rather, configured correctly to shoot a particular color. Perhaps you have seen photographs in which photographs of nature have a yellowish tint, and portraits, when photographed with flash, acquire blue tint. All these problems can be corrected with good white balance correction.
What is the Kelvin scale?
The colors (sometimes corresponding to the temperature) of light are measured using the "Kelvin scale". The Kelvin scale was created as a result of many physical experiments and research to study wavelength by heating black objects different temperatures. Maybe this knowledge will not help you create great photos, but you need to know that there is a scale for measuring white balance; you also need to remember that the lower the Kelvin number, the redder the color of the light; higher values correspond to blue shades. You don’t need to remember all the possible values (and there are quite a lot of them) to fine-tune your camera; it’s enough to grasp the basic idea and understand the principle of transition from one color to another, this is what will be useful to you in practice.
Do you feel the difference?
White balance in camera
The exact method for setting white balance varies from camera to camera, but is generally the most quick way do this using one of the standard values. Just set a different white balance mode and your camera instantly sees the world in a different color of light.
Of course, you have the opportunity to set any specific white balance value, the one you like, but in the vast majority of situations, standard options the settings will be more than enough for you. Considering that you can correct small inaccuracies using computer photo processing, there is little point in being overly scrupulous. Although, of course, if you are more than determined, and are used to setting up your camera “From” and “To” all the time, then you can try, but it is worth warning that mastering this and learning will take a lot of time, and this will not work the first time, and not the second time. And besides, imagine how many times you will have to reconfigure the camera during the entire shooting period if you are photographing, say, a wedding or other “dynamic” event.
Below are possible options white balance settings, and situations are indicated when and which options are best to use.
Auto white balance- the camera independently determines the type of lighting and adapts to it. The photographs will not always be successful, let’s just say that it doesn’t happen every time, and most likely you will have to work hard with such photographs on the computer. This a good option, in case you are in a hurry and you simply do not have the opportunity to choose a better setting.
Daylight - best option for shooting outdoors, in normal daylight. This golden mean color range of light.
Cloudy/Indoor- the mode is used in cooler lighting, for example on a cloudy day, or indoors. As a result, images will have warmer tones.
Shade – Best used at dusk, or early morning. Gives photos a warmer tone (yellowish-red hues) than the previous mode. Also, the mode can be used when daylight, but then your pictures will be even warmer.
Incandescent lamp- Great for indoor shooting under artificial lighting (such as fluorescent lamps, which can emit yellowish tints). Working in this mode, you will get cooler shades.
Fluorescent lamp- The mode is used when shooting with artificial lighting. In this mode you will get warmer photos, the mode compensates for the cold and slightly greenish tint of the light created by the source.
Flash – This mode adds warmer tones to the image, but not as warm as fluorescent light.
Post-processing
The ability to accurately select white balance mode is one of the main advantages of shooting in RAW mode. If you don't know about this or don't shoot in RAW format, don't worry, you can still make tonal changes by shooting in other image modes, although not as much as you'd like.
For RAW images, you have the option to either choose from the available provided options (choose from the available white balance modes in your camera) or, if you prefer, make the adjustment manually.
Manual white balance adjustment
Study manual setting White balance is best done with practice, this is the only way you can learn to distinguish the color of light and know what parameters to set. In fact, the controls are quite simple and use only two controls (although this largely depends on software, and may change):
Temperature – Whether the lighting is warm or cool, you can adjust your camera to add an orange or blue tint to your shot.
Tint - Adjusts and adjusts the shades of green and purple.
You can manually set white balance in three steps. Don't forget, you can select one of the proposed modes, and then use “fine tuning” to adjust it manually.
Adjust the temperature of the photo, ask yourself if the image is too warm or too cold and increase or decrease the temperature accordingly.
- Adjust the hue of the image, think about what is missing more - green or purple. Look for objects in the frame that can help you draw the right conclusion. If you are photographing a portrait, look at how the tonality of the skin color changes, and do not let it acquire unnatural shades, too blue or yellow.
- Compare before and after images. Analyze your photos and decide what you did right and what would be better to fix. Try again if necessary.
- Don't forget, there is no right or wrong white balance, if the photo looks the way you want it, then everything is done right.
And always remember what you are doing and how you set up the camera in certain conditions. Perhaps next time you will use the same settings in the same situation, and it will take you less time to correct the white balance.
White balance– this is a parameter that helps to correctly construct the transmission of a color image.
It is simply called for short WB (white balance), in English-language literature one can find WB (White balances), which doesn’t change the essence.
This is very important parameter when creating color photography. He is responsible for correct color rendering. Roughly speaking, for white objects to be white and not have different shades yellow or blue.
White Balance helps the camera determine what light is considered white. Indeed, a camera is not a human eye, which makes adjustments with a powerful (or less powerful) brain and sets the color white. The camera needs to somehow figure out what it considers white. In this difficult task, the camera is helped by knowledge of the laws of physics.
Let's superficially reveal the essence of the issue: from thick textbooks it is known that white is the color produced by an absolute black body (usually platinum is used) heated to a certain temperature. A certain temperature will give a certain wavelength, and the wavelength determines what we call color. Temperature is measured in Kelvin and, for example, they say that the daytime temperature white light equal to 6500 K.
What happens if the temperature is less than 6500? Then we get more low temperature, and the light will correspond to it more yellow color– for example, a candle has a temperature of around 1800 K. Therefore, the candle gives off a yellowish warm light.
What if you heat it up more? There will be light with a temperature corresponding different types lamps with a bluish tint.

Why is it so important to monitor BB? The answer is very simple, by setting the correct white balance you can achieve “ the right colors" in your photo. For example, for a portrait, the skin should have a natural color. If not correct installation BB, the color will be mixed with yellowness or even worse – with a tint of blue. You can see for yourself in the test pictures that are in this article and compare the appearance of the picture with different BB settings. The flowers are illuminated on the left by daylight from the window and on the top right by an incandescent lamp, due to this, light is obtained from different sources with different color temperatures and it is difficult for the camera to correctly set the BB. Please note the difference between automatic balance and white sheet balance (preset).

How to set up the WB in the camera? Setting white balance in your camera is as easy as shelling pears; almost all regular digital or DSLR cameras have this feature. Typically, the camera offers one of the preset WB profiles, for example, “sunny”, “cloudy”, “indirect light”, “incandescent”, “flash” and, of course, “auto”. These standard settings are usually in the form of icons and are intuitive. For example, outdoors on a sunny day, it would be wise to set the WB to the “sunny” mode and thereby let the camera know that the WB is shifted to the hotter side. Likewise, in the evening, with incandescent lamps, you need to use the appropriate setting.
More advanced cameras have the ability setting color temperature in Kelvin. The task is quite interesting and useful for visually studying the BB.

How to set up BB in Nikon cameras? Just press the WB button and use the multi selector to select a preset option. Or select the PRE option, press the WB button again, point the camera at a white object and take a photo. The photo will not be recorded on the card, but information about the color that is considered white will be taken from it. After successful installation of the BB, the camera will write Good, but if the camera was unable to correctly read the BB, the message No Good will appear, and you will have to repeat the procedure again. You can also store BB samples in the camera’s memory and turn them on as needed. Only the instructions for the camera will help you in more detail, which I strongly recommend studying.
Interesting thoughts: If you have an advanced camera and have the opportunity to choose to set the color temperature manually, I advise you to conduct an experiment - take the same picture at the lowest temperature allowed by the camera and at the highest possible temperature, as shown in the examples. After comparison, most likely, you will very quickly understand how this parameter works.
How to configure the BB as correctly as possible? It's very simple, you just need to tell the camera what exactly is considered white. To do this, you need to take a test shot in a special mode (measuring the shot), placing a white object in the center. Usually this method of installing the BB is called white balance on white sheet. This is the best option. But, in my opinion, it has a drawback. Personally, I often forget that I made a preset white balance and continue to shoot further as the location and light for shooting change.
Do I need to constantly remember about BB? It all depends on the situation - when there is a lot of time and there is a desire to take the most “correct” picture - then white balance is an irreplaceable thing. But if scenes and compositions are changing at great speed, then I recommend using Auto White Balance. Modern cameras, especially digital SLRs, do an excellent job of this task. But still, in low light, it will be difficult for the camera to choose the right color temperature. For the majority of people Automatic white balance is enough, since it is sometimes very difficult to distinguish between pictures with different BBs.
If the white balance was not set correctly, the photo can still be saved. To do this, you need to use a photo editor such as Photoshop or any other. In the editor you can set the color temperature, this is especially easy to do by selecting a white object in the photo and using an eyedropper to “take” a white sample. It's very easy to pull BB out of RAW. I use a little trick when I shoot people, portraits, etc. and I want to get the correct white balance from RAW, then I set the BB using a pipette metering over the white areas of the eyes.
By the way, professional cameras have a separate BB button for quick settings, just like ISO or image quality. That is, the manufacturers themselves place great emphasis on setting the correct color temperature.
Conclusion: in almost all cases, when setting the white balance, you can rely on the automatic mode; in extreme cases, you can adjust it using the editor. IN ideal It is better to set the BB using a preset on a white sheet or area.
Thank you for your attention and don’t forget to +1, tweet and like. Arkady Shapoval.