Do-it-yourself collapsible kayak. Building a homemade fishing kayak from plywood. We shape the boat and glue it
A plywood kayak is made in the form of sports and tourist equipment. Externally they are different and design features and weight. At self-installation, it is important to remember that the product should allow the rower to be positioned facing the direction of movement, and for rowing, one oar with two blades is used, rotated relative to each other for ease of movement.
Main advantages
- Easy movement on water.
- Light weight.
- The shallow draft facilitates the passage of riffles and shallow water.
- Wave stability and high load capacity.
- Protection of the rower from splashes using a special apron.
- Possibility of traveling in cold water.
- If you decide to build a kayak from plywood yourself, you can make the drawings yourself or use those proposed on this page.
Disadvantages include the absence of a keel. It is not suitable for long-term swimming in large open waters. The structures are used in small rivers and coastal areas.

Design Features
When choosing a plywood kayak with your own hands, the drawings can meet the specified characteristics:
- The recreational kayak is designed for short trips. It is equipped with everything necessary equipment for day tourism. The design of the products prevents them from turning over. Seating is provided inside – a series of “Sit-In” structures. The duration of the walk is 3-5 hours, it can be used by people with limited mobility. Includes luggage compartment and deck harness. The length is 3.5-3.7 m, and the width is from 66 to 80 cm.
- Tourist kayak. Designed for long distances. They cover long distances more easily than recreational kayaks, and are distinguished by their speed and directional stability. There are products for day tourism, no more than 1-2 days, and for longer walks (from 3 days).
A kayak made of plywood with patterns is presented with 2 or more luggage compartments and internal partitions luggage compartments. Some models have a retractable keel ("skeg") or steering system. The seats are characterized by different positions for adjustment to suit the rowers.

- A universal kayak used for fishing and walking. Among the main features is a two-position raised seat. Equipped with a sealed luggage hatch and latches.
- Large sea kayak for long expeditions. The peculiarity of the design is its large dimensions, which allows it to accommodate a manager with tall stature and large dimensions. The device has 2 luggage compartments with large dimensions.

Self-installation
Equipment preparation:
- Electric drill, electric screwdriver, jigsaw, belt sander.
- Cutting tools, pliers, wire cutters used for assembly.
- Epoxy for sealing the body at the seams and securely fastening plywood sheets.
- Plywood panels 3 mm thick – 4 pcs. standard size.
- Knitting rod - for fastening elements during assembly.
- Fiberglass - allows for seams with increased level strength. You can use a ready-made tape 3-4 cm wide.
- Waterproof varnish coating to prevent swelling in water and loss of shape.
- May be needed protective elements in the form of gloves, masks, glasses.

Assembly steps
Before cutting out the elements of the future device, plywood is prepared. The standard parameter of 1 sheet is 150 by 150 cm, and for a kayak you will need strips of 280 cm and 75 cm in width. They are purchased from the manufacturer.
To create the edges, it is necessary to cut the plywood sheets into strips of 75 cm. For joints, use a grinder to cut the corner chamfer, ensuring the fit of adjacent sheets. The strips are assembled into one panel with parameters of 360 – 380 cm.

The joints are glued with epoxy. To ensure rigid properties, fiberglass tape coated with epoxy is laid on the surface of the seam. The connection areas are fixed using construction staples. High-quality gluing can be created by pressing with heavy weights placed on top of the structure until the glue is completely dry.
In the process of gluing the elements for the side part, cutting of plywood parts for the remaining parts continues. To do this you will need:
- 4 partitions for dividing the inner part of the hull, giving rigidity and preventing it from sinking to the bottom in the presence of a pothole.
- Deck blank.
- 4 products for the junction of the deck with the sides.

Shaping and gluing
After gluing the plywood sheets, use a jigsaw to give the desired shape. Then the blanks of the side parts are placed side by side and connected using a knitting rod. Gaps are made at the joints using an electric drill. The connection of the structure is made from the center.
Attention! The shape of the future equipment is given by 4 pre-created partitions.
Wholesale seams are glued using fiberglass and epoxy with different sides. As the hull dries, the deck and 4 side elements are fixed to it, providing airtight properties. Using a jigsaw, a landing gap is created in the deck, which is additionally covered with fiberglass.

After complete drying, the outside is glued with fiberglass with epoxy and varnish. For ease of placement in the body, a plywood panel is fixed under the landing gap, acting as a seat. A separate issue is creating a paddle or purchasing it in a specialized store.
All photos from the article
If you like active recreation, but do not want to spend significant money on a swimming device, then you can make your own kayak from plywood. This option is different in that you can build a structure according to your own parameters, while the cost ready-made solution will be several times, or even tens of times lower than that of a factory product. In this article we will talk about the main features of the process so that you understand its essence and understand its specifics.

Necessary materials
In order to carry out the work, you will need a certain set of components. To calculate their number, you need to have drawings of a plywood kayak on hand - it’s difficult to make them yourself without knowledge in this area, it’s better to buy finished project. Many companies sell patterns with life-size patterns, which is very convenient when working and saves a lot of time and effort.
As for materials, you need the following:
| Plywood | You need 3 sheets measuring 2440x1220 mm and 4 mm thick. Only products suitable for work premium without knots or other flaws. Ideally, it is better to use special marine plywood; it is not sold everywhere, but it is best suited for creating ships, so high price should not be an obstacle, it is better to take this option |
| Fiberglass | Material with a density of 130 g/m2 is required; it is sold in rolls of different lengths. On average it takes from 15 to 20 linear meters. It is important that the fiberglass is of high quality, without flaws or damage to the surface |
| Epoxy resin | To strengthen the structure, increase its strength and protect it from moisture, epoxy resin is used; approximately 10 kg of it is needed. Naturally, a hardener is also needed, its amount depends on the proportion in which the components are mixed. You should always take a small reserve of hardener, since most often it is used 10-15% more than normal |
| Varnish | There are special yacht varnishes on sale that perfectly withstand both fresh and salt water and retain their properties for a long time. long period time. Also, do not forget to purchase a solvent, sometimes the varnish needs to be diluted, and you also need to wash your hands and tools after finishing work |
Important!
To tighten the elements together, 2 mm thick copper wire is used; do not forget about this important component, since the work process often stops precisely due to the lack of this material.

The working process
It is very important to do everything correctly, since any errors and shortcomings will make the design unusable. We will divide the process into two main stages to make it easier for you to understand.
Cutting and assembling the structure
At this stage the following work is carried out:
- First of all, you need to carefully consider the drawings of a plywood kayak - you need to transfer all the patterns onto the material with your own hands. As noted above, it is best to purchase ready set to avoid miscalculations and errors when cutting finished elements;
- The patterns are applied to the surface and then transferred to it using an awl. To make the lines clearly visible, you need to draw them with a carpenter's pencil. When drawing Special attention pay attention to the accuracy of the lines, you need them to be as close to ideal as possible;
- The instructions for cutting the material are simple, but keep in mind that the thickness of the plywood used is small, so it is very easy to damage. When sawing, you should not rush, you must be careful. The better you carry out this part of the work, the better and more reliable the final result will be;

- It is very important to collect small sawdust when cutting, to do this, lay down newspapers, they will be useful to you in the future when gluing individual elements;
- When assembling elements, holes are drilled at a distance of 10 mm from the edge and the parts are pulled together copper wire , do not apply too much force so as not to damage the plywood.

It is worth noting that other options are assembled in a similar way - a do-it-yourself plywood punt is made in the same way, the only difference is in the shape of the elements.

Strengthening the structure
This stage is also very important, you need to complete whole line works:
- First of all, all seams are filled epoxy resin with filling from sawdust. This is done very carefully after hardening;
- Then the external joints are processed - filled with the composition, rounded and leveled. Next, the fiberglass is cut out, applied to the surface and impregnated with epoxy. After drying, the excess is trimmed off;
- The upper ceiling is made of 4 mm thick slats; first, all elements are cut out, and then they are fastened with transverse bars;

- Next, all the elements are connected, treated with resin and leveled. The last stage appears on the surface.
Of course, structures such as a do-it-yourself plywood yacht can also be assembled, but this is much more difficult than a small kayak or punt.
Conclusion
To make an individual watercraft, you do not need to have complex equipment at hand and have special skills, you just need time and accuracy. The video in this article will help you understand the process in more detail, and if you have questions, ask them in the comments, qualified specialists will answer you.
When going to a pond, many take watercraft with them to turn their vacation into a more exciting event. However, an avid fisherman does not always find compelling arguments to convince his wife to buy an expensive rubber boat for such outings. Therefore, it makes sense that persistent fishermen consider building a fishing kayak on their own. It's interesting, useful and not that expensive.
Anglers who are not experienced in shipping rarely know exactly what is the difference between a canoe and a kayak. All three representatives of small river vessels are very similar and are distinguished by their extraordinary lightness and buoyancy. It is for these advantages that they are so valued by fishermen.
 The main difference between a kayak and a kayak is their size.. If a kayak is made for only 1-2 people, then kayaks can accommodate up to six people. A canoe can have even more impressive dimensions. There are sea canoe options with residential buildings on board.
Another difference between canoes and kayaks is the absence seats and closed compartments for storing things. Kayaks and paddleboards have places like this.
There are single-sided canoe oars and double-sided kayak oars. The bottom of kayaks and paddle boards is usually flat, while canoes have an oval bottom.
Otherwise, all three types of ships are very similar. They are light in weight, very easy to operate and quite durable and reliable, unlike their rubber counterparts.
Preparation for construction
Having decided to build a canoe for fishing, any master tries to prepare for the process and provide for everything possible difficulties and problems. Here short list main preparation points:

Having prepared everything you need, start building a kayak with your own hands.
Drawings and construction diagram
Getting started is usually the hardest part. We must decide to build a canoe or other vessel, so many people hesitate at this stage. However, it is worth remembering that the sooner construction begins, the faster it will end. In order to make a canoe with your own hands, follow a scheme proven over the years:


A fishing kayak is a swimming device that is lightweight and highly maneuverable. It is capable of developing high speed, passing unhindered between thickets of reeds and in other hard-to-reach places.
Industrial enterprises that produce kayaks took as a basis the watercraft used by the peoples of the North. The boats have been improved and fishermen can now purchase a tourist version.
According to its characteristics, the vessel differs from inflatable, aluminum and plastic boats. For its production, casting technology is used. The body resembles a capsule closed type, it is protected from water penetration. Companies often use polyethylene, consisting of 3 layers, to produce kayaks. This material has positive buoyancy. This ensures that the watercraft never sink.
The products have a drainage system. This is the name given to a series of holes through which water that gets inside is discharged out. If necessary, the fisherman can close them with plugs.
The inflatable fishing kayak has. It is also equipped with sockets that are designed for fixing fishing rods.

You can carry cargo in a kayak small size, luggage compartments were made for its transportation. To prevent the fisherman from getting tired, manufacturers equip the watercraft with foot rests. The oars are secured to the sides with clips, so you can release them to give your arms a rest.
In the store we choose a fishing kayak, paying attention to its dimensions. Speed and maneuverability are influenced by length and width. The larger the ship, the faster it is. As the size decreases, its stability on water decreases.
In the store you can buy an inflatable kayak for fishing. If you plan to fish on small canals, rivers and small lakes, you can choose a kayak with a length of 3.5 to 3.7 m.
The kayak is used not only for tourism, but also for hunting and fishing; models longer than 4 m with a high seating position are suitable for the sea. The fact is that short ships are not designed to big wave. In a strong crosswind, their heading stability will decrease and their movement speed will be low.
The larger the body of water, the longer the kayak should be. The width of the craft is selected individually, it depends on physical fitness fisherman and his weight. An important parameter is the carrying capacity. It is determined by the following formula: the weight of the kayaker plus 40 kg.
Benefits of using it while fishing
Fishing kayaks have the following advantages:
- It does not need to be registered, there is no need to have a license with you.
- No inspection required.
- It can be stored in the garage by hanging it on the wall.
- Affordable price.
- A comfortable seat that allows the fisherman to remain in one position on the water for several hours.
- There is a holder for rods. There are clamps for the echo sounder sensor, anchor and anchor line.
- The vessel is easy to transport by car.

High speed allows you to cover long distances during daylight hours. The silent movement makes it possible to get close to shy fish.
Advantages and disadvantages of a homemade watercraft
A homemade kayak can be made from plywood and other cheap materials, so creating such a vessel will not cause damage family budget. But construction requires skills in working with tools, this can be an obstacle.
Self-construction will require the installation of slipways; they must be positioned strictly horizontally, so this stage will be difficult for beginners. The boat can be framed; a do-it-yourself kayak can be made on slipways in a week.

Fishermen are often interested in how to make a kayak themselves. The construction of a watercraft begins with the purchase of materials. You will need the following tools:
- jigsaw;
- Grinder;
- screwdriver and drill;
- construction hair dryer;
- wire cutters;
- pliers.
To make a fishing kayak with your own hands, you will need 4 sheets of plywood, a knife and a spatula. Fiberglass or polyethylene films are suitable for covering the body.
Drawings and diagrams
Schemes will help speed up construction. You can make them yourself, but it is better to use ready-made drawings of kayak frames.

You can make a kayak for fishing with your own hands using polystyrene foam, plywood or other materials according to the diagram. A canoe is hollowed out of wood, and household building materials are sufficient to complete the work. When assembling, pay attention to joints and seams.
Materials
To make a kayak you will need plywood, epoxy resin and fiberglass. The strength of the vessel depends on the quality of the materials used, so you need to buy sheets of plywood without knots and other defects.
The fiberglass must have specific gravity from 130 to 200 g/m². For gluing, it is worth taking pieces of material without bends. If they are, it will be more difficult to coat the vessel with epoxy resin.
To make a kayak, 10 kg of epoxy resin is required. This amount is enough to cover the surface of the product for 1 time. It is best to purchase Etal-370. A hardener will also be needed; Etal-47 F5 is suitable for this purpose.
Work order
It is best to build a boat in a garage; the process can be divided into the following technological stages:
- Marking and cutting out kayak elements. To speed up the construction process, use an electric jigsaw.
- Assembling parts using masking tape.
- Fixing the decks and the bottom of the product.
- Connecting parts of a structure into a single whole. If necessary, the elements are adjusted to each other.
- The inside of the parts is coated with epoxy resin.
- At the bottom of the boat there is a compartment consisting of several partitions. He will make the ship unsinkable. All elements are also coated with epoxy material.
- Once again, adjust the bottom of the boat and the deck; there should be no gaps between them. After this, they begin gluing all the elements; the joints are covered with epoxy resin.
- Hatch device.
- The structure is covered with fiberglass.
After the epoxy resin has hardened, the surface of the kayak is sanded and then painted in the chosen color.
Sea trials
When the homemade watercraft is ready, the stage of sea trials begins. They are necessary in order to check its technical characteristics.
If everything was done correctly, the kayak will not leak water. It must be easy to operate, carry at least 120 kg of cargo, be stable on the water and be maneuverable.
Without carrying out sea trials, you cannot operate the product in deep water.
How to make your own kayak
Kayaks are narrow rowing boats with a sharp bow and stern, which are now actively used for rafting, tourism, hunting, expeditions, family walks and hikes in protected areas. They differ from ordinary boats in their shallow draft, high maneuverability, compact size, low weight and rowing method, which is carried out with two-blade oars. Kayaks are able to freely penetrate into places where a standard boat cannot enter. These are, for example, narrow bends, littered, overgrown with algae and reeds, or swampy reservoirs, rivers with big amount steep rapids and so on. That is why they have become very popular today among lovers of active water recreation.
Modern kayaks are made from polyethylene, composite materials, duralumin, thick fabric PVC. They come in single, double, triple, quadruple, and have different design and different prices. However, many lovers of spending time on the water do not want to buy a ready-made boat, but rather make it with their own hands. In this case optimal choice there will be a collapsible model with a shell stretched over a frame made of wooden and aluminum elements. It is better to prefer a single-seat kayak, which is quickly assembled, has sufficient strength, maneuverability, good running characteristics and a fairly large load capacity. The best option There will be a model like the Siren kayak, weighing about 16 kilograms made of plywood and duralumin, which can satisfy both avid fishermen and fans of rafting on mountain rivers or traveling along spacious bodies of water.
Where to start building a homemade kayak
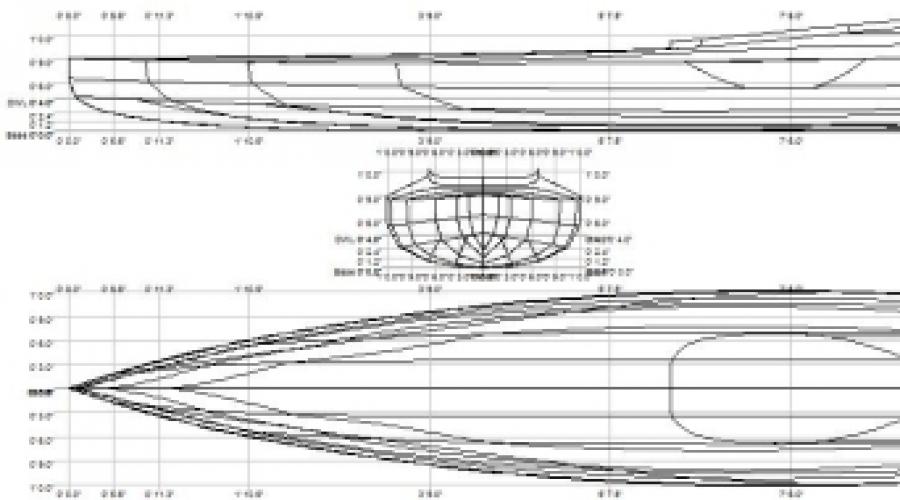
To create a kayak with your own hands, you need to have its drawings, which you can develop yourself or find on the Internet. They should show in detail and with dimensions the stems, keelson sections, bulwarks, midships, frames, stems, stringers, fenders, shell. To create drawings, you can take as a basis a kayak 4 meters long, 65 centimeters wide, and 20 centimeters high on the side.If a model similar to the Sirena kayak is chosen, its bulwark, sternpost, stems are made of plywood, the stringer and fenders are made of pine, the midships and keelson are made of larch. The shell can be made of dense PVC or M-72 fabric. Initially for wooden parts you should prepare dry, fine-grained pine and larch wood, BS-1 plywood with a thickness of 5.7–9 millimeters, pieces of sheet duralumin with a thickness of 1, 1.5, 2, 3.4 millimeters, a metal rod with a diameter of about 8 millimeters, pieces of of stainless steel 08 and 2 millimeters thick. For fastening you will need aluminum rivets with a diameter of 3-4 millimeters, a length of 2-3 centimeters and screws with anti-corrosion coating. The shell will require about 5 square meters waterproof fabric, the same fabric will go on the deck. You also need to prepare a rubber hose with a diameter of 3.5 - 4 centimeters and a length of 2 meters, a rubber cord with a diameter of 0.5 centimeters and a length of 1.2 meters and a slipway on which the boat frame will be assembled.

What you need to assemble a homemade kayak frame
The kayak frame includes two stems, five frames, a keelson of four sections, four stringers, two fenders, a midship and a bulwark. To assemble them you will need tongues, locks, an oval strip made of duralumin, fasteners for fixing the fender bars on the stems, an end strip connecting the stringers with the fender bars, locks for the fender bars and midships made of stainless steel. In addition, you will need fastenings of the keelson to stainless steel stems, a square for the midships, a wedge plate made of duralumin, side and middle slats for the keelson, plywood cross members, a tongue and lock for the keelson, a rail for its middle section, a bracket for attaching the bulwark and midships from duralumin, bracket for fixing the stringer on the frame, keelson latch made of duralumin with a stainless steel screw, aft bulwark made of plywood with a latch, loop and square.
Frame assembly
The fenders are assembled with stringers along their length. The sections, consisting of four parts, are fastened together with tongue locks. To the stringer slats, eight in number, locks are attached at one end with rivets, and tongues at the other end. Locks are riveted to four of the remaining eight blanks, and tabs are attached to the remaining four. The fenders are equipped with duralumin tongues and stainless steel locks. After this, they proceed to assembling the keelson. It consists of three vertical slats, which are connected by transverse strips. The keelson sections are fastened together with locks and tongues made of stainless steel. They are installed on all middle sections. Either locks or tabs are attached to the outer sections. The midsection sections are also connected with stainless steel locks and tongues.Keelson is assembled at flat surface. First, mark the center line and the location of the frames for the central sections with a pencil. Then transverse strips for the keelson are cut out of plywood 5 millimeters thick. Their length is 2 meters, width 2.5 centimeters. The planks are glued to the keelson slats with epoxy resin and secured with screws.
Near the stems, the side rails of the keelson are raised and placed on the wedge lining so that the middle rail is under it. It is cut according to the overlay, and will be adjusted to other elements when installing the stem. After that with inside cut off the side rivers of the keelson at a distance of 10-12 centimeters from the lining. They must be cut so that the stem fits tightly into the slots.
The stems are cut from plywood 8-9 millimeters thick. Clips are mounted on them, ensuring the fixation of the stems on the keelson slats. The frames for the kayak frame are bent from duralumin tubes, the diameter of which is 14-15 millimeters, or made from a U-shaped duralumin profile. For the middle frame, take a profile 2 millimeters thick, for the rest - 1.5 millimeters thick.
The profile is made from a duralumin strip. In order to bend it along the contours of the frames, templates are first prepared from steel and cut according to the markings. Templates are made separately for each frame. After this, the profiles are bent according to the templates using a rotating roller.
The frame sections are connected to each other by riveted duralumin inserts and plywood fillers. A large bracket is glued to the upper part of the second and fourth frames with epoxy resin, which is necessary to fix the end of the midsection to them. Smaller brackets are placed on all frames in order to secure the stringers to them. Additional staples are still glued to the top of the first and fifth frames, which are necessary to fully seat the midships. The frames are attached to the keelson with turntables.
To install the fenders, oval strips are first riveted onto them. In order for them to stand correctly, they connect the two middle sections of the fender bars, then put 4 centimeters on both sides of the joint. On the fender section with a lock, the oval bar is rotated 180º. To fix it on the third frame, a hole is drilled in the tongue on the fender beam for a screw, which is machined from stainless steel.
If the fenders are first secured to the three central frames, you can immediately mark the mounting locations for the oval strips on the first and fifth frames. To do this, you should join the end parts of the fenders, then press them tightly to the end frames and mark points in the places where the fenders touch the propeller.
After this, you need to rivet the hook and lock to the midship workpiece, secure the tongue to the stems and install the fork in place. Then use rivets to connect the ends of the fenders, stringers, midships with the stems. The fender bars are connected to them with an overlay. Holes for installing rivets are drilled after the frame is assembled. The stringers are attracted to it by twines.
The side sections of the bulwark are glued together according to the template waterproof glue. The strips for their assembly within a radius of 120 centimeters are first cut from plywood with a thickness of 7 and 10 millimeters. A groove is made in the lower edge of the blanks, which is necessary to pull the deck cord through it. The side parts of the bulwark in the bow are connected by a loop. To strengthen the frames, small slots are cut on the bulwarks into which the ends of the brackets on the third and fourth frames should fit. When the bulwarks are fitted to the frame brackets, you need to rivet the latches and install the backdrop using duralumin corners.
Creating a shell and deck for a homemade kayak
To create a shell, you will need a single piece of appropriate fabric with a length of at least 4.2 meters and a width of at least 91 centimeters. It is placed on the bottom of the frame, then the edges of the canvas, which protrude beyond the fenders, are tied together with thick or nylon threads. After this, the fabric on the bow and stern is cut and the shell is adjusted along the stems.
To strengthen the shell at the ends of the boat, it is glued outside and inside with a rubber hose, which is first cut into two parts in the longitudinal direction. The outer and inner hoses are sealed onto the stems, after which the sides of the shell at the ends are cut from above under the deck.

Then they begin to cut out the deck and attach it to the shell that remains on the frame. For the deck you will need four pieces of material - two middle and two end. A rubber cord is sewn along the perimeter of the middle parts, which is necessary for the deck to fit the bulwark. It is sewn to the bottom of the shell. Then a sealing strip is glued to this seam. The edges of the deck with a sewn cord are inserted into the grooves on the bulwark and tightened.
Now you need to attach the backrest to the bulwark using oval strips and rods. After this comes the turn of the footrest, which is easiest to create from a plywood strip measuring 18x24 centimeters. The bar is attached with guy wires to the second frame. Now all that's left is a seat that can be made of plastic, inflatable, and make a paddle. It is not difficult. The blades of the oar are cut from plywood 5 mm thick according to a template, its central parts are made of duralumin. The blades are connected to the seat by bushings or screws.
Such a kayak can be equipped with sailing rigs, a keel, and steering. It is suitable for hiking in various bodies of water, swimming along rivers of medium difficulty, and walking along the sea coast. If desired, you can attach a low-power electric motor or a gasoline-powered motor to the kayak if you mount a bracket on the stern and place a motor board. This will allow you to increase the speed of its movement and travel many kilometers.
Based on the design of a single-seater kayak, if desired, it is possible to independently build a double or even a three-seater boat. It is only necessary to correctly develop the drawings and prepare a piece of fabric for the shell that is larger in size than that of a single piece. The main thing is to carefully and carefully assemble the frame, remove and dry the shell in a timely manner, and then the kayak will be suitable for use for many years. If the “skin” of the boat is torn, it can be repaired by sealing the damage, or simply replaced with another shell made of denser fabric.