Hive frames are the main tool for a successful beekeeper. Making frames - how to make them yourself
Interior arrangement hive necessarily includes the installation of special wooden frames, on which the bees will build honeycombs. Making hive frames with your own hands - good basis for a novice beekeeper, since successful breeding of insects will require a lot of these products, and buying them ready-made is not economically profitable.
From this article you will learn not how to make frames with your own hands, but also how to build houses for bees yourself. The article provides instructions, drawings, photos and videos for the construction of a hive-bed and a multi-hull house for bees.
How to make beehive frames
In order for making beehive frames with your own hands to be successful, you must, first of all, decide on the size of the bee’s home itself. Each type of house has its own models, so their height depends on the depth of the boxes.
In addition, they are divided into several types, a description of which you will find below. They differ in design and complexity of manufacture. Also, these products are usually divided into types depending on the material from which they are made.
Types of frames
If you are not going to make frames yourself, but want to buy them in a store, it will be useful for you to know what types they are divided into depending on the material.
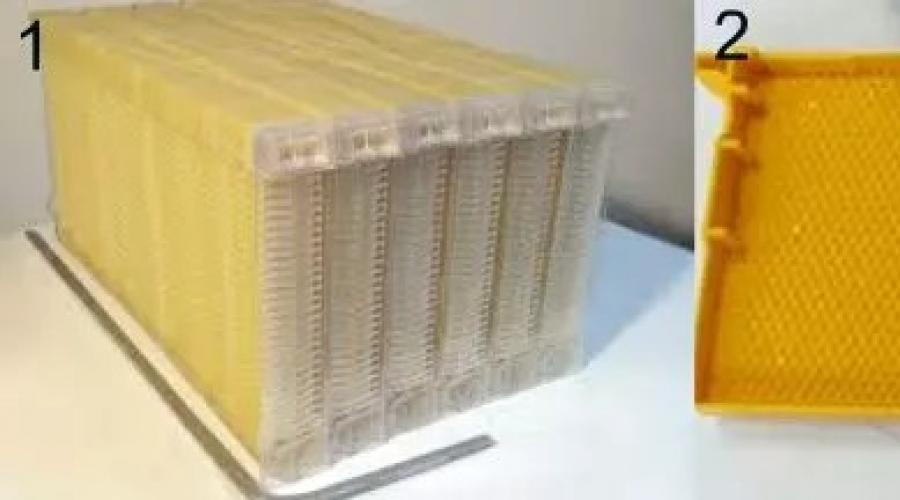
Modern manufacturers produce models from such materials(picture 1):
- Plastic made from high quality material, which does not release toxins into the air and has no unpleasant odor. If you come across a specimen with a strong, characteristic smell of plastic, it is better not to buy it.
- Polymer products, including those made of plastic, are considered one of the most durable. This material does not absorb moisture and does not deteriorate under the influence of direct sun rays and does not deform under high temperatures.
- Wooden are considered the most environmentally friendly, since in nature bees live inside tree trunks or on branches. You can make them from wood with your own hands, using ready-made drawings and available materials.
 Figure 1. Models from different materials: 1 - plastic, 2 - polymer, 3 - wooden
 The only drawback wooden products can be considered their relative fragility. They often harbor wax moths, which gnaw through the passages and make the structure unsuitable for further use. In addition, no processing special compounds Such products quickly deteriorate when exposed to moisture and direct sunlight.
Kinds
Conventionally, all models are usually divided into nesting and magazine (Figure 2). Nests serve as an incubator, as young bees reach adulthood in them. They can store very limited quantities of honey and bee bread.
Store-bought ones have a simple design, since their main function is to store reserves of honey produced by bees.
 Figure 2. Drawings of the nest and magazine model
 To make a frame yourself, you need to decide which hives will be in your apiary. Each type has its own models, but most beekeepers prefer to save materials and effort and make hives and frames standard size so that they can be changed at will.
Making frames with your own hands: video
Making a frame yourself according to drawings can be problematic, especially if you are doing this for the first time. To make the task easier, we recommend watching a video that shows all stages of their production step by step.
The multi-body hive is one of the most popular among beekeepers. It allows you to place large families, as well as many frames inside at the same time and, accordingly, get more finished products.
In addition, such models are easy to manufacture and maintain, so making such a house for bees with your own hands is quite possible, if you take into account some practical nuances and features.
Rules
To make a multi-frame house with 10 frames with your own hands, you need to adhere to certain rules. Firstly, the size of one frame should be 230*435 mm. Secondly, you need to strictly observe the dimensions of the case (length 450 mm, height 250 mm, and width 375 mm). Thirdly, it is advisable to select boards with a thickness of 35 mm: this will maintain an optimal microclimate inside the house.
For the manufacturing process to be successful, you need to follow these rules(Figure 3):
- Strict adherence to dimensions will allow you to make several multi-hull houses and frames for them at once. An apiary with such identical dwellings will be very easy to maintain.
- The material must be durable and high quality. It is better to use wood for construction, as it natural material, comfortable for bees.
- When installing the roof, you should try to install it tightly, without gaps, and cover it with any available roofing material.
 Figure 3. Design features of a multi-body hive
 Small ones must be made in the walls ventilation holes with gratings made of metal mesh so that a sufficient amount enters the house fresh air, but no other insects or debris entered.
Peculiarities
The main feature of a multi-body hive is the presence of several extensions, the number of which can reach 6 pieces. The three upper extensions are taller and larger, the lower ones are smaller, which is associated with the physiological characteristics of bees (Figure 4).
The bottom of this design is removable and resembles a frame in shape. As a rule, boards 3 centimeters wide are used for its production.
Note: It is better to install the bottom on a slope to make cleaning easier inner space.
 Figure 4. Drawing of a multi-body hive
 The entrance is a small board that is attached to the house with the help of two supports. If necessary, the entrance can be easily folded back so that the bees can fly out of the house, or vice versa - covered if the house is planned to be transported. To prevent the bottom from rotting, two bars are stuffed onto it, which act as legs.
Making a beehive with 20 frames
Bed hives differ from multi-hull hives in that new frames are delivered in width rather than height. In fact, the size of the sun lounger can be arbitrary, but in practice the most popular model A hive-bed with 20 frames is considered, so we will take a closer look at this particular design (Figure 5).
Note: The beds are considered quite bulky, so they are used mainly in stationary apiaries.
 Figure 5. Beehive bed: design features
 The internal dimensions of the lounger are: 810*450*400 mm, and different walls require material of different thicknesses. Front and back walls made from boards 40 mm thick, and side boards - 30 mm.
Rules
Making a beehive is more difficult than independent production multi-hull (Figure 6). Firstly, finished design it is quite bulky, and secondly, during production you need to strictly adhere to the dimensions in the drawing and tightly fasten the parts to each other.
To make the task of making hive frames easier for you, we recommend watching a video that shows in detail all the stages of the process.
Peculiarities
Among the main features of the hive-lounger, it is worth highlighting the bulkiness of the design. This bee house is quite heavy and is not suitable for manual carrying or transportation.
 Figure 6. Drawing for making a beehive
 In addition, in comparison with vertical hives, not all comb molds in beehives are filled with honey. Also, such houses are more difficult to maintain, since the bottom cannot be removed, but the structure is very strong and durable.
A special feature of the beds is that you can leave not one, but two bee colonies in them for the winter. This saves feed and vitality worker bees.
Anyone who has been breeding bees is not limited to beekeeping skills alone. As a rule, you have to have knowledge in agronomy (understand crops, predict the timing of germination and flowering), animal science (properly breeding and keeping bees), veterinary medicine (be able to carry out prevention against diseases, and in case of illness, treat them), carpentry ( repair hives, make them yourself, make frames).
I would like to dwell on the framework in more detail. They can serve for 10 years or more. Every time after reheating an old honeycomb, you have to thoroughly clean and disinfect it. In addition, they become loose, bend on the sides, and warp. But the most important thing is that it takes a lot of time and effort to restore them.
To make the top bars, I take a board 30 mm thick. If it is unedged, then I trim it from any edge and level it on a plane. Then I go through both planes on a plane, making them completely smooth with a clean thickness of 24-25 mm. Having prepared in this way required quantity boards, I proceed to the next operation.
We prepare bars for the frame
Another thing is the new frame. It is pleasant to hold in your hands, it is smooth, light, and smells of fresh wood. With such a frame, the entire nest of bees is renewed. When you turn away the canvas when examining a family, new frames with freshly built honeycombs immediately catch your eye.
The process of making them is simple; it is enough to have any woodworking machine.
Choosing lumber for hive frames
The board for the top bars and bottom bars should be 30 mm thick (acceptable - 25 mm), side - 40 mm. It is not so important what kind of wood the lumber is made of, the main thing is that it is well dried, because the frame parts can “twist”.
I set it on the saw using a corner right size (empirically I set the optimal one for myself - 20 mm). I make a test cut and check. If necessary, I will correct it. If the machine has a thicknesser, then I set the size 1 mm larger: subsequently passing all the workpieces through it, I get Exact size. The width should be 24-25 mm, thickness - 20 mm.
After the bars are prepared, they need to be cut to length. Considering the fact that inner dimensions hives are not always accurate; it is better to make the length of the top bar not 470 mm, but 468 mm. This is a slight departure from the standard, but allows the frame to fit into the hive without difficulty.
After the required number of top bars has been cut, I begin sawing them down. To do this, I install the table on the machine so that the saw protrudes above it by 10 mm, and the angle from the saw protrudes by 26 mm. Be sure to make a test cut and check. If necessary, I will correct it.
I take one or two workpieces, press the ends against the corner and pass them over the saw, trying not to skew them. It is better if the table itself moves, then the workpieces will be pressed against the block at an angle of 90 degrees relative to the saw. I make cuts on both sides.
Notching the corner of the top frame bar
The next operation is cutting the corner of the upper frame bar. In this case, the saw protrudes above the table at a distance of 26 mm, and the angle from the saw protrudes 10 mm. In this case, it is desirable that the corner be higher. I make cuts while holding the workpiece in vertical position. Pressing it to the corner, I pass it over the saw, doing this on both sides.
At this stage, work with the top bar is completed. It remains, if desired, to remove all roughness with sandpaper.
Making the bottom frame frame for the hive
It is not difficult to make. The width of the strip is 24-25 mm, thickness – 10 mm, length – 416 mm.
Some beekeepers do not adhere to these width dimensions, making the bar in the form of a square -10x10 mm. But I am more satisfied with this particular width, because two nails can be driven into the bottom bar on each side. They keep the frame from twisting well, and they can be cut from the same board as the top block.
I install the angle from the saw at a distance of 10 mm. I take a board and saw it. The output is a 10x24 mm strip. But before proceeding to the next cut, I plane the end of the board on a plane. Thus, only one side will not be completely smooth.
In the future, I trim all the workpieces, avoiding the presence of knots.
Making the side hangers of the frame
For hangers you will need a board 40 mm thick. The standard frame has a shoulder of 37 mm and a length of 290 mm. But I always aim for a 35mm shoulder size instead of 37mm. Why? The fact is that in practice, bees always glue propolis with wax to the edges of the hangers, thus increasing the size by 1-3 mm. Therefore, I plan a board 40 mm thick on both sides to 35 mm.
Then I set the angle from the saw to 10 mm (because the standard position of 8 mm leads to the fact that when the wire is tensioned, the side arms bend) and start sawing. Before each cut, I don’t forget to go over the end of the board on the plane.
The next operation is trimming 290 mm with mandatory culling of knots. From the blanks obtained in this way, it is also necessary to select the hangers. To do this, I make two cuts on one side and the other until the third part of the workpiece. The result should be 24 mm. I break off the remaining strips of wood.
The last stage is a smooth cut after washing. To perform this operation, I remove the saw and instead install a cutter 10-12 mm wide. I raise the table to a height at which there will be no indentations in the workpiece, but only a smooth cut. I definitely need to install a stop. It is necessary, because without it the workpiece simply cannot be held.
I put a strip of tin behind the cutter. For safety, it should be as close to the cutter as possible.
So, bottom part I lean the side bar against the stop and, pressing it against the corner, press it from top to bottom. I turn it and do the same on the other side. The output should be two smooth cuts on both sides.
This completes the work with the side bar. All that remains is to knock down the frame and equip it with wire.
Frame for the hive - drawing
DIY photo frames

- Cutting a plane at a corner
- I set the angle to 90 degrees and use a moving table to make cuts
- Notching the corner of the top frame bar
- I make two cuts on one side and the other until the third part of the workpiece
- I press from top to bottom and make a smooth cut on both sides
©Gennady IVANOV, experienced beekeeper
The key to successful bee breeding is comfortable and properly equipped hives. How successful the honey collection will be largely depends on how correctly the frames are made and positioned inside the bee house.
The correct design of the frame, despite its apparent simplicity, must take into account whole line factors, each of which has a significant impact on their quality. This should include:
- selection of material for manufacturing;
- geometric dimensions;
- plank shape;
- wire tension method;
- installation method;
- number of frames in the hive.
Therefore, the correct manufacture of frames for hives is a very important and responsible task, the solution of which must be approached very responsibly.
Options for placing frames inside the hive
The spatial position of the honeycomb frames is determined depending on the direction of their axes. It can be longitudinal or transverse in relation to the tap hole. As experienced beekeepers note, the chosen method of arranging hive frames does not affect the productivity of bees, but the speed and ease of control by the beekeeper depends on it.
With a longitudinal arrangement, it is possible to tilt the hive and inspect all the frames at once. In a transverse position, this is not possible, since the hive frames will swing and could crush the bees.
The longitudinal arrangement is used for quick work only by experienced beekeepers in large apiaries, and for beginners and small bee farms, a transverse arrangement and inspection of each frame separately is recommended.
In the case of hives with square cross section(for example, store type), you can change the spatial arrangement of the frames at any time and switch to an accelerated control method.
Sizing selection and basic standards
Before you determine the required geometric dimensions of the frames, you need to know the basic requirements for their correct placement. Both the overall productivity and the development of your apiary can depend on their correct spatial arrangement inside the hive. Therefore, when manufacturing and installing frames, it should be taken into account that the distances:
- between the axes of adjacent frames there should be 37-38 mm, which will ensure the width of the “streets” (passages for bees) within 10-12 mm;
- from the top and bottom bars of the hive frame to the body should not be more than 10 mm and not less than 8 mm;
- from the bottom row of frames to the bottom of the hive body - 20-30 mm;
- from the walls of the hive to the side slats - within 5-7 mm;
- The recommended width of the top bar is 25 mm.
The technology for manufacturing frames for hives should ensure their reliable fixation in the internal volume and the possibility of unhindered removal if necessary.
Among the most common standards that show good results, experts indicate the following sizes, which have frames for comb honey in outer height and width:
- Zander, 220 x 420 mm;
- frames for 12 frame Dadan-Blatt hive, 300 x 435 mm;
- Dadana (modified), 285 x 448 mm;
- Kuncha or “Goltz hive”, 330 x 250 mm;
- Langstroth, 232 x 448 mm;
- German standard, 223 x 370 mm.
When determining required sizes It should also be taken into account that they must correspond to the size of the hive in order to fully comply with the conditions specified above. Therefore, we can say that the design of the bee house and the dimensions of the honeycomb frames are inextricably linked and your honey collection and proper development bee family.
 Drawing and dimensions of the Dadan-Blatt frame.
 Distance between frames
The construction of the honeycomb occurs inside the frames that the beekeeper installs in the hive. This technology makes it possible to simplify the control of honeycomb filling and facilitate the process of collecting honey. The stability of the honeycomb can be increased by installing a special wax plate and securing it to a wire stretched inside.
Intermediate honeycomb walls can be purchased at specialized beekeeping stores or you can make them yourself. Bees fill honeycombs much faster in ready-made slabs. beeswax.
 Drawing and dimensions of the Ruth frame.
 The distance between the planes of hive frames is called “bee lanes”. Their width should be between 10-12 mm. Reducing the passage will not allow the bees to work normally on the combs due to the cramped space, and due to the increased distance, the construction of combs between the frames may begin or a significant increase in the thickness of the comb set may occur.
In order to accurately withstand required distance, the side planks are given a curly shape, in which the upper part of the plank is wider and the middle is thin. Another solution could be the use of special spacers on the side bars, which prevent the frames from getting closer together and allow for quick and accurate installation.
Design principle
Traditional frames for comb honey are assembled from 4 wooden planks: two side, top and bottom. In this case, the length of the top bar is slightly larger than the overall dimensions of the frame and its edges protrude on both sides. This allows you to quickly and easily install the structure inside the hive, placing it on the existing longitudinal supports along the side walls.
 Ruth workpiece dimensions.
 Retail networks They offer beekeepers sets of elements for assembly, bee frames in a ready-made assembled form, with or without holes for wire. The price of factory-made frames depends on the type of wood, the quality of processing of parts, the presence of holes, the level of assembly and trademark manufacturer. The most expensive products are made from beech and are supplied completely ready for use.
The type of material chosen for the manufacture of frames has a significant impact on the effectiveness of their use and the amount of comb honey produced. The dimensions of the structure, its strength and weight are also important. Wood and plastics are used as materials today.
 Assembling the sectional frame.
 Moreover, plastic as an innovative material has not yet become widespread. Most beekeepers, when making bee frames, prefer wood as a more natural and environmentally friendly material.
Wooden planks used for assembly must be well processed sandpaper or at grinding machine until a completely smooth surface is obtained.
When using resinous coniferous species, it is recommended to treat the surface of the planks with hot wax or natural drying oil. The planks should be connected to each other using steel self-tapping screws, having previously coated the joints with PVA glue. The use of nails may not provide sufficient structural strength.
The fastening of the intermediate walls made of foundation in the internal space of the frames is ensured by the tension of strings made of steel wire. At the same time, the strength of the wooden planks should be such as to ensure the possibility of strong tension on the strings, while eliminating the deflection of the wooden parts.
To ensure better stability assembled structure, it is recommended to do 4 pulls when the string is positioned longitudinally and 6 times to pull the wire when positioned transversely. In mini frames you can make only 2 broaches. The use of hardwood allows you to reduce the number of strings and simplify the work process, but this option will increase the weight of the product.
To ensure that the installed wire does not protrude above the surface of the planks and does not touch the walls of the hive, making their installation difficult, longitudinal grooves are cut out in the planks. The diameter of the holes drilled to pass the wire should not exceed 1.5 times the diameter of the wire.
The holes themselves are best made using a low-speed drill or screwdriver. Good results can be obtained by burning holes with hot metal. Using a cold awl or other similar tool for these purposes can lead to splitting of the finished planks.
Which wire arrangement is best?
The increased number of tensioned strings with a transverse arrangement makes it possible to more evenly distribute the force applied to the bars and reduce possible bending. Four, and sometimes only two, stretched strings increase the force impact and contribute to greater bending, and, therefore, a subsequent weakening of the wire tension.
 Longitudinal and transverse winding.
 On the other hand, an increase in the number of strings leads to a more complex design, increases the time for its manufacture and complicates the process of soldering the intermediate wall of foundation to the wire. Therefore, when choosing the location of steel strings and their quantity, you should take into account the strength of the frame material and its dimensions, since the larger the frame, the more tension will be required.
To create the possibility of tightening the strings when they are weakened during operation, some beekeepers recommend not tying the ends of the wire to the tensioned string, but hammering fixing nails into the upper bar.
They should protrude 4-5 mm above the surface of the bar, which is enough to fix the wire. The length of the nails is 15-20 mm, the diameter is 1.5-2.0 mm, and the surface itself must have an anti-corrosion coating.
If it is necessary to perform a tightening, the nails are simply driven into the bar up to the head. In this case, the wire changes its length and provides better tension. This stretching technique allows you to do without the use of a tensioning machine or other specialized devices.
Selecting wire for frames
The wire used for bee frames as tension strings must be steel. The use of non-ferrous metal wire or thick fishing line is not recommended due to the soft structure of the material and the ability to stretch over time, as well as the complex technology of fastening the intermediate wall to the frame. In addition, the use of fishing line or soft metal does not ensure the safety of the strings when removing the honeycomb with a knife.
Excellent results can be obtained by using nichrome or tungsten. These materials are not subject to corrosion, are easy to process and heat up quickly. However high price does not contribute to their widespread distribution.
Therefore, specialized stores offer beekeepers two types of steel wire: regular black and high-alloy stainless steel. Stainless steel is durable, but it is also more expensive.
Its increased rigidity makes the process of pulling it onto the frame somewhat more difficult. At the same time, it should be borne in mind that black strings are much cheaper and softer, but can rust over time due to the treatment of frames with pest control compounds. The final choice is yours, since each type of wire has its own advantages and disadvantages.
1 of 3


Instructions for stringing the wire
After making wooden frames with installed spacers or shaped side strips, it is necessary to begin tensioning the wire to subsequently attach the intermediate wall made of foundation to it. To do this you will need the following equipment and materials:
- steel wire with a diameter of 1.5-2.0 mm, wound on a reel;
- drill or screwdriver with a drill of the appropriate diameter for the wire;
- marking drill jig or template that you can make yourself;
- hammer, pliers, pliers;
- nails for fastening and tightening wire.
To increase the convenience of unwinding the wire, it is recommended to install the reel on a vertical axis.
Installation and tension of strings
When stretching the strings on the frame, the order of work will be as follows:
- using a jig or marking using a template, drill required holes in opposite strips depending on the chosen arrangement of strings;
- drive the tension nail into the frame;
- pull the wire through the drilled holes, passing through them in a sequential snake;
- wrap one end of the wire around the corresponding nail;
- Pull the wire using pliers and secure it to the second nail in the same way.
The tension level of the string should ensure that a musical tone appears when it is plucked with a finger. Otherwise, it is necessary to perform a constriction.
Installing the inner wall
After the frame with stretched strings is ready, you can begin the process of attaching it to the wire inner wall from wax. This is done by heating the wire and fusing it into the material of the plate being fixed.
The ends of the wire are connected to a current transformer operating at an applied voltage of 12-36V. The use of 220V equipment is prohibited due to safety reasons.
You can use it as a current source Charger for car batteries or buy a device in a specialized beekeeping store in the equipment department. Usage car battery not recommended, since you can simply damage it by turning it on in short circuit mode.
To solder the intermediate wall:
- place the frame with stretched steel wire horizontally on the desktop;
- place the cut wall plate inside the frame on the wire;
- connect the ends electrical wires from the power source to the nails or ends of the wire;
- turn on the electric current source;
- when the wire is heated, the wall material will begin to melt and it will go inside the material;
- After cooling, the intermediate wall will be securely attached to the frame.
A very important point when performing this operation is to prevent the wire from overheating. If this happens, the hot strings will simply cut the material, and the result will be negative. It is also impossible to achieve good result and with insufficient heating.
For bees, the fundamental location of the intermediate wall has no of great importance. It may not reach the edge of the frame slightly, have a slight distortion during installation, or be assembled from several strips. The main thing is that it does not fall off after installing the frame in the hive.
Frames for hives made of plastic
Today, most beekeepers use wood to make bee frames as a natural material that has been proven over the centuries. However, development modern technologies led to the appearance of plastic products on the market.

This is due to the desire of manufacturers to exceed performance indicators traditional materials and create lighter, stronger and more comfortable hive frames. In cold weather, wood quite actively absorbs moisture from the air, and in the heat it dries out. This leads to deterioration in the quality of the frames and may lead to a decrease in the quality of honey.
So far, plastic frames are only made industrially and are sold as ready-to-use products. Plastic structures are made of full standard size and mini frames for connecting them into a cassette block.
In this case, the internal space of the product is filled with thin plastic plate and wire tension and subsequent installation of the inner wall is not required. Simply cover the surface of the plastic with melted wax using a roller and install the frame in the hive.
Summarizing
Self-production of frames for bee hives is not difficult work, and even a novice beekeeper can do it. Traditional structures are made of wood and steel wire. dimensions frames depend on the design of the hive and its volume.
In addition, plastic frames are on sale and are successfully sold, which are easier to use, but more expensive for the beekeeper. Choice suitable design depends on the size of your hives, the level of development of the bee colony and the wishes of the beekeeper.
In those days, when bees lived in trees, in hives and hollows, people in search of honey lured them out and smoked them out. Then they found a way to extract honey more humanely - raising bees. People began to create homemade hives from wood and other materials. The main purpose of such structures was to simplify the process of obtaining honey. The basis of any hive is made up of frames, which, in turn, can also be vertical, horizontal, or square.
Often, experienced beekeepers make hives from wood: pine or cedar. The use of willow, poplar or linden is also allowed. The wood should be well dried, and the boards for the walls should be even and smooth. It is more convenient to fasten the boards with screws and a drill, but you can also use nails. Color bee house should be painted with light paint and preferably 3 times a year. Typically, a traditional hive consists of 12 frames. In order to make the structure correctly, it is necessary to maintain the dimensions and proportions inside the house:
Standard parameters of frames for bees:
Classification of hive framesTypes of frames:
Wooden framesToday, traditional wooden frames are losing their former popularity. Beekeepers increasingly prefer plastic frames. Advantages of wooden frames:
Disadvantages of wooden frames:
Advantages and disadvantages of plastic framesMany beekeepers note that working with plastic frames is much easier, largely due to the savings in foundation. Advantages of plastic frames:
Before you start working with a plastic frame, it must be covered with an even layer of wax. In order for the wax to be properly distributed over the surface, you can dry it with a hairdryer or dip it in warm water. If the water is too hot, the plastic will deform. Plastic frames do not leak, unlike wooden frames. When rotating in a honey extractor, such frames do not break even at the most extreme speeds. The advantage of plastic frames is that they do not become moldy or sag. This frame is difficult for rodents to chew through. The service life of high-quality plastic frames is about half a century. Disadvantages of plastic frames:
Allowable number of frames in a hiveThere are absolutely different sizes and types. And only after analyzing the specifics of bees and the surrounding climate, you can choose a certain type of hive. Houses for bees can be one-story or with several buildings. An important parameter When choosing a hive, the number of frames is important. They are:
Hive frame sizesDepending on its size, evidence can accommodate either 8 frames or 24. But there is a certain classification of sizes for different types frames:
Frame manufacturing technology involves the use special machine. However, professionals can do without it, but it will take much more time to create each detail. In any case, to collect wooden frame into one design, you need to use a hammer, wire and other necessary tools. DIY nesting frameIn order to make a nesting frame for bees with your own hands, you must first cut out two side planks from wood, an upper beam and a lower one. Manufacturing technology: Before you start attaching the prepared parts together, prepare a metal wire and a screwdriver.
Frame for Dadan-Blatt hive and hive-loungerThe process of making such a frame is quite simple. For work, you should stock up on dry wooden blanks, thin wire, nails, hammer, awl and pliers. Manufacturing technologyThe external dimensions of the frame for the bees will be 43.5x30 cm. First, cut out the planks from wood according to the dimensions as in the picture.
Waxing wireSteel wire can be replaced with durable nylon thread. The advantage of this method is good thread tension and elasticity. It is recommended to use 0.5 mm thick thread for bee frames. It is recommended to fix it with nails. The end of the thread must be twisted several times around the nail and driven in until it stops. The wax holds on a nylon thread just as firmly as on a steel wire. Waxing bee framesFoundation is a thin layer of wax on which hexagons are pressed out with a press - future cells for honeycombs. This material is most in demand in beekeeping. After you have made a frame with tensioned wire, you need to attach the foundation to it artificial production using a pattern. As a rule, a wooden pattern has the following dimensions: width 29.5 cm, length 45 cm, thickness 30 mm. A frame with wire must be placed on the board with the fold applied. And the pattern determines whether the folding is done correctly. Frame extension is done by hanging foundation on a frame with wire. When performing this procedure, you must ensure that the top rows of the frames are filled with wax. Otherwise, insects will organize the honeycombs crosswise.
Processing frames for beesOnce you've completed your bee frames, you'll want to sanitize and clean them before waxing them. wooden elements. To do this, beekeepers recommend using a solution of propolis (10%) in alcohol (70-90°). Alcohol can be replaced with moonshine (90°). This solution is well absorbed into the wood and is an excellent antiseptic that evaporates instantly. When the coating dries, a film remains on the wood. This film is protective layer and prevents the formation of mold and other infections. In addition, bees react normally to such coating. Storing bee framesOne of important points in the process of beekeeping is also an organization proper storage frames for bees. It is important to protect the wax frame from damage by rodents and harmful insects. The most dangerous in this case is the wax moth, which can destroy the entire supply of honeycombs. As soon as the moth gets on the honeycomb, it begins to leave larvae there, which destroy the cells. Therefore, directly during the process of pumping honey, care must be taken to protect the honeycombs. If you find traces of caterpillars on them, you must immediately treat the honeycombs with vinegar, at the rate of 20 ml per 20 nesting combs. Directly from the honey extractor, the frames are transferred into sealed packages. Good at repelling moths orange peels and mint, which can be placed on frames and in honeycomb storage. Mousetraps and poisons must be used against rodents. The honeycombs are cut from the frames and stored in tight bags. Store frames are cleaned in the fall and transferred to dry storage areas. Another bee enemy is the shrike bird. Also avoid ants near the hives. These insects can enter hives and destroy bees and their queens. You can prevent the appearance of ants by simply lubricating the legs of the hive with lime or another viscous product.
Making frames for bees. Video |


What is photography? It's not only Nice picture or the face of a familiar person. Photos are memories. And the most Beautiful moments They are worth storing them not in an album or on a computer, but hanging on the wall.
What is a photo frame for?
However, good photography is necessary decent frame. Although there are many different photo frames to choose from, choosing the right one is not that easy. For really expensive and valuable works you need to choose the frame especially carefully.
The frame can be not only decent design photography, but also an element of interior design. In order to choose the most suitable option, it is better to contact a specialist.

Our framing workshop produces photo frames from wood, plastic and aluminum. Thanks to special processing technology, they can have any shape and color. Plastic frames may look like wood or metal, may be gold-plated or silver-plated, with an imitation of antiquity. A qualified framer will be able to offer the client exactly the option that best suits both the theme and style of the photo, as well as the design of a particular room.
A plastic frame differs from wooden or metal frames in its lightness and relatively inexpensive price. The photo will look natural on your desktop or decorate the wall of your apartment. long years. In addition, such frames are not afraid of mechanical influences, moisture and temperature changes.

If suddenly, among the store variety, you cannot find decent option, don't despair. Among the services of our company is the production of frames custom size for your photos.
How to order photo frames
Before choosing a frame, you need to decide on its purpose. Imagine where the photo will be placed - on the wall of the apartment, on the desktop, in the office. Then you should go to the website www.site, look at the offers and select the desired color and profile.

If it’s not easy to make a choice, or you want something original and unusual, then you can come to our framing workshop. It is located 2 minutes from Dostoevskaya metro station or Novoslobodskaya metro station. With the help of our experienced specialists can be found the best option shapes or finishes.
The rich experience and qualifications of our craftsmen allow us to offer products of the most High Quality. Call!
