Proper finishing of the blind area with paving slabs. How to make a blind area around the house: do it correctly according to the instructions with your own hands. Connection nodes for the blind area.
7627 1
The blind area is a waterproof stone strip around the building, one edge adjacent to the base and sloping away from the house, ensuring the drainage of storm and flood waters from the foundation.
The construction of a blind area made of paving slabs is very popular
Thus, the blind area is important element construction of a house, the construction of which cannot be neglected. There are several types of blind areas that differ from each other in design and materials, but perform one task - protecting the foundation of the house from water. However, if the surface of the structure is properly finished paving slabs, the blind area can also perform the function pedestrian path and decorative element of the home interior. Knowing the technology of this design, it is not difficult to make and equip it with your own hands.
Let's break down the full scope of work on constructing a blind area into stages and consider technologies that allow finishing it with paving slabs:
- Marking.
- Waterproofing.
- Installation of curbs.
- Sand pillow.
- Crushed stone preparation.
- Reinforcement.
- Concrete base.
- Laying tiles.
- Filling paving joints.
Marking
The width of the blind area of the house should be 20-30 cm greater than the roof overhang, but not less than 60 cm. Another 30 cm should be added to this value for installing curbs or concrete drainage trays.
In order to correctly project the contour of the roof onto the ground with your own hands, lower a construction plumb line to the ground from a ladder attached to the wall of the house and drive a peg at the point of contact. 2 points are projected from each straight section of the roof. These points are moved from the walls of the house another 30 cm, pegs are driven in and a control cord is pulled over them.

First you need to decide on the width of the blind area and make the appropriate markings
The design horizontal line of the top finishing mark of the paving slabs is applied to the outside of the building around the perimeter. Then, parallel to it below, another line is drawn - the level of pouring the concrete base. The distance between these lines should be equal to the thickness of the tile plus 2-3 cm.
Using a bayonet shovel, you need to make an incision in the turf along the control cord and remove the soil to a depth of 25-30 cm around the building from the walls to the incision line.
Along the outer perimeter of the resulting new base, a trench is dug 25 cm wide and 15 cm deep to install curbs, after which the surface of the base and the bottom of the trench in it are leveled and compacted.

Stages of preparing the surface for the blind area
Waterproofing construction
Strips of roofing material are laid across the dug trench with an overlap of 10 cm over each other in such a way that the roofing material repeats the profile of the base - it descends from the ground into the trench, comes out of it and, passing across the base of the future blind area, forms an overlap 30 cm high on the base. The surfaces of the overlaps of the roofing felt strips are covered with bitumen mastic and glued together.
Construction of an expansion joint on the plinth
To the base along the perimeter, over the roofing material overlaps, using dowels-fungi, do it yourself butt-fasten strips of extruded polystyrene foam (foam with a solid structure, without balls) 2-3 cm thick.
The width of the strips should be 30 cm, the upper edge of the strip should run along the line of the upper level of the tile marked on the base. Expanded polystyrene will not only evenly press the roofing felt to the surface of the base, but will also take on the stresses that will arise in the concrete due to temperature fluctuations.
Insulated blind area
Installation of expanded polystyrene on the base, in addition to the method of damping deformations, is part of the technology for constructing an insulated blind area, which is carried out in areas with high level soil freezing. The technology for constructing an insulated blind area also includes a number of other works, for example, insulating the base to a great depth and adding expanded clay under it in a conical manner.
The insulated blind area of the house prevents the formation of condensation on inner surface basement, which is important when using a technical underground room.
The construction of a blind area from paving slabs is made using curbs that prevent the paving stones from sliding down an inclined surface and give completeness to the finishing of the structure. Curb stone is produced different sizes. For arranging a blind area, stones of the format 1000x150x300 and 850x150x300 mm (length x width x height) are convenient, requiring the efforts of two people during installation, but ensuring high structural strength. When arranging a blind area with a figured configuration of the outer edge, the curbs are cut into 2 or 4 parts using a grinder with a dry cutter.

Crushed stone of the 20-40 mm fraction is poured into the bottom of the trench on top of the roofing material in a layer of 5-7 cm, leveled and compacted with a tamper made by hand from a piece of log or timber. The border is laid on a layer of cement-sand mortar 5 cm thick, applied to a compacted crushed stone cushion in the trench, and leveled along the control cord and bubble level.
It is necessary to make a “curb lock” - the solution flush with the soil base of the blind area is placed in a trench on both sides of the curb between the stone and the roofing felt.
Level of the top edge of the curbs
The design position of the upper plane of the stone can be of two types:
- flush with paving slabs;
- 5-7 cm above the level of paving stones (blind area-sidewalk).
In the first case, the curbs are installed without a gap, with a preliminary application of a continuous layer of mortar on the end of the stone and its installation close to the adjacent product. The top mark of the curb should be 5-7 cm below the tile mark line marked on the base. This corresponds to a slope of the blind area of 5-7%. Excess mortar that appears is removed with a trowel, and the joints are rubbed down.
When installing borders above the tiles, every second joint is made with a gap of 5 cm to allow water to drain. The level of the upper edge of the curb in this case should approximately coincide with the level of the edge of the tile adjacent to the base of the house.
Sand cushion device
Sand is poured over the waterproofing and leveled with a layer of 10 cm. It is better if the sand is wet - this will improve the quality of its subsequent compaction with your own hands. The sand will evenly and without damage press the roofing felt to the compacted primed base, and will also preliminarily mark the profile of the crushed stone cushion.

To do this, you will need to pour a ball of sand and compact it tightly.
Construction of crushed stone cushion
Crushed stone of a fraction of 20-40 mm is laid on top of the sand layer, leveled with a layer of 8-10 cm and compacted. Compaction is carried out so that the subsidence of crushed stone into the hidden cavity does not lead to subsidence of concrete.
The profile of the crushed stone layer should repeat the profile of the sand cushion, that is, it should have a slope of 5-7% away from the building.
The concrete base around the building is reinforced with a flat steel mesh with a cell size of 15x15 or 20x20 cm from reinforcement with a diameter of 6-8 mm. The pieces of mesh are laid sequentially in a row with an overlap on each other in 2 cells, fastening the overlaps with knitting wire with your own hands. The plane of the installed reinforcing mesh should be positioned so that after laying the concrete it is under a layer of mortar of at least 3-4 centimeters. The mesh should also not have stressed areas, which, after pouring concrete, will bend outward from it.

Especially on heaving soils: a special cushion and reinforcement are required
Construction of transverse expansion joints
Due to temperature changes, the blind area of the house is subject to significant linear changes in size, which can lead to swelling. Therefore, the technology includes not only the arrangement of a longitudinal expansion joint between the plinth and the blind area around the house, but also the installation of additional transverse damping joints in the structure.
To do this, damping partitions-spacers are installed on top of the reinforcement perpendicular to the base in increments of 1.5-2.0 m around the building. curb stone and the building. The same partitions are installed diagonally at the corners of the base. Spacers can be made with your own hands from strips of extruded polystyrene foam or boards soaked in used motor oil. The thickness of the strip or board should be 3 cm, the width should be the thickness of the concrete pad, and the length should be the width of the blind area in the installed location.
Concrete preparation
In the compartments between the damping partitions, flush with their upper edge, concrete is placed in a layer of 5-7 cm, made by hand in volumetric proportions of 2: 4: 8: 1 (M500 cement, sand, crushed stone, water).

Only after completing the previous steps can you begin to prepare the concrete mixture
The design slope of the mortar surface during compaction and leveling should be made at 5%.
After a few hours, the set concrete around the house is covered plastic film to avoid premature evaporation of water and loss of foundation strength. It is correct to begin laying paving slabs after a week, when the concrete has gained approximately 70% strength.
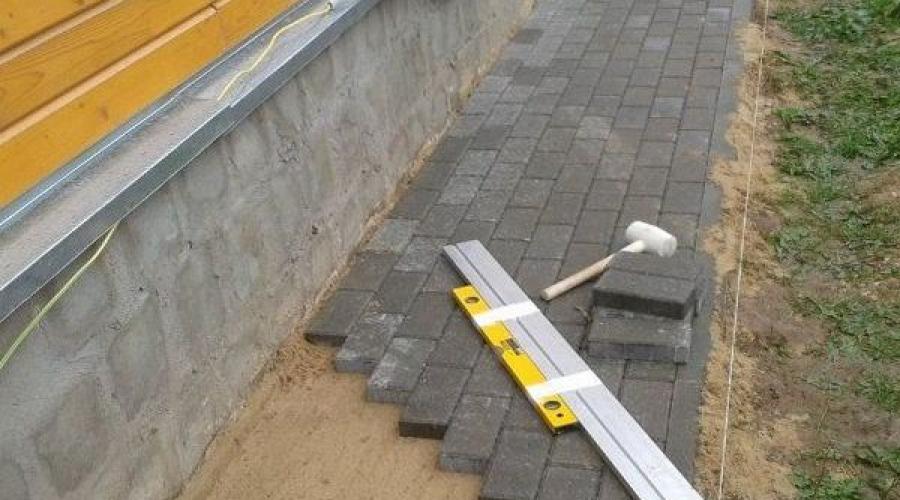
The blind area paving stones are laid on cement-sand mortar, made in volumetric proportions 1:3. For a base area of approximately 0.25 square meters. apply a layer of mortar 1-2 cm thick. The tiles around the building are laid from the curb to the base, that is, from the bottom up, so that they do not slide down an inclined slope. Having laid the tile on the mortar, press it slightly to the base and tap rubber mallet installed locally. A fixed gap of 2-3 mm is left between the tiles. Cutting and fitting of paving stones is done with your own hands using a grinder with a dry cutter.

Traditional technology for laying paving slabs on a sandy base will ensure surface mobility
Filling the seams of paving slabs
Three days after the completion of laying the paving stones, they fill the joints of the coating with their own hands. To do this, you need to make a dry cement-sand mixture in a ratio of 1:3, which is poured in half-bucket portions onto the blind area tiles. Using a hard broom, sweep the mixture along the plinth around the house, filling the joints of the tiles. After filling all the joints, gently water the surface with water from a garden watering can, just to moisten the dry mixture in the joints.
After a day, the procedure is repeated, but without wetting with water. The mixture should not fill the joints flush with the surface; the joints should be clearly marked. The dry mixture, due to its hygroscopicity, will harden in a week, picking up moisture from the air and the fresh concrete base.
To remove excess roofing material overlap, you need to make an incision around the building on the waterproofing along the edge where the paving stones meet the polystyrene foam of the base. In the same way, excess roofing material is removed from outside borders.
Rules for constructing a blind area are regulated by a number of regulatory documents, each of which contains many requirements. Therefore, there is no point in looking for SNiP for the blind area as the only standards: if you want to do everything in compliance with the requirements, you will have to comply with them all. At one time I collected quite a lot big row excerpts from the requirements for the installation of blind areas for filing a lawsuit against the customer's service, because its representatives grossly violated the rules for drawing up estimate documentation, reflecting both incorrect and non-existent values in it. Let's look at everything sequentially.
General requirements for foundations (according to SNiP 2.02.01 83)
By SNiP 2.02.01 83, which is often defined as SNiP for the blind area, only the general aspects of the construction of the foundations of buildings and structures are regulated, including calculations for deformation, impact groundwater and other similar things. Accordingly, SNiP 2.02.01 83 can be used as a guide for general calculations and fulfillment of basic requirements for soils, etc. However, specific values this document does not define, and therefore it is not possible to recommend it as the only one.
General requirements for landscaping (according to SNiP III-10-75)
“The blind areas around the perimeter of the buildings must be tightly adjacent to the base of the building. The slope of the blind area must be at least 1% and no more than 10%.
In places inaccessible to the operation of mechanisms, the base under the blind area can be compacted manually until the imprints from the impacts of the tamper disappear and the movement of the compacted material stops.
The outer edge of the blind area within the straight sections should not have horizontal and vertical curvatures of more than 10 mm. Concrete blind area in terms of frost resistance must meet the requirements for road concrete"
According to the paragraph above, the requirements for concrete must satisfy “GOST 9128-97*. Mixtures of asphalt concrete road, airfield and asphalt concrete. Technical specifications" and "GOST 7473-94. Concrete mixtures. Technical conditions".
Requirements of technical supervision services (manuals on SNiP)
Let's study another one normative document, which is called “Schemes operational control quality of construction, repair and construction and installation work" Documentation of this type are used by technical supervision services as instructions for performing site inspections and quality control of work:
1. Technical requirements : according to SNiP 3.04.01-87 table. 20, SNiP III-10-75 clause 3.26
2. Permissible deviations: slope of the coating from the specified one - 0.2% of the width of the blind area; surface of asphalt or concrete covering from the plane when checking with a two-meter rod - 5 mm; surfaces crushed stone preparation from the plane when checking with a two-meter rod - 15 mm; thickness of the covering of the blind area from the design - -5% - +10%. The blind areas around the perimeter of the building should be tightly adjacent to the base. The slope of the blind area from the building must be at least 1% and no more than 10%.
The width of the blind area should be: at clay soils- not less than 100 cm; at sandy soils- at least 70 cm.
3. Not allowed in a concrete monolithic blind area there are cracks, cavities and depressions.
To prepare the base (evenness, quality of compaction) for the blind area, an inspection report should be drawn up hidden work. I'll add a note here: if a representative of technical supervision refuses to sign the acts, suspend the work, and ask the official to either sign or write a reasoned refusal. Before the customer, blame everything on technical supervision - they are obliged to sign your acts or refuse with justification. Do not believe the words, because if you (or you) are sued for arbitration, then permission to pour concrete without acts, only in words, will not be evidence. Record the refusal to sign acts (oral) on a voice recorder. Demand yours and send everyone - if you are framed, then it will be you who will pay, not the customer, and especially not technical supervision. Learn this well. Let's continue.
4. Requirements for the quality of materials used: GOST 9128-97*. Mixtures of asphalt concrete road, airfield and asphalt concrete. Technical specifications; GOST 7473-94. Concrete mixtures. Technical conditions.
Concrete mixtures must be characterized the following indicators : strength class; workability; type and quantity starting materials(binders, fillers, additives); size of aggregates.
In agreement with design organization carrying out designer's supervision, samples of the concrete mixture at the site of their placement in a monolithic structure are allowed. The workability of the concrete mixture is determined for each batch no later than 20 minutes after delivery of the mixture to the place of placement.
Concrete mixtures at the installation site are taken by volume. Ready-made concrete mixtures must be delivered to the consumer by concrete mixer trucks and concrete trucks. By agreement between the manufacturer and the consumer, delivery of concrete mixtures by dump trucks and vehicles in bunkers (tubs) is allowed.
Asphalt concrete mixtures are characterized by the following indicators: the nature of the mixture depending on its temperature; density of asphalt concrete; largest size filler mixture. The temperature of hot mixtures when discharged from the mixer must be no lower than 140°C.
Quality control asphalt concrete mixtures produced at asphalt concrete plants during their production, as well as during installation. To control the quality of the mixture, one sample from each batch is taken and tested. When delivered to the consumer, each batch of the mixture must be accompanied by a quality document. Let me add one more note: documents should not be for the entire batch of concrete or asphalt, but for each mixer (dump truck). Demand certificates for each flight– they are obliged to provide them. Poor quality material send it back, because you may be given a certificate for a batch of 100 cubes, and of these only 25 cubes will more or less correspond to this certificate. Let's continue.
Instructions for carrying out work: according to SNiP III-10-75 clause 3.26
The base for the asphalt concrete blind area must be compacted with crushed stone or gravel with a particle size of 40-60 mm and pressed into the ground with a roller or tamper. Blind area from monolithic concrete should be installed on a sandy base, compacted to a density coefficient of at least 0.98.
Asphalt concrete blind areas should be constructed from a factory-prepared hot mixture with a temperature of at least 120°C when laying it. The concrete used for the blind area must correspond in frost resistance to road concrete and the grade must be at least M200.
Asphalt concrete mixtures can only be laid in dry weather. The bases under the coatings must be cleaned of dirt. The air temperature when laying hot mix asphalt concrete pavements should be no lower than +5°C in spring and summer, and no lower than +10°C in autumn. To remove moisture from drainpipes special concrete or asphalt concrete trays must be made with a slope of at least 15%.
In general, here is a quote. Pay attention to the lines: “sampling the concrete mixture at the site of laying it in a monolithic structure is allowed do not select, but evaluate the strength of concrete according to the control data of the concrete mix manufacturer" In practice, this usually means that you will have to cast several cubes of concrete and send them to the factory laboratory (without giving them to technical supervision). Each concrete plant has its own laboratory, where samples will be tested and certificates will be issued, which will need to be presented to technical supervision or to the customer (if you work directly with him). When casting, the cubes must be well compacted, otherwise they may fall apart. I made the molds for casting like this: I went to the trash heap near the supermarket, rummaged through it, and found about five fruit boxes and a piece of plywood. From all this I built homemade forms with cells, like this:

These things need to be placed on a hard surface (gypsum board, for example), pour concrete into them and compact it well. Then the molds need to be broken and samples removed from them (in the photo below, some of the samples didn’t turn out very well good quality). From each mixer you need to prepare 3–4 cubes with a side of 15 cm; it is better to wrap the finished products in a rag before transportation. It is strictly necessary to submit samples no earlier than they have gained primary strength (at least 7 days). In practice, laboratories sometimes pick them up a day or two later, as soon as they are ready. If you work directly with the customer, do not forget to include laboratory tests of concrete and the production of samples for them in the estimate. For government orders, you will have to make samples even if this is not reflected in the estimate.


This is about “instructions”. As you can see, SNiP 2.02.01 83 on the blind area is not mentioned at all, which confirms the comments I made above that this point can be considered only general, indicative, and some information can be used for calculations.
From TSN Moscow
“4.11.4 To ensure surface drainage from buildings and structures along their perimeter, it is necessary to provide a blind area with reliable waterproofing in accordance with SNiP III-10. The slope of the blind area should be at least 10 ‰ from the building. The width of the blind area for buildings and structures is recommended to be 0.8-1.2 m, in difficult geological conditions (soils with karst) - 1.5-3 m. In the case of a building adjacent to pedestrian communications, the role of the blind area is played by a sidewalk with a hard surface. »
This is how the requirements for blind areas of buildings are regulated by the “Norms and Rules of Design comprehensive improvement on the territory of the city of Moscow MGSN 1.02-02 TSN 30-307-2002.” Surprisingly, I carefully tried to find a similar document for St. Petersburg, but I could not find it. However, appealing to the fact that in in this case the requirements set out in the document are not caused by special climatic and other conditions, as well as construction conditions and/or operating characteristics of buildings and structures in a certain region; these figures and recommendations can also be applied to the territory of St. Petersburg.
Requirements for buildings constructed according to projects in accordance with 384-FZ
Article 25. Requirements for ensuring protection from moisture
1. B project documentation buildings and structures must be provided Constructive decisions, providing:
1) drainage from the outer surfaces of the fencing building structures, including roofing, and from underground building structures of buildings and structures;
2) waterproofness of the roof, external walls, ceilings, as well as walls of underground floors and floors on the ground;
3) preventing the formation of condensation on the inner surface of enclosing building structures, with the exception of translucent parts of windows and stained glass windows.
2. If this is established in the design assignment, the design documentation must also provide for measures to prevent flooding of premises and building structures in the event of accidents on water supply systems.
As you can see, unlike TSN and SNiP, 384-FZ only in general outline sets out the requirements for waterproofing, being not a regulatory document, but a guideline. Accordingly, paragraph 2 of Article 25 indicates ensuring the waterproofness of “walls of underground floors and floors on the ground,” which includes both waterproofing foundations and constructing blind areas that protect these foundations.
Requirements for the thickness of the blind area
As I believe, the thickness of layers (pillows) of sand, crushed stone and other similar things should, in theory, be calculated based on the materials of SNiP, Part II, Section B “Floors. Design standards. II-В.8-71." Usually, however, the thickness of the sand layer is taken to be at least 10 and up to 15 cm, crushed stone - at least 6 and up to 9, and concrete - from 7 to 12 cm (all in a solid body, i.e. a compacted layer ). Standard average thickness of reinforced concrete blind area for residential and public buildings(in practice) - 10 cm, and from asphalt concrete - 5 cm. I have not found any direct indications of the minimum thickness of the blind area anywhere.
However, in accordance with paragraphs. 3.1 and 3.128. "Guidelines for the design of concrete and iron concrete structures from heavy concrete without prestress", thickness monolithic slabs must be prescribed and accepted not less than 40 mm. This is not a normative document, but a recommendation. If we consider the blind area to be a monolithic structure (like a beam slab), then, therefore, these recommendations apply to it too.
This concludes the basic requirements for the construction of reinforced concrete and other blind areas. As you can see, they include not only SNiP, but also TSN standards, as well as all sorts of other notes, calculations and recommendations set out in guidance and recommending documents. Accordingly, if this is a government order, some other Additional requirements. Naturally, in this case, the customer’s additional wishes should not contradict established norms and rules, so you need to be careful before taking on any contract. I must say that concrete works in government procurement they are distinguished by their low cost and draconian quibbles, since concrete as a general construction material has an abyss of all sorts of approvals, certificates and other bureaucracy.
The plinth is the lower protecting part of the wall, the transitional part of the foundation to the outer walls of the house. The basement is the most vulnerable part of the house. A blind area is a concrete or asphalt impervious covering around a house. First of all, it is the base and blind area of the building that are exposed to temperature. Rain and melt water, snow - all this negatively affects the foundation and walls of the house. It is the blind area of the building that protects the foundation structure and the soil around the house from moisture. As a result of shrinkage of the soil, and accordingly the building itself, cracks appear between the wall and the blind area.
If the sealing of the base and blind area is broken, moisture will freely enter the basement and technical rooms of the building, thereby destroying it. In order to prevent moisture from entering, you need to carefully study the design of the blind area around the house.
To ensure water drainage, the base of the house and the blind area must fit tightly to each other.
What a plinth and a blind area are, a photo, how they should adjoin each other, can be found in the instructions or found this information on the Internet.

Why is tightness important?
Although the installation of a blind area around the house is of a decorative nature, its main task is to protect the building from storm and flood waters. To do this, it is always performed with a certain slope in the direction opposite to the foundation. It is imperative to provide hermetic connection blind areas with the building around the entire perimeter. If the seal is broken, moisture will inevitably get inside.
And when winter comes, the base of the house and the blind area, the tightness of which is broken, will no longer save the foundation from deformation.
And the next stage is the appearance of cracks in the walls of the house.

How to ensure tightness
Installing a blind area around the house, how the blind area is made and how to ensure tightness - these are the main questions that arise at the preparatory stage for the manufacture of the blind area.
To make it easier to deal with these issues, there are some already proven methods:
- The blind area, regardless of what material it is made of, must be placed on a drainage base.
- The lower edge of the blind area itself should be higher than the surface of the soil around the building.
- The construction of a blind area around the house provides for its adjoining closely to the base. The blind area of the building with the plinth must maintain its tightness under any temperature deformations.
- When sealing an abutment seam, experts advise using polyurethane sealants.
This is a small list of those mandatory rules when making blind areas for any building.
Using these methods, the blind area can be placed around a small building, technical building, garage, the blind area of a private house is also done.

Types and characteristics of the base. Insulation of the base and blind area
To clearly see how the blind area should be adjacent to the base of the building, you can simply type the words “blind area photo” into a search engine and see how it should look.
What types of socles are there? The base comes in two forms:
- speaker;
- sinking;
- may be located in the same cavity with the outer wall.
Using the first form of the plinth, you can correct the position of the wall if an error was made in the position. A protruding plinth is used in houses with thin walls.
The falling base is more reliable. It protects the waterproofing layer well from atmospheric and mechanical influences and ensures complete drainage of water from the walls.
The sunken one will be cheaper than the protruding one and looks more aesthetically pleasing.
The third form of the base is in the same cavity with the walls; this is an impractical method. This type of base requires additional finishing and is exposed to precipitation.

When installing any type of plinth, you should use reliable, practical and durable materials, since this part of the house is very exposed to external factors. Appearance the base requires periodic repairs, since during operation the finish loses its original appearance.
Another important detail is the insulation of the blind area and basement. As a result of insulating the base and blind area, heat costs are significantly reduced. It is better to insulate in advance, without waiting for the cold to set in.
You can insulate the blind area using polystyrene foam or expanded polystyrene. This is one of the cheapest and simple ways. Between the layers of the blind area it is necessary to lay one of these materials and, for greater strength, lubricate them with an adhesive composition.
Insulating the base is a more labor-intensive and expensive process. Insulation of the base can also be done using sheets of expanded polystyrene, which is a very good thermal insulation material.
More on this topic on our website:
-
In order for the blind area to serve for a long time, truly protect the house and ensure drainage, its production is best entrusted to professionals. Only they can choose high-quality durable material... -
The first stage in the construction of the structure will be the arrangement of a foundation pit, which will play a role protective system. It should not protrude above the surface of the earth, but it should not be... -
After the house is built, it is necessary to arrange the area near the building. In addition to external beauty, you need to think about high-quality precipitation drainage and a convenient path for moving along... -
The main function of the blind area is to prevent the impact of external factors on the foundation of the house. This protective structure, which should prevent any moisture from entering the building, and for this it...
The quality of the various components of the house largely depends on the structures that are directly adjacent to them and perform a number of unnoticed but very important functions.
A blind area is a strip of various materials located along the entire perimeter of the building and adjacent at a certain angle to its walls. The service life of the foundation and the general microclimate in the basement and ground floors depend on the quality of the constructed blind area.
In this article, we will try to consider general device blind areas and step by step process its arrangement.
Why is it needed and the essence of construction
Blind area - device and construction technology
The blind area, as mentioned above, has important and executes whole line functions:
- protection of the foundation from moisture, rainfall and groundwater;
- affects the microclimate in the basement and basement;
- does not cause subsidence of the foundation along the perimeter of the building;
- decorative element;
- in some cases it serves as a house sidewalk.
As a rule, the arrangement begins after or during the process of cladding the walls and the basement of the load-bearing base. This process should not be delayed for some time since after several years, especially in areas with high precipitation, flooding of the foundation can significantly reduce its strength.
In the absence of a blind area, in winter and cold period years, due to soil freezing, the soil swells and puts pressure on concrete base and walls. This subsequently leads to cracks or destruction of the supporting structure.
General design and components

The construction of any foundation blind area is a “construction pie” consisting of at least two layers: the underlying layer and the outer covering.
- The base or sub-base is compacted material laid over soil or waterproofing. For the base, both ordinary sand or crushed stone and clay can be used, which will serve as additional insulation. As a rule, the thickness of the underlying layer does not exceed 30-40 cm. The material is taken depending on the coating used.
- The outer coating is a material that prevents moisture from penetrating into the blind area and prevents it from eroding. For this purpose, a concrete-cement screed with the addition of gravel, asphalt or paving slabs are usually used. The thickness of this layer should be at least 10 cm.
Required width and slope of the structure

Diagram of the device with the required width and surface slope
The width of the blind area, first of all, depends on the distance to which the edge of the building’s roof protrudes. The minimum required width ranges from 60 to 80 cm and depends on the type of soil on which the structure will be built.
For stable soil types, the width should not extend beyond the edge of the roof extension by more than 20-30 cm. If the soil layer is unstable, then the width can be increased to 90-120 cm. Further increase plays virtually no role.

General scheme of arrangement
If the blind area also serves as a pedestrian path, then its width may well be 1.5-2 m. The main thing is to monitor the overall composition of the building so that the dimensions of the structure are harmoniously combined with other elements of the building.
The slope depends on the coating used for the outer layer. For most concrete structures, a slope of 4-5% is sufficient. For a blind area made of crushed stone or gravel, it is recommended to make a slope of at least 5-7%.
Design and technology of work
The general arrangement of the blind area can be reduced to the following main stages:
- At the first stage, you should excavate the soil to the width and depth of the future blind area. It is recommended to treat the dug trench by special means for removing plant roots.
- Along the perimeter of the trench, formwork is installed from wide board. Small ones can be used as formwork concrete blocks or curb stone.
- A layer of underlying material is placed at the bottom of the trench and thoroughly compacted. It is advisable to lay the material so that part of the sheet slightly extends onto the wall of the base. This is necessary to create an expansion joint between the blind area and the wall.
- A coating of various materials is laid in several layers on top of the inner layer.
This completes the general device, but for each type of material used to create the outer layer, there is its own installation technology:

Prepared sand base and exposed formwork on the outside

The seams are placed perpendicular to the walls of the building in increments of 2-2.5 meters. The slats can be used as guide beacons for distributing concrete over the surface of the blind area.
After laying the concrete, the wet surface of the foundation blind area must be additionally sprinkled with cement and smoothed with a trowel. This process called ironing and is necessary to increase the moisture resistance of concrete. Afterwards, the finished structure is covered with fabric material and periodically moistened with water until the concrete sets completely.
For concrete structures located on unstable and heaving soils, it is recommended to carry out reinforcement. This is done to increase service life by laying metal mesh with cells of 10 by 10 centimeters before pouring concrete.
The technology is quite simple and does not require the involvement of specialists. The main thing is to carry out the work step by step and adhere to the basic installation rules.
Sealing the structure

Sealed expansion joint
Sometimes, in houses located on heaving soils, a crack may appear between the base and the surface of the structure. To prevent this, it is recommended to carry out sealing work.
This can be done both at the design stage and subsequently during operation. In the first case, the following options are possible:
- the structure must be made on a drainage base in the form of sand, crushed stone and clay;
- the lower part of the blind area should be higher than the soil around the building;
- the expansion joint must be made in such a way that the tightness between the blind area and the plinth wall is maintained.
If these conditions are not met, as mentioned above, a crack may form or the structure may move away from the building. If this happens, then special polyurethane-based sealants are used. The resulting crack is filled with sealant using a mounting gun.
To protect against mold and mildew, the sealed seam is treated with a water repellent.
Insulation of the structure

Insulation using foam plastic and mesh reinforcement
Insulation should be carried out when constructing a structure on unstable types of soil. The insulation will help prevent soil freezing, thereby preventing soil heaving.
For this purpose, heat-insulating materials are used, which are laid on top of the underlying layer. It is advisable that outer covering was made of concrete or paving slabs, as this will help avoid additional load on the thermal insulation material.
For the usual and simplest thermal insulation, we recommend using extruded polystyrene foam or polystyrene foam.
Structural repair
If there is obvious damage to the outer layer of the blind area, it should be repaired as soon as possible to avoid further destruction. To do this, determine the damage boundary so that the main cracks or potholes are combined into common plane, which can be deleted.
Proceed to repair work it is better in cool weather, when the main damage is most exposed under the influence of absorbed moisture.
If the asphalt surface is damaged, it must be removed in the right area layer of material to the full depth. After removing the damage, it is recommended to clean the holes from dirt and coat them with bitumen.
Only then can the asphalt concrete be re-laid and compacted. It is advisable that new asphalt covered with a layer of old coating. This will give better adhesion to the old material.
Use bitumen mastic and cement-sand mortar. The cracks are cleaned of dirt and filled with mastic. Minor damage can be covered with cement mortar mixed in proportions of 1/1.
During the construction of a new building and during the operation of an already built one, the question often arises of the need for waterproofing and protection from the destructive atmospheric effects of such structural elements as the base and blind area.
Let us recall that a plinth is usually called a wall or foundation enclosing the underground of a building, located above ground level. If the foundation is strip, then the plinth is its upper part, protruding above the surface of the earth. If the foundation is columnar, then the plinth is the walls that are installed between the pillars or above them (i.e., grillage).
Towards external wall the base can be protruding, recessed, or be in the same plane with it. However, a lot has been written about this on the Internet.
In our opinion, the most reliable is a sinking base, because... its shape allows you to cover the waterproofing layer installed to protect the walls from external influences and ensure the drainage of water from the walls during rains.
Blind area - simply put, this is a building element made in the form of a strip (the width of the blind area depends on the type of soil and the extension eaves overhangs roofs, but not less than 100 cm) made of concrete, asphalt or other material, running along the perimeter of the building, with a slope in the direction from the building.
The main task of the blind area is to protect the foundation from external influences.
If the blind area does not perform this task, then rain and melt water will constantly flow down the foundation and destroy it.
Conclusion: In order for the blind area to protect the foundation of the house, it itself must be protected from external influences. Thus, the issue of waterproofing comes first, as in the case of the base.
If the question is about the construction stage, then perfect option– add waterproofing additive Megatron Additive to the concrete.
Read more about waterproofing technology at the concreting stage here.
Also, for waterproofing the basement and blind area made of concrete, you can use Megatron Penetrating waterproofing.
The principle of operation of the Megatron Penetrating material is described here. The main thing is that “Megatron Penetrating” works inside the concrete and protects the entire thickness of the concrete from water! For bricks, Megatron Penetrating only provides an armor layer.
Note that concrete surfaces, treated with the Megatron Penetrating material, can be further refined: glue and mixtures for gluing tiles, sandstone and stone have good adhesion to exposed concrete.
Another effective waterproofing option: the use of elastic polymer-cement coating waterproofing"Megatron Elastic".
This material is used for waterproofing concrete, stone and brick structures, on which hairline cracks have formed or may form. Of course, finishing work is possible in the future.
A simpler option: a hard drive waterproofing coating on a cement base using the Megatron Coating material.
If the building’s base is damaged (brick crumbling, concrete corrosion) and not only waterproofing, but also repairs are required, then one of effective options– use of the Megatron Repair material. The material has strong adhesion to concrete, brick and stone and is highly waterproof. During the work process, the structure of the plinth and (or) blind area is restored using the Clamp, after which the final waterproofing is performed.
Another option, the simplest and cheapest, but not the most durable, is the use of a water-repellent liquid or water-repellent agents.
Hydrophobizers are special compounds on an acrylic or organosilicon base, giving the treated porous surface (concrete, brick, sandstone and other materials) water-repellent properties and frost resistance. As a result of hydrophobization, water stops penetrating even into pores and cracks up to 1 mm wide.
Find a water repellent here.
And still very important point, which is worth paying attention to.
No matter how well the blind area is made, over time a gap will form between the blind area and the base. As people say, “the blind area moves away from the house.”
In addition, out of ignorance or for other reasons, when pouring a blind area, they forget about expansion joints. As a result, cracks appear, water gets into the seam where the blind area meets the foundation and into the cracks that appear, and freezing and thawing, “tears” the blind area and makes the foundation accessible to water.
Therefore, cutting seams and sealing them is one of the conditions for the efficiency, reliability and durability of the blind area.
For sealing expansion joints in the blind area and at the junction of the blind area with the plinth, we recommend using polyurethane sealant Tenalux.
An example of sealing a blind area to a basement wall in Kharkov can be seen here.
Thus, there are many technologies and materials for waterproofing and protecting the blind area and basement. The main thing is to approach the issue competently.
You can select materials for waterproofing and protecting the blind area and plinth yourself.
Consultations, purchase and ordering of waterproofing services here.
Any building should have a blind area around the foundation. But often, due to incorrect work technology or due to excessive soil mobility, a gap forms between the foundation and this structure. To eliminate the problem, you need to repair the crack using one of the methods recommended by experts. And since a lot of materials for such work are produced nowadays, it is worth choosing the most suitable one for everyone specific case.
How to seal the gap
Initially, the blind area and the foundation are not rigidly attached to each other due to the uneven shrinkage of both structures. Be sure to leave an expansion joint in the form of a small hole, running along the perimeter around the base of the house. It is sealed with different materials, covering it from the outside to seal it from external influences.
Eliminating the gap between the base and the blind area can be done using the following materials:
- polyurethane sealant;
- construction foam;
- damper tape;
- expanded polystyrene (extruded only);
- bitumen mastics;
- transverse reinforcement with additional finishing with mortar.
The main materials used to seal the gap between the basement floor and the blind area are polyurethane sealant, polystyrene foam or medium-thick foam. Quite often foams, damper tapes or bitumen mastics are used.
Many owners prefer to save money and eliminate the defect by filling the expansion joint with cement mortar. This will not help the matter, since next spring or in a couple of years the crack will form again, but it will become much larger.
It is worth remembering that the gap between the foundation and the blind area should always remain. Otherwise, the pressure of the structure on the base of the house can lead to premature destruction of the foundation.
Basic methods of sealing a gap
 There are several ways to eliminate the hole between the adjacent structure and the foundation. Each option has its own characteristics and is only good for sealing at a certain time.
The first method is to seal the gap between the blind area structure and the foundation using polyurethane sealing materials. They perform the function of maintaining the required temperature regime between these two structures. You need to do it like this:
- coat the hole with primers;
- carefully blow material into the crack formed;
- hide the work site using decorative finishing.
This method is suitable for structures that have served for several years.
You can also use transverse reinforcement of the blind area to connect it to the foundation of the house. For this purpose in finished design you need to do the following:
- Drill transverse holes in the structure, going 10 cm into the base of the house.
- Insert metal rods into the resulting holes.
- Fill all holes with solution.
This simple construction will prevent the expansion joint from spreading to a large width. This method is used both for the initial connection of the blind area and the foundation, and for connecting the seam during the operation of the building. The rods will secure both structures at a certain distance.
Quick ways to seal emerging holes
A good option would be to blow construction foam into the crack that forms. This should be done according to this scheme:
- tie the blind area and base with metal rods;
- blow out the gap with construction foam;
- strengthen the joint with mesh;
- hide the work site with special borders or finishing materials.
Another way is to eliminate the gap between the foundation and the adjacent structure. This method is very simple and you can do it yourself:
- The crack is filled with bitumen-based mastics.
- One of the cement sealants is installed.
- All materials are covered thin layer concrete mortar.
One of quick ways eliminate the gap between the blind area and the foundation - seal it with foam plastic materials. Work must be done in the following sequence:
- prime the junction of structures with water-based mastics;
- place the foam tightly in the gap;
- strengthen it with chain link;
- apply a thin layer cement mortar on the material;
- hide work areas with finishing materials.
 Many owners prefer traditional old methods of eliminating seams and cracks. To do this you need to purchase a regular mineral wool. And then do the work according to this scenario:
- Treat the gap with waterproofing mastics.
- Place cotton wool in the holes, rolling it into a tight roll.
- Secure the wool with a metal mesh.
- Finish the joint with finishing material.
It is up to the owners themselves to choose which option is suitable for each specific case. After all, all the methods come down to one thing: the gap will not be visible, and the blind area will continue to perform its functions effectively.
Sealing the gap when constructing a blind area
After the blind area has been completed using one of the available methods, it is worth starting to process the expansion joint. Simply, seal the gap between the base and the blind area. There is no need to tightly tie structures together. It is better to bind them using soft porous materials.
Work can be done according to the following scheme:
- Prime the hole running around the perimeter of the house.
- Place the prepared materials into the gap.
- Secure the material with mesh.
- Hide the seam with trim.
It is necessary to prime before work. This will prevent the structure from getting moisture into the small cracks that form during the shrinkage of the blind area during the first years.
 The material for sealing the gap is selected in accordance with the future finish. But you can hide the place of work with various elements.
If the blind area is made of tiles, then the finishing should also be made of the same material. For structures made of stone or paving stones, a thin border running around the perimeter is perfect. For classic blind areas from concrete solutions it is appropriate to close the gap with the same solution, applied in a thin layer using the technology proposed earlier. A soft designs connected to the base using sealants, covered with soil on top.
The blind area has moved away from the base
After the first year of operation of the house, the blind area often moves away from the base. This occurs due to shrinkage of the structure or violation of construction technology. You can help the trouble both when the blind area has moved away from the base of the house, and when the structure has sagged in some places.
In cases where the structure has moved far away from the base, it is worth first establishing the reason for this action. Often a gap is formed not due to soil mobility, but due to a disruption in the working process of the structure. In this case, you need to make the blind area again, completely dismantling the old structure and creating a new one.
If the reason for the formation of a gap is excessive heaving of the soil, then it is worth lightly reinforcing the blind area itself, creating a connection with the foundation using rods. This will prevent the gap from increasing in size, always remaining at the same level. And the crack itself that appeared in the base area should be repaired soft materials, allowing you to save temperature regime and freedom regarding both designs.
The clutch material is masked with finishing curbs, slopes or decorative elements. This will add beauty to both the base and the entire building as a whole.
Started building a house.
The soils are bad, so I will build on a monolithic slab.
House made of aerated concrete + facing brick.1. Consultation is required on heat loss (cold bridges) at the junction of the slab and the wall.
For clarification, I am sending you a diagram.
In order to close the base insulation I will use sawn building brick(on edge) + tile.
I'm worried about the cold bridge over the base insulation along the foundation.
Inside the slab there will be a mound of expanded clay + 100 mm of insulation and a water heated floor.
I just don’t understand whether to do something about this or not to be afraid of it...
2. Question about the blind area and its insulation.
I plan to make a hidden blind area using a polyethylene bubble membrane (.PLANTER - TechnoNIKOL).
The issue of attaching it through the waterproofing made is not clear to me + insulation of the base is 100 mm EPS (via Planter) /
I also wanted to insulate the perimeter around the house under the blind area (Planter).
The builders are talking. that this is wasted work and wasted money.
Pictures sent to Oleg Pada
Sincerely, Alexander
A 2m high basement is sufficient for storing storage rooms and for installing boiler equipment. Higher basements are uneconomical both during construction and during further operation (in particular, when heating in winter time). The thickness of the basement walls and their planting depth are determined taking into account the lateral pressure of the soil, its condition and the groundwater level (Table 1). The basement walls are laid out of stone, brick, concrete - in dry soil; in heaving and wet soils - only from concrete and reinforced concrete (with the use of mineral additives). Basement walls made of brick, stone and concrete blocks are reinforced through 0.4 m of masonry and reinforced concrete belts are installed along the top of the wall.
Table 1. Minimum thickness basement walls in non-heaving soils
| Basement wall material |
Basement depth from floor to blind area, m |
Basement wall thickness |
||
| up to 2m | 2-3m | 3-4m | ||
| Reinforced concrete | 1,0–1,5 | 10 | 15 | 20 |
| 1,5–2,0 | 15 | 20 | 25 | |
| Monolithic concrete | 1,0–1,5 | 20 | 25 | 30 |
| 1,5–2,0 | 25 | 30 | 40 | |
| Concrete blocks | 1,0–1,5 | 25 | 30 | 40 |
| 1,5–2,0 | 30 | 40 | 50 | |
| Rubble concrete | 1,0–1,5 | 30 | 35 | 40 |
| 1,5–2,0 | 35 | 40 | 50 | |
| Brickwork | 1,0–1,5 | 25 | 38 | 51 |
| 1,5–2,0 | 38 | 51 | 64 | |
| Rubble masonry | 1,0–1,5 | 40 | 50 | 60 |
| 1,5–2,0 | 50 | 60 | 70 | |
Thermal insulation materials for the basement
It is recommended to use expanded clay, mineral wool, and foam plastics for basement insulation. It is better if the thermal protection is located and made on the outside of the wall using foam plastic, which has lower thermal conductivity and less water absorption.
The basement must be waterproofed, regardless of soil moisture. In highly moist soils, ordinary coating of basement walls with waterproof mastics or bitumen will not be enough; glued waterproofing using roofing felt or polyethylene is required. When the groundwater level is above the basement floor adhesive waterproofing arranged from several layers of roofing material on bitumen mastic. To pressure groundwater does not violate the integrity of the floor and waterproofing of the basement, a pressure-resistant structure in the form of concrete or reinforced concrete slab. To protect the vertical waterproofing of the basement from possible damage, a protective wall is made of concrete or brick (Fig. 1, 2). The ceiling above the basement is best made of reinforced concrete, and if basement floor wooden, load-bearing beams above the basement should be left open and the insulation placed above them.
Every basement must have ventilation; ventilation that extends beyond the roof is most effective.
In heaving soils, basement walls should be built from monolithic concrete and reinforced concrete (these materials are also used during the construction of a septic tank), and their thickness must be increased by 1.5-2 times in comparison with the thickness of the basement walls given in Table 1.
Blind area to protect the basement and foundation
To drain water running off the roof away from the house and protect the foundation from penetration surface waters arrange a blind area, which should be at least 70cm wide and 20cm wider than the cornice, so that water flowing from the roof does not erode the soil and stagnate under the house. On subsidence soils, the width of the blind area around the house should be at least 1 m and at least 30 cm wider than the foundation cavities to be filled.
The blind area is arranged with a slope of at least 5°, it consists of an underlying layer and a waterproof concrete coating with a thickness of at least 8 cm. Around the foundation, the soil is removed to a depth of 10-15 cm and a layer of soft clay is laid, which is well compacted.

In addition to a stone or concrete blind area, you can arrange a “living” and relatively cheap blind area around the house. To do this, a plant layer and soil 1 m wide and to a depth of 0.5-0.6 m are removed around the perimeter of the foundation. The base of the resulting excavation is compacted and covered with coarse sand 10 cm thick. This will serve as a drainage layer. Then a layer of greasy crumpled clay 20-30 cm thick is laid. The clay is carefully compacted, giving it the desired slope away from the house, equal to 0.1 of its width (at 1 m the slope is 10 cm). A layer of turf is laid on the clay fertile land 10-15 cm thick, and on top of it turf (preferably meadow), cut into pieces 20x20 cm and 5-10 cm thick. At first, the turf is regularly watered to help it take root faster. In the first 2-3 years, the plant layer of the blind area is regularly trimmed whenever the grass reaches a height of 10 cm.
Concrete blind areas are the most effective, as they are less susceptible to destruction under natural influences. Asphalt concrete blind areas have also proven themselves well. They retain moisture well, removing it outside the site. It is advisable to install blind areas with insulation in houses where there is ground floor or basement. They improve the temperature regime and protect the underground space from high temperature fluctuations.