Building a hipped roof with your own hands. Hip roof - drawings and detailed arrangement! Calculation of the rafter system
Read also
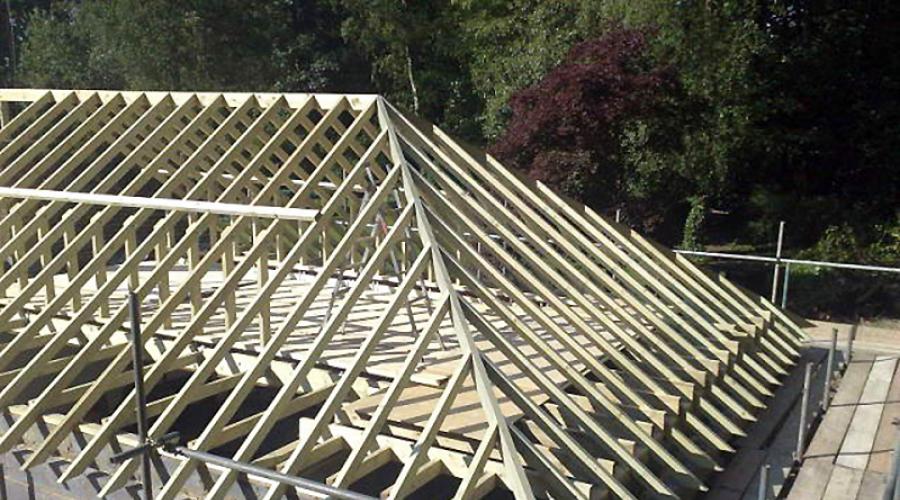
The roofs of private houses, which have four rather than one or two slopes, are a much more serious structure. It is no more difficult to assemble than a gable roof, but the advantages of a hip roof rafter system has more. High quality the roof is ensured by the strength of such a system. The photo shows a do-it-yourself hipped roof
Features of a four-slope roof
- The main advantage is the absence of gables and gables. The unconventional design of the rafter system allows the roof to withstand strong winds without consequences, minimize possible damage in places where the eaves overhang over time, and the absence of a pediment means savings on building materials and labor costs.
- The ends of the rafters, which intersect each other and are attached to the ridge beam, give rigidity to the structure and prevent it from deforming under the weight of precipitation, roofing building materials or equipment mounted on the roof.
- Design and device hip roof suggests the possibility of arrangement eaves overhangs along the perimeter of the entire house, protecting the facade from atmospheric influences and temperature changes.
- In the architectural compliance scheme, a hipped roof when adding a veranda or attic to a house makes the building more resistant to unevenly distributed loads.
- The aesthetics of the roof have been proven by practice and time - such structures have been used since those years when people learned to build shelters for themselves, which later turned into durable and beautiful houses.
How the rafter system of a hipped roof will be constructed depends on the type of roof - hip or hip. Therefore, it is worth taking a closer look at these varieties, their features and structure.  Photo of the hip roof device
Hip roof
The hip roof (see photo above) is an assembly of two trapezoidal or triangular wooden units. These elements are fastened together by the planes of the upper surfaces, and the edges of the triangles are overlapped by ridge slopes.
A roofing pie consisting of several layers is mounted on the rafter frame of the hip roof: a waterproofing material, a heat insulator, a ventilation layer of building materials and a finishing decorative and protective coating(see video). Based on the type of fastening, the hip roof system is divided into hanging and layered type. The layered design of the hipped roof rafter system is more economical, easier to install and easier to design.  Rafter system drawings
When the hip roof slopes ≤ 35°, it is necessary to install auxiliary support beams to strengthen the long span with layered rafters. Additional supports protect the house from atmospheric moisture, strong winds and temperature changes.

- Rafters of a slanted design - a beam mounted diagonally, one end rests against the mauerlat, the second is attached to the next pair. Since when expanded, the slanted rafters have a very big sizes, then they must be securely fixed on the roof. Also, the slanted rafters act as a support for the growers.
- Trapezoidal wooden assemblies for roof slopes.
- Narozhniki - designs small size from rafter beams of short length, fixed on rafters of the sloped type. If the width of the walls of the house is ≥ 4.5 m, then the structure is connected into a block of several elements, in order to later make a single roof from them.
- Struts, crossbars and racks serve to minimize the size and use of spigots. The use of these elements allows you to assemble the roof with virtually no additional reinforcement.
- The beds serve as supports for racks and struts; their lower end rests against brick supports on the inner wall end or is adjusted to size using wooden blocks.
- The purlin is a beam laid parallel to the lower support beam. Serves to ensure the strength of the rafter structure.
- Sprengels increase rigidity in all directions. The trusses must have the same cross-section as the rafters, and they are attached along the length of the span.
 Scheme of a hipped roof
 Hip roof
A tent-type roof can be built from triangular wooden structures. It will not be easy for a non-specialist to cope with the construction of such a roof, since it is important to absolutely accurately observe all dimensions and dimensions in order to achieve complete symmetry hip roof. But thanks to such a roof, your house will withstand winds of any strength, even a hurricane. A homemade roof, the rafter system of which is designed in the form of a tent, perfectly protects housing from the penetration of cold and moisture even into the attic or attic space. 
In terms of design, the drawings of the hip and hip rafter systems are similar, since they consist of the same units and elements. The difference is only in the length of the rafters and installation options. IN tent structure Hanging or layered rafters also work well, but it is very difficult for an amateur to secure hanging elements on his own - the help of a professional will be required. A hip roof is often installed over areas without internal ceilings, partitions or walls, and support beams are laid on load-bearing walls. Parts of a layered structure are cheaper and easier to manufacture, but in order to be able to work with them, it is necessary to have an internal load-bearing wall and/or concrete columns. 
- Before starting work with any wood products, they must be treated with antiseptic and fire retardant agents.
- Wood for any elements must be well dried in natural conditions. The moisture content of the material should be ≤ 22%.
- The Mauerlat is made from timber with a square section of 150 mm or rectangular 150 x 100 mm.
- The rafters must be ≥ 50 mm long and ≥ 150 mm wide.
- All products use the same type of wood, preferably coniferous.
- To produce a large number of crossbars, racks and purlins with one cut angle, a pre-prepared template is used.

In the hip rafter system, a support is first made in the form of a Mauerlat. Not only the strength of the structure, but also the aesthetics of the entire roof depends on its level arrangement, so the support beams must be laid strictly horizontally. The alignment of the mauerlat can be facilitated by pouring a small grillage (formwork) around the entire perimeter of the walls of the house. For more information about this, watch the video below.
To secure the grillage, reinforcement pins are used, driven or inserted into the wall. The Mauerlat is attached through the holes in these rods threaded connections to the walls and grillage. 
How to assemble and install a hip roof system on site:
- The upper planes of the load-bearing walls of the house must be opened before installation with waterproofing agents - mastic, bitumen, tar. Roofing felt is laid on top of the waterproofing layer.
- The support beam from which the Mauerlat will be assembled is mounted on pins in the walls and tightened with nuts and washers. When installing the Mauerlat, you must constantly check its horizontalness using a level.
- The next one is installed central support– racks with a ridge will be attached to it. The support beam is laid either on the side beams of the mauerlat, or on the surface of the internal load-bearing walls.
- Vertical beams are installed for the main support of the ridge. The ridge supports do not need to be rigidly fastened immediately - only after the rafter system has been completely assembled. Rigidity can be provided by steel angles, wooden spacers or metal studs.
- To ensure that the roof is perfectly symmetrical, the rafters of triangular hip structures rest on the Mauerlat in the calculated locations. Markings for each of them must be done in advance so that the beam does not fall on the fastening rod. Intermediate beams are needed to connect the ridge to the walls.
- Next, slanted rafter beams are installed, which will connect each corner of the house to the end of the ridge beam.
A distance of ≥ 50 cm is maintained between the overhang and the wall. If the site is selected in a region with strong winds, then this distance increases by 2 times. This ensures protection of the roof and walls from precipitation, which can blow in and moisten the surface right down to the foundation.

- Now you can attach ordinary rafter beams to connect the Mauerlat to the ridge. The distance between the rafters is calculated based on general sizes roofs and lengths of intermediate rafters. Some roofing building materials need to be laid on frequently installed sheathing, so general recommendations There are no distances to keep. Ordinary rafters in the standard solution are installed in the groove every 0.4-0.5 m; the attachment point can also be reinforced with nails or steel plates.
- If the roof has a small angle of inclination, then the rafters need to be reinforced with trusses due to the additional pressure of snow in winter.
- To strengthen the upper end of the mowing beams, a truss made of trusses is installed. It consists of two struts extending from one point.
- The last step in the construction of the rafter system is lathing. The material for the sheathing frame is selected based on the roofing material. Most often these are square slats with a cross-section of 5 cm, and if the sheathing is solid, then you can use boards or five-layer plywood.
Classic - the design with four slopes remains unusual for Russians, evoking associations with the overseas way of life. They build it when they want to use interesting architectural solutions, to achieve a special effect that is perceived differently, the house compares favorably with monotonous buildings.
The photo of a hipped roof shows a wide variety of options, the main thing is to build in accordance with all the rules, then you can take advantage of the numerous advantages.

Types of hipped roofs
Making drawings of hipped roofs yourself is a difficult task: specialists will be able to correctly perform the calculations. The slopes are made as isosceles triangles; when the roof looks like a square from above, it is hipped, and if it resembles a rectangle, the variety is called hip.

Classic variation
The classics include the hip or Dutch roof, which is resistant to adverse weather conditions. weather conditions: strong winds and heavy snowfalls.


The surface of the structure is formed by 2 slopes in the form of a trapezoid on the long sides and 2 slopes with a triangular shape on the short sides.

Many modern architects They believe that, aesthetically, a Dutch roof looks more presentable compared to a hip roof. The rafter system is formed by 4 support bars, they descend from the slopes to upper corners structures.

2 types of half-hip roof:
- Dutch - a part is cut off from the side slopes from the end upper side.
- Danish - a part is cut off from the side slopes from the end bottom side.

Dutch roof design
The half-hip combines the characteristics of a gable and hip roof: the end slopes are presented in the form of triangles, the length of the hip is 1.5 - 3 times less than the length of the side slopes.

The design allows for the installation of a vertical window; it does not have a sharp protrusion characteristic of gable roof, so the roof can withstand large wind loads.

Danish roof design
This type of hip roof is characterized by ease of installation; it is necessary to mount the end slope from below, leaving a small pediment under the ridge.

The Danish design provides the following benefits to users:
- There is no need to install problematic roof windows that require high-quality waterproofing.
- The option provides good natural light to the attic floor thanks to vertical glazing.


Hip roof design
A type of roof is installed on buildings with a square perimeter, important nuance– all slopes must have the same shape. The construction of a hip structure is more complex when compared to a hip structure: it is necessary for the rafters to meet at one point.

Rafter system
Hip roof with your own hands - optimal solution for everyone who wants to save money family budget. Sequence of construction work:
The planning and design phase is time consuming and every detail needs to be carefully considered. No matter how easy the installation of the roof may seem, be sure to make a drawing, which will help identify defects and shortcomings.


If the calculation of a hipped roof is done incorrectly, it will be quite difficult to correct the situation - as a result of the error, the diagonal rafters will not connect at the ridge. It is better to use the best option; prepare a drawing using one of the special graphic programs.

Creating a 3D model allows you to see what the future roof will look like in order to prepare detail drawing, seek professional help.

Preparation of structural elements
The Mauerlat is laid on top along the perimeter of the walls, its task is to serve as a support for the rafters; the material used is 15x10 cm timber.

The roof slope is made using rafter legs, standard rafters are made from boards 50X150 mm, diagonal - 100X150 mm.

Special tightenings do not allow the rafter legs to move; they are fixed, and their ends are connected at the bottom; a 50X150 m board is taken for manufacturing.

A beam made of timber 100x100 mm or 100x150 mm is a transverse beam that serves as a support for the posts that hold the ridge girder.

The slopes do not allow the rafters to move; they are installed at an angle to the racks; the material used is timber with the same dimensions as for making the beam.

The ridge rests on a vertical post; it is made of mauerlat material.


A horizontal wind board connects the rafter ends from below, it is nailed to the rafters with inside roofing using 100x50 mm boards.

A filly is attached to the outside of the structure - a board made of exactly the same material.

The most complex element is considered to be the truss; it gives rigidity to the roof, connecting the horizontal and vertical components. The sprengel is made from timber with dimensions of 100x100 mm; it must be installed at an angle.

Rashes or shortened rafters are found only in hip roofs; they are made from 50x150 mm boards.

Attic floor installation
It is better to make roof hangers from steel; special clamps and purlins are used for fastening; a suspended ceiling significantly reduces the load.

If the trusses are steel, then the ceiling is made fireproof; reinforced concrete slabs are laid between the steel beams prefabricated type, and light insulation is placed on them.

The optimal material for the manufacture of load-bearing structures is large-sized factory-produced panels with high fire resistance.

Installation of a ridge run
It will be necessary to make 2 runs if the structure has permanent longitudinal walls or there are internal pillars in 2 rows. When the building has internal supports, construction trusses are made and the ceiling is suspended from them. When the width of the house is large, the structure is suspended on steel clamps to the truss belt below.


Installation of rafters
The diagonal rafter legs must rest on the ridge; they are additionally secured with metal wire.

When one purlin is made, the diagonal legs are nailed to the console, and when there are two purlins, they are attached to a truss structure made of a horizontal beam with racks.

Photo of a hipped roof


Most often, a hipped roof for a house is chosen because of its visual appeal, without taking into account that this design has other advantages: the ability to withstand high wind loads, increase the level of protection of walls from moisture, and allow the installation of living quarters in the attic space.
DIY hipped roof. Photo
Four slopes are considered the best option for regions with strong winds and large amounts of precipitation. When deciding to build a hipped roof yourself, you must take into account that this design requires accurate drawings and increased attention when measuring and marking.

Preparatory work
The main difference between a hip roof with four slopes and a structure with two slopes is the absence of the need for side gables. The four-slope structure consists of two trapezoidal and two triangular slopes, the latter replacing the pediments.

Under the roof there can be simply an attic space or a residential attic. The construction of a hipped roof begins with determining its purpose and selecting materials, taking into account climate features. It is important to take into account the amount of precipitation and wind strength when choosing the angles of the slopes, the thickness of materials for wooden components and the type of roof.
Important! The slope of the slopes can vary from 5 to 60
The wooden components must be thicker than for gable design. If the slope does not exceed 18°, rolled materials are suitable for the roof. For a slope of 18-30°, it is better to choose metal or ceramic tiles.

Calculation h do-it-yourself hipped roof. Photo
Upon completion of the first stage, an accurate roofing diagram. You must know what materials and in what quantities you need to buy.

Stages of building a hipped roof with your own hands
Wood is used to construct a hipped roof coniferous species without defects with humidity 18-22%. First of all, a foundation is arranged that evenly distributes the load on bearing structures. A layer is laid around the perimeter of the building waterproofing and mounted Mauerlat - solid timber 10x15 cm or 15x15 cm. The connections are made in an overlay; metal brackets, plates and corners are used to connect the corners.

The next step in constructing a hip roof is installation of beds. This is a beam that serves as a support for the racks and is located on the base. Next, racks (beams 10x10 or 10x15 cm) are mounted on the beams with a rafter pitch (no more than 2 meters), a ridge beam (10x20 cm) is installed, temporarily resting on special racks.

Important! It is necessary to pay special attention to the angle of installation of the racks.

When installing a hipped roof, it is necessary to take into account that it consists of 4 planes. For slopes in the form of trapezoids, lateral rafters, for triangular ones - diagonal (oblique). This is a solid beam 10x15 cm or 10x20 cm, which is mounted in increments of 50-150 cm. If joints are necessary, overlays are mounted and secured in several places.


DIY hipped roof. Photo
At the points where the rafters rest on the base, you need to make cuts and secure the structure with metal elements. From above, the rafters rest against the ridge beam, connected to the racks using grooves. To strengthen the structure, it is recommended to use diagonal supports, struts, and steel connecting elements.

Roof installation
The final stage of building a hipped roof with your own hands is the installation of a waterproofing layer, counter-lattice, sheathing (or solid flooring). Placed on the rafters waterproofing material . Its purpose is to prevent destruction of the rafter system due to moisture ingress from attic space under roofing material. The film is laid overlapping and secured with adhesive tape for tightness.


The next step is the device counter-lattice. This is a timber or board treated with an antiseptic. Attaches to the rafters, allows you to fix the waterproofing material, creates air cushion between roofing material and insulation.

For lathing, dry boards 4-5 cm wide are used, which are attached to the counter-lattice at a distance of 25-30 cm from each other. If there are no plans to equip living quarters in the attic space, then roofing material is installed next. 
When installing warm attic mounted on the rafters from the inside using staplers vapor barrier material(film, foil, glassine), preventing moisture from entering warm room into the insulation. Installed on vapor barrier thermal insulation material 15-20 cm thick.

Advantages of a hipped roof
The construction of a hipped roof allows you to:
- convert attic space into residential attic, that is, increase the usable area of the house;
- increase the level of resistance to external influences in the form of wind and rain, thereby increasing the strength of the roof and extending its service life;
- do appearance home more attractive.
Despite the fact that the planning and installation process requires a lot of time and money, installing a hipped roof with your own hands is possible if you have basic carpenter skills. The household must have: gasoline, Circular Saw or hand, drill, chisels, hammers, level, cord, tape measure. Before starting work, it is advisable to carefully watch the appropriate video content.
The construction of a frame for a hipped roof is a labor-intensive and complex process with characteristic features. Here you will need accurate calculations and strict installation sequence. However, the result will amaze you with the solidity and reliability of the design with an impressive shape. Before you begin creating this frame, you should study the features and algorithm of actions by which the rafter system of a gable roof is erected.
Rafter system of a hipped roof: components and design advantages
A hip roof consists of a rectangular base and four inclined slopes. The two end surfaces are triangular in shape. They replace gables, as in gable roof. The other two slopes are called facade. Their shape resembles a trapezoid. The angle of inclination of the surfaces ranges from 15 to 60 degrees. Attic or dormer windows, bay windows, cuckoos, which creates an even more respectable appearance of the roof.

This design has its advantages over other types of mansard roofs:
- the design is more resistant to intense gusts of wind, which occurs due to the absence of gables;
- thanks to the large number of slopes, rain and melt water are more efficiently drained from the roof surface;
- The special design of the rafter frame allows you to get a spacious attic room, which is especially important for one-story houses with a hipped roof;
- thanks to the use of wood to create the roof frame and the ability to choose any roofing material, construction hipped design will not be much more expensive than the construction of a gable.
The structure of a hipped roof includes the following mandatory elements:
- the ridge, which is located at the top of the roof and is the intersection of the inclined slopes;
- four inclined surfaces, which are located at a certain angle to the rectangular base of the roof and covered with roofing material;

- overhangs are parts of the roof formed by fillets or extensions of rafter legs protruding beyond its perimeter, which protect the walls from moisture;
- rafter frame that forms the geometry of the roof and is hidden under the roofing material;
- roofing pie, consisting of a hydro-, heat- and vapor barrier layer, which is placed on the rafter frame in order to insulate the building and protect it from negative impacts environment;
- drainage system that provides drainage excess water from the roof surface. It is represented by an external drain, which includes a gutter, a water inlet funnel and a vertical pipe;
- Snow guards are small horizontal sides located along the edges of inclined slopes and prevent the collapse of the snow mass accumulated on the roof.
The diagram of a hipped roof allows you to study its design more clearly and in detail.

Construction of a roof truss system made of wooden elements
The rafter system, the photos clearly show this, is a wooden frame on which the hipped roof rests. It contains many mandatory and auxiliary elements, which are made mainly from coniferous wood. The drawing of the hip roof truss system shows the following elements:
- Mauerlat in the form of four beams with a cross-section of 10×10 cm or 15×15 cm, located along the perimeter of the load-bearing walls, is designed to absorb the load from the roof and distribute it evenly on the load-bearing walls of the building;
- bench - a wooden beam that is placed on the internal load-bearing wall and serves as a support for the racks used in the layered rafter system;
- rafter legs in the form wooden boards cross-section 5×5 cm or 10×15 cm define the geometry of inclined slopes and are the basis for roofing pie.
- the ridge girder is the highest point of the roof and is represented by a wooden beam resting on vertical racks. The rafter legs are attached to them;

- the racks are represented by vertical supports mounted on a bench and serve to support ridge girder and the middle of the rafter leg;
- struts, wooden blocks, attached to the rafter legs at an angle and preventing them from bending;
- The crossbar and tie are represented by horizontal jumpers made of metal or wood, which connect pairs of rafters, while reducing the load pushing on the walls. The crossbar is installed in the upper part of the rafter legs, and the tie is installed in the lower part.
- truss trusses - vertical risers for sloped rafters;
- the sheathing is the basis for installing the roofing material. Can be solid or lattice, which is determined by the type roofing.
During the installation of the rafter system of a hipped roof, layered, outer and ordinary rafters are used. The layer elements radiate from the ridge to two opposite corners of the house. They form triangular end inclined surfaces. Ordinary rafters are mounted along the ridge girder in pairs. They form trapezoidal façade slopes. The outer elements, having different lengths, rest on the layered rafters with their upper part.

Types of hipped roofs. Photos of interesting options
Hip-slope roofs include several types of structures that have the same number of inclined surfaces, but different structures.
The classic version is hip design, as can be seen in the photo of a house with a hipped roof. It consists of two triangular slopes and two trapezoidal ones. The place where they connect is called the ridge, which is much shorter than the length of the house. The hip roof is a structure increased complexity, in which design and installation are a very labor-intensive and complex process that requires certain skills and experience.
This design is suitable for the base of a building rectangular shape. This is the most aesthetically attractive roof option. However, it is also the most complex, both in terms of the necessary calculations and in terms of construction technology, since it uses a complicated rafter frame, which is proven by the diagram of the rafter system, which requires additional measurements and adjustment of the material on site.

The half-hip Dutch roof is both a gable and a hipped roof. It consists of two inclined trapezoidal slopes and two truncated triangular hips. Small hips do not completely replace gables, which makes it possible to install simple vertical windows, which are much cheaper than attic windows. In the photos presented on the Internet, you can see various designs of houses with a hipped roof of this type.
The half-hip Danish design has four trapezoidal slopes, which differ in size. The truncated hips extend not from the ridge, but a little lower, leaving room for a triangular pediment. This is where the auditory or vertical window for additional natural light, as can be seen in the photo of a house with a hipped roof. This design is the most resistant to strong winds. Therefore, it is advisable to install it for houses located in areas with increased wind activity.
Four-slope mansard roof consists of two triangular hips and two broken surfaces with a variable angle of inclination. This complex structure helps to get a large attic with a high ceiling, which is especially important for one-story houses. Projects with a hipped roof of this design are clear proof of this.
A hipped hip roof is erected on buildings square shape, mainly used for frame houses. The rafter system does not provide for a ridge run. The structure consists of inclined surfaces of the same size and triangular shape, which are connected at a peak.

How to calculate a hipped roof?
Before building a hipped roof, it is necessary to make all the calculations, which determine the amount of material for constructing the rafter frame, installing the roofing pie and laying the roof. The calculation can be done using special computer programs and a drawing of a hipped roof. However, it is better to do this yourself, using elementary mathematical formulas.
Helpful advice! At this stage, you should choose a roofing material, which will determine the angle of the roof. The sharper it is, the longer the roof slope and the greater the material consumption.
At the first stage, the angle of inclination of the slopes is determined. It depends on climatic features a specific region, the intended purpose of the attic space, the choice of roofing material, the calculation of which can be seen in the diagrams located on specialized sites on the Internet.

The tilt angle can be from 5 to 60 degrees. For regions with heavy precipitation and strong winds, you should choose an inclination angle in the range from 45 to 60 degrees. If the region is characterized by little snowy winters, rare rains and low-intensity winds, then the angle can be chosen much smaller.
For an inclination angle of 5-18 degrees. preference should be given to rolled materials for an angle of 14-30 degrees. It is advisable to use asbestos cement sheets or.
Next, the height of the roof ridge is calculated. For this purpose, special tables or trigonometric formulas are used for right triangle. After this, it is necessary to calculate the rafters, the cross-section of which is selected taking into account the load. This takes into account the weight of the rafter structure, the roofing pie, the angle of inclination of the slopes and the impact of the environment. Next, the pitch of the rafters is determined, followed by checking their load-bearing capacity.

When drawing up a drawing of a hipped roof, you should decide on the structure of the rafter system. The type of rafter system, the diagrams clearly display this, are selected based on the method of fastening the rafters. Houses with load-bearing walls or pillar supports require the use of layered rafters. Where it is not possible to provide support, hanging rafters should be installed.
Related article:
Design and benefits of hip roofs. Basic elements, diagram, models with a bay window. Calculation and development of drawings. DIY installation.

How to calculate the area of a hipped roof and calculate the roof covering?
The calculation of a hipped roof is carried out in compliance with certain rules:
- The general drawing of the structure of the rafter system of a hipped roof must be decomposed into separate geometric shapes with all dimensions plotted.
- The length of the slope is determined by measuring the distance from the ridge to the extreme line of the eaves.
- The area of all figures is calculated using mathematical formulas.
- Each inclined roof slope is calculated using the formula, where the area of the figure should be multiplied by the cosine of the angle, which corresponds to the location of the roofing material.
- If the inclined slope has the shape of an irregular triangle, it must be divided into regular figures and perform the calculation.
- After receiving data for each of the elements, the final values are summed up.

When calculating the total area of a hipped roof, there is no need to subtract the area values of small elements such as dormers, chimneys, skylights or parapets. Their areas are so small that they will not lead to large financial costs.
Important! It should be remembered that the area of the roof does not coincide with the area of the roofing material.
Each roofing material has the peculiarity of being laid with an overlap, the amount of which depends on the specific type of product, which accordingly increases material consumption.
When calculating the roofing material, it is necessary to add 15% of the stock of material to the total roof area, which overlaps. You should also take into account the amount of waste, for which you need to add another 20%.

Having obtained the result, it is necessary to correctly calculate the amount of sheet roofing material. To do this, the total value is divided by the area of one sheet. The length of the sheet of material is determined by the height of the slope. However, it should be remembered that the longer the sheet, the more difficult the process of transporting it. Therefore, based on the roof area, the most suitable size is selected.
If the roof has large dimensions, it is better to give preference to soft roofing materials, the use of which creates minimal amount waste. However, it should be borne in mind that these coatings require a device continuous sheathing, which increases additional costs.
How to make a hip roof at home with your own hands?
Constructing a hip roof structure with your own hands, drawings and photos posted on the Internet will help this issue, is a labor-intensive but doable process that requires correct calculations and a certain sequence of actions.

The roof truss system is a powerful and durable frame that can withstand all roof loads, including roofing pie and roofing. The reliability and strength of the roof depends on the correct and accurate calculation of the load on the rafter system.
It must withstand permanent and temporary impacts. Constants include the weight of the roof, the weight of all elements of the rafter frame, and the mass of the roofing pie. Temporary impacts include the influence of the environment, the weight of workers and equipment when performing repair work on the roof.
Having a diagram of the rafter system in front of you, you can begin construction wooden frame. First you need to install the main structural elements on which the rafter legs are attached.
Do-it-yourself installation of a rafter system structure begins with arranging the base for the future frame. To do this, a mauerlat is installed, which is erected along the perimeter of the upper row of load-bearing side walls. Next, you should install the bench for the ridge support and mount the vertical posts. They must be located strictly at an angle of 90 degrees. The slightest deviations can lead to deformation of the entire structure. The pitch of the racks is no more than 2 m. It is necessary to attach a ridge beam to the racks, the cross-section of which is selected taking into account the load of the central part of the rafter frame.

Helpful advice! For large-sized roofing structures, it is advisable to install several roof supports.
- installation of diagonal rafters, Bottom part which are attached to the mauerlat by cutting;
- installation of central rafters;
- installation of corner rafters that are attached to diagonal beams;
- installation of a tie, which is used to secure the legs of the skate;
- installation of central posts, which are attached at one end to the ridge and at the other to the tie (crossbar);
- installation of struts, which are fixed to the rafter leg and crossbar;
- installation of a truss, one part of which is attached to the mauerlat, and the other to the rafter leg.

After this, the sheathing is installed. Then the roofing pie is laid. It consists of a waterproofing, thermal insulation and vapor barrier layer. Next comes work on the outer covering of the roof with the selected roofing material, observing the specifics of its installation.
Important! The durability and reliability of the entire structure directly depends on how well each attachment point of the roof truss system is made.
If it is not possible to carry out the work yourself, you can use the services of specialists to install the rafter system, the price of which depends on the complexity of the structure, the total area of the roof, the type of roofing, the height of the building, the configuration of the roof and the location of the facility. The price per m2 of rafter system installation starts from 400 rubles.

Installation of roofing pie
The roofing pie of a hipped roof consists of several layers laid in a certain sequence. It is installed on the rafter frame and consists of the following layers:
- vapor barrier layer in the form protective film preventing the penetration of moisture into the under-roof system from the room;
- a heat-insulating layer in the form of insulation placed in the space between the rafters;
- a waterproofing layer in the form of a special material that prevents moisture from entering the room;
- lathing in the form of boards to which the roofing covering is mounted.
Important! The quality and durability of the entire roof directly depends on laying the layers of the roofing cake in strict sequence.

The lathing in the form of wooden beams with a cross-section of 50×50 mm is fastened transversely with nails to the rafters in a continuous layer or with a certain pitch depending on the roof covering. Next, an overlapping vapor barrier is attached to the sheathing using a stapler. Installation of insulation is carried out in the space between the rafters. Next, a waterproofing layer is attached, the installation technology of which is similar to the vapor barrier layer.
Important! During installation, the ridge part deserves special attention, where there is the greatest likelihood of condensate vapor accumulation.
Do-it-yourself hipped roof for a gazebo
Construction of a cozy gazebo on personal plot is ideal option creation comfort zone recreation. Depending on the geometric shape, the structure can be selected most suitable look hipped roof.

For a square-shaped gazebo, it is advisable to build hip roof with four equal-sized triangular slopes connected at one point. For rectangular structures, hip-type hip roofs are ideal.
Despite the fact that this design is more expensive and more complex compared to the gable one, it is the most suitable option for the gazebo. A hip roof is the most appropriate solution for this task for a number of reasons:
- due to large quantity inclined slopes are provided effective protection from precipitation;
- large overhangs can retain heat for a long time, which accumulates throughout a sunny day;
- inclined slopes protect well from the penetration of intrusive sun rays without blocking your horizons;

- reliable and rigid design guarantees minimal maintenance and routine repairs;
- affordable Construction Materials make this option an ideal and inexpensive solution for constructing a gazebo;
- due to the fact that the gazebo is a small structure, everything installation work The construction of a hipped roof can be done independently.
How to make a hipped roof for a gazebo?
Before starting to build a rafter system for a gazebo, it is necessary to calculate the angle of inclination of the slopes, the height of the ridge and the load to correctly select the section of the rafters. Having received the result, it is necessary to draw up a drawing of the rafter system, which displays all dimensions and mutual arrangement rafter frame elements.

Based on the drawing, preparation is made necessary elements and their subsequent assembly. The construction of a hipped roof for a gazebo consists of the following sequential steps:
- Reinforcing the top frame of the gazebo frame with a board.
- Attaching the tie-beam to the harness using metal corners.
- Having retreated the same distance from the middle of the tightening (about 50 cm), it is necessary to install two wooden posts, each 100 cm high.
- Connecting the tops of the posts with a ridge purlin.
- Installation of ordinary rafters with a selected pitch.
- Fastening the diagonal rafters with nails to the ridge so that they continue the ridge run.
- Installation of external rafters, which are attached on one side to the diagonal legs, and the other is attached to top harness designs. The pitch between the rafters is about 60 cm.
- Laying waterproofing coating overlap the rafters from one side to the other by about 10 cm and fix it with a stapler. The waterproofing along the rafters is secured using counter-battens.
- Installation of sheathing.
- Installation of roofing material with treatment of all joints with sealant.

Having familiarized yourself with the design features, you can safely begin constructing the selected type of hipped roof. However, you should remember to get a reliable, durable and durable design Preliminary calculations of structural elements should not be neglected and the work execution algorithm should be strictly followed.
Sequence of work on the construction of the roof truss system. Video instructions
If you need to create a durable and reliable roofing system for a private house, you can create a hipped roof with your own hands. It is important to carefully consider the development of the rafter system project and strictly follow the technology for installing structures.
Design of a hipped roof
Hip or tent hipped roof differs from a gable one in the absence of pediments - instead of them, additional triangular slopes are mounted at the ends. This design is more labor-intensive to construct, but is characterized by increased strength and reliability. At the design stage, it is necessary to correctly calculate the parameters and location of the elements, and during the installation process, they need to be precisely adjusted to the installation locations.
Please note that building a roof with your own hands may require the use of non-standard solutions, if the builders do not have suitable building materials at their disposal.
The project of a hipped roof is developed taking into account all types of loads that it will experience. The first step is to determine the angle of inclination roof slopes. This parameter primarily depends on factors such as:
- purpose of the attic;
- choice of roofing material;
- the nature of atmospheric loads in the construction area.
Typically, the angle of inclination of the roof slopes is 5 – 60 degrees. If the region is characterized by low rainfall and strong winds, you can build a roof with a slight angle of inclination. In areas with heavy snowfall and frequent rain, it is recommended to build roofs with a slope angle of 45 to 60 degrees.
When choosing a roofing material, you should take into account the features of its installation:
- Flat or wavy slate and rolled materials can be mounted on slopes with an inclination angle of less than 18 degrees;
- if the angle of inclination is less than 30 degrees, it can be used different kinds tiles;
- if the slopes are located at an angle from 14 to 60 degrees, the number suitable materials roofing metal included.

The roof structure diagram must contain detailed information about the locations and sizes of system elements. After defining optimal angle slope of the slopes, it is necessary to calculate the height of the roof ridge (based on the formula of a right triangle).
Rafter system
The installation of a hipped roof includes determining the required cross-section of the elements of the rafter system. It is performed based on an analysis of the loads that the rafter system will experience during operation. It is necessary to take into account the wind load, the maximum mass of snow in winter period, slope angle.
It is recommended to select a rafter safety factor of at least 1.4, as well as evaluate their load-bearing capacity and take it into account when calculating the rafter spacing. The type of rafter system is selected based on the parameters of the building: if there is an internal load-bearing wall or columnar supports, it is more convenient to use a system with layered rafters; if it is not possible to create a supporting structure, installation hanging rafters. In some cases, both types of rafters can be used.

During the design process, it is important not only to determine the type of rafter system, but also to determine the need for additional fastening elements, such as braces and tie-downs. They provide rigidity to the entire structure, prevent it from loosening over time, and reduce the load on the rafters.
Load calculation
Considering in detail how to make a hipped roof, it is worth Special attention pay attention to the principles of load calculation. There are two types of loads:
- permanent (weight of sheathing, insulation, insulating materials, roofing);
- temporary (weight of snow accumulated on the roof, exposure to wind, etc.);
- additional (any structures attached to the rafters).
According to SNiP, when designing a roof, one should proceed from the average snow load, which is 180 kg/m2, but in the event of a snow bag, the load increases to 400 kg/m2 in such an area. In this case, the snow load is not taken into account if the angle of inclination of the roof slopes exceeds 60 degrees. It is also necessary to take into account wind loads, but their value is noticeably less - up to 35 kg/m2. If the angle of inclination of the slopes is less than 30 degrees, the wind correction can be neglected.
It is recommended to correct the above averaged load parameters using correction factors, corresponding to the climate in the construction area.
An additional load comes from any suspended objects attached to the roof rafters. These could be vents, a water tank, or other devices installed in the attic. The possibility of their installation should be taken into account at the design stage of a hipped roof.

When designing a rafter system, it is necessary to perform two calculations. The first calculation is aimed at assessing the strength parameters of the structure - it is necessary to make sure that the system will not break under loads. The second calculation makes it possible to assess the degree of deformation of structural elements. For example, the deflection of the rafters of an attic roof should not exceed 1/250 of its length.
Special computer calculator programs can significantly simplify the calculations of the design of a hipped roof and avoid possible errors.
After performing the necessary calculations, a drawing of the rafter structure of the hipped roof is drawn up. Detailed diagram contains information about the dimensions of each element and the method of their fastening.

Materials for the manufacture of the rafter system
A do-it-yourself hipped roof is usually made using lumber from softwood - larch or pine. You should carefully consider the type of wood - the lumber should not have defects that affect its strength and durability.
Wood moisture content should be no more than 18-22%. Otherwise, the boards and timber should be dried before use to avoid deformation of the roofing structure during operation.
To create a rafter system, it is optimal to use rectangular timber, the cross section of which is determined by design calculations. As alternative solution a board with a cross section of 50×100 or 50×200 mm can be used. If necessary, double boards are installed.

It is possible to increase the strength of a multi-pitched roof structure steel elements, which hold the rafters and keep their relative position unchanged. Supports for the most loaded ridge girders can also be made of metal. Combined designs are characterized by increased strength.
Features of the construction of a hip roof
 The support for a roof with four slopes is the Mauerlat, the installation of which is described in detail in the instructions for constructing a gable roof. A feature of the hip roof is that the mauerlat must be laid on all four external walls of the building. When figuring out how to make a hipped roof, it should be noted that key feature design is the presence of diagonal rafters connecting the ridge and corners of the building. It is these rafters that take on the maximum load.
It is extremely important to correctly mark the diagonal rafters, ridge girder and supports for it. This makes it possible to ensure absolute symmetry of the structure, which is the key to uniform distribution of loads on the roof of the structure and prevents its deformation.
After installing the Mauerlat, supports are installed for the ridge girder, which must be fixed strictly horizontally at the height provided for by the project. Diagonal rafters made of timber or double boards are attached to the ridge girder.
To ensure the required length of the diagonal rafters, in some cases it is necessary to install them in two parts. To relieve the load on the joint, it is recommended to install a support under it. The greatest rigidity of the structure can be achieved if the joint with the support is located at a distance equal to a quarter of the length of the rafter from its upper part, fixed to the ridge. In general, for the installation of diagonal rafters it is most convenient to use prefabricated (glued) rafter legs, which are highly durable and ideal for the construction of complex structures.

After installing the main structure, consisting of a ridge girder and diagonal rafters, rafters are installed for installing the sheathing. The peculiarities of the hip roof include the use of not only full-size rafter legs, which are attached with the upper part to the ridge (central rafters), but also flanges - corner rafters, resting with the upper end against the diagonal rafters. The length of the sprigs decreases as they approach the corner of the triangular or trapezoidal slope. The spacing of the rafter legs is determined at the design stage, and at least three central rafters must be mounted on each slope, regardless of its length.

To ensure the rigidity of the entire structure, in the right places supports, tie-downs and braces are installed. Installation of the sheathing completes the creation of the rafter system. Waterproofing and roofing material are being installed. Insulation and vapor barrier are fixed from the inside. If the space under the roof is intended to be used as a living space, special attention should be paid to thermal insulation and ventilation of the roof. In addition, it is necessary to design and then correctly install roof windows.
Details on how to build a hipped roof on your own can be found in the thematic video.