Connecting a sewer system in a private house to a septic tank. Do-it-yourself sewerage installation in a private house - basic steps. Scheme of the internal sewer system
Read also
To make life at the dacha comfortable, it is necessary to carry out basic communications - water supply and sewerage. Often absent in suburban areas centralized network sewerage, so each house owner solves the problem independently. Periodic use of the home does not require the installation of expensive and complex equipment; it is enough to install a septic tank.
Often in dachas, the function of collecting wastewater is performed by a cesspool. If the house is not equipped plumbing system this option is fully justified, but when installing plumbing fixtures and a large volume of drained water, it is not enough. In this article we will talk about how to make a sewer system in your country house with your own hands. different ways(from concrete rings, barrels, without pumping), and we will also demonstrate diagrams, drawings, photos and video instructions.
The sewerage system must be built in accordance with the developed project, which includes external and internal piping diagrams.

Two-chamber septic tank

The most convenient option is to install a collector consisting of two chambers connected by an overflow pipe. Let's find out how to arrange it yourself.
- Work begins with digging a pit in a place chosen taking into account all sanitary requirements. The volume of the structure depends on the number of people living in the country house. You can dig a pit manually or using an excavator.
- A sand cushion up to 15 cm high is formed at the bottom of the pit. The depth of the pit is 3 meters.
- It is necessary to install formwork made of boards or chipboard. The design must be reliable. Next, a reinforcing belt is formed from metal rods tied with steel wire.
- It is necessary to make two holes in the formwork and insert pipe cuttings. These will be places for the entrance of the sewer main and the overflow pipe between the sections.
- The formwork is filled with concrete, which is distributed throughout the entire volume using a vibrating tool. The design of the septic tank must be monolithic, so it is advisable to fill the entire formwork at one time.
- In the first compartment, the bottom is filled with concrete, a sealed section is formed, which will serve as a sump. Here the wastewater will be separated into large solid fractions that sink to the bottom, and clarified water that flows into the adjacent section. For better decomposition of solid residues, aerobic bacteria can be purchased.
- The second compartment is made without a bottom; it can be made not only from monolithic walls, but also using concrete rings with a diameter of 1–1.5 meters, stacked on top of each other. The bottom of the well is covered with a thick layer of sedimentary rock (crushed stone, pebbles, gravel) to filter the wastewater.
- An overflow pipe is laid between the two sections. It is installed at an angle of 30 mm on linear meter. The height of the pipe is located in the upper third of the wells. The number of sections is not necessarily limited to two; a four-section septic tank can be made, which provides better cleaning.
- The ceiling of the septic tank is made independently, using formwork and concrete, or ready-made ones are used reinforced concrete slabs. Be sure to install a hatch that allows you to control the filling of sections and the hood. The pit is filled with sand and selected soil. The sump tank of such a system will be cleaned every 2–3 years.
Due to the ease of installation, many summer residents prefer to make a septic tank from concrete rings.

If the soil on the site is clayey or the groundwater is located very close to the surface, it will not be possible to install a septic tank of this design. You can settle on a sealed container of sufficient volume, securely installed and secured to concrete slab in the pit.

Another option is a biological treatment station. Local stations are convenient and efficient, they are indispensable for suburban buildings large area. The installation and commissioning of the device is carried out by specialists; the cost of such a station is acceptable for a narrow circle of summer residents.
Laying the external main

From exit point sewer pipe It is necessary to lay a pipeline from the house to the septic tank. The main must lie at a slope that ensures the drainage of contaminated water. The larger the diameter of the pipes you use, the smaller the angle of inclination required for their operation, on average it is 2 degrees. The depth of the trench for laying pipes must be greater than the amount of winter freezing of the soil. If the depth of the trench is small, provide thermal insulation of the line.
The average depth for laying a sewer system is 1 meter; in warm regions it is enough to go down to 70 cm, and in cold regions you will need to dig a pit up to 1.5 meters. The bottom of the dug hole is covered with a dense cushion of compacted sand. This procedure will protect the pipes from soil displacement.

The best option would be to lay a direct pipeline to the collector. If it is necessary to make a turn, this place will be equipped with an inspection well. For the main line, you can use plastic and cast iron pipes with a diameter of 110 mm; their connection must be airtight. After installation, the pipeline is covered with sand and then with soil.

The design, which does not require regular pumping of wastewater, consists of several tanks operating simultaneously. These can be two/three-chamber septic tanks. The first tank is used as a sump. It is the largest in volume. In two-chamber septic tanks, the septic tank occupies ¾ of the structure, and in three-chamber septic tanks ½. Here, preliminary wastewater treatment takes place: heavy fractions settle, and light fractions are poured into the next compartment as the first one is filled. In the last part of the septic tank, the final wastewater treatment takes place. The water is then directed to the filtration fields/drainage well.
The first 2 compartments must be sealed. The last chamber has holes in the walls/bottom. In this way, purified water seeps into the ground, which helps avoid systematic pumping of waste without causing irreparable damage to the soil.
It is worth considering that in Wastewater ah, in addition to organic matter, there are also insoluble impurities. In view of this, such a structure will also have to be pumped out periodically to get rid of the sediment accumulating in the sump. This can be done with a fecal/drainage pump. The frequency of septic tank maintenance depends entirely on the size/volume/composition of wastewater.

To independently construct such a septic tank, you need to correctly calculate its volume. It depends on the water consumption of your household. The water consumption rate per person is 200 liters per day. So, multiplying this amount by the number of household members, you get daily norm water consumption in the house. Add another 20% to the resulting figure.
18 m3. In this case, you need a septic tank that has a depth and length of 3 m, and a width of 2 m. By multiplying all sides, you get 18 m3. Minimum distance from the bottom of the septic tank to drain pipe– 0.8 m.

The advantage of the treatment system is that the sludge is processed by anaerobic bacteria, as a result of which it settles to the bottom in a much smaller volume. Gradually this sediment becomes denser and rises. When the sludge reaches the overflow level, the septic tank must be cleaned immediately. You should resort to cleaning a septic tank quite rarely. This is due to the fact that the volume of sludge in 6 months will be from 60 to 90 liters.
Volatile septic tanks have built-in pumping units. Their non-volatile analogues should be cleaned manually or using sewer equipment.
However, not so long ago, biological products with special enzymes appeared that convert sludge into acid, and then into methane and carbon dioxide. To remove these gases, you just need to install ventilation in the septic tank. Thus, your septic tank will become an absolutely waste-free, safe and energy-independent treatment facility.
Bacteria need to be “fed” with oxygen to make their work more efficient. You can buy containers for a septic tank or make your own.

Before installation finished design it is necessary to determine a suitable location for the septic tank. The minimum distance between the septic tank and the house is 5 m. The sewer pipes leaving the house must be directed directly to the septic tank. It is better to avoid turning the pipeline, because it is in such places that blockages form.
The septic tank should not be installed near trees, as their roots can damage the integrity of the body. The depth of the septic tank and sewer pipes directly depends on the level of soil freezing.

If groundwater is close to the surface, then reinforce the bottom of the pit with a concrete slab/screed. The dimensions of the pit will depend on the size of the septic tank. If you have to install a compact structure, then it is easier to dig a pit manually in order to save money.
The pit should be slightly wider than the septic tank body. The gaps between the walls and the ground should be at least 20 cm, and preferably more. If there is no need to strengthen the bottom, then you should still lay a sand cushion 15 cm thick (meaning the thickness of compacted sand).
The top of the septic tank should rise above the ground. Otherwise, melt water will flood the device’s equipment in the spring.

After constructing the base of the pit, lower the septic tank into it. This can be done using cables placed in the ribs of the septic tank. In this matter you cannot do without an assistant. Next, connect the device to the communications, having previously dug trenches for the pipes, laid a sand cushion and installed the pipes. They should be laid at a slight slope - 1–2 cm per linear meter. The pipes are laid to a depth of approximately 70–80 cm.
The septic tank should be installed strictly according to the level. It will work better in a horizontal position.

To connect the sewer pipe to the septic tank, a hole of the appropriate diameter should be made in it. This is done according to the instructions for the cleaning system. After this, you need to weld the pipe to the hole. To solve this problem you will need a polypropylene cord and construction hair dryer. When the pipe has cooled down, you can insert a sewer pipe into it.
If you are connecting a volatile septic tank, then after these steps you need to connect electric cable. It is carried out from the panel to a separate machine. It needs to be placed in a special corrugated pipe and place in the same trench as the sewer pipe. There are special holes with marks on the septic tank. The cable is connected to them.

If the level of soil freezing in your region is high enough, then insulate the septic tank. Any type of insulation can be used thermal insulation material, which can be used for laying in the ground.
After connecting the electricity and pipes, the septic tank should be filled with soil. This is done in layers of 15–20 cm. To equalize the pressure during the process of filling the soil, you need to pour water into the septic tank. In this case, the water level should be slightly higher than the level of backfilling of the pit. So, gradually the entire septic tank will be underground.

If you are not satisfied with the finished plastic autonomous system to clean wastewater, due to its size or cost, then you can make a septic tank from several compartments yourself. Great inexpensive material to implement the plan - concrete rings. You can do all the work yourself.

Among the advantages of a septic tank made of reinforced concrete rings, we note the following:
- Affordable price.
- Unpretentiousness during operation.
- Possibility of performing work without the help of specialists.
The following disadvantages deserve attention:
- Presence unpleasant odor. It is impossible to make the structure completely airtight, and therefore the formation of an unpleasant odor near the septic tank cannot be avoided.
- The need to clean the chambers of solid waste using sewage disposal equipment.
You can reduce the frequency of the need to pump out the septic tank if you use bioactivators. They reduce the amount of solid fractions by accelerating the process of their decomposition.
If the installation of the rings is carried out incorrectly, the septic tank will not be airtight, which will increase the risk of untreated wastewater penetrating into the ground. But, with proper installation, the septic tank will be sealed, so this disadvantage of the system is rightly called conditional.

The design of a septic tank, as a rule, includes 1–2 chambers designed for settling and purifying wastewater and a filtration field/filter well.
If there are few people living in your house and there is a minimum connection to the sewer system plumbing fixtures, then you can easily get by with a septic tank consisting of one septic tank and a filter well. And vice versa, if you have a lot of household members and many devices are connected to the sewer system, then it is better to make a septic tank from two chambers and a filtration well.

How to calculate the required volume for a septic tank has already been described above. According to building regulations, the septic tank chamber must accommodate a three-day volume of wastewater. The volume of the reinforced concrete ring is 0.62 m3, which means that to build a septic tank for 5 people you will need a septic tank of five rings. Where did this amount come from? For 5 people you need a septic tank with a volume of 3 m3. This figure must be divided by the volume of the ring, equal to 0.62 m 3. You will get a value of 4.83. It needs to be rounded up, which means that to install a septic tank in this specific case you will need 5 rings.

The pit must be of such a size that it can accommodate septic tank chambers and a filter well. This work, of course, can be done manually, but it takes a long time and is very difficult, so it is more cost-effective to order digging a pit from a company with earth-moving equipment.
The bottom of the pit at the site where the settling chambers are installed must be concreted in order to avoid the possibility of untreated wastewater penetrating into the ground. Before the beginning concrete works, part of the bottom of the pit should be drained to install settling tanks by laying a sand cushion on it in a layer of 30–50 cm.
If you do not want to concrete the bottom, then you can purchase reinforced concrete rings with a solid bottom. They will need to be installed first in a vertical row.
The place for the filter well also requires preparation of the base. Under it you need to make a cushion of sand, crushed stone and gravel at least 50 cm thick.

To install the rings, you will have to order the services of lifting equipment. Performing these tasks manually is very difficult. You can, of course, install the rings by digging under the bottom ring. But this method is labor-intensive. And the bottom will have to be filled after installing the last ring, which will entail whole line inconvenience. In view of this, it is better not to save on ordering lifting equipment.
Usually the rings are fastened together with a solution, but for greater reliability of the structure they can be fastened metal plates or staples. In this case, your septic tank will not be damaged due to soil movement.
Now it’s time to organize an overflow, and for this you need to connect pipes to the rings. It is better that they work on the principle of a water seal, that is, they need to be installed with a bend.

To seal the joints you need to use a solution with an aqua barrier. The outside of the tanks must be treated with coating or weld-on waterproofing.
Another option is to purchase plastic cylinders that are installed inside the well. In this case, the likelihood of dirty water entering will be minimized.
Installation of slabs/backfill

Finished wells must be covered with special concrete slabs, which have holes for installing sewer hatches. Ideally, backfilling of the pit should be done with soil containing a high percentage of sand. But if this is not possible, the pit can be filled with soil previously removed from it.
Now the septic tank can be put into operation.

The system for treating wastewater from barrels, like a similar structure made of reinforced concrete, can be two- or three-chamber. Sewage will flow into it by gravity, so it must be installed below the sewer pipes. The operating principle of this device is similar to the design of reinforced concrete rings.

For arrangement autonomous sewerage According to the principle of the purification system, any containers can be used. It could be old metal/ plastic barrels. The main thing is that they are airtight.
If you decide to make a septic tank from metal barrels, then they should be pre-treated with an anti-corrosion agent.

Plastic containers have a number of advantages over their metal counterparts:
- A wide range of plastic containers, which can be used to install a septic tank.
- The barrels are highly resistant to the aggressive effects of wastewater. Therefore, they last longer than their metal counterparts.
- The light weight of the containers simplifies their installation at a permanent location.
- Plastic does not require additional processing, unlike metal.
- The high tightness of the barrels eliminates the possibility of penetration dirty waters into the ground.
Plastic barrels must be securely fastened when installed in the ground, because due to spring floods or winter frosts they can be squeezed out of the ground. In view of this, plastic barrels are secured with cables to a concrete base (it must first be poured or a reinforced concrete slab must be installed). To avoid crushing plastic barrels, backfilling of soil should be done extremely carefully.
For seasonal use, sewerage from metal barrels is also suitable, but for stationary use this is not an option.

The popularity of metal containers for sewerage installations is associated with their compactness and ease of installation. Can be used as a lid of the appropriate size wooden blank or the one provided by the manufacturer. For installation metal septic tank you need to dig a corresponding pit, which also needs to be concreted - the walls and the bottom.
Metal containers do not have a long service life even after they are treated with anti-corrosion compounds. Therefore, installing them as a septic tank may be unprofitable. Buying stainless steel containers is not an option, as these products are very expensive.
Maybe you decide that in this case you can buy barrels with thin walls. However, this is also not The best decision, since during operation such a septic tank can be pushed out. And such barrels have a limited capacity - up to 250 liters, which is not suitable for a large family.
For installation reliable system It is better to use factory-made polymer barrels for wastewater treatment.

To make a septic tank from 220 liter barrels, you will need the following materials:
- geotextiles – 80 m2;
- sewer pipe Ø110 m, length 5 m;
- crushed stone fraction 1.8–3.5 cm, approximately 9 m3;
- corner for sewerage at an angle of 45 and 90º – 4 pcs.;
- plastic barrel with a volume of 220 l – 2 pcs.;
- coupling, flange – 2 pcs.;
- wooden peg – 10 pcs.;
- Y-shaped sewer tee- 4 things.;
- building level;
- drainage perforated pipe in a 5 m filter – 2 pcs.;
- epoxy two-component sealant – 1 pc.;
- glue for PVC – 1 pc.;
- plumbing tape – 1 pc.
Tools you will need:
- Shovel.
- Electric jigsaw.
- Rake.

For a cottage/small country house at economical use Standard plastic barrels will do. Install this cleaning system not difficult. If you do not pour black waste into the sewer, the septic tank will be unpretentious in maintenance. If there is a toilet in the house, then the sewerage system will have to be cleaned regularly by calling a sewer service.
For private homes with permanent residence, barrels will not be enough. For sewerage, it is better to purchase plastic cubes/tanks/tanks. The process of installing them in the ground is no different from installing barrels.

The distance of the septic tank from the house should not exceed 15 m. Too much distance will complicate the process of connecting the sewerage system to the house:
- there is a need for a large depth of the pipeline;
- On the way to the septic tank you will need to install an inspection well.

A sewage system made from metal barrels does not require large financial investments And complex work on installation. To begin with, as in previous cases, you need to prepare a pit, and then install 2 barrels, each of which has a volume of at least 200 liters. Then pipes are installed to transfer liquid from one barrel to another and transfer to the filtration fields/drainage well.
Each subsequent container must be located below the previous one in level.
The joints must be sealed, and the barrels must be insulated using polystyrene foam. After this, the pit and septic tank are filled up. Since, as mentioned above, metal barrels do not last long, you need to be prepared for the fact that after 3-4 years they will need to be replaced.
Pipe laying


Scheme


Hardly modern man can imagine his existence without the comfort and usual benefits of existence, therefore, when arranging a frequency house or cottage, first of all, it is necessary to properly arrange the water supply and, of course, the sewer system in compliance with all sanitary and hygienic standards.
The installation of a sewerage system allows you not only to use the bathroom, but also to connect sinks, a dishwasher or washing machine and bring life in a suburban area closer to living in a city apartment.
Installation sewer system is a labor-intensive process and requires a serious approach, besides, it is best to design a sewer system based on initial stage construction of private buildings.
Before starting work, it is necessary to install a water supply and only then install the sewerage system, adhering to a strict sequence.
Main types of sewer systems
Modern sewer systems are classified into three main types:
- Internal, where all communications are located inside the house.
- External, in which communications are located outside the house, which include cesspools, treatment stations, cesspool settling wells, and septic tanks.
- The most important stage is to install a sewer system into the house, since all the main elements and connections to the main highways will be located inside the building. At this stage, proper arrangement is very important, which will ensure the performance and smooth functioning of the entire system.
Materials that will be needed when installing a sewer system

The basis of any type of sewer system is a common riser into which waste water flows. Everything that passes through the riser enters the laid external sewer system and is drained into a sump, which is located on the site.
Necessary materials:
- Pipes, the number of which must be calculated in advance.
- Bends for the sewer system, the size of which must correspond to the diameter of the pipes.
- Tees of the required style, which are necessary for branching the system.
- Reducers and adapters for connecting pipes various diameters.
- Audits to monitor the functioning of the sewer system and access for cleaning it in case of blockage.
- Plugs for sockets that cover unused holes.
- Special fasteners for fixing sewer pipes.
- Sealant - plumbing silicone in pipes and a gun, which is necessary for its application.
Important! The riser will require a pipe of a sufficiently large diameter (from 100 mm), since this pipe diameter is used to drain wastewater from the toilet. Install the riser in the very corner of the bathroom or in a pre-arranged shaft.
In addition, it is important to prepare all the tools and materials necessary for the work so that everything is at hand during the work.
The drain pipe must be well fixed. It is also necessary to level the future locations and joints that will include outlet pipes from sinks, toilets, and bathtubs.
To ensure better sealing of pipe joints and avoid leaks, the joints are lubricated with grease or silicone.
Since plastic pipes are most often used when constructing a sewer system, it is necessary to ensure their reliable fixation. The more reliable the fastening, the less likely the sewer pipes will be deformed, since the mass of filled pipes is much greater than empty ones.
Self-assembly of a sewer system

It is quite simple to install a sewer system with your own hands, even without certain skills and experience. The main thing is to maintain the sequence of work, acquire quality materials, and prepare the necessary tool for the job.
Important! If you are still unsure of your abilities, you can always invite professional craftsmen who will carry out all sewer installation work quickly and efficiently. However, in the process of their work, you can monitor the progress of the work, gaining experience and at the same time monitoring quality.
It is very important that the drain pipes coming from the toilet or bathtub exit at an angle, which will prevent them from clogging and ensure the normal level of system performance. The angle of inclination for each meter should be from 2 to 4 degrees.
You should not purchase corrugated pipes for arranging a sewerage system - give preference better than pipes with an internal nasty surface. It is recommended to fix the pipes immediately after connecting and joining. To do this, you need to build a box or trench from plasterboard or other waterproof material. This design will allow you to achieve reliable fixation and obtain a rigid system that will be resistant to mechanical damage and water displacement.
Important! When installing a transition between a vertical drain and a horizontal drain, it is advisable to install a connecting element with an angle of 90 degrees in this place. This will help to significantly reduce the load on components and pipes from pressure when draining water.
To install the transition unit, you need to dig a deep hole of the appropriate diameter. This is also convenient because, if necessary, you can install an inspection coupling, which will allow you to clean the system if it becomes clogged.
At the next stage, the drain line is taken outside the house. make a hole in the foundation of the required size and cut out a corner at an angle of 15 degrees and then set a constant level of inclination of the drain pipe, inclusive of its entry into drain hole no more than 2-3 degrees.
You should not make a smaller slope or, conversely, tilt the pipe too much. Small level the slope will slow down the passage of wastewater, and with a strong slope, wastewater will flow too quickly through the sewer pipes, leaving solid fragments on the walls, which will soon lead to blockage and disruption of the functioning of the sewer system.
Important! If the location is too close, the foundation may be damaged over time, and if the distance is too large, it can cause stagnation in the system, especially if it has many joints and turns.
At the final stage, it is necessary to dig a trench for laying the pipe, the depth of which depends on the climatic and weather conditions in your region. If winters are harsh and cold, the trench should be deep enough to prevent freezing and damage to the integrity of the pipes. For greater safety, you can insulate the pipes with insulation before the final filling of the soil.
It is equally important to install several small ones along the entire length of the sewer pipes. inspection wells, which will allow for an audit of the sewer system in case of congestion. Immediately before laying sewer pipes, it is recommended to concrete the trench. The bottom of the trench should be as dewy as possible without elevation changes.
It is difficult for us to live without amenities, even if we are in a private home. We strive to provide maximum comfort, creating an optimal standard of living for your family. For this, it is very important to think through the issue of construction in advance.
When building a sewer system with your own hands in a private country cottage, You can save money, but you need to carry out this work in accordance with construction and installation requirements.
Sewerage installation in a house involves the arrangement of external and internal sewerage systems.
Internal is pipe routing, installation fan pipe and a boner.
External refers to a set of pipes running from the house to a septic tank or deep cleaning station.
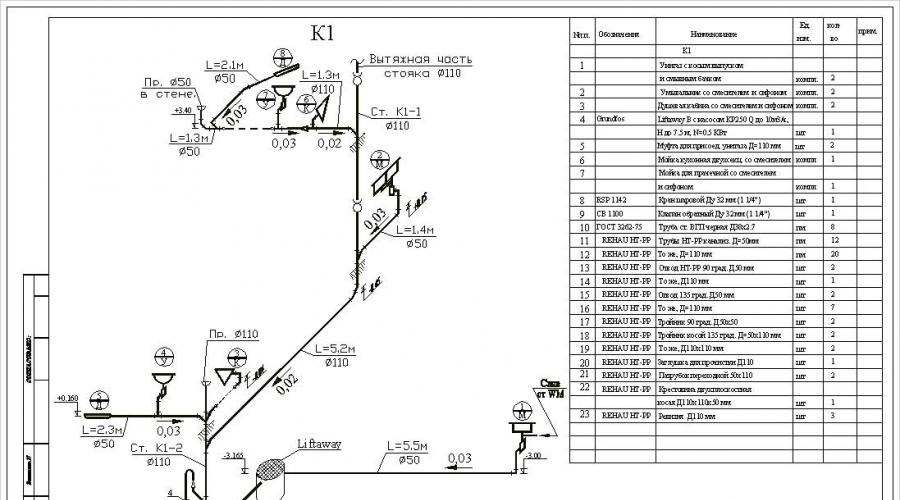
Internal sewerage diagram

You need to choose a scheme based on the layout of each house. Ideal when everything plumbing equipment tied to one collector through which the water flow will pass.
IN big house, with several bathrooms, it is more correct to prefer a scheme in which there will be at least two cesspools or a septic tank. And in two-story house risers must be installed.
How to draw up a sewerage diagram for a private house:
- draw up a house plan;
- determine the location of risers;
- mark the locations of plumbing fixtures and decide on how to connect them;
- depict the pipes running from the fittings and riser to the plumbing, and all connection elements;
- do this for each floor;
- determine the dimensions of the fan pipe and riser;
- add up the length of all internal pipes;
- At the final stage, make a diagram external sewerage.
How to choose sewer pipes
Different ones are used for external and internal sewerage.
For laying pipes inside, polyvinyl chloride and gray ones are used. For sunbeds and risers, pipes with a diameter of 110 mm are used, and for drainage - 40 and 50 mm. Turns are made with two plastic elbows bent at right angles.
Often, pipes for external sewerage have Orange color, diameter 110 mm and the required rigidity. Double-layer corrugated pipes can also be used.
Pipe properties
 Cast iron:
- durable and strong, designed for heavy loads.
- expensive, heavy and fragile, corrosion on the inside can contribute to clogs.
Polypropylene:
- light and flexible, holds up well high temperature water.
- there are no shortcomings.
Polyvinyl chloride:
- inexpensive and lightweight, used for external sewerage.
- They are fragile and do not tolerate high water temperatures well.
Pipe laying
The most serious process when constructing a sewer system in a house is the routing and laying of pipes. Upon completion of work, check the tightness of the system, and only then proceed to its operation.
Pipe connection
Today many types of revisions, tees, elbows and plastic pipes, which are easy to connect. The joints can be processed. And in places where the pipe passes through the foundation, it is recommended to install a sleeve.
It is also important to remember the slope of the pipes, which depends on its diameter and is 2 - 3 cm per 1 m.
Sewer outlet
In order not to encounter a discrepancy between the internal and external sewer systems, begin the installation of the sewer system from the outlet,
It is installed through the foundation below the frost level. When installing the outlet higher, it will be necessary to insulate the pipe.
If you didn’t think about it, you will need to punch a hole in it large enough to install a drain pipe with a sleeve. The sleeve is a small piece of pipe with a diameter of 130-160 mm. It should protrude 15 cm on both sides of the foundation.
The outlet diameter must be no less than the diameter of the riser. And the sleeve is needed to create a pipe slope.

Pipe routing and riser installation
It is ideal to place the riser in the toilet. It can be mounted openly or hidden.
To connect sewer pipes to the riser, oblique tees are used, and adapters are used at the joints of pipes that differ in diameter. At the intersection of pipes, it is necessary to install a collector with a diameter of 100-110 mm. Also install water seals that will protect you from unpleasant odors.
Installation of a special tee (revision) on each riser is mandatory. With its help it will be possible to clear the blockage. You can install cleaning after each bend.
 It is better to place the riser in the toilet of a private house
 Fan pipe outlet
Functions of the drain pipe:
- maintains atmospheric pressure inside the system;
- increases the durability of the sewer system;
- ventilates the entire sewer system.
The fan pipe is the continuation of the riser. This is a pipe leading to the roof. Before connecting the drain pipe and the riser, it is important to install an inspection. After which the pipe is led out at a convenient angle into the attic.
You cannot combine the fan pipe with the chimney or ventilation of the house. The exhaust pipe outlet must be located at a distance of 4 meters from windows and balconies. The height of the retreat from the roof should be 70 cm. It is also important to place the sewer, house and chimney ventilation at different levels.

External sewage system of the house
There are different ways to equip a sewer system in a house, but it is very important to choose the right system that meets your needs.
It is necessary to select an external sewerage scheme taking into account the following:
- you live in the house temporarily or permanently;
- number of people living;
- daily water consumption per person;
- soil water level;
- plot size;
- soil type and structure;
- climate.
For more detailed information, you should read the relevant chapters of SNiP and SanPin.
All external sewage systems are divided into two types:
- storage (cesspool, sealed container);
- structures for wastewater treatment (single-chamber septic tank, septic tank with two overflowing wells, aeration tank, septic tank with a biofilter, septic tank with several chambers and a filtration field).
Cesspool without bottom
This is very old way sewerage, which is now used exclusively as a country house.
In the cesspool, walls are made from rings of concrete or bricks, and the earth remains as the bottom. In a hole, relatively pure water seeps into the ground, and organic waste settles at the bottom.
When completely filled with waste, it needs to be cleaned.
Do something like this cesspool It is possible if they do not live in the house permanently and do not consume a lot of water. Groundwater in this case, they must pass at least 1 m below the bottom of the pit, otherwise this will lead to contamination of soil waters.

Adding microorganisms to the pit will slightly reduce the unpleasant odor and speed up the process of water purification.
Sealed storage tank
This option involves installing a sealed container into which water will drain. You can purchase a ready-made container made of metal or plastic, or you can make one yourself from concrete rings. The lid is made of metal, and the bottom is made of concrete. Important during construction storage tank is its complete tightness and insulated lid.
When filling the tank, it must be cleaned using a special vacuum cleaner. The volume of the tank and the frequency of cleaning it depend on water consumption.
This system can be used in high ground groundwater, this way you will protect water sources and soil. But its downside is that you will need to call the sewer truck quite often.

Single chamber septic tank
This is a well, the bottom of which is covered with a layer of crushed stone and coarse sand. Water seeping through them is purified by 50%. Along with mechanical cleaning, biological cleaning processes take place here.
You should not build such a sewer system in a private house if people live in it permanently. This option can only be used when groundwater levels are low. Please note that crushed stone and sand need to be changed periodically.
With your own hands, you can make a septic tank from polypropylene, reinforced concrete rings, brick, or fill its walls and floor. In this case, it is necessary to determine whether the wastewater treatment will take place in the well field or in the filtration field. You also need to equip the system and carry out its hydro- and thermal insulation.

Two-chamber septic tank
The most popular method of installation in a country house, it is economical and can be built independently.
It consists of two wells. The first has a sealed bottom, and the second does not, but is filled with crushed stone and sand, which will need to be replaced approximately every five years.
The first well plays the role of a sump, and the second - a filter well. Periodically, the first well is filled with waste and to clean it you need to call a sewer truck about 2 times a year.
It is worth installing such a sewer system in a house if, even during a flood, the groundwater level is below 1 m from the bottom of the second well. 
Soil and biological treatment - septic tank with filtration field
This type of septic tank is made in the form of a container divided into sections connected by pipes.
The first container is needed to settle the wastewater. Lightened the water is flowing into the second section, where organic residues are decomposed by anaerobic bacteria. Afterwards the water goes to the filtration fields.
This is a vast underground area where soil treatment of wastewater takes place. If the soil on your site is sandy, then this perfect option. After this, the water is sent through pipelines to a well or drainage ditch.
Sometimes sand and crushed stone need to be replaced in the filtration field.

Natural treatment station - septic tank with biofilter
With its help, it is possible to carry out sewerage at any level of groundwater.
Such a station is a container divided into 3-4 sections.

In the first, the water settles, in the second, organic residues are decomposed by anaerobic microorganisms. In the third, water is separated, and in the fourth, organic matter is decomposed by aerobic bacteria, which live only under the condition of constant air flow. To do this, a pipe rising above the ground is installed above the chamber. In the pipe leading from the third chamber to the fourth, there is a filter with aerobic bacteria. Purified water can be used for technical purposes. From the fourth chamber there is a pipe leading to a drainage ditch, or storage tank.
For a country house with permanent residence, a septic tank with a biofilter is optimal solution. The disadvantage is that when non-permanent residence, the bacteria will simply die.
Artificial treatment station - septic tank with forced air supply
This is a quick cleaning unit with artificially natural processes are triggered. It is impossible to install a sewer system using an aeration tank without connecting it to


Hard to call comfortable a private house, not equipped with a well-thought-out, well-functioning drainage system. It is as much a part of civilized existence as electricity, ventilation and heating. Such an important component of the home communications network is subject to requirements for environmental friendliness and efficiency; The drainage system of a private home should be simple to install and easy to use.

Schematic diagram of a sewer system in a private house
One of the main issues of improvement is sewerage for a private house; How to design it correctly and what to focus on during installation will be helped by empirically tested rules.
Types of sewerage systems in a private house
All houses located in the private sector are divided into two categories:
Houses with the ability to connect to the city (central) network. In most cases - best option, with a long service life and no problems with maintenance, unplanned expenses and water quality control.
Houses in which the connection to centralized system impossible. The fact that the city network is unavailable is not a reason to give up comfort. In such conditions, the installation of sewerage in a private house is reduced to an autonomous option, where water purification and waste disposal occur in locally installed treatment facilities.

You can also combine sewer and drainage systems
The autonomous sewerage system includes:
Internal sewerage responsible for collecting wastewater and discharging it outside. This includes internal wiring (piping system), as well as plumbing and household appliances.
External sewerage . Its elements are external piping and a water purification device (septic tank or autonomous sewage system).
The most suitable type of individual cleaning equipment (in terms of performance) is selected taking into account several factors:
seasonality of living in the house;
intensity of water use;
plot size, soil type and structure;
groundwater level;
climatic conditions region.
The first stage of sewerage installation is the development of a preliminary project diagram.
Rules for drawing up a sewerage diagram in a house
The sewerage diagram in a private house is tied to the house plan. It must contain key elements systems - riser (if the building has more than one floor), pipe markings (internal wiring, corners and turns), water drainage points.
When designing, it is important to remember that an overly complicated circuit will cause problems in the future during operation and repair.
Internal wiring is laid during the construction of the house. Its installation begins when the roof of the house and ceilings are installed, but Finishing work premises has not yet been completed. External sewerage is installed after internal system fully furnished. Below is a sewerage diagram for a private two-story house:

General diagram of internal sewerage in a two-story house
The procedure for drawing up a diagram:
All drawings are drawn to scale; the installation location of the riser, pipe laying lines, and the number of drain points (connection of plumbing and household appliances) are indicated on the plan.
The size of the riser is determined, the total length of the pipeline is calculated (taking into account the outlet), and the exit point from the main riser structure.
In places where blockages may form, cleaning and inspection are provided.
A separate drawing is constructed for each floor.
The size and installation location of the sewer pipe are calculated (in large sewer systems it prevents the occurrence of vacuum in the sewer pipe)
The external communications scheme is based on the same principle.
On our website you can find contacts construction companies who offer design and installation services for sewerage and water supply. You can communicate directly with representatives by visiting the “Low-Rise Country” exhibition of houses.
About the sewerage diagram with a waste pipe in the video:
Selection of pipes for internal sewerage
The following categories of pipes are allowed by building codes:
Cast iron. Traditional (until recently) solution. Cast iron products are strong, corrosion-resistant and durable. The disadvantage is the weight and roughness inner surface. The latter quality contributes to the formation of deposits and blockages. Pipes are ideal for laying in the ground.
Plastic. They are lighter and cheaper than cast iron analogues, have smooth surface, but less durable. Pipes for indoor wiring are gray in color; intended for external use made of orange plastic. The most popular options include:
Pipes from PVC(polyvinyl chloride). Frost-resistant and wear-resistant, main drawback– high hardness. They soften from high temperature and are mainly used in outdoor work.
Pipes from PP(polypropylene). Elastic, lightweight and wear-resistant. They are valued for their heat resistance (soften only at 140 C°), making them ideal for indoor use.

Plastic pipes for internal and external circuits
Less common ceramic And asbestos-cement analogues.
In practice, installation of sewerage in a private house is in most cases carried out using products from polymer materials(plastic). The choice is determined by the lack of corrosion (plastic is resistant to the aggressive environment of wastewater), and easy installation of structures.
How to make a sewer line
The most labor-intensive part of the work is considered to be the installation of sewerage for a private home; how to carry it out correctly is indicated in the design and installation rules.
Inside the house
Elements of the sewerage system for a private house are installed parallel to the construction of the building. Holes for internal wiring are laid during the construction of walls, partitions and ceilings.
The sewerage installation technology provides for several types of pipes:
Sewer riser, diameter 100 mm.
Main (between the riser and the outlet); diameter 70 mm.
Tap-off (connected to washbasin, bathtub, washing machine) – 50 mm.

Completed installation of the outlet pipe
The drainage system inside the house is gravity (non-pressure). To avoid blockages, pipes are installed with a slope, the magnitude of which is controlled by the level and depends on the diameter. Sewer pipe with a diameter of 40–50 mm, a slope of 30 mm per linear meter is set, with a diameter of 100 mm – 20 mm.

Completed ceiling wiring
Horizontal wiring is carried out using oblique tees and adapters (crosses) for connection. Turns are carried out using two knees with a smooth bend at an angle of 45°; This arrangement reduces the risk of clogging. After each turn, inspections (cleaning) are provided. Right angles are permissible only in vertically located structures.
Fan pipe
In case of sudden entry into the sewer large quantity drains, the latter can completely fill the entire diameter of the pipe. At the same time, when the drains go down, an area of low water is created behind them. atmospheric pressure(vacuum), into which water from the siphon and air from the room are sucked in with characteristic sounds.
When the pressure equalizes, without a water plug, the smell from the sewer enters the room through the siphons. To prevent the occurrence of vacuum, a fan pipe is installed with air valve– they are responsible for maintaining atmospheric pressure in all parts of the sewer system.
Features of the fan pipe:
It is designed and installed 50-70 cm above the roof.
It is prohibited to combine it with a chimney or ventilation.
It is not placed near windows or balconies.

Outlet of the exhaust (waste) pipe through the roof
External part
Installation of the external part of the sewer system begins after determining the location of the septic tank.
Release (the link between external and internal sewerage at the boundary of the room) is laid in the foundation of the house below the freezing point of the soil and is thermally insulated. If it was not provided for when laying the foundation, it is necessary to drill a hole for the protective sleeve, 200-250 mm wider than the diameter of the pipe. Its edge should protrude 15 cm from each side of the foundation. The space between the sleeve and the outlet pipe is filled with foam.

Laying external communications
It is reasonable to place wet rooms (kitchen, bathroom) nearby and at the same time as close as possible to the central riser. This will help reduce the length of sewer lines to the riser, which will facilitate installation and further maintenance.
A large project (swimming pool, bathhouse, sauna) and additional plumbing means a large volume of waste. A carefully designed water supply and drainage system, additional risers and septic tanks, and a pump connection will be required.
Sewage pipes in a private house can be located under the floor, in the walls, or laid on top. A water seal is installed near the sink, in the shower and in the toilet, thanks to which foreign odors will not be able to penetrate into the premises.
It is unacceptable to arbitrarily change the slope. Its increase will lead to a deterioration in the self-cleaning of the system and the appearance of loud noises. As the slope decreases, the flow of water slows down, which can lead to blockages.

Slope control when laying sewerage
The difficult terrain of the site creates additional problems for laying a pipeline with a slope. In this case, an axonometric diagram is constructed that allows one to determine the position of the sewerage elements in space. If difficult places there is no way around it, the solution is to install a pump.
You can clearly see some of the nuances of sewerage in the video:
Conclusion
Well designed and organized system sewerage will help create minimum required comfort for the inhabitants of the house. Achieving this worthy goal is facilitated by the involvement of specialized specialists. And it doesn’t matter whether it’s a wooden or brick house - the principles of operation of the system are the same everywhere.