Crafts from birch branches. DIY craft ideas from twigs and twigs. How to make a pumpkin house with your own hands with children
Read also
You can transform your interior using the simplest and most affordable materials. Why not remember the lessons of labor in primary school and not try to make interesting and unusual crafts from branches? We bring to your attention the most best ideas for inspiration.
Bouquets that won't wither
What to make from dry branches? The simplest answer to this question is a composition in a vase. We select branches of the required length and, if necessary, cut off all excess from them. Then we collect a beautiful “bouquet”. Then all the fun begins - if you wish, you can paint the branches, it is more convenient to do this with paint in a spray can. If you want to make crafts from branches for the New Year, you can depict snow and frost. There are several ways - you can just spread it required areas glue and sprinkle them with sugar, salt or foam chips. A special “ artificial snow"for decoration. You can get real crystals on the branches by immersing them in a strong saline solution and leaving them until completely dry. The composition will look interesting if you complement it with some thematic decor. These can be artificial flowers, natural or decorative fruits, bird figurines, pendants in the form of hearts or stars, bows or other elements. from branches in the form of bouquets, complement with bright leaves, rowan and hawthorn berries.
Eco frames

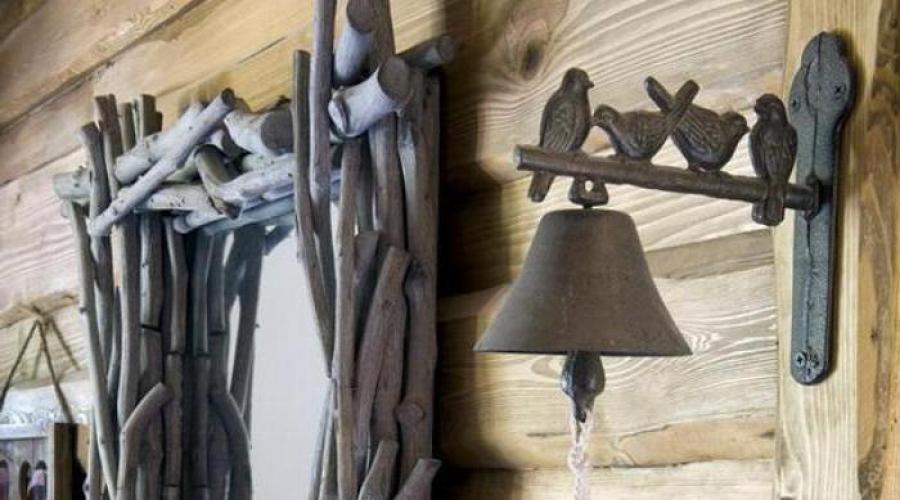
Photo frames decorated with natural twigs look incredibly beautiful and interesting. The basis the right size can be cut out of thick cardboard or cut out of plywood. A regular purchased frame with a smooth baguette will also work. Arrange the branches in neat rows and trim the ends, or create a creative mess by overlapping them. You can fix it using any universal glue. If desired, the finished frame can be varnished or decorated with some decorative elements. Using this principle, you can make crafts from branches with your own hands to decorate an entire wall or shelf. A group of similar frames with various photographs or reproductions of paintings will enliven a boring corner and make it more cozy. You can also place a mirror in a twig frame.
Decorative panels
You can also use dry branches to create paintings or three-dimensional compositions in frames. This perfect solution, if there was no vase for a bouquet of twigs. The panel can be more complex; lay out landscapes, silhouettes of animals with branches, or try to collect flowers from small pieces. You can use fabric or beautiful paper as a background. Dry seeds and fruits will look great various trees, birch bark, moss. Crafts from branches of this type can be made without a background. Make individual figures from twigs and hang them on a frame.
Crafts from branches for the interior: vases, candlesticks and much more

Do you have several jars of the same size accumulated or an old vase that needs updating? It’s not at all difficult to make original candlesticks or containers for flowers. Option one - simply cover the existing base with even branches, placing them close to each other. If such vases and candlesticks seem too boring to you, try randomly gluing a few branches to the container, and then tie them around or with a string. Candlesticks look especially impressive in this design; when the candle is lit, the light will softly break through the gaps between the rods. You can make similar ones with branches, but keep in mind that in this case your decor will wither in a few days. This idea is perfect for festive interior decoration. If the branches are fresh, cut in spring or summer, the vase decorated with them can be placed on a tray of water, and then the composition will retain its fresh appearance a little longer. Autumn branches with berries or bright leaves also look great. It is not difficult to assemble hot stands from dry twigs. To do this, take a small piece of plywood or cork as a base. square shape and glue the branches onto it, trimming them if necessary.
Large-scale ideas and unusual solutions

In home art and decor, it is appropriate to use not only small twigs and twigs. If you have the opportunity and desire, try to transform large driftwood and elements of trunks. By fixing several large branches or young trees vertically to the floor, you can divide the room into two zones. Large knots, neatly sawn and varnished, will be an excellent hanger for clothes or jewelry. Curved branches can also be used to make curtain rods or decorative decoration, decorating the doorway. Attention: it is better to make large crafts from branches with your own hands, observing all the rules of wood processing. This means that the wood should first be thoroughly dried and processed. protective compounds. Then all that remains is to show your imagination and let natural forms into the existing interior.
Crafts from branches are affordable way decorate the house, give the interior a unique coziness. Items made with warmth and love will become an original gift for friends. And if you involve a child in the process, the activity will become a real field for creativity.
Photos of crafts made from branches are distinguished by a huge variety, from which it is difficult to single out just one. There are enough ideas for everyone - elegant twigs frame mirrors, panels, flower pots, candlesticks, furniture.

You should start creating handmade beauty with the right choice of blanks.

Selecting the source material
Beautiful crafts for decoration from branches are obtained only when the source material is chosen correctly. Straight, not too dry branches are suitable for self-expression. This may be a piece of spruce or pine without resin.


It is convenient to make small figures from birch and linden. They are easy to process. The wood should not be eaten by the beetle.

It is better to choose flexible rods that contain a small amount of moisture. Sometimes forked branches that resemble forks are required. Working with them is somewhat more difficult; experience and skills are required.

Preparing branches for work
To make the product beautiful and durable, you should know how to properly make crafts from branches with your own hands. The following 2 steps are required:
Drying of raw materials. Neglecting this advice leads to warping of the craft. You can dry it for 10-14 days at room temperature, 7 days on radiator. Particularly impatient people resort to using the oven - 2-3 hours at the lowest temperature will ideally prepare the material.

Disinfection. To prevent the appearance of insects, the branches are disinfected in weak potassium permanganate.

For improvement appearance paint and varnish are applied to the material. This can be done at the beginning of the process or issued ready product.

We store the material correctly
If crafts from twigs have become a hobby, then it is important to properly preserve the preparations for future masterpieces. Prepared shoots are packaged in a container and stored in a cool place (refrigerator, basement). If the wood has dried out during storage, it can be slightly moistened with water.


When the details are ready, you can start imagining.

Decorating the house with crafts from branches
A bedroom made in eco-style will be decorated with curtain rods made from thick tree branches. For lovers unusual hallways Branch hangers with strong branches will appeal to your taste.

A floor vase with a composition of branches and cereals looks appropriate in the dining area. And the living room can be highlighted with the help of wreaths, frames, and shelves made of paste material.

The above is an incomplete list of what you can make from branches with your own hands. Let's look at the most popular options.


Making a photo frame
For a frame of branches you will need minimum set tools: dry shoots, frame base (can be cut from thick cardboard), glue, decorative elements.

Action plan:

Take one dry twig and glue it along the frame using regular glue or a hot-melt gun with a glue stick. Place the second piece next to it, securing it in the same way. We continue until the entire base of the frame is filled with branches.

We decorate corners, empty space, and overlapping branches with shells, beads, flat stones, coins, buttons, and moss.

We get a frame, to the back of which you can attach a ribbon loop. All that remains is to hang the product on the wall.

Vase of branches
We bring to your attention a simple master class on crafts from branches. This time we will make a vase:
Cut a plastic bottle (juice box, shampoo bottle) to the desired height. We break off the branches to the same size.

From thick paper cut out a blank - a backing for gluing branches. We fix it on the walls of the bottle using double-sided tape or glue. To the surface paper base paste double-sided tape and apply a piece of fabric cut to the size of the bottle.


Place the branches vertically in a row on the adhesive side of the masking tape. The length of the latter should be equal to the circumference of the bottle.

We coat the fabric on the bottle with PVA glue and apply masking tape with branches. For reliability, we tie it with twine and paint it in desired color. We decorate the vase with flowers made from ribbons and insect figures. Place the bouquet in the vase and enjoy the craft.

Christmas wreath
On New Year's Eve, it's time to create a stylish door wreath from pine cones, branches, berries and dried leaves. This element is a symbol of comfort, celebration, and hospitality. According to Feng Shui, wreaths attract good forces and good luck into the home. We present detailed instructions how to make a craft from branches in the form of a wreath.

We select materials. For work you will need spruce and Pine cones, glue, foam rubber, burlap, branches, ribbons and acrylic paints.

Cut out a circle from foam rubber with big hole in the center. We wrap the resulting “donut” in burlap, the edges of which are secured with glue. The wreath base is ready!

We glue branches, berries, and pine cones onto the fabric. We cover the product with acrylic paints.

Bend a small piece of satin ribbon in half and glue it to the back of the wreath at the top. We get a loop for hanging.

A wreath made of branches looks interesting on kitchen table. You can place a candle or a ceramic figurine in the center.

Zoning by branches
Ideas and instructions for twig crafts are not limited to just small decorations. You can create tall compositions that will divide the room into several functional zones.

To separate the bedroom from the living room, tall and fairly thick branches of bushes are used, which are fixed in the holes of a wooden stand. The result is an openwork partition that allows sunlight and involved in zoning.

Photos of crafts made from branches


Every child needs toys for his full development. You don't have to buy them in the store. It is enough to know how to properly make the same house with your own hands in order to please your baby with a new toy with which he will tinker and not make noise. for a long time.
Most available material for production - cardboard, paper, plasticine. But you can also make a house from pumpkins, chestnuts, zucchini, eggplants, clothespins and various shoe boxes, household appliances and technology.

What kind of house can you make?
You can see many photos on the theme of “House” crafts. The following wonderful toys are made for your child from improvised materials:
- Hut on Chicken Legs - made of clothespins;
- Old Man-Lesovich's hut;
- A hut in a clearing, decorated with chestnuts;
- Forester's hut made of natural materials;
- Build a pumpkin house;
- Using twigs, weave a tower.


There are a lot of ideas and all kinds of instructions for making houses, your imagination is limitless. A little skill and patience - and the craft will be ready!

Let's consider the most popular models and let's try to make them together.

Understanding what these toys can be made from and how to get started simple process, you can make a work of art. Let the house be far from perfect the first time, but every time it will turn out better and better!

A hut on chicken legs
Children like it fairy tale characters. And they will be happy to help in making a house for their beloved Baba Yaga. For this craft we will need the following components:
- Dried moss;
- Opened spruce or pine cones;
- Pre-prepared (ironed) leaves;
- Dry berries;
- Clothes pins;
- Plasticine;
- Glue.


Making a Hut on Chicken Legs with your own hands
Let's show a simple diagram by which you can assemble this beautiful house for Baba Yaga. You can use other templates, but this one is the simplest and will not cause any difficulties in making for either an adult or a child.

So, step by step instructions:
- We take apart the wood chips and glue the house together. It is best to use “liquid nails” for this;
- Place the assembled Baba Yaga's Hut on a piece of cardboard and cover the space around it with moss;
- We glue the leaves of the berries onto the roof. We also place the remains of the moss there;
- We paint the cones in green color, glue them also to the cardboard. These will be our Christmas trees;
- We sculpt various animals - bunnies, squirrels from plasticine.

The scenery and creation of the atmosphere of a fairy-tale forest are important here, because we are creating Baba Yaga’s hut, which, according to the fairy tale, is located in a place inaccessible to outsiders.


Old Man-Lesovich's hut
Making such a house together with your child may take several days. Spending time together like this brings parents and their children closer together. So what can you make such a craft from?

Let's list the main components that we need and get started with the process:
- You will need pastry packaging for a cake or cookies. We decorate it with the remnants of old wallpaper, creating an autumn forest background. With the help of matches, acorns, cones, we make forest inhabitants - Lesovich himself and his friend the hedgehog.
- We make the house from a kefir box, and cover the walls themselves with large dill sticks to create the effect of logs. The hedgehog will live under stumps, which can be made from cutting branches.
- We make a path leading from the house to the pond using colored semolina and bean grains. We create the effect of water using colored paper, and pebbles using plum seeds.
- We decorate the forest and clearing with pieces of moss, dry twigs and leaves.

Hut in the clearing
We will hold another master class on crafts on the theme “House”. This time the design will be more complicated, and the pleasure can be extended for a long time.

For this we need:
- Scotch;
- Cardboard box;
- A couple of kilograms of chestnuts;
- Dry branches;
- Glue;
- Berries;
- Pen;
- Multi-colored fallen leaves;
- Scissors;
- Needles;
- Wire.

Hut in the clearing: making it step by step
Let’s start making the next craft together with our child, instilling in him useful skills and curiosity.

We assemble this toy in the following sequence:
We are making the foundation on which our house will stand. For this it uses cardboard box. We prepare a square 400x400 mm. We cut out the elements of the house from cardboard and connect them with tape. We attach it to the base.

We cut out windows and doors from pieces of snow-white paper. Glue it. We draw curtains with a pen. We decorate all the walls with chestnuts. We design the roof and ground around the house using colorful leaves, pine needles and berries.

Thus, you can make a house from almost any material by connecting the necessary components into one whole using tape and glue. Or - cut from pumpkin, watermelon, zucchini, eggplant.

There are many manuals and master classes on this topic on the Internet. Many lessons are accompanied by excellent explanations of what and how to do correctly in order to assemble a good and high-quality toy.

The new time spent together will delight the child, and he will enthusiastically help in collecting it for a long time. And then – have fun playing!

Photos of crafts houses


DIY crafts made from tree branches are an excellent and easy-to-implement way to decorate your home and make the interior truly unique. Such crafts can also become an original gift for loved ones, and if you involve children in the process, the activity will become a true field for creativity!
On a note! The variety of crafts made from branches is impressive, as you can see for yourself by looking at the photo below, and therefore it is not easy to single out just one option. There are so many ideas that there is enough for everyone!

But before you create such beauty with your own hands, you should take care the right choice blanks

How to choose branches to work with?
To do beautiful craft, it is worth choosing the right source material. Straight, not very dry branches are most suitable - for example, part of a pine/spruce tree (but it is important that without resin).


If the craft is small, then it is convenient to use linden or birch to make it, since such wood is easy to process. It is also important that the branches are not eaten by beetles.

It is also important that the rods are flexible and not big amount moisture. Sometimes forked branches (like forks) are needed, but working with them is more difficult - skills and some experience are required.

How to prepare branches?
To create a durable and beautiful product you need to know about proper preparation branches to work. The following steps are required!
Table. Stages of preparing branches.
| Name, photo | Short description |
|---|---|
| If the branches are not dried, the craft will warp. Drying should last from 10 to 14 days (if the temperature is room temperature) or a week (if you put the branches on the radiator). There is another option for those who are especially impatient - use the oven. In this case, a few hours at a minimum temperature will be enough. | |
| To prevent insects from appearing on the craft, the branches are disinfected with a weak solution of potassium permanganate before starting work. |


Craft - a fence made of branches
The appearance of the craft can be improved by applying varnish or paint. Moreover, the processing can be carried out both at the beginning of the process and with the finished product.

Storage rules
If you do crafts regularly, i.e. it has become your hobby, then learn proper storage blanks Pack the branches selected in accordance with the requirements listed above into containers and keep them in some cool place (in the basement, for example, or in the refrigerator). If they dry out during storage, you can moisten them a little with water.

After preparation source material you can start fantasizing.

Decorating your home with original crafts from branches
To decorate a bedroom decorated in an ecological style (or eco-style), you can use curtain rods made from thick branches. The hallway can be decorated with branch hangers with strong knots.

Note! Dining area can be decorated with an unusual floor vase made from cereals and branches. And for the living room, wreaths, shelves, and various frames are suitable.

This is, of course, far from full list what you can make yourself from branches. Let's take a look at the most popular ideas.

Option #1. Photo frame
To make a frame from branches, you need:
- the branches themselves;
- glue;
- base (you can cut it out of thick cardboard);
- decorative elements.
Prices for gun hot glue
Glue gun

The algorithm of actions will look something like this. To begin with, one branch is glued along the frame (you can use a heat gun or regular glue), a second one is placed next to it and fixed in the same way. Work continues until the entire base is filled with branches.

The voids, overlaps and corners are decorated with beads, coins, small pebbles, shells, moss, etc.

As a result, you will receive a frame. You can glue a ribbon in the form of a loop to the back side of it to hang the finished craft on the wall.

Option #2. Vase of twigs
There is nothing complicated in making such a vase. Plastic bottle(although you can use a shampoo bottle, juice carton, etc. instead) cut to the required height; Prepared branches are broken off to the same size.
Next, a base is cut out (a kind of backing to which the branches will be glued), for which a sheet of thick paper is suitable. The backing is attached to the bottle with glue or double-sided tape. Next it is glued onto the paper Double-sided tape, and on it, in turn, a piece of fabric (it needs to be cut according to the size of the bottle).

On a note! The branches are laid vertically, it is important that the latter has the same length as the circumference of the bottle.

PVA glue is applied to the fabric on the bottle, after which masking tape with twigs is applied. For extra security, you can tie everything with twine, after which all that remains is to paint it in the required color. You can decorate such a vase with various insect figures, decorative flowers made from ribbons, etc. At the end, place a bouquet in a vase and enjoy the beauty made by yourself!


Option #3. Christmas wreath
IN Western countries houses are often decorated with such wreaths. They look really beautiful, and therefore are definitely worth considering original version making a wreath from branches.

To begin, prepare:
- willow branches;
- decorative tape;
- cones;
- scissors;
- special wire (it is called floral wire);
- garden shears;
- lotus seed pods;
- twine;
- St. John's wort branches.

Step 1. First, cut a piece of wire and wrap it around several branches (you need to make it in a dense layer).

Step 2. The second beam is created in a similar way.
Step 3. One longer bundle is made from two blanks.

Step 4. To make the fixation more reliable, you can cut off another piece of wire.

Step 5. The blank is bent and given the shape of a wreath (see photo below).

Step 6. Fix the workpiece with wire. You need to act carefully so that the wire does not stand out against the background of the branches.

Step 7 Cones prepared in advance are attached to the workpiece using the same wire.

Prices for side cutters
Side cutters
Step 8 The composition is decorated with seed boxes and branches of St. John's wort. To make the fixation more reliable, use a heat gun.

Step 9 A couple of branches of St. John's wort are attached to where the willow branches meet.

Step 10 Take a tape and cut a piece of the required length from it. The wreath is wrapped with ribbon, a knot is tied, and the ends are trimmed (but so that they hang down a little).

Step 11 Another piece of tape is cut off and wrapped around the same area. If you want, you can additionally make a large bow. That's it, the wreath is ready, now it will become a great decoration for your home!

Video - Original crafts from dry branches
Option number 4. Beautiful lamp made of branches
We offer another master class on creating an original autumn lamp.

To make it you need:
- dry branches (it is important that the length/size is different);
- old lampshade;
- acrylic paints;
- vase;
- heat gun;
- alcohol;
- lamp, wires to it;
- glitter;
- tassels;
- cones;
- basis for future construction.

Step 1. The vase is treated with alcohol, after which branches are glued to it using a heat gun.

Step 2. Branches are gradually added, but it is important to leave small area without them.

Step 3. A lamp in a lampshade is lowered into a glass vase.

Step 4. Branches are glued to the area without branches that was left earlier.


All, original lamp ready for further use!
Step 6. If desired, the branches can be additionally painted. In our example, this is done with white acrylic paint.

This is what the craft looks like after painting.

Step 7 If the vase will be used in winter, then it is better to use silver paint; Additionally, you can use glitter for decoration.

Step 8 Fans Scandinavian style can apply several shades at the same time. For example, pink and white - great combination for this composition.


Option #5. Branches for bouquet decoration
It is always the flower arrangements. And there is nothing surprising in this, since each such composition is unique. Let's look at how to decorate a bouquet in an original way using branches.

To work you will need:
- the branches themselves (including those with leaves);
- decorative tape;
- flowers;
- pruner;
- wire cutters;
- decorative wire.

Prices for secateurs
Step 1. First of all, the branches are cut - they should ultimately have the same length. Then a couple of pieces of wire (also the same length) are cut and folded in half. A stick is placed between the pieces of wire; one turn must be made on each side. This way it will be securely fixed.

Step 2. The remaining sticks are added one by one.

Step 3. The ends of the wire are securely fixed. The result will be a kind of path made of sticks.

Step 4. The finished path is laid on the table, branches with leaves and flowers are evenly distributed on it (as in the image below). The distance between them should be small. After this, the track curls, but not very tightly.

Step 5. The ends of the track are connected using a small piece of decorative wire.

Step 6. The composition obtained in this way is decorated with a bright satin ribbon.

Step 7 The finished composition is placed in a low glass container filled with water. Thanks to this craft, even the simplest and most monotonous interior will be transformed, filled with freshness and lightness!

Option No. 7. Decorating an old screen with branches
To give a second life to an old screen, follow a simple step by step instructions given below.

To work you will need:
- the screen itself;
- white acrylic paint;
- lace fabric;
- stapler;
- tassels;
- branches;
- scissors;
- heat gun.


Stapler prices
Construction stapler
Step 1. First of all, the fabric is removed from the screen. Wood elements are coated with two layers acrylic paint, after which you need to wait for it to dry completely.


Step 3. A piece of fabric is attached to the screen using a mounting stapler. The fabric should be taut so that it doesn’t end up sagging.


Step 4. The branches are attached to the frame using a heat gun.

Step 5. If you wish, you can additionally use cones various sizes and thin branches.


Step 6. The finished screen will decorate any room and will definitely attract the attention of your guests!

How to zone space using branches?
As mentioned earlier, ideas for crafts from branches are not only small decor. If desired, you can make tall compositions, with which you can divide the room into several functional zones.

To separate the living room from the bedroom, thick and tall branches of bushes are often used, fixing them in the holes on the wooden stand. The result is an openwork partition that allows light to pass through and takes part in zoning.

As a conclusion. Photos of crafts made from branches


Video - What can be made from branches: the best ideas
In order to make the interior of your home individual and a little creative, you don’t have to buy expensive designer items. In order to make it like this, it is enough to use ordinary branches trees for decoration.
Original lamp made from dry twigs
Few people think about this option, but in vain, because dry branches are a very beautiful and sophisticated material with which you can create many original things for the home with your own hands. Tree branches will look very good and appropriate in any room, be it a bedroom, living room, bathroom, hallway or kitchen. They are perfect for decorating candles, decorating mirrors, creating an original cornice or hanger for things. Here everything depends only on your personal imagination!
However, before you make decor from tree branches with your own hands, it is worth remembering that only dry branches are suitable for creating it, otherwise, otherwise, you will have to dry them. It is not necessary to use the branches in their original form; they can be:
- coat with wood varnish,
- paint with spray paint,
- or regular enamel in any desired color.

We offer you several original ideas What you can make from dry branches for the interior with your own hands does not require any special skills, you just need to find a beautifully shaped branch.
Partitions in the room
An interesting and very original screen for zoning can be made from equal length, even dry branches. On final stage, it is better to varnish such a partition; thanks to this, the finished product will acquire a certain charm. Such zoning will look not only interesting, but also very stylish. In exactly the same way, you can make a screen in the bedroom from identical branches.

Curtain made of branches for zoning

Eco-curtain for the bedroom
Headboard
The most important thing in the execution of such decor is to treat the branches well so that they do not fall off on the heads of the sleeping person in the future. You also need to secure them well so that they do not move when the mattress moves.

Boho style for the bedroom

Raw branches for the head of the bed

Birch is ideal for the bedroom
Wall decor
Painted dry branches with a large number of branches can be an excellent decoration for the living room.
- The main secret of this decor is that the branch was a contrasting color to the wall.
- If the wall is dark in color, then the branch should be either light, or with a metallic sheen, but if the wall is in a light tone, then it is better to use branches in their original color or painted in dark colors.
- Also consider illuminating this wall decor. Can be used for illumination small candlesticks attached to a branch with glue, spot lighting on the ceiling or a garland randomly wrapped around a branch.
It is thanks to the lighting that such an unusual and rather original version of wall decor looks very impressive and can transform an ordinary wall to the stylish part of the room.

Birch in the interior

Branches in the interior
Kitchen decor
Dry branches will look very appropriate in the interior of the kitchen. So old batteries can be perfectly disguised with a screen made of dry twigs of the same length. A panel made of dry branches, which can be quite large, will also come in handy in the kitchen.
like this the right thing Like coasters for hot dishes, it’s very easy to make yourself from ordinary branches. Quite cute and original look have fridge trinkets that can easily be made from small twigs and then glued to magnets. Its interesting and non-standard decoration of the kitchen with branches will add a special atmosphere.

Kitchen decoration
Bathroom decor
Dry branches can be used to make very practical decor in the bathroom; it can be a large shelf on the entire wall where you can store bathroom accessories, or a ladder on which you can hang towels. Or it can be small branches that will act as hooks; it is very convenient to hang bathrobes and towels on them. A dry twig can also be used as a toilet paper holder.

Original towel hangers

toilet paper holder
Furniture
Dry branches, as well as their cuts, can be used as furniture decor. The tables look incredibly elegant and stylish, the basis of which are thick branches, and the table top is made of clear glass. Dressing tables and coffee tables can be covered with cuts from dry branches; they turn out not only beautiful, but also very comfortable. For example, take a look. 
Decorative lamp
So many different ideas exists to create lighting fixtures. Lamps with branches in them look very beautiful different diameters used as a base.

A thick dry tree branch equipped with light bulbs will make any room more comfortable. This eco-style element will perfectly complement modern interior, and will make him close to nature.
Look great Wall lights And desk lamp decorated with dry branches. Such lighting made from natural or painted branches will fit perfectly into the most different interiors, ranging from simple to exclusive designer interiors.

Unusual lamp on a large branch

Designer table lamp


Night light on a branch

Lamp for working on a tree branch

Lamp base made from old driftwood
Shelves for storing small items
Very cute and pretty practical shelves for storing books, souvenirs, jewelry and other small items can be easily made from dry branches. Such decor just needs to be well fixed on the wall and complemented with decorative elements. finishing materials. Also, a wooden trunk can become the basis for several shelves in the form of a partition.

Shelves for small items


Untreated birch shelf
Branch hangers
Dry branches make excellent and very convenient wall hangers, as well as hangers and hangers. These can be not just knots that look like hooks on the walls, but also unusual wall and floor hangers for hallways and bedrooms. Thus, thick branches with shoots can serve as very convenient vertical hangers for clothes, while thinner ones can be placed along the wall.

Clothes hanger

Original wardrobe hanger

For outerwear

For costume jewelry

Great idea for a store
Cornices
Non-standard and very interesting window cornices can be made from thicker branches or thin tree base. Curtains with large hooks or loops to match the curtains will look very nice on such curtain rods. This decor will bring creativity to the interior and create a certain homeliness.

Cornice for pots

Wooden curtain rod
Panel of branches
To create such decor requires a lot of energy, in contrast to simply making a “bouquet” of branches in a vase. Initially, you need to come up with a composition, for example, a heart or a bird, or a star, and then start implementing it. You can make this kind of decoration from dry branches with your own hands, and it is unlikely that anyone else will have it.

Decor from branches “Heart”
Pictures and frames
Unique and unique paintings can be made from dry branches. To do this, you need to attach the branch composition to the wall and then surround it with a beautiful frame. You can decorate a photo frame with thin twigs or their cuts, pasting it in a circle. You can decorate a mirror in exactly the same way, which will look great on the walls in the hallway.

Composition of branches and picture frame

Branches in floor vases
Floor vases with dry branches look very impressive and stylish. Long branches in transparent vase will perfectly replace any other decor, attracting glances.

Decorative branches for floor vases
Vase decoration
Vase decor made from dry branches is a very stylish way to complement the interior of a room in Scandinavian and eco-style. You can use branches of the original color picked from the ground, but they do not look as attractive as if they were painted. When starting to color them, it is better to choose the color for the branches in accordance with color range room interior. The most spectacular and stylish colors for this purpose will be gold, silver, white and black. Such original vases with decorated branches will look good on shelves, coffee tables and nightstands near the beds.

Stylish candlestick