From moles repeller turntable. How to make do-it-yourself mole repellers from plastic bottles and other materials. Master class spinner from a plastic bottle

Read also
Electronic mole repellers in some cases cannot cope with moles, which can adapt to such devices and not notice their actions. Then a radical method will help you, which surpasses all known means in power. It will definitely help you get rid of moles, while the animals will remain safe and sound and just leave your garden.
Blogger Lawyer Egorov, tried many standard ways to deal with moles and, disappointed in their effectiveness, came up with an author's method. Traps, poisons and traps are cruel methods. Exhaust fumes and other exotic innovations are ruining the lawn. Animals have adapted to electronic scarers.
Every year, when the water in the canal dries up, a family of moles comes to the garden to the author of the idea. By sticking a nozzle into a hole in the ground and turning on the device for 10 minutes, he makes annoying animals leave their shelter and run away outside the garden. You can increase the power of the repeller if you pour water into the hole, then its action will be effectively manifested over a larger area.
How long does the ultrasonic repeller work? As experience shows - no more than three seasons. Have to buy a new one. And the deep vibrator in comparison with them is eternal. In addition, it is useful for work for its intended purpose. The cost of the internal vibrator turned out to be cheaper than the cost of all the repellers that had to be used for several years.
If you are only ready for such humane ways, then chances are that you have a pet. There is about a three-room apartment for hamsters.
How to permanently get rid of moles in a summer cottage?
Though mole and brings many benefits in nature, but in summer cottages it is a real scourge. Which is not so easy to get out of your garden. It is necessary and possible to fight the mole! If you do not fight, then you will be deprived of part of the potatoes, for example, one mole prepares stocks for the winter that reach up to 40 kg of potatoes, and how he loves carrots and red beets. Yes, this is my entire crop!
And he also loves to feast on worms, which do a lot of good for us, loosen the earth and saturate it with oxygen. Plus, most of your root crops will be destroyed, as they will most likely be in the path of the mole.

Ways to deal with the mole I know a lot, something I used myself, something my neighbors. Really working and really funny!
Personally, my method is simple prevention in quotation marks. Around the perimeter of the garden, I always plant onion and garlic. It not only saves from moles. And also some plants, for example daffodils and beautiful and safe.
And so, the usual rattles in the form of cans on strings have always been disliked by moles. They can't stand loud noise.

But I brought out my uninvited guests with the help of a pungent smell, with the help of herring))
I bought a kilogram of salted herring, took it out into the street and gave it time to lie down so that it would give a “good” smell, or rather rotten. And then she tore the mounds of moles and threw into the trench a piece no longer than 5 cm long. From such a stench, I myself would have run away.
She threw it into almost all the holes, and repeated the same the next day when the mole began to leave. On the third day, he was already outside my summer cottage, forgive me neighbor Ivan Ilyich))
I know that now there are electronic mole repellers. But they should be chosen carefully, many do not bring any benefit. It is better to read reviews about them, and then buy.

There was in my life a funny case of fighting a mole. A whole family of moles settled with a relative, the site was like after an air raid. Krotov did not take anything. And since they feed on insects and some root crops, it is difficult to feed them with pesticides. The relative was so desperate that no method worked that he took a vibrating plate from a friend. And the moles are afraid of sharp sounds, but here it’s just an earthquake)) Having started at lunchtime, from the beginning and gradually moving towards the mole holes, by the evening he had collected half a bucket of mole brood. He says the moles almost jumped out of the holes. Here is such a physically difficult way, but effective! Best regards © Babushka Manya…
Very relevant for summer residents is the issue of fighting moles. These, at first glance, harmless creatures can cause great harm to the garden and the products that are grown on it. Therefore, many puzzle over how to solve this problem. Despite the mass of means and devices from moles in the city, there is one simple option that everyone can afford.
You do not need to be a skilled craftsman to create this tool, and the whole work will take about 20 minutes at most. Intrigued? Then let's find out how to make a mole repeller from a plastic bottle.
Looking for Solutions
There are a lot of requests on the Internet on the topic of rodent control, especially moles. Everyone wants to make sure that they no longer face this problem. However, not everyone knows how to act in such a case. Killing animals is not entirely humane, so poisons and other killing devices will not work. Often, gardeners run to the store to ask for advice or buy an effective and at the same time inexpensive remedy. Others go the easier way, making a mole repeller with their own hands.

But how can a plastic bottle scare away moles? Everything is simple. You only need to upgrade it by building a kind of blades from a bottle that will make it spin. During rotation, the turntable will make noise. The design is pretty simple:
- Plastic bottle.
- Stick.
That's all you need. The container is mounted on a stick or rod, after which it will spin under the influence of the wind. Due to the fact that the rod is deepened into the ground, vibration and noise scare away moles. For the garden, you can make a lot of such products, the cost of which is simply meager. And most importantly, you do not need to spend a lot of time. Let's look at the instructions on how to create this simple miracle of technology.
What is required for work
The advantage of a plastic bottle repeller is that you will need a minimal set of tools and materials. Everyone can work with them, and acquiring them is not a problem at all. You can see for yourself. Here is a list of everything you need:
- plastic bottle;
- steel bar or wooden stick;
- stationery knife or scissors;
- drill with a drill (in some cases it is not required).

That's the whole set. Are you surprised? Not worth it, because for all its simplicity, the mechanism works flawlessly. You just need to connect all this into one device.
Note! The device is automatic, but it works only from the wind. In calm calm weather, it will be simply useless.
Step-by-step instructions for creating a mole repeller
So, when you have everything you need, you can proceed. The bottle can be of any color, shape, displacement ... It's not so important. Provide yourself with a comfortable place to work. It is best to do everything at a table on a flat surface. Then no problems will arise. The instruction is as follows:
That's all, the device is ready. Now you just need to find the mole's tunnel in order to put the rod into it. Due to the vibration and sound transmitted from the bottle along the rod to the ground, the moles will not approach this place. They are afraid of such aggressive noises. If you have a large garden, then make several designs to eliminate the appearance of moles in another part of the garden.
Advice! Such a repeller will act not only on moles. Birds and other rodents are also very afraid of such noise. Therefore, you can not be afraid that our smaller brothers will devour your crop.

The mole is a predator by nature. Its diet consists of larvae, small vertebrates, worms and insects. He also loves caterpillars, bears and wireworms. He can get to them by breaking through long underground passages. As a result, the excess land, formed in the process of painstaking work, is pushed up by the animal. This is how mounds unloved by gardeners are formed. It is noteworthy that he eats precisely those pests that are capable of destroying the future crop.
However, accompanying problems appear - in search of something edible, the mole digs long tunnels in the ground at different depths. Labyrinths, laid in the thickness of the earth, damage the roots and disrupt the natural microenvironment near the root system of plants. And the earthen heaps that appeared on the surface spoil the appearance of the site. In general, it becomes obvious that the animal does more harm than good, and then the question arises of how to get rid of moles on the site.
general information
A large number of moles appear in the gardens in the first half of summer. This is due to the fact that the upper earthen layer of forests and meadows becomes scarce and depleted. And garden partnerships and summer cottages with their fed “fat” land, teeming with all living creatures, attract moles like a magnet.
During a short hunt for their food, a mole can dig up the entire area up and down, while spoiling the garden, beds with crops or a beautiful lawn. To prevent this from happening, you need to know how to get rid of an uninvited guest. If you do everything consistently, a positive result will be unambiguous and the mole will leave the area where he is not welcome.
It is believed that moles are afraid of unpleasant odors. As a result, some summer residents water the garden with carbide and kerosene, scatter rotten fish around the site and use smoke bombs. However, such methods are unlikely to suit good gardeners - how can you have a good rest on a site where it constantly stinks of rotten meat and kerosene ?! Therefore, people are looking for alternative ways to fight.
Attention! Industrial enterprises have developed and produce various kinds of electronic repellers. But their price is quite high.
Experienced summer residents know that moles cannot stand various kinds of noise. They don't like the sound of metal, crackling plastic, or the ticking of an alarm clock. It was these features of the character of the animal that served as the theoretical basis for the creation of various kinds of mole repellers.
Do-it-yourself mole repeller
Since the task is not to destroy the mole, but to evict it from a certain territory, for this purpose they use not all kinds of poisons and chemicals, but "noise makers". How to make a mole repeller with your own hands? In fact, it is not difficult and there are several varieties of noise structures.
Materials from which this device can be made:
- plastic bottles;
- tin cans of various shapes;
- ultrasonic and electronic devices;
- electric alarm clocks.
The leading place among homemade repellers is occupied by those made of plastic.
The simplest device in the fight against moles for their territory is an ordinary plastic bottle worn on a metal pipe. Under gusts of wind, a plastic bottle makes an unpleasant sound, transmits vibration through the pipe. They are heard in the underground passages of the animal and he does not like it very much. It should be noted here that wooden sticks are not suitable for these purposes, since they conduct sound worse than iron.
Windmill from a plastic bottle
A difficult option is a mole repeller in the form of a windmill. This is a kind of weather vane that works under any direction of the wind. With his impulses, he makes an unpleasant sound that scares away moles.
Windmill from a plastic bottle
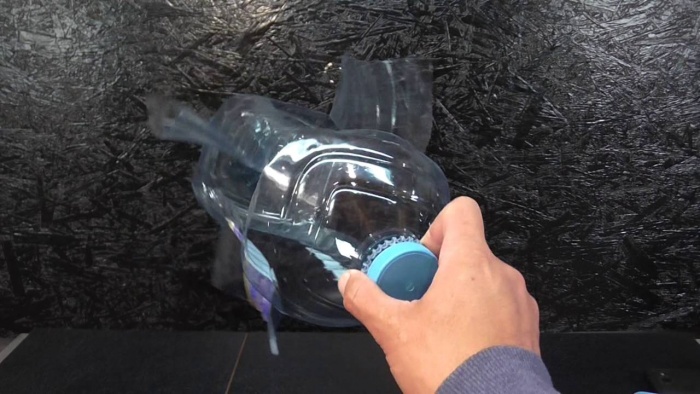
A mole spinner from a plastic bottle is made as follows:
- An ordinary beer bottle with a volume of one and a half liters is taken. Its form should be classical.
- The bottle is turned over and the bottom is cut off with sharp scissors. As a rule, the classic bottle shape has a strip near the bottom. It is on it that the cut is made.
- The finished cut bottom is turned upside down and a marker or felt-tip pen draws lines along which further cuts must be made. Or rather, remove some of the plastic. The bottom has a central circle from which five rays diverge. It is necessary to make markings from the border of the circle to the middle of the beam. Also from the middle of the circle and in the middle of the depression between the rays. This piece in the form of a half beam must be cut out.
- This manipulation is repeated with the remaining rays. And now the turntable is ready.
- Exactly in the center of such a propeller, a hole is punched, which should be perfect, without torn edges.
- A self-tapping screw is inserted into the turntable (the cap is directed inward) and screwed into the center of the bottle cap. Twist until it stops until the thread ends. To make the fixation more rigid, it is possible to add a nut on the reverse side.
- On the neck of the bottle, strictly marking the center line, two holes are made for the nail. They must be against each other.
A do-it-yourself windmill from moles is almost ready. It remains to fix it on a pole and stick it in the ground.
To make the scaring stronger, they take a metal pipe and dig it into the ground below the level of the mole's moves. They stick a pole with a weather vane into it, and fasten it tightly to prevent vibrations. The sound of a ratchet, which is unpleasant for the hearing of a mole, will scare him away from an inhospitable area.
Tin Repellers
It's easy enough to make it. If you imagine the sound of regularly beating metal on metal, it becomes clear that it cannot be pleasant. The mole definitely does not like this sound.
Tin Repellers
But it’s enough to stick a piece of rebar or any other “iron” stick into the ground and hang a beer can on it. Under the wind gusts, the bank will beat against the metal of the rod and the sounds of blows will go deep into the ground. Such a musical performance will again make the mole say goodbye to the garden.
You can also string on a rope any number of the same beer cans you like. The main thing is that the distance between them allows them to knock against each other in windy weather.
How to make a mole spinner from tin cans? It is made by analogy with a turntable from a plastic bottle. Here, the blades are cut with scissors and bent outward. Despite its small size, such a repeller will be loud enough and will quickly drive the mole out of the area.
Attention! As for ultrasonic devices, people with some experience can make them on their own.
Those who wish to have an ultrasonic mole repeller on their site should contact professionals who are well versed in physics and electronics. Because explaining to an amateur how to assemble such a device is not too easy.
Such devices create vibration inside the soil. Only the mole and other underground inhabitants can hear them. The human ear does not recognize ultrasound noise. But the excellent hearing of the animal will immediately suffer. The mole will stop earthworks in this direction and turn the underground passage in the other direction.
Sound waves that have an electronic source act like all mechanical devices. Except that a certain scheme controls them. Sometimes devices with electrical noise have a vibration motor that can increase the power of sound underground. You can buy different types of ultrasonic devices against moles in specialized stores, but the cost can scare off ordinary summer residents.
How are mole alarms used?
Repelling moles from a summer cottage with the help of a clockwork is already a proven and most importantly effective thing. To do this, you need to purchase an inexpensive battery-powered alarm clock, or better not one. Different ring times are set on the clock. Then they are placed in glass jars with screw caps. Such a "gift", previously checked for tightness, is buried in different places of the site. Moles are very annoyed by the endless ticking of the clock, and even more so by the alarm clock. In such a simple way, the mole alarm clock helps a lot.
A slightly more complex variation, again using a clock, is also considered very effective. To make such a homemade clockwork repeller, you will need a wide pipe (half a meter). On its sides, holes are drilled in the lower part. The pipe is buried with one side into the ground, below the level of the underground corridors of the mole. An alarm clock is lowered into the pipe itself, to which a rope is tied for the convenience of further extraction. The ticking mechanism creates an ultrasonic effect inside the pipe. And the mole is forced to leave the area.
Thus, using an alarm clock against moles, you can get rid of them one hundred percent. The main thing is to wait until the enemy's nerves give up, and he retires from the battlefield.
As you can see, various kinds of noisemakers perfectly repel moles. It is the annoying sound that complicates their life in a certain area. Most importantly, the methods are repeatedly proven and effective. Using them it is quite possible to get rid of these creatures in your garden once and for all.
In the described design, to scare away rodents, the principle of creating vibrational vibrations in the ground is used - this alarms them and they leave in search of quieter places. One of the easiest ways to create vibrations is to stick wooden or metal pins into the ground with weather vanes-windmills attached to them. But you can try to apply "electronics" and use a vibration motor instead of a windmill. Special power is not required here, and for better efficiency and coverage of a larger area, it is enough to increase the number of such repellers. As vibration motors, you can use both ready-made “vibration alerts” from cell phones, and more powerful, but requiring little refinement, low-voltage motors from old cassette recorders or car radios (the refinement itself consists in fixing a small eccentric on the shaft).
The easiest option for this design is to take a 6-12 V battery and connect several vibration motors to it ( fig.1). The battery must be of adequate capacity and should last for several days of operation. Of course, you can take several batteries and change them as they are discharged, or simply connect each battery to its own vibration motor - this option has fewer problems with wires.
For even more economical use of the battery, it is necessary to assemble a motor control circuit that ensures their intermittent operation - for example, switching on for 0.2 ... 0.5 seconds after pauses of several seconds. On the figure 2- a photo at the stage of layout of such a scheme, on Figure 3- the resulting circuit for controlling one vibration motor.


The principle of operation of the circuit is simple - on the elements DD1.1, DD1.2 and DD1.3, a generator with a changed duty cycle of the pulses is assembled (approximate time characteristics are shown in figure 4). The frequency and duration of the pulses can be selected within a wide range by selecting the values of the capacitor C1 and resistors R2 and R3.

Element DD1.4 is a buffer element, the voltage from its output is supplied to an emitter follower assembled on a transistor VT1, the load of which is the motor M. Resistor R5 is a current-limiting resistor, its resistance and overall power dissipation is selected based on the electrical parameters of the motor. Diode VD3 protects the transistor from pulses of reverse polarity, which may appear if the motor shaft continues to rotate by inertia with the transistor already closed. When using the motor shown in figure 5, such impulses did not occur (two such engines were removed from an old car radio).

The +12 V supply voltage is supplied to the circuit through the VD4 diode - this is a kind of protection against accidental polarity reversal when connecting the wires to the battery. Capacitor C2 acts as an interference suppressor, C3 - storage (smooths out ripples in the power supply when the engine is running).
The maximum current consumption of the circuit when using the shown motor reaches 90 ... 100 mA at the start of rotation. Therefore, in the case of high consumption currents, in place of the transistor VT1, either a high-power composite transistor (for example, KT829) should be placed or assembled from two as shown in figure 6. The capacitance of the capacitor C3 should be increased to 330 ... 1000 uF, and the value of the resistor R5 should be reduced.

As mentioned above, motors from the tape drive mechanism of the car radio, as well as from the old Soviet tape recorder and from the CD drive, were used as vibration motors. M5-M6 nuts, short metal racks and self-tapping screws of approximately the same mass were used as an eccentric (seen on fig.5). All this was glued to the motor shafts with hot glue and then wrapped with insulating tape. The "vibrate" from a cell phone was also tested and everything worked fine, but it was not used in the repeller, as it was planned to be used in other experiments.
All these scarers fig.7) were collected at the request of a summer resident neighbor. Then, after a while, he asked to collect a few more pieces - it turns out that the moles that bothered him went to neighboring dachas and now their owners also have something to do. As can be seen in the figure, the vibration motors and boards with electronics were placed in plastic cases of suitable size and fixed on wooden and metal pins-poles (the metal ones are the remains of the “thresholds”, about 60 ... 70 cm long). The neighbor says that he also covered them with plastic bottles cut in half on top - this is both protection from rain and getting additional vibration from the fact that the bottles are dangling in the wind.

Attached to the text are the layout files of two variants of printed circuit boards in the format of the program - one option for surface mounting with lead-out parts, the second - with partial use of SMD components. The drawing of the "low-voltage" SMD version is drawn from the side of printing and when using it, you will need to turn on the "mirror" mode.
Andrey Goltsov, r9o-11, Iskitim, summer 2017
List of radio elements
| Designation | Type of | Denomination | Quantity | Note | Score | My notepad | |
|---|---|---|---|---|---|---|---|
| Figure #3 | |||||||
| DD1 | Chip digital | K561LN2 | 1 | To notepad | |||
| VT1 | bipolar transistor | KT315B | 1 | To notepad | |||
| VD1, VD2, VD3, VD4 | rectifier diode | 1N4002 | 4 | To notepad | |||
| R1 | Resistor | 10 kOhm | 1 | To notepad | |||
| R2 | Resistor | 200 kOhm | 1 | To notepad | |||
| R3 | Resistor | 5.1 MΩ | 1 | To notepad | |||
| R4 | Resistor | ||||||