Small bathhouses for the dacha - several interesting projects for self-construction. Comfortable mini-steam room in a private home or country house with your own hands: step-by-step technology for arrangement Homemade mini bath
Read also
Everyone who has suburban area wants to make the most of his space. And to lay out a garden and plant a vegetable garden and have a house. And for rest and relaxation, of course, you definitely need a bathhouse.
Mobile sauna trailer - an ideal mini-tower option
There is absolutely no reason to be upset and upset if the area of your site is not large enough to build a bathhouse of standard sizes. You can consider the project compact bath mini at the dacha. A small sauna built with your own hands meets the needs of steam lovers just as much as a standard one. And in terms of saving free space and material costs, its construction will certainly be of interest to the thrifty owner.
How to determine the size of a mini bath?
If the ground is sufficiently dry and hard, then you can use a simplified version of the foundation. First, flat stones are laid around the perimeter of the future structure, then with the same stones - the internal space of the foundation. Free places between the stones they are filled with clay and compacted thoroughly. A layer of wooden beams is placed on top, treated over the entire surface with hot bitumen.
Walling
Arrangement of water supply and drainage
Heating system
Ventilation and lighting of mini baths
Single mini sauna on the street

Mini sauna - barrel without foundation
To assemble such a bathhouse, you will need lightweight insulated panels, which are a frame made of wooden beams covered with thin boards. The size of one frame is 185x60 cm, and in its manufacture they use timber with a cross-section of 3x6 cm and boards 1-1.5 cm thick. To insulate and provide heat and vapor barrier, the panels are filled with foam plastic or mineral wool, closing it from the inside plastic film or aluminum foil. The outer side is covered with glassine or roofing felt. Then the panels are covered with clapboard.
Mini sauna indoors

Cabin - mini sauna single

Portable compact mini steam room in a city apartment

Steam cabin in a regular small bathroom
How to build a mini-sauna with your own hands in the country or at home
If the area of your site is not large enough to build a bathhouse of standard sizes, then you can consider the design of a compact mini bathhouse in the country.
A small do-it-yourself sauna in a country house or country house

Modern country houses or country houses It’s hard to imagine without a bathhouse, which has become a mandatory component country holiday. But what to do if there is not enough money to build a full-fledged steam room or the plot of land is very small, on which it will not be possible to place a separate building? For those who experience similar problems, there is only one way out - a mini-sauna with your own hands in the country.
Choosing a place in a country house to build a mini-sauna
As a rule, a steam room is set up in one of the rooms of the house, the main thing is that it is suitable in size and it is possible to organize power supply and ventilation in it. For example, a do-it-yourself mini-sauna in a country house can be placed in the attic, basement or on the balcony if the house is two-story. An ideal option if it is possible to make a direct exit from the sauna to the shore of an artificial or natural reservoir.

Choosing a location for a mini-sauna
Equipping a mini-bath in country house, it is possible to save significant funds on the installation of communications: sewerage, water supply, electrical wiring, but at the same time not lose square meters of internal space.
Layout and dimensions of a mini-sana in a country house
Setting up a sauna with your own hands in the first stages includes developing a diagram and determining the dimensions of the future home bath. The size of a small steam room is designed on the basis that one or two people will steam in it. Each person in the booth must have a volume of at least 2 m3. In this case, the ceiling height should be at least 2 m. The most successful minimum size is 2 x 1.8 m, when a bench can be installed on each side.

Layout and dimensions of the mini-sauna
A do-it-yourself mini-sauna at the dacha, the drawings of which include the minimum permissible height and area, allows you to significantly save on electricity and time to warm up the steam room. Because the larger the cabin, the more electricity it will require to operate.
Finishing floors in the sauna
We begin the construction of a home bath with finishing the floors. For their base, concrete is used, lined with natural or artificial stones. You can also lay the floor in a steam room with tiles - a practical, inexpensive and common option.
According to its characteristics, a terrace board (thermowood) is ideal for installing a floor in a sauna, as it can withstand high temperatures, changes in humidity, dynamic loads and has a corrugated surface, beautiful texture and long lasting shade.
Installation of a wooden frame
Before making a frame, you need to make sure that the room is rectangular by measuring and comparing its diagonals - they should be the same. If necessary, make adjustments using the frame beams, retreating the required distance from the walls.
The elements of the frame are dry pine beams, with a cross-section of 5x5 cm. Depending on how the walls will be covered with clapboard, they are placed vertically or horizontally, in increments of 400 mm. The thickness of the thermal insulation material is indented from the main wall (50 - 100 mm).
In order to subsequently carry out the correct installation of an electric heater, which is installed on a finished wall, it is necessary to provide embedded elements (additional frame bars).
Organization of ventilation in the mini-sauna
For the steam room to work correctly, you need a well-executed do-it-yourself sauna ventilation system that can provide no less than a six-fold change of air in the cabin per hour.
For this purpose, an inlet opening is made near the heater and the floor to allow entry into the bathhouse. fresh air. On the opposite wall, closer to the ceiling, there is an exhaust opening through which hot air will enter the common air duct. Another ventilation hole is made in the ceiling, closed with a damper, designed for quick and complete ventilation of the sauna between sessions. This option for organizing ventilation is the most common.
Depending on the design of the steam room and the features of its location, the ventilation scheme may vary.
Electrical supply for mini-baths
Since the steam room is a room with increased danger and high temperatures, it is necessary to pay special attention to the arrangement of the power supply. For hidden electrical wiring you need to use wires with reliable heat-resistant insulation that can withstand up to 170 - 180 0 C. It is not allowed to connect wires, install electrical sockets and switches, or control devices inside the bathhouse.

Lamps should be used only specialized ones - heat-resistant (protection degree IP 65). It is practical to place them under benches.
All electrical equipment in a home bath must be connected through high-quality circuit breakers that protect the electrical circuits from short circuits.
Organization of thermal insulation of a mini-bath
Insulating the sauna from the inside with your own hands is necessary to ensure quick heating of the steam room and save on energy resources, and, accordingly, on the power of the heater. Thermal insulation made from basalt-based mineral wool has become widespread, since it does not absorb moisture and has vapor-permeable and non-flammable properties.
Mineral wool is inserted into the wall frames in mats with a thickness of 5 cm. Special attention Pay attention to thermal insulation of the ceiling, as large heat losses occur through it. The thickness of the mineral wool must be at least 10 cm. The wool should be attached to the rough wooden ceiling using long screws.
Having completed the installation of mineral wool, the entire frame must be covered with special foil paper. It has excellent reflective properties, and also perfectly retains radiation energy and creates a “thermos effect”.
After completing the process of insulating the home steam room, it must be sheathed with clapboard.
Selecting and assembling a stove with your own hands for a mini-sauna
A self-made electric heater for a sauna will help to significantly save money on arranging a mini-steam room, and the connection finished device It would be better to entrust it to professional electricians. It is very compact, making it ideal for small steam rooms. In addition, the heater is quite easy to install and does not require the purchase of expensive materials.

Electric sauna stove
In order to assemble an electric sauna stove with your own hands, you need to carry out the following steps:
- we draw up a drawing of the future stove, taking into account the size of the cage for stones;
- we calculate the number of heating elements, depending on the required power;
- We assemble the stove - we fix the heating elements on the frame and connect them with jumpers. We use a sheet of steel 3 mm thick as a base, and attach the remaining parts to it using bolts and welding;
- We place stones on top as tightly as possible into the finished frame;
- install a protective casing made of steel sheet;
- connect the electric furnace using serial, parallel connection heating elements;
- We check the functionality of the oven.
You can also make a wood-burning sauna stove with your own hands, which is classic version. It has universal properties that allow you to maintain the temperature in the bath for required level with minimal costs.
A stove for a wood-burning sauna with your own hands can be assembled in the following options:
- the stove frame is welded from sheet steel 4–5 mm thick, and having installed it at the installation site, it is covered with refractory bricks;
- The stove is made of special refractory bricks.
Installation of benches
Shelves in the sauna can be built with your own hands from planed timber with a cross-section of 5x5 cm. Its design will completely depend on the size and type of benches. If the ceiling height is 2 m, the upper shelf should be made at a level of 1 m. The width of such a lounger should be at least 70 cm. The lower shelf is installed at a height of 60 - 70 cm, its width can be 40 - 50 cm, since it is intended for sitting.
Mini-sauna in the country: how to make it yourself
If you want your holiday at the dacha to be complete and with health benefits, then start building a small sauna in a country house that will take up a minimum of space.
Do-it-yourself comfortable mini-steam room in a private home or country house: step-by-step arrangement technology
 Agree, it’s very convenient to have a mini-steam room right in your home or country house, and not just on your garden plot? The ability to take bath procedures at any time of the day or night, reducing energy costs, and prompt heating are just a small part of the advantages of a compact bath over a traditional one. But the most important thing is that it is much easier to equip it with your own hands. If you are increasingly thinking about a mini-steam room, here is a step-by-step technology for its construction with detailed photos and useful videos.
Design and assembly of the steam room
The first stage of installing a mini-steam room in a house or country house is drawing up a project. It will protect you from mistakes at all subsequent stages of construction. The project must necessarily contain:
- general drawing of the steam room;
- frame dimensions;
- location and connection diagram of the heating device and ventilation;
- internal filling of the steam room.
Determine the size of the mini-steam room at your discretion: depending on your needs and the available space. Practice shows that optimal dimensions for a home bath - 2x2 or 2x1.6 m. As for the location, most often a steam room is installed in the bathroom, since all the necessary communications are already there. Although, if square meters allow, you can allocate a loggia or even separate room.

The second stage is the installation of the steam room:
- Pour the floating concrete floor onto the marked work area.
- Assemble the frame of the bathhouse from vertical bars. Install the elements in 60 cm increments and secure them with screws and corners.
- Install a door between a pair of bars: a compartment door with hinges or Velcro, glass structure– everything that your budget and imagination allow.
- Place on concrete floor ceramic tiles. Subsequently, it will need to be covered with wooden gratings.
- Cover the outside of the frame with wood panels. These can be boards made of coniferous or hardwood, or lining. Install the panels horizontally and secure them to the frame with screws and dowels.
Advice. To prevent moisture from penetrating into the casing, install wooden panels with a little overlap.
Thermal insulation of walls
The recommended layer of mineral wool is at least 5 cm. It is laid on the inside of the frame between the bars. But the wood cladding sheets are first covered with aluminum foil - it will serve as an intermediate layer between the thermal insulation and the outer cladding and protect the wood from condensation.
Mineral wool is laid overlapping on the foil. A layer of waterproofing is again placed on top of the insulation - aluminum foil can also be used here. In this case, the reflective layer of material should be directed not towards the mineral wool, but towards the steam room. The foil should be fixed with a construction stapler on the frame bars. And the waterproofing sheets need to be connected to each other with tape.
After laying the thermal insulation, sew up the walls of the mini-steam room from the inside. You can use the same wood materials as for the external walls.

Heating and ventilation
To heat a mini-steam room in the house, the easiest way is to use an electric heater. Its power is calculated according to a simple scheme: 1.-1.5 kW per 1 sq.m. area. That is, for a home bathhouse 2x2 m, a device with a power of 4-6 kW will be sufficient. It can even be connected to a standard single-phase power supply.
The electric furnace is placed either on the wall or on the floor, but always near the door - this is necessary so that cold air immediately grabbed and warmed up hot air currents. The stove is equipped with a compartment for stones - when poured with water, they form steam, which increases the humidity in the mini-steam room.
The electric oven is also equipped with a thermostat, thanks to which the required comfortable temperature is maintained in the steam room.
Another mandatory stage arrangement of a mini-bath in the house - organization of ventilation:
- At the bottom of the floor near the stove, make a supply hole for air in one of the walls of the steam room.
- Make an exhaust hole in the wall as far as possible from the supply opening and from the door.
Both openings must go into one room, which, in turn, must have a ventilation exhaust duct facing the street. An electric fan should be installed in the hood.
Interior arrangement
Finally, the final stage of creating a mini-steam room is its internal filling. To make using the sauna easier, you will need:

This minimum set, which, if the dimensions are correctly calculated, will fit perfectly in a mini-steam room. In order not to make mistakes with the dimensions, all filling elements must be included in the drawing at the stage of creating the steam room project.
All components of the bath must be made of wood that does not contain resin and is characterized by low thermal conductivity: linden, spruce, aspen. You can make benches and shelves with your own hands, but it is better to buy footrests and headrests in special stores.
Another important component of filling a mini-steam room is lighting fixtures. These should only be heat- and moisture-resistant lamps. To ensure safety, switches should be placed exclusively on the outside of the bathhouse.
Thus, a mini-steam room in a private house or country house is not at all a hard-to-find exotic, but a completely feasible idea. For its successful implementation, you need to think through every moment: design, size, finishing, heating, ventilation, interior arrangement - by paying maximum attention to each of these points, you will get a functional and comfortable mini-bath that will give you a lot of pleasant moments.
Do-it-yourself mini-steam room at the dacha and in a private house: photo, video
If you are increasingly thinking about a mini-steam room, here is a step-by-step technology for its construction with detailed photos and useful videos.
Mini sauna for a summer residence: how is it different from a regular one and is it difficult to build it with your own hands?
If you pay attention to the dacha plots that were allocated to ordinary citizens in Soviet times, then the thought immediately arises only about planting vegetables. After all, there is no room left for anything other than a small house. But spending summer time at the dacha, I also want to take a steam bath in the bathhouse after a hard day of work on the site. Few people know, but even in a small area it is possible to install a steam room. Moreover, this will be a purely budget option that does not require special investments. Surely some have already guessed that today we will talk about such a construction as a mini bathhouse for a summer house, as well as how to do all the work with your own hands.

A mini sauna at the dacha is really very necessary

Mobile sauna in the countryside made of wood - simple and tasteful
Mini bathhouse in a country house of 6 acres - myth or reality?
What are the usual reasons why a summer resident does not decide to build a bathhouse on his property? Of course, this is the lack of funds for its construction and required space Location on. As for a mini sauna in the country, it can be an ideal solution to these two issues. Let's try to figure out whether it is worth undertaking such construction or whether it might be easier to purchase a ready-made one and install it on the site.
Let's start with the fact that buying a ready-made room for a bathhouse is an easier solution, but at the same time, the summer resident faces another problem - after all, he really needs a budget option. And the acquisition of a finished building cannot be attributed to it. It is for this reason that today we will consider the construction of a bathhouse with our own hands. Although we will definitely dwell on the cost of ready-made ones, but a little later.
Everyone puts a different meaning into the concept of “small bathhouse in the country”. After all, for some, even a plot of 20 acres is considered small. But we will consider the average garden plots of 6-8 acres. This means that the bathhouse on them should not occupy more than 4-6 m in length and 2-3 m in width. First of all, let’s look at what bathhouses can be like summer cottage, from which they can be built, and only after that we will decide how to complete all the necessary work.
Materials from which you can make a small bathhouse in your summer cottage
First you need to understand what the structure will consist of. It could be:
- Wooden beam;
- Edged board;
- Metal frame covered with wood;
- Plastic corrugated sheeting (not suitable for stove kindling - only steam);
- Brick or foam block.
Of course, the most common material for such a building was and remains wood. After all, if you think about it, what kind of bathhouse is made of plastic and similar materials. Naturally, metal is out of the question at all, although some recommend it for the frame of a building. And yet, not everyone in their yard has the opportunity to process and weld metal, and therefore we will focus on an option consisting entirely of wood.

A mini bath can also be built on a metal frame like this
Frame baths as the simplest type of construction
Surely in childhood everyone built “headquarters” in the forest between the trees. Something similar will happen in this case. The initial stage is the assembly of the skeleton, like the skeleton of the future structure. The interesting thing about building a frame mini bathhouse with your own hands is that you can even do without a foundation as such. Of course, it won’t be worse if a good foundation is made, but the main task is to ensure that the frame settles tightly on the soil. Now we will try to explain step by step how construction should proceed. To make it clearer and more comprehensive, let’s take a larger bathhouse as an example of a frame, but there will be no changes in the algorithm of actions, and therefore there should be no problems during construction.
Let’s say right away that all the work was done on a computer, this is a complete project. But this only applies to the frame of the bathhouse. We will observe everything related to finishing and cladding in photo examples.


At first glance, everything seems very complicated. But when you start working, you can understand that the eyes are afraid, but the hands are doing the work. Although it is difficult to assemble a frame mini bathhouse with your own hands, it is quite possible.
A bathhouse made of boards - is it much more difficult to build?
In fact, assembling a bathhouse from boards with your own hands is a little more difficult than a frame one. The work algorithm looks something like this. To begin with, just like for the frame, a base frame is assembled from timber, which is laid on the foundation. Floor joists are attached. In this case, the floor can even be assembled immediately - it will be more convenient. The next steps are raising the walls, which is made from boards joined “in a tenon”.
This way the walls are raised to the required height. After this, you can strengthen them from the inside, lay insulation, vapor barrier film and cover them with clapboard. The roof rises in the same way previous version. But if how to build a bathhouse from boards with your own hands is more or less clear, then an even more complex option remains to be dealt with.
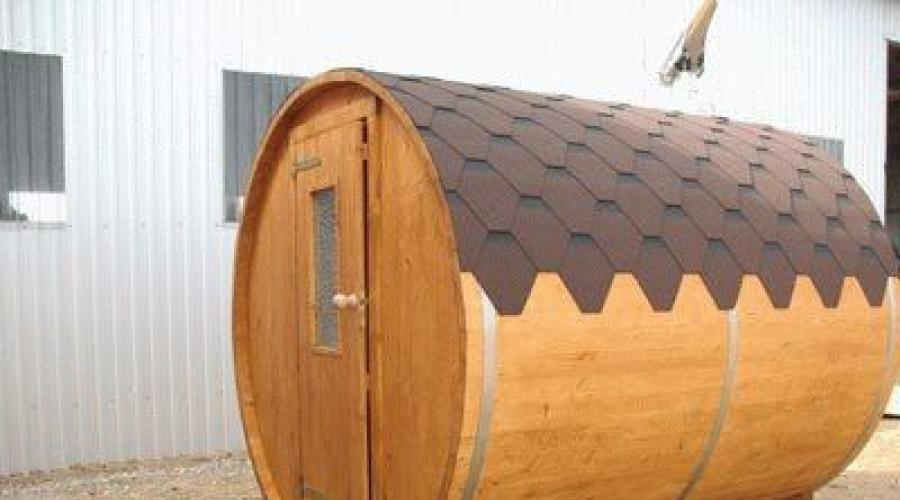
Barrel sauna - what is it and how to build it
Mini barrel sauna is quite interesting structure, which will decorate the landscape of any site. If we make comparisons, then the most suitable here would be a small tank with cut out windows and a door. Let's try to understand how it is assembled.
Among the advantages, in addition to appearance, one can point out the absence of a foundation for such a building, which means the structure will be mobile. Of course, provided that it is firmly assembled. For the walls you will need an edged board (it is better to use spruce or larch) which is connected using the tongue-and-groove method, like lining. But the board should be much thicker. The base is made of 5-6 boards at least 5 cm thick, standing on an edge with a semicircular notch.

The barrel sauna is difficult to build, but it looks its best
Further along, on the supports, boards prepared for the walls are laid. After assembling the lower part of the walls, round partitions are assembled in the same way with recesses for the door. Well, after that you can assemble the walls completely in a circle. As for interior decoration, then there is complete freedom of imagination. We offer several examples that will help explain how to build a barrel sauna with your own hands.


This is roughly what happens. But no matter what method the bathhouse is built, it is very important what it will have inside.
Components and equipment - what needs to be installed inside
Of course, everyone knows that the stove is the most important thing in a sauna. But besides mandatory elements you can think of what else can be supplemented with it. And yet, first of all, about the main thing.
Mini stove for a bath – buy or make?
This question cannot be answered unequivocally. If a home craftsman has experience in making such equipment, then, of course, a DIY mini-stove for a wood-burning sauna will be preferable. If not, then you will have to purchase a similar heat generator. In this case, a good and relatively inexpensive solution would be to purchase a “Varvara mini” sauna stove.

Bath stove "Varvara mini" is a very good choice
Do you need a pool in a mini sauna and how to arrange it?
It makes sense to purchase a swimming pool for mini baths only if the size of the building allows it. Although sometimes it is installed directly next to the building. Of course, this is a pretty good way to relax after a steam room, but if the area is small, it may be overkill.
Sauna inside a bathhouse - what’s good about this option?
A mini sauna in the country will be very useful for those in whose family not everyone likes a hot enough steam room. Then, by making a firebox on the back side of the door, you can fence off a small room inside. The temperature in it will be significantly higher than in the washing room. This way, those who like intense heat will be able to relax with a good steam. Others will be in next room, where the heat is not so strong.
Bathhouse projects with a relaxation room and a terrace. In a separate publication you will learn about the most successful layouts baths with an extension in the form of a veranda or terrace.
Advantages of a self-made small bathhouse in the country
Before building a mini sauna for a summer residence with your own hands, the project is the first thing you should think about. Without it, nothing meaningful will happen.

You can make such a bathhouse if there are no neighbors nearby and there is nothing to be embarrassed about
Of course, a small bathhouse in the country is a necessary thing, and therefore such a construction is worth starting, despite the apparent complexity. Well, if you have a complete lack of desire and desire for construction, you can purchase a ready-made steam room, which will be delivered to you directly to your yard. The only thing you need to do is prepare a flat area for it.
Finishing the bathhouse inside. Photos and examples. In a separate publication you will find interesting ideas for finishing steam rooms and relaxation rooms, and also learn the main stages of installation.
Where can you buy a mini sauna for your dacha inexpensively?
Nowadays, you can order a finished building quite easily - the Internet is replete with such advertisements. The question is that the cost of such a building is quite high. Now let’s try to figure it out at what price you can buy a mini sauna for your dacha.
Thus, you can understand that it is unlikely to be possible to purchase a turnkey bathhouse for your dacha inexpensively. That is why it is worth thinking about DIY construction. In this case, you can meet less than half of the market price, or even a third. Of course, you can buy a sauna for your dacha inexpensively, but in this case you will only receive a box without interior decoration and a stove. And this will be a barn, not a steam room.
Examples of small bathhouses made by hand at the dacha - photo review of interesting solutions
Perhaps someone else doubts whether it is worth starting construction. We invite you to look at a few photos of mini baths for summer cottages with your own hands.


This is roughly how you get homemade, quite beautiful steam rooms. Agree that small bathhouses for summer cottages look simply lovely in the photo.
Summarizing
Summarizing the material presented, we can draw the following conclusions:
- If you decide to start building a bathhouse with your own hands, the first thing you need to do is draw up a project;
- Next, think through everything thoroughly and purchase the necessary material;
- You need to approach work carefully and carefully, but at the same time creatively;
- There is no need to rush in this matter, but you should not leave an unfinished bathhouse for the winter.
And if you follow these simple rules, then a mini sauna at the dacha will not only please the eye, but also soothe the soul, and give health and joy to you and your loved ones.
Do-it-yourself mini sauna for a summer residence: materials, components, models
Mini sauna for a summer residence: materials from which it can be made, components and equipment, advantages, review of purchased models, useful tips and recommendations from experts.
Homemade construction portal
Mini baths in the country: how to make it yourself. Device description location of mini baths in garden and summer cottages

Surely every happy owner of the notorious 6 acres outside the city tries to make the most of his small area land. Plant fruit trees, organize a small vegetable garden, and build a two-story house, albeit with only two rooms. And where there is a house, there is a desire to build a bathhouse, so that if you relax, then to the fullest.
There is absolutely no reason to be upset and upset if the area of your site is not large enough to build a bathhouse of standard sizes. You can consider a compact project mini baths in the country. A small sauna built with your own hands meets the needs of steam lovers just as much as a standard one. And in terms of saving free space and material costs, its construction will certainly be of interest to the thrifty owner.
The size of your future bathhouse must be calculated based on the number of people who will use it. For a small family consisting of 2 or 4 people, a budget option for a small building is quite suitable. The height of the bathhouse in such a project will be 2 m, the length will be 6 m, and the width will be only 2 m 20 cm.
The interior space of the mini bath should be divided into 4 separate rooms, each of which has its own purpose. The dressing room is included in the design of any bathhouse, and for a small bath house its area can be no more than 1.5x2 m. Of course, you can’t do without a rest room, the parameters of which in this case will be 2x2 meters. For two or three people it will be quite possible to stay in such a room. The remaining room of the mini bath is allocated for a tiny shower room, with an area of 1x1 m, and, in fact, a steam room, with the same dimensions as the dressing room - 1.5x2 meters. For shower corner and steam rooms will need to be made additional calculations area, taking into account the arrangement of a tray in the shower, and the placement of shelves in the steam room.
The stages of building a mini bathhouse at the dacha are carried out in the usual sequence. Despite the fact that our bathhouse will be very small, the construction rules for it are the same as for all other buildings.
You should start by building a foundation. At this stage it is extremely important point is the type of soil on which the bathhouse will be located.
If the ground is sufficiently dry and hard, then you can use a simplified version of the foundation. First, flat stones are laid around the perimeter of the future structure, then the same stones are laid in the interior of the foundation. The free spaces between the stones are filled with clay and compacted thoroughly. A layer of wooden beams is placed on top, treated over the entire surface with hot bitumen.
You don’t have to use clay, but lay the foundation of a mini bathhouse out of stones alone – “solid”. In this case, it will be necessary to cover the stone foundation with a layer of waterproofing.
Most often they are made for a bath columnar foundation, using brick, stone, ready-made asbestos concrete or concrete pipes filled with the same concrete. The structure can be installed on metal, wood or concrete piles. But then you will need to take care of additional thermal insulation of the bathhouse floor.
The most reliable and common is the strip foundation. To make it, a trench is dug, which is filled layer by layer with wet compacted sand and crushed stone. Then they knit the reinforcement and fill it with concrete. As usual, roofing felt is used as waterproofing.
If the soil on your site consists of sand and is filled groundwater, then to create a foundation for a mini bath you can use concrete blocks. For small light design, 10 blocks with standard sizes 20x20x40 cm.
The first step is to install the frame of the future bath house and erect the walls. After this, the walls of the dressing room, rest room and shower are insulated with a mixture of expanded clay and sawdust. The insulating mixture is covered with polystyrene sheets and the walls of the mini bath are lined with clapboard. Can be added to sawdust and expanded clay broken glass, which will protect your bathhouse from the penetration of rodents into the interstitial space.
The walls of the steam room require special treatment. Therefore, about 5 cm of free space is left behind the lining, a heat and vapor barrier film is placed there, and then the air gap is filled with mineral wool. It is rational to make the walls inside the shower room from galvanized or polystyrene, which are much more better than wood tolerate frequent contact with water.
If there is no pressure water supply in your area, the water supply to the mini bath can easily be made by gravity. To do this, you need to build a structure from two galvanized tanks, each with a volume of 50 liters, hoses and a mixer.
The hot water tank is installed at a level half a meter lower than the installation level of the cold water tank. One end connecting hose fixed at the bottom of the “cold” tank, and the second one is brought to the top of the “hot” tank. The temperature difference will ensure independent circulation of water through the pipes. To supply water to the shower, both tanks are connected by a separate pipe, at the end of which a mixer is installed.
To equip a water drain, a few drainage pipes and a drainage hole will be enough. The pipes are positioned at the desired angle, and the water flows by gravity into the pit.

The water in the mini bath is heated using a stove installed in the steam room. You can also use a heating element for these purposes, which can be easily purchased in a store.
If you heat water with a stove, you need to install a U-shaped pipe in the hottest part of the stove, wrapping it around the base of the chimney. The water supply end of the pipe should be on the body, and the outlet end should be located 5 cm higher from it.
The heating element is placed under a cold water tank and connected to the system with hoses and stainless steel pipes.
It is not difficult to provide ventilation for a small bathhouse. To do this, you do not need to buy any additional devices. It is enough to make a small hole in the wall opposite the entrance door, which can be easily opened or closed using a damper.
To illuminate a mini bath, several halogen lamps with a heat-resistant housing are sufficient. Using a small transformer, you can easily reduce the voltage from 220 to 12V.
As you can see, building a mini bathhouse with your own hands is not that difficult.
Let's look at an example of a compact mini bath for one person.
To assemble such a bathhouse, you will need lightweight insulated panels, which are a frame made of wooden beams covered with thin boards. The size of one frame is 185x60 cm, and in its manufacture they use timber with a cross-section of 3x6 cm and boards 1-1.5 cm thick. To insulate and provide heat and vapor barrier, the panels are filled with foam plastic or mineral wool, covering it on the inside with polyethylene film or aluminum foil . The outer side is covered with glassine or roofing felt. Then the panels are covered with clapboard.
In one of the panels a door is made, measuring 160x60 cm, in which a small window with double glass is provided. Door locks at the top and bottom of the doorway ensure the tightness of the bathhouse. At the bottom of the panel, near which the heating device will be located, make a small ventilation hole with a plug.
How to build a mini sauna for one person on the street? Very simple. It is necessary to assemble a structure of the required size and provide it with hydro- and thermal insulation.
For a single steam room with an internal area of 180x130 cm, 10 panels for the walls and two for the roof are enough. The seams of the structure are filled with batting and covered on both sides with wooden planks. The ceiling of the mini bath will be protected from precipitation by a triple layer of roofing material.
If you intend to use the bathhouse only in the warm season, then the floor of the structure does not need to be insulated. For year-round use a strip foundation with insulating lintels is poured.
To heat a single steam room to 80-90 degrees C, use an electric stove closed type, power 3 kW. Place a metal bucket or box of stones on the stove and turn it on for several hours. After this, you can begin bathing procedures.
In an apartment, in your bathroom, a small bathhouse with your own hands can also be equipped quite quickly and easily. There are two ways to arrange a mini bath with electric heating in the bathroom.
The first option involves installing a removable shelf at a height of 1 meter from the floor on two beams. The beams must be securely fastened to the walls with strong pins. The height of the shelf above the bath is 40-60 cm.

To climb onto the shelves, a small ladder with rubber bearings is made. To avoid injury, the ladder must be tied to the shelf with twine. The width of the shelf is 60 cm. The steam room is heated with an electric stove, which is placed on a reinforced stand above the sink. The heater in this version is a metal basin or bucket, which is filled with stones and placed directly on the stove.
In the second option, they make a sitting steam room on the bathtub, covering it with removable wooden panels. In this case, the shelf serves as a seat, and you can not only rest your feet on the durable panels, but also stand on them. At a short distance from the shelf, hang a wooden block and put your feet on it.
To achieve maximum resemblance to a bathhouse, the walls and ceiling above the bathtub are sheathed wooden slats or install removable boards from boards. If necessary, such shields are easy to install and remove.
Heating of a mini bath is also carried out using an electric stove with a container with hot stones placed on it.
Don't forget about safety precautions and enjoy the mini sauna you built with your own hands!
Do-it-yourself compact mini baths
Today a private house or a dacha are unthinkable without a bathhouse, which has become an indispensable component of country life. But what to do if there is not enough money to build a full-fledged bathhouse with all the attributes? Or is the plot so small that it is impossible to place a large building on it? For those who experience such problems, there is one solution - a mini sauna for the dacha.
What is better to choose – a ready-made or a homemade mini-bath?

Anyone who has a certain amount of money, but does not want to waste time and energy, can safely buy a miniature bathhouse that is completely ready for use. Otherwise, you will have to start building a mini sauna with your own hands. On Russian market ready-made mini bath projects are presented in a wide variety. Unfortunately, not all of them are of acceptable quality, so you need to be especially careful when choosing.
Products of this kind must meet the following requirements:
Small dimensions and weight
Ease of installation - the ability to do without constructing a capital foundation or laying additional communications
Ready for use quickly
Functionality combined with ease of use
Beautiful appearance (optional).
The most successful example is the mini bathhouse project called Emelya. It meets the above requirements as much as possible. Due to its low weight (only 500 kg), there are no problems with transportation and no capital foundation is required. Despite its compact size, Emelya’s mini bathhouse is equipped with everything necessary and includes all the traditional premises of a Russian bathhouse: dressing room, shower room and steam room. To start the sauna, a simple extension cord is enough, through which it is connected to the home electrical network. At the same time, the electric oven is made in a safe version, so you can use it without fear even while washing (see photo).
Inflatable bath models
Among the ready-made projects there are options for the lazy (see photo below). These are portable inflatable models. They are a soft, elastic body made of ultra-strong and lightweight polymers. To prepare such a bath, a few minutes and 2-3 simple operations are enough:
Connects to the pump and fills with air
Then all that remains is to fill the steam generator with water.
After use, the case is freed from air, collapses and can be stored in a regular sports bag. The complete set weighs only a few kilograms, so you can take the inflatable bathhouse with you anywhere. An inflatable mini sauna is especially good in a country house where there is no running water, sewerage and other amenities, without which it is impossible to build a regular sauna.
Do-it-yourself mini sauna is small frame construction, divided into functional zones by light partitions, the internal space of which is filled with insulation and waterproofing. To save volume, they are usually used modern materials, combining both of these properties. For example, roll insulation, covered on both sides (or one) with a layer of foil or membrane vapor barrier.
We build it ourselves - where to start?
On clay soils, a concrete pit will be required to collect and subsequently drain water into the drainage ditch. Since a small diameter pipe is used for this, the drain hole in the floor must be protected with a fine-mesh filter.
Then the frame is erected vertically installed timber and horizontal strapping systems. The frame is covered with clapboard on both sides, and the internal space is filled with reliable insulation, resistant to water, or protected by hydro- and vapor barrier.

When using a small bathhouse, the issue of saving free space arises. This imposes certain requirements on the design of the shelves and oven. On the one hand, the stove must be powerful enough to heat the steam room well and quickly. On the other hand, maximum compactness is required.
You can purchase ready-made mini sauna stoves or make them yourself. Naturally, the first option is simpler, but also expensive, since the price of high-quality samples today ranges from 30 to 60 thousand rubles. depending on the country of manufacture and configuration. In general, factory models are a metal body-firebox, on top of which there is a platform for the heater. The water tank can be:
hinged, when it is mounted on the side surface of the body and heating occurs due to heat transfer directly from the firebox
separate, in this case it is installed at a height, and the chimney acts as a coolant, through which combustion products are removed from the firebox.
You can assemble a mini sauna stove yourself. Moreover, this will not require special skills and abilities, but the savings will be significant. For those who are interested, we will briefly describe the technological process of creating the simplest version of the furnace for small bathhouse.
A simple version of a homemade stove for a mini steam room
The main element is a regular cast iron sink. First, its surface must be completely cleaned of enamel, which, when burned, will give off an unpleasant odor.
Then the firebox body is prepared - it is made up of bricks laid in 9 rows, as shown in the figure. In order to comply with measures fire safety, at the place where the furnace is planned to be installed, first lay a flat asbestos cement slate, on top of which a sheet of metal about 1 mm thick is attached.
Next, three lower rows of continuous masonry are made. The bricks are laid on a clay-sand mortar with a joint thickness of 3 to 5 mm. After this, three walls are built into one brick. One wall is missing, since instead there will be an open firebox, that is, a hole for loading firewood, without a door. To make it easier to form the firebox, you can use a special frame welded from corners. Bricks are laid into its grooves using the “poke” method.

The dimensions of the oven are selected in such a way as to ensure the possibility of tightly installing the sink on the side stiffeners, as shown in the figure above. The drain hole should be located near the wall opposite the open firebox. This is a mandatory condition, since this hole is used to drain flue gases. For this purpose, a pipe of suitable diameter and length of at least 2.5 m is inserted into it.
Water in a bathhouse equipped with such a stove can be heated in several buckets installed next to the heater, but it is better to make a 40-50 liter tank, which is placed directly on the stones. In summer, you can even get by with a container on the roof where the water is heated by the sun's rays. It is advisable to make shelves in a small bathhouse removable or folding, with fastening to the wall through a hinge device. This allows for more efficient use of the limited footage of the steam room.
Installation of mini baths in garden and summer cottages
People's need for bath procedures is so high that opportunities for improving baths are being sought with great ingenuity.
It is known that baths are equipped on car trailers, ships, submarines and even in spaceships. Temporary baths are set up at the camps of tourists, prospectors, and field camps.
It is quite natural that in summer cottages and gardens, and even in apartments, they also set up simple bathhouses that allow you to steam and wash. They are called mini-baths.
Let's consider two options for a mini-bath installed in the bathroom using electric heating.
The first version of a mini-bath

In the first option for installing a bathhouse, at a height of 1-1.3 m from the floor (0.4-0.6 m above the bathtub), a removable shelf is mounted on two beams nailed to the walls with strong pins.
The width of the shelf is 55-60 cm. To climb onto it, use ladder with rubber bearings. The ladder is tied to the shelf with a rope.
An electric stove with stones is installed on a stand above the sink.
The stand must have its own support on the floor to protect the sink from destruction.
The second version of the bathhouse
In the second option, the shelves are made to sit, and the bath is covered with removable wooden panels that you can stand on.
To place your legs in a raised position, hang a planed block or stick at a distance of an outstretched leg from the shelf. To climb onto the bathtub, you can use a low bench or stool.
To assemble a bathhouse on outdoors Instead of shields, it is necessary to make insulated lightweight panels.
To do this, frames measuring 185x65 cm are made from beams with a cross-section of 3x6 cm and sheathed with boards 1-1.2 cm thick.
Before covering the panels, they are filled with foam plastic, mineral wool or straw, covering them on the inside with aluminum foil or polyethylene film (moisture and vapor barrier), and on the outside with roofing felt or glassine.
The number of shields depends on the required size of the steam room.

One panel contains a door with a built-in window. At the same time, the height of the threshold is 20 cm, the dimensions of the door are 160×60 cm, the dimensions of the window are 36×25 cm.
The window must have double glazing.
To ensure the tightness of the closure, the locks on the door are made in two places: below and above. At the bottom of the panel where the electric stove is installed, a ventilation hole is made that is closed with a valve or plug.
From 12 panels (10 for walls and 2 for ceilings) a steam room with internal dimensions of 130x180 cm is assembled, in which you can equip a shelf-bed.
For a steam room with internal dimensions of 130x110 cm with a bench shelf, it is enough to have 10 panels or 8 panels measuring 185x56 cm (for walls) and 1 panel measuring 130x150 cm for the ceiling.
The seams of the panel are sealed with batting and covered on both sides with wooden slats.
The outside of the ceiling is covered with 2-3 layers of roofing material.
Bath floor design
The design of the floor depends on the location of the mini-bath. If it is located on open area and is intended for use only in summer, then the floor can be made of boards without additional insulation.
For use in winter, the foundation must be strip or have insulated lintels that protect against blowing from below. If a mini-bath is installed indoors, then the main requirement for the floor is to ensure proper isolation from leakage, collection and direction Wastewater into the sewer.
Heating devices in the bath

As heating device use a closed-type electric stove with a power of 2-3 kW, on which they place metal box, bucket or jar with stones.
To warm up the steam room to 80-90° C, the tile is turned on for several hours, and before the bath procedures it is turned off for safety. Before heating the room, remove all metal, plastic and flammable objects, curtains, curtains.
Metal objects heat up quickly and can cause burns if you come into contact with them.
Plastic objects deform at high temperatures.
Curtains and drapes make it difficult to heat the room and are a fire hazard.
How to speed up heating of a bath
To speed up heating, you can use an additionally installed electric heater.
By creating artificial air circulation, it ensures more uniform heating of all parts of the room. In this case, the power of the electric stove with stones can be reduced to 1.2 kW.
More better stones heat them on a gas stove in the kitchen, placing them in a mesh container made of thick steel wire, then put them in a metal bucket with a lid and bring them into the steam room.
If there is a source of hot water, for example, a gas water heater located in an adjacent room (kitchen), you can speed up the heating of the mini-bath by filling the bath with hot water. In this case, the bathtub should be covered with a wooden board or grate covered with film (oilcloth) to reduce water evaporation and prevent high humidity air.
Mini-sauna - economy option
In order to make a sauna in the shortest possible time, we offer the option of a small mini-sauna, which can be built in one month and immediately begin to be used. This is an important factor, since log sauna In order for its walls to shrink, it must be kept for about a year before use.
The dimensions of the mini-bath may well suit a family of two or three people (Fig. 12). The steam room, combined with a washing room, is equipped with a two-level shelf. There is a shower, the water tank of which is located on the roof of the bathhouse.

The structure of the mini-bath frame is similar to that described above, so during its construction you can use the same structural components and elements. The main feature of the proposed mini-bath is a small stove-heater, which can be made without much expense or difficulty.
It is based on an old kitchen cast-iron sink, installed with ribs along the perimeter on brickwork, that is, the sink is lined with brickwork on three sides, and on the side opposite the drain hole, an open (without door) heater firebox is installed. The bottom double row of bricks is laid on a metal sheet 1 mm thick, which in turn is laid on flat sheet asbestos slate.
This protects the floor from fire. To improve the heat transfer of the stove stones, as well as to eliminate unpleasant odors in the bathhouse from enamel burnout, the sink must be cleaned before placing it in the stove. For the flue gas trunk, a sink drain hole is used, into which a metal piece must be installed chimney with a diameter of 60-80 mm and a length of 2.5 m, on which to attach the upper part of the chimney, individual sections of which can be made independently from sheet steel 0.8-1 mm.
The small dimensions of the heater (Fig. 13) (750 x 500 x 720 mm) allow you to arrange half a room in the steam room. The brickwork of the heater stove should be done using clay-sand mortar with a seam thickness of 3-5 mm. To form a firebox, a frame of 65 * 65 mm is welded from a corner, into the grooves of which bricks are placed along the perimeter on a butt. Thus, the cast-iron sink, resting on these bricks, forms the combustion chamber of the heater stove. Stones placed on top of the sink heat up very quickly both from the walls of the sink and from the metal chimney, which allows you to quickly heat up a small volume of the steam room (5.5 m3).
Water for bath procedures can be heated either in several buckets installed on the side of the heater, or in a tank with a capacity of 40-50 liters. IN summer period A small tank (80-100 l) for showering will be placed on the roof of the bathhouse. The drainage of water must be done in the area of the second shelf of the shelf, arranging a drainage hole and draining the water before installing the floor.

Starting the construction of both a capital family bathhouse and small bathhouse, the owner of a rural farmstead must also perform some work on its external and interior design, which directly relate to the operation of the bathhouse. Such works include drainage system to remove used water, install a shelf in the steam room and lay out the chimney of the heater.
A drainage hole is made before laying the logs and bathhouse floor boards. This is a serious matter, since poor water drainage can damage the bathhouse.
If the soil on the site is sandy or sandy-gravel, that is, it easily absorbs water, then under the bathhouse it is enough to dig a regular drainage hole, the dimensions of which usually depend on the size of the structure and water consumption. For example, if a family of 3-4 people will use the bathhouse, it is enough to make a hole 70 x 70 cm and 60 cm deep. The drainage hole is filled with broken bricks, large crushed stone or gravel. Around the pit, the soil is compacted with a wooden tamper and covered with roofing felt with a slight slope on all sides towards the pit.

In the case of clay soil, draining used water from the bathhouse will require much more work and expense. Instead of a drainage hole, you need concrete pit size 50 x 50; 60 x 60 cm, depth 50-60 cm and wall thickness 10-12 cm. To drain water from the pit, you can use a drain pipe with a diameter of 50-70 cm. It must be placed at a distance of about 10 cm from the bottom of the pit. It is necessary to install a float water seal in it so that unpleasant odors do not penetrate into the bathhouse. IN drain hole on the floor of the bathhouse located above the pit, it is necessary to install a fine-mesh filter to prevent clogging drain pipe garbage.
The shelves are installed after laying the floor and installing the heater on it. In a small steam room (especially in a mini-bath), it is advisable to make the shelves either folding (hinged) or completely removable, which will provide more rational use limited steam room area. In addition, removable shelves can be removed for cleaning and drying.
Only completely smooth boards and planks are suitable for arranging a shelf. The boards must not be impregnated or coated with any varnishes, solutions, or paints. All edges, especially the outer ones, should be rounded. It is advisable to arrange the shelves from wood species with soft and non-resinous wood (linden, aspen, poplar), since the boards from them heat up less.

In a small steam room you can build two-tier shelves (Fig. 14), and for large family baths - three-tier ones. Shelves are usually arranged along a wall that does not have a window, and the size of the upper tier should be taken based on the average height of a person, that is, 175-185 cm long and 65-70 cm wide.
The upper floor should be placed approximately at the same level with the stove stones so that the space around it warms up faster and better. The height between the top shelf and the ceiling of the bathhouse should be sufficient to make it convenient to steam with a broom, that is, 100-110 cm.
The second shelf should be located from the floor at approximately 70-80 cm, its width should be 45-50 cm. Portable wide and stable benches are placed near the two-tier shelf to make it easy to get down and climb onto the desired tier. For the same purposes, sometimes a small, reliable ladder is installed.

On shelves, to fasten boards together, it is necessary to use copper-plated or galvanized nails and screws, the heads of which must be sunk into the wood. The thickness of the boards depends on the distance between the supports on which they rest. The greater this distance, the thicker the board should be. For example, a board with a thickness of 20 mm is used with a distance between supports of 500 mm, 25 mm - respectively with 900 mm, and boards with a thickness of 40 mm can be used with a distance of 1200-1300 mm.
Mini baths in the country: how to make it yourself
The water in the mini bath is heated using a stove installed in the steam room. You can also use a heating element for these purposes, which can be easily purchased in a store.
We will send the material to you by e-mail
If you pay attention to the dacha plots that were allocated to ordinary citizens in Soviet times, then the thought immediately arises only about planting vegetables. After all, there is no room left for anything other than . But spending summer time at the dacha, I also want to take a steam bath in the bathhouse after a hard day of work on the site. Few people know, but even in a small area it is possible to install a steam room. Moreover, this will be a purely budget option that does not require special investments. Surely some have already guessed that today we will talk about such a building as a mini-sauna for a summer residence, as well as how to do all the work with your own hands.
A mini sauna at the dacha is really very necessary
What are the usual reasons why a summer resident does not decide to stay on his property? Of course, this is the lack of funds for its construction and the necessary space on the site. As for a mini sauna in the country, it can be an ideal solution to these two issues. Let's try to figure out whether it is worth undertaking such construction or whether it might be easier to purchase a ready-made one and install it on the site.
Let's start with the fact that buying a ready-made room for a bathhouse is an easier solution, but at the same time, the summer resident faces another problem - after all, he really needs a budget option. And the acquisition of a finished building cannot be attributed to it. It is for this reason that today we will consider the construction of a bathhouse with our own hands. Although we will definitely dwell on the cost of ready-made ones, but a little later.
Everyone puts a different meaning into the concept of “small bathhouse in the country”. After all, for some, even a plot of 20 acres is considered small. But we will consider the average garden plots of 6-8 acres. This means that the bathhouse on them should not occupy more than 4-6 m in length and 2-3 m in width. First of all, we’ll figure out what bathhouses can be like on a summer cottage, what they can be built from, and only after that we’ll decide how to do all the necessary work.
Materials from which you can make a small bathhouse in your summer cottage
First you need to understand what the structure will consist of. It could be:
Of course, the most common material for such a building was and remains wood. After all, if you think about it, what kind of bathhouse is made of plastic and similar materials. Naturally, metal is out of the question at all, although some recommend it for the frame of a building. And yet, not everyone in their yard has the opportunity to process and weld metal, and therefore we will focus on an option consisting entirely of wood.

Important information! Many manufacturers offer inflatable mini saunas with a steam generator. Perhaps for some people a similar steam room is enough, but in the full sense it cannot be considered a bathhouse. This is a subjective opinion, and we do not pretend to accept it as the truth, but still in Russia people are accustomed to something different.
Frame baths as the simplest type of construction
Surely in childhood everyone built “headquarters” in the forest between the trees. Something similar will happen in this case. The initial stage is the assembly of the skeleton, like the skeleton of the future structure. The interesting thing about building a frame mini-bath with your own hands is that you can even do without a foundation as such. Of course, it won’t be worse if a good foundation is made, but the main task is to ensure that the frame settles tightly on the soil. Now we will try to explain step by step how construction should proceed. To make it clearer and more comprehensive, let’s take a larger bathhouse as an example of a frame, but there will be no changes in the algorithm of actions, and therefore there should be no problems during construction.
Let’s say right away that all the work was done on a computer, this is a complete project. But this only applies to the frame of the bathhouse. We will observe everything related to finishing and cladding in photographic examples.
| Photo | Actions Performed |
|---|---|
 | The first thing we did was drive piles into the soil to a depth of 2-2.5 m. Although with dense soil, one and a half meters is enough. |
 | Next, the timber base is assembled |
 | In this case, the timber is connected to each other in this way, after which it is pulled together vertically with studs using nuts and washers |
 | Assembling floor joists... |
 | ...after which we tighten them additionally from above |
 | Now we begin to raise the walls. You can assemble them separately, but in this way, as shown in the figure, you can do this work alone |
 | Installing roof pillars... |
 | ...and connect them together |
 | Now you need to install the central beam |
 | We begin assembling the roof. The rafters are connected like this |
 | A similar design should be obtained |
 | Now you should cover it with sheets of vapor barrier material... |
 | ...and assemble a frame on top for attaching metal tiles or slate |
 | In the end it looks like this |
 | All that remains is to close the roof. Next, having laid insulation between the vertical posts, we move on to the interior decoration |
 | After insulation, cover the floor with a vapor barrier, which should extend slightly onto the wall. |
 | Having covered the wall from the inside with a layer of felt, we secure it using slats |
 | This is what it should look like |
 | We cover the floor with boards to create “ air cushion" It will help you keep warm better |
 | A hole is cut in the center to drain water. |
 | Now it's time flat slate– after all, the floor needs to be strengthened. Instead, you can use thick plywood or boards. We laid slate because the floor will be tiled |
 | Don’t forget about the base for the oven |
 | Now we also cover the walls with a vapor barrier film. You shouldn’t do this before - you can push or tear the floor if durable material has not yet been laid on it |
 | We leave bare insulation near the stove - the film may melt due to temperature |
 | Everything is the same as with the floor - the film is secured with wooden slats - leaving an air cushion |
 | It's time to start finishing the floor |
 | Near the stove, we attach an asbestos board to the space left without film. |
 | The matter remains small. After covering the walls with clapboard, this is what you should get. |
At first glance, everything seems very complicated. But when you start working, you can understand that the eyes are afraid, but the hands are doing the work. Although it is difficult to assemble a frame mini-bath with your own hands, it is quite possible.
A bathhouse made of boards - is it much more difficult to build?
In fact, assembling a bathhouse from boards with your own hands is a little more difficult than a frame one. The work algorithm looks something like this. To begin with, just like for the frame, a base frame is assembled from timber, which is laid on the foundation. Floor joists are attached. In this case, the floor can even be assembled immediately - it will be more convenient. The next steps are raising the walls, which is made from boards joined “in a tenon”.
This way the walls are raised to the required height. After this, you can strengthen them from the inside, lay them, and cover them with clapboard. The roof rises similarly to the previous version. But if how to build a bathhouse from boards with your own hands is more or less clear, then an even more complex option remains to be dealt with.
Barrel sauna - what is it and how to build it
A barrel mini-sauna is a rather interesting structure that will decorate the landscape of any area. If we make comparisons, then the most suitable here would be a small tank with cut out windows and a door. Let's try to understand how it is assembled.
Among the advantages, in addition to appearance, one can point out the absence of a foundation for such a building, which means the structure will be mobile. Of course, provided that it is firmly assembled. For the walls you will need an edged board (it is better to use spruce or larch) which is connected using the tongue-and-groove method, like lining. But the board should be much thicker. The base is made of 5-6 boards at least 5 cm thick, standing on an edge with a semicircular notch.

Important information! The boards for the base must be thoroughly impregnated with drying oil or other composition that prevents rotting.
Further along, on the supports, boards prepared for the walls are laid. After assembling the lower part of the walls, round partitions are assembled in the same way with recesses for the door. Well, after that you can assemble the walls completely in a circle. As for, there is complete freedom of imagination here. We offer several examples that will help explain how to build a barrel sauna with your own hands.


This is roughly what happens. But no matter what method the bathhouse is built, it is very important what it will have inside.
Components and equipment - what needs to be installed inside
Of course, everyone knows that the stove is the most important thing in a sauna. But in addition to the required elements, you can think of what else you can supplement it with. And yet, first of all, about the main thing.
Mini-stove for a bath – buy or make?
This question cannot be answered unequivocally. If a home craftsman has experience in making such equipment, then, of course, a do-it-yourself mini-stove for a wood-burning sauna will be preferable. If not, then you will have to purchase a similar heat generator. In this case, a good and relatively inexpensive solution would be to purchase a “Varvara mini” sauna stove.

Bath stove “Varvara mini” is a very good choice
Do you need a pool in a mini sauna and how to arrange it?
It makes sense to purchase a pool for mini-baths only if the size of the building allows it. Although sometimes it is installed directly next to the building. Of course, this is a pretty good way to relax after a steam room, but if the area is small, it may be overkill.
Sauna inside a bathhouse - what’s good about this option?
At the dacha it will be very useful for those in whose family not everyone likes a hot enough steam room. Then, by making a firebox on the back side of the door, you can fence off a small room inside. The temperature in it will be significantly higher than in the washing room. This way, those who like intense heat will be able to relax with a good steam. Others will be in the next room, where the heat is not so strong.
Related article:
In a separate publication you will learn about the most successful layouts of bathhouses with an extension in the form of a veranda or terrace.
Advantages of a self-made small bathhouse in the country
Before building a mini-sauna for a summer house with your own hands, the project is the first thing you should think about. Without it, nothing meaningful will happen.

Important! Before you build a small bathhouse with your own hands, you need to think through everything down to the smallest detail, from the size to the materials and even the rugs. This will allow you not to be distracted from work because two boards or a kilogram of nails are missing.
Of course, a small bathhouse in the country is a necessary thing, and therefore such a construction is worth starting, despite the apparent complexity.Well, if you have a complete lack of desire and desire for construction, you can purchase a ready-made steam room, which will be delivered to you directly to your yard. The only thing you need to do is prepare a flat area for it.
Related article:
In a separate publication you will find interesting ideas for decorating steam rooms and relaxation rooms, and also learn the main stages of installation.
Small bathhouses for the dacha - several interesting projects for self-construction
Bath- This is one of the main buildings on a modern personal plot. Here you can relax and take a break from household and garden work, while improving your health. However, in order to bath building functioned correctly, when constructing it you should take into account whole line nuances.
Traditional sauna includes several functional rooms, however, due to the territorial limitations of personal plots, home craftsmen strive to reduce the size of the structure as much as possible. Sometimes this reduces the area of the premises, and in some cases some of them have to be abandoned altogether.
This article outlines several useful tips By design and construction of small bath structures.

Features of bath buildings
Traditional Russian bath was made of wood. However, today such buildings can be erected from any building blocks.
Ideally bath building should include the following premises:
- Waiting room. This is an ordinary hallway or dressing room, in which there is a closet where the clothes of bathhouse visitors are hung, as well as a place to store fuel.
- Restroom- usually the largest room in the bathhouse, where there is a table where you can have tea and have conversations with friends.
- Washing, where a container of water is located for receiving cooling procedures.
- Steam room — main place in the bath, Where stove-stove being installed, heating the air in the steam room.

Unfortunately, due to space saving, such a set of rooms is not present in every bath, which will be discussed below.
Reasons for building a small bathhouse
Nowadays small sauna for the cottage can be built for several reasons:
- Lack of free space.
- Low price, because the costs for small-sized construction will be much lower.
- For practical reasons. The smaller the building, the lighter it is and puts less pressure on the foundation, therefore, it is easier to maintain it in proper condition. And there is simply no need for a single person or a small family to build a whole mansion for bathing procedures.

About the distribution of space in small baths
If your goal is do-it-yourself small sauna in the country, then to save space you should listen to these tips:
- Waiting room And rest room Most often they are combined into one large room. Naturally, if you do not plan to use the bathhouse by several people at once, then it is better to make the rest room small, cozy room, placing a table for four people and four stools here.

Advice! Should only be used simple wooden furniture. Cushioned furniture, covered with leather or fabric is not suitable for such rooms, because constant humidity will have an extremely negative effect on the appearance of such upholstery.
You also need to decide from which room the fuel will be loaded into the stove.
Often the oven is loaded from the rest room, because:
- It is more convenient to store firewood here; in this case, there is no need to bring it into the steam room.
- Despite the small size of the steam room, loading fuel from this room will be inconvenient.

- Along one wall there is a place for storing firewood, a stove door and a door to the steam room.
- On the opposite wall there is a wardrobe and a table with chairs.
Advice! The interior of the rest room should be as simple as possible. Before decorating it with various objects, think about whether they are suitable for the given room. Skins and stuffed animals are clearly a bad choice.
- If you are planning to build a very small bathhouse (for example, 3 by 3 meters), then you can completely abandon the rest room.
In this case, you need to do the following:
- At the entrance there is small hallway, which accommodates a cabinet and fuel storage space.
- Fuel is loaded in the steam room.
- The interior consists of three rooms: an entrance hall, a sink and a steam room.

Calculation of space for bathhouse premises
Wishing build a small bathhouse, it is very important not to overdo it, because considerations of saving space should not be higher than the functionality of the room.
- The volume of the rest room should be calculated taking into account the fact that each visitor has 2-3 square meters of area.
- The area of the washing room is calculated similarly to the rest room.
- The steam room can be more cramped; one and a half to two square meters per person will be enough here.

It is advisable that there is one small window in each room. This will save you energy costs when taking bath procedures in daytime days.
Advice! Windows should be located at a height above the height of the average person, that is, at a distance of 185-190 cm from the floor.
Construction planning- a very important stage, since it is during the development of the plan that the further comfort from using the bathhouse is determined. Therefore, compiling project of a small bathhouse for a summer residence, you should compare all the pros and cons as much as possible to get the most functional structure.
Small bathhouses for a summer residence photo


Traditionally, it is customary to install baths on your own personal plots or in dachas in the form of separate buildings. However, not everyone has enough territory to install such a full-fledged bath complex. In this case, a mini sauna for a summer residence comes to the rescue.
You can build this miracle yourself, based on the space allocated for it. In this case, you will need to draw up a full-fledged project with scrupulous geometric calculations. Also, this stage can easily be delegated to professionals who, for a certain cost (it can be quite large), will provide results in the shortest possible time. In some cases, it is appropriate to use ready-made standard proposals.
Dimensions
A mini sauna for a dacha, built with your own hands, will bring more joy to the owner and will allow you to significantly save on the project and on paying third-party builders. At the design stage, you will have to pay attention to the fact that in projects for mini-baths for summer cottages, as a rule, not all traditional rooms found in classic bathhouse complexes are included.

In most cases, such buildings are devoid of rest rooms and other frills. Only functionally important elements remain:
- a steam room that combines the functions of a washing room;
- a dressing room where people undress and leave things.
Pouring the foundation
The implementation of a do-it-yourself mini bathhouse project for a summer cottage begins with the construction of a foundation. Since the structure is supposed to carry a small load, in most cases they make do with support-column piles or a shallow strip foundation.
.jpg)
For small design a strip base is suitable
The second option is relevant for loose soft soils. Piles are used in cases where the soil is quite hard and digging a deep trench is not advisable. When the mini sauna in the country (the video is presented on the page) will be mounted on hard and dry soil, they will make do with pouring a lightweight version of the foundation. To form it, a layer of stones is laid close to each other over the entire area of the future building. A layer of clay is applied on top of it and compaction is carried out. After carrying out such work, it is necessary to level the surface and then lay a waterproofing layer on it.
If a mini bathhouse for a summer residence (the photo is on our website) requires the presence of a strip foundation, then the following actions are carried out:
- a sand cushion of up to 150 mm is poured into the trench;
- roofing felt is laid for waterproofing;
- mounted wooden formwork;
- Prepared concrete is poured into the formwork cavity.
To make a columnar foundation for a mini bathhouse for a summer house, you need to buy concrete pillars and bury them at approximately equal distances from each other, 0.8-1.0 m. This type of foundation will be relevant for frame construction.
It is also worth paying attention to the pile-screw foundation, which is much easier to install than concrete pillars, but at the same time is a more durable foundation.
The distance between piles should not exceed two meters around the perimeter of the building. Piles can be driven in manually or using special equipment(Yamobura), while they always dive to a depth below the freezing level of the soil (150-200 cm).
Piles for one house with an area of up to 60 sq.m. two people can do it in 1 day.
Wall installation
You can make it easier to build a foundation for yourself using frame method construction. This option is the most economical in this situation.

Construction of walls
The inner side of the installed wooden frame is sheathed with timber. At the next stage, a layer of thermal insulation is formed. To ensure the effective functioning of a budget mini-sauna in a country house, installed with your own hands, you need to choose the right insulation layer. The following materials serve as it:
- mineral wool;
- sawdust with clay;
- expanded clay
Cladding the outside with a block house will give the structure an elegant appearance. You can choose the finishing of the building in the same style as the house located on the site.
When choosing materials, it is necessary to take into account their fireproof properties.
Water supply and drainage
In order for a mini sauna for a dacha to be inexpensive, it is necessary to install an effective but compact drainage system. A hole with a useful volume of about 100 liters is dug nearby for it. This is enough for 1-2 people. You can put a barrel without a bottom inside it to prevent the walls from collapsing. It is necessary to lay the pipeline from the steam room taking into account the operating time of the mini bath. For winter period plastic sewer pipe deepen below 0.8-1.0 m so that it does not freeze.
.jpg)
Draining
To provide a mini sauna at your dacha with hot water, you need to buy an inexpensive electric heating element. It will quickly heat a small volume of water, which will reduce the time it takes to light the stove. Containers with water are placed higher so that it can be used without additional pumping, and it flows by gravity. In some cases, a mixer is installed.
The water drain can also be connected to a common home sewer system. This option will reduce the cost of additional equipment autonomous system drainage.
Drain communications are laid at a slight angle of inclination so that water does not linger in the cavities. For an autonomous pit, a layer of expanded clay or coarse crushed stone is provided at the bottom of the cavity. From above it is necessary to reliably insulate it from freezing. It is enough to lay a layer of soil or clay.
Ventilation installation
In order for a mini bathhouse in the countryside, assembled with your own hands, to look like in the photo for a long time, you need to provide it with high-quality ventilation. If this is not done, an unpleasant odor will form inside, which will be difficult to get rid of. With good ventilation, the internal wooden base long time will have therapeutic and prophylactic properties.

Ventilation
For a small bathhouse, a glazed window will be suitable, which will be located opposite the front door. It can also be seen by simple holes with a damper in the wall. If the budget allows, then buy an exhaust or supply opening of the required dimensions.
Even when building a frame bath, you need to pay attention to thermal insulation. It does not matter what the temperature inside the room and steam room will be if more than 50% of the heat escapes through the walls and ceiling. The main points of heat loss are walls, floors and ceilings. To insulate them, standard heat insulators are used, but with mandatory waterproofing.
Single design
Most simple option is a frame mini bathhouse at the dacha installed with your own hands. The minimum size of the structure is often limited to a length of 2 meters. Its width rarely exceeds 1.3-1.5 m. Outer layer it is made up of lining, and the waterproofing material is roofing felt. The room can be heated with a powerful heater up to 4 kW. It is located next to the heater made of fragments of soapstone or basalt.

Single bathhouse
Limestone, flint or layered sandstones should not be used as heating stones for the heater.
If space allows, it can be filled with a wood-burning stove. Small room it will warm up very quickly.
VIDEO: Mini sauna. The dream of all summer residents! Log house 2x3 and dressing room made of clapboard
A small bathhouse for a summer residence is by no means a luxury. With minimal construction skills, you can build it yourself in a relatively short time. In addition, the market today offers a wide range of ready-made structures at very affordable prices.
In general, there is plenty to choose from, but so that you can more confidently navigate all the diversity, below we will describe the main types of baths.
Historical classification
Even a quite compact bathhouse for a summer residence can have the most different designs, which, accordingly, provides a difference in sensations when visiting the steam room. And here main role plays a role in the type of steam supply, as well as its temperature and humidity.
From this point of view, it is most convenient to consider the historically established types of steam rooms:
- Russian bathhouse is the most popular type in our country. It is a room with a stove-heater, which, in fact, is responsible for pumping up the heat. A special feature of the Russian steam room is its high humidity, which can be adjusted independently by periodically adding cold water to the hot stones.

- The Finnish bathhouse (aka sauna) is only slightly inferior in popularity to the Russian one. The designs of these varieties are identical, but unlike a wet Russian steam room, the air in the sauna is maintained in a fairly dry state. Thanks to this, the human body more effectively resists high temperatures, so experienced amateurs can easily tolerate heat well beyond 100 0 C.
Note!
We should use the usual broom in the sauna only at low temperatures, otherwise there is a risk of severe burns.
- The Turkish hammam is distinguished by the fact that it maintains a relatively low temperature. They try to keep the steam in the room quite humid and not heat it above 50 -60 0 C. Thanks to this, you can spend not just a few minutes in the hammam, as in a regular steam room, but up to several hours without any damage to your health.

- A Japanese bath (furo) is essentially a large wooden tub into which hot water is poured. The tub is usually placed in a room with hot (+30 0 C or more) and humid air. There are also varieties of furo designed for several people - the so-called sento. They differ large sizes, and it is advisable to dive into them only after taking a shower.
Analyzing this list, you can see that small bathhouses for a dacha can only be built in Russian or Finnish technology. To build a hammam, Japanese bath, as well as other exotic options, such as a Roman or Mexican steam room, it is advisable to build a separate, fairly large room. Naturally, the price of the project will also be appropriate.
Structures used in private households
By type of structure
So, if we have decided that a small bathhouse at the dacha will be built according to the Russian or Finnish type, it is worth understanding the design features.
In private households, the following options can be implemented:
- Mini sauna in the country, which is part of the house itself. If the size of a residential building allows, then a separate room can be allocated for a steam room with a shower. This way we will ensure significant savings on the construction of a separate building, in addition, we will not need to worry about thermal insulation: additional insulation You will only need it for the steam room itself.
Note!
On the other hand, it is important to place it in such a way that the heat from it does not become a source of discomfort.
- Extension to the house. A compromise option that allows you to comfortably use the steam room even if this structure was not originally included in the project. Typically, mini saunas for summer cottages are attached to the back wall of the house, which allows them to be hidden from prying eyes and protected from wind and drafts.

- Full-size permanent structure. This option is suitable for those who want maximum comfort. Of course, building a sauna with your own hands may require serious investment, and you will have to work hard, but as a result we will have a full-fledged sauna in which you can steam without regard to temperature and humidity. And if you also add a terrace to it, then the resting place will be simply ideal!

- Compact version in the form of a mobile trailer. It is quite convenient to transport, installed either on the ground or on a low-power foundation, but has a relatively small area. In principle, you can steam in such a trailer, and even comfortably, but only inexpensive bathhouses for summer cottages are produced in this format.
Note!
An exception is the technology used to produce country houses from block containers.
Baths made using this method turn out to be quite large and relatively spacious, and they are cheaper than a permanent building.
- A separate group consists of temporary structures, which are canopies made of tent fabric. They are installed on any flat area and dismantled after use.

By material
A homemade bathhouse in a country house can easily be erected without the involvement of third-party craftsmen. If this is your option, then you should choose in advance what material you will use to build the steam room.

Experts give the most different recommendations, which we tried to summarize in a single table:
| Material | Advantages | Flaws |
| Log |
|
|
| Beam (flat and profiled) |
|
|
| Brick |
|
|
| Cellular concrete |
|
|
It should be noted that this instruction contains information only about the main points. Thus, despite the low fire resistance, prefabricated bathhouses for summer cottages are often made from logs or timber impregnated with special protective compounds.
The same applies to foam concrete: yes, it cracks when it settles, so they try to compensate for this minus by building the most stable base possible.

By heat source
Another important factor to consider is how our sauna will be heated.
A sauna stove can be very different, but the main thing is that it can heat the steam room and maintain a high temperature (up to 100 0 C) for a long time.

The following varieties are available on the market:
- Wood burning is the traditional option. The stove can be made of brick, or it can be a cast iron or steel container with a chimney and a heater located inside the steam room itself. Usually the firebox is located in the dressing room, which allows you to save space in the steam room and add firewood in advance.
- Gas ones are more modern and most economical. The main difficulty is the installation of the equipment, since only a certified specialist can connect it.
- Electric ones are the most compact and easiest to use. They are located in the steam room itself and do not require the installation of a chimney. Most electric ovens are equipped with convenient control panels that allow you to adjust the temperature.

Note! The right decision When installing such a stove, you will need to purchase or rent a diesel generator for your summer cottage: the device consumes a large amount of electricity, so it is advisable to purchase a separate unit to power it.
What if you buy ready-made?
If you don’t want to bother with construction, then your choice is ready sauna for the dacha.
Let's try to figure out what it is and what its features are:
- As a rule, such products are mounted either on the basis of small trailers (sometimes even on a chassis, which makes transportation possible), or on wooden frames covered with boards.
Note!
Recently, cylindrical models have become popular.
They look original, but there are questions about ease of use.
It’s better to independently examine the specimen you like and draw a conclusion.
- The outer and inner cladding is made of lining. Since such structures are positioned as budget ones, the lining is mainly pine, albeit well-treated and impregnated with moisture-proof compounds.
- More expensive models are assembled entirely from timber, most often profiled.
- Inside mobile saunas for a dacha they are equipped with a small compartment for clothes (aka a dressing room), a washing room and a steam room itself. An electric heater is responsible for heating, but you can also find models equipped with a wood-burning stove.
- A water tank is mounted on the roof, and a drainage tray is installed under the washing compartment. At the bottom of one of the side walls there is a pipe through which water is drained.
In principle, the purchase of such a product will be completely justified if you do not have construction skills: the construction of even the simplest bathhouse by a hired team will cost much more.
Conclusion
Expensive, budget and very cheap summerhouses can have very different designs. And although they provide us with different levels of comfort, the wide range allows us to make a choice in favor of the most suitable option. And in order not to make a mistake, we recommend that you remember the information presented above, and also watch the video in this article.