DIY paper house model: diagrams, patterns for gluing. Production of architectural models of buildings and houses
Despite the fact that the majority computer programs, which are performed in 3D modeling, allow you to imagine quite realistically appearance your future home, designing paper houses is still relevant. After all, not everyone knows these programs. Should you order one from an experienced engineer or designer? computer model expensive. In this case, mastering simple techniques for modeling houses made of paper and cardboard is much faster.
And if you have children from 2 to 10 years old, then this work can turn into a fascinating activity for them. Moreover, the educational and developmental effect of this type of activity is difficult to overestimate. This includes accuracy, motor skills, skills in working with tools and, of course, the development of spatial thinking.
Simple layouts of paper houses and patterns for gluing
Making a house model with your own hands is not difficult. The simplest layouts of paper houses are easiest to make from the so-called. developments, when all their elements are connected to each other by fold lines and represent a solid element in the form of a diagram.

Also, the development, in addition to the walls, floor and roof, has additional bends for gluing. You can find links to such scans on the Internet. It is enough to print them on a printer or, by measuring the aspect ratio, draw them on sheets of paper or cardboard and obtain a scan diagram for modeling.


You can transfer the resulting scan to colored paper.

Using a needle or awl, you can transfer key points of various elements onto it: windows, doors, places for attaching additional architectural elements And so on. You need to cut them out immediately using a stationery knife, placing a piece of thick cardboard or plywood under the sheet with the scan.

Separately, overlay elements are made: window frames, shutters, doors, etc., which you glue onto the finished layout last.

The easiest way to make an even bend along the lines is to apply a ruler with a sharp edge to it. By repeating this procedure at all bend points, you will get a development ready for gluing.

You can also make a development by making each structural element separately and connecting them together at the bend points from the inside with tape. This method is especially interesting when you are making a house model from thick, hard cardboard.
You can glue the layout using quick-setting adhesives such as PVA, stationery silicate, glue stick, etc. It can also be produced using double sided tape, sold in construction stores.

We offer a video to help:
Making a layout for a house model with your own hands
Process self-made development is no less exciting than working with ready-made samples. To do this, you will need almost any program installed on your computer to work with graphic images. CorelDraw or something similar that processes vector images is best. In it, with an increase or decrease in the image size, both the thickness of the lines and the loaded textures change in the same ratio. This allows you to obtain more realistic images. And the library of textures built into its shell is impressive. At the same time, by filling the sweep element with texture, you can get the finished appearance of the main layout elements.

The entire process, including filling parts of the scan with the selected texture, applying visual effects and architectural elements, and inserting images from the symbol library, takes from 10 minutes to half an hour if the house is not very complex. Print the scan on a color printer and start prototyping.

For testing, you can use this one we made by copying the image to your computer and enlarging it to the required size.
Making complex designs from paper
The process of manufacturing complex multi-component house models is not much different from that described above. It’s just that similar sweeps are performed for individual elements of composite layouts. A group photo of the assembly of a similar layout shows it individual elements and assembly order.

Having mastered the simple technique of paper layout simple houses, you can create entire paper towns with elements landscape design, plants, car models and small architectural forms.

Paper building models round shape The easiest way to do this is to apply the formula for determining the circumference of a circle (2πr) to their calculation, adding to it a strip for gluing.
You can also add realism to your layout by simply lighting the house from the inside.

To do this, you can mark the connection points for the LEDs and the battery on the scanner, and then install them during the process of gluing the layout.

Such a house can also serve as a night lamp, but in this case it is better to use a switching power supply connected to the mains.

Will do Charger For mobile phone. You can also use inexpensive Christmas tree garland:
Simple house layouts without development
These are, first of all, houses assembled with your own hands from paper cylinders. The same layouts are great for various small architectural forms on prefabricated layouts with landscapes.

But also, using a similar technique, you can create a realistic model that imitates a log house so dear to the heart of any Russian.
To do this, you need to take longer pieces of paper to make the tubes, so that after folding, its turns resemble the annual rings of a tree cut.

And the junctions of the crowns can be modeled by pressing the ends of the tubes with a solid round object of suitable diameter.

It is easy to assemble a paper frame from such elements. And display the intermediate crowns along the facades, and for a sample you can take a photograph of any real log house.
It is better to make roof coverings for house models separately, in the form of paper slate sheets, tile flakes or honeycombs of bitumen shingles.
Dear readers, if you have any questions, please ask them using the form below. We will be glad to communicate with you;)
Architects usually create miniature models (models) of buildings. Before you start building a house or an entire residential complex, you first need to make a sample of it to scale (photo). Real architects make models from PVC (polyvinyl chloride), and parts for future buildings are cut out on a special milling machine, which is programmed with a specific computer program.

Such a machine is capable of not only cutting out microscopic parts with pinpoint precision, but also applying a cross-section to their surface that imitates brickwork or other coating. Thanks to this, maximum reliability of the layout is achieved. The machine cuts out tiny windows, doors and other parts. After this, the architect connects them together using a solvent, which melts the edges of the PVC plates and tightly fastens them to each other.
The same thing can be done at home, but only without milling machine, PVC and solvent, and using cardboard, paper, PVA glue and scissors. The production technology is very similar to what the pros use. The difference lies only in the materials and, of course, the quality of the model produced in this way.
But if you try really hard, you can make a paper building without anything. worse than that, which is created by an architect using a high-tech milling machine. So, how to make a house model with your own hands using a basic set of stationery?
What do you need for work?
To make a house model, you will need the following tools:
thick white/colored A4 paper (several sheets);
cardboard of the same size;
a sharp construction knife (it is convenient for cutting out the walls of a building, and then cutting small windows and doors into them);
glue brush;
PVA glue;
wooden or plastic board for modeling (it’s convenient to cut out parts on it so as not to damage the table);
scissors;
pencil;
ruler.
You can also use a regular household hair dryer to quickly dry the glued parts. You can cut out a building from either paper or cardboard. Last option- more reliable, but a little more difficult to work with. You can cut out the entire layout from paper, and then mount it on several “load-bearing” cardboard walls (photo). This will strengthen the entire structure and give it more stability.

Creating a diagram of the future building
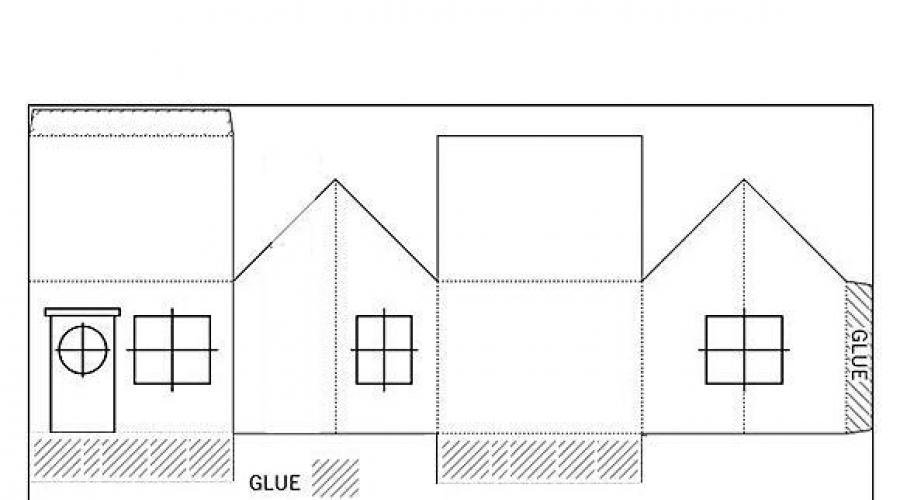
There are two ways to create the walls of a future building. For the first one, a scheme like the one in the photo below is used. This is literally the entire building, but in a centerfold. Adjacent walls can be made continuous and not cut. They will simply need to be bent later, forming the corners of the building.

Immediately mark the locations of future windows. They must be on the same level. Don't forget to leave small indentations on the sides and bottom of the walls, as in the diagram. Afterwards, with their help it will be possible to connect the structural parts with each other. The entire building should be done to scale so that later the walls, roof and other parts of the house are proportional.
Making a layout: method 1
After the entire diagram is drawn on paper, all that remains is to cut out the future building, bend the lines marked with a blue dotted line and cut through construction knife windows. Use a modeling board. It allows you to cut out parts from cardboard and then glue them together much more conveniently.
The scheme presented in the photo above is suitable for the production of the simplest houses. More complex design will literally have to be made up of several parts. By the way, the layout can also be made to open (so you can see interior decoration Houses). It is on this principle that children's doll houses are made, which can be purchased in the store.

To make such a layout (photo), it is advisable to use the thickest cardboard you can find. In order for part of the wall to open, an appropriate fastener is used (this can be found in old Soviet-made boxes) or simply a piece of cardboard bent in half. Doors can be made to open in the same way.
Method 2
The second method is suitable for producing models of buildings with more complex configurations (photo).

First, you need to fold a sheet of paper like an accordion, as in the photo. The more folds, the more walls you get, but their width will be correspondingly smaller. On one fold you need to draw ½ of the building's facade. We draw very carefully, with a thick line outlining the places of the cut, and a thin line outlining the places where the paper is folded.

Then we cut along the bold lines and unfold the accordion. The result will be a whole façade, absolutely proportional and even, as in mirror image. We bend the paper holders as in the photo and cut the windows with a construction knife.

After this, the parts of the structure are assembled together, coated with glue at the joints and glued together. We make a base for the layout from cardboard. When the entire structure is ready, you can paint it or stick some images (as in the photo).

Making trees and grass
To make the layout look more authentic and to be able to visually assess its scale, it is advisable to decorate the cardboard stand with greenery: grass and trees. To do this you will need:
a can of green paint;
acrylic paint in several green shades;
dried twigs (dead wood);
a piece of foam rubber;
glue;
awl;
paint brush.
First, in any unnecessary container, mix several tones of green acrylic paint(dark and light to achieve maximum authenticity effect). After this, you need to cut the foam rubber into small pieces and properly saturate them with this paint. When the foam rubber is colored, we leave it to dry for a day.

We cut the dried foam rubber into such small pieces that they literally resemble crumbs. This will be our grass. After this, paint the cardboard stand well with greenery several times, and when the paint dries, cover it with a thick layer of glue. Pour green foam crumbs onto the wet glue in random order. The grass is ready.
When the glue is completely dry, you need to make several holes in the cardboard base with an awl. Be very careful not to damage the entire layout. We paint dry twigs with green spray paint and stick them into the holes in the stand. Now the trees have taken their place. All this vegetation makes our paper building model look more realistic.
Miniature buildings can give the client a complete impression of the future construction. The layout workshop "ArchLine" creates layouts residential buildings, specialized equipment, military buildings for professional or industry exhibitions in Moscow and Russian Federation. Large-scale structures reproduce in detail the development projects of neighborhoods or complexes.
Miniature building models
For the presentation of the main technical features and characteristics of the structure, the layout can be made in several versions:
- Architectural. Aimed at general awareness of the buyer or customer about the appearance, infrastructure, and basic concept of the future residential building;
- Presentation. Represents the architects' idea in its entirety. Projects are thought through small parts: built-in lighting, moving elements;
- Planning. The most detailed view. Reflects the subtleties of apartment planning solutions; it can be implemented with partial or complete arrangement of furniture and interior decoration;
- Conceptual. Designed to familiarize you with the initial stages of construction. Performed in one color scheme With minimum quantity small details.
You can buy a model of a residential building by contacting the company’s architect-designers by phone in Moscow +7 495 532 41 34 or leaving a request online on the website. The staff will provide full information about the models offered, payment and delivery methods. The price and production time of the product depends on the degree of detail, the presence of moving parts and elements of the surrounding areas.
An architectural model is a three-dimensional representation of a designed or already built house, a complex of buildings or an entire city. Layouts are a necessary part of design; with their help, a designer or developer evaluates the composition and harmony of a building, and also clearly demonstrates the project to the customer.
Layouts are made on a computer, which simplifies the process and saves resources. 3D printing allows you to quickly and economically present a visual design to the customer. In this article we will look at the features of architectural models and 3D printing.
We create and print architectural models of any complexity.
Architectural model of the buildingin a 3D model: advantages
Architectural models - complex product with many small details, and when creating them you need to take into account whole line nuances. Creating a real architectural model sometimes requires many weeks and hundreds of dollars. But 3D printing significantly reduces the cost of the project. In addition, the creation of models takes several hours, not weeks.
Architectural firms have been using CAD (Computer Aided Design) to create projects for many years. If the studio decides to install a 3D printer, it will not need to make changes to software. All you need to do is connect the device to your computer.

3D models allow architects to work more freely without the fear of making mistakes, and designs are much more accurate than actual models. Rendering 3D models on a printer is fast and saves significant resources. Such visualization is clearer and closer to reality than sketches, drawings and digital models.
Therefore, 3D printers quickly gained recognition in the industry, and more and more studios are using them for a variety of purposes - even printing real objects of urban architecture.
3D printed house by Apis Cor.
By the way, another direction is emerging in 3D printing of buildings modern science: bionics in architecture - layouts, structure of buildings, as well as their shape, repeating nature. For example, when creating lightweight and at the same time strong walls, the structure of bones is taken as a model. In April 2014, the Chinese implemented a project for cheap 3D-printed houses. The photograph below shows the structure of the walls, modeled after bone tissue.

Architectural models on a 3D printer: program selection
Architectural models are created on a computer using a number of programs. One of the best is considered to be CAD (Computer Aided Design), or rather, its subtype ArchiCAD - a program made by Graphisoft specifically for architects. It makes 2D and 3D sketches, models based on sketches with the addition of photorealistic textures, and project visualization. The program models not only individual buildings and interiors, but also complexes of urban buildings.
Modeling in ArchiCAD
Other programs for architects:
- Revit;
- AutoCAD Architecture;
- AutoCAD Civil 3D - Best suited for engineering communications;
- Chief Architect - better at home design;
- Rhino3D;
- CATIA;
- SketchUp - helps with architectural sketches and sketches;
- 3D Studio Max;
- Solidworks - more suitable for engineers.
Frank Gehry uses CATIA in his work
Architectural layout of the house:scale selection
After planning your model, the next step is choosing the scale that best suits your specific project. This decision is influenced by two factors: area and detail. If you need to show large areas, for example, architectural models of cities, set the scale to 1:500 or 1:1000. Then the model will not be too large and easily visible.
For a single building, choose a scale of 1:200 or 1:100. At this scale, quite detailed detail is obtained, and windows, doors and balconies will be clearly visible. To show only part suitable for home scale 1:20 - 1:50. The larger the scale, the more details can be discerned.
We will even printarchitectural model KyivA. in a studio industrial design KLONA.

How to make an architectural model: houses, district, city
Creating a model in any program follows the same principles. A building or a complex of buildings is assembled from elements: windows, doors, walls, ceilings and floors, and so on. One model contains hundreds and even thousands of elements - the number depends on the object being modeled and the taste of the architects. Various designers include various elements into your creation.
Stages of creating a model:
- construction of hermetically sealed solid frames;
- removing excess holes;
- checking topology and counting polygons;
- invert normals;
- finding overlapping surfaces;
- removal of moving elements;
- smallest printable elements (SPF);
- strengthening and support;
- the architectural layout must be hollow;
- removing unnecessary geometry.

Creation of impervious elements and removal of gaps
3D printers love being given models that consist of geometrically correct objects called wireframes. The elements should not be permeable, for example, a hexagon has all six sides. If it has only five sides, then it is open frame with a hole. Geometry with holes often prints incorrectly.
When removing holes, use the rule: all adjacent triangles have two common vertices. This ensures a continuous surface without dips. They are removed special applications and manually.

Left - low number of polygons, right - high
Dips in the surface also occur due to the conversion of files from one format to another. Sometimes the number of missing or distorted polygons is so large that you have to manually align them. Software Applications only cope well with external surfaces, so it’s important to review the project yourself.
The more simple elements, the better. WITH big amount It is easy to fix the frames one by one and eliminate all the errors. The fewer elements there are, the more difficult it can be to correct gaps.

Checking topology and counting polygons
Topology checking and polygon counting are necessary to ensure quality printing. The fewer polygons, the smaller size file, and it is easier for the printer to cope with the job. To make a very smooth model, you can make 10,000 polygons or 2,500. The printed model will feel equally smooth to the touch in both cases.
Majority 3D models consists of triangular polygons. Each polygon has three points and a normal - an invisible line perpendicular to the surface of the polygon. They tell the printer how to add material.
If the normals are facing outward as expected, then the printer will add material to the outside. If the normals point inward, the result will be compression of matter. Fortunately, most modeling programs automatically correct all normals.

Coinciding and duplicating surfaces cause a lot of problems. Because of them, the printing result becomes unpredictable. For example, two walls form a corner of a house - this is usually not a problem. But if they have different textures, then the surfaces of the walls differ from each other. Elements are combined in unpredictable ways, which will affect print performance. Therefore, you should avoid this: correctly combine planes with the same textures and choose high-quality printers.
The same applies to moving elements and dots - you need to remove them, as they have an undesirable effect on the print.

What is the smallest printing unit for a 3D printer? This depends on the scale and complexity of the project. Usually for load-bearing elements the smallest parts are 3-5 mm, for ornaments and thin components (windows, doors, columns) - 0.5-1 mm. But still, the sizes are individual for each layout.

Strengthening and support
Some details of the layout require artificial support and reinforcement due to their thinness. Elements that are too delicate may not survive the process of being removed from the printer, polished, and built into the model. Integrated support remains within the layout - adding additional arches and columns, thickening doors and windows. The second way to save the model is through elements that are removed after finishing is completed. For example, roof overhangs need to be supported with something, because they often break off when the model is removed.
How does a 3D printer work?
Hollow model and removal of unnecessary geometry
In cases where it is important to show the appearance of the model, then to save materials and reduce weight it would be wise to remove all unnecessary things inside the model.
How more elements, the better - but extra parts waste material and time printing them. The best architectural mockups have a very simple structure.