Led headlight headlamp instructions. Flashlight led headlight instructions. Motion Sensing Cree Led Headlamp Headlight. Headlamp with IR sensor
Read also
How to charge a battery-powered headlamp? It would seem nothing complicated, however, nevertheless, there are certain rules here. Use of rechargeable batteries - convenient and environmentally friendly clean way autonomous power supply of electrical equipment. Conventional rechargeable batteries can be charged hundreds of times. Such power supplies will last three to four years, or even ten years. The performance of batteries depends on how correctly you use them and how careful you are when charging them. Consider, for example, how to charge a flashlight battery.
What is a battery charger and how does it work?
What's going on inside regular battery, such as in a flashlight? When you turn on the light you call chemical reaction inside power sources, as a result of which, under the influence of electrolyte, electrodes begin to operate, generating electricity, which is transmitted through the circuit to the light bulbs. But such a reaction cannot last indefinitely. It gradually fades and the lamp goes out.
Batteries like travel bags: The more you load into them, the harder it is to fit anything else into it. Overcharging batteries is generally worse than undercharging. Excessive current leads to heating of the batteries, increasing the pressure level inside, releasing chemical substances and even an explosion. Chargers are available with a timer, which helps prevent batteries from being overloaded.
How to charge the battery of a headlamp or other electrical device
How to properly charge the flashlight battery can be found in the instructions for the device, battery and charger. Various chargers are designed to be used with their respective batteries. This is the main rule. If you are wondering how to charge a headlamp with an 18650 battery, then the answer is: only with the help of a suitable charger. Some flashlights are already equipped with a built-in charger or such a device is supplied additionally complete with lighting device. All complex electronics are equipped with their own specific charging: smartphones, laptops, mp3 players, etc. When purchasing rechargeable batteries, pay attention to the voltage and current levels indicated on the batteries. The charger must meet these parameters. Some manufacturers of charging adapters additionally indicate with batteries which manufacturers their products are compatible with. It is possible to purchase both a charger and batteries in one set.
How to properly charge a flashlight battery:
- Use the flashlight regularly and recharge the battery regularly. Do not leave the battery fully charged or discharged for months.
- It is necessary to ensure the possibility of battery recovery. To do this, charge only the discharged battery (do not completely deplete the battery). As soon as the light of the flashlight begins to dim, turn off the device and put it aside or put it on charge.
- Make sure the batteries match the charger.
- Do not overcharge batteries. This will damage them.
- Do not allow batteries to become too hot or cold during charging, storage or use. Of course, batteries can get hot when they're being charged, but if they get hot, that's a problem.
- Don't skimp on buying a good, high-quality charger. This determines how long the batteries will last.
- Follow the instructions included with the products you use.
Now you know how to properly charge a flashlight battery and can extend the life of the batteries or even the entire lighting fixture.
The main purpose of headlamps is to illuminate a space while keeping your hands free. However, everyone different tasks and accordingly, different headlamps are needed; a flashlight for a speleologist or climber will not be suitable for a diver or cyclist.
In our store big choice LED headlamps. There are compact, ultra-light, rechargeable flashlights from Nitecore that are ideal for running in the park at night and in the evening. There are many functional flashlights in an L-shaped aluminum body with a light output of 1000 lm. If you need both high beam and the ability to illuminate the space in front of you, then Led Lenser headlamps, which have a beam focusing function, are suitable for you.
In stores now there is a large selection of headlamps, and it is often difficult to choose the right one and quickly navigate it. Below we have written down the main characteristics of flashlights that are mounted on the head. We recommend that you take them into account when choosing a flashlight and then you will not be disappointed with the purchase.
Parameters of flashlights that are mounted on the head:
- Power
- Range
- Working hours
- Power elements (batteries, accumulators) and the form factor of these elements
- Availability of low beam or additional red
- Beam focusing
- Shockproof and waterproof
- Color rendering (how accurately colors differ in flashlight light)
- Dimmer (possibility smooth adjustment headlamp brightness)
- Fastening
- Additional specialized features (explosion-proof headlamps, helmet-mounted flashlights)
- Flashlight life
In detail about each parameter we
After working for about a year, my LED Headlight XM-L T6 headlamp began to turn on every once in a while, or even turn off without a command. Soon it stopped turning on completely.
The first thing I thought was that the battery in the battery compartment was failing.
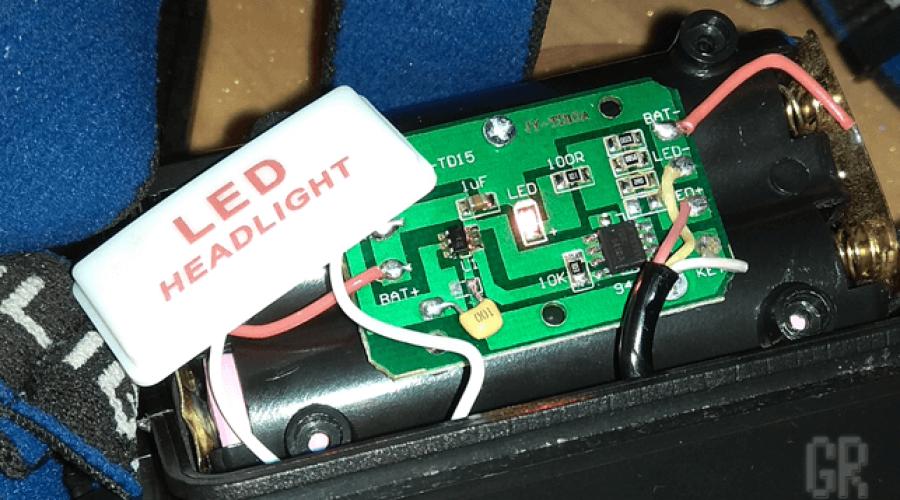
To illuminate the rear LED HEADLIGHT indicator, a regular red SMD LED is used. Marked on the board as LED. It illuminates a plate of white plastic.

Since the battery compartment is located on the back of the head, this indicator is clearly visible at night.

Obviously it won’t hurt when cycling and walking along road routes.

Through a 100 Ohm resistor, the positive terminal of the red SMD LED is connected to the drain of the FDS9435A MOSFET transistor. Thus, when the flashlight is turned on, voltage is supplied to the main Cree LED XM-L T6 XLamp, and a low-power red SMD LED.
We've sorted out the main details. Now I'll tell you what's broken.
When pressing the button to turn on the flashlight, it was clear that the red SMD LED It begins to shine, but very dimly. The operation of the LED corresponded to the standard operating modes of the flashlight (maximum brightness, low brightness and strobe). It became clear that the control chip U1 (FM2819) is most likely working.
Since it responds normally to pressing a button, then perhaps the problem lies in the load itself - a powerful white LED. Having unsoldered the wires going to the Cree XM-L T6 LED and connected it to a homemade power supply, I was convinced that it was working.
During measurements, it turned out that in maximum brightness mode, the drain of the FDS9435A transistor is only 1.2V. Naturally, this voltage was not enough to power the powerful Cree XM-L T6 LED, but it was enough for the red SMD LED to make its crystal glow dimly.
It became clear that the FDS9435A transistor, which is used in the circuit as an electronic key, is faulty.
I didn’t choose anything to replace the transistor, but bought an original P-channel PowerTrench MOSFET FDS9435A from Fairchild. Here is his appearance.

As you can see, this transistor has full markings and the distinctive sign of the Fairchild company ( F ), which released this transistor.
Having compared the original transistor with the one installed on the board, the thought crept into my head that a fake or less powerful transistor was installed in the flashlight. Perhaps even marriage. Still, the lantern did not even last a year, and the power element had already “thrown its hooves away.”
The pinout of the FDS9435A transistor is as follows.

As you can see, there is only one transistor inside the SO-8 case. Pins 5, 6, 7, 8 are combined and are the drain pin ( D rain). Pins 1, 2, 3 are also connected together and are the source ( S ource). The 4th pin is the gate ( G ate). It is to this that the signal comes from the control chip FM2819 (U1).
As a replacement for the FDS9435A transistor, you can use APM9435, AO9435, SI9435. These are all analogues.

You can desolder the transistor using either conventional methods or more exotic ones, for example, using Rose alloy. You can also use the brute force method - cut the leads with a knife, dismantle the case, and then unsolder the remaining leads on the board.
After replacing the FDS9435A transistor, the headlamp began to work properly.

This concludes the story about the renovation. But if I weren’t a curious radio mechanic, I would have left everything as it is. It works fine. But some moments haunted me.
Since initially I did not know that the microcircuit marked 819L (24) is FM2819, then, armed with an oscilloscope, I decided to see what signal the microcircuit sends to the transistor gate when different modes work. It's interesting.
When the first mode is turned on, -3.4...3.8V is supplied to the gate of the FDS9435A transistor from the FM2819 chip, which practically corresponds to the voltage on the battery (3.75...3.8V). Naturally, a negative voltage is applied to the gate of the transistor, since it is P-channel.
In this case, the transistor opens completely and the voltage on the Cree XM-L T6 LED reaches 3.4...3.5V.
In the minimum glow mode (1/4 brightness), about 0.97V comes to the FDS9435A transistor from the U1 chip. This is if you take measurements with a regular multimeter without any bells and whistles.
In fact, in this mode, a PWM (pulse width modulation) signal arrives at the transistor. Having connected the oscilloscope probes between the “+” power supply and the gate terminal of the FDS9435A transistor, I saw this picture.
Picture of a PWM signal on the oscilloscope screen (time/division - 0.5; V/division - 0.5). Sweep time is mS (milliseconds).

Since a negative voltage is applied to the gate, the “picture” on the oscilloscope screen is flipped. That is, now the photo in the center of the screen shows not an impulse, but a pause between them!
The pause itself lasts about 2.25 milliseconds (mS) (4.5 divisions of 0.5 mS). At this moment the transistor is closed.
Then the transistor opens for 0.75 mS. At the same time, voltage is supplied to the XM-L T6 LED. The amplitude of each pulse is 3V. And, as we remember, I measured only 0.97V with a multimeter. This is not surprising, since I measured constant voltage with a multimeter.
This is the moment on the oscilloscope screen. The time/division switch was set to 0.1 to better determine the pulse duration. The transistor is open. Don't forget that the shutter is marked with a minus "-". The impulse is reversed.

S = (2.25mS + 0.75mS) / 0.75mS = 3mS / 0.75mS = 4. Where,
S - duty cycle (dimensionless value);
Τ - repetition period (milliseconds, mS). In our case, the period is equal to the sum of switching on (0.75 mS) and pause (2.25 mS);
τ - pulse duration (milliseconds, mS). For us it is 0.75mS.
You can also define duty cycle(D), which in the English-speaking environment is called Duty Cycle (often found in all sorts of datasheets on electronic components). It is usually indicated as a percentage.
D = τ/Τ = 0.75/3 = 0.25 (25%). Thus, in low-brightness mode, the LED is turned on for only a quarter of the period.
When I did the calculations for the first time, my fill factor came out to 75%. But then, when I saw a line in the datasheet on the FM2819 about the 1/4 brightness mode, I realized that I had screwed up somewhere. I simply mixed up the pause and pulse duration, because out of habit I mistook the minus “-” on the shutter for the plus “+”. That's why it turned out the other way around.
In the "STROBE" mode, I was not able to view the PWM signal, since the oscilloscope is analog and quite old. I was unable to synchronize the signal on the screen and get a clear image of the pulses, although its presence was visible.
Typical connection diagram and pinout of the FM2819 microcircuit. Maybe someone will find it useful.

Some issues related to the operation of the LED also haunted me. I had somehow never dealt with LED lights before, but now I wanted to figure it out.
When I looked through the datasheet for the Cree XM-L T6 LED, which is installed in the flashlight, I realized that the value of the current-limiting resistor was too small (0.13 Ohm). Yes, and there is one on the board seat under the resistor was free.
When I was surfing the Internet in search of information about the FM2819 microcircuit, I saw photos of several printed circuit boards of similar flashlights. Some had four 1 Ohm resistors soldered to them, and some even had an SMD resistor marked “0” (jumper), which, in my opinion, is generally a crime.
An LED is a nonlinear element, and therefore a current-limiting resistor must be connected in series with it.
If you look at the datasheet for the Cree XLamp XM-L series LEDs, you will find that they maximum voltage The power supply is 3.5V, and the nominal is 2.9V. In this case, the current through the LED can reach 3A. Here is the graph from the datasheet.

The rated current for such LEDs is considered to be a current of 700 mA at a voltage of 2.9V.
Specifically, in my flashlight, the current through the LED was 1.2 A at a voltage of 3.4...3.5V, which is clearly too much.
To reduce the forward current through the LED, instead of the previous resistors, I soldered four new ones with a nominal value of 2.4 Ohms (size 1206). I got a total resistance of 0.6 Ohm (power dissipation 0.125W * 4 = 0.5W).

After replacing the resistors, the forward current through the LED was 800 mA at a voltage of 3.15V. This way the LED will operate at a softer thermal mode, and hopefully will last a long time.

Since resistors of size 1206 are designed for a power dissipation of 1/8W (0.125 W), and in maximum brightness mode, about 0.5 W of power is dissipated on four current-limiting resistors, it is desirable to remove excess heat from them.
To do this, I cleaned the green varnish from the copper area next to the resistors and soldered a drop of solder onto it. This technique is often used on printed circuit boards of consumer electronic equipment.

After revision electronic filling The lantern coated the printed circuit board with PLASTIK-71 varnish (electrical insulating acrylic varnish) to protect against condensation and moisture.

When calculating the current-limiting resistor, I encountered some subtleties. The voltage at the drain of the MOSFET transistor should be taken as the LED supply voltage. The point is that on open channel The MOSFET transistor loses part of the voltage due to the channel resistance (R (ds)on).
The higher the current, the more voltage “settles” along the Source-Drain path of the transistor. For me, at a current of 1.2A it was 0.33V, and at 0.8A - 0.08V. Also, part of the voltage drops on the connecting wires that go from the battery terminals to the board (0.04V). It would seem such a trifle, but in total it adds up to 0.12V. Since under load the voltage on the Li-ion battery drops to 3.67...3.75V, then the drain on the MOSFET is already 3.55...3.63V.
Another 0.5...0.52V is extinguished by a circuit of four parallel resistors. As a result, the LED receives a voltage of around 3-odd volts.
At the time of writing this article, an updated version of the reviewed headlamp appeared on sale. It already has a built-in charge/discharge control board Li-ion battery, and also added an optical sensor that allows you to turn on the flashlight with a palm gesture.
. Flashlight led headlight instructions
Motion Sensing Cree Led Headlamp Headlight . Headlamp with IR sensor
 The strap or “headband” is classic, the power supply is located at the back of the head, which makes the flashlight weightless and unnoticeable. The weight of the flashlight itself is 33-35 g. The strap can be removed - there are slots in the loops.
  The head of the flashlight is plastic and can be rotated in a vertical plane by 90 degrees with fixation at certain intervals.

 In the back of the head there is a container for the battery. Here you can see the 3.5 mm socket for charging, closed with a plug. But hardly anyone will use it. To do this, you need a special 4.2 volt adapter and a protected battery. It's easier to remove the battery and charge it.
  Although there is enough space to install a charging controller
 Power is supplied from an 18650 element. An adapter for 3 AAA batteries is also included.

 There are 2 buttons to operate the flashlight. The button on top switches modes. maximum - minimum - strobe. Always turns on at maximum. But in order to turn off the flashlight you need to go through all the modes. The button on the right turns on the contactless mode, at which time it lights up red.
mysku.me
Motion Sensing Cree Led Headlamp Headlight . Headlamp with IR sensor
Hello. Review of a flashlight that can be turned on and off without touching.The flashlight is supplied without packaging.  The strap or “headband” is classic, the power supply is located at the back of the head, which makes the flashlight weightless and unnoticeable. The weight of the flashlight itself is 33-35 g. The strap can be removed - there are slots in the loops.
  The head of the flashlight is plastic and can be rotated in a vertical plane by 90 degrees with fixation at certain intervals.
 The optical part is aluminum, it is also a heat sink. Pressed into the flashlight body. Disassembly is not provided. Through the glass you can estimate the size of the LED. There seems to be no rubber band between the glass and the reflector; the glass rattles slightly. And this simply cannot be fixed - the glass does not unscrew.
 In the back of the head there is a container for the battery. Here you can see the 3.5 mm socket for charging, closed with a plug. But hardly anyone will use it. To do this, you need a special 4.2 volt adapter and a protected battery. It's easier to remove the battery and charge it.
  Although there is enough space to install a charging controller
 Power is supplied from an 18650 element. An adapter for 3 AAA batteries is also included.
 There are no electronics in the container.
 There are 2 buttons to operate the flashlight. The button on top switches modes. maximum - minimum - strobe. Always turns on at maximum. But in order to turn off the flashlight you need to go through all the modes. The button on the right turns on the contactless mode, at which time it lights up red.
Non-contact mode is the main feature of the flashlight. Convenient when your hands are busy and you need to turn on the flashlight. Or while working when your hands are dirty. There is a drawback here - the activation distance is too long (25 - 30 cm), so it can turn on or off unexpectedly when approaching objects at this distance. But this can be corrected by covering the IR receiver or transmitter with some translucent material.
 Let's take a look inside. The driver does not have a stabilization function, that is, as the battery voltage decreases, the intensity of the light flux will decrease.
 On the other hand, the board is empty, only, as I understand it, an infrared receiver and transmitter.
 Here you can see the star from behind.
At maximum mode, consumption is 300 mA, at minimum 80 mA... When the IR sensor is turned on, 7 mA.
 After 20 minutes of operation at maximum mode, the flashlight heated up to 56 degrees. More temperature did not increase. Let's move on to the light characteristics.
 By the nature of the light spot, the flashlight is universal, but closer to long-range ones. The hotspot is pronounced, but the side illumination is also quite bright...
 Comfortably illuminates within 50 meters.

 Maximum and minimum mode. Considering the low energy consumption and the possibility of using a capacious battery, the flashlight turned out to be quite long-lasting. In maximum mode, using a 2400 mAh battery, theoretically eight hours, and in minimum mode seven times longer. Yes, it does not have a flood light, which is sometimes required from a headlamp, but it is quite possible to work with a subcut light. It is especially convenient to do small work; at the minimum mode, the bright spot comfortably highlights the area of interest. Well, contactless activation can come in handy quite often. Common AAA elements can be used. This means that the flashlight can be bought and used by anyone far from the flashlight theme and unaware of the existence of 18650 elements. It’s a shame that there is no rubber band between the glass and the reflector and it is impossible to disassemble it. But if you use it indoors it doesn’t matter.
There is a branded version of the OxyLED-Mh30 subcutaneous flashlight, according to appearance, in terms of light spot, not noticeably different in modes, although powered only by AAA. It is probably of better quality and has rubber bands where required, but it costs 10 times more. Thank you for your attention
mysku.ru
5000LM CREE XM-L 3x T6 LED Headlight \ Headlamp from Boruit
Features: * Color: Black * LED Model: 3x CREE XM-L T6 * Lumen: Max to 5000LM * Powered by 2 x 18650 3.7V (not included) * Mode: 1x Cree XM-L T6 / 2x Cree XM- L T6 / 3x Cree XM-L T6 / Flashing * 90 degree rotation: Yes


Perhaps one of the highest quality Chinese headbands that has been in my hands. The parcel took an awfully long time, more than a month. I thought it was stolen from the post office, there was already a precedent with a flashlight, it just disappeared. For this reason, I advise you to take this kind of parcel with a tracking number, especially considering our situation in Ukraine.

Let's start with the appearance. All the flashlights that had been in my hands before gave me the impression of “handicraft” assembly and production. In this same flashlight, everything, from the applied paint to the headband, already creates the impression of being closer to factory production. 

The button has a soft move and does not need to be “recessed” completely to turn on or switch modes. 
Brand labels everywhere 
I don’t know what it is, confirmation of the originality of the product or a warranty sticker behind which a screw is hidden... 

The elements are declared CREE XM-L T6, well, later we will see if this is so 

Glass lenses everywhere! 

Entrails 

The battery cassette is standard, with charging capabilities. AC charging is not included. The only difference is the backlighting of the cassette. It is not as bright and orange as on all other flashlights 

So... the first mode turns on the largest flashlight in the middle 


The second mode turns off the large flashlight and turns on two small ones on the sides. The light becomes softer and acquires a little turquoise shade. With such light it is convenient to do something close. 


The third mode includes all 3 flashlights, but at the same time all the light is balanced, the main flashlight does not blind as in the first case, but complements the two small ones. Accordingly, battery consumption will not be so ruthless, but there will be enough light. I was very pleased with this moment... I liked even more that the flashlight practically does not heat up. After at least 15 minutes I didn't feel anything. 


The fourth mode includes a strobe light.
This is what I think is an interesting flashlight that fell into my hands and will become my main favorite for now. Lightweight, comfortable, well made. The only negative for me is the lack of zoom, I'm too used to it. Product provided specifically for review 
mysku.ru
3 Mode CREE LED Zoom 18650 Headlight Headlamp Torch for Winter Skiing
During the winter season, the daylight hours are much shorter, and it starts to get dark before you get home from work. I like skiing, the Balatovsky forest with a skating track nearby. To remove restrictions on the choice of riding time, thanks to the senneka review, a headlamp was ordered. In my review, I will not duplicate existing reviews, I will not compare beamshots as on a flashlight, but I will talk about one application for which a flashlight is excellent (taking into account the price) - night skiing. In total, we bought 2 of these flashlights with one sku, they differ slightly - the width of the rear compartment for the battery and the presence/absence of an adapter for 3xAAA batteries. The first came at the end of 2011, the second at the end of February. The luminous flux did not differ.

For field tests a ski track was chosen in the Balatovsky forest in Perm. Photos taken on a Canon PowerShot A495 point-and-shoot camera automatic settings with the flash off. Scene 1: 
 Scene 2: different zooms:
 Scene 3. Ski slope - number.
  Scene 4. A Christmas tree was born in the forest.

Video of the descent from the hill, filmed using the F500L video recorder (bought from Diana from ebay). 
In reality you can see much better, your eyes adapt. The light falls on the snow; it has a good light reflectance coefficient. As a result, we get sufficient lighting. If you shine on dark surfaces, the reflected light is not enough. This is due to both the small luminous flux from the diode and the zoom - the light spot has a clearly defined elliptical shape with sharp boundaries. In the video there is minimal zoom.
Comparison with a flashlight on an XML-T6 diode I have 2 flashlights on an XML-T6 LED, I use it as a bike light, it was interesting to compare the illumination from them with a headlamp: Scene 3: The circle on the right is a headlamp:  Flashlight Brinyte XML-C8 with diffuser in the form orange peel:
 The less light falls on the snow, the darker it is.
Of course, the XML-T6 LED is much more powerful than the CREE Q3 (IMHO it’s inside the headlamp with the bic), but the size and shape of the reflector also has an impact. 
Conclusion: Pros: *Price/features *Operating time - more than 2 hours without reducing brightness on a 18650 Trustfire 2400 battery (real capacity about 2000mAh). * Luminous flux the amount received from the flashlight is sufficient for illumination, this is facilitated by high reflectivity white snow, so you have to shine on the snow in front of you; if you shine into the distance, the reflected light is clearly not enough. PHOTO tilt angle PHOTO into the distance PHOTO in front of the skier *The design of the flashlight's power supply system is quite successful, in addition to the weight distribution, the design of the battery compartment with a rubber cap fits tightly to the head, heat is supplied to the head through the cap and elastic band battery: LiIon quickly lose capacity in the cold, so heating will increase the operating time of the flashlight in winter.
Cons: *There are no restrictions in the flashlight driver to completely drain the battery. The flashlight switches to a less powerful mode, and the protection of the Trustfire 2400 did not work. *The elastic band may fall off when putting on due to design features: 

During operation it never fell off, the flashlight is fixed firmly enough, no problems arise. * The tilting hinged design of the flashlight seems unreliable to me; you can get by by pulling the flashlight at an angle on your forehead (so that it shines close to the snow in front of the skier). Other applications: the flashlight is quite poorly suited for cycling - at cycling speeds there is a lack of light supply
On the head the flashlight looks like this: 


 PS the following participated in testing Chinese goods:
 Flashlights: subject, Brinyte XML-C8 (XML T6 diode) with BuyInCoins, UltraFire WF-502B with Dinodirect (XML T6 diode), batteries: 3x Trustfire 2400 with light with Bic, 2x EniTime with DX, and F500L DVR from ebay from Diana .
mysku.ru
Review of the LED Headlight Flashlight – It turned out that it is very convenient.
Advantages
Convenient, practical
Flaws
Not significant
Details
Until recently, I did not use other flashlights at all, except those found in ordinary Chinese lighters. And what? I always have a lighter in my pocket. If this is not some cheap fake, then the flashlight burns with a very bright, even light and lasts for a long time. You went out into the street at night and walked along, lighting the road. The same is true in other cases. If you go into the basement for pickles or do something in the garage with both hands, you just clamp a small lighter between your teeth and work. I always didn’t like ordinary hand-held flashlights because of their large size, and besides, since my Soviet childhood, there was some kind of prejudice against them because of the fragility of the batteries. I remember how the lights constantly went out at the most inopportune moments and how I had to take out these huge batteries and bang them against each other so that they would work for a couple more minutes. It’s easier with lighters - they cost pennies and last a month, or even two. As soon as they start to go out, you just go and buy another one.
Of course, I heard about special headlamps. I've seen them more than once in films about special forces and miners, but in real life Until the year before last I almost never encountered them. And a couple of years ago, one of my friends, who was then serving in the special forces, gave me a brand new Led Headlight headlamp for free. Their unit is full of all sorts of equipment, and sponsors regularly “warm” them, so with some things like balaclavas, flashlights and small radios, all their personal lockers and the storeroom are filled. So the buddy periodically unloaded his locker, presenting me and his other friends with these gadgets. I admit, at first I was quite skeptical about this gift, but after some time, having tried the flashlight in action, I was able to appreciate it. Now it always lies on my shelf near the exit to the street and I use it almost every day.
What can you say about this flashlight? Nothing, actually... It's just very convenient and practical. I wear it when dark time day you need to go, for example, to the woodshed, or to the chicken coop. Again, it is indispensable when you go into the basement to get potatoes or go down to clean a well. There is light and your hands are free. The flashlight has a special lock, by adjusting which you can direct the light beam either downwards or straight in front of you. The flashlight shines very smoothly and brightly. Just now I counted - there are exactly twenty small LED bulbs in mine. There are two modes of operation - press the button located on the side once - it lights up evenly, press it again - it starts flashing. I don’t know why this mode is needed, perhaps to save money or to send some kind of signal.
Speaking of saving... I've had my flashlight for almost two years now and I haven't changed the batteries in it yet. There are three of them in the flashlight, 1.5 V each, I have them from Sony. They are inserted into the flashlight on the side, in a cassette similar to a small revolving drum. I don't know why they last me so long. LED lights may use less electricity. Or the whole point is that I try not to turn on the flashlight for a long time. For a maximum of 10-15 minutes. At the same time, what’s interesting is that when I see that the flashlight is starting to dim, I usually turn it off, put it on the shelf to “rest”, and after a few days it burns evenly again, bright light. Do they have self-charging, or what?
This flashlight has only one noticeable drawback, and even then it is insignificant. As already noted in previous reviews, the retaining rubber band of flashlights is constantly twisted, so it has to be adjusted and aligned regularly. However, if you don’t care about aesthetics, then you can easily overcome this drawback. I most often use a flashlight in the winter, so I simply pull it over my sports hat without looking and don’t experience any discomfort.
Unfortunately, I don’t have the packaging, so I can’t say for sure where this flashlight was made. But judging by the “native” batteries, which were made in Indonesia, most likely the flashlight was produced somewhere in the same region.
What else? Yes, that's all, I guess... Excellent, very convenient thing. Personally, I am quite pleased with this gift.
Ratings
efficiency
durability
Year of manufacture/purchase: 2013
It turned out to be very convenient.
otzyv.expert
Instructions for using LED flashlights
The flashlight must be stored out of the reach of water and children. Transport flashlights with acrylic lenses in special protective covers or bags - this will protect the optics from scratches.
Never point the switched-on flashlight into the eyes of people or animals - this may cause momentary blinding. Be careful with the fast blinking mode - strobe, theoretically it can cause a disorder of nervous activity. Do not use SOS mode unnecessarily.
We remind you that lanterns with moisture protection less than 100% can be used in light rain for a limited time. 100% waterproof flashlights can be used in the rain and can withstand being dropped in a puddle, but should not be submerged or swam with them.
Use only those batteries that are listed in the "Specifications" section on the flashlight's web page. Install batteries in compliance with polarity: in hand-held flashlights, the “+” of the battery is directed towards the head of the flashlight; in headbands, the “+” of the battery must coincide with the contact without a spring (“-” with a spring-loaded contact). Do not use lithium ion batteries without protection board (un protected). When using 2 or more batteries at the same time, you must ensure that they are from the same manufacturer, have the same capacity, and have gone through the same number of charge/discharge cycles.
Twice a year it is necessary to clean all contact surfaces of the flashlight with the wooden end of a match or a hard eraser that does not leave marks. It is necessary to unscrew the tail part of the flashlight and clean all the contacts, as well as the contacts of the metal module with the LED.
It is recommended to lubricate the threads once or twice a year and O-rings flashlight with silicone grease. The lubricant can be either specially designed for flashlights, or any from a car shop, BUT, it should not damage or soften the rubber.
In anticipation of the upcoming cold weather and as a consequence, possible problems With the launch of the car, I propose to get acquainted with another representative of the increasingly popular family of powerful power banks, capable of not only charging everything that can be connected via USB, but also starting cars when standard batteries decide to give up.
The portable charger under review has the loud name “High Power”, which should already speak about its capabilities: thanks to a powerful battery, it is capable of charging several mobile gadgets at once, and can also supply current for a short time great strength to ensure the ability to start the car in the event of a discharge or malfunction of the standard battery.
This is what the list of all the “useful things” contained in the device body looks like:
- Starting the engines of cars, motorcycles, boats instead of the standard battery and if the standard battery is discharged.
- Starting car engines when low temperatures to “strengthen” the standard battery.
- Charging portable electronic devices: phones, tablets, laptops, wearable modems, game consoles, cameras and other voltages 5v, 12v, 16v, 19v (to choose from).
- LCD screen with backlight for displaying information and controlling the operating modes of the device.
- A bright LED flashlight is installed in the device body, operating in three modes: flashlight, strobe, and SOS signal. Two additional blue and red lights, when turned on, imitate the operation of a police “beacon”.
- Cullet. A metal tip is mounted at the end of the case, which can be useful in extreme situations for breaking car glass.
- Cutter. Helps cut seat belts, tarpaulins, etc.;
- Bright yellow(as it is also called “never lost”) - a guarantee that it will not get lost.
Specifications:
Battery type: lithium polymer.
Battery capacity: 69800mAh.
Actual capacity: 18000mAh
Battery life: 3-5 years or more than 3000 cycles.
Input current: 12v/1A
Output current: 5v/2A (USB), 12v/1A, 16v/2A, 19v/3.5A
Charging time: 4-5 hours
Starting current: 300A
Peak current: 600A (for 3 seconds)
Ports for connecting USB devices: 4.
Temperature: from -20 to +60 C
Size: 160x75x28 mm.
Weight: 500 g.
The device is supplied in a convenient plastic case with information stickers in English applied to the body.
I liked that not all the information provided is of an advertising nature and talks about the undeniable advantages and fantastic possibilities of the contents of the case.
No, of course such information is available here - it is intended for it front surface, the back part contains information about safety precautions, and also shows how to correctly connect the device to the car’s on-board network: first you need to connect the “crocodiles” to the terminals car battery, and only after that connect the alligator clip connector to the starting device. After the engine is started, you need to turn off the device in the reverse order - disconnect the alligator clip connector, and only then disconnect the wires from the car terminals.
An “opening” of the case showed that although the case itself is quite thick and durable, they still saved a little on its size. The contents are packed very tightly, free space no at all, and I was even a little surprised how everything that came in the kit fit here.
Case contents:
The device itself.
A set of cables for connecting most smartphones and tablets (including iPhone).
8 adapters with cable for connecting laptops of various models.
Adapter for connecting to the cigarette lighter socket for charging from a car battery.
Cigarette lighter adapter for connecting car gadgets to the device.
Alligator clips for connecting to a car battery.
Adapter for charging the device itself.
The wires with “crocodiles” are quite thick, and there is also a device here, which, as far as I understand, is designed to block the ability to charge the battery of this starting charger from the car battery, so as not to discharge it even more. Those. Through the “crocodiles” the device can only release a charge.
The connector for connecting crocodile clips to the starter-charger is also protected from incorrect connection.
The “crocodiles” themselves are also very well made - durable plastic combined with a powerful spring and thick metal.
Adapters for connecting to the car’s on-board power supply via the cigarette lighter for charging the battery of the starting charger, as well as a cigarette lighter adapter for powering various car gadgets from this device.
A wire for connecting to a special device connector, the voltage of which you can choose yourself - 12, 16 or 19 volts, depending on what kind of gadget you need to power.
Again, depending on the gadget, you need to connect the appropriate adapter to the wiring, choosing it from the eight included in the kit.
Universal USB charging cable mobile devices has four most common plugs: mini-usb, micro-usb and two for connecting “old” and “new” iPhones.
At first glance at the body of the charging and starting device, it seems that there is some kind of black rubber bumper on it.
But this is not so - the body is completely made of thick plastic in a combination of yellow and black colors.
Below is the model name and brief technical specifications.
On the right side there is a so-called “glass breaker”.
It looks like plastic, it is not attracted by a magnet, it would seem that the first assumption should also be the last, but plastic should not move when touching the skin - this one is distinctly cold, just like any metal, so I can assume that some kind of alloy.
On the left side there are three flashlight LEDs.
A small cutter was placed on the side edge, resembling a sling cutter in appearance. What can they cut in a car in an emergency? Well, the first thing you can assume is jammed seat belts. But, it seems to me, doing this with such a device is not very convenient. Well, okay – let’s put it in the same category of things “no motorist can do without” as the above-mentioned compass.
All controls and connectors of the device, as well as the LCD screen, are concentrated on the other side edge.
To the left of the screen, under the rubber plug (left/right) there are: a socket for powering devices via an adapter cable with selection of the required voltage, a multifunction button, four USB ports for connecting mobile devices, a socket for charging the device itself via external charging or from the car’s on-board network, as well as a device on/off switch.
You can figure out what is intended for what by looking at the corresponding symbols printed on the rubber plug. By the way, you can use the multifunction button without removing the cover.
To the right of the screen, also under the plug, there is a connector for connecting crocodile clips or a cigarette lighter adapter.
Power is always present at this connector and does not depend on the position of the power slider.
By pressing the multifunction button, you can cycle through the voltage values on the connector for connecting laptops, etc. devices.
Here, on the screen, there is an indication of connecting devices via USB.
As we managed to understand, when initially connected to any of the 4 ports, a current of up to 2.1A is supplied to it (I was able to load a maximum of 1.9A), and the corresponding designation appears on the screen.
After this, when simultaneously connected to other ports, a current of no more than 1A is supplied to them.
The side LEDs are turned on by two short presses of the button and their glow is very reminiscent of a police “flashing light”, so in in this case, on a dark road you will really be visible from afar and the speed limit will definitely not be violated by passing cars :)
This is what the flasher looks like in action.
Let's check how the device copes with its main function as a launcher.
The test vehicle was an Opel Vectra 1.8 liter.
The battery is still fine, so I don’t see any point in connecting the starter through it - we’ll connect the device instead.
Although the indicator shows a full charge, the device has already had time to charge a little before, so the charge is not quite 100 percent now. According to the instructions, it is allowed to start the car engine only if the starter charge is at least three bars.
As I mentioned above, in this case there is no need to turn on the device with the slider; power is always present at this connector.
We try to start the engine. He starts with a half kick
If you compare it with a standard battery, you get the feeling that the starter makes it a little more energetic...
We turn off the engine and look at the charge indicator - all the bars remain in place.
We try to start and stop the car three more times.
We look at the indicator - one division has disappeared.
For four “factories”, it seems to me that this is not bad at all.
After that, to drain the battery, I decided to check how long it would last in flashlight mode. The flashlight worked for exactly 18 hours. Charging the battery takes about 5-6 hours.
The vacuum cleaner started working quite briskly - about the same as when the car was running. This fact pleasantly surprised me, and I measured the output voltage in idle mode and under load in the form of a running vacuum cleaner.
In idle mode, the multimeter recorded a voltage of 15.9 volts.
With the vacuum cleaner running, it dropped by exactly one unit and amounted to 14.9 volts, which can be considered quite normal operating voltage in the on-board network of a car with the engine running.
Next I conducted a test with the automatic one, which I already did. I don’t see the point in inflating a car tire, because... To do this, you always have a car cigarette lighter at hand, but it’s quite possible to try to pump up something that may be far from the outlet and the car.
For example, bicycle wheels, if both wheels are deflated, and instead of hand pump you managed to take a compressor and charger starting device:)
In general, everything turned out to be banal quickly and easily.
Just as if the compressor was powered from a car or a regular outlet - no failures or power drops. Set it on the compressor required pressure, turned it on, waited until it pumped up and stopped, turned it off. I repeated the same with the second wheel. All.
After pumping up two wheels, the indicator still showed a full charge.
Video of using the device at work
I also tried using this device as a battery for a 15-inch laptop. With an 80 percent partial charge of the starter, at full brightness and with Wi-Fi turned on, the laptop lasted a little over an hour.
In general, the device is very interesting and not only (not so much) as a starter for a car, but as a kind of universal PowerBank that can significantly simplify the life of its owner when away from an outlet.
At the same time, there is no need to limit yourself to only charging mobile 5-volt gadgets. Now you can safely take with you a more power-hungry 12-volt tablet or even a 19-volt laptop - the device can handle them too.
Besides, I don’t know about anyone, of course, but I really liked the possibility of “cigarette lighter emulation.” Thanks to this, taking with you, for example, a small electric pump and this starting device can easily and quickly deflate/inflate toys, circles or mattresses without carrying it all from the car and back, and of course, if necessary, recharge a dead smartphone or camera.
Discount information
The coupon “SH6%OFF” gives a 6% discount on products from the auto section (until December of this year).
Thank you for your attention and good luck to everyone!
The product was provided for writing a review by the store. The review was published in accordance with clause 18 of the Site Rules.
I'm planning to buy +23 Add to favorites I liked the review +21 +39