Which side to install the interior glazed door. How to install interior doors: a step-by-step guide. Current rules and regulations
Read also
Even the most good doors Over time, they may begin to creak or sag: no one can cancel the force of gravity and friction. And if you have heavy steel ones, then even the metal will get tired of holding them. After the summer, plastic ones also “sag” - they almost always remain open in the heat, which leads to such results. There is no need to tolerate these “disgraces,” nor is there any need to spend money on eliminating them. Although adjusting the entrance doors is a delicate matter, in most cases you can do it yourself. Once you have adjusted the hinges and the rebate with your own hands, you can easily repeat it later.
Adjusting a metal entrance door
- creak;
- draft - blowing from under the canvas (cracks around the perimeter or from above/bottom);
- closes with difficulty.
The solution to all these problems is called "adjustment" front door“, but this includes very different measures - from banal lubrication and replacement of the seal, to actual adjustments and mechanical influences.
Sometimes, to fix a problem, you need to go through all the methods, and sometimes the problem that has arisen can only be eliminated radically - by replacement. Most often, this situation occurs with cheap Chinese products. Adjusting entrance doors made in China practically impossible. Of course, you can try to do something with your own hands: companies and craftsmen do not undertake them.
Eliminating the squeak
Doors can creak for two reasons: the hinge grease is clogged or the door leaf touches the frame. Although both are called “creaking”, the nature of the sound is different. It’s easier to deal with clogged loops, so they usually start with this procedure.
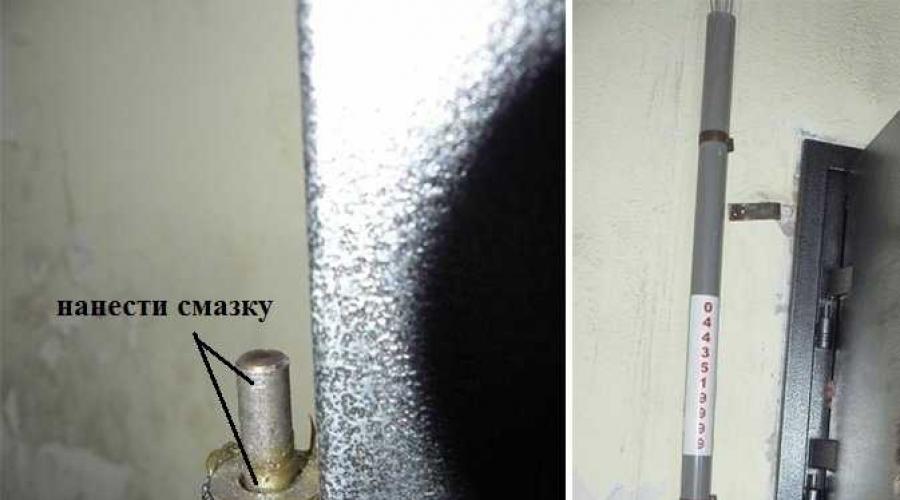
Hinge lubrication
First, remove the old grease, at the same time removing any dirt stuck to it. The procedure is standard: wipe with a soft cloth wherever marks are visible. If this procedure has not been done for several years, and the loops of the standard classic type, and even detachable, the canvas can be removed. It is better to clean it when removed.

If the hinges are rusty and cannot be removed even though they should, do not try to knock them off with a hammer or sledgehammer. You'll do more harm than good. It is better to buy a rust remover. It is usually sold in the form of sprays. Apply to the rusted hinge and wait for the prescribed period. Then remove the fabric from the loops and clean it. But this time it is necessary to remove all the rust. Before pure metal, then coat it with a rust converter and only then with lubricant.
After the old lubricant is removed, take “fresh” and apply it to the hinges. If the blade is removed, no problems will arise - lubricate the pin and ring. If there are any other rubbing mechanisms visible on the frame, lubricate them too.
In traditional type hinges, creaking may occur due to the fact that the washer on the rod has worn off. You inspect it after you have removed the door panel. If there are signs of wear, replace them. Install a new carbide washer. You can use an engraver instead. It will also compensate for the load.
If the hinges are one-piece, find liquid lubricant in a can (the most common is WD40) or machine oil, which can be applied using a large syringe. Handle all rubbing parts carefully.

There is another method, but it is destructive. A hole is drilled in the upper part of the loop, which is then filled with lubricant. The trick is to not damage the mechanism inside.
If the hinges are hidden, find all the turning parts and lubricate them. Often these models have holes into which oil is applied.

After applying the lubricant, rock the doors from side to side several times, distributing the lubricant. If this was the reason, the squeak goes away. Finishing touch- wipe off excess oil.
How to lubricate front door hinges
You must select a lubricant primarily based on the temperatures at which the loop is operated. If the loops go outside, you need a composition that does not thicken when low temperatures. There's not much choice here:
- Litol. Operates reliably at temperatures from -40°C to +120°C.
- Solid oil. The temperature range is slightly lower, but also sufficient: from -35°C to +65°C.
For entrance doors facing the entrance and operated at above-zero temperatures, several more items can be added to this list:

Eliminating friction on the box
If the creaking remains after processing the hinges, it is most likely caused by friction of the door leaf against the frame. Inspect the door frame for scuffs. If you find any signs of abrasion, look at which loop is closest. It will need to be regulated, if possible.
The difficulty is that there are a lot of types and models of loops and it is impossible to say unambiguously what needs to be done. All that is possible is to list the main points that may exist. Based on them, you may be able to determine how to “treat” your door.

Two types of loops for the entrance metal door with adjustment
Standard hinges do not provide adjustment options. In this case, adjusting the entrance doors consists of replacing the washer. Select them of greater or lesser thickness, adjusting the position of the door leaf. Some hinges with a ball at the top have an adjustment screw. By unscrewing it, we raise the doors a little, and by twisting it, we lower it. You can try to correct the situation with its help.
If standard hinges on a steel door are welded, we can assume that the possibilities have been exhausted. If they are mounted on screws, loosen the fastening screws and move the sash in the desired direction as far as possible. Then the screws are tightened. Check to see if the problem has gone away. If not, try with another loop. Sometimes it is necessary to loosen all the loops and tug the canvas in this position. In general, decide where to press and where to press.
There are hinge models in which the adjustment holes are hidden under a protective cap. But you can’t just remove it: it is secured with a bolt that can be unscrewed from inside the room. An example of adjusting such a loop is in the video.
If the hinges on the front door are screwed on, you can use them to eliminate friction between the door leaf and the frame. First, loosen the screws near the area where the wear occurs. Try to move the door leaf a little. To begin with, you can knock with your palm or fist, moving it in the desired direction. Try opening/closing a couple of times. Did it help? Screw the clamping screws back. And try to open/close again.

If it doesn’t help, you can use some kind of leverage, hit rubber mallet or hammer through the board. But don't overdo it. You need to handle Chinese products especially carefully: they are very flimsy.
If these manipulations also do not yield anything, you will have to loosen the screws on all the hinges and try to move the canvas over the entire area. Take the edge of the canvas with your hands and shake it. In this case, the loops should fall into place. You try to open and close. If there is no squeak, tighten the bolts. That's all, adjusting the front door hinges can't do more. The next thing you can try is to change the geometry of the door frame. More on this in the next paragraph.
The photo above (right picture) shows an adjustable hinge. By loosening the screws, you can turn the adjusting screw. It doesn’t help - we try to move the canvas as described above.
Eliminating a leaky door (blowing from under the door)
Sometimes there is a noticeable blow from under the front door. If you examine the perimeter, you will most likely find that in some place the fit of the door leaf to the door frame is loose. There may be a decent sized gap. You can check your suspicions with a piece of paper. Open the doors, insert a piece of paper between the door leaf and the jamb and close the doors. If the rebate is normal, the paper either stretches with very great force, or is clamped so tightly that it is impossible to remove it. Just break it up. If the sheet comes out freely, then the fit is insufficient.
The simplest explanation is that the seal has lost its elasticity. If the doors are several years old, this is possible. And the first thing you do is change the seal. Didn't help or only partially solved the problem? Let's move on.

Replacing the seal is the first step if there is leakage from under the front door
If the door leaf is displaced relative to the door in the horizontal plane, we try to eliminate the draft from under the front door by first moving the door leaf. This is described above: loosen the fastening screws on the hinges, then try to move the blade in the desired direction. Check the result - the gap has disappeared - tighten all the screws to their original position.
Sometimes gaps under the front door occur due to the door frame being skewed. This is checked using a level. Most likely, it is skewed in the place where the sheet of paper can be easily removed. The second option, on the contrary, the box was pushed out in the place where the sheet is pressed, due to the fact that the “normal” part cannot be pressed. All this is determined using an eye gauge and a level. Having determined what the problem is, we try to return the geometry to normal. The measures depend on how the box is installed:

For an option to correct the gap in the vestibule, see the video. After entrance door installation It turned out that it was blowing strongly from under it. The owner corrected the distortion with a hammer.
Eliminating door sag (shuffles on the threshold)
If, after several years of operation, the doors begin to open with difficulty and rub against the threshold, most likely the problem is that the ball or bearings have worn out. If there are possible adjustments, you won’t even have to remove them. Simply unscrew one of the bolts and lift it slightly up.

If there is no adjustment, there are several options:
- replacing hinges;
- replacing bearings with new ones;
- installation of washers instead of bearings.
All this is determined based on the situation and the design of the loop.
Adjusting plastic entrance doors
The problems may be the same: friction, creaking hinges and loose connection to the frame, which can cause blowing. But the adjustment PVC doors simpler - the hinges and mechanisms are standardized, there are not many types. So there is hope that you can deal with the problems yourself, without calling a specialist.
Balcony door adjustment
After summer plastic doors they sag on the balcony: in the summer they often remain open for a long time, which is why such a nuisance happens. Then they touch the threshold, it sounds unpleasant sound, the plastic wears off. In this case, you need to lift the canvas up. This is done using the adjustment located at the top of the lower hinge.

They do this when open lock, but the door is closed. Take a hex wrench (usually 4 or 5) and insert it into the hole and turn it a few turns. There is no need to lift too much right away, as this may cause other problems. Raise only until the problem is fixed.
Sometimes, when closing, the doors rub from the side, hitting the metal latches. It turns out that you need to move the canvas towards the loop part. For this there is another adjustment on the same hinge. It is located below, visible when open door.

This adjustment is also carried out with a couple of turns clockwise or counterclockwise. If you need the doors to not rub against the counter, turn counterclockwise. Give it a couple of turns and check. Once the problem goes away, stop. Otherwise, you can move it so much that the lock stops “clinging” to the mate.
If the upper left corner “clings”, you need to adjust the loop that is at the top. The principle is the same: one or two turns until the problem is eliminated.

Top Hinge Adjustment - Top Left Corner Pressure
Pressure adjustment (to prevent draught)
Sometimes weak pressure observed from the castle part. It seems that the canvas adjoins smoothly, but there is a noticeable pull from under the door. In summer this is not a problem, but with the onset of cold weather it significantly reduces the temperature. There are two ways. The first is to adjust the clamping pins. These are metal protrusions on the sash.

They come in two types. as in the photo above - oval and round, but with an eccentric in the middle. The position of this element determines the degree of pressing of the sash to the frame. The method of changing the position depends on the shape of the trunnion. If it is like in the photo, take pliers, clamp it and turn it slightly. The maximum pressure is if the long side is turned horizontally, the minimum is if it is directed vertically upward. There are also all the intermediate options.
If there is an eccentric in the center of the trunnion, then there is also a hole for the hexagon. Insert it and turn it, achieving the desired degree of pressure.

It is not recommended to set the stasis to the maximum value: the seals will quickly lose their elasticity. Also make sure that all eccentrics are rotated the same way. This guarantees normal work accessories.
But sometimes there is a situation where the balcony door leaf is not pressed tightly on the hinge side. This can also be eliminated by adjusting the hinges. At the bottom it is located under a protective cap. Remove it (pull it up). Take the key (hexagon) and with a couple of turns adjust the pressure of the lower right corner of the plastic balcony door.

There are also hidden hinges on the frame, which also provide the ability to adjust the pressure. They are located on the frame on the hinge side. Adjustment with the same hex wrench. Turns “clockwise” and “counterclockwise”.

Adjusting plastic entrance doors
The plastic entrance doors have different hinges, and there are no locking and tilting fittings. They have closed loops of the overhead type. They have three adjustments:
- the height of the door leaf relative to the frame - at the bottom of the hinge;
- the density of pressing the canvas to the frame is on the top on the hinge;
- movement of the sash horizontally - sideways

They are sufficient if the doors were initially installed correctly: the limits for changing positions are significant, which makes it possible to compensate for those changes that occurred during operation.
If there is a squeak in the hinges, they need to be lubricated. To do this, remove the top cap and put lubricant into the opened hole. Since plastic doors are installed as entrance doors mainly in private houses and they go out onto the street or into an unheated vestibule, you select a lubricant that does not thicken at low temperatures (Litol and Solidol).

Put lubricant here
In some models of hinges, the lid is simply lifted off, in others, you need to unscrew it and then pull it out. Determined by location.
Sometimes a situation arises when intervention is required: the lock does not lock properly. If the sash pressure is normal, correction of the striker is necessary. She is mobile in such doors. Loosen the mounting screws, use a screwdriver to move the bar slightly in the desired direction and tighten the screws back. Checking. It should help.
Wooden doors produced by industry are available internally and externally. By design, they are divided into frames, which consist of strapping (bars) and filling (panels), panel panels, which are three-layer construction, made of a wooden frame-frame, lined on both sides with plywood or solid fiberboard, and internal filling various materials- bars, scraps of insulating fiberboards, etc.
Cheap wooden doors produced by industry are available for interior and exterior. According to the process of how to make doors, they are divided into frame doors, which consist of frame (bars) and filling (panels), panel doors, which are a three-layer structure made of a wooden frame-frame, lined on both sides with plywood or solid fiberboard, and internal filling with various materials - bars, scraps of insulating fibreboards, etc. Both external and internal doors are made solid or glazed; single-field, one-and-a-half (consisting of two canvases) different widths) and double-layered, consisting of two identical canvases. In glazed doors, the panels are made of a strapping structure made from solid wooden elements. Vertical and horizontal strappings are usually connected with spikes. For glazing doors, transparent or patterned sheet glass 4-5 mm thick is used, installed on non-drying putty or on rubber gaskets with wooden beads. External doors are made with a threshold, and internal doors (with the exception of doors in bathrooms) without a threshold. For a cheap door, use quarter boxes with a depth of 15 mm, used for a rebate with a leaf. To increase the tightness of Guardian doors, a sealing polyurethane foam gasket is installed in the narthex.
The bottom trim of the box and quarter forms a threshold. A box without a threshold is embroidered at the bottom with a mounting board and secured with nails to the ends of the vertical bars. The production of panel door blocks is made from boards no more than 120 mm wide, laid in layers in different sides. Boards are used different thicknesses- from 40 to 60 mm. They are assembled into a quarter, into a tongue and groove, etc. Ridges are arranged in the door leaf along the upper and lower ends, onto which bars with grooves 20-30 mm deep are placed. Sometimes panel doors sheathed on both sides with plywood or fiberboard.
A well-made Guardian door gives a home or room a beautiful, elegant look. Exterior and front doors are often made of massive hardwood (oak, ash, beech), while interior, balcony and black ones are made of coniferous species wood Paneled doors are assembled from simple bars, as well as with chamfers and grooves. Kalevki can be selected directly on the harness or on separate bars. They form a groove 10-20 mm deep into which the panels are inserted. For internal doors panels are taken with a thickness of 8 to 22 mm, for external ones - up to 50 mm. They are divided into smooth, flat, floating, with figarees; made from plywood, fiberboards or particle boards.
When installing doors in a frame, it is especially important to correctly fit the door to the quarter. A hung door should not spring when opening and closing, but should rotate freely on its hinges. Door frames in stone and brick walls installed in the same way as window boxes, using screws or brushes driven into antiseptic wooden plugs provided in the walls of the opening. IN wooden houses door frames are attached to walls and partitions with nails, while the horizontal and verticality of the bars is checked using a level and plumb line. To secure the door frame and eliminate its distortion, wooden wedges are used. The gaps between the frame and the masonry of the external walls are sealed with thermal insulation material - tow, felt, soaked in gypsum mortar.
When installing doors in interior walls openings are made without quarters. The door frame in the partitions is pulled out to one side of the doorway to the thickness of the plaster so that the platband is adjacent to the frame and the wall. If the thickness of the partition is greater than the width of the door frame, then inside boxes are nailed with a block of appropriate thickness. During operation, doors require periodic inspection and repair.
When skewed and drying out door leaves straighten skewed canvases to fit in place, stuff slats, re-glue panels or seal cracks using glue with slats. If the door is unstuck and the bars move freely, it is necessary to knock out the dowels in the corners ( wooden nails) and disassemble the door.
After this, clean the tenon joints from dust, dirt and old glue and glue the bars again, using the same glue with which they were previously glued. If there is a large gap between the parts, you can put slats or some kind of fabric pre-lubricated with glue. To correct distortions and increase strength, you can place angles in the corners of the door, tightening them with screws. The heat and sound insulation properties of doors are increased by the use of sealing gaskets in the recesses, drag aprons (for doors without a threshold) and the installation of a threshold.
When panels in paired balcony doors freeze, they are sealed with foam rubber, hardboard or mineral felt, tightly placed in the space between the outer and inner panels. When the door rubs against the threshold when opening and closing, which most often occurs due to loose hinges, it is necessary to screw (tighten) all the screws until they stop. If the friction resumes after a few days, it is necessary to replace the screws with longer ones. But it happens that this cannot be done either, since when hanging the door the screws were driven in and not screwed.
In this case, the doors should be unscrewed one by one for free, a wooden plug coated with PVA glue should be hammered into the resulting hole, and then the screw should be screwed in.
Processed
The question of which way the front door opens is not at all as simple as it seems at first glance. This is due to the fact that the answer that seems obvious is not always the correct one. In this case, the problem needs to be considered in two aspects, where and from which side the steel structure installed in an apartment or house should open.
Current rules and regulations
Currently valid SNiPs and Technical regulations, approved by the relevant Federal laws, clearly define the location and method of opening entrance structures only in buildings for public and industrial use. In such buildings, steel and other types of doors must open strictly in the direction of movement towards the exit of the building. Moreover, this applies only to those structures that are installed on evacuation routes.
It is important to note that in the current regulatory documents answer to the question in which direction the front door should open in apartment and private buildings residential buildings, is simply absent, since this parameter is non-standardized. This situation looks somewhat strange, however, it has developed quite a long time ago. Therefore, in most cases, choosing the opening option entrance structure should rely on common sense and practical considerations.
Rules for determining where a steel door should open
 When determining which way to open the front door, you need to follow fairly simple and unspoken, but effective rules. They state that in most cases the structure should be installed so that the sash swings outward. Thanks to this location, the homeowner receives a number of significant advantages:
- when leaving the room, you do not need to stop and take a step back to open the door;
- it becomes possible to install an additional internal entrance structure, which is often used to increase thermal insulation parameters exit;
- not consumed usable space hallway room, which in most cases is missing.
An important advantage of opening a steel door outward is that this arrangement increases the burglary resistance of the structure, which becomes more difficult to knock out. However, when deciding on the type of opening, it is necessary to take into account the ease of use of the installed product. In particular, if the sash, when opening, touches counters located in the corridor, other parts or interior items, it is advisable to use a design whose sash swings inward.
As another example, when is it appropriate to choose steel doors, which open into the room, we can cite this often encountered situation. A vestibule is created on the site where several apartments are located. It fences off residential areas from the rest of the entrance space. The door at the entrance to it, which is quite natural, swings outward. However, the designs of each apartment in this case are usually chosen to open inwards. As a result, the vestibule area is much more convenient and efficient to use.
How to choose the opening side of the front door
 The opening side of the front door is also not regulated in any way by current building codes. Therefore, when choosing a product option, the following factors are taken into account:
- convenience and comfort of use. Main criterion which must be followed first. The sash must be opened in such a way as to exclude the possibility of injury or interference with movement. In this case, the structure should occupy the minimum possible space;
- location and opening side of adjacent doors. Probably every person has ever faced a situation when incorrect choice entrance structure led to problems in relations between neighbors. Although it is quite simple to avoid such a development of the situation - you just need to correctly select the necessary door;
- the presence and option of opening a second door installed in the opening. The main thing to consider in this issue– providing a convenient entrance to the apartment.
Most often, when choosing a product option, if any of the problems described above are absent, residential property owners opt for the right-hand door opening. This means that upon entering the door swings open right hand, and when exiting - accordingly, to the left. This option is considered traditional, however, it can be changed to the opposite for any of the reasons and circumstances listed above.
Any construction is carried out according to the project. This also applies to where the interior door should open. Factors influencing this can be identified.
Design based on building codes and rules (SNiP), regulations fire safety. The main conditions when installing doors are safety in the event of emergency and unhindered evacuation if it occurs.
Based on this, in places where people gather, in work premises (offices, organizations of different profiles), it is impossible to change the direction of opening the doors without approval from the fire inspection authorities. The principle of opening is only from the room into the corridor towards the main exit.
The entrance door opens to the outside of the apartment and must be installed strictly according to the design. If you decide to change the opening side, then this should not prevent (block) the neighbors from leaving the apartment.
It happens that an incorrectly deployed door touches the neighbor’s and catches it, which is unacceptable. Hence the conclusion - doors should allow you to freely enter and exit the apartment for security reasons, plus be convenient to use.
Now let's talk about where interior doors in an apartment should open. Here the canvases are installed according to the drawings, but the owner himself can change the opening. This is dictated by ease of use, the location of openings in the wall, the size of the room, and the location of the windows.
And also, the number of rooms opening onto one corridor, its area, and other points. Therefore, for each situation, you can define rules that take into account where the interior door should open.
Options for opening interior doors
 Single door model
 When choosing a design, it is based on its best location and ease of use. There are several types of opening models:
Single-leaf swing doors are the most commonly used design, as they close tightly around the perimeter, which increases sound insulation and thermal insulation of the room.
They are easy to install, the design is simple and clear, the opening side can be any, depending on external factors.
 Double door
 Hinged double doors - these designs are more suitable for large rooms. These are mainly places with large crowds of people (conference halls, cinemas and other institutions). Often in country houses or apartments with improved layout large area they look quite aesthetically pleasing.
The accordion sliding door is installed in rooms with a small area, narrow corridor, so the swing option, when opening into the room, will not allow you to place any furniture in its path.
If the hallway or corridor is narrow, then when turning in their direction, the swing model will block the free movement of other family members. An accordion helps out because it folds without taking away extra space.
Sliding models are similar in functionality to accordion doors, as they save space. They can zone an area and block fairly large openings where another type is unacceptable.
But in terms of sound insulation characteristics and heat retention, the two above types are inferior swing options. So choose according to your room parameters, noise and thermal insulation requirements, where the interior door should open.
Location of interior doors
We all live in apartments, dormitories, and other dwellings, where they are installed everywhere door blocks. Today people are buying apartments made in " gray version“—without decoration, door panels, even without partitions.
To bring them to " white version", you will have to install interior doors as well. I'll explain general principles, which can be followed when determining the direction of rotation.
Interior doors from small rooms should open into a large room.
The bathroom door opens outwards, as does the toilet door for safety reasons. For example, if after taking a bath an elderly person becomes ill, he will fall at the exit, blocking the opening. If it opens outward, then he will receive help, but if it opens inside, then it will be difficult to get into the bathroom.
In addition to security, there is also constraint. How will you get into the toilet when you open the door inward if the door hits the toilet? There are also such small toilets. And bathrooms in houses old building so small that there is no room to turn around.
When installing door panels, make sure that they do not partially block the space of the room; place them with the opening towards the wall.
The interior door, when open, should not cover the switch or sockets, so as not to bypass it - this is the convenience of installation. So the concept of where interior doors should open is a matter of comfort.
The door from the kitchen opens into the corridor, and with a normal area of the room, eating can be done inside, to the nearby wall, so proceed from the situation.
Often in the kitchen the canvas is removed and an arch is arranged, but this is not for everyone. Not everyone likes the fact that when cooking, all couples go into the rooms unhindered. It is better to close the door, cook food, ventilate, and then open it.
If there are one or more windows in the room, then when you open the interior door, you should contemplate not a blank wall, but the windows and the space of the room.
Opening doors in the apartment
 1 – correct; 2 – incorrect; 3 – door – accordion.
 In bedrooms, if they are adjacent to a sanitary cabin, it is better to open the doors inward to the adjacent wall, and not outward, so that the door does not block the passage when open.
The living room is the largest room in terms of area, so the door opens inward, and if the area is not so hot, then install a sliding model. I have a narrow and long corridor and the door from the hallway was moved into it.
The corridor, divided by an opening, began to visually appear wider and lighter. I made the accordion door myself according to my drawings according to the width of the cut opening, and installed it myself. It’s very convenient, doesn’t interfere, doesn’t take up extra space, and there’s no question about where the interior door should open.
The only thing that, when moving the doorway, was to coordinate this nuance and legitimize it. MBTI took measurements, and based on them they issued a new one technical certificate. Moving the opening is considered redevelopment.
IN narrow passage make sure that the canvases do not touch each other, so that you do not “get entangled” in them. That's why there are doors that open left and right (hinged).
Often built-in wardrobes are installed in corridors and hallways. As a rule, narrow hinged doors are installed here that open outward and do not create inconvenience. But if the hallway is small, then you can install sliding doors.
The arrangement of the paintings should be such that when the door is open you can move freely around the apartment. If a door opens somewhere and hits the wall, install stops.
If it is inconvenient to use any of the doors, reinstall it. I did this with door frames upon exiting the loggia. As a rule, they all open into the room, creating a “dead zone” around them for installing pieces of furniture. And the tulle kept clinging to the canvas.
I turned all the boxes, and the canvases began to open onto the loggia; it’s good that they are 1.5 meters wide. It has become much more convenient, and the entire area near the loggia is free, you can place some furniture. My friends followed my example and were also pleased.
If you are just planning a renovation, then consider the most in advance rational option, where the interior door should open. If it is already installed and causes discomfort when using it, then reinstall it.