How to mount your smartphone on a camera tripod. Mounting your phone (iPhone) on a tripod. How to secure your iPhone in this selfie mount
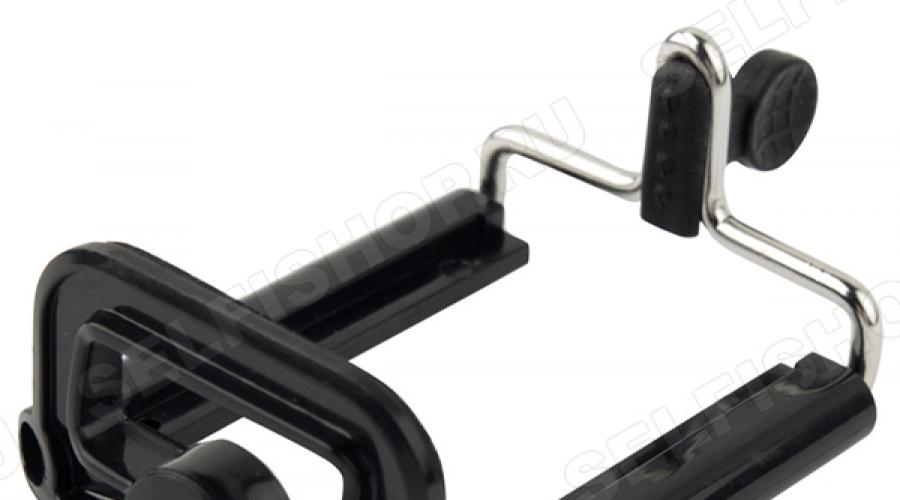
This mount is designed to be attached to mobile phone selfie tripods (iPhone, Android, Windows). This mount consists of a lower plastic part and an upper iron bracket - a clamp with springs.
The bottom part has a standard 1/4" threaded tripod mount, with which you need to screw this mount to the tripod. Also with inside There is a soft insert made of polypropylene foam that holds the smartphone without allowing it to slip out.

The upper part extends and, thanks to built-in springs, can hold mobile phone. At the top there is rubber insert which is necessary to expand the clamp, and its second function is to prevent the clamped smartphone from being scratched or sliding. There are screws in the plastic tubes below that hold the springs and the sliding mechanism.

We managed to see several at the selfie shop color options such fastening, but the most popular is black with a metal insert.

How to secure your iPhone in this selfie mount
This mount fits all iPhone models, we tested from iPhone 2 to iPhone 6. It even fits the largest iPhone 6 to date, measuring 5.7". And this maximum size phone that fits in it.


Models of Samsung Android smartphones
All Samsung models that are smaller than 5.7" fit well in this mount. For example, SamsungGalaxy 2. Models with a large screen such as SamsungNote can of course be inserted with some force if you try, but the design is clearly not intended for such sizes.
Other smartphone models
All models with a screen smaller than 6" are ideal. For large screens, Selfishop recommends other mounts, for example, silicone or special sliding ones for large models.
Advantages of sliding layer mass fastening
- Simple, robust design
- Holds the phone well
- Quickly install or remove your phone
- Does not spoil the surface thanks to soft inserts.
- Not a high price
- Suitable for most popular models smartphones
Disadvantages of a sliding mount
- The plastic at the bottom may crack during transportation or heavy load
- Not suitable for large smartphones (6" screen)
conclusions
Simple, convenient and compact design. If you have a smartphone from 3.5" to 5", then this mount will suit you well. The mount can be broken if you put it in the back pocket of your jeans and accidentally sit on it. But if you don’t treat it barbarically, then take it, it gets the job done good. The phone does not scratch, you can twist it at any angle, it has never slipped out. In terms of size, this mount fits well with the entire iPhone line, as well as for other smartphones with a screen size smaller than 6".
Mounts for installing phones and, in particular, iPhones are sold in stores, but why spend money when you can make this mount yourself using scrap materials.
How to mount your phone on a photo tripod
If you are a motorist or you know a driver, then you will probably find an unnecessary (if you have not already thrown away) mount for your phone, navigator on Windshield. These fasteners, especially cheap ones, often break. As a rule, the suction cup stopper breaks, but the phone mount itself with its sliding fixing bars remains intact. To make a fastening with your own hands, in addition to a plastic part, you will need two pieces of plywood 4 and 10 mm thick, wood glue and small screws. The tools you need are a jigsaw or a saw with a fine tooth, a means for screwing screws, a 1.5 and 5 mm drill.
1. On a sheet of 10 mm plywood we mark the contours of the future fastening heel. We take the dimensions from the heel of the tripod, but which will be installed on the manufactured mount.
2. We outline the dimensions of the platform and stand for installing the phone. The dimensions are determined by the location and method of installation of the plastic mount you choose. The Master's Secret will install a plastic fastener using self-tapping screws.
3. Try on the heel and platform on a tripod. We mark their relative positions.
Marking the heel and platform Marking the rack Markings for combining parts
4. Using a clamp, glue the heel and platform.
5. We mark two holes for the self-tapping screws for installing the mounting posts. Using a thin ~1.5 mm drill, drill a hole in the platform and in the rack. They need to be made in a rack so that it does not crack. We make a chamfer at the entry point of the conical head so that the head does not protrude from the back side of the platform.
6. Glue and screw the stand.
7. If desired, you can also provide a corner for solidity, but the rack will be sufficiently rigid without it.
Gluing the heel and the platform The screws are recessed into the platform Gluing the parts The rotation unit is attached8. The following photo shows an example of installing a rotating mounting unit on a rack. The unit is carefully disassembled. IN separate place two balls and two ratchet springs are placed. A hole is drilled in the wooden stand to assemble the rotation unit. The rotation unit is attached to the stand with three short screws.
9. Springs and balls are placed in their regular places. The plastic fastener is pressed. Through drilled hole The fixing screw is screwed in.
The mount is ready. Compared to purchased ones, installing the mount is much simpler, since the heel is already included in the mount and installation on a tripod only involves fixing the mount lever.
And they are amazing, but don’t forget about specially designed devices that help you fully utilize the capabilities of your smartphone’s camera. Most people have probably thought about tripods, but they are not the only solution for getting a clearer photo with your smartphone camera. This article will discuss 10 interesting accessories for mobile cameras that can satisfy the photography quality requirements of the most critical photographers.

The Photojojo Lens Series includes four interchangeable lenses (macro lens, wide angle lens, "fisheye" and "telephoto"), which are fixed to the body using magnetic ring. By the way, the latter is glued to the phone using a sticky base. According to the manufacturer, with Lens Series lenses from Photojojo you can forget about Canon EOS 5D Mark III. The lenses have only one drawback - they are so large that they cover the built-in flash. Photojojo's Lens Series kit costs $49.

The American company Joby offers a universal tripod that is compatible with most smartphones and tablets on the market. Moreover, the universal mount allows you to use this tripod in tandem with different lenses. The Joby GripTight tripod costs $20.

3. Steadicam Smoothee
The Steadicam Smoothee stabilization system uses the same materials as in professional equipment worth more than 60 thousand dollars, which is used in Hollywood to film masterpieces of the film industry. Durable metal structure allows you to achieve amazing photo quality. The Steadicam Smoothee system consists of an elbow-supported handle and smartphone mounts. It is worth noting that the device is also compatible with modern tripods, so it can be used as a convenient accessory to any camera. The Steadicam Smoothee stabilization system costs $149.

4. Hama Wireless Data Reader
The compact Hama Wireless Data Reader supports following types memory cards: SD, SDHC, SDXC, MMC, MMC Plus, as well as MicroSD and RS-MMC. The device can act as a Wi-Fi router and is equipped with USB port and is intended for use with iPhone smartphones and iPad tablets. The Hama Wireless Data Reader costs about $90.

5. iRigMic microphone
IK Multimedia positions the iRigMic microphone as an ideal device for recording audio on professional level. The microphone features three levels of sensitivity control and a software package for vocal processing. The iRigMic microphone costs $50.

This device, which resembles a two-piece cylinder, allows you to create slow-motion effects in 360-degree panoramic videos or take stunning 360-degree panoramic photos of any location. The Camalapse 3 device is an intermediate link between a tripod and GoPro cameras, Contour, Drift or smartphone. Camalapse 3 consists of two parts that can rotate relative to each other. The top part is a timer with a tripod screw, and the bottom has a hole for a tripod screw. Camalapse 3 costs $30.
7.Glif+
The Glif+ tripod is designed for use with iPhone smartphones. The device is very small in size, can be worn with keys like a keychain, and allows you to take photos and videos using your iPhone from different angles. The Glif+ tripod costs $30.

This device allows users to mount their favorite smartphone on a tripod, move to the desired distance and take a photo in right moment. To transmit commands, the iPhone Shutter Remote uses a module wireless communication Bluetooth. The device allows you to control the camera capabilities of an iPhone smartphone at a distance of 10 meters, and its cost is $40.

9. Camera Table Dolly
The Camera Table Dolly features a rigid design that allows for smooth movement across the entire frame. The only downside is that Camera Table Dolly requires a perfect Smooth surface. According to the manufacturer, this disadvantage compensated by video recording good quality without sudden jerks when the subject moves. The Camera Table Dolly costs $90.

The Bikepod turns your bike into a tripod. More precisely, a Bikepod is a tripod that firmly holds a smartphone while the owner pedals his bike. This device is aimed at lovers of cycling and will allow you to capture the most unusual and beautiful landscapes. A tripod with a smartphone equipped with a GPS satellite navigation receiver can also be used as a navigator.