How to install a split system with your own hands. Useful information about installing air conditioners yourself. Tools and equipment
Read also
So your dream has come true - an air conditioner has appeared in the house, now the heat in the summer period and dampness in the room in the off-season, when the heating has not yet been turned on, and there are prolonged rains outside the window. Immediately after installation connection in progress air conditioner to the electrical network - it must be carried out strictly according to the diagrams indicated on the internal covers of the modules. The operating instructions also contain recommendations for connecting and specify the basic requirements for electrical network installation locations.
It must be remembered that electrical diagram connecting an air conditioner used in everyday life differs significantly from the similar connection of semi-industrial models that are installed in offices. Pets only have single-phase connection.
In practice, there are two main ways to connect a split system:
- direct connection via socket;
- separate wiring to the electrical panel.
The first option is ideal for everyone household devices- they are everywhere put into operation only in this way. Connecting any air conditioning system is carried out in several steps, which must be strictly followed when you decide to do everything yourself.
Connection diagram of the air conditioner to the electrical network
The figure shows a diagram of connecting the air conditioner to the electrical network, as well as various connections between the system modules; in addition, you will definitely need a circuit diagram of the air conditioner of the purchased model.
First way
Before you begin connecting the product to the network, you must install cables from the evaporator to the outdoor module:
- we lay the wire that will connect the two blocks;
- we draw a separate line to the electrical panel for powerful systems, which includes a cable and an overload protection circuit breaker;
- Medium power devices are connected directly through an ordinary outlet.
The last option for connecting an air conditioner is used in certain cases:
- the power of the product is low;
- window or mobile class climate system;
- the apartment has a network of sufficient power;
- temporary location of the unit;
- Others must not be connected to this line. Appliances.
Important! To connect the indoor unit, you need to use reinforced sockets and install a circuit breaker nearby.
It should be taken into account that the air conditioner operates on different modes, its power varies from minimum to maximum value, so separate protection must be installed on the connection line.
Before sending a product for sale, each manufacturer attaches instructions to it, which include:
- product operation diagram;
- connection diagram - general;
- electrical diagram for connecting external and indoor unit.
There is similar information on the surface of the remote unit housing and the evaporator cover, but it is applied from the inside. This greatly simplifies the independent connection of any air conditioning system at home.
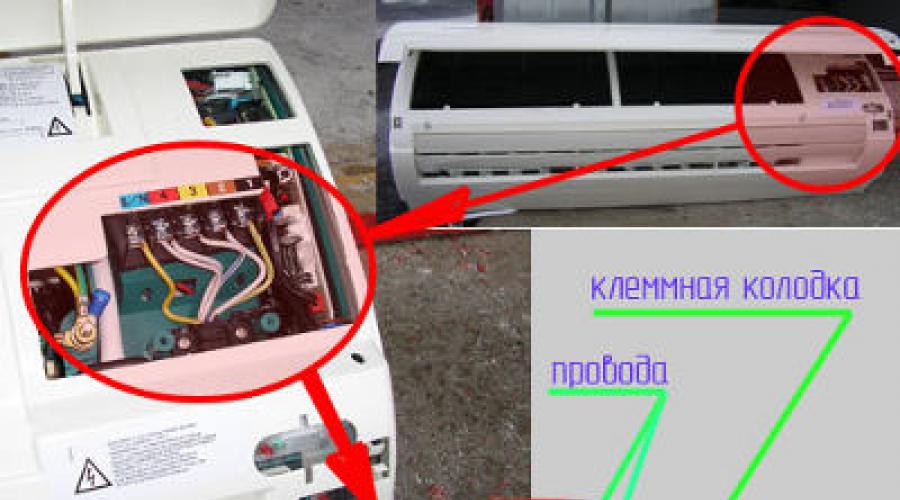
Under the front panel of the evaporator there is a special box where the terminals for connecting wiring- this air conditioner unit or split system is always installed indoors.


The wires from the evaporator are connected to the contacts of the outdoor unit, guided by the numbering; the free wires are carefully insulated with special tape. Schematic diagram will help you figure everything out correctly. Before connecting the air conditioning system, you must check insulation of each core so that later normal operation the air conditioner was not interrupted by a short circuit.
Important! If the system diagram is unclear to you and you have no practice in working with electricity, then it is better not to try to connect the split system yourself, but call a professional.
There are reasons that do not allow connecting any air conditioning system to the electrical network of an apartment or country house:
- old wiring where aluminum wire was used;
- the cross-section of the wires is too small - they will not withstand the load;
- the condition of the wiring requires its urgent replacement;
- There is no high-quality grounding or basic protection against voltage surges.
Air conditioning systems are rather delicate devices, so they should only be connected to working electrical network so as not to spend the family budget on very expensive repairs.
Second way
Experts advise using the most reliable and safe option for connecting an air conditioner - an individual cable, which ensures stable operation of the device. If you install separate protection - RCD (device protective shutdown), then it will protect the product from any voltage surge or network overload, and an individual line will allow you to place system modules anywhere.
Standard requirements for the components of a separate electrical line:
- Necessarily presence of RCD or AZO(residual circuit breaker);
- all conductors must be made of copper;
- the diameter of the wire must correspond to the size prescribed by the manufacturer;
- equip separate grounding for the entire line.
Electrical harnesses are passed into a protective hose, then placed in a specially designed plastic box so as not to violate the integrity of the walls. Watch how the professionals make the connection in this special video:

Work algorithm
When a home master is confident in his abilities and knows perfectly well how various household appliances are connected, he can safely begin working according to a fairly simple scheme.
- Selecting a set the necessary tool and the necessary materials.
- We study the schemes proposed by the manufacturer.
- We lay the cables to connect the terminals of the external unit to the similar connectors of the air conditioner evaporator.
- We check the proper operation of all components of the product.
It does not depend on the design of the product where the cable for connecting to the outlet comes from - from the evaporator or the external module.
Choosing an outlet
A home outlet must meet certain requirements:
- Availability is welcome differentiated relay or reliable grounding;
- it must fully meet all the requirements and parameters drawn up by the manufacturers, according to the appendices in the instructions for using the split system;
- if the socket is supplied with electricity using aluminum wires, it must be replaced with copper analogues with a normal cross-section;
- it must be connected to the panel via a circuit breaker.
Modern standard euro sockets are ideal for connecting high-power household appliances, but all work on connecting the air conditioner must be performed by a specialist with the appropriate approval, otherwise the product warranty will be void. If you moved to a new place and decided to install a product that was already working, especially since you carried out the dismantling yourself, then follow the recommendations and do everything carefully.
Selecting the wire
To correctly connect the air conditioner with your own hands, you must use a wire only of the cross-section specified by the manufacturer individually for each model. Household products require the use of a cross-section within the range of 1.5-2.5 square (mm 2), and the current strength will correspondingly be up to 18 amperes or more.
If the distance between the system and the electrical panel is up to 10 m, then a cross-section of 1.5 mm 2 is suitable, when the distance is greater, then the cross-section increases.
For efficient work climate systems are used copper wires : for single-phase connection - 3 wires, for three-phase version - 5 wires.


Wires are not laid near heating system and gas supply pipes; the standard distance between communications is no closer than a meter. Electrical harnesses, assembled in a protective corrugation, are placed in grooves and secured with special clamps.
When laying communications using ducts, glue and screws are used to secure the wiring. When they do hidden wiring , then the cables are secured in the grooves with special clamps, and then plastered construction plaster so that you can quickly open it in case of emergency.
Connecting the evaporator
In principle, the method of connecting system modules is identical, with the exception of minor nuances, so we present detailed methodology connection of the internal module, and the external one - by analogy with it.

After completing the connection of both modules, check again correct connection, checking the diagrams, only after a scrupulous check is a trial and short-term switching on of the air conditioner performed.
In conclusion, I would like to warn all users once again: electricity does not forgive mistakes and inaccuracies, so when self-connection use your skills adequately so that you don’t have to deal with extinguishing wiring and repairing expensive climate control equipment later.
That's it now more people want to buy and install a split system in their apartment. And it's not just air conditioning. The split system allows you to better freshen the indoor air. What is its advantage? First of all, it doesn't block daylight, since it does not crash into the window frame. The second advantage is that it does not depend on common system air conditioning of the house as a whole. And lastly, it consists of only two blocks: internal and external. The only reason why a large number of consumers hesitate to purchase a split system - this is due to ignorance of the rules for its installation. Let's look at all the steps in order and tell you how to install a split system yourself.
Compound
First of all, you need to know what this air conditioning system consists of. It includes two separate units: an external one - a condenser, and an internal one - an evaporator. They communicate with each other through electrical wires and two tubes made of copper through which the refrigerant circulates. In addition, the indoor unit is equipped with a thin plastic tube, performing a drainage function, i.e., removing condensed moisture from the system. According to the rules, it must be connected to a special drain tank or to sewer pipe, but for some reason, most often it ends up being taken outside, and the water from it drips directly onto the heads or under the feet of passers-by.
Principle of operation
It is quite simple and consists in the fact that if the room needs to be cooled, then freon flows through a copper tube from the heat exchanger of the external unit to the heat exchanger of the internal one. Thus, the refrigerant is processed by the fan, and cold air comes out from inside the air conditioner.
If, on the contrary, the room needs to be heated, then the heat pump of the external condenser begins to work as an evaporator, and the evaporator, in turn, acts as a condenser. The split system is also equipped with a compressor located in the external unit. Its main function is to compress freon, which significantly increases the efficiency of the air conditioner.
Mounting methods
Internal units of split systems can be either wall-mounted or floor-ceiling. The latter can be successfully attached to both the ceiling and the floor. Most often, wall blocks are used in apartments of multi-storey buildings. They are equipped with movable blinds, with which you can change the direction of air flow.

The power of wall-mounted units is specifically limited by the manufacturers themselves, since if the flow of cooled air in a small room is too strong, it can literally blow away everything that is there. If the room is quite spacious, for example, it is an office or workshop, then a more powerful split system with a floor-ceiling indoor unit is installed in it.
Installation tools
In order to install a split system with your own hands, you will need whole line equipment that you will have to purchase or rent. The quality of the work performed and the durability of your air conditioner directly depend on what tool you use during the installation process. You will need:
● Rotary hammer with a set of chisels. It is useful for making holes in the main wall.
● Rebar detector. It may be needed if the walls of the house are made of concrete. If during drilling the tool hits the reinforcement, you will have to make another hole.
● Tube flaring kit. It will not be possible to do this work efficiently using improvised means, since it will be impossible to achieve complete tightness.
● Pipe cutter. Under no circumstances should you cut off the pipes through which the refrigerant circulates with a regular hacksaw. Copper chips always remain in the gap, which can subsequently lead to compressor failure.
● Shabrovka. This tool is used to strip cut ends of pipes. An ordinary file or needle file is not suitable for this purpose precisely because of the sawdust.
● Pressure gauge. Needed to measure the refrigerant pressure in the system.
● Vacuum pump. It is necessary to process the system before filling it. Quite often you can hear advice that it can be washed with refrigerant. This is fundamentally wrong, since it does not remove moisture and spoils the compressor, just like metal chips.
● Hand bicycle pump. It is used to check the system for leaks.
● Tester and phase indicator. These devices are necessary for electrical installation work.
Tubes and working with them
Experts recommend buying a whole coil of copper pipe in the store at once, and it doesn’t matter if there is an extra one left. It can be used elsewhere. But if iron filings remain in the cut tube, you risk damaging the compressor of your air conditioner. Also, when purchasing it, you need to make sure that there are no visible cracks or dents on the surface, and that its ends are rolled by the manufacturer.

Before installing a split system yourself, you need to practice flaring the pipes. It is worth noting that this procedure is only done special tool and nothing else.
To practice working with flaring, you need to take the same small piece from the store along with the tube, but do not touch the coil itself. At the same time, you can try to cut the tube in a circular motion, and also scrape the product, holding it end down.
Installation
In order to carry out high-quality installation of a split system with your own hands, you need to know the sequence of actions. Professionals recommend installing air conditioners only before or during renovation, since you will still have to chisel the walls, lay electrical wiring and attach the brackets. If the repairs have already been made, then all communications can be hidden using external boxes, but this, as you yourself understand, will not improve the interior. How to install a split system yourself correctly will help you understand the step-by-step implementation of this work.
Stage one: electrical wiring
If we take even the lowest-power modern air conditioner, which consumes 1.5 kW of electricity, then it also needs to lay separate wiring with a cross-section of at least 1.5 square meters. mm. In addition, you will need an automatic shutdown.
When connecting the wires to the input panel, you need to find where the phase and zero are located with a special indicator, and after determining, mark them at both ends.

Stage two: outdoor unit
It is strictly not recommended to install an external split system unit yourself if your apartment is not on the first floor, as there is a risk of falling from a height. But on the other hand, thanks to the presence of loggias and balconies on the upper floors, this problem practically does not exist. In addition, maintenance and repair of air conditioners in such cases become more convenient.
Typically, a split system is installed on the east or north side of the house. But even if you had to attach the outdoor unit from the south, the balcony canopy will still protect it from direct exposure to sunlight.
Stage three: indoor unit
In order for the installation of a split system with your own hands to be successful, you must strictly follow the sequence of actions. First, using screws, attach special brackets to the ceiling (if it is a floor-ceiling air conditioner) or to the wall ( wall system). Having completed this work, it is necessary to check the strength of the fastening, namely, install the indoor unit and connect it. If the structure does not wobble or vibrate, then the brackets are securely fixed.
It is easiest to install a split system with a floor-mounted unit, since it usually does not require fasteners. But you still need to finally decide on its location, because after laying communications it will no longer be possible to rearrange it.
Stage four: punching gutters
If you doubt your knowledge or are unsure about something, you can always get advice from a specialist who will tell you how to install the split system yourself and connect the freon pipes and electric wires, thereby connecting the two blocks to each other. To do this, special gutters are usually punched into the ceiling or walls, but only if it is necessary to lay a hidden pipeline.
If you don’t want to hammer, then there is another option. All wires can be covered with skirting boards or decorative plastic boxes.
If a multi-storey building consists of blocks, then before you start punching a hole in the wall, you must first use a rebar detector to determine the places where the iron core lies. Under no circumstances should you cut the reinforcement, as it is located in the outer load-bearing wall. According to the standard, the hole diameter must be at least 80 mm. Sometimes you can hear recommendations about 50-60 cm, but here the thickness of the thermal insulation was clearly not taken into account.
In addition, you will definitely need an assistant to stand below and warn people passing nearby, since a piece of brick or concrete accidentally falling from a height can injure someone. Such an incident can be very costly for the owner.
Stage five: connecting pipelines
In order not to make a mistake and to correctly connect all the pipes, you need to carefully study the instructions on how to properly install a split system. First, you need to measure the required length of the tube and cut it off with a margin of at least 1 m. All excess will be used for bends.
Professionals warn that bending tubes must be done with great care, as they can break, and sometimes wrinkles form on their surface. They create obstacles to the free flow of refrigerant, which leads to a significant increase in energy consumption. The minimum permissible bending radius is 100 mm.

Then polyurethane foam hoses or flex insulation are put on the tubes. It is highly undesirable to use foam rubber. After this, threaded flanges are put on them, and the ends are flared. Next, the pipelines are connected to the fittings. The main thing in this work is not to confuse the connection. Most air conditioner manufacturers make the cold and hot fittings different in diameter.
For the drainage system you will need a piece of reinforced plastic pipe. It is connected to the waste pipe using a heat-shrinkable tube or threaded flange. The drainage must be installed at an angle of at least 5-10 mm. This is necessary for the natural flow of water.
Sometimes, for some reason, such a tilt cannot be made. In this case, you will have to additionally install a special pump to pump out moisture. I must say that purchasing it can cost about 70-200 dollars. The price depends on the pump model.
Stage six: sealing and vacuuming
The simplest and reliable way checking sealing - soap solution. To prepare it, you need to buy half a liter of distilled water at the pharmacy and heat it, then throw in shavings of laundry soap.

By using a rubber hose from a bicycle hand pump connected to the outlet nipple, you can easily check the seal quality. This is done like this: one worker pumps up the air, and another spreads a soap solution onto the threaded connection with a brush and watches for the appearance of bubbles. When they stop swelling, tighten another 1/8 turn. After completion of work soap scum cleans with a damp cloth.
Having completed the seal check, the system must be evacuated, i.e., moisture, dust and air that have entered there must be removed. To do this, return the nipple to its place and tighten it. Next, connect a vacuum pump and pump for about an hour. During this time, the moisture from the system should evaporate along with the remaining air.
Final stage: testing
To carry out the tests, the split system is filled with refrigerant from a cylinder through a special adapter on which a pressure gauge is installed. Wait until the pressure gauge shows the pressure indicated in the instructions. It is worth noting here that air conditioners running on freon cannot be filled with refrigerant, and vice versa.

During testing, the circuit breaker is turned on, and the air conditioner should enter the mode itself. If this does not happen, you need to try running the test using the remote control remote control. If this does not help, you will still have to call specialists, but know that all installation guarantees have already been lost.
If the test is successful, cold air flows out and the blinds are set to desired position, you can safely tell yourself and others that you now know how to install a split system yourself. AND finishing touch- You need to repair the hole in the wall. And not with foam, but thoroughly.
Installing an air conditioner is not an easy task, but it can be done! At each stage many questions arise. This is complicated by the fact that it is impossible to give one standard scheme– each case is individual. If you don’t know where to start installation, in what sequence to perform operations, then this article is for you!
There are many recommendations and guides on the Internet, but they are not very specific. In this post I will highlight the nuances that arise at each installation step - I will try to do clear instructions. So that with the help of it everyone can perform a simple installation household split system. But before starting work, read the entire article.
- if the “route” of the air conditioner is very long and has complex bends;
- if the highway will pass through several walls;
- if the external unit is installed at a high altitude (above the second floor);
- if the diameter of at least one of the pipes is greater than 3/8 inch.
Air conditioner installation
- The first stage is the most difficult. It is necessary to imagine how the “route” between them will be laid. Each factor should be taken into account:


On mounting plate mark the center of the block. Then we mark the center on the wall. Don't forget about the distance to the ceiling. Using a level, level the plate and secure it. 
After this, you can fit the indoor unit to the fixed plate (but do not snap the lower clips to the plate!). Use a pencil to mark the lower corners of the body. Then remove the block from the plate.
- Mark where the hole will be in external wall.

Carefully cut through the wallpaper and knock off the plaster at the drilling point. If the installation is direct or as in the photo above, then you need to make a so-called “approach” to the hole (where the tubes will enter the wall). So that in this place the bend of the “route” is smooth. 

- for brick or concrete walls you will need a large hammer drill and a drill with a pobedite tip. Drill the first 2-3 cm of the wall without tilting (in a straight line) so that the drill barely enters the wall. Then be sure to tilt downwards. During this operation it is better to use an industrial vacuum cleaner.
- It is better to drill a wooden wall with a drill with a feather drill with a diameter of 45 mm. The process will go slowly but surely. Don't forget about the downward slope of the hole.
- It is better to drill a metal profile or “sandwich” with a 45mm bimetallic crown. Also, do not forget about the downward slope of the hole.


- If the air conditioner “route” needs to be pulled through just one hole in the wall, then you can proceed as follows:
We conveniently position the indoor unit and connect the materials to it:


We form the following materials into one compact bundle:

- With the help of a partner, we drag the indoor block with the “route” through the hole in the wall. We hang it on the plate, but do not snap the lower clips!

- We bring the power cable to the desired place inside the room (but do not connect it!). If required, close the “track” inside the room cable channel. Snap the lower clips of the block.

- We throw the external unit onto the brackets and screw it securely. We carefully bring the “route” from the outside to the taps of the external unit.

- We unscrew the nuts of the taps of the external unit (make sure that nothing gets into the open fittings). We put the nuts on the tubes, after which we roll them. We screw the copper tubes to the fittings.

- We connect the interconnect cable in the same way as to the indoor unit. If included with air conditioning is on additional wire, then connect it to the corresponding block. We connect the “power” cable if, according to the diagram, it goes to the external unit.

- Further you will need pressure gauges and a vacuum pump(pressure gauges must match the type of freon). Be careful here:
- connect the LEFT hose of the pressure gauge to the fitting of the external unit (to which a large diameter tube fits). Connect the MIDDLE pressure gauge hose to the vacuum pump;

- start the pump and open the LEFT tap on the pressure gauge (counterclockwise);

- We wait a few minutes until the air is pumped out. For small air conditioners (up to 2.7 kW of power) and a short “path” (up to 5 meters), wait 8 to 10 minutes;
- at the end of the “pumping out”, close the LEFT valve of the pressure gauge, and immediately after that turn off the pump. We look at the pressure gauge readings (the arrow should be at “-1”). If in your case refueling with freon is required, then read the relevant articles ();

- open the tap of the thin tube on the external block with a hexagon. At the same time, we look at the readings of the pressure gauges - “catch” the arrow at about 3 bar. We watch the arrow for 5 minutes - it should not move to 0 bar (which will indicate the tightness of the tube connections);

- Next, unscrew the LEFT pressure gauge hose from the air conditioner. Here you need to be VERY careful and QUICKLY unscrew the hose so as not to get burned by the freon (be sure to wear gloves). Even experienced specialists can suffer during this operation;

- open both taps on the external block with a hexagon (counterclockwise). After this we can close all the plugs.

Approximately the same instructions are in a separate article.

Thus, the installation of the air conditioner is complete! This article is not universal instructions for all household air conditioners. But in most cases it will be relevant, and I hope it will help you install an air conditioner. Watch a detailed video on installing a split system.
If you have anything to add, leave a comment!
By controlling the microclimate of personal space, we create conditions that are optimal for rest, work, and activities. Installing a split system will allow you to set a favorable level of temperature and humidity for the most in a simple way. Agree, in the summer there are many days that require regulation of climatic parameters.
After reading the article we have proposed, you will learn all the details and subtleties of the installation of air conditioning equipment. Carefully selected and systematized information will be useful to both independent home craftsmen and customers of installer services to verify proper performance.
We describe the installation process in detail, listing the nuances of the location and fastening of the blocks. The materials required for installation and connection of the units are listed. Photo and video attachments are a valuable addition to the text, making it easier to perceive information.
When studying information on how to correctly install a split system in a private house or apartment, you first need to choose the location of its parts.
To do this, it is necessary to take into account the direction of distribution of the flow of cold/hot air in the room, taking into account the basic technical requirements specified by the equipment manufacturer in the instructions.
The most common options for the location of the indoor unit of a split system are above the bed/sofa. Outdoor - usually taken outside and installed on an area near a window or on balcony slabs
There are certain rules that must be taken into account when choosing a block placement point:
- the distance between the unit and the ceiling should be at least 15-20 cm, although some manufacturers indicate 20-30 cm in the instructions;
- from the side to the wall - at least 30 cm;
- to an obstacle that will impede the flow of outgoing air or disperse it - at least 150 cm.
For the external part of the split system, the location is chosen based on load-bearing capacity walls Installation is possible near a window, on slabs enclosing a loggia, or on a wall next to a balcony.
For those who live on lower floors, the unit is installed above the window - as far as possible from passers-by.

Based technical requirements to the wall of the ventilation facade, used as a platform for fixing the outdoor unit of the split system - the possible load capacity should be 2.5 times the weight of the installation unit
For multi-storey building, especially if the apartment is on the top floor, you will need to involve high-rise specialists or determine the installation point very close to the window, which will provide easy access during installation.
Determining the distance between blocks
Often the choice of equipment location is regulated by minimal and maximum distance between its parts. These indicators are mainly indicated by the manufacturer and depend on model range and characteristics.
Sometimes companies do not indicate the minimum length of the circuit between two units, so installation can be carried out arbitrarily.

The minimum distance between the blocks of the split system from Daikin is 1.5-2.5 m, Panasonic - up to 3 m. However, if the blocks are located a meter apart, the length of the route must be at least 5 m (its excess is rolled up into a ring and hidden behind the block)
It is a little easier to figure out the maximum possible distance between two units. The standard indicator is 5 m. It is also possible to increase the length of the route, but in this case it is necessary to count on additional expenses due to the need to refill with freon.
Preparation for work
The decision to install a split system yourself usually comes after asking the specialists for prices. Incredibly high amounts for completing a job that takes 3 hours are justified by the presence of expensive tools and their wear and tear during operation. This is what makes up the bulk of the fee for the master’s services.

If the prices from split system installers are too high, it is worth installing with my own hands, having thoroughly studied the technology of this type of work
If you look at the recommendations of equipment manufacturers, the instructions often indicate that the preparatory work can be done on your own, but for installing pipelines, connecting to the electrical network, and carrying out the vacuum process, it is advisable to invite specialists with the appropriate tools.
Hardware Installation Tools
You can install the cooling unit yourself, because... Most of the tools are in the suitcase home handyman. An exception may be a vacuum pump, but it is not necessary to buy one - it will be possible to make such a unit from old parts.
Some teams of craftsmen do not even use this equipment when laying a route up to 6 m long.

If you couldn’t find a vacuum pump when installing the air conditioner yourself, an alternative would be powerful compressor from an old refrigerator or aquarium blower
During the installation process, an important aspect is maintaining the horizontal position of the block systems. In connection with these requirements, each stage of work must be accompanied by a control check at the construction level.
If a tool is not available, you can rent it at a hardware store.
You will need to prepare the following equipment in advance:
- Hammer. It is used for making holes in the façade through which a route will be laid connecting the external and internal blocks.
- Drill with a set of drills. Used for mounting fasteners.
- Pipe cutter for cutting copper pipes.
- A device for removing burrs after cutting pipes. You can use a reamer, a file and sandpaper.
- Roller copper pipes.
Some people believe that using a reamer does not make sense, especially if the new one does not leave burrs and dents, but in vain.
Only after manipulations with the chamfer remover can the edge of the flared tube be pressed as tightly as possible with the nut, and accordingly, freon leakage is unlikely.

The operation of a device for flaring copper pipes is carried out by deforming the tube according to a selected pattern, as a result of which a cone is formed. At the same time, the original wall thickness and circular cross-section are preserved
According to technical installation rules, a vacuum pump is required - sealing the air conditioning system is carried out with this equipment. After filling the route with refrigerant, the evacuation process is carried out.
Purchasing the necessary materials
You will need quite a lot of components, but all of them are easily available in any specialized store. Do not forget that materials must be of the highest quality and selected exclusively for a device that is functionally designed for cold weather.
It is necessary to purchase a wire to supply power and connect the units. The required parameters are always indicated in the passport or equipment installation instructions.
Standard is four-wire power cable with a cross-sectional area of 2 mm 2 or 2.5 mm 2. The length is selected based on the distance of the route, taking into account a small margin.
You will also need to prepare thick-walled seamless pipes made of soft copper intended for cooling devices. Pipes are selected with smaller and larger diameters. More specific characteristics specified in the user manual.
The length is equal to the length of the route plus an additional margin of up to 30 cm. During the transportation of tubes, their edges must be sealed to protect from dust settling inside the product.

The pipes are selected exclusively for the cooling system; their soft copper alloy lends itself well to flaring and ensures proper tightness
Foamed rubber insulation is used to insulate pipes. They sell it in 2 m lengths. To implement thermal insulation measures, you will need a length equal to the length of the route. Synthetic insulation is used on two pipe diameters.
As a drainage tube, experts recommend installing a corrugated hose equipped with a plastic spiral inside. You can also use alternative part– polypropylene tube. Its length is equal to the length of the track with an additional 80 cm.
You will also need two L-shaped brackets to secure the unit from the outside. The suitable size of the parts is determined by its dimensions, and the safety margin for the load-bearing load should exceed its weight by 5 times. Such an increase in the maximum permissible stress of the part is required to compensate for the loads of wind and snow.
It is better to buy these components from a company that sells spare parts for household split systems

After purchasing a bracket for attaching the outdoor unit of the air conditioner, you cannot make additional holes in it, because this significantly reduces the safety factor of the part
The following fastening parts are used: anchors, dowels and bolts. Their number, type and parameters are selected based on the type of brackets and mounting plate intended for the indoor unit.
The type of walls where the outer part of the system is to be installed also matters. To camouflage the laid communication line you will need plastic box standard dimensions 60*80 cm.
Installation procedure for split system
Installing an air conditioning system yourself is a very real task, however, there are many nuances in the work and they relate to certain models, so the installation process may have some differences. To study all the requirements, you must first read the instructions specifically for the purchased equipment model.
Stage #1 – installation of outdoor and indoor units
The indoor unit must be installed first. Having decided on its location, the area for the mounting card is marked on the wall. After drilling out the gaps, plastic plugs for the dowels are inserted, the card is hung and secured with dowels.

The most careful fastening should be done in the lower part of the plate, because in this area there are latches that hold the block
After installing the cassette, use building level The strict horizontal positioning of the future block is measured. In case of any discrepancy, all completed work will need to be redone.
At this stage, preparatory work for laying the routes will take place. First, the lines of its location are calculated. Then a hole is drilled in the facade wall, taking into account the required slope of more than 1/100.
A hole with a diameter of 5 cm is also drilled with a slope, and the angle of inclination can be increased in comparison with the route. Thus, the condensate formed will better leave the system.
When choosing a back-to-back mounting pattern for the units, it is necessary to check the hole intended to accommodate the power cable. To do this, you need to check the location of the power ports on the units.
And now it’s time to install the outdoor unit. If we are talking about a multi-story building, then you will need special equipment for high-altitude work.
As in the first case, the block must be strictly horizontal, so a level is also used at the marking stage.

When placing the outdoor unit, it is necessary to take into account the limitation regarding its slope - the maximum permissible slope angle is 45°
When installing the fasteners, each existing hole must be filled with anchor bolts ( standard diameter 10*100 mm), regardless of their quantity. Afterwards, the outdoor unit is installed and also fixed with fasteners.
Stage #2 – laying a communication line
Using an electrical wire and two copper tubes, the outdoor and indoor units are connected. Additionally, through the wall there will be laid drainage system, responsible for removing condensate. These elements must be correctly selected, connected, laid and secured.
First, you should prepare the copper tubes by cutting them to the required length using a pipe cutter and treating the edges with a reamer to remove burrs and dents after the cutting procedure.
It is not recommended to use other tools, such as a file. After its use, metal shavings get inside the tube, which will circulate throughout the system and ultimately lead to failure of the compressor.

To pass copper tubes through a wall, their edges must be insulated with a plug to protect them from dust.
Thermal insulation of the tubes is carried out by placing polyurethane foam hoses on them. You cannot choose foam rubber as a sealant - it has a short service life. Having completed thermal insulation measures, all joining areas of the material are tightly taped with metallized tape.
Now it’s time to lay the drainage and cable. Each wire must be equipped with a special tip. They are installed on cleared insulating material conductors and crimped with forceps.
The finished cable is connected to the air conditioner according to the diagram given in the manual for the device.

On both blocks, in an area located slightly above the ports, there is a removable plate designed for connecting copper pipes. Under it there are electrical connectors for the cable.
The drainage tube is connected to a special outlet on the block indoors and is discharged through a hole in the wall. The tube must be long enough and end at least 60 cm from the wall.
According to the rules, its installation is carried out at an angle towards the exit. Fixation with clamps is required every meter of length to eliminate sagging and prevent condensation accumulation.
Stage #3 – connecting system units
Communications carried out through the wall are connected to the corresponding ports. It is important to remember that the total length of the drainage pipeline cannot be more than 20 m. Copper pipes are laid in a loop to catch oil, which is contained in small quantities in freon.
Drainage can be diverted in two ways: take it to the sewer or to the street. The first method is technically correct, but due to the complexity of reproduction it is not widely used.

When laying the drainage pipe, it is better to avoid sharp turns; sagging is also not allowed - condensation will accumulate in these areas
At the bottom of the internal block of the system there is a tube with a plastic tip. A corrugated hose is put on it and tightened at the connection with a clamp.
A similar procedure is performed for the outer part of the device, but many people ignore it. If instead of a hose you use polymer pipe, the appropriate adapter is selected. It is used to connect the output of the unit and the tube.
To connect copper pipes, you first need to lay them along the wall using a pipe bender. If such a tool is not available, then we suggest that you read the article, which describes in detail how to bend a pipe without special equipment. Read more - read.
The tubes must be given the necessary slope without kinks or sharp creases. First of all, they are connected to the unit indoors. To do this, loosen the nuts on the corresponding ports.
When unwinding, a characteristic hissing sound of escaping nitrogen will be heard. It is pumped in at the time of production to eliminate oxidation of parts. After lowering it, you need to remove the plugs and completely unscrew the nut. Next, the rolling procedure is performed.

During the flaring process, the pipe is held with the hole down to prevent metal shavings from entering the system
The edges of the pipes in a 5 cm area are leveled. Then flaring is carried out to ensure the connection between the inlet and outlet of the blocks. This will create a closed circulation system. Correct installation plays an important role in achieving maximum tightness during the movement of freon.
The flared edge of the pipe is connected to the required outlet and secured with a nut. It is prohibited to use any additional devices here - sealants, gaskets, etc. The copper tubes used provide the necessary sealing.

When connecting copper tubes, it is necessary to apply a force of 60 kg, only then the copper will clamp the fitting monolithically, and the contact will be sealed
Similar actions are performed with all four ports. After connecting, you should final stage installation of an air conditioning system - elimination of air and moisture, as well as possible argon residues that may have accumulated during the installation process.
Stage #4 - vacuuming the system
During installation work, air enters the air conditioner pipes and if it is not removed, it will end up in the air conditioning system. The result is increased load on the compressor and, accordingly, its rapid heating.
Also, water particles negatively affect all parts. Freon contains a proportion of lubricating oil; its hygroscopic consistency becomes less effective when in contact with water. As a result, component wear will accelerate.
To remove air, you can use two methods: a vacuum pump or a small amount of freon liquid, which is drained from a unit located outside. When manufacturing an outdoor unit, manufacturers with a slight surplus.

The “spray” method is repeated several times, with the second attempt being made with the top valve. If the length of the route is 2-3 m, the procedure is carried out 3 times, with a four-meter length - 2 times
An alternative to an expensive vacuum pump is to release excess freon from the outdoor unit system. To do this, unscrew the plugs on its valves. It is necessary to work with a lower port of larger diameter. Under its cover there is a hexagonal connector. Based on its parameters, the appropriate key is selected.
Using a suitable key, turn the valve 90° and after a second return it to its previous position. Thus, a small amount of freon enters the system and creates increased pressure. By pressing your finger for a second on the spool located on the same port, excess freon and gases are released from the system.
After complete removal of air, the spool outlet is tightened with a plug, and the valves are fully opened and freon enters the split system. To check the tightness of the connections, they are coated with soap foam.
It is worth remembering that with independent, insignificant factors do not exist. And everything that was done incorrectly, for example, rolling pipes without cleaning the edges, or an insufficiently fixed connection, ultimately leads to rapid wear of the cooling system components. Therefore, during the installation process you need to be extremely careful with all details.
If you have the necessary experience or knowledge in the installation of split systems, please share it with our readers. Perhaps you know some subtleties that we did not mention in this material? Leave your comments and ask questions in the block below.
Installing an air conditioner is a rather complicated undertaking that requires, if not experience in carrying out such work, then at least thorough theoretical training. In more than half of the cases, problems with air conditioning appear due to incorrect installation and errors during the system connection process. Even the most expensive and modern device will not be able to fully realize its potential if its installation is carried out in violation of technology.
A traditional split system includes an external unit, which is placed outside the window, and an internal unit. In some cases, more than 1 block is installed. Such combinations are known as multi-split systems.

Each element of the system performs its own functions. So, the outdoor unit is responsible for condensation, while the indoor unit performs the functions of an evaporator. The blocks are connected using a backbone of tubes and wires. Freon circulates through the tubes. The system also includes a drainage tube. It is connected to the outdoor unit. It is responsible for removing moisture that condenses during operation of the installation. According to the rules, this tube must be connected to the sewer system.
Air conditioning systems are available for sale to suit every taste and requirement. However, in terms of their composition and connection technology, they are practically no different from each other.
Before you begin installing the blocks, you need to decide on a number of important points.
- First, decide on the side of the world that the capacitor unit will face.
- Secondly, you need to establish the material from which the walls of the house are made. In accordance with this point, suitable fasteners will be selected. Additionally, certain changes in the system installation process are made by the weight of the blocks.
It is important to ensure normal access to the units to carry out preventive maintenance and repair activities. The outdoor unit must be protected from precipitation, icing and other adverse influences.
When choosing the power of a future split system, take into account operational and other important characteristics housing. First of all, take into account the orientation of the apartment or house to the cardinal points. Also important has the number of people inhabiting the home, the total power of electrical appliances, the number of heating radiators, the presence of other ventilation systems and devices.

Before proceeding with the installation of the outdoor unit, you need to make sure that the strength of the balcony railing or wall is sufficient to support the weight of the product. The most powerful models weigh up to 60 kg or even more. On average, household outdoor units weigh 10-15 kg and usually no problems arise with their placement. The wall and all fasteners used must have a minimum of two times the strength factor.
If there is external insulation, be sure to ensure that the brackets are not attached to the thermal insulation, but directly to the wall material.

Quite often, aerated concrete is used in modern housing construction. This excellent material with high thermal insulation properties, however, unfortunately, it cannot boast of great strength. If external walls Since your home is built specifically from aerated concrete, you should refrain from installing the air conditioner directly on the wall.
It is not recommended to hang the block on a ventilated façade., because During its operation, quite strong vibration and noise can be created. In the situations described, the unit should be installed using a special damping seal, which is pre-fixed to the wall. The air conditioner itself rarely produces noise more than 25-30 dB, so in houses with walls made of a material denser than aerated concrete, no inconvenience usually occurs.
Any distortions when installing the external unit are unacceptable. At each stage of installation, you need to check the horizontal installation of the product using a building level. Deviations from the horizontal will lead to disruption of the circulation of freon or other refrigerant used.
If possible, the air conditioner should be installed in a place where the wind blows from all sides, but at the same time it is protected from precipitation and other negative influences. The best option is to place the unit under a pre-installed canopy or at least on the balcony. Residents upper floors apartment buildings can install an outdoor air conditioner unit on the roof. It is only important to ensure that the main length does not exceed 15-20 m in total. Otherwise, there will be significant losses of cold in the system, and the air conditioner will consume electricity in vain.

Take care of proper arrangement drainage of condensed moisture. Regulations require that this pipe be connected to a sewer. However, this requirement is almost never met, and the moisture simply drips onto the ground under the window. In such a situation, you need to at least make sure that water does not drip on passers-by.
The rules require that the distance between the outdoor unit and the wall surface be at least 10 cm. The problem is that the compressor must have sufficient airflow from all sides. If you install it closer than 10 cm to the wall, in summer the airflow will be insufficient, which will lead to damage to the unit.
Installing an outdoor unit is associated with a certain danger, because... This is still high-altitude work. Therefore, installation can be carried out only if you have the necessary insurance, or it is better to completely entrust it to professional installers.

Installation procedure for the indoor unit
Inside the premises, the corresponding unit is installed and the pipeline is laid. Special attention should be paid to the process of arranging electrical wiring. Household air conditioners consume about 2 kW of electricity or more. First make sure that the wiring in your apartment or house can withstand such a load. If she is not capable of this, lay an individual line from the shield with a separate fuse. This will protect the wiring from overheating and your property from fire.

Lay the line from the external unit of the air conditioning system to the location of the indoor unit. The line can be laid outside or inside. At external laying it is hidden in a plastic box, but in accordance with internal installation, the line must be recessed into the wall.
Be careful when choosing a place to place the indoor unit. The further the blocks are removed from each other, the less efficient the system will be and the higher the energy losses will be.
The indoor unit must be placed so that there are no objects near it that could interfere with the normal flow of cooled air. Appliances, curtains and other objects that are at the same height as the unit must be at least 3 m away from it.
The unit must not be placed directly above a heating radiator. The installation location must be such that the installation can be easily accessed for repair and maintenance work. The distance between the unit and the ceiling should be at least 20-25 cm. It is not recommended to install the air conditioner above appliances and furniture.
The air conditioner must be installed so that the cold air produced during operation does not blow directly on a person. Otherwise, bronchitis and sore throats will not take long to appear.

The indoor unit can have a wall or ceiling design. The latter are extremely rare. However, regardless of the type of system, it is necessary to ensure the most correct and reliable fastening. Installation is carried out using brackets and screws. The brackets must be checked for strength.
After connecting the outdoor and indoor units, it is necessary to remove moisture and air from the line. This process is known as vacuumization. Special equipment is used to pump out air and water.
Do-it-yourself air conditioner connection sequence
Air conditioner installation is carried out in several stages. First, the electrical wiring is laid. Further the external unit of the system is installed. The technology requires that it be placed at a height of at least 180-200 cm from ground level. This requirement is relevant for owners of private houses and residents of apartments located on the ground floor.

In the outer wall holes are drilled for laying communications. The diameter of these holes should be 500-600 mm. Brackets are installed to ensure the block is secured. A special waterproofing cup is inserted into the prepared hole and the connecting lines are laid directly.
Next you need install the indoor unit. Maximum permissible distance between these two elements is 20 m. The optimal distance is considered to be 7-12 m. Specific recommendations are given in the instructions for the equipment; be sure to study it before installation. Install the brackets and secure the indoor unit of the air conditioning system.
At the end, all that remains is to lay the wires that will ensure the functioning of the system. Mount the box. It, as already noted, can be internal or external. Connect the electrical wires and freon tubes. Evacuate the system. Special equipment is used for this. The procedure itself lasts on average 45-60 minutes.
After the vacuum is completed, perform a test run of the air conditioner. Professionals at this stage use special software and hardware equipment. If it is absent, at least observe the operation of the system and the state of the electrical network for some time.
Basic connection errors and their elimination
Mistakes made during the installation of an air conditioner lead to many different troubles. However, the services of professional installers are becoming more expensive every year and an increasing number of people, in an attempt to save money, are trying to install the air conditioner themselves. This, as already noted, is quite complex and very responsible work, which has many features and requires taking into account a wide variety of nuances.
- One of the most common mistakes is laying pipes with unacceptable and/or repeated kinks. Because of this, the load on the compressor will increase, which will not have the most favorable effect on the operation of the system.
- The external unit cannot be installed on a glazed balcony. Previously, recommendations were given for its installation in this room, but they are relevant only for unglazed balconies. It is important that normal air circulation is maintained and the unit is blown from all sides.
- The air conditioner should not be installed where any kind of installation that generates high-frequency electromagnetic waves is operating. Such equipment includes various welders, machines, etc.
- It is important to maintain maximum evenness of the installation of the blocks. If this rule is violated, the resulting condensation will simply drain onto the floor, which will cause a lot of inconvenience. As already noted, the air conditioner cannot be installed directly above the radiators.
If these and any other errors were made and led to undesirable consequences, appropriate measures must be taken to correct the violations. If there is a draft from the air conditioner, it is usually enough to change the direction of air flow by adjusting the dampers.
When the system is turned on in heating mode, ice is often detected on the external unit. The reason for this phenomenon is usually that the system does not have an automatic defrost function. To remove ice, it is enough to turn on the equipment for a while to cool. The air conditioner will heat up and the ice will disappear.

If your air conditioner stops cooling properly, you need to check the filters. They require regular cleaning. Detailed recommendations about this are usually given in the instructions.
If water begins to drip from the indoor unit, the cause of this problem in most cases is a severely clogged drainage channel. Ice plugs that form also lead to this. It is impossible to eliminate this kind of blockage on your own without the necessary skills. It is recommended to urgently call a technician who can properly warm up the system and correct the situation.
Uncharacteristic noises during system operation usually indicate an imbalance of the fan or severe wear of the bearings. This problem can also be dealt with only by a qualified technician.
If you find that the air conditioner has begun to overheat, you should call a technician to check the freon level and the tightness of the system.

Thus, installing and connecting an air conditioner yourself is a completely feasible job. But you need to be prepared in advance for the fact that this event is not easy. Follow the instructions in everything and promptly eliminate any problems that arise. Then the air conditioner will serve as long as possible, fully performing all the tasks assigned to it.

Good luck!
Video - How to install an air conditioner yourself