How to make a staircase with your own hands. How to build a wooden staircase - from calculations to painting. Prices for various types of staircase elements

Read also
Wooden stairs They are gaining more and more popularity every year. This is due, first of all, to the fact that people more often began to purchase country houses several floors. When arranging a room, it plays an important role right choice steps. Stairs from natural wood have many positive aspects. This type Products can be either purchased or made yourself. To do this, you will need to collect a certain set of tools, buy good wood and be patient.
How to make the calculation correctly?
 Before starting work, you should Special attention pay attention to the selection of the main material. Wooden stairs to the second floor can be made from different breeds trees, but pine is best. This type of raw material is soft and low in price. Even a beginner will find it easy to work with such material.
A staircase made of solid pine will not darken if, before starting work, the raw materials are properly treated with a special product.
So that the design is reliable and lasts long years, it is recommended to buy wood of more expensive varieties. These include beech, oak, and larch. They have a denser structure, but have a high price.
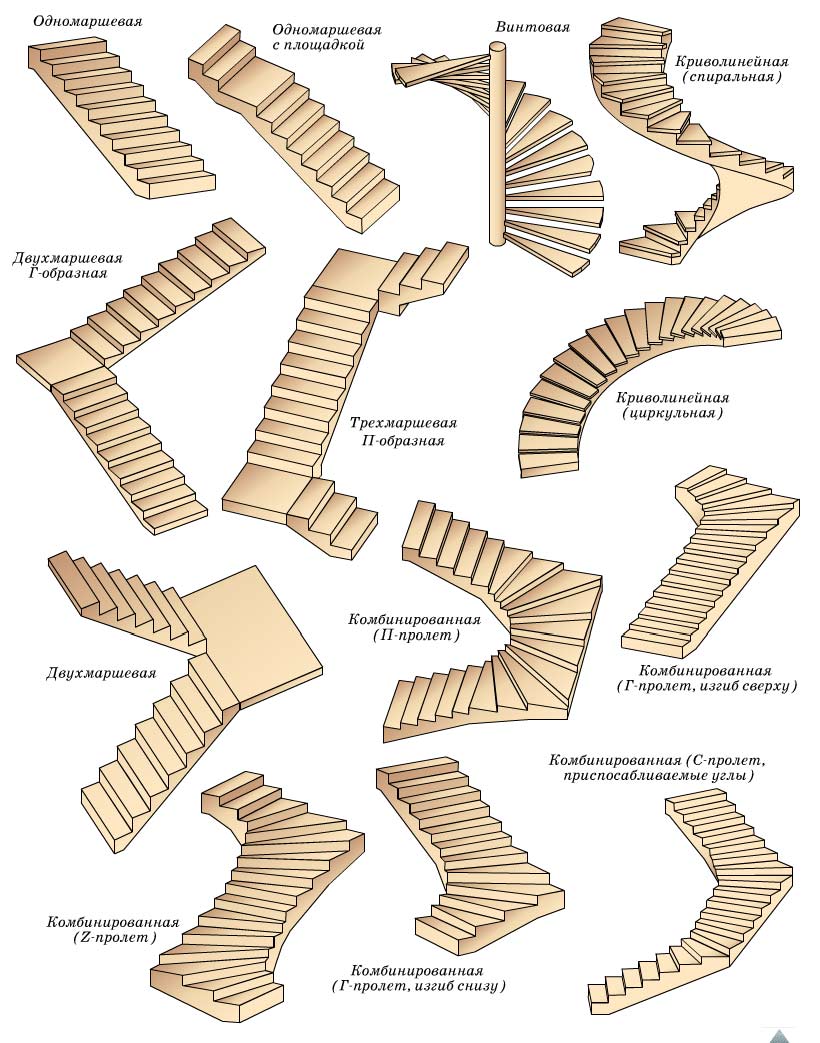
Main types of stairs:
- screw;
- marching
To make the first option, in addition to wooden materials Metal ones are also used. Such stairs are intended only for human movement. It is almost impossible to lift furniture or other large elements on them. Often, screw structures are chosen for indoor spaces. small area. Popular types of wooden stairs are shown in the photo below: 


Marching ones are the most practical and easiest to manufacture. Similar designs are divided into many types. They can be either single-flight or consist of several parts. In the second option, a platform is often used that separates these elements and is used to create a turn.
Before you start work, you need to calculate the wooden stairs:
- The product should not have an angle of inclination greater than 45 0.
- The tread depth is at least 25 cm.
- The dimensions of the riser should be within 16-20 cm.
- Opening width from 1000 mm.
- The height of the railing is from 1 meter. For children – 60 cm.
- The opening is vertical - at least 2 meters.
In order to determine the number of steps, it is necessary to divide the height of the future staircase by the height of the riser. The resulting number should be rounded to the nearest whole number. This indicator will be the number of steps. 
An accurate count can be made using a special computer program. Using simple rules and recommendations, you can make a comfortable, and most importantly, reliable staircase.
Product design
 Before you make a wooden staircase, you need to know what it consists of. This will help you quickly create an option that will best fit into the chosen interior of the room.
For ease of movement, the number of steps should be odd.
In design flight of stairs includes the following parts:
- Bowstring. This element acts as a load-bearing beam and is an additional fastener for the steps.
- Stringers. They are cuts that are created in the main parallel beams. They are necessary for placing treads.
- Riser. They are designed to cover the visible part between the steps. The risers are mounted vertically. It is not necessary to use these elements.
- Step through. This type of element is the upper part of the steps.
- Balusters. With this part, maximum rigidity and strength of the product is achieved. The elements are attached to the steps and railings.
- Columns. They are also often called support rods. This main part screw structures.
- Handrails. Mounted to the top of the balusters.
- Radius steps. They are presented in the form of a rounded shape. Installed at the bottom of the stairs.
- Decorative parts. They are installed on poles. They are often called stubs.
- Winder step. It is installed at the very beginning flight of stairs. Its distinctive feature is its unusual shape.
The complexity of the structure depends not only on the type of structure, but also on the manufacturing method. You can make a wooden staircase to the second floor with your own hands for a private house using both bowstrings and stringers.
Bowstrings are mounted from the end of the tread. For this, corners, grooves and construction adhesive are used. They can also be secured using bars. All elements are fixed with bolts or self-tapping screws. 
As for the stringers, they are placed under the steps themselves. Special fasteners are used for their installation. 
To make bowstrings and stringers, it is best to use oak or ash. Craftsmen also prefer larch. Such tree species will make the structure more reliable.
Layout and creation of elements
The manufacture of wooden stairs should be started only after full calculations have been made. You also need to finally decide on the place where the product will be installed.
Sequencing:

If the steps will be laid on stringers, then their length should be 10-20 mm longer and their width 20-30 mm longer.
Particular attention should be paid wooden railings for the stairs. They should be sanded in several stages, reducing the graininess of the paper. This way, the handrails will be perfectly smooth.
Also, do not forget about the connector to the second floor. If it is not there, then the dismantling method will require removing part of the ceiling.
Installation of a wooden staircase
 Fastening the structure is the main part of the work. A lot depends on the correct assembly of the elements.
The installation of a wooden staircase must begin with fastening the support beam. It is fixed to the floor where the stairs will begin. Then the stringer is attached to the beam. This can be done in two ways: washed down in a beam or washed down in a stringer.
 After this, the product is fixed to the support beam, to the side wall and the ceiling opening. As soon as the first stringer is well fixed, you can proceed to the second. The second element is installed according to the length of the prepared steps.
The top step should be on the same level with the floor of the second floor.
Depending on the width of the stairs and the expected loads, you can use not two stringers, but three or more. The use of several elements gives the structure rigidity.
To ensure that the steps are not tilted different sides, stringers should be installed as evenly as possible.
Once the main parts are attached, you can begin installing the risers and then the steps. The treads are attached using wood screws to the stringers and risers. It is important to ensure that the fasteners are well embedded in the wood. 
The installation of balusters and posts must begin from the markings where they will be located. The hole for the dowel should be located in the middle of the baluster. The fasteners are fixed into the connector using glue. They should protrude 10-15 cm upward. A hole is drilled in the baluster to suit the size of the dowel. 
Then the posts are attached. On a single-flight structure they are mounted at the beginning and end. First you need to attach only top elements, the lower ones will be installed at the very last moment.
After this, you need to fix one or two balusters. This is necessary in order to determine the angle of the surface. To do this you will need to attach a handrail. Cut off the unnecessary part from all elements.
Then the base and holes of the prepared balusters are carefully treated with glue and connected to the dowels. 
The railings are cut at the required angle. Holes are made on the cuts to connect them to the posts using a dowel. The slats are attached to the balusters after the glue has completely dried. They are also fixed using adhesive and self-tapping screws. For reliable fastening we use . 
The bottom column is installed last. It is also fixed to the railing with a dowel. After the glue has completely dried, the wooden staircase made by yourself is considered ready.
To prevent the material from being attacked by fungus and insects, the wood must be painted antiseptic. The stairs should be coated with varnish or other paints and varnishes after the primer has dried thoroughly. To do this you will need to wait at least 24 hours. If this is not done, the paint will not apply evenly and will begin to peel off over time.
Making a staircase out of wood is not difficult. By following the sequence of actions and recommendations, you can make a beautiful, durable and durable design, which will decorate the room for many years.
Hello everybody!
How to get to an object that is at a height beyond your reach? How to collect fruits from the very top of a tree or paint a house? Such questions, most likely, have visited you more than once; it was for these purposes that a special device was invented, which is called a Stepladder.
Stepladders are perhaps the most popular and necessary stairs, they are used in everyday life and in other areas of activity.
This article will describe the manufacturing method ladder, With detailed photo report.
To make the stairs we will need:
Materials:
Two beams 60*40 mm;
- timber 50*35 mm;
- self-tapping screws;
- dye.
Tool:
Wood saw or other available cutting tool;
- Sander;
- drill;
- hammer;
- axe;
- mount.

Let's start by taking two vertical strings with a beam cross-section of 60*40 mm, we take its length at our discretion, in in this case length was 3.6 m.

In order to make the stairs strong and the upper edge of the steps to be horizontal when tilted, we make special notches, apply markings in the places where we plan to install the steps, take the distance between the rungs to be 30 cm. We use timber for the steps with a section of 50 mm, according to these dimensions We make markings and apply them on both sides of the bowstring. Next, mark the depth of the notch - 15-20 mm. We connect the resulting marks with an oblique line, as shown in the photo.

Then using sharp ax and using a hammer, we remove part of the wood at an angle, but before doing this, we need to make a recess along the marked line with a hacksaw, this is so that the timber does not split in a place that is unnecessary for us.

We use the ax as a plane, leveling the angle of the notch.

In a similar way we make notches on both bowstrings.

Next, using a grinding machine, we process the surface of the timber.

We need to carefully align the notches we made.

Now we paint with paint inner part notches. We put them off until completely dry.

Next, we take a beam with a cross section of 50*35 mm for the steps, it needs to be slightly modified. We take a plane and use it to remove the chamfer. We perform the same operation on each block.

Then you need to make one of the sides of the beams the base one; to do this, take a corner ruler and apply markings using a pencil.

When everything is ready, using cutting tool saw off all uneven edges, then treat the surface grinder, smooth the ends.

Now you can move on to making the upper and lower rungs of the stairs. In order to distinguish the top and bottom of the staircase, it needs to be made with a slight narrowing. The top part should be shorter than the bottom. We take the width of the stairs to be 65 cm at the bottom and 55 cm at the top. You can take other sizes at your discretion. Using a tape measure, mark the length.

Using a square, we apply markings in the place where the future step will be cut.

Let's start cutting.

When the steps are ready, we process the ends with a grinding machine.

Next, we find the center at the edges of the beam; to do this, we need to step back from each edge by half the thickness of the string (20 mm).

Then we make holes for self-tapping screws at the marked centers. The self-tapping screw should fit freely into this hole.

We make a countersink using a larger diameter drill.

Now we install the top and bottom crossbars, placing and aligning them in the notch. We make the ends of the steps flush with the side parts of the bowstrings. After this, through the existing holes in the steps, we make a mark of the place where the hole will need to be drilled. They are needed so that the screws do not split the wood when twisted. The holes were made with a drill 0.2-0.3 smaller than the thickness of the screws.


Now you can fix the step in its place, but before that you should paint the pressing side of the crossbar.


When the stairs are given required dimensions, we add the missing steps, to do this we lay out the prepared bars in the notches, aligning the base ends flush with the side parts of the bowstrings.
Ladder- this is one of the main elements of the interior design of a room, therefore, when designing it, attention should be paid not only to reliability and functionality, but also appearance. Before you take on making a wooden staircase with your own hands, need to be taken into account a large number of factors on which not only its design, but also its dimensions will depend.

These factors include:
- available room area,
- height,
- maximum load, for which the staircase is designed,
- ease of use for people living in the house.
Today there are a huge number of design options interfloor stairs, so the choice suitable design- the task is quite difficult..

Choosing which staircase to build
Marching and spiral staircases. The design of the flight of stairs is quite simple and is best choice, if you plan to make it yourself, however, in order to ensure an acceptable slope and height of the steps, a considerable area is required. This ladder is very easy to use and can withstand heavy loads. It can be used to easily lift furniture and other large objects to the second floor; in addition, it is safer, so it will be the best choice if children or elderly people live in the house.

The spiral staircase has more complex device. It is used in conditions of limited space, when due to lack of space it is not possible to provide a safe slope of an ordinary staircase. The main disadvantages include not too convenient design, which makes lifting difficult and does not allow carrying large objects. At the same time, a skillfully made spiral staircase has sufficient strength and can be the main element of the interior.

Safety first!
Before you start DIY staircase making, you need to take care of her safety. Firstly, it must be durable and easily withstand a load several times greater than the weight of a person of average build. Secondly, the ladder must be comfortable and ergonomic. In this case, it is necessary to pay great attention to such factors as the height of the steps, the slope of the stairs, as well as the location and shape of the railings. The steps must have non-slip coating, and the spaces between the balusters are chosen in such a way that a child cannot squeeze through them and fall.
Design features of stairs
Depending on the method of fastening the steps marching stairs can be on bowstrings, stringers or bolts.
- Stairs on bowstrings have two side beams to which the steps are attached. Such squirrels (strings) can be made of metal or wood. They can be attached to a wall or special supports, ensuring high strength of the entire structure.

- The steps of the stairs on stringers are attached to beams, which are located below and repeat the geometry of the entire structure. Such beams (stringers) can be straight or curved. Straight stringers, as a rule, have a jagged shape, with the steps superimposed on the teeth.

- Stairs with bolt-jointed steps are highly durable, so this design does not require additional supports and can be supported on two points. The steps are attached to each other using metal rods - bolts, which completely eliminates the creaking caused by the friction of two wooden surfaces.

How to make a staircase with your own hands. Selecting materials
Wood is most often used to make stairs coniferous species, because it is affordable and easy to process. An oak staircase will be more durable, but the cost of such a structure will increase several times, and besides, processing this type of wood is quite labor-intensive and requires certain skills.
The main stages of staircase manufacturing
Let's look at the basic principles of making stairs using an example wooden structure on stringers. Before you start designing, you need to understand that any, even minor errors and inaccuracies in calculations can lead to serious problems that will arise during installation, so each stage should be treated with extreme care. Our future staircase will consist of three main elements: steps, handrails and stringers. On initial stage everything needs to be done necessary calculations designs.
Calculation of the width and height of steps
To calculate the size of steps, the formula 2A + B = 64 cm is usually used, where A is the width and B is the height. Typical step heights range from 140 to 170mm. We measure the height of the future staircase and divide by the expected value of the height of the steps.
Let's assume it is 240cm, and the desired height of the steps is 17cm. We divide the resulting value by the height of the steps 240/16=15 and round the result to the whole part, therefore, our future staircase will consist of 15 steps. Now we determine the exact height of the steps; to do this, we divide the height of the entire staircase by the number of steps: 240/15 = 16 cm. We find the width using the formula, using the height value, we get 24cm. You can also use the table.

The protrusion (the part of the step overhanging the riser) should be no more than 3-4 cm. The greater the height of the riser, the narrower the step itself, but its width should not be less than its height. Most optimal width steps should correspond to shoe size forty-two (29-30 cm.)

When calculating the stairs, it is also necessary to take into account the distance between the steps and the objects located above them (ceiling, beams, balconies, etc.). It should be at least 1.9-2 meters.

The horizontal size of the stairs is determined as follows: the width of the steps is multiplied by their number, it should be taken into account that the floor surface serves as the first step, so in our case the calculation will look like this: 13x24=312cm.
If the height of the stairs is large enough, you can make a platform. It is recommended to make such platforms in 7-8 steps. In the case when it is necessary to design a staircase with a certain number of steps, you can reduce their height in order to create a landing.
Making stringers
Can be used as a material for making stringers pine board 40mm wide. Make a pattern that exactly repeats the dimensions of the steps' profile and apply markings to the prepared boards. Then cut out the teeth using a hacksaw or electric jigsaw. In those places where the riser meets the step, it is necessary to cut the corner. Having made one stringer, you can use it as a template for the rest. Since the strength, safety and durability of the staircase depend on the stringers, you should not skimp on their quantity, as well as on the quality of the material from which they are made. The boards must be free of knots and any signs of insect activity. Consider how to attach the stringers. To achieve the required strength, as a rule, 3-4 stringers are enough.

Installation of steps and railings making wooden stairs with your own hands
The steps can be attached either directly to the stringers or with the help of additional wooden elements - fillies. Measure and cut from wood required amount steps and risers, be sure to take into account the overhang. The steps are attached using nails or self-tapping screws.

The design using triangular fillies is more reliable. The fillies are attached using dowels, for which grooves are pre-made. Most robust design obtained using fillies complex shape, while a special cutout is made on the stringers. The connection of the staircase elements is carried out using glue and self-tapping screws.

After the steps are ready, you can screw the railing balusters to them. In order to protect the tree from the influence of destructive factors (dampness, mold harmful insects), it must be coated with paint.
Making a wooden staircase with your own hands is, in principle, not so difficult. All you need for this is quality wood, the necessary tool and a little patience. Before you start work, carefully consider all the nuances future design and check your preliminary calculations several times.
If you plan to make a wooden staircase with your own hands, step-by-step instructions with photos, videos and installation projects posted on this portal will be an excellent guide to this issue. To prepare for the process, you need to stock up necessary tool and materials.
Materials and parameters
Lumber: board 40 and 25 cm wide, 4 to 2.5 cm thick, beams 5x5 cm, wood glue, paints and varnishes, galvanized tie rods, screws and corners. The equipment used includes a hand-held circular saw, a screwdriver, brushes, abrasive sandpaper, a clamp, a chisel, and a grinder.
For correct placement, the slope is determined to be 25 - 40 degrees. The gap between the steps is 19 cm. The tread width is 25 cm or more. The height of the handrails is 90 cm. The string of the structure is made from pine edged boards with parameters 40 cm wide and 4 cm thick.

Installation of a regular straight staircase
- Here you can find out the best way how to create a wooden staircase with your own hands, video from step by step instructions will allow you to build the structure as quickly and correctly as possible:
- Marking of areas for installation of treads is provided by means of a circular using a template. To do this, cuts are made 1 cm deep. Using a chisel, the mass of wood between the cuts is removed. The finished bowstring is mounted on the workplace.
- The bowstrings are fixed using screws to floor surface. To do this, you should stock up on a screwdriver and galvanized metal corners.

- Steps are cut out of boards 25 cm wide using a circular saw. The thickness of the steps is adjusted to the width of the span, no less than 2.5 cm. The end parts are processed with a grinding machine for more reliable fixation with the bowstring.
- The steps and strings are assembled using wood glue. The end parts of the steps and the grooves in the bowstring are smeared. Galvanized rods with threaded ends are used for the screed. Nuts with wide spacers are screwed onto them.
- Two boards are fixed to the installed rack at a level of 90 cm. They will provide the functions of handrails.
- 3.5 inch steel stand.
- Solid wood 1x8.
- Wooden elements 1×12.
- Connectors in the form of racks.
- Supports for handrails.
- Handrails with specified parameters.
- Metal base for steps.
- Welding machine.
Spiral staircase: Materials for making

Step-by-step installation
In the design under consideration, the distance between the floors is 3 m. Then the total height is divided by the selected size of the steps and their number is obtained: 300 cm ÷ 18 cm = 16.6 pcs.
The top position will end with the 17th step (rounded result). The width of the steps along the inner edge is 10 cm. Calculation of the outer edge begins with determining the outer diameter of the stairs without handrails.
The middle post and 2 steps form a cross-section of 172 cm. To determine the circumference, you need to multiply the diameter of the staircase by 3.14. Then 172 cm x 3.14 = 540 cm. Since 17 steps are to be installed, 210 ÷ 17 = 32 cm. To create an overlap of 2.5 cm, the width of the steps on the outside is 35 cm.

Support part
The screw device is created using a central metal support and bases for the steps. For a central post with a diameter of 20 cm, 400 cm is cut off. Of these, 300 are allocated for 17 steps, 90 cm for the fence at the top and 10 cm protrude for the reserve.
The pillar is marked at the points where it is planned to erect steps, that is, every 17.64 cm. The upper part is crowned with a thick round plate welded to the pillar. At the bottom, a square platform is created with a height of 1 cm and dimensions of 30 by 30 cm. Gaps are made at each corner of the platform for anchors and fixed to the base.

Placement of steps
Steps are attached to central support in the marked areas. Each subsequent step overlaps the previous one by 2.5 cm so that the supports for the connection can be fixed. They attach one step to another. This can be done using metal or wood. Then all the bases of the steps are fixed to the central support. Wooden steps are placed on the bases. Gaps are made in the places connecting the supports.
Then you can screw 3 railing posts onto the step so that there is a gap of no more than 10 cm between them. After installing the posts, you can fix the handrails. When purchasing material, it is important to observe the ability to form bends in the direction of the stairs.

When implementing decorative processing, can be pasted over metal support wood materials. Used for finishing steps varnish coatings. They are applied over a primed surface.
Attention! Widely used wooden steps in combination with glass, metal and plastic handrails.
For installation of structures, adhesive compositions with different types fastenings. However, their design may place too much stress on the product.
Modern country or country houses They are rarely built as one-story buildings; they are mostly two-story, three-story, or one-story with attic floor buildings. In this case, there is always a need to somehow make possible high-quality movement between floors. A good decision There will be the production of wooden stairs that could provide comfortable entry and carrying of heavy furniture or equipment. Let's say right away - this is not an easy matter. And if it is possible to order at least a project or even ready-made staircase elements from the manufacturer, then it is better to do so. Well, if you are confident in your abilities, have carpentry skills and free time, you can try to make the stairs yourself. In this article, we will briefly talk about what types of stairs there are, how to perform calculations and how to make a staircase.
Wooden staircase design
It is necessary to choose a staircase design based on the space that can be used, the convenience of location, configuration and lifting, as well as aesthetic considerations.
Conventionally, all wooden staircases can be divided into spiral and marching.

Spiral staircases are used quite rarely. Mainly in conditions of extremely limited space. The second reason may be the owner’s wish - for aesthetic reasons. It is worth noting that spiral staircases are not very functional. For example, enter heavy furniture it is extremely difficult. In other words, it can only serve for the descent - ascent of one person. To make it you will need to perform complex calculations, since it will rest on one pillar - a support. The slightest error in strength calculations can lead to dire consequences.
Marching stairs- the most common. They consist of flights, they are also called “flight of stairs”, i.e. directly the steps and platforms that separate the marches. There can be one or several marches. And there may be no platforms at all if the staircase is single-flight.
Marching stairs can have different design, you can see them in detail in the diagram below.

There are straight flight stairs. Moreover, they can be single-flight or double-flight, separated by a platform for ease of movement. Such stairs can be located against the wall or not rest on the wall at all. Characteristic feature Straight stairs are that they take up a lot of space.
Most often, to save space and ease of use, two-flights are made between floors inside the house. turning stairs. The rotation can be at a right angle (90°) or at any other angle, up to 180°.
The march can have a curved design with a convenient angle for entering the stairs. In this case, all steps can also be rotary.
Also, two-flight and three-flight stairs may not have platforms, but only turning steps.
In order to choose the right staircase design for a given situation, it is necessary to take measurements of the free space that can be used under the stairs, make small calculations and draw a drawing. The drawing should show how the staircase is positioned, whether its elements are in the way, and how comfortable it will be.
Elements of wooden stairs

The photo above shows the elements that make up the stairs and their names.
Kosour represents load-bearing beam, which supports steps and risers from below. It bears all the loads.
Bowstring also performs a support-bearing function. At the same time, there are recesses in it into which the steps are inserted at the end. This design used on one side if the staircase is adjacent to a wall, and on both sides if the flight is sandwiched between two walls. The bowstring is less preferable than the stringer due to the fact that it is not able to withstand heavy loads. Therefore, even if the staircase is adjacent to the wall, they still try to do it on stringers.
steps for stairs - wooden beams, consist of a tread (horizontal) and a riser (vertical). We step on the surface of the tread with our feet. And the riser represents vertical beam under the step, which encloses the space of the tread and performs a supporting function. You can make stairs without risers, in which case the space of the step will be free, your foot will not rest, but the structure will be less strong and reliable.
The steps can be rectangular, radius for a beautiful approach to the stairs, rotary at a certain angle to replace the dividing platform, and winder - the first step of a non-standard shape.
Railing for stairs - wooden balusters and handrails. Their shape and size may vary. Basically, railings are made to order, in the shape that the customer desires.
If the staircase is more than one flight, its design includes support pillar or pillars at the turning points of the stairs.
Before you start making the stairs, you must make calculations and complete a drawing. Wooden drawings for stairs are made both independently and with the help of special architectural programs. In the latter you can also perform calculations. A good solution would be to contact companies specializing in wooden stairs. This way you can be confident in the quality and accuracy of the calculations.
Calculation of a wooden staircase
Number of steps and riser height
To determine the height of the stairs, we measure the distance from the base of the finished floor of the first floor to the finished floor of the second floor. If the finished floor is not yet equipped, then its dimensions must be calculated “by eye”. Because the wooden staircase only goes to the finished floor. In this case, we assume that the height from floor to ceiling is 250 cm, the thickness interfloor covering together with the floor - 35 cm. Total 285 cm.
We make calculations based on the height of the riser. The fact is that most often this size is standard and ranges from 15.2 to 19.7 cm. It is believed that this height is the most optimal for ease of use. Anything less will slow down your step. The big one is too heavy to climb and difficult to descend. From this interval we take the average value (you can take any) - 17 cm.
Number of steps = staircase height / riser height;
Since the number of steps cannot be uneven, we round up to big side - 17 pieces.
In this case, we have two ways. We can first winder step make it small, and the rest with a riser of 17 cm. Or we can recalculate and get a more accurate, but uneven result.
To do this, divide the height of the stairs by the number of steps: 285/17 = 16.76 cm.
So we can complete 17 identical steps with riser height 16.7 cm.

It is believed that the minimum tread width for convenience should be 22 cm, and the maximum 37 - 40 cm. If it is less, it will be difficult to descend; if it is more, the step will be lost.
For a more accurate calculation, there is a dependence:
- 2a + b = 64 cm;
- a + b = 47 cm;
a - riser height;
b - tread width.
Let's try the second formula: 47 cm - 16.7 cm = 30.3 cm. This width is quite acceptable, we can round it up to 30 cm.
For fun, let’s calculate using the second formula: 2a + 16.7 = 64; a = 23.65 cm. This width is too small, so we will use the data obtained from the previous formula.
Width of a wooden staircase
In principle, the width of the flight is not strictly regulated in any way, but the number of flights will depend on the space that can be used for the stairs.
It is believed that the minimum comfortable width of a flight of stairs is 80 cm. If the stairs are narrower, there will be difficulties with passage fat people or carrying furniture. Options from 100 to 140 cm will be successful.
To make the entire staircase structure look organic, you can use the following hint: the width of the march must be a multiple of the width of the tread. In our case, these are 60 cm, 90 cm, 120 cm and 160 cm.
Stair length
To calculate the length of the stairs, we only need two values, which we have already calculated: the width of the tread and the number of steps.
Stair length = tread width * number of steps(without the last one - this will be the floor of the second floor);
30 * 16 = 480 cm.
4 meters and 80 cm- quite a long length, which “eats up” a lot of space.
Therefore, if it is not possible to arrange such a staircase in one flight and straight, you will have to change the design and make it two flights with a rotation of 180 °. In this case, you can make a dividing platform, or you can make turning steps. It is most convenient to make such calculations in special programs, the location of the staircase elements will also be clearly visible there.
Clearance height above steps

An important parameter. The beginning of a flight of stairs almost always occurs at the ceiling, thus reducing free space over the head of someone walking up the stairs.
Even at the stage of creating the drawing, it is necessary to calculate the height from the highest step located under the ceiling to the ceiling. Minimum permissible value, capable of providing comfortable access to the stairs even for the most tall people, is 195 - 200 cm.
Stringer length
Calculated using the Pythagorean theorem.
Length of ladder2 + height of ladder2 = length of stringer2;
4802+2852= stringer length2;
230400 + 81225 = stringer length2;
Stringer length = 558,23 cm. Take with a margin of 560 or 580 cm.
How to make a wooden staircase

The most simple solution will order from the company a design and finished elements of the staircase, with all the necessary cutouts. All elements will be numbered. After the disassembled stairs are delivered to the construction site, the wooden stairs are assembled according to the attached drawing and diagram. So you don't have to buy special tool for pruning and dusting in the house.
We purchase material for wooden stairs
If you decide to do self-installation wooden stairs, start by purchasing building materials.
For bowstrings or stringers, a beam of 50*250 mm is required. Its minimum width can be 150 mm, if the staircase design allows.
For the risers we purchase beams with a thickness of at least 25 mm, you can take even thicker ones.
For beam treads, it is better to take from 30 to 40 mm. Or you can use the same ones as for the steps.
We order handrails and balusters from the manufacturer or buy ready-made ones, since to make them yourself and beautifully, you need to have considerable experience, knowledge and skills.
Installing stringers or bowstrings

We cut the beam that we bought for the stringers at the top and bottom so that the required length of the stairs is obtained. Then we cut off another thickness of one tread from below, i.e. 5 cm.
Important! The fact is that when we calculated the number of treads, we did not take into account the thickness of the steps. It is really not important for the entire structure, except for the first step - its height does not increase by the thickness of the tread.


We cut off the excess. It is better to use a jigsaw or saw. But if you don't have it, you can use a hand saw.
Then we place the stringer in the place where the ladder will stand. Its upper edge should rest against the ceiling, and the lower edge should rest tightly against the floor of the first floor. We check the horizontality of the cuts for the steps.
Important! We need two such stringers, but depending on the loads that the staircase must withstand, there may be more stringers. In this case, we cut out all the rest, using the first one as a template.

We thoroughly sand all surfaces. If necessary, we mill the outer edges, making curves (for beauty).

The bottom and top of the stringers must be connected to each other by a beam. To do this, we cut them into quarters from the bottom and top. We fix it to a thick beam with anchor bolts. If it is possible to secure the stringers to the walls, then we also use anchors.
If we use one string, then it must be cut to the required length. Then cut out holes inside using a cutter - recesses for the steps. The string is secured to the wall with anchors.
Important! Checking correct location bowstrings and stringers on the other hand, they should be located at the same level so that the steps do not have a slope.
Installing steps and risers
After the stringers are tightly secured, we begin to install the risers.
To do this, we cut the beam into the required number of risers of a certain length. We level them relative to each other and sand them.

We fasten it to the stringer with self-tapping screws from the front side. Then we will putty them or hide them under decorative elements. You can also use special glue.
When all the steps are installed, we proceed to the steps - treads.
To do this, we also cut the beam into the number of steps minus one. Then we sand their surface and mill the protruding outer edge with an angle.

Then we place them on top of the risers and secure them with self-tapping screws.
Important! If we use a string on one side, then we insert the step into the groove cut in the string, having previously coated the edge of the step and the hole in the string with glue.

We install the balusters on the steps and secure them with studs 100 mm long and 8 mm thick.
We install and secure the railings on top with self-tapping screws.
At this point the work is completed, all that remains is to paint the wooden stairs. To better preserve the wood, while preserving its natural beauty, you can use special transparent varnish coatings.
In this article, we looked at making a wooden single-flight straight staircase with our own hands. If the project involves a staircase of a different design, then the installation will be different. For example, for a two-flight staircase, the first step is to install and secure the platform and support pillar, and then stringers, risers and steps are installed. In this case, some steps may not be straight, but rotary and rounded.