How to make a horizontal wood milling machine. Milling table: design, diagrams, DIY manufacturing technology. Additional protective elements
Read also
The masters of the past produced decorative treatment wood by hand. We still admire their creations to this day. But it took years to learn fine woodworking, and not every apprentice was able to create a masterpiece that earned him the title of master. And raise money for tools and accessories for higher craftsmanship. What is still relevant today: sets of shaped planes, pieces of iron for them and cutters for manual finishing of the product will cost more than a good manual wood milling machine. Which will also shorten the learning process and increase labor productivity significantly. If you make a milling table for it with your own hands, then the quality of the products will become much more stable. True, the functionality of the router will be reduced (the number of types of work operations), but the remaining sections will not be so difficult to finish using the same router without a table or even manually, without the risk of “screwing up” the entire workpiece. This material will be about the essential aspects of making a milling table yourself.
Note: masterpiece was originally a technical term meaning trial work, which must be done independently by an apprentice applying for the title of master. Since in the old workshops the corporate spirit and nepotism dominated everything and everyone, in order for a new apprentice to make his way into a master, he had to do something truly outstanding, even exceptional. This is where the use of the word “masterpiece” came from for a creation created during a creative surge.
Table or machine?
However, hand routers are not cheap tools. There seems to be no fundamental difference in the design of it and the milling head of a vertical milling machine. A motor suitable for power and speed for a homemade milling machine may be waiting in the closet for some use. So what is better to do for milling work on wood: the entire machine from scrap materials, or buy a manual router and a table for it?

Note: factory-made tables for hand-held milling machines are sold in the same way as drill stands that turn them into drilling or lathe machines.
It's about vibrations. The vibration of a machine with a workpiece is the worst enemy of cutting materials. In milling operations, the influence of vibration on the quality of processing is especially strong. If a drill or cutter (except for a chisel in a slotting machine) bites into the workpiece once and then moves through the material more or less smoothly, then the cutter hits the workpiece at least twice on each revolution. Shaped cutters with cutting edges curved in 3 planes reduce this drawback, but do not eliminate it completely - a cutter that does not hit the workpiece will not cut anything from it.
A homemade milling machine with a motor made from junk generally shakes as best it can. Vibration dampening measures available in the home workshop provide a quality of work suitable for simpler applications. carpentry work. In manual wood milling machines, vibration damping is already provided structurally. Installing the router into the table further reduces the “shaking”, and the entire unit becomes suitable for fairly delicate carpentry work, incl. over the front parts of furniture, decorative parts and other important parts. So there is still a fundamental difference between a homemade milling machine and a table for an existing manual milling machine.
How does a milling table work?
The main differences between a milling table with a finished machine and a home-made machine for the same purpose are as follows:
- The table is made according to design diagram vertical milling machine with bottom drive, while homemade machine can be both vertical and horizontal. However, the latter does not provide any tangible advantages over the vertical one at home.
- The milling table can be easily equipped with a lift - a device for smoothly and possibly quickly adjusting the protrusion of the cutter above the work table.
- The workpiece stop system of a milling table can be improved compared to a home-made machine to improve the accuracy and cleanliness of processing.
- The table-mounted milling machine is reversibly modified (see below) so that it can be removed for manual work.
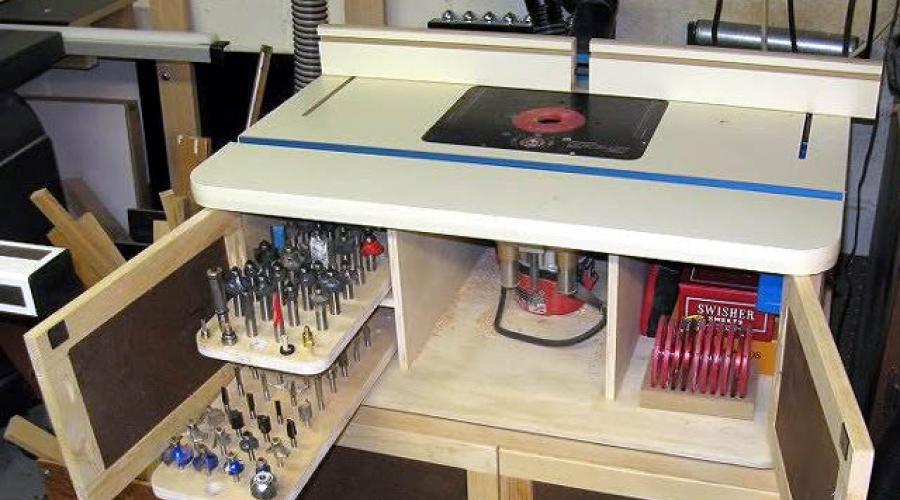
How a simple milling table for woodworking works is shown in Fig. Cabinet (bed) - any sufficiently strong and stable design, because The main vibration damping is carried out, except with the router itself, by the base plate. Therefore, the cabinet in this case is not actually a bed, because is simply a supporting structure.

On a simple table it is difficult to achieve high-quality processing of workpieces with a large width-to-height ratio. A completely flat board on an equally flat table suddenly, for no apparent reason, moves jerkily, the cut turns out to be uneven, or even the workpiece is bitten by the cutter. The reason is longitudinal, i.e. horizontally propagating elastic waves in the workpiece material. The comb vertical stop (see below) does not have time to absorb them, and antinodes (foci) of vibrations appear on the workpiece, spoiling the whole thing.
The horizontal stop is designed for such a situation, see next. rice. It is always performed with a comb, because is primarily a vibration absorber. For the same purpose, a second vertical comb stop is added.

In Fig. a table with 2-sided stops is shown, designed to feed the workpiece back and forth, see below. For a homemade table for ordinary carpentry work, it is better to make one-sided stops (see below): they are technologically simpler and can be made from ordinary hard, fine-grained wood (oak, beech, walnut). In any case, the most responsible structural units homemade milling table are:
- Support (work table) and installation (mounting) plates;
- Stops – comb and blind (simple);
- Milling machine lift.
Plates
The base and mounting plates of a milling table are structurally identical to those of the same machine. An example of the design of a base plate for a milling table made of 2 layers of 19 mm plywood is shown in the figure:

Its main disadvantage is its high cost: birch plywood (bakelite is even better) of grade no lower than Ib. Meanwhile, having spent a little more time and labor on gluing a multilayer plywood “pie”, it, and even better quality, can be made, as for a milling machine, from cheap 4-mm construction (grade II) or packaging (non-grade) plywood. The required wear resistance and strength are ensured by impregnating the sheet with a water-polymer emulsion before cutting (a full-fledged substitute is the construction primer EKO Grunt), and vibration-absorbing properties by layers of PVA glue. Dried assembly (reinforced) PVA produces a viscous elastic film that perfectly damps vibrations, but even without that, the height space in which the elastic wave can gain strength is reduced by five.
Note: plywood is glued together from veneer sheets with cheap casein or similar synthetic glue, which has vibration-damping properties only to a small extent (its layer is hard and brittle). Plywood glued with PVA would be completely unprofitable.
The design of an installation unit with increased vibration damping for a milling table is shown in Fig. and exactly the same as for a milling machine ().

And the procedure for making the base plate is the same: a sheet of plywood is impregnated 2-3 times on each side, then cut out (immediately with cutouts for the router). It is better to make a car window round or with rounded corners. The bag is glued according to the glue instructions and dried for at least 2 days under dispersed pressure for approx. 100 kg/sq. m slabs; a very good load - stacks of books and/or magazine files.
Plate for the router and its modification
The installation (mounting) plate of the router is made of fiber-laminated vibration-absorbing thermosetting plastic: textolite, fiberglass. Massive thermoplastic materials - hardboard, etc. - are somewhat worse at absorbing vibration. Thermoplastic plastic may warp when heated during operation and the machine will lose accuracy. Massive (ebonite, bakelite) or layered thermosetting plastics (getinax) are unsuitable - they very soon delaminate and crack due to vibrations and heating.
How the machine is modified for installation in a milling table is shown in the figure:

The lock of the standard sliding work table (shown by the arrow on the left in the figure) is released (pressed out). Then the standard table is removed and placed on compression springs (in the center) overall strength approx. 1.5 car weight. The base of the standard table (shown by the arrow in the center) is removed, and a mounting plate is attached in its place (on the right in the figure). Restoring a machine for use in manual mode done in reverse order.
Stops
Since a homemade milling table is capable of providing better precision and cleanliness of processing than the same machine, it is advisable to modify the stop system for it. Stops, as in the machine or in Fig. above with picture simple table, are suitable for the manufacture of non-facade (decorative) parts, because The straight L-shaped blind stop still strongly transmits vibrations back into the workpiece and makes it difficult to feed it (a workpiece made from ordinary industrial wood can jam).
Drawings of oblique comb and blind vertical stops for a homemade wood milling table are shown in Fig. Structurally, the comb stop for a table is somewhat different from that for a machine (all teeth are the same), because The whole unit doesn't shake as much anymore. Maple is one of the best vibration absorbers, but seasoned, without defects, knots, twists and cross-layers, commercial maple wood is an expensive and scarce material. It can be completely replaced by oak, beech, hornbeam, and walnut.

Note: An even better vibration damper is elm wood. But defect-free mature commercial elm is practically not available for general sale, because All of it goes into lasts for sewing expensive leather shoes and important machine parts.

The comb and blind stops are installed in pairs (the blind stop is the first along the workpiece), see the inset in the center in Fig. They are fixed with a locking block (stopper), highlighted in red in Fig. on right. However, placing a comb with a capercaillie before the cutter along the course of the workpiece when feeding it, as shown there, is still wrong: the main “shaking” occurs behind the cutter. But installing 2 pairs of comb-grouse, before and after the cutter, is not prohibited and is useful for processing accuracy.
Back and forth emphasis
Blanks from homogeneous materials High Quality(MDF, postforming for kitchen countertops, selected small-grained wood) are often milled using a back-and-forth method: the part is pushed onto the cutter and then immediately, without turning off the router, pulled back. The combination of up and down milling in one pass (see the article on the milling machine) gives the cleanest surface.
Note: parts milled back and forth are quite suitable for veneering and lamination.
However, it is impossible to install a pair of oblique combs turned in opposite directions for milling back and forth: the workpiece will jam on the incoming ridge. For back-and-forth milling, the workpiece is supported by pairs of vertical and horizontal straight combs (see figure above): their ridges (and grooves between them) are perpendicular work surface, and the working parts of the combs are trapezoidal in plan with bevels of 60 degrees from the perpendicular (30 degrees from the sole of the comb). Unfortunately, the choice of materials for making straight 2-sided combs yourself is limited: defect-free, seasoned commercial maple, elm, teak.
Note: On sale there are straight combs for wood routers, cast from polypropylene. I don’t know how they work, I haven’t tried them.
Elevator
The simplest elevator designs for a wood milling table are a rigid cam (pos. A in the figure) and a wedge (pos. B).

Their common advantage is the ability to make the base plate folding for easy access to the router. But the overall huge drawback is instability, the machine slides down due to vibration. In fact, after 1.5-2 m of cutting, the elevator has to be reinstalled. A cam elevator, in addition, in terms of ease of use, is not much better than a homemade milling machine elevator that is adjustable with washers and rubber.
The optimal design of the milling machine elevator in the table is screw, see next. rice. If the lower flange nut is additionally secured with a locknut (or a self-tightening flange nut is installed), the cutter extension is held firmly. And it can be really quickly adjusted, literally while the workpiece is being processed.

Precision mini table
For artistic woodworking and/or facade carpentry, an indispensable thing is a milling and copying machine. It’s possible to make it yourself, but it’s a little difficult, and purchasing a factory made one only makes sense if there is a stable flow of orders for work of this type and solid skills in performing them.
However, shaped grooves in the front parts of furniture, milled in a straight line, can give an excellent aesthetic effect. Direct milling is widely used in the manufacture of furniture and decorative wood products in any style, see fig. It is carried out independently using low-power manual wood milling machines of high precision (on the right in the figure); installing a manual mini router in a table improves the quality of work and productivity in the same way as a “large” one.

Drawings of a mini wood milling table for a domestic manual milling machine are given below. rice. Its distinctive features are a cam side clamp of the workpiece and a vertical comb with wide teeth. The solution for working with high-quality materials is quite justified: small fine combs themselves “act” a little on the workpiece, which is minimized in this design.

What about the hood?
Milling wood produces many times more sawdust, shavings and wood dust than sawing operations. Dust spoils the precision of processing on the table and the health of its operator just like a dusty machine. Therefore, a milling table also requires a dust collector, a dust extractor and a dust collector; their design is the same for both the table and the machine, see respectively. article.
The presence of a milling machine will greatly simplify the process and accuracy of product processing. It can be purchased ready-made in a specialized store, or you can save your own savings and make a table with your own hands.
With this device you can cut not only different types of trees, but also plastic and wood boards. You can also use it to independently make profile cuts, grooves, tenons and slots.

With a DIY router table, you can equip your workshop with a practical woodworking machine. Everything you need for efficient work- this is to attach the manual router itself to the product.
Type designs, the milling table can be:
- mounted. This option is quite practical and easy to use. To do this, a separate unit block is attached to sawing machine on the clamps on the side. This design allows you to save space. If necessary, it can be easily and quickly removed and left aside;
- portable. This option is in great demand, especially if the workshop is small. Also, this type of design is suitable for those who often change their place of residence or take a router with them to construction sites;
- stationary. This option is suitable for a spacious workshop. This is very convenient model. Since with a stationary product you can equip a well-thought-out workplace.
Material
 To make a milling table, you can use various materials:
Each individual option has its own advantages. Wood is characterized by high strength, reliability and durability. But you need to be able to work with this material. It is more difficult to give in manual processing, unlike DPP or MDF. And natural wood is much more expensive.
As for chipboard and MDF, these materials are more affordable in terms of price. They can be easily processed with hand and electric tools and have good technical characteristics.
Drawing of a homemade wood milling table
Before you start making a milling table, you need to make a drawing. It indicates exact dimensions everyone individual element and manufacturing materials. As for making the drawing, you can make it yourself, you can use special programs on the computer or, order from a furniture company. Last option the most reliable. Since the specialists will make a competent calculation of all the details, with an accuracy of one millimeter.

Tools
 For the manufacture of homemade design router table you will need the following tools:
- hacksaw;
- electric jigsaw;
- sander or sandpaper;
- drill;
- chisel;
- screwdriver or screwdriver.
Advice: Using power tools will greatly speed up the process of making and assembling the product.
From materials you will need:
- Chipboard or MDF. To avoid sagging during work, you should choose lumber with a cross-section of 3.6 cm. For the side parts, chipboard with a thickness of 1.6 cm is suitable;
- plywood, textolite, metal (production of mounting plate);
- The router is purchased at a specialized store.
An easy way to make a table for a hand router
Making a countertop
First you need to prepare the parts for the table. They are cut with a jigsaw from selected lumber, according to the drawing.
Advice: Detailing can be ordered from a specialized furniture company. Here they will help you immediately create a competent drawing and select lumber. The cost of the furniture company’s services is fully justified by the quality and precision of the work. All you need next is to simply assemble the product according to the diagram in your workshop.
The manufacturing process of a milling table is carried out in the following sequence:

Important: whether to design a table or not is a personal matter for everyone. The table top with the router installed can simply be secured between two tables.
How to make and install a plate yourself
Since the table top of a homemade milling table is quite thick, the mounting plate should have a small thickness. Then you can make maximum use of the cutting tool reach.
Attention: a plate with a minimum thickness should be as strong and rigid as possible.
 It can be made of metal or of a material that is in no way inferior in strength, for example, PCB. The thickness of the PCB should vary between 4-8 mm.
The plate manufacturing process is as follows:
- After checking the drawing, cut out a rectangular piece from a sheet of textolite.
- In the center of a rectangular piece make a hole. Its dimensions must correspond to the diameter of the hole in the router sole.
- We connect the plate with the router base and the table.
- For fixing plates to the tabletop making clamps for the machine, which are located at the four corners. These dimensions must strictly correspond to the holes located on the tool itself.
Work area equipment
After manufacturing and assembling the milling table, it is recommended to think over a competent work area. To maintain the accuracy of milling processing, it is worth installing on the tabletop:
- guides. They can be made from chipboard or from the same materials as the countertop. The guides are installed at right angles and fastened with four oblique stops.
- clamps. They can be made in the form wooden comb or ball bearing required sizes and weight.
Finishing
 After constructing a milling table with your own hands, to give the product an aesthetic appearance and to extend its service life, you need all the working surfaces:
- polish;
- polish;
- bottom and sides - paint;
- open with varnish.
The electrical part of the product must be covered with a metal sleeve.
Photo
The result of your work may be a table that looks like one of the following


Useful video
A detailed description of the manufacturing process can be seen in the following video:
Conclusion
In conclusion, it is worth noting that the process of manufacturing a milling table is a rather responsible process. If you are confident that you can handle this task, you can save your own savings and make the product yourself. To do this you will need: stock up on a well-drawn drawing, necessary materials and tools and free time.
In search of a worthy answer to the discomfort that arises when working with hand-held milling tools, owners of home carpentry eventually come to the need to purchase a convenient milling table.
VovroKsyu User FORUMHOUSE
I've been thinking about the table for a long time. Especially after manually performing the reservation 22 m of fence.
The purchase option can be expensive; the dimensions of a machine assembled in a production environment do not correspond to the size of a small home workshop. The optimal solution in this case it will be self-assembly milling table.
Those who want to make a homemade milling machine will find it in the corresponding section of FORUMHOUSE.
How to make a milling table

A homemade milling table is the simplest. The main working unit in it is a manual milling machine. Working with hand-held power tools involves moving the working cutter along the surface of a stationary workpiece (which is not always convenient). A milling table for hand tools allows you to change the processing method and mill in a lightweight way: the hand tool is fixed on the work table, and the workpiece is easily fed to the cutter by hand.

A homemade milling table is simplest processing wood The main working unit in it is a manual milling machine. Working with hand-held power tools involves moving the working cutter along the surface of a stationary workpiece (which is not always convenient). A milling table for hand tools allows you to change the processing method and mill in a lightweight way: the hand tool is fixed on the work table, and the workpiece is easily fed to the cutter by hand.
A milling table for a manual router consists of basic and additional elements. Additional items are not required, but their use makes it possible to make the master’s heavy work as easy as possible, make the design of the device safer, and make the functionality closer to the capabilities of serial installations.
Universal milling table:main structural elements
The main elements of the milling table are indicated in the figure.
Aib User FORUMHOUSE, Moscow.
I really needed a mobile milling table. I welded the frame, painted and assembled the structure.


The dimensions of the milling table depend on the dimensions of the parts being processed, as well as on the height of the master himself. The length and width should be slightly smaller than the tabletop, and the height of the bed is 850...900 mm, which corresponds to the most comfortable conditions for standing work. The homemade legs can be made adjustable, which will allow you to compensate for uneven floors or change the height of the bed.

Tabletop for router
The dimensions of the tabletop depend on the size of the parts being processed.

dauto User FORUMHOUSE
In a home workshop, a small table of 500x500 mm is sufficient.
To process relatively long parts (for profiling edges on door frames), you will need a tabletop of the appropriate size. Let's look at the drawing:

For the manufacture of the frame, wood-based materials are most often used, which can effectively dampen vibrations. This could be a countertop made of chipboard, which is used in the manufacture kitchen furniture or a sheet of thick plywood. Here, for example, is a countertop made from chipboard scraps formed after installing a kitchen sink.


Krott64 User FORUMHOUSE
With this piece of table top, after some simple modifications, you can do some pretty decent things.

Some people make countertops from metal, others from edged boards, but, as practice shows, chipboard and plywood are always a priority.

Orfo74 User FORUMHOUSE
If I do it, then from laminated plywood(I have one like this on my trailer). I have already traveled hundreds of thousands of kilometers under the heat and below zero. Neither salt nor rain spoiled it. And it can still be used, but you need to assemble it either in 2 layers, or make the bottom out of simple plywood.
To make a tabletop, you cannot use material that has defects on the surface (knotty boards, etc.).
Mounting plate for hand router
To the mounting plate using threaded connections a hand router is attached. Therefore, its production must be taken with full responsibility. The material from which the plate will be made must be strong enough so that the router does not tear out during operation (you can imagine the consequences). This can be a rectangle made of metal or plywood sheet(but metal is more reliable).

AlekX User FORUMHOUSE
A powerful car has a lot of dope. And if she gets thrown out of the table while working–it won't seem like much.

Dgusepe User FORUMHOUSE
The legs can be made of wood, but it is advisable to make the tabletop from 3 mm metal. For maximum cutter lift.
The length and width of the mounting plate must correspond to the dimensions of the base of the hand router, with which the power tool will be attached to the table.


Longitudinal workpiece stop
The longitudinal stop can be made from a regular sheet of chipboard or from an edged board. The stop must be made movable to ensure the possibility of adjusting the horizontal reach of the cutter. For more precise adjustment, you can attach measuring rulers to the sides of the tabletop.

The design of the locking mechanism, which allows you to secure the longitudinal stop in the required position, is extremely simple. It can consist of two slats with through longitudinal grooves and two threaded fasteners with wings.
Instead of slats, you can use two metal corner, which will last longer and will not be deformed under the action of clamps.

To prevent dust and chips from interfering with work, it is advisable to equip the longitudinal stop with a dust collector, to which a chip extractor or a small carpenter's vacuum cleaner is connected.

The longitudinal stop can be made double, which significantly expands the functionality of the milling table.
Superkuzen User FORUMHOUSE
The monolithic stop makes it impossible to carry out a lot of operations performed on the milling table, that is, it makes the table of little functionality.
The milling table can serve as a small jointer, if between two halves longitudinal stop organize an adjustable difference between working planes. This design allows you to move one half of the stop relative to the other, setting one stop flush with the cutter using thin wooden plates. Adjustment plates are placed under the non-working surface of the stop.

Manual milling machine
The performance of the milling table will directly depend on the technical characteristics of the hand tool (power, number of revolutions per minute, etc.). You should choose a router for a milling table based on the expected load. The additional functionality of the machine will be an additional advantage for the master. If you don’t yet have a manual milling cutter, then choose a tool with an adjustable cutter rotation speed and the ability to set the processing depth (plunge-beam milling machines). Very easy to use machines with a spindle lock (for easy replacement of cutting tools), as well as devices with soft start and quick spindle stop.
We looked at the main elements of a milling table, which will allow the owner to perform the simplest milling operations. In order to expand the functionality of the device, make it universal and increase operational safety, it is necessary to ensure the availability of additional accessories. Let's look at the most common of them.
Longitudinal guide for movable milling carriage
Using a longitudinal guide built into the surface of the table top, you can attach a variety of devices to the milling table: an angular stop with a protractor, a perpendicular stop, etc.

The longitudinal guide may have different designs, but most often it is an aluminum C-shaped profile into which bolts and wing nuts are inserted. This design allows you to quickly install what you need on the milling table. this moment device


By the way, using the C-shaped profile, you can also attach a longitudinal adjustable stop to the tabletop.

Vertical clamp
The upper clamp increases safety when working with a homemade router and increases processing accuracy. Its fastening can be implemented using the type of clamps for a movable carriage.

If you are planning to make a milling table with your own hands, a video about setting up a universal carpentry workshop for personal use will help you with this.
Lift for router
The vertical reach of the cutter very often has to be adjusted. To perform this adjustment, a milling lift is provided - an adjustable stop that allows you to maintain the milling machine at a given height and, if necessary, quickly change this height.
It is advisable to use a milling elevator in conjunction with submersible milling machines. Their design initially has guides for adjusting the reach of the cutter (unlike machines with a fixed motor).
A lift for a homemade router can have different designs.
Elevator from car jack
You can use an old car jack to create a lifting mechanism.

leon42 User FORUMHOUSE
The elevator can be made from a car jack: there is a shelf under the router, and we attach the jack to the shelf. We turn the jack - the router rises or lowers.

For convenience, the jack handle can be pulled out behind side wall beds. This will make adjustments much easier.
Threaded rod lift
Blackk User FORUMHOUSE
The angle with the threaded rod is screwed to the protrusion on the router, to which the measuring pin is normally attached. The corner for the threaded rod is threaded. By rotating the pin, we seem to screw into the corner and pull the entire router up along the guides. Accordingly, when rotating backwards, we lower the router.

The mechanism consists of a wooden wedge (item 1), in which a through hole is drilled for a screw (item 2). Thanks to metal plates (item 3), attached to the sides of the wedge and having threaded holes, the wedge moves in a horizontal plane, raising or lowering the milling machine. The handle of the lifting mechanism is brought to lateral surface beds. To reduce the load during lifting, the router is equipped with a homemade roller (item 4).
Turning the router table on and off
All necessary equipment for the electrical part of the milling table is already provided in the design of the milling machine. The only thing you can add to what you already have is electrical diagram– this is a remote switch and an emergency shutdown button (after all, no one has yet canceled the safety rules during operation).
You can use a very ordinary switch for the router. As for the possibility of quick shutdown: it can be implemented by installing an emergency button with a locking mechanism on the table (in which the unlocking is carried out by turning).

Table assembly
We have listed the main and auxiliary elements of the milling table. Each master can determine the order of assembling the device for himself. The only point to pay attention to is the manufacture and installation of the mounting plate.
After a plate of a suitable size is cut from a steel (or plywood) sheet, it is necessary to drill holes in it for attaching the milling machine, a hole for the cutter (its diameter must correspond to the diameter of the hole in the base of the router) and mounting holes (for attaching the plate to the tabletop) .

What tools should you have in your carpentry or furniture workshop? And a video about the design of a homemade milling table and the features of power carpentry tools will help you find answers to questions regarding equipment that is extremely rarely used in a small home workshop.
The question of how to make a milling table yourself is asked by many home craftsmen. This is understandable: equipment on which the milling cutter is fixed motionless and the workpiece moves on a work table specially equipped for this purpose is in many cases much more convenient to use. Often, when working with a manual router, the workpiece is fixed on a regular table, and all manipulations are carried out by the tool itself, which makes it impossible to maintain precision processing.
The milling table significantly increases labor productivity and efficiency when working with a hand router. It is often unprofitable to purchase a serial model of such a table for your home. It is much more economical to make a milling table yourself. It will not take much time and will require very little financial investment. Any home craftsman can cope with this task if desired.
Using a homemade table for a manual router when processing wood products, you can achieve results that can be obtained with professional milling machines. With the help of such a simple device, a whole list of tasks can be performed efficiently. technological operations: cutting shaped holes and making various slots and grooves in the workpiece, manufacturing connecting elements, processing and profiling edges.
You can see the structure of a factory-made milling table in the video below. We will try to do no worse, and in some ways even better and, most importantly, cheaper.
A homemade milling table, which you will equip your home machine with, will give you the opportunity to process not only wooden workpieces, but also products made from chipboard, MDF, plastic, etc. With the help of such a homemade milling table, you will be able to make grooves and splines, process elements of tongue-and-groove joints and tongue-and-groove joints, chamfering and creating decorative profiles.
A homemade table for a router, the production of which does not require large financial expenditures, will allow you to equip your home workshop with a real woodworking machine. It will only be necessary to secure the tool itself - a manual milling cutter, for which you can use the stand of a drilling machine or a workbench. It is no coincidence that many manufacturing companies have started manufacturing milling tables and accessories for them, but you will have to pay a decent amount of money for such a device. A homemade table for equipping a milling machine, if made in accordance with the drawings that we will analyze in this article, is in no way inferior in functionality to models produced in production conditions, and it will cost much less.
Milling table drawings: option No. 1
Milling table drawings with detailed analysis designs of main components and their dimensions.
Drawings of a homemade table for a manual router (click to enlarge)
Dimensions of parts Sectional table Double-layer table cover Cutout in the first layer of the table
Marking the cutout of the second layer of the table Gluing both layers Cutting the cutout according to the markings of the second layer Drawing of the rip fence
Stop end plate Dust extraction pipe  Plexiglas safety shield Comb clamp and locking block
Milling table design
If you wish, you can make a homemade milling table from a regular workbench, but it is better to make a special design. This is explained by the fact that a machine with a milling cutter creates strong vibration during operation, so the bed used to fix the milling cutter must be highly stable and reliable. It should also be taken into account that the milling device itself is attached to the bottom of the tabletop for the milling table, so there must be enough free space under it.
When attaching the device to the top of a homemade table for a manual router, a mounting plate is used, which must have high strength and rigidity, or special clamps for a milling machine. Such a plate can be made from metal sheet, textolite or durable plywood. The soles of most router models already have threaded holes, and they are needed to connect such a device to the tabletop and mounting plate. If there are no such holes, you can drill them yourself and cut threads into them, or use special clamps for a milling machine.

The clamps for the milling machine or the mounting plate must be located at the same level as the tabletop; for this purpose, the latter is sampled with the appropriate dimensions. It is necessary to drill several holes in the plate, some of which are necessary to connect it to the tabletop using self-tapping screws, and others so that such a plate can be fixed to the base of the router. The screws and self-tapping screws that you will use must have a countersunk head.
To make turning on yours more convenient, you can place it on the tabletop regular button, as well as a mushroom button, which will make your device safer to use. To improve your convenience home machine You can attach a long metal ruler to the surface of a milling table made for a manual router with your own hands.
Before you start designing a milling machine coordinate table with your own hands, you need to determine the place where it will be located, and also decide what type of milling equipment you want to make. So, you can make an aggregate router with your own hands (the table will be located on the side of the sawing equipment, serving as its extension), a compact desktop machine, or free-standing stationary equipment.
You can opt for compact benchtop equipment for working with wood and other materials if you access it irregularly or often use it outside your workshop. This installation, which is distinguished by its small size, takes up very little space, and if desired, it can be hung on the wall.
If the size of your workshop allows, then it is better to adapt the base of a stationary milling machine for the milling machine, which is much more convenient to work on than on desktop equipment. To make such a device more mobile, it can be placed on wheels, with which you can easily change its location.
A simple homemade milling table. There are questions about the overall strength, but it’s cheap and cheerful.
A simple milling table or table for a drilling machine can be made very quickly. To make such a structure, which can easily be placed on a regular desktop, you will need a sheet of chipboard on which the guide elements are fixed. As such a guide, which can be used as a parallel stop for a milling table, a regular board of small thickness, which is attached to the tabletop using bolted joints, is suitable. If necessary, you can attach a second such board in parallel, which will serve as a limiting stop.
To insert a router into a table, you will need to make a hole in a sheet of chipboard to accommodate it, and it will be fixed to the tabletop using two clamps. After this, the manufacture of the milling table can be considered complete. To make the use of this design more convenient, you can place simple clamps for a milling machine on the tabletop.
Manufacturing of bed and table top
The bed of a homemade milling installation must be highly stable and reliable, since it will bear the main loads. Structurally, it consists of a frame with supports on which the tabletop is fixed. As a material for the manufacture of the frame of the bed, you can use metal profiles connected by welding, chipboard, MDF, wood. It is advisable to first prepare drawings of such a device. They must indicate all structural elements and their dimensions, depending on the dimensions of the parts that are planned to be processed on such milling equipment.

The lower part of the bed from the front side must be deepened by 100–200 mm so that nothing interferes with the feet of the milling machine operator. If you are going to process linings for doors and the ends of facades for them on your homemade machine, then the dimensions of the frame can be as follows: 900x500x1500 (height, depth, width).
One of the significant characteristics of the bed for a homemade milling machine is its height, on which the ease of working on such equipment depends. According to ergonomic requirements, the most suitable height for equipment used while standing is 850–900 mm. It is advisable to make the lower parts of the frame supports adjustable. This will make it possible not only to compensate for uneven floors, but also, if necessary, to change the height of the milling table. To make a turntable with your own hands, just fix special wheels on its legs.

The assembly of approximately such a table is discussed in option No. 2
You can make a low-price, highly reliable milling table from the top of an old kitchen table. Such countertops are usually made of chipboard sheets 26 or 36 mm thick, coated with wear-resistant plastic. Their surface ensures good sliding of the workpiece, and the chipboard base perfectly dampens vibrations that occur during operation of the equipment. If you make a desktop for a machine with your own hands, then MDF and chipboard (LDSP) boards with a thickness of 16 mm or more are suitable for these purposes.
Milling table drawings: option No. 2
Detailed drawings of a milling table with additional retractable drawers, which can be made from timber and plywood (or MDF). A list of parts with dimensions and recommended materials of manufacture is presented in the table.

Table of table parts and their sizes Frame Top corner frame Bottom corner of frame
Guide for sliding drawers Guide layout diagram Table top Stop drawing
Large drawer Small drawer Front of small drawer Side panels table
How to make a mounting plate
Since the tabletop of a homemade milling machine is quite thick, the mounting plate for attaching the router must have a minimum thickness. This will allow maximum use of the cutting tool reach. It is clear that such a plate, with a minimum thickness, should have high strength and rigidity.
The plate can be made of metal or of a material that is not inferior to it in strength - textolite. The thickness of the textolite sheet should be in the range of 4–8 mm. Using previously prepared drawings, a rectangular part is cut out of such a sheet, in the center of which a hole is made. The dimensions of the latter correspond to the diameter of the hole in the milling cutter sole.

The connection of the plate with the base of the router and the table itself, as mentioned above, is ensured by the holes made in it and the corresponding threaded holes in the base of the router. Holes for fixing the plates to the table surface, which are used as clamps for the milling machine, are made in their four corners.
The dimensions and location of the holes for connecting the plate to the router must fully correspond to the holes located on the tool base. In order not to make a mistake when manufacturing a plate, you must first prepare its drawing, on which you need to indicate dimensions this part, the diameters and location of all holes on it. If desired, you can fix it on the table surface using clamp brackets.
Video from a detailed story about building a milling table, the functionality and convenience of which are very high, but the complexity of manufacturing is also very serious. For most craftsmen, such a table will be unnecessarily complex, but perhaps someone will gain useful ideas when creating their own equipment.
Milling table assembly
A universal milling table or begin to assemble by attaching the table top to the finished frame. The mounting plate is applied to the place on the tabletop where it should be placed according to the drawing, and its outline is traced with a pencil. This is necessary in order to select a recess for the plate along the marked contour, for which a manual milling cutter with a tool with a diameter of 6–10 mm is used. The size of this recess should be such that the plate fits into it at the same level as the surface of the tabletop.
It will not be possible to make a recess with right angles using a round cutter, so the corners on the plate itself must also be rounded using a file. After fixing it in the tabletop, it is necessary to make a hole in the mounting plate with dimensions corresponding to the diameter of the router base. It is done using a straight cutter, the thickness of which should be greater than that of the tabletop itself.
When the requirements for equipment are small and there is no desire to mess with homemade products, you can buy something similar to that, which is shown in the photo below.

PROMA, priced at about 6 thousand rubles, is one of the cheapest factory milling tables
To perform such an operation you do not need a drawing, since it does not require high precision. On the back side of the tabletop, it is also necessary to select a certain amount of material, since the dust collector casing and other devices will need to be placed at the bottom of the table. To quickly perform all the operations described above, you can rely on the drawings or photos posted in this article.
The final stage of assembling a homemade milling table is connecting all its structural elements. First, the router is started from the bottom of the tabletop, its base is screwed to the mounting plate. Then the plate itself is attached to the upper surface of the tabletop using self-tapping screws with countersunk heads, which must be completely recessed into the prepared holes. Only after performing these operations is the tabletop itself securely fixed to the frame.
Milling table drawings: option No. 3
Compact benchtop router table and detailed analysis its creation in the photo below.

Computer model Appearance assembled Rear view Front view
The cutter is raised, the sashes are moved apart The cutter is lowered, the sashes are moved Manual frezer Vacuum cleaner hose for removing dust and chips
Attaching the router and removing chips Adjusting the lift of the cutter Lifting the cutter is carried out by rotating the screw Adjusting the lift of the cutter
Setting the extension of the cutter Plexiglas platform before installing the router The glass is precisely adjusted to the tabletop The router is screwed to the support platform
Making the top clamp
When wondering how to make a homemade machine safer to use and ensure ease of processing large workpieces on it, you can equip such equipment with an upper clamp. To create this device, made on the basis of a roller, it is also necessary to prepare drawings.
A ball bearing of a suitable size is often used as a roller for the pressing device. Such a roller is mounted on a holding device that allows it to be fixed at any distance from the tabletop. With this simple universal device the workpiece of any thickness will be securely fixed when moving along the surface of the work table.
In the video below, a man shows his homemade milling table, which he assembled right on the balcony of his own house.
Drive for a homemade milling machine
In order for the homemade wood router you made to be highly productive and functional, you need to equip it with an electric drive of sufficient power. If you plan to use your machine to process wood parts with shallow recesses, a 500 W electric motor will be sufficient for it. However, equipment with a low-power drive will often shut down, which will negate any savings from purchasing a weak electric motor.
The optimal choice for such machines are electric motors, the power of which starts from 1100 W. Such an electric motor with a power varying between 1–2 kW will allow you to use your homemade device as a real milling machine for processing wood products. In addition, you can use any type of cutter on this machine. To equip the machine drive, you can use electric motors that are installed on stationary equipment (for example, on drilling machines), as well as on hand tools (drills, grinders, hand routers).

More serious factory equipment costs significantly more. For example, the price of such a Kreg table starts at 22 thousand rubles
You should pay attention not only to the power, but also to the speed of the electric motor. The higher this indicator, the better quality the cut will be. Electric motors, as is known, can be powered by electrical network with a voltage of 220 and 380 V. There will be no problems connecting the former, but three-phase asynchronous motors will have to be powered using a special star-delta circuit. Connecting according to this scheme will make it possible to use the electric motor at its maximum power and provide it with a smooth start. And if you directly connect such an electric motor to a 220 V network, you will lose 30–50% of its power.
Milling table drawings: option No. 4
Analysis of another design of a self-made milling table, supplemented by a video from the author.
 The elevator is organized using a jack. A steel plate for attaching the router
Safety when working on a homemade milling table
When making a wood router with your own hands, ensure the safety of working on such equipment. First of all, you need to equip your homemade machine with a protective screen. Photos and drawings illustrate how such screens are constructed. professional equipment. A mandatory element of your homemade equipment should be an emergency stop button, the so-called mushroom. It should be placed in an easily accessible place, and the start button should be secured in a place where it will not be pressed accidentally.
Make sure that the treatment area is well illuminated, as this is the most dangerous place any equipment. If during work you need to frequently change the offset of the cutter, you should make a manual or automatic device lifting and lowering the tool (lift). By creating a lift for a router with your own hands, you will be able to use your homemade milling equipment more efficiently and make working on it comfortable and safe. Various designs such elevators can also be found on the Internet.
Modern carpentry workshop is a set convenient tools for processing any type of wood. This is unthinkable without a wood milling machine, assembled with your own hands. Assembling a stationary installation using hand tools is quite simple.
Design
It is worth knowing the necessary parts of the structure for milling. The main components of a self-made machine are:
- Bed.
- Table.
- Support (caliper).
- Spindle.
- Slides for movement of workpieces.
- Panel that starts the spindle.
- Management control technology.
- Cutting kit.
220V models have an additional carriage. Thanks to it, you can process parts at different angles.
Scheme
The equipment diagram is shown below:
Required Tools
To make the frame, a very dense piece of cast iron or of stainless steel. A special shaft is attached to the caliper from above. Its upper zone rises above the table through an opening. In all such machines, the shaft lift height can be adjusted.
A spindle equipped with a cutting tool is mounted on top. Industrial models use a solid cutting arsenal. The key types of equipment are: disk, knife and cutters of various shapes.
To carry out cutting strictly along a straight vector, a special guide bar is used. Due to a special fastening unit, it moves to the desired length. The quality of processing increases significantly if the dynamics of spindle rotation is high.

Classification of units
There are three categories of milling cutters:
- Professional. Process workpieces of different sizes and in large quantities. For this, a serious range of cutting tools is used.
- Household. In terms of functionality, they are suitable only for home workshops.
- Manual.
Each classification has its own subtypes. So professional machines have the following varieties:
- Standard. Used to implement template operations. Their equipment allows you to perform many jobs and give workpieces the required configuration. The cutting arsenal includes: cutters, drills of different diameters, and special knives.
- Copying. They perform artistic operations: applying complex images, placing samples on different surfaces, and designing ornaments. In this work, accuracy is guaranteed since the workpiece is fixed using the vacuum method.
- For vertical processing of parts (from top to bottom). Here grooves with the required width and depth are cut, and fastening components are prepared. The parts are cut to the required length.

- For horizontal work with workpieces. Here the spindle axis is horizontal in relation to the floor. There are cylindrical and end mills.
- Performing simultaneous processing on both sides. They are universal. Various profiles are processed here. Not a single production of furniture components is complete without these machines: stands, legs, supporting elements etc.
- Equipped with CNC devices. An electronic complex based on a special microprocessor is integrated here. It contains a program that determines the algorithm of operations. Due to this, accuracy, quality and dynamics of work, and labor productivity are significantly improved.
Household models differ in small dimensions and weight. They implement basic functions(planing, drilling, grinding, sawing). Their types:
- Desktop. Characterized by ease of operation and service.
- Manual. Used for working with small-sized parts. Small grooves are prepared on it, which are required for the articulation of separate components.

Step-by-step creation of a wood milling machine with your own hands
If for some reason it is difficult to purchase this equipment, you can build the installation yourself. All of the following components are taken into account:
- Tabletop.
- Parallel stop.
- Spindle.
- Bed.
- Sled.
- Vacuum cleaner to remove chips.

What components and materials are needed for the work?
To create power components, steel angles and pipes with a minimum wall density of 2 mm are used. Their connection options are welding or screws. All metal components are coated with primer and paint to protect them from corrosion.
Durable ones are suitable for the countertop and some other elements. chipboard classes and plywood. They are resistant to moisture, temperature changes and other dangerous factors.
Electric motor
It is needed when you plan to create a small CNC router. Its most important parameter is power. It is better to use a 1100 W device. It will allow you to use a variety of cutters.
You can also use a motor from hand power tools: drill, hammer drill or grinder.
engine's type
For optimal operation, you can base the machine on an asynchronous unit with three phases. Then the router will connect to the network and follow a special circuit. It uses a star-triangle algorithm. Due to this, the engine starts smoothly and allows the machine to operate at maximum power.
If such a motor is connected to a single-phase network, it will lose 50% of its efficiency. If the network does not allow this type of connection, then use a 1-2 phase motor.
How to choose the power drive of a wood milling machine for a home workshop
According to the recommendations of experts, for the planned router it is better to use a power device with a minimum power of 1.4 - 1.6 kW. If it is planned to implement a significant amount of work, this indicator develops by 20-25%.
Powerful equipment will operate without excessive load, the likelihood of breakdowns will be reduced, and its service life will increase. You can also install large cutters on this machine.
Speed
When selecting an engine, it is important to take into account the parameter of its speed - rotation frequency. It should be in the range from 10,000 to 35,000 rpm.
If the cutter diameter increases, angular dynamics also develop. When a certain limit is overcome, due to the friction force, the processing temperature increases dramatically, and the workpiece is coated dark spots or even ignite.
Nutrition
It must be suitable for the motor, as in the example with a three-phase device. If you use a motor from any tool designed to operate from a household network, then there should be no problems with the operation of the machine.
One way or another, the power cable must be wear-resistant and have a cross-section corresponding to the power of the machine.

Crafting table
This is a special table for the work process. It can be equipped with various auxiliary elements. Its parameters are determined by the quantity free space in room. The planned amount of work is also taken into account.
Today, the most common types of workbenches for milling tables are:
- Static. This is a full-fledged work site.
- Portable. This is a desktop version that is quickly assembled and allows for milling operations.
- Aggregate. It has such capabilities, due to which the sawing area expands.
For a household workshop, step 1 is optimal. The second type is suitable for working with small parts and has limited functionality. For the third there should be a spacious room.

To make it, you need drawings (at least by hand), and also profile pipes 2.5x2.5 cm. A total of 4 of them are needed. They are welded together. A fifth pipe is welded on one side of the created table. It is required for the movement of the rip fence. Legs are mounted to pipes using a similar method.
To strengthen the structure, one corner of identical length is added to all sides. This way the tabletop will be securely fixed in the recess.

Making a countertop
For this purpose, a sheet with specific dimensions is used:
- laminated dense plywood 1 cm thick;
- chipboard slab from 2.5 cm, having a polymer protective layer on top and on the end sides.
Such products have better resistance to aggressive external factors when compared with wooden analogues. You need to create recesses in the worksheet and place metal profiles in them.

Making your own frame for a homemade wood milling machine
The process goes like this: the required blanks (corners) are cut off with a grinder. Reinforcing crossbars are placed on the lower side. Support components (plates) are welded to the end zones. You can make threaded holes in them. Then the bolts are screwed into them.
You can install additional supports instead of corners. For this task, two pipes are mounted to the long sides. They will support the plywood and act as limiters for the machine. For better stability of the table, jumpers are welded between its legs at a distance of 20 cm from the floor surface.
Additional protective elements
Working on the machine must be safe both for its user and for those who may happen to be nearby. For this purpose, special fences are created from powerful plexiglass with minimum density 4 mm. You can build a transparent screen next to the instrument itself.
Those elements of equipment that extend beyond the frame are marked yellow. Similar markings should be on rapidly moving parts, internal surfaces of casings and doors.
Also, your machine should be equipped with overload protection. This system automatically blocks power in dangerous cases (for example, when a cutter stalls), and automatically brakes the spindle after the drive is turned off.
Other functional parts
Their list is as follows:
- Base plate. Absorbs elasticity waves.
- Drive board for vibration damping.
- Comb stops (combs). Needed to neutralize vertical vibrations of the workpiece.
- Static side stop. Guarantees the correct feeding of the part and the depth of its horizontal processing.
- Dust catcher.
Drive unit
It is better to make the opening for placing the drive round, so the machine will have less vibration during operation. The motor must not come into contact with the plate.
Installation of the drive in this plate is as follows:

It is better to create the drive board from PCB or fiberglass with a density of at least 1.5 cm.
Thick plywood (1.9 cm) treated with a vibration-absorbing agent is used for the slab.
The board and the plate are separated by a gap of 0.5 - 1 mm. It is desirable for the engine to have mounting feet, and they should extend beyond the body. This will allow the cutter to move upward. To install it, long motor bolts are used. The removal of the cutter is ensured as follows: steel washers with rubber gaskets are put on the bolts in turn between the engine housing and the suspension cushion.
Emphasis
Suitable material for the stop is thick plywood (from 2 cm). It is required to drill 3-5 holes for combs and risers. The first two are located 5 mm from the extreme sides of the cutout for the cutter. Others - after 2.5-3 cm. The positions of the stops depend on the parameters and quality of the workpiece.
The lateral movement of the cutter can be slightly adjusted by turning the stop and fixing it with a clamp.
The side support diagram is as follows:

It can have this configuration:

System elements
- A 15-20 liter bucket with a tight lid and snap-on latches.
- Pipe 1 – inlet. Diameter – 2 cm. Its end is beveled by 45 degrees and rotated by 25 degrees in outside. It is placed 2 cm from the side of the container.
- Branch pipe-2 – exhaust. Diameter – 3 cm. Placed strictly vertically in the bucket. Its selective ending is narrowed to 1.5-2 cm.
- Vacuum cleaner.
Combs
Oak or walnut is used for combs, without fungi or defects. They are made on the right and left sides for ease of feeding the workpiece.

The length of the first tooth is reduced by 3 mm. The reason is that it acts as a rebound spring for the entire ridge. Without this, damage may occur.
The ridges are attached to the stop using a special bolt through a slotted hole.
The non-working element is fixed with a self-tapping screw to the same stop through hole D7.
To work, the comb is positioned so that it contacts the workpiece with all teeth except the initial one. Then it is secured with a lamb.
In what order are the components assembled?
Here the work proceeds according to the following algorithm:
- Creating a frame.
- Installation of countertops and hanging parts.
- The structure is placed on its side. The drive and hose of the vacuum cleaner are connected to it.
- The machine is located in the working position and connected to the network.
- Testing its operation.

Design options: making a milling machine from improvised means
The equipment can be constructed from a drill, an angle grinder, or a washing machine. These are the most popular household options. The devices are produced with less power and are of a manual type, but are suitable for minor work.
How to make a functional wood router from a regular drill
Here a stand is built and the equipment is changed. These are the main criteria for creating such a router option.

The cutter shank is fixed in the chuck. You can make a vertical and horizontal router (example 1 and 2). The stand is made from laminated chipboard.


Advantages and disadvantages of a drill router
The advantages of such a device:
- Easy to use.
- Little dust from work.
- Poor quality of the result due to low speed (3000 rpm).
- Very narrow range of functions.
How to make a router from a grinder
There are two ways:
- A collet is screwed onto the tool spindle. Work can be done with all accessories that have cylindrical shanks.
- Attached to the spindle standard cartridge cam type (from a drill)

Milling cutter from a washing machine engine
A table is created using the described method. The motor shaft is placed on a collet. For this, a special adapter is ordered.
A lifting system is created to control the output of the tool: a motor and a threaded rod are mounted on two pipes.
One end of it goes into the nut fixed to the bottom of the table, and the other ends into the lower side of the engine. It is firmly fixed on it rotating device- wheel. The height is adjustable due to this.
Features of operating a homemade manual router
Work with this device according to the following criteria:
- They focus all their attention on how the cutter is moving.
- Do not move the workpiece by hand - use special mechanisms.
- Protect your hands and eyes with gloves and goggles.
- Children are not allowed near the machine.
- If the router is broken, disconnect it from the power supply and send it for repair.
Instead of a conclusion
The range of milling machines is quite wide. If funds allow, you can purchase any suitable model. But when you have the necessary skills and abilities, it is quite interesting to build this equipment yourself. It is important to understand for what purposes the installation is necessary. If you are satisfied with a very modest router with narrow functionality, then it is created from a household power tool.