How to properly sew a ceiling with clapboard. Correct ceiling lining with clapboard. Characteristics of MDF lining
Read also
Facing ceiling surface- a construction event for which high demands are initially placed. This is due to the characteristics of the materials used and the fact that in most cases a homeowner who decides to do the ceiling cladding himself will need experience and the availability of specialized tools. Regardless of the type of materials used, the technology of ceiling cladding is generally similar and involves the arrangement of a frame and its subsequent cladding. However, the materials used in the process of finishing ceilings are different, and their choice is determined by the characteristics of a particular finishing method. Despite the fact that carrying out finishing activities using most methods requires certain skills of a specialist in this field, there are those that can be carried out by everyone, including beginners, and the most common of them is covering the ceiling with clapboard. It is widely used on construction sites, being the material of choice in the process of carrying out both external and internal finishing works. The World Wide Web offers a lot of information on this topic, however, this article, being the most complete and structured, will most effectively answer the question: “How to cover a ceiling with clapboard?”
Ceiling made of lining: main types of material
Although construction market provides the consumer with freedom of choice among a variety of inexpensive polymer materials Today, many true connoisseurs of natural wood remain for finishing premises that have won the trust of developers. Craftsmen's commitment to use of this material due to its aesthetic characteristics, environmental safety and ease of use, and about the unique woody aroma in a room where the ceiling is lined with clapboard, in literally This word is legendary. In addition, the thermal insulation characteristics of wood make it possible to create a balanced microclimatic environment in a room where the ceiling is lined with clapboard.

Wooden lining: specifics of the material
The lining is a facing board, the specificity of which lies in the tongue-and-groove fixation system. In the last century, it was used only for covering carriages, which is why it got its name, and subsequently became a material widely used for both external and internal decoration of premises. In the post-war years, being one of the most budget options, lining was the only finishing material available. Over the past decades, lining has not only not lost its former popularity, but has also established itself as a reliable facing material. Subsequently, along with the advent of new technologies for manufacturing lining, the scope of its application expanded significantly.

The production of lining is a multi-stage process, including the manufacture edged boards with its subsequent industrial drying, application of tongue-and-groove joints, thorough grinding of material surfaces and, finally, sorting of finished products. The specified production features determine the advantages of the material, such as the possibility of obtaining a strong connection of panels without gaps, an attractive appearance, and therefore the material does not require additional processing, and its decorative characteristics significantly higher than operational ones.

There are various classifications of natural lining, which involve the division of lining in accordance with many characteristics. Among them is quality finished product, the type of wood used for the production of lining, and the scope of its use, and other, no less relevant parameters. Let's take a closer look at the most common classifications.
Ceiling made of lining photo


The following types of wood are used to make lining:
- Noble wood species, among which oak and ash deserve special attention;
- Soft species - among them alder and linden;
- Universal species - spruce and pine (the profile thickness is 12.0 x 25.0 mm, width - 90.0 x 150.0 mm and length up to 6 m).
In accordance with the scope of use, several types of lining are also distinguished:
- “Eurolining” is a type of lining, often exported to European countries and characterized by a smooth front surface and the presence of a deep tongue-and-groove system;
- “American” is a type of lining, using which you can imitate the overlap laying that is popular in America;
- “Lining panel” is a type of material whose appearance has obvious similarities with timber;
- “Block house” is a profile that has external similarities with rounded timber.

Another classification wood panels involves their division depending on quality:
- “Extra” - panels included in this category are characterized by high quality, the absence of dark spots and knots, which determines the most high cost material;
- Category “A” - small knots may be found on the surface of the panels included in this group, which significantly affects the price of this material and makes it affordable for most buyers;
- Category “B” - panels of average quality, most suitable for finishing work in a country house, balcony or recreation center;
- Category “C” - low-grade panels, the surface of which is characterized big amount dark spots and knots.
Important! Among the variety of wooden panels, experts recommend giving preference to products made from cedar, aspen or linden. However, not only wooden, but also plastic panels can be used for ceiling cladding.

Plastic panels: brief description
The traditional classification of plastic panels involves their division into seamless panels and panels with a dedicated seam, as a result of which the ceiling surface is characterized appearance similar to wood flooring.
Important! Unlike wooden lining, plastic panels do not require additional processing, which must be carried out before or after finishing the ceiling with lining. This is due to initial practicality plastic lining and its diversity color range, allowing you to choose a plastic lining that imitates a wooden surface.

- Seamless plastic lining characterized by the presence of a hidden tongue-and-groove system, which makes it possible to make the seams almost invisible after installing the ceiling covering. Also, in the process of producing seamless lining, the manufacturer relies on reducing the number of joints between panels, increasing their width, which is five times the width of traditional panels;
- Plastic lining with highlighted seam has external similarities with wooden lining, differing from it in that, unlike the latter, it does not require additional processing.

Important! When giving preference to plastic lining, you need to carefully familiarize yourself with the main features of PVC panels:
- Despite the fact that plastic panels are designed to hide existing unevenness of the surface being finished, and therefore they bend easily, excessive stress constantly applied to the panel can lead to cracks. A damaged panel is not suitable for restoration;
- Plastic panels are moisture resistant, however ultraviolet radiation, constantly affecting the material can cause it to fade.
MDF panels: specifics of use
There is another type of lining - MDF panels, which are lining made from fiberboard. The production of this variety is based on the method of pressing wood fiber, followed by giving the material the required shape and installing a tongue-and-groove system. If the size and shape of MDF panels are generally standard, then the color range has virtually no restrictions. The principle of covering the surface using this material is similar to that when using wooden lining. Due to the fact that one of the disadvantages of MDF panels is low moisture resistance, and constant exposure to moisture can cause their deformation and collapse, this type of lining can only be used in rooms characterized by low level humidity, and is not suitable for installing suspended ceilings in the bathroom or kitchen.

- Wooden lining is universal material, combined with almost any finishing materials that are relevant today. Regarding finishing country houses, saunas and baths, in in this case lining is the material of choice for finishing activities. Apartment owners also have a good reputation for wooden lining; it is used for finishing balconies and loggias, as well as for partial or complete finishing of the kitchen or living room.
- If you are seriously thinking about using wood to decorate a room and, in particular, the ceiling, read this article, which will discuss how to attach lining to the ceiling so that it is not only reliable, but also stylish and harmonious;
- The ceiling, covered with wooden lining, should organically fit into the overall interior concept, combining favorably not only with the floor and furniture, but also with home textiles. This advice will be especially relevant if you plan to decorate the interior in a classic or rustic style;
- To ensure that the surface of the ceiling covered with clapboard is not monotonous, it is recommended to install the slats in different directions, which will help create a certain pattern on the ceiling. To enhance decorativeness created effect, you can use slats or decorative beams different color;
- Suspended ceiling - perfect option for the living room. To install it, you can use not only a long board, but also ready-made modules. Panels used for installation suspended ceiling in the living room, can be decorated with carvings, paintings or stained glass windows- thanks to the use modern technologies, manufacturers offer a lot of options.

What to do if you purchased wooden lining?
After you have purchased wooden lining, experts do not recommend immediately starting to install the ceiling. In connection with this, we advise you to familiarize yourself with the following tips on preserving the original quality of the material:
- First of all, it is necessary to remove the purchased lining from its packaging;
- Next, the panels are carefully laid out on flat surface, it is better if they are wooden boards;
- Before you begin installing the ceiling, wait the time necessary for completely dry linings. It is important to know that the lining needs to be dried as much as possible, which will have a positive effect on their quality. Drying of the panels must be carried out in the room where installation is planned.
Important! Experts do not recommend rushing to install the lining on the ceiling and let it dry completely. Most optimal time for complete drying of the lining, a time period of three months is considered, however, if you cannot wait too long, the time frame can be compressed to several weeks.
- Importance this advice cannot be underestimated, since ideally the humidity of the room where installation will be carried out and the humidity of the panels should match. Otherwise, failure to follow these recommendations may lead to deformation of the panels. In this sense, the practicality of MDF panels and plastic panels is much higher, since they do not require pre-drying. To install plastic lining on the ceiling, it is enough to leave it for two or three days in a heated room where the work will be carried out and feel free to begin installation activities.

Calculation of the amount of material. Required Tools
- Calculation required quantity material - the undertaking is simple, but quite painstaking, and its implementation must be carried out at the proper level. Experts advise purchasing material with some reserve so that no unpleasant surprises arise during the work process.
- First of all, decide on the direction of fastening the elements, and then display this on the drawing. He will become your faithful assistant in correctly determining and calculating the required amount of material;
- If the area of your room is calculated according to the scheme 2.5 x 3.3 m, purchase material 3 m long and fasten it along a width of 2.5 m, trimming the material by 50 cm, which will go to waste. If you choose a different placement, you will have to sharpen part of the element, which will be noticeable upon completion of installation;
- In the process of taking into account the width of the configuration, it is important to remember the groove running along the edge of each part.

In order to make a lining ceiling with your own hands, you will need the following set of tools:
- Drill, screwdriver and hammer drill;
- Hacksaw, as well as metal scissors;
- Hammer;
- Roulette;
- Construction corner and construction level;
For the manufacture of wooden frame prepare a beam, the thickness of which is calculated based on the features of the chosen design, but its cross-section should not be less than 20 mm. In case of installation additional insulation its thickness must be added to the thickness of the timber.

Important! In case of installation of additional insulation, the material should also be taken with a reserve. During the installation process, you should not press the insulation excessively - it should be fastened freely, without additional clamping, since in the case of rigid fastening, the insulation will lose its properties.
If you plan to install a ceiling made of wooden lining on metallic profile, be prepared for costs to increase. In addition to the main material, additional elements will be required:
- UD profile, which is fastened around the perimeter of the entire room;
- CD profile, which serves as the basis of the frame;
- Crabs, which are a cross-shaped fastener and a U-shaped fastener;
- Self-tapping screws.
Important! Despite the fact that some craftsmen prefer to fasten the lining using a stapler or nails, citing the speed of the method. However, this fastening is considered not reliable enough, and therefore experts recommend using proven self-tapping screws.

Lining the ceiling with clapboard: step-by-step instructions
Ceiling frame installation
During the installation of the frame, it is important to take your time and follow all recommendations, since if the arrangement of the elements is violated, the geometry of the entire structure will be disrupted, which will subsequently be impossible to correct.
In accordance with the instructions, first of all, find the lowest corner in the room and, adding to it the height of the beam and the thickness of the lining, put a mark on this place and transfer it to other planes in the room. To make this task easier, it is recommended to use a hydraulic level;
The resulting marks are connected with a nylon thread and the resulting level is marked on the walls in the room.
Important! If you use wood during the installation of the frame, make it pre-treatment an antiseptic that will protect the material from the formation of mold and rot. This work It is recommended to do this in advance, as the material must dry. The processing method, as well as its timing, are indicated by the manufacturer of the antiseptic composition on the packaging.

To ensure that the lining is attached to the ceiling, prepare a flat base surface on which the cladding will be attached.
To do this, secure straight bars with a cross-section of 40 x 40 mm around the perimeter, constantly monitoring the water level;
To adjust them, use wooden plates of various thicknesses, which must be placed in the places where the bars are attached to the load-bearing ceiling panels;

After you have screwed in all the screws, a solid base is formed on the ceiling, which is limited by the surface of the bars;
If you are dealing with concrete floor Before attaching the paneling, take the following steps:
Install dowels 8 x 40 mm, for which you need to use a carbide drill to drill a hole 40-50 mm deep and insert the dowel. Next, using a drill with a diameter of 5 mm, drill through the bars at the places where the dowels are installed;

Using a cord, mark lines on the ceiling along which the intermediate battens of the sheathing will be attached, which should be located at a distance of 0.6 mm from each other.
Important! Due to the fact that even at the stage of installation of the facing surface there remains the possibility of an error leading to a violation of flatness and the appearance of noticeable unevenness, it is recommended to use a fishing line stretched along the marked lines. This will allow you to avoid using a building level.
To install the inside of the sheathing, you will need an assistant who will hold the bars as close as possible to the tensioned lines and, if necessary, place adjustment plates. At this time you will drill and screw the bars.

Important! If you are faced with the need for additional insulation, install block and roll lathing between the sheathing bars thermal insulation materials, over which it is necessary to stretch a vapor barrier film to prevent contact of the sheathing with moisture.
Cladding the ceiling with clapboard: how to attach the facing material
- The next stage is covering the ceiling with clapboard in a wooden house.
- This stage is not particularly difficult, but despite this you will need an assistant. If you are using long panels, this is a must.
- Take the first panel and, placing it tightly against the wall, secure it;
- The next panel is inserted into the groove to the previous one and secured at the location of the sheathing;
- If you plan to install holes for lamps and pipes, they are drilled as work progresses, which eliminates the possibility of errors;
- If, in the process of covering the ceiling with clapboard in a wooden house, you manage to make fasteners where the ridge enters the groove, you will get a truly harmonious ceiling covering, hiding the screw heads;
- If you are covering the ceiling with plastic panels, everything required holes must be drilled in advance to eliminate the risk of surface damage.
Important! Make sure in advance that all communications and electrical wiring are not damaged, since dismantling the surface is highly undesirable. As fasteners, use those made from stainless materials, which will avoid the appearance of rust stains.

Important! During work, take into account the temperature and humidity of the room where installation will be carried out. In case of temperature below + 10 degrees and high humidity, it is recommended to postpone installation activities.
Today, such a finishing method as covering the ceiling with clapboard has become widespread. With the help of aesthetic, decorative and beautiful material, you can easily transform the space and refresh the room.
What is a lining
The lining for ceiling cladding is represented by thin planks with a special type of connection, when the protrusion of another element is inserted into the groove of one plank.
The variety of types and quality of the material makes it suitable for installation in rooms with different operating conditions, and you can easily cover the ceiling with clapboard with your own hands. Panels are made from:
- solid wood species;
- MDF boards;
- plastic.
For example, for a bathroom or kitchen it is preferable to install plastic that is resistant to moisture, is not afraid of fungus, and is easy to wash. Wooden slabs or MDF is better used in living rooms.
Types of construction lining

Wooden lining - natural material(from deciduous or coniferous species), the main quality criteria of which are:
- strength;
- hardness;
- classism;
- fire resistance.
Wooden slats are divided into several classes:
- extra class or premium. Such boards are characterized by ideal smoothness and the absence of any defects. When finishing ceilings with premium eurolining, you will not have to adjust the parts to each other;
- class A. There may be minor defects:
— slight roughness in some areas;
— small inclusions of resin on the surface;
- small non-through cracks;
- B-class. This type is characterized by the presence of a significant number of defects. The end parts may have small chips. It is better to sheathe rooms with these panels country house, balcony or loggia;
- Class C- the lowest grade and cheap category material. In this case, only rotten boards are prohibited. Ceiling cladding with class C clapboard is recommended for basements, attics or utility rooms.

Its advantages include:
- no need to carefully prepare the ceiling space for finishing;
- ease of installation will allow you to hem the ceilings with MDF panels yourself;
- ease of care;
- the variety of options for MDF slats allows you to choose suitable color or texture that will organically fit into the overall design and style of the room.
MDF lining is produced based on the method of pressing wood fiber and further shaping the material required sizes and shapes.
Disadvantages include low performance characteristics, since over time the surface of such panels begins to crack and acquires a dark tint.

This is no less popular material than natural wood or particle boards. The production of this type of lamella is based on the extrusion method, in which a viscous polyvinyl chloride mass is squeezed out through special holes.
- from wooden beams. To do this, two beams are fixed on opposite sides of the room, retreating 10-15 cm from wall surface. They are fixed with nails or self-tapping screws every 60 cm.
Important! The timber must be fastened perpendicular to the location of the lamellas.
The distance between the beams is 60-100 cm if the lining is made of wood, and 40-60 cm when it is planned to install plastic panels.
The bottom edges of each beam should be parallel to the floor and at the same level as the other beams. By stretching a nylon thread along the underside of the transverse strips, the remaining beams are secured. To strengthen the structure, lintels made of timber of the same dimensions are installed;
- from a metal profile. If such a frame is installed, then first the UD profile is attached to the dowels along a horizontal line. The CD profile is fixed on opposite sides at a distance of 10-15 cm from the wall surface in increments of 60 cm. In this case, the CD profiles will be located perpendicular to the UD profile strips and the lining. The profile is fixed to the ceiling using U-shaped hangers with a distance of 40-60 cm.
Upon completion of the installation of the frame, wires are connected to the locations of the lighting fixtures using any of the methods.
Installation of lining
The first panel is fixed, pressed tightly against the wall. Next, the ridge of the next lamella is inserted into the groove of the previous one and secured with fasteners at the points of contact of the lining with the frame.
On a note! Holes for lamps are cut during the process of covering the ceiling with clapboard. Otherwise, damage may remain on it that is difficult to disguise.
Final stage
After the lining ceilings have been made, it is necessary to adjust the lamellas to length and file the corner joints. Gaps at the junction of walls and ceilings are masked with baseboards. Decorative plugs should match the color of the room's interior, so it is recommended to buy them together with the panels.
This finishing method is often used in the Provence style. Emphasizing its direction, the lining looks especially original and impressive. Designers advise applying a layer of special paint to clapboard ceilings, which gives them an aging effect.
Panels gray made of larch will highlight well, and the colorless varnish will give the coating additional shine and beauty.
If you first study the technology of how to properly cover ceilings with clapboard, then installation will not take much time and effort. As a result of the work, you will get an original and beautiful ceiling.
Ceiling finishing with clapboard video
One of the common ways to finish a ceiling is to cover it with clapboard. Materials used for this include solid wood, MDF and plastic. In any case, the ceiling surface correct installation turns into a perfectly flat surface with characteristic appearance. The arrangement of stripes can contribute to the correct visual perception of the room. Any interested owner who is not afraid of work and is not averse to working can make a lining ceiling with their own hands construction tool. Having become familiar with detailed instructions and having purchased everything necessary materials, you can begin to implement your plans.
In the usual sense, in order to cover the ceiling with clapboard, a frame is first formed. Its purpose is to separate the future finishing surface of the ceiling from the uneven and unattractive base, to bring out a single level plane and ensure the strength of the entire structure. It is on the frame that both the lining and the lighting. The lining of the selected type is already sewn on top of the frame. Even in the case when they say that they sew the lining directly onto the wall or ceiling, it seems like without a frame, a sheathing is still formed.
Strips of material (actually “lining”) are fixed across the frame guides. General direction stripes are selected in accordance with the requirements of the room design. Visually, the room will appear longer, precisely in the direction in which the lining is laid.
You can form a frame from. The same ones used to secure drywall. Besides classic version There remains the option of using wooden beams.
What exactly should you choose from these materials? It all depends on the material from which the lining is made and operating conditions. So for wet rooms like the bathroom or kitchen would be better suited metal frame and plastic lining for the ceiling. Wooden or MDF lining is allowed in the kitchen, again with a metal frame.

various types of wooden lining
Perfect for residential areas wooden beam in combination with any material you like. On the positive side wooden frame, the process of installing the lining becomes simpler. It is easier to nail small nails to wood, tighten screws and attach clips.
What will you need?
You will need the following set of tools, which should always be kept nearby when covering the ceiling with clapboard with your own hands:
- Hammer;
- Impact drill or hammer drill, screwdriver;
- Construction corner, water level, bubble level or rule;
- Tape measure, centimeter;
- Hacksaw, metal scissors (for metal profiles).
The material is naturally selected from the selected materials. So for a wooden frame it is best to use timber 20X40, 40X40, 50X50 mm. The entire structure will be made up of the selected timber and its derivatives. To fasten the beams and attach them to the ceiling and walls, plastic dowels are used together with nails-screws (8X45) or anchors, and hardened wood screws (4X50, 4X75).
For metal frame the list of purchases will already increase, at least in the number of components:
- UD profile for forming the perimeter;
- CD profile as the basis of the frame;
- U-shaped fastenings and cross fastenings “crab”;
- Flea-tapping screws with a drill tip, metal screws with a piercing head.
The instructions below will help you find out how much material you need to purchase, after reading which you will be able to calculate the quantity based on your needs.
To attach the lining to the ceiling, or rather to the frame, staples are used construction stapler, self-tapping screws with a press washer, nails, special clips, the latter mainly for plastic lining, also called PVC panels. Nails can only be used in combination with a wooden frame.
Frame installation
Even before starting the main work, the lowest point on the ceiling is selected and a measurement is taken from it 6-10 cm down the wall, where the first mark is made. Next, the mark is transferred to all four walls using a water level. At best it is used laser level. As a result, a line will be obtained along the perimeter of the room, along which the installation of the frame will be verified.
Important: If wooden beams and boards are used in construction or renovation, they must also be treated with a fire retardant to protect them from rot, pests and increase fire safety.
Option 1: frame based on wooden beams
The beams must be fixed to the ceiling in a direction perpendicular to how the lining will be sheathed. The distance between the bars is selected in the range of 40-60 cm for plastic and 60-100 cm for wood. The beams must be mounted so that their lower edge is strictly parallel to the floor and at the same level as all other beams. You can check this using a water level.

So, at the beginning, two beams are fixed on opposite sides of the room at a distance of approximately 10-15 cm from the wall. Be sure to check the level not only at the edges of the beam, but also in the middle. For every 60 cm it is necessary to attach a beam to the ceiling. Impact screws and dowels or anchors are used for this. If the beam is distant from the ceiling, wooden plates made from the remnants of the same beam are placed.
Between installed beams a rope or fishing line is pulled along their lower edge. Using the line on the wall and the stretched line as a guide, the remaining beams are installed. Once everything is ready, you can start strengthening.
For reliability, you can install jumpers between the main beams. So from the same timber pieces are cut with a length equal to the distance between the installed beams and attached to them in the middle of the ceiling. However, it is enough to install jumpers only in those places where an increased load on the frame is implied, that is, places where lamps are installed. At this point the frame is considered ready.
Option 2: frame based on a metal profile
The rules for constructing the frame are the same as for and. Along the perimeter of the walls, according to the drawn line of the suspended ceiling level, a UD profile is attached using dowels. Next, the first two outer CD profiles are attached at a distance of 10-15 cm from the wall, also perpendicular to the direction of the lining. It should be fixed along the length of the profile U-shaped fastenings to the ceiling, with a frequency of every 40-60 cm. Using a stretched rope or fishing line, the remaining profiles are installed and secured along the ceiling at a distance the same as when using timber. Jumpers in places where reinforcement of the frame is required are mounted using crab crosses.
Before installing the lining, wiring for the lighting system is also laid. IN in the right places loops or wire leads are left. After covering with clapboard, they can be pulled out through the prepared holes and.
Cladding
If the lining is made of wood or MDF
Lining from solid wood and MDF is mounted identically. To do this, strips of material are cut to a length equal to the distance between the walls minus 5 mm. A slightly smaller size is necessary to form a gap; this will protect the ceiling from the effects of thermal expansion. If you are not sure that the walls are perfectly parallel, it is better to cut a strip of lining for a specific installation location.

The installation of the lining on the ceiling begins with the first strip, which is fixed on both sides along the entire length, that is, to each guide. This leaves a gap of 3-5 mm to the wall. Subsequent stripes are inserted under small angle groove into the lock of the previous strip, and slides tightly into it. For reliability, you can use a rubber hammer and lightly tap the end of the strip. The second side is nailed or screwed to the frame guides behind the lower edge of the lock. As mentioned above, either self-tapping screws with a press washer or nails are used for this.
Advice: When using self-tapping screws, it is advisable to pre-drill holes in the places where they are installed on the strips, otherwise the material may chip. When using nails, use a hammer to avoid damaging the front part of the lining with a hammer blow.
 In the process of assembling the ceiling, it is important to take care in advance of the output of the supply wires in the required places and make the corresponding holes on the lining strips. After complete installation It will be almost impossible to do this on the ceiling without the risk of damaging the front side.
Continue installing stripes to the opposite end of the room. The last strip is best driven into the lock using small wedges that are driven between the strip and the wall. Most likely, you will have to cut the strip along its entire length, because the whole strip will not fit. MDF lining, just like plastic, is easier to cut with a knife. Incisions are made along the entire length on both sides, after which the strip is carefully broken. Strips of solid wood will have to be cut using either a hacksaw or a jigsaw. Additionally, ceilings made of wooden lining should not be glued; securing all the strips to each of the guides will result in a durable and durable design. Moreover, the glued lining will begin to creak and crack over time.
Video: finishing the ceiling in an apartment with wooden paneling
If the lining is made of plastic
Plastic lining, or PVC panels, are laid in the same way as wooden lining, and with the same gaps on all sides to compensate for thermal expansion of 3-5 mm. However, before installing the first strip, a U-shaped groove should be secured around the perimeter of the new ceiling, in which the extreme ends of all strips will be hidden. Often this groove is an integral part of the baseboard or is a collapsible structure made of L-shaped parts. One of them is fixed before covering with clapboard, and the second is snapped in after. It all depends on which option will be purchased.

Since the single level of the ceiling is already determined by the frame, when covering with clapboard you just need to carefully ensure that each strip fits snugly to the guides and does not move away at the joints.
Final stage
At the stage of securing the entire lining, the work is not yet completed. It is also necessary to secure around the perimeter of the new ceiling or a corner that will close the gap between the lining and the walls. You can secure the plinth using liquid nails, clips or screws. Only after this can you consider that finishing the ceiling with clapboard is completed and enjoy the new look of the room. The lining itself does not require any additional finishing work. Only if the simplest version of the cladding made from untreated profiled boards is used, will it be necessary to open it with varnish. However, it is better to complete this process in advance, even before installing the ceiling.
One of the stages of any repair can be called ceiling work. Repairing the ceiling is quite a labor-intensive job, so everyone is trying to make this process easier and simpler. Finishing the ceiling with clapboard is considered the most simple option, requiring neither construction experience nor special costs. But how to cover a ceiling with clapboard correctly?
To answer this question, you need to carefully study some of the subtleties of the process. Covering the ceiling with clapboard is carried out in several stages.
The lining on the ceiling looks noble
Material selection
This stage can safely be called the most important, since you need to select quality material, which will serve for a long time.
The modern construction market offers a variety of materials for finishing residential premises. One of these materials is lining. It is a panel with a ridge on one side and a groove on the other. The connection of tongue-and-groove panels allows you to create reliable system fixation.
Most often, natural wood is used to make lining. Linden, pine and cedar are considered ideal raw materials.
Depending on the quality, wooden lining is divided into categories:
- “Extra” are panels High Quality, there are no knots on them and dark spots. The price of such material is very high.
- “A” – material with a small number of knots. Lining of this class is available to most consumers.
- “B” – panels with knots on the surface. It is quite suitable for finishing country houses, lounges and balconies.
- “C” is a material of very low quality, with a large number of knots and dark spots.

Wooden paneling on the ceiling
In addition to wood, polyvinyl chloride is used to make lining. Plastic panels have a number of advantages:
- resistance to high humidity;
- no additional treatment with protective agents is required;
- decorative film on the surface can imitate any expensive wood.
But PVC panels also have negative qualities:
- under the influence of gravity, the material may crack,
- the color of the lining “fades” from sunlight.
Having purchased wooden lining for ceiling cladding, you should use the following tips:
- After unpacking, the purchased material must be laid out in the room where the ceiling will be sheathed.
- To prevent the drying panels from becoming deformed, the surface underneath them must be fairly flat.
- It is recommended to dry the lining for a long time, from one month to three.
Selection of tools
Cladding the ceiling with clapboard involves the use simple tools that every owner has in his arsenal:
- drill,
- screwdriver,
- hacksaw,
- level,
- roulette.
Preparatory work
- First of all, it is necessary to remove the old coating from the ceiling and clean the crumbling plaster.
- Then you need to make markings for the sheathing. The frame guides are positioned perpendicular to the selected direction of the lining boards. The direction is chosen so that the length of the panels does not have joints.
- If you select for the frame wooden blocks, then they must be additionally treated with protective agents. Metal sheathing has small indentations from the ceiling, which allow you to hide existing engineering systems and communications.
The surface under the frame must be perfectly flat. This will extend the life of the ceiling and avoid unnecessary problems.

Lathing for plastic lining can be made from wooden slats
Installation of panels on the sheathing
To finish the ceiling with clapboard is not required a large number of people with special knowledge. But the help of a friend or relative will make the job much easier. This is especially true for the installation of long panels.
The first panel is pressed tightly against the wall and secured in the places where the frame passes. The ridge of the second panel is inserted into the groove of the panel of the previous row and secured in a similar way. Work should be carried out only at positive temperatures and low humidity.
Holes for pipes and fixtures are cut as work progresses to avoid unnecessary cuts.

Clapboard ceiling
Fastening is best done where the ridge enters the groove. This will hide the caps of the fasteners. When covering the ceiling with wooden paneling, it is advisable to use stainless fasteners to prevent the appearance of rusty stains. It is possible to use hidden fasteners, but their cost is quite high.
The ceiling covered with clapboard does not require special care. The main thing is to promptly clean it from dust and dirt. And on plastic panels Any damage or scratches found can be repaired with wax.
Lining is considered one of the most the best materials for interior decoration of housing, since it is made from natural raw materials and not only serves as a decoration for the premises, but also acts an excellent remedy for noise and heat insulation. Installation of the lining is simple, and a huge selection of textures and colors allows it to be used to decorate any design. Special attention clapboard ceilings deserve - they give the room stylish look and fill it with atmosphere home comfort and warmth.


Peculiarities
The lining is a board that has a special groove on one side and a protrusion on the other. Thanks to this design, when assembled, the parts form a solid coating, which is reliable in operation and does not deform under the influence of temperature. Usually the lining is produced from various breeds wood, but panels made of plastic and metal can also be found.
The ceiling in an apartment is usually covered with boards made of coniferous wood - they are characterized by a beautiful texture and patterns, withstand mechanical loads and give the room a pleasant aroma.


The lining ceiling can be installed as a single-tier or decorated complex designs, consisting of several levels. Difference between models suspension systems consists only of assembling the frame. Finishing the ceiling with clapboard has many advantages, which include:
- Beautiful decor. This type of design is always in fashion and can be used for any style.
- Ease of installation work. Suspended structures do not require additional processing– it is enough to cover them with stain or varnish.
- Masking of surface defects. Facing panels can not only brighten up unevenness, but also allow you to hide communication systems and wiring that are necessary when installing lamps.
- Excellent thermal conductivity and sound insulation.
- Possibility of combination with others decorative materials . Thanks to the original combination of wood with metal and glass, you can achieve a stunning design effect.
- Environmental friendliness. Wood is a natural raw material, therefore it is completely safe for human health. In addition, board structures are able to maintain a certain microclimate in the rooms.

Despite the presence positive properties, lining ceilings also have their disadvantages, namely:
- Reducing the height of the room. Regardless of whether it is a simple or multi-tiered system, when installing it, it will not be possible to maintain the height of the room. Therefore, such ceilings are recommended to be placed in spacious rooms.
- Absence fire safety . Unlike finishing the ceiling with plasterboard wooden structures can quickly ignite, so it is advisable to coat them with special mixtures that will not only extend the life of the coating, but also protect it from a possible fire.
- Low level of moisture resistance. In rooms with high humidity It is best not to install lining ceilings, since under the influence of condensation and fumes the panels may change in size and undergo deformation. For such premises, it is advisable to choose plastic lining. If the design provides wooden plank, then it will have to be coated with a protective varnish.
- Instability to mold and mildew. This only applies to wooden lining.


Types of lining
Today, for cladding ceilings, they produce lining from natural wood, plastics and fiberboard. At the same time, it is extremely popular in modern design Solid wood material is used, as it is made from various types of wood. As a rule, pine and linden boards are chosen for finishing ceilings in residential premises - pine panels are well suited for interiors in private houses and cottages, and fake options can be used for covering surfaces in apartments.
In addition, wooden lining differs in size, class of wood, pattern and fastening system. The wide board has the appearance of eurolining, and it looks beautiful on ceilings with beams.


Plastic panels come in two types: seamless and with a separated seam. Moreover, after installation, the latter outwardly resemble wood covering and are characterized by high aesthetics and at an affordable price, so they can be used if the house is budget renovation or you need to decorate ceilings in rooms with high humidity. Unlike natural material plastic lining is practical and presented in wide selection colors and textures. It is produced not only with imitation wood, but also decorative stone.
Seamless plastic panels have a special tongue-and-groove system in their design, so after their installation the seams are almost invisible. The width of this material is quite large, so it is used for finishing spacious rooms.


Fiberboard lining has also proven itself well. It is made from wood fiber by pressing. Such boards have standard sizes and shapes, but their designs are limitless. Outer layer The panels are decorated with original drawings and patterns and covered with paint of various colors.
It is not advisable to use the material for decorating ceilings in damp rooms. Therefore, if you need to install suspended ceiling in the bathroom or kitchen, then aluminum or metal lining is recommended for this.


Design
On modern market There are many models of lining available, thanks to which you can make any design idea. It is considered a wonderful decoration for a room. white ceiling made of timber, as it will not only visually expand the boundaries of space, but also make the room bright and fill it with a special atmosphere of comfort. If desired suspended structure You can add colored areas or make inserts from dark boards.
Glossy lining also looks chic in rooms - unlike matte panels, it is practical to use, does not get dirty, and after cleaning there are no streaks left on its surface.


IN classic style wooden boards are chosen for cladding ceilings - their natural pattern and color add beauty to the interior and go well with other decorative items. An interesting option Mirror lining is also considered in the design. Its seamless wide panels are well suited for finishing ceilings in bedrooms, bathrooms and living rooms.
In order to create an unusual room design when installing lining ceilings, it is recommended to combine materials of different textures and shades. You can also additionally apply patterns to the panels that would follow the lines of furniture and flooring.


At the same time, do not forget that wood paneling requires correct selection color scheme - there should be complete harmony in the interior, the ceiling should not be a separate part of the design. Therefore, it is worth paying great attention to its shape, number of levels and complexity of design. For example, massive dark-colored structures will reduce the space and make it gloomy, while light panel inserts, on the contrary, will expand the boundaries.
To further highlight the beauty of wood, suspended ceilings should have good system lighting in the form of stylish chandeliers.


Scope of application
Recently, various materials have been used for interior decoration, but most in demand Among them, lining is used. The surfaces sheathed with it are highly durable, versatile and environmentally friendly. Ceilings made of lining can be installed in both brick and wooden houses; such structures also look interesting in apartments. Panels with imitation logs or timber can easily decorate any interior; they are especially often used for cladding the attic.


Wood goes well with stonework. The stone itself is a cold material, but if you add it with clapboard, the room will be transformed and become cozy.
For example, in a bedroom or living room one of the walls can be tiled decorative stone and install a clapboard ceiling. The end result is a gorgeous design. Such panels will fit perfectly into the interior of hallways, kitchens and children's rooms. In addition, ceilings on balconies and loggias are often covered with clapboard.


How to sheathe it yourself?
The process of installing a suspended ceiling made of lining is simple, so its installation can be done independently, without the help of craftsmen. Finishing is carried out in two stages: first, it is prepared load-bearing frame, then the cladding is done with boards.


The frame is attached as follows:
- The direction of fastening the lining is determined. If it is longitudinal, then the frame sheathing is fixed transversely; if it is transverse, vice versa. In addition, before installation, you need to set the level of the future ceiling and draw markings along which the filing will take place. The frame must be mounted 5-10 cm lower from the main ceiling. To do this correctly, it is recommended to use a laser or hydraulic level.
- After all the markings, you need to secure an aluminum guide profile around the perimeter of the room. You can join the parts using self-tapping screws and dowels. In this case, the profile must correspond to the dimensions of the structure, so it is cut and positioned along the length and width of the frame. To increase the strength of the frame, it is additionally reinforced with suspensions, observing a step of 60 cm.


- The next step in installing the ceiling is laying the lining. First, you need to nail slats to the frame, adjusting them to fit the walls, then you can lay decorative boards. At the end of the work, all joint gaps will be covered with strips, and the joints with the walls will be covered with plinths. When installing plastic lining, on the contrary, the baseboards are fixed first, and only then the panels are laid.
- Staples should be hammered in inner wall groove. Wooden lining is fastened with small nails, MDF panels are fastened with nails with a large head, and plastic boards are fixed to the frame using self-tapping screws and a stapler.


To learn how to attach the lining to the ceiling, see the following video.
The lining ceiling looks beautiful and original in modern interior, but so that it not only pleases with its aesthetics, but also serves reliably long term, you need to know how to attach it correctly. If installation work are carried out independently, then the following recommendations from specialists can help novice masters with this:
- Since wood is considered a “capricious” material, before use it should be kept for several days in the room where the ceiling is planned to be installed. Thanks to this, the lining will “get used” to the new conditions of temperature and humidity, take on the desired shape and be easy to install. The boards must be stacked.
- If, when purchasing the material in the package, you find several crooked planks, then there is no need to be upset - they can be used in covering those places where pieces of material are needed.
- The lining should be secured with nails with a small head. At the same time, for covering ceilings in bathrooms and verandas, the nails need to be covered with a protective mixture, otherwise under the influence of humidity they will rust, and stains will appear on the white lining that will be difficult to wipe off.
Burrs and chips around the screws can be prevented if you pre-drill holes for the screws before attaching them to the board.


- In rooms where there is unstable humidity, it is recommended to purchase yellow self-tapping screws.
- When attaching the edges of the board, it is necessary to use a center punch - it will protect the surface of the lining from mechanical damage.
- Along the perimeter installed ceiling you need to lay out skirting boards, as they will help hide the joints between the structure and the walls.
- It is advisable to sheathe the ceiling with boards from the corners to the center.
- The last panel of the structure is adjusted in width and placed in the least visible place.
- If, while attaching the lining, the self-tapping screw on its edge splits the wood, and a small crack has formed, then the self-tapping screw can be slightly unscrewed back and a small nail can be driven in nearby at an angle - this way the two halves of the board will be pulled together, and the defect will be invisible.


Beautiful examples in the interior
It is impossible to imagine a modern home interior without clapboard finishing. This is especially true for hanging structures, which have the appearance of a slatted covering and fit perfectly into the design of apartments and country houses. These look beautiful wood planking in living rooms - a ceiling decorated in this way fills the room with comfort and homely warmth.
In order for the design to be harmoniously combined with other types of finishing and decorative items, the outer part of the panels must be detonated with varnish - the result will be a stunning effect, and the natural patterns of the wood will be favorably emphasized in the general plan.

If the size of the living room allows, then you can also create a ceiling that will look like beam floor. As a rule, this design idea is used when decorating rooms in the Alpine style.
At the same time, it is not necessary to choose natural colors for the cladding; contrasting shades will also look interesting in the interior. It all depends on what colors predominate in the room.

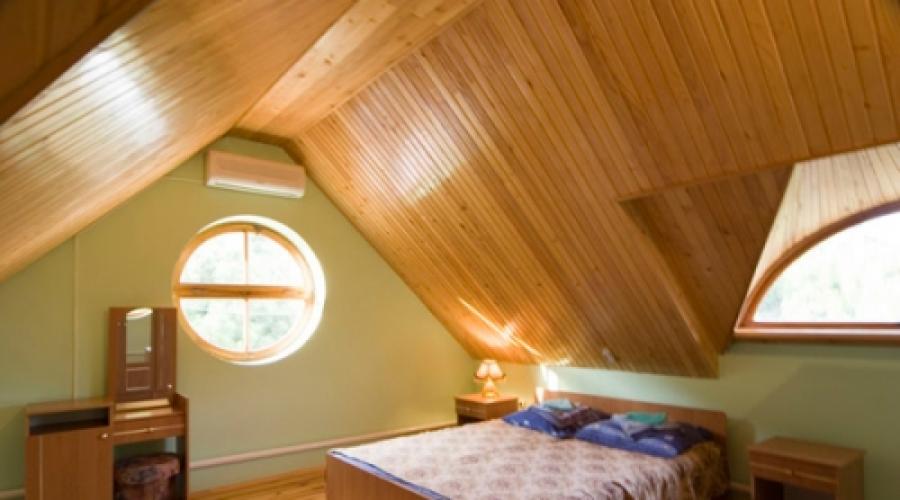
An excellent solution would be to install such a ceiling in the bedroom. White or beige slats will create a good atmosphere in the room, which will be most conducive to relaxation. Typically, lining structures are chosen for the Provence style. To achieve an interesting design effect, you can lay out panels of several colors. In this case, the lining ceiling in the bedroom can become a continuation of the wall cladding.