How to build a wooden fence with your own hands. Cheap DIY fence. Initial stage of construction
Construction beautiful fencing- the logical conclusion of home ownership registration, protection from the indiscreet glances of others and decoration of the site. The decision to make a wooden fence with your own hands, despite its cheapness, requires preparation and accurate calculations.
Wooden fence: advantages and disadvantages
Wood is one of the most attractive materials for making a fence, however, it is capricious in operation, and the durability of a fence made of this material largely depends on the choice of type of wood.
To make the simplest picket fence, coniferous wood is usually chosen, which is cheap and less susceptible to rotting. Of course, no one will forbid making a fence from oak or beech, but such a fence will cost a pretty penny.
Advantages of wood:
- Environmental friendliness;
- Availability of material;
- Low cost;
- Ease of processing and installation;
- Highly decorative.
Disadvantages of the material:
- Fragility (of some breeds);
- Tendency to cracking;
- Rotting in conditions of high humidity;
- Fire hazard;
- Pest infestation.
Since some of the shortcomings can be eliminated with various impregnations, wood is most often chosen for fencing.
Types of wooden fences
For thousands of years, wood was the only building material; our ancestors accumulated vast experience in using wood in for different purposes, including for fences.
The figure shows the most common designs of picket fences, but this is the most simple design made of boards - a picket, in addition to it made of wood:
- wattle fence;
- plank;
- pole;
- palisade;
- panel;
- ranch.
With a little imagination, any of these fences can be made business card plot, and, explaining the way to guests, the neighbors will say: this is where the fence is beautiful (unusual, stunning, unique)!
Examples of options in the photo
A low fence opens up the children's playground on the property to the neighbors' view  A fence made of boards arranged in a checkerboard pattern blocks the view of the site
  A weave of boards placed at an angle can serve as a support climbing plants
  Walking past such a fence, you can’t help but smile
  The picket pattern is made in such a way that short dies create a high fence
  A picket fence, supplemented with end cuts of wood, becomes a solid fence
  Mirror film, pasted on pickets, turns an ordinary fence into an art object
  There is no place for pests in a garden with such fences
Preparing for construction
Even something as seemingly simple as fencing a site with your own hands requires:
- preliminary familiarization with regulatory documentation;
- project development;
- determining the need for materials;
- budgeting.
Current standards
Standards for the construction of fences summer cottages are prescribed in SP 53.13330.2011 “SNiP” 30–02–97* “Planning and development of territories of gardening (dacha) citizen associations. Buildings and constructions":
- Fences between areas should have a height of no more than 1.5 m, mesh or lattice;
- By decision general meeting members of the partnership, the fencing of the site on the side of the street or driveway can be solid, but not higher than 2.2 meters;
- The distance between the fence supports is 2–3 meters;
- Each rack requires a point foundation with a depth of 0.8 to 0.9 meters;
- Recommended racks - made of metal rectangular pipes cross section 4x6 centimeters.
In addition to the general requirements for the state, local authorities may introduce their own standards, so before starting design it is advisable to consult the regional service in charge of the general plan.
Design
Having decided on the requirements, you can begin designing. The basis for the project will be a cadastral plan of the site indicating the boundaries. According to the plan, calculate the total length of the perimeter and the size of each side separately. These dimensions will allow you to calculate the number of fence sections and the size of additional sections. A scale diagram of the site indicating all dimensions is drawn on a separate sheet of paper. Don't forget about the entry gate and the entrance gate.
When constructing a wooden fence, experts recommend making the distance between the supports no more than 2.5 meters, since as the span increases, the deflection of the horizontal crossbars increases, which can cause deformation of the structure.
On the drawing of an ordinary section of the fence we put all the dimensions, including the underground part of the pillar
A drawing is also being developed for an ordinary section with a height of one and a half meters.
Having decided on the type of fence, draw a separate typical section of the fence to scale, including the foundation for the support, with all dimensions.
The bottom line of the fence should be raised 10–15 cm above ground level, the posts should exceed the fence by 10 cm or more.
For corner supports, gate posts and wickets we accept pipes with a cross-section of 60x60 mm, intermediate pipes of 40x60 mm. If the soil is in an area of neutral acidity, and the level groundwater below one and a half meters, the racks can be installed using partial concreting or backfilling. In this case, the racks are buried in the soil to a depth of 0.8–1.2 meters, but not less than a quarter of their total height.
Material selection
From the huge number of types of wood for fences, it is best to choose coniferous species:
- they grow everywhere;
- due to the structure being saturated with resin, the wood is resistant to humidity and solar radiation;
- have low cost.
Of course, you can make a fence from ash or oak, it will be more durable than a fence made from spruce or pine, but such a fence will cost a pretty penny. The best choice- larch, the most resistant to moisture of all coniferous species, having an adequate price.
If desired, except edged boards, the fence can be made from cheaper materials - slab or unedged board. Also available materials may be useful - sawmill waste, dead wood, pallets (pallets), old door leaves or window frames.
You should use old pallets with caution: they are often made from hardwood, such as birch, which does not tolerate moisture and rots in the air.
Calculation of material requirements
Calculation of the required amount of materials is carried out based on geometric dimensions plot. Suppose the site has square shape size 30x30 meters, with three sides fenced with a picket fence 1.5 meters high, on the driveway side there is a blind fence 2 meters high, with a gate 2.5 meters wide and a wicket 1 meter wide. The depth of soil freezing is 1.4 meters, the aquifer is at a depth of 3.3 meters.
Based on the size of the site, we determine the need for materials
Racks made of pipe with a cross section of 60x60 mm and a height of 3.0 m
Length of fence along the driveway
L1= 30–(2.5+1)=26.5 m
Number of racks
L1: 2.5 + 1+2 =26.5: 2.5 +3= 13.6
Since we have an additional section, we take the number of racks equal to 14.
To seal the ends of the racks you will need a strip 100 x 4 mm, 100 mm long, with a total length of 9.8 m.
The total length of the picket fence with a height of 1.5 m:
The number of racks made of pipe with a cross section of 40x60 mm and a height of 2.5 m will be:
L2: 2.5 -1 = 90:2.5 - 1 = 36 –1= 35 pcs.
Horizontal logs are made from boards with a section of 40x100 mm long:
L3= 2.5 – 0.07 = 2.43 m
The number of logs is equal to the number of ordinary fencing sections multiplied by two:
(12 x 3 + 10) x 2= 92
For an additional section 1.5 m wide, two 40x100 boards 1.43 m long are needed.
We attach the logs to metal corners from a 30x3 profile, each 60 mm long, the total number is 94 pieces, equal to the number of logs.
For a fence 1.5 m high, we take planks 10 cm wide, 22 mm thick, 1.35 m high with a gap of 4 cm between the planks, 17 pickets will be required per row section, total quantity:
17 x 46 +10 = 792 pcs.
For a blind fence 2 m high, planks 10 cm wide, 1.85 m high, and 25 mm thick are needed. Their quantity will be 25 pieces. per section, total:
25 x 11 = 275 pcs.
In addition, you will need self-tapping screws for attaching the corners to the posts and crossbars to the corners, and nails for attaching the picket to the crossbars.
For foundations based on the depth of pits 1 m with a diameter of 40 mm, 6 - 6.5 m3 of crushed stone will be required.
Wood volume:
- Boards 40x100 mm - 92 x 2.5 x 0.1 x 0.04 +2 x 1.5 x0.1 x 0.04 = 0.94 m3
- Boards 100x22 mm - 1.5 x 0.1 x 0.022 x 792 = 2.38 m3
- Boards 100x25 mm - 2 x 0.1 x 0.025 x 275 = 1.38 m3
Metal volume:
- Racks 60x60 - 3.0 x 14 = 42 m.p.
- Racks 40 x 60 – 2.5 x 35 = 87.5 m.p.
- Angle 30 x 3, length 60 mm - 94 x 0.06 = 5.64 m.p.
- Steel strip 100 x 4 – 9.8 m.p.
Wood will require impregnation and paint or a complex composition that protects the wood from pests, unfavorable weather conditions and fire. Metal requires a layer of soil, waterproofing for the underground part of the racks and a protective coating.
Since fence boards do not perform any work, the selection of thickness is determined by flexibility. From experience it is known that for horizontal boards - a log, a section of 100 x 40 mm is sufficient; for a picket height of 1.5 m with two fastening points, a board 22 mm thick is suitable; for a height of 2 m, a board 25 mm thick is suitable.
Required Tools
To complete the foundations you will need a gardener earth drill or you will have to dig holes 1–1.2 meters deep and 40 cm in diameter manually.
The toolkit includes:
- Jigsaw;
- Circular saw with discs for working on metal;
- Welding machine;
- Electric planer;
- Electric drill with drills for metal and wood;
- Wood hacksaw;
- Hammer;
- Pliers;
- Screwdrivers;
- Universal wrench;
- Construction level, horizontal and vertical;
- Roulette;
- Cord or twine;
- Brushes.
Installation of fencing, step-by-step instructions for DIY construction
Fencing the site is carried out in several stages:
- Preparation of racks;
- Installation of picket fence sections;
- Marking the actual fence;
- Excavation;
- Installation of racks;
- Installation of fencing.
There is another installation method, when all elements are fixed in place sequentially, without preparation. This method has a right to exist, however, it will take more time, and it is inconvenient to mount corners for attaching lags to an installed rack.
1. Preparation of racks
For each rack, in accordance with the drawing, for ordinary racks, two corners are attached to self-tapping screws on the long sides, for corner posts- two each adjacent parties. Plates - plugs - are welded to the ends of the racks. Welds cleaned, the racks are covered with primer, then paint.2. Installation of picket fence sections
Pegs or reinforcement are driven into the place where the corner posts are installed.
A cord or twine is pulled along the perimeter of the area between the corner pegs. Using a tape measure, determine the installation locations of row racks.
4. Excavation work
Using a garden drill, we make a hole 1 - 1.2 m deep for corner posts and fence posts along the driveway, and a hole 0.8 - 1 m deep for the remaining posts. We pour sand in a layer of 0.1 - 0.2 m at the bottom of the hole and compact it well.
5. Installation of racks
We waterproof the underground part of the racks by wrapping them with bitumen-polymer material on mastic or covering them with a special waterproofing compound for metal. We install the racks, fixing them in the recesses using pieces of reinforcement or corners. We fill the crushed stone with a layer of 20 - 25 cm, check the verticality of the support, compact it, and moisten the layer with water. We repeat the operation until the pit is leveled with the ground surface.
6. Installation of fencing
We install prepared fence panels. If the posts are installed correctly, at the required distance, height and without distortion, the fencing sections are mounted without problems. The fence joists are installed on corners fixed to the posts and screwed with self-tapping screws.
7. Painting the fence
Painting and protecting the fence wood can be done different ways, which are the subject of the next section.
Materials for protecting and tinting wood
Until recently, stain, drying oil and PF-115 paint were offered for protecting and painting wood, but now the store shelves with such products are running wild. Wood coloring should have the following qualities:
- Resistance to low and high temperatures, precipitation, wind;
- Resistance to sunlight;
- Resistance to pests, rot and fungus;
- Durability;
- Fire safety.
The following compositions are offered for protection and tinting:
- Paints;
- Enamel;
- azure
- Belinka, Slovenia;
- Tikkurila, Finland;
- ALPINA, Germany;
- Teknos, Finland;
- AQUATEX, RF;
- Yaroslavl paints.
In order for the fence to serve for a long time, you will have to work hard: the processing takes place in several stages:
- Cleaning from dirt,
- Grinding;
- Dust removal;
- Primer complex composition, giving wood fire resistance, resistance to rot and fungus;
- tinting.
There are many options for painting a picket fence; if you wish, you can add your own method to the existing ones.
When it comes to fencing the estate, the board is most often relegated to the background. This material is considered by many to be a temporary and uncreative option.
However, in recent years, the designs of plank fences have changed significantly. From primitive “ladders” they turned into masterpieces of wooden architecture. Great appearance, ease of installation and minimum cost attract the attention of many country house owners to them.
In this article we offer you an overview modern fences from the board and practical recommendations for their production. We hope that after getting acquainted with the presented options, you will change your mind and build a beautiful and practical wooden fence at your dacha with your own hands.
Options for plank fences
In order to install a wooden fence, you don’t need to strain your imagination and test your design talents. Dozens of interesting varieties of fencing have already been built and captured in photographs.
The simplest option is a horizontal slab fence. Its cost is minimal, and its aesthetic qualities are high. Before installation, the slab must be refined by grinding, tinted by firing and varnished. Otherwise, its appearance will be associated with a pasture for livestock.
One more tip. Wooden fence made from unedged boards look perfect with wooden buildings. In the photo below White color mansion walls and columns entrance group do not fit well with a wooden fence.

A fence made of slabs is simple, inexpensive and aesthetically pleasing
In the design under consideration, purlins made of boards are fixed between two wooden posts. The ends of the racks are protected from rain by an inclined bar. The most vulnerable point - the contact between wood and concrete requires high-quality insulation. Here you need to use modern antiseptic impregnations or coating with hot bitumen.
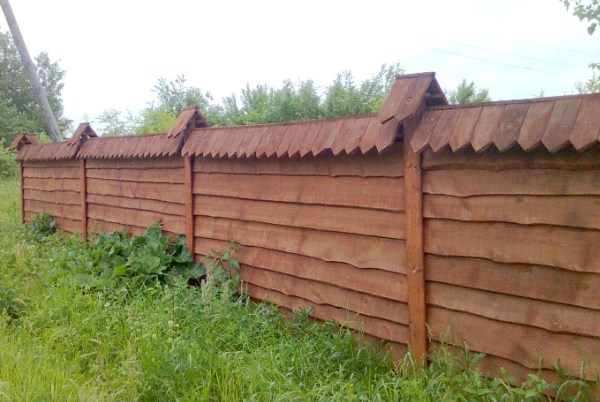
A croaker, cleared of bark and installed with an overlap, looks very beautiful in a fence. It is nailed to wooden posts. The front joint is covered with an edged board. An easy-to-make plank canopy tops the structure.
Another interesting option- “artificial” croaker. In this case, the edges of the boards are cut so that they form a symmetrical pattern.

To create a color contrast, the wooden caps on the posts are treated with a dark stain.
The “decorative turn” method is equally suitable for both slabs and edged boards. In the latter case, we get an aesthetic shutter fence. When viewed directly, he appears deaf. However, due to the spaces between the slats, this design is not only well ventilated, but also partially transmits the sun's rays.

Climbing plants love such fences and quickly turn them into flowering trellises.

Fragment of a fence-blind design made from edged boards
We note in passing that best foundation for fastening the fence boards - metal posts. A compromise option is to embed steel cages in concrete from scraps of profile pipe. Wooden posts are inserted into them and secured with self-tapping screws.

A little imagination and a nondescript croaker-obapole turns into a designer picket fence guarding the “kingdom of Berendey.”

The posts for such a fence can be cut from cheap round timber. The natural shape of this material will fit perfectly into the “country design” chosen for this fence.
Classic picket fence (planed board with rounded edge) remains a relevant element of the fence structure. The only condition is not to paint it with dull green or brown paint. It’s better to treat the planks with an antiseptic and open them a couple of times with a good varnish. After such finishing, the wood will sparkle with golden hues and last 10 years longer.

If you prefer tinted wood, then use dark brown paint for this purpose. It will reliably protect the picket fence from dampness and give it a noble appearance.

A blank fence made from edged boards looks better when the vertical slats are installed not on one, but on both sides, overlapping. This installation scheme creates a rhythmic stepped structure. The ends of the boards are covered from above with a planed plank. A decorative framing belt is also installed at the bottom of the fence.

A blank fence will not look boring if it design diagram arched grilles made of thin strips were introduced.

Arched lattice inserts eliminate the monotony of a blank fence
When choosing a material for a fence, pay attention to the decking board. It is strong, expressive and durable. It is attached to metal posts installed in the concrete foundation.
The photo below shows an option for double-sided horizontal installation of a terrace board (American fence). To increase rigidity, vertical bars are placed in the middle part of the spans.

Fence made from decking boards - 50 year guarantee
This kind of fence cannot be called cheap, but it is very durable and beautiful. The decking board is made from a colored wood-polymer composite and does not require painting.
In a fence structure, the board can be combined with timber. Below we see a fencing option in which the timber is installed on the outside and the board is nailed on the inside. Its joints are not visible, since they are covered by timber. The brown tinting of the wood in contrast with the white base gives the structure a solid and solid appearance.

From the facade this fence is made solid. There is no guard on the side at the bottom of the board. This decision was made to improve ventilation of the site.
Russia is far from America, but the romance of cowboy ranches has reached us. On a spacious area, remote from other buildings, a low country-style fence looks great. Its base is thick wooden pillars, to which three belts of boards are nailed horizontally on one side. In the upper part, a wooden plank is placed crosswise, closing the open “windows” of the sections.

Wicker fences from boards
If someone tells you that you can weave fences from boards, don’t hesitate. This is the most fashionable topic today. A wicker fence made from boards looks great, and there are many options for its installation.
The board for wicker fencing should not be very thick. Therefore, having bought an edged “thirty” in a warehouse, you can safely plan it on both sides to a thickness of 25 mm. Optimal width slats from 8 to 10 cm.
The simplest version of such a fence resembles a wall summer gazebo. Having made openwork panels from wooden slats, they are attached to the pillars. You can nail a dark board frame along the contour for contrast.

A board fence with a diamond pattern is elegant and light

The wooden fence post is antiseptic and concreted in the ground
And here is another, no less interesting plank wickerwork.

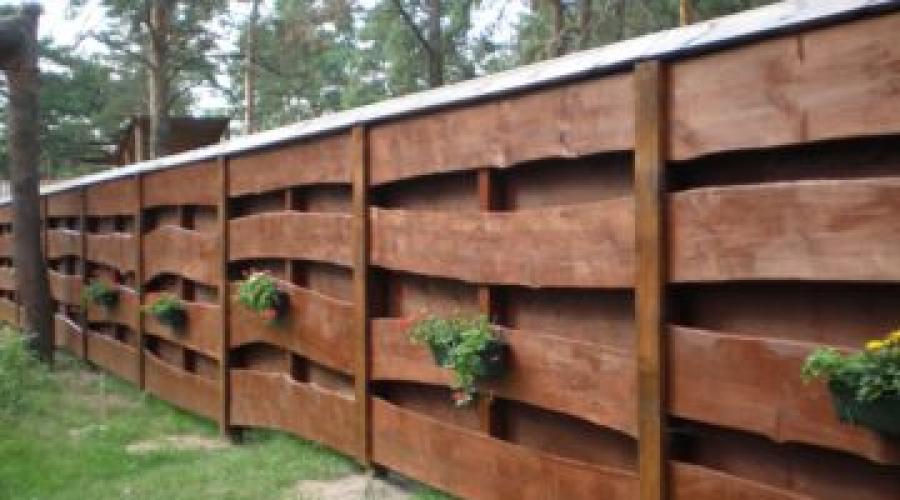
Here, a thin planed board 25 mm thick and 2.5 meters long is attached to the posts in a checkerboard pattern. The bend is given by the original method of installation: the ends of the boards are alternately attached to one and the other side of the wooden stand. In the middle part of the span there is a vertical rail that fixes the bend. The places where the boards are attached to the racks are covered with slats.
Vertical weaving from boards looks no worse. In this case, the answer to the question of which board is best to use for a fence is obvious: at a length of 2 meters, it is easiest to bend a plank, no more than 16 mm thick and 8 cm wide.

A wicker fence is good for everyone, but it can also be improved by combining it with a picket fence.
This design is quite difficult to install, but its picturesque appearance justifies all the effort.

An original version of the fence, combining weaving from boards with double-sided installation of a picket fence
Those wishing to build an exclusive fence from boards should contact an experienced craftsman. Only he will be able to assemble the structure depicted in this photograph.

Each board for such a fence is cut separately, based on the section template. At its ends and side edges, connecting tenons are cut, with which the boards, like puzzles, are connected to each other, attached to the pillars and to the lower belt.
The advice that we gave throughout the article should be supplemented with the parameters of the main elements of the board fencing:
- Size cross section wooden posts – 10x10 cm.
- When used for racks steel profile its cross-section must be no less than 40x40 mm (wall 2 mm).
- Horizontal crossbars (purlins) must have a cross-section of at least 30x50 mm with a strut spacing of 2 meters.
- For ease of installation of wooden purlins, fastening plates “ears” with holes drilled in them for self-tapping screws must be welded to the steel posts.
At the stage of purchasing materials, the question arises of how to calculate how many boards are needed for the fence. The solution is simple. If the fence is solid, then its total length must be multiplied by the height and thickness of the purchased board.
For a lattice picket fence, the calculation is done differently. Taking into account the selected pitch of the slats, their number is determined per 1 linear meter fencing. The resulting pieces are multiplied by the total length of the fence, and, if necessary, converted to cubic meters, multiplying the total area by the thickness of one plank.
Another important point - how to paint a fence made of boards? If you save on the quality of paint, the fence will have to be updated more often. Therefore, we recommend buying expensive paint for exterior use. Before applying it, treat the board with hot drying oil or antiseptic impregnation. The consumption of paint and impregnation will be minimal when applied to a planed board. Consider this nuance when choosing a material.
Considering large area board fencing, you need to paint it with a roller or spray gun. Omissions and errors made during work are corrected with a paint brush.
The territory of a private house or cottage is always transformed when decorative vegetation spreads out on it in green waves. Abundance of flowers, fruit trees, or neat beds with all your favorite vegetables, herbs and berries, are always pleasing to the eye. Using bio-soil, https://bio-grunt.ru/torf-kupit.html, it will not be difficult to grow and maintain all this more diverse, in best condition. But it is also important to protect and preserve the site from uninvited guests and unwanted weeds. In this article we will look at how to make a fence with your own hands that will protect the fragrant, green diversity of your personal plot.
It is not surprising that for people who have the opportunity to buy land plot and it will not be difficult to build a residential building on it and fence it off. The only question is what material to use to do this?
Unlike cottages for several families, where taking care of this lies on the shoulders of the construction organization, in a private case, everything depends on the personal desire of the homeowner.

Enough high percent Owners of country cottages today choose corrugated sheets as the most economical option. This is done quickly and does not require large financial costs. However, in the end, the appearance of such a structure creates some kind of fence from the outside world. Trying to avoid the factor of peculiar isolation and monotony, they prefer to install wooden fences.

Main functions and design solutions
Wood is a special material. Working with him gives rise to many design ideas. Sometimes it is very difficult to decide which design is most suitable. To make the task easier, you need to decide what functions should be performed.


Most often, the main ones are: determining the boundaries of the site; protection from the entry of strangers into the territory, as well as persons located within the personal territory; protection from noise and wind; restricting access to travel roads; creating a decorative background.

Design solutions are presented in three definitions external forms: solid closed, lattice type with gaps and combined (for example, paired with brick).

Selecting the type of fencing
An additional component is the choice of design option. If you don’t get carried away with listing all the types and focus on one specific one, then, perhaps, most often they prefer “classics”. Solid or with gaps, covered with edged boards.

Initial stage of construction

If at the same time there are concerns that you can accidentally seize part of someone else’s territory, then for insurance it is better to get a cadastral plan. You should definitely indicate on the diagram the height, size and location where the gate will be located.

Can be applied symbols all large structures, houses, outbuildings, and planting areas located on the site (garden, vegetable garden). This will help you visualize the future picture and possibly make some adjustments.


Material selection
For corners support posts most often suitable profile pipe square section 60x60 mm. For the remaining racks, which are located between the corner ones at an equal distance from each other, a profile pipe with a cross section of 50x50 mm is suitable.

For “classics”, coniferous species such as spruce, cedar or pine are more suitable. Fine, strong wood is without a doubt better for protective purposes. Usually they are in the lead due to their protection from dampness and rotting. An additional advantage is their low price.

The main stages of fence construction
The actual construction itself includes three stages, which have already been mentioned above: installation support pillars, fastening transverse joists and frame sheathing.

Each of them contains a certain range of work. In general, the workflow involves the following actions:
- Wooden or metal pegs are hammered into the markings. Twine is stretched between them;
- Pre-dug holes 0.8 meters deep. At the bottom of each of them there is a sand bed 10-15 centimeters thick. Next, the profile pipe is installed and secured. The pit is filled with crushed stone to a height of twenty-five centimeters. Carry out thorough compaction. The supports are fixed and filled with concrete;
- Transverse joists are being installed. Fastening is done using metal corners(35x35). There are two corners for each support;
- They make either continuous cladding of the frame, or with alternating boards. The top can be either a straight line or with protrusions of the supports above the skin by 10-15 centimeters;
- Since the material is wood, it is necessary to treat it with fire-prevention agents;


For painting, it is best to purchase special paint compositions recommended for such surfaces and designed for any atmospheric influence (sun, rain, wind).

Coloring is considered economical option. Dark colors are always more popular. After all, this is an outdoor structure and is not immune to dust and dirt, and accordingly, light colors create the risk of having to repaint it again.

Advantages and disadvantages of a wooden fence
In the process of installing and operating such a fence, you can come to a logical conclusion about the main advantages and evaluate them no longer unfoundedly, but taking into account your direct participation in its construction.

The list of advantages includes the following components: environmental friendliness, diversity tree species, relatively low installation complexity, easy solution to the replacement problem.


Besides positive aspects, the design also has its drawbacks. These include the following: fire hazard (need special processing), susceptibility to rotting (they can settle in the pores small pests), short service life.

Photo of a wooden fence with your own hands


The fence belongs to the elements garden landscape. In addition to their direct “responsibilities” - protecting the site from unauthorized access and indicating the boundaries of private households, fences play an important role in the aesthetic arrangement of the territory. There is a fence different types, configuration and texture, but the most popular in decorative meaning there was and remains a wooden version. In addition, you can make such a fence yourself, using all your imagination as a craftsman.
Making a wooden fence is quite simple compared to metal analogue. This option has many advantages when minimum indicator shortcomings. For the construction of wooden fencing you can use various material– boards with different breeds trees: beech, pine, larch or oak. Coniferous wood is especially valued. Each master chooses the material at his own discretion, because the main thing is that the wooden fence is of good quality and lasts a long time.
How to make a fence correctly
Wood fences can be divided into 2 groups: hedges and palisades. Also, such fences vary in design (picket picket, wattle fence, bamboo fence, ranch, lattice and other fence design options).
The most popular and simple ones are picket fences, as well as those made by a continuous row of boards. Regardless of what kind of fence you plan to build, you definitely need to carry out preparatory work according to its structure:
- clear the area for wooden fence(remove trash, pull out grass or weeds, uproot stumps and roots of old trees, if any);
- dismantle the old fence;
- draw up a design diagram of the future picket fence, where to mark the location of the gate, taking into account boundary boundaries and signs;
- select and buy all the necessary materials for building a fence (wood, nails or construction screws treated with an anti-corrosion agent, cement to stabilize the fence support, beams and logs, paint);
- prepare tools (hammer, hacksaw, shovel, crowbar, hole drill, tamper, cord and pegs for marking the area, wheelbarrow, mixing container cement mortar or concrete mixer).
Service life of a wooden fence
 A wooden fence has a service life of about 8 years. However, if you properly care for it and repair it on time, then this period increases 3 times. A good wooden fence can last more than 30 years, although fences from historical wooden architecture, which are more than 50 years old.
The main factors for the durability of wooden fences are:
- quality of building material - wood (soft or hard wood, manufacturer);
- good quality and correct installation;
- operating conditions.
Manufacturers determine the quality of a material by its likely wear resistance. Also, the service life of the fence depends on how carefully it is handled.
The advantages of wooden fences are:
- environmentally friendly - absolutely clean natural material which does no harm environment, the sanded fence is pleasant to the touch, it does not pick up sunlight, which is important for closely growing plants;
- variability - compared to the factory version of the metal profile, which is usually installed in vertical position, wood can be worked with various options– horizontally, vertically, diagonally, interlacing, and also use boards of various lengths, widths and thicknesses;
- ease of installation - when installing a wooden fence, no special skills, thorough concreting or a large number of people are required, since a wooden fence is not heavy and can be easily handled by one person;
- aesthetics - the natural beauty of wood leads in the selection of materials for the future fence; it looks great in any landscape design solution.
It is worth considering that wood is “afraid” of exposure to moisture, since over time it begins to rot, turn black, and become covered with mold spots. To delay these unpleasant moments, it is necessary to carefully care for the wooden fence and carry out antiseptic prophylaxis for it in a timely manner. You should also pay attention to flammability of this building material and use special means to impregnate and protect it to prevent fire.
Wooden fence design
 Modern wooden fences come in a variety of designs in any format that provide a visual impact. Such a fence - traditional version for Russian villages, holiday villages or country cottages.
The tree is beautifully decorated and covered different paints or varnish, it fits harmoniously into any landscape composition. The design of a wooden fence depends on the preferences, imagination of the owner, as well as the overall compositional background. The most original fences are obtained using following types fences:
- solid - made in the form of a palisade made of stakes or round logs, slabs, edged boards;
- option checkerboard layout or overlap - the boards are laid in a horizontal, vertical or diagonal position;
- “braiding” - boards are fixed between support pillars, either from the inside or from the outside, by braiding them;
- – a combination of boards with round logs as support, a classic option;
- wicker fence - vines, tree branches, twigs are used;
- lattice fencing - slats are used;
- a fence in the style of a cowboy ranch - the exotic horizontal bars are attractive with brutality; it is recommended to combine them with a massive concrete or stone base.
Whatever fence design you choose, it is worth considering its role in the overall compositional picture and functionality.
Wooden fences are considered the most short-lived. After all, not everyone knows (or does not want to know) the secrets of wood and its processing.
An untreated pine fence will, indeed, last no more than 10 years, and then only if the lower part of the post is reliably waterproofed. If you are making temporary fencing for the period of construction and improvement, then this is a completely justified decision.
It’s another matter when a tree is chosen as building material not because of its cheapness, but because of its design capabilities. After all, wood is considered the most malleable decorative processing material.

This is what the fence looks like from the first photo from the side of the yard. Agree, no less attractive...

Pay attention to the outline of the boards: how much “attention” was paid to each of them, how carefully the edges were worked out and the corners were smoothed... The photo shows sliding gates all in the same yard.
How many exist? design techniques: firing, tinting, aged effect, combination with forged overlays, and finally, just perfect sanding and coating with yacht varnish.

Design options for wooden fences are given at the end of the article.
Having invested work (or cash) in creating a masterpiece of wooden architecture, you want to admire it for as long as possible. Therefore there are a number important points, which the owner of the estate should know.
Pledge OF LONGEVITY
Choose for the fence those types of wood that differ high density: Siberian larch, oak, mulberry, acacia, aspen, alder, ash. By the way, a fence made of Siberian larch can be called eternal - on the contrary, the wood of this tree grows stronger when it comes into contact with water.
Limit the use of pine to creating a fence panel - if it wears out quickly, it is not difficult to replace it. Under no circumstances should you install a fence made of birch - it is the most unstable wood.

Support pillars for a wooden fence they can be wooden, metal or made of masonry.
Two latest options will serve as a reliable support for long years. But don't write off the tree. It doesn't have to be buried in the ground.
To extend the service life, you can use special metal consoles (stands), which are concreted, and then a wooden beam is attached to them (see link on the side).

The most vulnerable part sawn wood - the one where the cut is made across the grain. A horizontal arrangement of boards or a protective canopy over vertical ones will help extend the life of a wooden fence.
Wood is vulnerable when it comes into direct contact with air: when it is wet it swells and is affected by fungus; too dry it causes it to crack. Risks can be reduced through mandatory treatment: impregnation with an antiseptic plus painting with special dyes (Swedish paint, yacht varnish, impregnation with hot drying oil).
SWEDISH PAINT
- iron (copper) sulfate – 260 g,
- red lead – 260 g,
- table salt – 260 g,
- rye flour – 580 g,
- drying oil or linseed oil– 240 ml,
- water - about 4.5 l.
Composition consumption is approximately 200-300 ml/m2. Color – golden. If you require a different shade, then red lead can be replaced with ocher or manganese peroxide.
Cooking coloring composition as follows: mix the flour with 3 liters of water and boil the paste, pass it through a sieve to avoid lumps, put it on the fire again and add iron sulfate and salt, stirring constantly until the vitriol is completely dissolved, continuing to stir, first pour in the oil in small portions ( drying oil) then water (until a liquid homogeneous consistency is obtained).
The paint must be applied immediately because it thickens quickly. Therefore, it is better to work with two or three people, or divide the composition into smaller portions and prepare it as it is used.
WOODEN FENCE FRAME

The pitch of the support pillars is 2-3 m.
As supports, choose a round or square beam with a section of 100x100 mm or metal pipe cross-section 40x40, 40x60, 60x60 mm (with a wall thickness of 2 mm), for gates 80x80 and 100x100 mm (with a wall thickness of 3 mm). The wider the support spacing and the greater the load (weight and wind), the larger size and wall thickness.
So for a fence-blinds with a two-meter section they choose minimum parameters of the above, for a solid one, and even with forged overlays - the maximum.
If there is no choice of lumber (wood species), then budget pine is carefully treated with protective chemicals, and the posts must be installed on a concrete base.

For horizontal crossbars, a beam with a cross section of 30 (sufficient) x 50 (and wider) mm is used.
For mounting wooden crossbars on metal pole“ears” with holes for fastening are welded to it. To avoid welding work During installation, you can purchase ready-made posts with fasteners.
The cladding (shield) is covered with a 25 mm thick board. The width varies depending on the design.
Everything else technological sequence, the depth and method of laying, up to the chemical treatment of the frame, is the same as for a fence made of corrugated sheets:
- the frame is mounted,
- paint,
- after that they stuff the shield.
METHOD OF ATTACHING THE FRAME AND BOARDS
The most durable connection will be with self-tapping screws. Self-tapping screws are selected taking into account the following requirement: into the body wooden post(crossbars) should include 30-40 mm of thread.
Each board is secured with at least two screws on each edge.

There are options for a non-standard approach to fastening boards. Here is an example of a fence assembled according to the wattle fence principle. The curved board, trying to straighten itself, is pressed tightly against the support. Although, given the flexibility of wood in a humid environment, additional fixation of each board will still have to be done.

The cladding method was used for the fence in the photo above. wood siding. Begin attaching the boards from bottom to top with an overlap of 2.5 cm.


If the boards are made with a downward slope towards the street, you will get an invisible fence that will not experience strong wind loads. There are several ways to secure boards at an angle.
In the photo on the right, wooden slats are nailed to a rack, which, in turn, is fixed to a support post.

Another way- nail the boards from the ends. It is important to clearly mark the wooden stand. This option is relevant for a fence with metal supports. When all sections are filled along the front and back parts, they nail a board that will cover the entire “kitchen”. A wooden cap must be placed on top of the post.
Are you interested in the question of how to mount the next section if the adjacent one restricts access to it? It is simply pushed slightly first towards the street, then towards the plot (or vice versa) to fix the lamella. Attachment to metal support performed after installing adjacent sections.

Third option for support from wooden beam. It makes inclined cuts-grooves into which the end of the lamellas is inserted. Each one must be screwed on with a self-tapping screw, and then a wooden overlay is made from the front part, which will hide the attachment points.

Ultimately, a wooden shutter fence will look like this. Be sure to nail the end caps to the top of the post.

Simple horizontal mount the boards look a bit boring. But if you make small (up to 1.5 cm) gaps between them, the section’s canvas will take on a more modern sound. How at the same board (within reason), the more interesting and modern the finished fence looks.

It’s also a good idea to alternate boards different widths- the main thing is that adjacent sections repeat the pattern.


Don't ignore unedged board. Besides the fact that it costs less, it also looks more exclusive. The truth is not suitable for all site design styles. It will look win-win in a forest area.

Here is another option for a wooden fence in a brutalist style.

You will need a jigsaw, a wood carving knife, sandpaper and skillful hands to make something like this. original fence with the effect of a time-worn board.

Have you ever put together puzzles? So, to create these fence sections (pictured above), you first need to draw them and carve them out of boards. Each board of this fence has its own clear size and bend, that is, first a template is created, then cut, chamfered, sanded, and treated with protective chemicals. And only then are they brought down to the section. And how the elements are fixed to each other is the master’s secret...

For the slab fence in the photo above, all the wane was carefully selected, because it is unacceptable that some sections of the boards were too thin in thickness. The bark was removed, each plank was given piquant contours with a jigsaw, and the surface was sanded. In general, the cheap price of the material is offset by painstaking work.

Copy this design I recommend exactly in relation to the original, or first create a project (span diagram) of the entire fence, choosing an alternation of drawings. And only after making sure that the fence canvas as a whole looks harmonious can we begin implementation.
Don't get carried away with such a bright texture for everyone wooden elements yard An exclusive wins only when it is unique.