How to lift and support the roof by the Mauerlat. Mauerlat for a gable roof: making the right base for the rafter system. Strengthening the rafter legs
Most suitable material For the roof frame, pine or larch wood is considered. This is due to their strength.
An important requirement for the bars and boards used is their integrity and absence of damage. Before their installation, directly in, they should be treated with antiseptic and fire-resistant solutions.
Exist the following types roofs: single- and double-slope, hipped, hipped, half-hipped, hipped or multi-gabled. All of the listed types are shown in the figure:
Mounting the Mauerlat
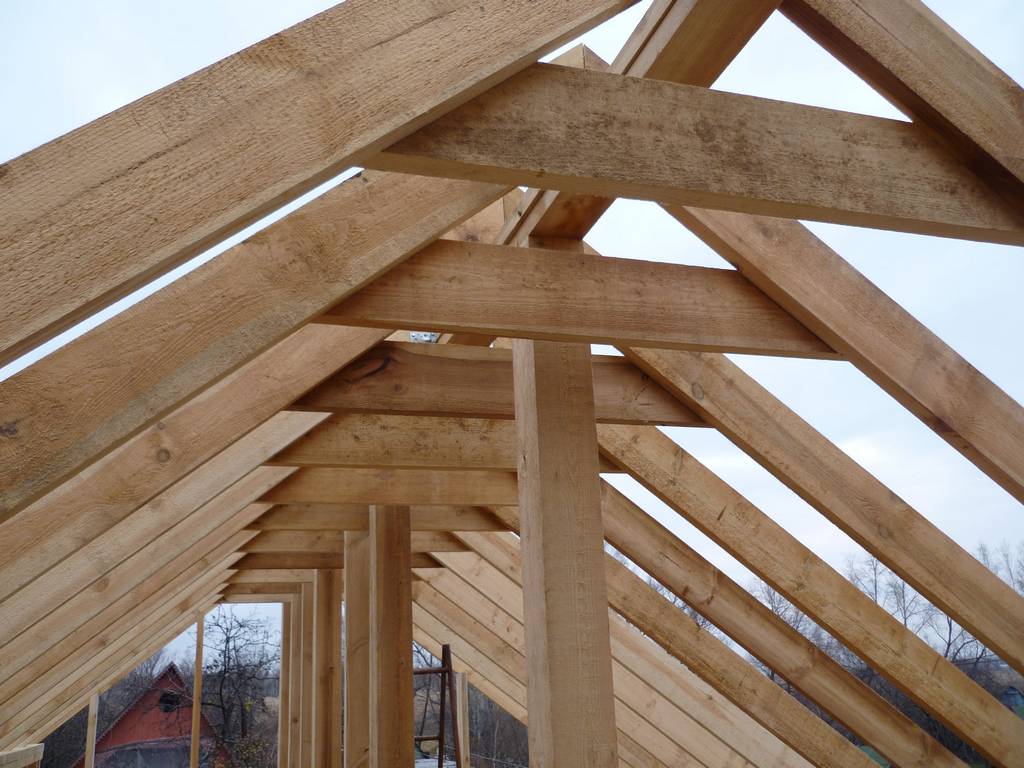
The Mauerlat is the base that bears a significant part of the load of the entire structure. The Mauerlat consists of beams with a cross-section of 15x15 cm, installed parallel to the ridge. These beams require reliable fastening. The beginning of strengthening this foundation begins when laying the walls, when the so-called wire rod - thick wire - is laid between the bricks. In the future, beams are tied with its free ends.
Frame installation

The frame is usually called rafters engaged with the Mauerlat. Their fastening device consists of three nails per knot. In this case, two nails are driven crosswise through the rafter directly into the Mauerlat, and the third is driven perpendicular to the surface. The ends of the beams are also attached overlapping each other with nails or bolts.
Roof reinforcement

To strengthen roofs, a device such as a crossbar is used - these are beams that fasten rafters opposite each other. The fastening is also nailed.
During installation of the frame, a problem may arise with the construction under right angle. So how can you avoid making mistakes in your calculations?
The angle of the roof may depend on the local climate. For areas with cold climates, a slope angle of 40-45 degrees is typical, which prevents the accumulation of snow on the roof surface. In hot regions, the angle of inclination can drop down to three degrees. The angle should be measured with an “inclinometer”, after calculating it using the formula. So, the length of the roof should be divided in two, and the height of the ridge should be divided by the result obtained.

Before covering the roof, sheathing is carried out. The dimensions of the boards for it are 25 cm thick and 2 m long. In the case of double sheathing, the first layer is laid parallel to the ridge, the second - perpendicular.

As a result, we find that making the roof of a house with your own hands is a quick process, but requires proper attention to the smallest details. In order for the building to last long years, during its construction it is necessary to comply with all necessary requirements and nuances.
Also, you should not waste time when choosing building materials, as this will negatively affect the quality. All boards and covering materials must be checked for integrity and quality.
Over time, wooden rafter structures can be damaged due to heavy snow loads, rot due to moisture, or become deformed due to errors in roof calculations or installation of the rafter system. Damage to the rafters may also be caused by the use Not quality material- damp, rotten, with big amount knots of boards. In these cases, repair or strengthening of the rafters is necessary.
Also in the process of creating a rafter system, structural reinforcement is performed. This means the use of various racks, struts, jumpers that distribute the load. Without them rafter legs they would have to be made very thick and heavy, which would increase the load on the walls of the building. Without such additional elements You can only get by in small buildings - garages, bathhouses.
What is the strengthening of rafters?
May be required
- increase bearing capacity rafters,
- strengthening the rafter legs in the lower part, at the junction with the Mauerlat,
- strengthening damaged rafters,
- increasing the roof slope angle and building a new rafter system,
- strengthening the nodes of the rafter system in case of poor-quality connection of elements.
To strengthen the rafters, beams and boards are used; they must be of the first grade and well dried. It's better to take conifers tree. Also, to fasten the elements of the rafter system to each other you will need metal corners, perforated plates and wire.

How to increase the load-bearing capacity of rafters
The need to strengthen wooden rafters may arise if they are not strong enough to withstand deflection, even if their cross-section is suitable for the load that falls on them. For this they use
- unloading beams (assistance),
- struts,
- double-sided pads.
The supports are placed between the mauerlat and the rafter leg (strut). They are attached using bolts or special plates with teeth.
Double-sided overlays are used to avoid deflection of the rafter leg at the point where it rests on the strut. It is at this point that the maximum bending moment occurs. With the help of overlays, the cross-section of the beam is increased by problem area. The covers are secured with nails or special bolts.
If the rafters are bent, they are straightened using a jack (hydraulic cylinder), and then strong horizontal struts are inserted to hold the connected rafters in place. straight state. This creates a design in the shape of the letter “A”.

Important! Before straightening the rafters, it is necessary to strengthen the place where they meet the Mauerlat so that the rafter legs do not jump off the beam while the jack is being used.
Creating a new rafter system
Also, sometimes when reconstructing a roof it is necessary to make a new one rafter system, with its help you can, for example, make the slope steeper. The need to increase the slope angle arises if snow accumulates on the roof and creates a large load on it. New rafters are installed above or below the old ones. In such cases, in order not to disassemble the old truss structures, new ones associate with them.
For the connection, a cross board-and-nail wall (truss) is used: new rafter legs are connected by cross-positioned boards to the existing ones. Most often, this method is used in layered rafter systems, which rest on a wall located in the center of the building. This technique cannot increase the height attic room.
How to strengthen the lower part of the rafters
Reinforcement of the rafters in the lower part is usually required at the junction with the Mauerlat. The lower parts of the rafter legs adjacent to the Mauerlat, and the Mauerlat itself are considered the most vulnerable parts of the rafter system.
To strengthen the rafters, additional struts are installed at the junction with the Mauerlat. They can rest either on the Mauerlat itself or on the bench. Sometimes it may be necessary to cut out the rotten part of the Mauerlat. Then the rafter is reinforced as shown in the figure.
The rafter is temporarily placed on supports, and the rotten parts of the rafter leg and mauerlat are cut out. Crutches are hammered into the wall and a beam 1 m long is placed on them. You can also put a piece of beam 1 m long on the wall or ceiling, this way the load will be distributed from one beam to two. Two struts are attached to the rafter leg on both sides, which rest against the mauerlat or bench.
The struts are attached to nails arranged in a checkerboard pattern. In this case, the struts are placed at an angle, as in the figure, in order to better distribute the load.
If the lower parts of several rafter legs have rotted, then they are temporarily installed on supports, the roof is dismantled, the rotten sections are sawed off, and then a rod (metal) prosthesis is made, which is put on the rafters and rests against the mauerlat. , thus resting on the prosthesis. The rigidity of the prosthesis is ensured by struts.
Replacing damaged parts
To replace rotten rafters, first remove roofing material on both sides of the house. In this case, the damaged part is cut out and the rafters need to be extended in length.

When replacing a horizontal beam, install temporary posts on which the horizontal beams will rest, then remove and save the posts that supported the damaged beam, replace the beam and place the posts back. Temporary stands are being removed.
If you need to replace the rack, then first install a temporary rack nearby, supported by a board at least 2.5 cm thick. Next, the damaged rack is removed, a new one is put in its place, then the temporary support is removed.
Strengthening the ridge unit
The connection of the rafters in the ridge is one of the the most important nodes in the rafter system. It is important here that the boards fit together tightly. If you find that the rafters have come apart at the ridge assembly, you need to join them together using a jack and secure them using a wooden overlay (boards at least 20 mm thick) or a perforated metal strip that is attached under the ridge. You can also use special bolts.
Bay window connection
The bay window roof can be separate or connected to the main roof of the house. Its shape can be very diverse: gable, multi-gable, complex hip. The simplest option — gable roof. To construct a bay window roof, a mauerlat is installed around the perimeter. In brick or concrete houses The reinforcing belt is first poured, and the Mauerlat is installed on it.
The rafters for the bay window roof are thinner than for the main roof, since the load on them is less. They are installed in such a way that they protrude beyond the Mauerlat, forming a roof overhang. How to connect rafters in a bay window, watch the video:
The bay window can be included in the house design immediately or added later.
How to extend the life of rafters
The rafter system begins to rot due to moisture ingress, which can occur as a result of poor air exchange in the under-roof space or leaks. It is important to make a good hydro- and vapor barrier of the roof.
If the air exchange is insufficient - this can be checked by measuring the temperature at the upper boundary of the insulation layer; it should not be more than 2C at any temperature below zero outside - make additional air vents. Ventilation area and dormer windows the total should be 1/500-1/300 of the roof area. If loose insulation is used, which tends to cake, then it is loosened once every 5 years. If necessary, the thickness of the insulation layer on the ceiling is increased; near the external walls it can be doubled compared to the calculated one.
Conclusion
By strengthening the truss structures, it is possible to eliminate deficiencies or damage that occurred during the operation of the building or during its construction. Most often, reinforcement is required at the junction of the rafter legs with the Mauerlat. To ensure that the rafters do not rot and serve for a long time, it is important to ensure good air exchange under the roof and use high-quality materials.
Strengthening truss structures may be required in cases where errors were made at the design or construction stage of the structure. Incorrectly calculated loads or material properties can lead to partial deformation of the roof, or even to its complete destruction. In this case, the reinforcement of the rafters becomes acute necessary procedure, which can save your home.
The rafters, which are the basis of any roof, must be periodically checked for any defects or damage caused by the use of the roof. If any are detected, it is necessary to strengthen and strengthen the rafter system of the house, garage, barn, bathhouse or other buildings. Errors during installation and calculations can occur with any type of rafter system, so home craftsmen need the ability to strengthen rafters for each of them.
Strengthening rafter legs

Strengthening rafters can be done in several ways, the main ones will be discussed in detail below. These methods can be used individually or in combination. In every specific case homeowners must decide for themselves this question. But it is best not to save money and take into account that the destruction of the roof above the same garage can damage the car and cause significant material damage, not to mention the danger of deformation of the roof structure of the house.
So, strengthening of load-bearing functions is carried out using:
- “help”, beams that take on part of the loads falling on the rafter structure;
- installation of struts;
- double-sided overlays.
Supports are installed in cases where incorrect calculations of the loads on the rafters were carried out, and as a result an increase is required cross section beams holding the structure of the entire roof. It is quite easy to carry out such reinforcement; to do this, you need to install this additional beam and secure it between the Mauerlat and the rafter leg. It is fastened either with bolted clamps or with special steel plates with teeth.

The place where the rafter leg is placed on the brace also requires special attention from the homeowner, since it is in this place that problems arise. maximum pressure to bend. For clarity, remember how in childhood you broke a stick over your knee; it is the knee that plays the role of the brace. To reduce the load and the risk of deformation of continuous rafters in the place where they rest on the strut, we recommend increasing the cross-section of the beam by covering it with overlays from boards. The thickness of the overlays depends on the calculation of the required cross-section for the structure under the planned bending loads. The rafters are connected to reinforcing linings using various fasteners, but more often with nails or special bolts. If at the same time the length of the support is extended beyond the fulcrum point, then it is possible to increase not only the strength of the beam, but also the entire connecting unit.
Sometimes a project may have an error in determining the angle of the roof slope, and operation reveals this miscalculation. For example, if the slope is not steep enough, snow accumulates, which can damage the roof. In this case, it becomes necessary to make some changes to the design of the rafters. To do this, new parts of the rafters are attached to the old elements using plank walls and nails, due to which the newly formed trusses become more rigid and change the slope of the roof in the desired direction.
This method will allow you to make changes without having to disassemble the entire roof again; however, you won’t be able to make any special changes to the under-roof space, since you won’t be able to either enlarge it or configure it in any way.
Strengthening the lower parts of the rafters

The roof truss structure of any building is most vulnerable in its lower part, which is where it most often requires reinforcement - this is the bottom of the rafter legs and the mauerlat beam. The reason for this vulnerability is that it is in the area of contact between the tree and brickwork Most often, condensation forms and moisture enters if the integrity of the roof is damaged. Another reason is the use of low-quality wood, which was either raw or dried in violation of technology. All this leads to the formation of putrefactive processes in the wood and its destruction. Therefore, during construction, it is important to pay attention to the choice of high-quality material and ensure reliable hydro- and vapor barrier. The absence or improper functioning of ventilation ducts can also cause moisture accumulation and wood destruction.
In this case, struts are used to strengthen the roof frame. They are attached to the lower end of the rafter leg and rest against the mauerlat or leg. The number of such additional struts depends on your situation. To give additional stability, the struts are attached slightly at an angle, that is, their lower part extends slightly to the sides. It is the support in the bed that will allow you to remove the effect of bending deformation on the span of the rafters in this part.
Strengthening rotted parts of the rafter system

If you still cannot protect yourself from the destructive effects of rot on wood, you can try to strengthen the damaged areas of the rafters or mauerlat of your house or garage. If we're talking about In one case of damage to the rafters, you can get by with wooden plank overlays. They are fastened with nails or bolts, while their bottom the boards of the lining should rest against the Mauerlat to ensure additional reliability of fixation, while the linings in this place are best attached to the Mauerlat using steel wire.
But if we are talking about massive damage to the rafters, when deformation or rot is found on many rafters, then it is necessary to apply special system prostheses. These prostheses are made of steel rods and are attached to an undamaged area of the structure, while the deformed part is simply removed. For this operation, it is necessary to fix the rafter with special temporary supports and remove the damaged part (for this you will have to disassemble part of the roof). Then you should cut out a similar size prosthesis from the same wood and install it in place of the removed area, its lower part should rest against the Mauerlat. The steel rods of the prosthesis provide additional fixation of the entire structure.
If strengthening with partial replacement requires not the rafter leg, but the mauerlat, then the following manipulations must be carried out:
- are fixed with temporary supports of the rafters of the roof frame;
- the rotten section of the Mauerlat is cut out and removed;
- steel spikes are driven into the masonry, onto which a beam of the required cross-section, at least one meter long, is laid;
- a piece of beam equal to the length of the beam is installed on the ceiling;
- then the rafter leg is fixed on both sides with struts, which rest on the newly installed beam.
Work to strengthen the rafters of any roof is a whole complex of works, which includes various operations to correct the deformation and destruction of the wooden elements themselves or the places where they are fastened.

Deformations are most often expressed through bending and the formation of cracks in the beams and boards of rafters and other wooden roof elements, but sometimes intervention is required when it is necessary to correct poor-quality fastening of parts of the system to each other.
In the latter case, it is worth paying attention to the key connection points. First of all, make sure that the rafters and ridge of your roof are properly secured; problems in this area often arise if you are not careful during installation.
When correcting defects, it is necessary to achieve the tightest possible connection between the rafters and ridge beam, using a special jack can help with this. To qualitatively strengthen this unit, use various techniques. This unit is fastened using either a special steel strip with perforated holes, or various wooden planks, or by placing the rafters on a steel fastening bolt. In each of these methods, several options can be distinguished, for example, wooden overlays can be attached both above and below the ridge beam; there are also several types of metal plates for reliable fixation of rafters and overlays.
There are some secrets when correcting the deflection of rafters. To do this on inside Special wooden stops are securely fastened to the beams, after which the rafters are straightened using a jack, and strong spacers are inserted between them one by one. Such a system will help counter external pressure on the roof and rafters and stop the deformation of the latter.
When strengthening the rafter legs through timber extensions, it is necessary to select the correct parameters. It should be either equal in width to the rafters or slightly wider. For ease of installation, the timber is fastened with self-tapping screws to the rafter beam, and then holes are made through both elements, after which the entire structure is mounted on special steel bolts or studs.
It is better to drill these holes in a staggered pattern, which increases the structure’s resistance to loads during bending deformation. The diameter of the drill and mounting pins must be equal. Fastening is done with steel studs, self-locking nuts and washers. This design is not only easy to install, but also reliable in operation. It will not come loose and will last as long as the wood can withstand.
The Mauerlat belt is the basis for the rafters. The lifespan of the entire roof depends on how strong you make it, how you secure it and think through the connection with the rafter system. So what is the Mauerlat for gable roof, what to make it from, how to mount it on a brick, frame wall and wall made of hydrophobic gas blocks? What pitfalls might there be and what mistakes should you avoid? It is precisely in order to answer all these questions that we have prepared this useful article for you.
By the way, if you heard from builders or a foreman you know such a word as murlat, this is the same mauerlat, only in common parlance. This is exactly what we will be talking about.
Mauerlat is a stable structure that is laid around the perimeter of the walls and serves as the basis for fastening the rafters. The main task of the Mauerlat is to distribute the loads of the roof overhangs as evenly as possible and firmly tie the roof itself to general design Houses. In other words, this is the very connecting link between the walls and the roof, and therefore its production must be started with special responsibility.
The secondary task of the Mauerlat is to reduce to a minimum the so-called windage of the roof, i.e. its ability to be torn by the dashing wind.
But why then, if this is so important, are there roofs without any Mauerlat at all? Yes, such a practice exists. The rafters are simply attached to the floor beams, if they are strong enough. But in this case, all the concentrated loads of the roof fall on the places where the rafters support, whereas the Mauerlat would distribute them over all the walls. What do you think is better and safer?
What materials can it be made from?
This roofing element made from wooden beam, I-beam, channel or metal.
Option #1 – durable timber
So, depending on the future weight of your roof, use timber with the following cross-section as the material for making the Mauerlat: 10x10, 10x15, 8x18, 15x15 or 20x20 cm. You just need to place it under the rafters along the entire perimeter of the roof to evenly distribute the load on walls of the house.
So, if you have already chosen wood for the mauerlat, pay attention that the knots on it in no case exceed two-thirds of the thickness in their length. What's the catch? The fact is that knots are dangerous not because of the release of resin, as many people think. It’s just that these places on the beam will ultimately work poorly in tension, and yet the Mauerlat is the one that experiences the heaviest loads of all other roof elements. What are the consequences of a poor choice of wood for this purpose? Cracks!
Option #2 – bonded boards
But, if you are building lightweight frame house and no special loads are planned on the roof, then save money and instead of heavy solid timber Use fastened boards as a mauerlat.
Option #3 – steel pipes
Often, additional beams made of steel pipes are used when constructing the Mauerlat. It looks like this: the wooden Mauerlat no longer protrudes beyond the perimeter of the building, but pipes are attached to its ends, which serve as the main support for the gable roof. Moreover, there are a number of serious requirements for pipes:
- Small section. The pipes pass through holes in the rafters.
- Exceptional strength. The whole roof is on them!
- High quality steel. It is important that such support element did not deform over time.
Make holes in the rafters strictly along the axis, with a diameter 10 cm less than the height of the rafter leg. If it doesn’t work, attach additional steel elements. Steel pipes work well for bending, and the fact that they require small holes round shape- also good. Such “damage” has almost no effect on the strength of the rafters themselves.
The main advantage of this design is that here the wooden Mauerlat is hidden under the roof, and is already more protected from smudges and melting snow.
Mounting the Mauerlat on the wall: 2 ways
So, we selected the material and made the Mauerlat. Now let's decide whether he needs reinforced belt. They are usually built on walls that are not strong enough so that the future roof has something to rest on:

Method #1 – installation without armored belt

But, even for a strong overall building, a reinforced belt will not be superfluous, because It is convenient to make special fastenings for the Mauerlat through it.
Method #2 – installation on an armored belt
The most difficult thing is to make a mauerlat on aerated concrete - the most fragile wall material. We advise you to make a structure on it for this purpose from more durable brick or concrete, because... the Mauerlat needs a solid base. But just an armored belt will do. Moreover, you can easily cope with this responsible construction task:

Calculate the thickness of the reinforced belt based on what loads will act on your roof: as constant, in the form of the weight of the rafter system and roofing covering, and temporary, in the form of winds and snow. But in any case, the width of the armored belt should not be less than that load-bearing wall. The minimum limit is 25x25 cm. And do not forget that the pressure on the main walls of the house is exerted not only by the Mauerlat, but also by those posts and ridge beams that rest on the internal floors. And for them, too, you need to build an armored belt.
To make the reinforced belt strong, use a concrete grade of at least M400 and pour the entire belt in one go. Of course, for this it is advisable to use a concrete mixer with a pump. To prepare the mixture, take cement, washed sand and crushed stone in a ratio of 1:3:3. Additionally, add modern plasticizers to reduce the amount of water used in the mixture and thereby increase the strength of the future belt.
Additionally, this will help you figure everything out short video:
We construct the formwork
It is important that the armored belt is continuous on both sides external walls Houses. And special U-shaped blocks can serve as a kind of formwork for constructing an armored belt. You can also complete the outer row with sawn blocks up to 10 cm wide, or build formwork from OSB boards. Even ordinary people will help wooden boards. But, no matter what formwork you make, be sure to check its upper edge with a water level.
If, due to some design feature of the building, you still have to interrupt the reinforced belt, then do it according to the same successful principle as in this project:

Choosing a mount
On frame walls and walls made of logs or Mauerlat timber are fastened with screws, self-tapping screws and even ordinary nails. For greater strength, special perforated connectors are used.
Also, if the area of your house is large and the roof is at least 250 m2, then you need to attach the Mauerlat to the walls with studs. Studs are long metal pins with threads, which are distributed at the place where the Mauerlat is attached so that it happens at least every 2 meters, plus always at the ends.
First, an armored belt is poured around the perimeter of the walls - concrete screed, and then the studs are embedded vertically, one after another. The height of each should remain greater than the thickness of the Mauerlat, and remain at least 3 cm higher. This is the only way you can firmly tighten the Mauerlat with nuts and a washer.
As you can see, nothing complicated:


And another way:

Strong metal brackets for attaching the Mauerlat are also convenient to some extent:

And also don’t forget about anchors and twisted wire, which works great in tension:

Using wire rod - thick wire - is the easiest method of all. So, between the rows of bricks, 3-4 rows before the top masonry, a piece of wire is placed in the middle so that the ends are enough after finishing the masonry to tie the entire mauerlat. Then the remaining ends are hidden in the thickness of the wall between the bricks.

They do it differently. It is not the studs that are embedded vertically into the reinforced belt, but the pins of the reinforcement itself so that they are lower than the height of the mauerlat. And studs of only 4-5 cm or long bolts with pre-cut heads are already welded to them.
Another popular method is that pins or studs are embedded during the laying process. brick wall. But this technique is only suitable for small roofs, and for greater reliability, take longer studs.
We reinforce the belt
So, if you don’t use anything proposed to attach the Mauerlat, then simply leave the protruding rods from the reinforcement, and put the beam itself on them after the concrete has hardened. So, even on the shortest wall, the armored belt should have at least four metal rods of 12 mm in diameter - for attaching the Mauerlat. Moreover, with such rods you can not only string the Mauerlat, but also secure it with outside:

But in any case, even if you chose pins or wire, there should be reinforcement in the belt.
Fill with concrete
When making such an armored belt, make the thickness of the concrete at least 5 cm. As soon as the concrete is laid, make sure that no air cavities form in the armored belt - you will notice them by bubbles. Why is this bad? All this reduces the strength and uniformity of the structure, but on the belt you will still have to install a mauerlat - the foundation of the roof. Therefore, simply pierce the concrete with a reinforcing bar along its entire length, and the air lenses will disappear.
The formwork must be removed on day 10-12, when the concrete has already gained its strength.
We put waterproofing
But this point is required!

Place a layer of roofing material on the finished armored belt as insulation or something similar waterproofing material. A tree is a tree, and it is better for it not to come into contact with wet wood.
All the subtleties and nuances of installation
Your most important task when installing the Mauerlat is to constantly check the levelness building level. If you find an unevenness, even a small one, correct it immediately: cut off the protruding parts, and raise those that are below the level using linings.
Now prepare a beam that will serve as a mauerlat. Process it disinfectant and fire retardant (against fire), dry well. Attach the beam to the future location of fastening and make marks where the holes will then be drilled. Connect the individual parts of the Mauerlat with a straight lock and additionally secure them with nails at the places of such connections.
Fasten the timber at the corners with a straight lock or an oblique cut - whichever is more convenient for you. Attach the Mauerlat to these boards using corners, dowels or metal brackets. But for the sake of economy, just don’t use the board that was fixed in advance in the upper groove of the SIP panels (if you are building from this very material) - this is completely unreliable and is fraught with future distortion of the roof, destruction of the panels themselves under the weight of the roof and other disastrous results.
And finally, secure all connections on the Mauerlat with locknuts, and cut off all protruding studs with a grinder.
We build a “bench” on the Mauerlat
As soon as the Mauerlat is laid, we proceed to the construction of the so-called “bench”:
- Step 1. Measure the distance between the opposite Mauerlats.
- Step 2. Divide this distance in half and mark the middle of the span.
- Step 3. Connect the marks so that you get the axis of the future “bench”.
It is along this axis that you will lay the bottom run. Most convenient option– make the “bench” with the bottom girder immediately intact, in a horizontal position, and then lift it and secure it vertically along the axis of the floor.
Fastening the rafters: all popular methods
Because the main task maueralat to distribute the loads from the roof, be sure to pay Special attention attaching rafters to it. The fact is that it depends on whether the roof will move over time, whether it will begin to sag or create stronger loads on one of the walls. This is serious!
There are two technologies for tying rafters to the Mauerlat:
- Tough. Here, any displacement of the rafter leg, bends or shifts is completely eliminated. For stability, a hemming block is used, which prevents the rafter leg from slipping. And the metal corners prevent the rafters from moving to the sides.
- sliding. Such fastening is necessary if the house was built from logs or timber, which noticeably settle over time. And the Mauerlat itself is usually not used here - only the upper crown of the log house. If you use a rigid rafter fastening system, then the next year the roof will lose up to 50% of its strength - it will simply fail.
And now about everything in more detail.

Rigid fastening of rafters to the mauerlat
Most often, when building a roof, they are used wooden rafters, as the most affordable and easy to process. But wood is bad because it quickly absorbs moisture and swells just as quickly, although it returns to its previous size after drying. And it is especially important to correctly fasten the wooden rafters to the mauerlat in order to prevent the formation of the so-called expansion force during a wet hike. Which, in turn, can significantly reduce the durability and reliability of the entire structure.
The main task of rigid fastening is to completely eliminate the possibility of rafters moving in any direction. Here the saddle of the cutout on the rafter is rested against the Mauerlat and firmly fixed with nails driven at an angle. But it is extremely important that all such cutouts on the rafters are the same, according to the same pattern and no more than 1/3 of the width of the rafters.
The second method is single fastening with a special fastening plate. Additionally, in some cases, a meter-long beam is hemmed under the rafter, which also serves as a stop, and the fastening is done with a metal corner.
A sliding mount is also called a hinged mount, and for good reason. Keep in mind that different wooden houses shrink in different ways. So, laminated veneer lumber sags the least over time, and the most is a fresh log house, which drops to 15% in just a year! Moreover, the shrinkage itself always occurs unevenly, which has an even greater impact on the distortion of the entire rafter system - if you have not installed a sliding fastening.
Roof distortion also occurs during the operation of the house itself. Thus, during prolonged rains, wood swells greatly, and in winter it loses a large percentage of moisture and dries out noticeably. Moreover, they settle in completely different ways:
- south and north side;
- the side that is constantly exposed to wet river or sea air, and drier;
- the side blown by the winds and the one in front of which there is a utility building;
- hidden from the sun by a tree and open.
All this time geometric parameters log houses are constantly changing. Moreover, even the central wall of the house, on which the racks and beams of the rafter system rest, changes its parameters. Especially during the winter heating period, when it dries out noticeably. Therefore, if the rafters on the mauerlat or the upper crown of the log house are firmly fixed, then in winter snow load will cause the rafter system to bend.

Therefore, the node needs to be a little free, for which you will need such fastener, like a “sled” or “slider”, as people like to call it. This is a special metal part that looks like a loop. When the geometry of the log house naturally changes, it moves along the guide, and the rafters settle a little without any harm to the entire system.

Here's more detail about the process itself:

By the way, some roofers still perform a sliding angle more traditional ways. To do this, they make a cut in the rafter leg, place the beam with a cut on the upper crown and secure it in the following ways:
- With staples.
- Crossing nails in the mauerlat.
- One nail driven vertically.
- Stylish fixing plates.
Also as a good alternative to modern sliding support use strong forged wire, twisted twice (we talked about it in the paragraph on attaching the Mauerlat to the wall). It works well in tension and gives a certain degree of freedom to all elements of the roof structure.
As you can see, everything can be sorted out!
To increase the load-bearing capacity of rafter legs (Fig. 68), both in layered and hanging rafter systems, the installation of unloading beams (supports), double-sided linings and struts is used.
Rice. 68. Strengthening rafter legs with help
As calculations according to the old SNiP “Loads and Impacts” showed, rafters in the span between the mauerlat beam and the rafter leg with section dimensions selected according to strength characteristics often did not pass the deflection calculation and it was necessary to increase their height. You can make a rafter leg of variable cross-section by including an additional wooden beam- help. The support is attached in the span between the mauerlat and the rafter leg; its height is adjusted to the height of the rafter section so that it passes according to the calculation for deflection. The support is secured with bolted clamps or metal toothed plates.
Another dangerous knot in a continuous rafter leg is resting on a strut. Have you ever broken a stick over your knee? So, in this design scheme, the strut is that same knee; here the largest bending moment occurs, due to which it is necessary to increase the cross-section of the entire rafter leg. There is no deflection in this node, so you can increase not the height of the rafters, but its width, by attaching double-sided board overlays (Fig. 69). The width of the overlays is selected when calculating the rafter section for the maximum bending moment. The linings are fastened with nails, bolts or, as in the previous case, with bolt clamps. If the rafter is already reinforced with help, then it needs to be made longer and the edge should be brought out beyond the support unit on the mow. In this case, two problems are solved at once: strengthening the support unit and the deflection in the span.
 rice. 69. Strengthening the support unit by increasing the width of the rafters
 When reconstructing a roof under more steep slope install new rafters, merging them with the old ones (if they have not rotted) with a board and nail cross wall. New rafters can be introduced either on top of the old rafters or below them. The resulting truss provides not only a new slope, but also increased rigidity of the truss structure (Fig. 70). This method eliminates the need to disassemble old roof and speeds up the work, but does not increase the under-roof space. If the purpose of changing the slope of the slopes was to construct an attic, then the volume of the attic will remain the same.
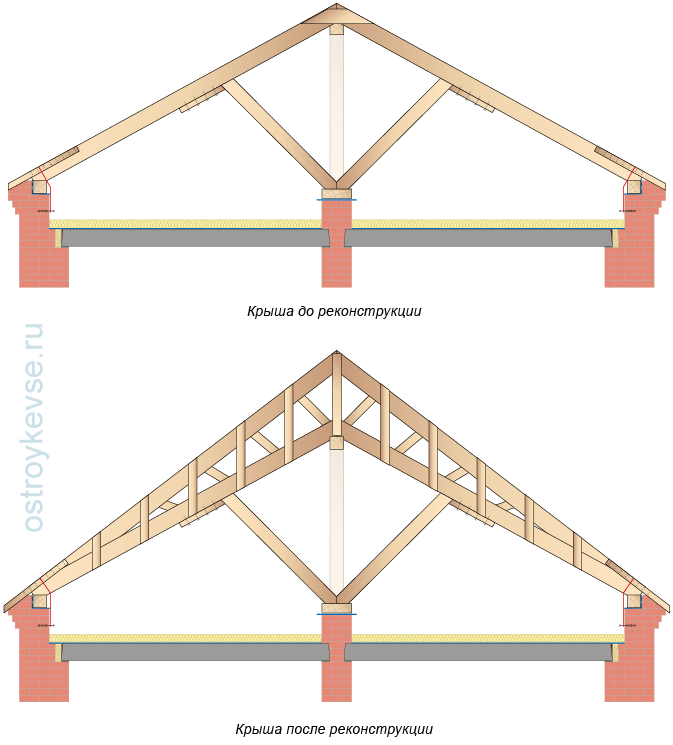 rice. 70. Reinforcing rafters with a board-and-nail truss
 Sometimes it happens that the end of the rafter leg rots and the support on the mauerlat becomes unreliable; in this case, additional struts can be attached to the lower end of the rafter leg, which rest against the same mauerlat beam or an additional support (Fig. 71). It is recommended to move the lower ends of the additional struts apart - they provide better stability to the rafters. And struts supported on an additional support can partially reduce the deflection of the rafters in the span between the rafter leg and the mauerlat. Additional struts are secured with nails and supported in the grooves on the rafters.
 rice. 71. Strengthening the bottom of the rafter leg by installing additional struts
 When raw wood (humidity more than 25%) is used in the construction of the roof and there is insufficient ventilation of the cold attic, with high dormer windows, their small area, or in the absence of attic vents, the lower end of the rafter legs or the Mauerlat may rot.
Also, rotting can occur if there is no or damage to the vapor barrier and air vents in the insulated structure mansard roof or clogging their ends. Either when the wood of the rafter legs and mauerlat in roofs of any type is moistened when the roof leaks, or when there is no waterproofing layer between the wood and the masonry of the wall and the wood is moistened from the masonry.
There are several ways to restore and strengthen damaged structures.
1. Use of wooden overlays. They are used for single damage to rafter legs. Reinforcement is carried out by installing reinforcing wooden overlays secured with bolts or nails. The support of the linings on the Mauerlat should be the entire end, followed by the installation of twisted wire (Fig. 72).
 rice. 72. Repair of the unit supporting the rafters on the Mauerlat with overlays and prostheses
 2. Use of rod prostheses. They are used for massive damage to rafter legs. Before work begins, the damaged rafter leg is strengthened on temporary supports, the covering is dismantled and the rotten part of the rafter leg is cut out. The prosthesis is put on the rafter leg and placed on the mauerlat. The sawn end of the rafter leg rests against support platform prosthesis that prevents it from slipping. The rigidity of the upper compressed belt of the prosthesis is ensured by the braced lattice.
3. Use of pads resting on the beam. This option is used if it is necessary to replace a rotten section of the mauerlat and the end of the rafter leg (Fig. 73). Before work begins, the rafter leg is strengthened with temporary supports, the rotten sections of the leg and the mauerlat are cut out, crutches are hammered into the masonry and a beam 1 m long is laid on them. If the design of the walls and ceiling allows, and most often this is the case, then a meter-long beam is laid on the wall or ceiling piece of bed. Two struts rest against this beam, fastened to nails on both sides of the rafter leg. The sheathing is supported by a new elongated fillet.
 rice. 73. Repair of the rafter support unit in case of damage to the Mauerlat
 If there is insufficient air exchange in the attic, and as a result, the development of fungal spores and wood rotting wooden structures roofs carry out a number of measures to restore ventilation (Fig. 74). IN attic you should study the nature of air movement, determine the air temperature at the upper boundary of the insulation (it should not exceed 2°C at any negative temperature outside air) and install additional vents and dormer windows. The cross-sectional area of dormer windows and vents should be 1/300–1/500 of the area attic floor. The width of the vents should be within 2–2.5 cm. It is necessary to measure and, if necessary, increase the thickness of the insulation to the calculated thickness. Caked insulation must be loosened approximately once every five years. For external walls with a width of up to 1 m, its thickness can be increased to 50% higher than the calculated one. The vapor barrier under the insulation layer should be checked and, if necessary, restored.
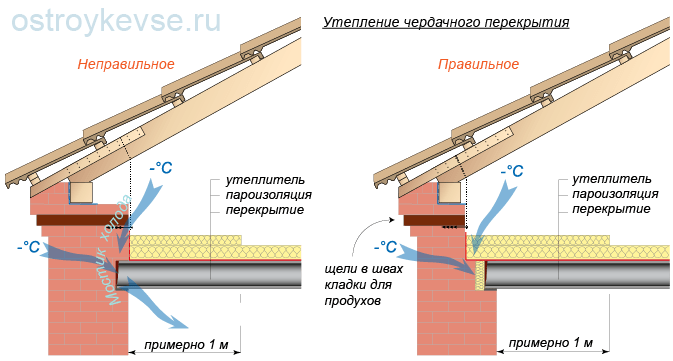 rice. 74. Device normal process air exchange in the attic roof
 Reinforcements of other wooden structures, walls, floors and foundations can be viewed in a special section of the site.