Making an axe. Making an ax: from a wooden toy to a real tool What kind of wood to make an ax from
Read also
“Come on, give me back my stone axe” - there is probably no person in our country who has not heard this song. Yes, the first axes were made of stone. But this time passed many thousands of years ago, and now they use quality wood and steel.
During the development of civilization, many varieties of this tool have appeared (construction, throwing, etc.) which have not yet lost their relevance. Moreover, on the market you can find many varieties of this product, which are designed to solve certain problems, for example, those facing a hunter or tourist.
Classification of axes
In practice, many types of axes are used, which are designed for working with wood. Conventionally, they can be divided into three types:
- cleavers;
- for logging;
- construction or universal.
Accordingly, there are various designs designed to solve specific problems, for example, a firefighter is equipped with a pick, with which you can pull beams and other structures away from the source of fire.
By the way, the size of the ax can be determined based on the height and physique of the person who will work with it.
Making a blank
A block is hewn out from a block that has been dried. Work must be carried out along the fibers. The size of the bar must be 100 mm larger than the size finished product. The size of the part where it will be installed, and the blade itself should be 2 - 3 mm larger than the size of the eye.
The template prepared in advance must be laid on the surface of the block. At the same time, leave allowances for processing. From the front its size is 10 mm, in the tail it is 90 mm. This allowance is necessary so that the handle does not crack when pulled onto the ax itself. Upon completion of work, this allowance is removed.
Hewing out an ax
To bring the details to required sizes, two cuts must be made in the upper and lower parts of the workpiece, but their depth should not reach the contour of 2 mm. Excess material can be removed using a chisel. After this, using a file with a large notch, the corners, transitions and other surfaces of the handle are leveled. For finishing abrasive sandpaper is used on the surface.
Impregnation with waterproof compound
To increase the resistance of the handle to moisture, use special compounds. But it is permissible to use drying oil or linseed oil. The handle is covered with this liquid until it stops being absorbed into it.
The handle for the tool should not slip in the hand and therefore, it is not recommended to cover it with any paint and varnish materials or use some kind of pads.
By the way, it wouldn’t hurt to add a coloring pigment, for example, orange, to the waterproof coating. Then the tool with a bright handle will not disappear on the site.
When choosing a piercing part, you must definitely find out what steel it is cast from. Our country has adopted GOST 18578-89. It defines the grades of steel from which it is permissible to make the blade parts of an ax. These are steels - 8ХФ, 9ХФ, 9ХС, ХВГ, У7А, У8, У8А, У8ГА, У9, У9А and many others similar in properties to the named grades.
Landing the ax on the handle
Fitting the blade onto the finished handle should be done using markings. To do this, draw a sketch of the eyelet on the upper end. Then you need to mark the length of the piercing part on it. And after that you can begin installing the blade on the handle.
After choosing a tool, the owner is faced with a new task - how to sharpen it. Yes, the manufacturer supplies this tool in a ready-made condition. But sooner or later, the sharpening done in the factory workshops will become dull and the need for independent editing will arise. Practice shows it's better to spend certain time to straighten it rather than doing the work with a blunt instrument. It is advisable to perform turning of a product using a template. It is made independently. To do this you will need a small piece of tin. After choosing the sharpening angle, you need to mark it on the sheet metal and cut out the angle. After this, attach the template to the blade. The angle of deviation from the required one will be immediately visible. Using a marker, mark the cutting edge accordingly.
When sharpening, the master must consider the following factors:
Characteristics of the wood he will have to work with. What kind of work will have to be done, harvesting lumber is one thing, cutting out locks on logs installed in a log house is another. Of course, the material from which the blade is made must also be taken into account.
How to make a battle ax
Not all axes can be purchased in the store; for example, it is impossible to buy a battle axe. And therefore, if you want to get such a product, it’s easier to make an ax with your own hands.
As a basis, you can take an ordinary construction tool, see Fig. 2., and make a combat blade from it.
It has certain disadvantages:
- It has an irrational form.
- It has excess mass, which will interfere with manipulations during the battle.
Viking battle ax
It should also be noted that the upper ledge will create difficulties during chopping and striking. That is, it gives the ax an unnecessary torque directed counterclockwise, thus causing increased wear on the ax handle. It won't hurt to grind off the protrusion located below. In addition, straight sharpening is not entirely suitable for a battle axe.
How to make an ax from wood
How to make an ax from wood? To do this, you need to prepare a wedge-shaped blank from which you will need to make a blade. On the surface of the workpiece, you need to draw the outline of the future toy with a marker. Excess material can be removed using an abrasive sharpener.
At the next stage end surface The workpiece must be marked with the outline of the hole for the ax handle. The technology for obtaining the handle is described above, but it is necessary to correct the dimensions.
Bringing the blade and handle to the required shape can be done using a sharpener or file. In a fairly short time, the children's ax will be ready.
What product does a hunter who spends a lot of time in conditions need? wildlife how it can be done. Yes, no one argues, in specialized stores you can buy a product for every taste. But not all of them meet the needs of hunters.
In order to make the cutting part of a product for hunting, you need to use a solid piece of metal. But somehow it’s more common to hold an ax with wooden handle. For the manufacture of the blade, grade 1040 steel is used, this is a structural alloy steel, the Russian equivalent is 40G.
You can make the cutting part by ordering it from the village smithy. The master is able to forge the necessary blank for the blade. He is also able to make and install a steel handle. If such a handle does not suit you, then you can install a wooden one. When making it, you need to take into account some simple rules:
The handle cannot be varnished - the hand will slip.
When choosing its shape, it is necessary to take into account the width of the palm grip; it is necessary to make stops that will allow you to hold the ax in your hand.
How to make a taiga ax
Before you do taiga ax, we need to understand how it differs from the traditional one? It has a different blade shape and ax handle parameters. That is, you can take an ordinary ax as a basis. Change the shape of its sharpening, remove excess material in the upper part, by analogy with the combat one.
You can use an angle grinder to remove excess material.
The ax handle can be made from birch. To secure it more securely in the blade, you can wrap a bandage impregnated with epoxy resin. It makes sense to soak the handle itself with linseed oil.
How to make an ax with your own hands, which will be useful for cutting meat carcasses, chopping firewood and when performing various construction work.
Its design consists of three parts:
Blade
ax handle
wedge
BLADE
When purchasing a blade, first of all we pay attention to:
1.
The quality of the metal from which it is made (it is best if you find a stamp on it confirming compliance with the requirements of the state standard).
2.
Weight (depends on the type of work performed; the heavier the blade, the greater the impact force - the optimal option is 700...1600 (g)).
3.
Blade shape (depends on the type of work performed: straight - carpentry and carpentry; rounded - for splitting and chopping wood and universal).
4.
Angle of sharpening of the blade (depends on the type of work performed: razor - carpentry and carpentry; oval - for splitting and chopping wood; straight - universal).
AX
We looked at how to make an ax handle for an ax earlier on the pages of our website.
WEDGE
It is made of durable, well-dried wood (plank thickness 5...10 (mm)).
A– depth of cut
S– kerf thickness
IN– cutting width
Reference:
The cut in the ax handle is made to ⅔ of the depth of the blade eye.
Before assembly, dry the wedge and ax handle.
How to make an ax with your own hands and assembly procedure:
1.
It is necessary to adjust the ax handle to the eye of the ax blade.
2.
After adjustment, lubricate with glue all contact surfaces of the axe, eyelet and wedge.
3.
Insert the ax handle into the eye.
4.
Place the ax handle on a hard surface in a vertical position.
5.
If necessary, widen the cut groove using a chisel.
6.
Place the wedge in the groove of the ax handle and drive it in with a hammer.
7.
Carefully cut off the part of the ax with the wedge that protrudes beyond the eye (cut parallel to the plane of the eye).
8.
Let's put the ax aside for a few days until completely dry glue.
9.
We carry out the final finishing of the ax along the hand.
10.
Let's soak the ax handle with antiseptic.
11.
Let's sharpen the blade.
Additionally:
You can make a cover for the ax blade, which must be put on after each use of the tool.
drill a through hole at the end of the ax for hanging it on the wall during storage
We hope that the information received on how to make an ax with your own hands will help you, if necessary, use it.
An ax is one of the tools you need to have on the farm. Of course, you can buy it in a store, but if you want to have a reliable and a convenient thing, it is better to make the tool yourself. The article will talk about how to make an ax handle at home with your own skillful hands and correctly attach the metal blade.
How to select and prepare wood
An ax handle is the handle of a working tool. Labor productivity completely depends on how easy it is to work with it. Therefore, a regular straight stick will not work in this case. A real ax handle is a curved beam with an oval cross-section and straight sections. The tail part should be widened and bent downwards.
Only with this option the hand of the person performing the work will be able to reliably hold the tool without experiencing fatigue for a long time.
The following types of wood are best suited for making an ax:
- maple;
- birch;
- acacia;
- ash.
Wood should be harvested in the fall. Birch is perfect for carpentry tools, while maple is more often used for camping tools. Its impact strength is less than that of birch. Ideal option Ash is considered to be very durable and rarely changes shape. It is better to make an ax handle from a section of wood located near the root, and the workpiece should be 15 cm wider and longer than the future product.
Attention! Before the prepared beams are used to make an ax handle, they must dry for at least a year in a dry, dark place, for example, in the attic.
How to make an ax - 50 photos and tips on creation depending on its purpose
This is necessary so that when finished, the handle does not shrink and start to dangle in the eyelet.
Fresh wood can only be used if the ax handle breaks. temporary option subject to immediate replacement.
How to make an ax handle
In order to make an ax handle you will need:
- wooden blank;
- hacksaw;
- chisel;
- pencil;
- file;
- hammer.
The manufacturing process itself takes place in the following order:
Attention! You need to make the ax handle so that the cross-section is oval. In this case, it will be possible to hold it without particularly straining your hand and make very accurate strikes.
Impregnation of the ax handle and ax attachment
The upper part of the finished handle must be impregnated with a water-repellent composition. There are two options:
- drying oil;
- linseed oil;
- ski resin.
Lubricate the wood with the chosen product and leave it until it dries. The treatment is repeated several more times until the fat is absorbed. Ski resin can penetrate deeper layers of the workpiece, but it is difficult to find in stores. Therefore, the first two options are often used.
Advice. You can add a bright dye to the impregnation agent. This way it will be difficult to lose the finished tool.
The ax attachment to the handle is done as follows:
Watching videos and photographs will help you better understand the manufacturing technique. Making an ax handle with your own hands is more difficult than buying it ready-made. However, if you have the desire and some skills, it is quite possible to get a high-quality tool.
How to make an ax handle: video
How to make an ax from hardboard
First, we need to get a detailed image of the future craft. A side view is required. Try to find an image of the highest quality possible.
Then, we print the image in full size and transfer it to hardboard.
We cut out the part (a jigsaw will help you here).
How to make a high-quality ax handle with your own hands: manufacturing rules
I used thick hardboard (2 cm), but you can also glue several layers of thin hardboard to achieve required thickness.
Now let's deal with the protruding parts. We cut our pattern into separate pieces, which will later protrude. 
We transfer it to hardboard, cut it out, and glue it on top of the main structure.
On this moment, after you have glued all the pieces, you should end up with something similar to the photo above.
Now it's time for a file and sandpaper. Use them to smooth out edges, remove rough edges, and add texture to future crafting. Process until it begins to seem that the ax is not assembled from a bunch of layers, but has a monolithic smooth structure. 
Then it's time for engraving. To do this, draw a pattern on the surface of the ax, and then, carefully, using chisels, cut out the pattern.
Now, the ax is almost ready. Fill all unwanted depressions and uneven areas. When the putty is dry, prime the ax. After the primer has dried, it is ready for painting.
What exactly will you do on last stage. As a result, you will end up with excellent quality craft.
That's all, good luck in your crafting,
your editors.
Discuss on VKontakte...
Home > Taiga articles > Taiga ax
Taiga ax
What should a real taiga ax be like, and what types of axes are not suitable for long trips to the taiga?
HOW TO MAKE AN AX SHARP AND COMFORTABLE
We will try to sort out these questions with you in this article. I can’t say that I’m such an experienced taiga hiker, but I still have some knowledge and experience. Not to say that I just took a swing various tools, but I had to work. There is no one universal tool, which would be suitable for any work. Of course, with an ordinary Soviet-style carpenter's ax you can perform any miracles if you get used to holding it in your hand, but I think each of you will agree with the thesis that it is quite inconvenient to perform certain work with an unsuitable ax. It’s not for nothing that our fathers and grandfathers came up with different forms for this most important assistant.
Any professional carpenter has at his disposal several types of axes for different types works So the taiga ax can only be of one declared shape with plus or minus minor changes. By the way, for example, it will be quite difficult for you to chop wood with a battle axe, and a cleaver exists only for chopping wood, so the shape is very important.
First, you need to figure out what the taiga ax is for and why is it called that? Many of those reading this article (I’m sure) have never seen or held anything else except the classic Russian carpenter’s axe. However, those people who are interested in this issue, who often visit field conditions, prefer correct tool and equipment for the taiga.
A taiga ax is necessary for a person in the field conditions of the taiga forest. This is the ax that a commercial hunter, huntsman, forester, tourist, geologist, surveyor or any other person who often visits the taiga takes with him as part of his equipment. It is necessary for all forest work that a person can do in the taiga. As a rule, a person will not need to prepare firewood for the winter and split large logs in the field, so a heavy cleaver is clearly not needed in the taiga. Most likely, people will not cut out carved details of platbands and all kinds of wood products in the field, since they usually go to the taiga for someone else.
Here is a list of things that a taiga does in the field:
- cutting down trees for some needs, be it sanitary felling of forests or felling trees for harvesting for logs or firewood (a saw is most often used for firewood, not an ax);
- rough work with fallen logs: removing branches, bark, cutting a groove for building a winter hut, etc.;
- production of bags, self-catchers;
- production of huts, screens, floorings;
- rough splitting of the log along its fibers (for better effect, use wedges and a wooden mallet);
- working with firewood.
Simply put, from the above it is clear that an ax in the taiga is necessary for rough work with wood, preparing firewood for a fire, setting up a bivouac for spending the night in the forest, various household needs, felling upright living trees to make a future log house for the taiga winter hut.
The forest is a place where man is not in charge - and even animals are not in charge there.
In the forest, the main things are the trees. The forest is a forest because it is filled various trees, which means that when you come there, you need to have the appropriate tool to use these trees for their intended purpose. A beaver can gnaw a tree with its teeth, but a person is forced to have a suitable axe, saw and knife - the main tools of a taiga dweller.
What qualities should a taiga ax have?
It should be relatively light for one simple reason - you will have to carry it a lot of time and kilometers on your back, and it is also much better to swing a lighter ax than a heavy sledgehammer. The main weight should lie in the metal part, that is, in its head. Figure 1 shows its parts:
Rice. 1. Parts of the taiga ax
Toporische a taiga ax should be much longer than a carpenter's ax handle. This is due to the better swing for hitting the tree. The long ax allows you to make the best blow. In my opinion, the optimal length of the ax is about 50 cm, or even more. The ax handle should not be heavy, and all the weight should be concentrated on the head, otherwise you will not achieve the desired result from your specimen - and you will only end up wearing yourself out there in the taiga.
If we compare heads two types, then an obvious difference immediately catches the eye: in the taiga head there is no upper part of the blade. Some people saw off a piece of this part from a simple carpenter's axe, turning it into a taiga axe. (See Figure 2).
Blade for a carpenter's ax it should be straight, and for a taiga ax it should be rounded (see Fig. 3). This is determined by the type of work that the taiga does in the forest.
Rice. 2. The head of a taiga ax against the background of a carpenter’s
Rice. 3. Blade of a taiga ax.
Goatee allows you to firmly fix the ax handle with the head.
Butt can be used as a hammer for any purpose.
Often a commercial hunter who, for example, intends to repair his winter quarters in the summer, does not take a heavy extra hammer with him into the taiga, but uses a butt as it.
Eye serves to place the head on the ax handle. Next, a wooden wedge is driven into the ax handle so that the head sits tightly on it.
Fungus protects hands from slipping and fixes them on the ax handle.
Rice. 4. Wedge
Rice. 5. Driving the wedge into the ax handle
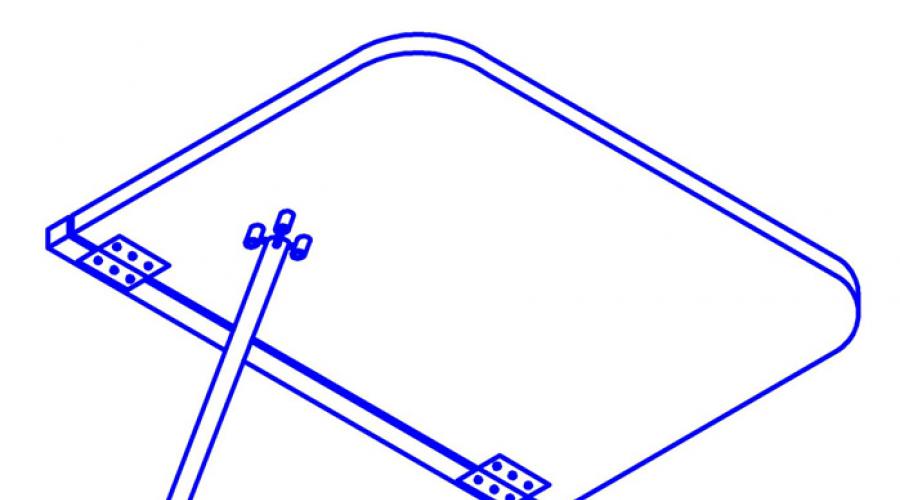
In Figure 4 we see three options. In numbers 1 a metal wedge is indicated, which is driven in last. This is the control wedge. Under the number 2 - ax handle. Under 3 number - a wooden wedge that is driven into a special hole in the ax handle so that the ax handle does not begin to crack. Many people hammer the wedge directly between the fibers, but this risks cracking the ax handle. Therefore, it is recommended to cut a small recess into which to then hammer a wooden wedge. It is better to place the wedge on glue, for example, epoxy. In numbers 4 the ax head is shown, mounted on the ax handle.
The metal wedge is driven in at the very end, note that it is driven diagonally to the main wooden wedge. You can also hammer it in at a 90 degree angle. Instead of a metal wedge, you can use a wooden one, preferably one made of a harder type of wood. Figure 5 shows the same process, but without the control second wedge. 1 - ax handle, 2 - notch, cut for a wedge, 3 - head, 4 - wedge
Taiga ax in its habitat
in business
Grigory Sokolov about his assistant
On the domestic market it is extremely difficult to find a high-quality ax that will serve you faithfully long years until you lose it in the forest or it is stolen from you. Axes Russian production these days are usually of very poor quality. The ax handles do not fit the head and almost always start to slip off. The blade of the head is overheated almost to the point of cast iron, and at the first frost the blade crumbles, or a large piece simply breaks off from it, after which the tool becomes completely unusable. You always need to modify such axes yourself to turn them into something tolerable. They are cheap, but change very often.
The Soviet production of the times of Stalin gave good quality axes, but those grandfather’s axes can’t be found now; now such examples from the 50s are sold on the Internet for 3 to 5 thousand rubles. The steel used for them was, as a rule, grade U7. In our garages, if we come across an axe, it will most likely be a production one from the 80s, that is, a “perestroika axe,” and at that time, as we know, production was in decline. However, examples from the Brezhnev era (70s), which are not as rare as Stalin’s ones, are of fairly good quality. Therefore, purchase good tool Available only from foreign companies, or ordered from a blacksmith. A blacksmith's ax will be quite expensive, so it's only for everyone. A working ax can now be purchased from foreign companies: Gransfors Bruks, Husquarna, Fiskars, Hultafors. Domestic serial manufacturers cannot yet boast of such quality tools.
Sections of the site
The most interesting
On social media networks
They say that a good ax can do much more for its owner than a knife. Especially when it comes to survival. And this may well be true.
A Brief History of the Ax
The ax is one of the most ancient tools of mankind. Its history probably begins from the time of the expulsion of Adam and Eve from the Garden of Eden (about 6,000 years ago). Well, according to the story about monkeys, it is already more than 35 thousand years old. In any case, the first ax is officially considered to be a chopping axe, representing a stick with a pointed stone tied to the end. With which, according to many historians, cute humanoid orangutans ran. Later, ground, drilled, copper, bronze and iron axes began to appear.
The ax is very important and beautiful cutting tool humanity
So, an ax is a tool that consists of a blade and a handle mounted perpendicularly. Among people, this tool has the widest distribution: it can be a bladed weapon, used for rough or skillful woodworking. Throughout the history of mankind, the material of the blade and ax handle, their attachment method and use cases – constantly changed and supplemented. In fact, the ax has always been an important and indispensable tool for humans.
The variety of axes is so great that there is no point in describing everything. By changing the shape of the blade and the ax, and their sizes, you can create any options, depending on necessary functions and customer requirements. At first they were made in very small forges, and with the advent of industrialism and a significant increase in demand, mass production of axes appeared.
Main types of axes
It should be mentioned that axes are divided into three main types:
- combat;
- universal;
- workers.
They also have six main blade shapes:
- wide;
- average;
- narrow;
- with a protruding posterior beard;
- with a hammer (impact back);
- double-sided (an ax with two opposite blades).
Splitting ax
There are small cleavers for holding with one hand, and large ones. These are very heavy axes with a shifted center of gravity and special blade shape.
The wedge-shaped blade easily and quickly enters the wood, and the wide part easily splits the log into pieces. This ax has another type - the sledgehammer ax, which is designed for splitting rough, knotty wood. Using a hammer-shaped butt, you can easily drive wedges into the deck.
It is best to chop frozen logs.
Hit the middle of the block if there are a lot of knots.
Craft Cleaver
Special ax for artistic treatment wood. Him rounded wide blade with notch at the base and chamfered on the right or left side (used as a support for carving).
There are also axes with a one-sided sharpening of the blade and a handle curved to the side for neat cutting of logs and planks.
How to make an ax: the whole process from cutting out the ax handle to sharpening the blade
When cutting a log, place your hands close to each other. Working hand should be placed in front, and thumb be located on the ax handle from above.
Carpenter's ax
It has a straight handle and a wide blade with a straight, thin cutting edge. The main purpose is the ability to make a smooth chopped surface. It should cut, not split, wood.
Another feature of it is the notch (sinuses) at the base of the head. The carpenter can easily take the ax at the very base of the blade, for stable and precise cutting of wood. And the straight ax handle allows you to hold the ax in any plane and under different angles. This ax is good for processing dry wood. The most important thing in a carpenter's ax is the sharpness of the blade!
Lumberjack ax
It has a long handle and a blade with a rounded edge. The blows of such an ax are powerful, and the blade will not get stuck in the tree trunk. They are ideal for cutting down even resinous trees. It handles branches easily.
Hunting ax
A special blade shape with rounded edges, a special spine for skinning, and an almost flat handle.
With such an ax good for chopping both wood and meat.
We remind you that you can buy a good fiskars ax in our online store by clicking on the link
Tourist ax
A small version of a hunting ax with a small butt. Chops, stabs and easily fits in a backpack. What else does a scout or tourist need on exciting trips?
When cutting branches, it is better to perform a longitudinal blow from the root to the top of the tree.
Finally, watch the video about how to chop wood “the Canadian way”:
How to make an ax handle at home
Many people have all the tools and materials on hand to make the necessary tools themselves, but not everyone does this. Some people simply don’t dare because they think it’s difficult, others don’t know where to start. I want to show you that this is not at all difficult and almost anyone can do it.
We will need: a small block of wood, a hacksaw knife, a pencil, and a hammer. You can take a block of wood instead of a block. Split in half and remove the bark. The wood must be well dried, since poorly dried wood can simply crack. Good stuff birch is used, as it increases the force of impact, it has good viscosity and the hands are less tired from work. In addition, birch is well processed, so it is the most popular material for ax handles. One of the disadvantages of birch is that it quickly rots when exposed to water, so if you need a camp hatchet, it is better to use ash and maple. These are the kind of bars that are perfect for you.
Let's move on to action. First, you need to draw the outlines of the future ax handle on the block; you need it to fit comfortably in your hand and be suitable for the type of work for which you need it. The easiest way is to take another ax and copy its shape, the main thing is that you feel comfortable working with this ax. A carpenter usually does everything by eye and spends very little time on it, but this requires practice and cannot be done without it. And so we drew the outlines.
Now we need to process the block according to the drawing. To do this, you need to file a little on both sides, and then cut it all off with a knife or chisel; this should be done very carefully so as not to cut off anything unnecessary.
Place the knife in place and slowly tap it with a hammer. You need to cut strictly according to the shape of your future ax handle.
If you did everything correctly, then you should have an almost finished product. Now this workpiece needs to be planed with a knife.

It is important that the ax handle is oval and not round, since you will hold the round one with tension and, because of this, the accuracy of the blow will decrease.
When you plant an ax, the wood in the area of the ax is slightly crushed by impacts. You need to do this carefully, as you can ruin the finished ax handle. To prevent splitting, it is necessary to constantly monitor the condition of the lower end of the ax when attaching it. Therefore, it is better to leave an allowance for this. The fit can be considered complete if the end of the ax extends about 8 mm beyond the eye. Then the surface of the ax is sanded with sandpaper.
Impregnation of the ax handle with a special compound
Then comes the next operation - impregnation of the front half of the ax with some kind of waterproof compound. This could be drying oil or ski resin.
DIY ax
Ski resin provides a more reliable and deep impregnation, but it may not be suitable due to the fact that the smell will transfer for a long time from ax to hands, this is not exactly suitable for a hunter.
Now we have reached the wedge. To do this, you need a well-dried board, so that the thickness is at least 10 mm, and preferably from the same hardwood or, better yet, a harder wood. It is better to make the width of the wedge 1...2 mm greater than the height of the eye, and the length such that it exceeds the width by at least 4 times. When the wedge is ready, the ax is finally placed on the impregnated ax handle, and the cut gap, if it is closed at the entrance, is slightly widened using a chisel.
It is important to lubricate the wedge with any glue before driving it in; it is better not to use rubber-based glue, this is not suitable. To prevent the lubricated wedge from creeping back out during driving, its lead-in part, approximately 10 mm, is not lubricated with glue. When driving a wedge, the ax must be placed vertically on the anvil. This anvil stop works well to prevent the ax head from slipping when you hit the wedge.
Final part
Now take a good look at the ax you made with your own hands. If you notice some shortcomings, you better correct them. Remove any remaining seam allowance and give the final shape to the ax shank. Sand the curved parts with a rasp or sandpaper. This is what the finished ax looks like.
And most importantly, you will be pleased to work with it, because you made it with your own hands. Now you can only improve your skills and practice, and I wish you good luck and always follow safety precautions, because no matter what, health comes first.
Those who live in their own home often need a tool such as a taiga ax at the dacha and on hikes. Work tool good quality is expensive and hard to find.
An ax from the market is not always of good quality. Therefore, we will make our own ax using improvised means.

Types of axes
Let's look at the variations of axes:
- A cleaver is a heavy cone-shaped axe. Due to its heavy weight, it is well suited for cutting large, hard wood.
- Carpenter's - light in weight and size, has a pointed blade. Used for careful, precise, careful work with wood.
- Taiga - suitable for cutting down trees, harvesting trees, building a hut, removing bark and branches.
- Tsalda – designed for clearing the area of bushes.
- Kitchen (cook's) - intended only for chopping bones. It is a small hatchet with a short handle and a large “blade”.
- Lumberjack - used only for cutting down trees. Consists of a long ax and a wide, sharp blade.
Of all the above types, the taiga ax is the most necessary and useful.

Distinctive features of the taiga ax:
- Light weight.
- Small piercing surface area (makes it possible to drive it as deep as possible into the wood).
- Specific sharpening of the blade (the back edge is much smaller, thinner than the front.

This feature is made in order to use this type of ax as a cleaver (if the blow is delivered correctly. A regular ax has a blade of the same shape for precise work with wood).

Making a taiga ax
Handle material
The functions of an ax are primarily influenced by its shape and length. The handle should be curved and the cross-section should be oval.

The best tree species for the handle are maple, oak, ash, and birch. Since these types of wood withstand vibration well upon impact.

Wood harvesting begins in autumn
Dry in dark place. Before use, wood must be stored for about one year, or better yet, five.

It is not advisable to use felled wood as it will dry out over time and will not stay in the eye.

Making a Cardboard Template
On a large cardboard sheet, outline the shape of the handle and apply it to wooden blank. The template will help us make a more accurate ax handle.
Preparing material for the handle
A block of one-year-old wood is hewn parallel to the grain. The blank for the handle should be longer than the template. We make the place that is inserted into the eyelet wider than the main part.

We outline the attached drawing on both sides, and do not forget to leave allowances. After inserting the upper part into the eyelet, we remove the excess wood.

Steps to carve an ax handle
Before cutting out the ax handle, you need to make transverse cuts, but so that they do not reach the line of the future handle by approximately 4-5 mm. Using a chisel, remove any remaining wood and excess allowances.

Ore transitions and corners are made by turning with a rasp. After the workpiece is made, sand it until smooth.

Buying a piercing part for a taiga hatchet
It is impossible to make a blade in a domestic environment. In this case, here is a list of what you need to focus on when buying it at the market or in a hardware store:
- Availability of GOST marking (indicates the quality of the steel);
- The hole for the handle (eye) should be cone-shaped;
- The blade is smooth, without defects;
Collecting an ax
- We cut the upper part of the handle lengthwise and crosswise.
- We cut five pieces from hard trees.
- We wrap gauze soaked in resin around the top of the handle for better fit into the hole of the blade.
- Using a hammer, hammer in the handle.
- We hammer the prepared pieces into the cuts at the top of the axe.
- After the structure has dried, cut off the protruding parts of the wooden pieces.

Note!

Sharpening the piercing part of the taiga ax
Excellent performance of the hatchet is ensured by a properly sharpened blade. The sharpening angle depends on the activity you will perform with the axe.

The taiga ax is sharpened at an angle of 30-35 ̊. If they will be working with fresh wood, then we sharpen it at an angle of 25 ̊.

If you use a sharpening wheel for sharpening, then the ax handle must be held at an angle of 40-45 ̊. We reproduce the sharpening slowly and carefully.

If you have all the necessary tools in stock, photo step-by-step production ax, then its creation will not take away large quantity time, effort and money, and in return you will receive a high-quality ax made by yourself.

But do not forget that with a piercing part made of high-quality metal, the ax will last much longer and if the handle is treated with linseed oil, it will not rot and deteriorate.
Photo of ax with your own hands

Note!


Note!


A wooden handle for an ax (axe handle) is a responsible product, and therefore, during its manufacture, a lot is taken into account - the material (type and moisture content of wood), the direction of the fibers, the type of ax (carpenter's, carpenter's or cleaver). The safety and ergonomics of the finished ax depend on the correct manufacture.
For carpenter's and joiner's axes, the ax handle is made depending on the weight of the piece of iron. For axes weighing up to a kilogram, the handle length is 40-60 centimeters, for one and a half kilograms and above - 55-65 centimeters.
The most suitable wood for ax handles is birch, oak, ash, and maple. Any wood for an ax handle must be dried for at least a year. natural conditions(not dryers) in the shade of well-ventilated areas.
We don’t have oak, ash or maple; they won’t talk about the quality of axes made from them. But I made dozens of axes out of birch, and that’s what I’ll talk about. By the way, those who worked with ax handles made of different types of wood claim that only birch “does not dry out” the worker’s hand, due to the viscosity of the fibers.
Harvesting birch for handles of axes, hammers, knives and other things hand tools, carried out in winter, as a last resort in early spring before the start of sap flow.
The root (butt) part of the tree is used. A birch block is split into blocks. It is split and not sawed lengthwise, in order to see the natural direction of the fibers, and in accordance with this, further make blanks.
Bars with a cross section of approximately 70-80 mm are cut out of the blocks. by 120-150 mm. and put it away to dry. During the drying process, the birch will shrink across the fibers and the workpiece will become smaller. The workpieces are dried for at least two years in a ventilated area without being exposed to sunlight(usually this is the attic)
We fugue the well-dried workpiece on one side and check for cracks. If everything is in order, we deduce the total thickness of the two layers to be 45 millimeters.
Place the workpiece on the surface and orient the template relative to the fibers
Ax templates, their dimensions - length, thickness, cross-section at the main points, also differ in the purpose of the axes themselves -

On the end part of the workpiece, we outline the shape of the ax eye with a pencil along its inner part, aligning it with the exit of the fastening part according to the template.

Now it performs rough processing of the workpiece according to the template. This can be done with another ax and a wide chisel; I simply cut it out along the contour with a jigsaw. And there are fewer chips, there is no load on the tree from impacts, and it looks more cultured.
We round the corners of the handle, in the upper part of it in a semicircle, and towards the bottom a little into a cone. It is this “inverted drop” shape that is most comfortable for the hand. Now let's put the piece of iron on the ax handle.
The attachment of the ax is made "under tension" The ax handle is pre-sawed under the wedge (wedges) to a depth of two-thirds of the width of the eye with a through drill at the end of the hole, along the cut.
Wedge, I personally make it for a birch ax from resinous pine boards. Holds up great. One wedge is enough if the birch handle is very well dried and does not dry out anymore.
Having planted the ax, twirl it in your hands, using a large file to remove those places where the ax handle does not lie comfortably in the palm of your hand. Don’t worry that you will deviate from the “standards” and “templates” if you are making the ax for yourself. Let it be at least three times unsightly, but if it fits perfectly in your hand, then you will be less tired and your productivity will increase, and the mood from working with an ax, which is an extension of your hand, will be good.
After the ax handle is ready and mounted. Treat it with linseed oil, preheating it. I only soak carpenter's axes in hot water. Carpentry is almost always indoors. I simply wipe the handles of the cleavers several times with light transformer oil.
Well, of course, every carpenter and joiner, over time, develops for himself the most optimal shape of the ax, with the desired placement of the center of gravity, length and thickness of the handle. There are a lot of options, as well as artists. However, GOST did not bypass this very the right tool -

He is the real “king” of carpenter’s tools. He is a true salvation for those who are lost in the forest. He - faithful assistant, if you need to chop firewood for a bathhouse, build a house or butcher game. A well-sharpened ax can be used in dozens of other situations, but the fact remains. The tool will be useful on any country farm.
The only difficulty that may arise is economic person– buying a good quality axe. More and more often you are convinced that it is much easier and more reliable to build an ax handle with your own hands. So let's look at the entire manufacturing process, starting from preparing the ax and ending with sharpening.
Making an ax handle step by step
The process of creating an ax with your own hands always takes place in strict sequence. First, the handle of the tool, called the ax handle, is made. When the length and shape of the handle are chosen correctly, the tool literally “burns”, demonstrating high performance and ease of use.
Try taking a stick with a regular one round and install an iron base. You will quickly get tired, because holding such a tool for a long time puts a lot of stress on your hand. It’s another matter when the ax handle has a curved shape, the tail part is widened and slightly bent down. Thanks to this design, the axes are firmly held in the hands even when strong blows.
 A traditional ax tool consists of wedges (2 and 9), a blade (3) and a butt (1), a toe (4), a chamfer (5) and a heel on the blade (6), a beard (7), and the ax itself (8). The number 10 indicates sharpening.
 Prepare the material and cut out the first template
Since you and I need to make an ax handle from wood, we will take this material as a basis. The best proven structures are those made from birch and oak, ash and maple.
A wooden ax can be made at any time of the year, but it is better to prepare the material for it in the fall, even before frost sets in. The blanks are stored in the attic for at least a year; some experts advise drying them for five or even more years.
It is clear that if the taiga ax given by your grandfather was broken with your own hands on an impenetrable log, you can take fresh wood. This option will still be temporary, because after drying the volume of wood decreases. The butt of the ax will begin to wobble and hold less tightly.
To prepare a good template, drawings of the future product are desirable.
When you have a cardboard template, it is much easier to transfer the contours of the designed product onto wood. The basis is a ready-made ax handle that you feel comfortable working with. It is traced with a simple pencil on cardboard and cut out.
 Preparing timber for work
 From the blank block to the careful hewing of the ax
- Before making an axe, you need to cut a block out of dried wood. Keep in mind that the length of the piece of wood should exceed the planned size of the finished product by about 10 cm. As for the width in front (placed on the canvas), ideally it exceeds the diameter of the metal eye by 2-3 mm.
- Place the finished template on the block and transfer its contours. Leave an allowance of 1 cm in front, and 9 cm in the tail part of the workpiece. Before you place the ax on the ax handle, you will strike more than a dozen blows on the handle. An allowance in the “tail” is needed to avoid splitting. When final assembly will be finished, you can cut it off without any problems.
- Let's begin the main part of the work with the ax handle. In the upper and lower parts of the block, transverse cuts are made with a depth not reaching 0.2 cm from the contours. A chisel is used to chip away excess wood along the cuts; the final cut is made with a rasp.
- Use a regular file or rasp to round corners and create smooth curves and transitions. Sandpaper will help with final sanding.
- It is too early to install the steel sheet - the wood is impregnated with a good waterproof compound. Flaxseed oil is suitable; drying oil has excellent properties. Apply a small amount of the substance to the ax handle and let it dry. Then the next layer is applied. The procedure is repeated until the instrument you personally made no longer absorbs it.
- The biggest mistake is to cover up wooden base varnish or oil paint. However, nothing prevents you from adding a little dye to the drying oil (red, yellow). A bright instrument will never get lost in thick grass.
How did our ancestors choose the canvas for the ax?
Several hundred years have passed, but the purchasing method good canvas hasn't changed. Our ancestors knew how to make an ax out of wood and what kind of metal base to use. They always paid attention to:
- Steel quality. By the way, today this issue is resolved simply. Look for the GOST badge on the product - this will be an indicator of excellent quality. No OST and TU!
- Blade. An ideal blade has no cracks or dents, and is very smooth.
- Butt ends. They are strictly perpendicular to the blade.
- Eyelet shape. It is better when it is made in the form of a cone.
How to place an ax on an ax handle (video)
When the blade has been chosen, a completely logical question arises: how to properly place an ax on an ax handle and achieve a “dead” fastening? Start by drawing center lines at the end. There will be two of them, perpendicular and longitudinal. The groove to the depth of the eye must be cut exactly along the contour of the longitudinal line. The cut will be useful for wedging the ax handle.
Having placed the butt to the end, outline the contours of the eye on it - the center lines will be a guide. To trim the landing part of the ax, use a knife or plane. It is important that the ax handle does not protrude beyond the edges of the eye by more than 1 cm.
It is convenient to install the blade using hammer blows. Do this accurately, with effort, but without unnecessary pressure. You don't want your blows to crack the wood, right? As soon as the end goes beyond the boundaries, we check the strength of the fit and see how the canvas sits. It shouldn't slide off.
Knock out a wedge with a wedge or wedging method
You can strengthen the fastening of the metal part if you wedge it. To do this, a small wedge made of hard wood, such as oak, is driven into the end. Because of this, the dimensions of the landing part increase, and it is fixed “tightly”.
Some craftsmen use not one, but two or even five wedges. But as practice shows, even one additional fixation is quite enough.
 Wedging an ax. Drawing
 A proven way to sharpen an ax blade
Sharpening an ax is the initial task after your tool is made and ready for use. Only in this case will the product perform its main function.
To work with freshly cut wood, the sharpening angle is the ideal instrument is 20 degrees, dry wood - from 25 to 30 degrees. The width of the chamfer is equally important.
 Sharpening an ax by hand
 How to properly sharpen an ax on a regular electric sharpener
Prepare in advance a container in which you will cool the metal. Next do this:
- Hold the product in such a way that the blade can be directed towards the rotation of the disc. We hold the butt at an angle of forty-five degrees. This is the optimal sharpening angle, regardless of the type of tool and its features.
- To sharpen the axe, it moves smoothly along the circle. The chamfer is ground and the sharpening angle is sharpened.
- The final sharpening of the ax is always performed with a special sharpening stone. From time to time it needs to be moistened with water to cool the metal.
- If it is not possible to sharpen the hatchet with a block, it is replaced with a piece of plywood, which is covered with sandpaper.
Don’t forget that working with a sharp tool is always pleasant, while a dull ax means more additional and completely unnecessary effort, quick fatigue and not the best good result. After the work on manufacturing and sharpening the ax is completed, a cover is put on the blade. This will extend the life of the product, and it will not need to be sharpened as often. The case is made of leather, birch bark, or any other suitable material.
 Case for ax
 There is an opinion that the tool can be stored stuck in a log. This is a big misconception. Consisting of strong steel and an ax made by hand, the ax becomes an “extension” of the master’s hands. Try chopping wood homemade instrument– and you will no longer want to return to store-bought products.